Mastering the Olympus OM-D E-M1 (2015)
Chapter 5. Playback Menu
Image © Darrell Young
The Playback Menu is the third system menu in this camera, and it is primarily used for working with images you’ve already taken. We will discuss viewing and printing images and transferring them to devices via Wi-Fi.
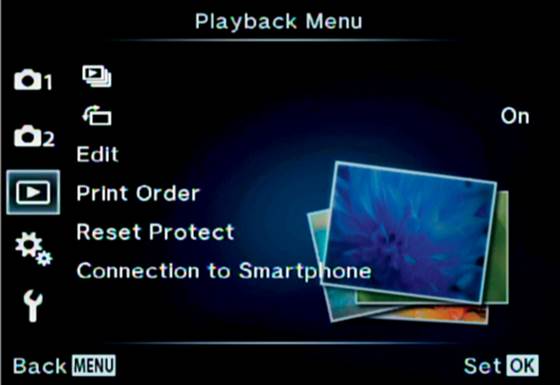
Figure 5.1: The Playback Menu
In this chapter we will discuss the options in the Playback Menu (figure 5.1):
• [Slideshow]: This function lets you present slideshows on the camera monitor. You can also connect your camera to an HDTV and display a slideshow on it—you can even play background music.
• [Image Rotation]: This setting lets you choose whether to display a vertical image in a vertical or horizontal orientation. If it is displayed vertically (as shot), it will look smaller on the camera monitor. If it is displayed horizontally, it will fit on the screen.
• Edit: This complex function allows you to do some in-camera image processing on photos you have already taken. If you don’t like to use computers, you can do basic image post-processing with this built-in system.
• Print Order: Allows you to create a digital print order format (DPOF) for individual images or all images on the memory card. After you create a Print Order you can insert the memory card into a kiosk (e.g., Kodak) at a superstore, or into your own DPOF-compatible printer, to get prints.
• Reset Protect: When an image is displayed on the camera monitor, you can press the OK button and select the key icon to lock the image, or protect it from deletion, during an All Erase memory card operation (but not a full card Format). The Reset Protect function allows you to remove the protection lock from all images on the memory card.
• Connection to Smartphone: This function lets your camera become a Wi-Fi access point so you can connect to it through an Android or iOS app on your smartphone or tablet and retrieve images from your camera. You can also control the camera with the smartphone or tablet and view through the lens remotely, change the settings, and take pictures.
Let’s consider each of these functions in much more detail.
[Slideshow]
When you have a card full of great pictures, you may want to share a slideshow with friends and family. The camera makes it easy and allows you to display timed still images or movies with background music, if you choose.
There are basically three ways to view a slideshow: on the camera monitor (but not in the viewfinder), on an HDTV or other HDMI-compatible device, or on an older TV or other device that uses RCA jacks.
Viewing a slideshow on the camera monitor is very easy, and we will discuss the steps in the upcoming subsection called Configuring and Displaying a Slideshow. But first let’s briefly consider how you might use the camera to display your slideshow on a TV (HDTV or SDTV).
Output to HDTV via HDMI Port
The E-M1 has a micro HDMI port on its left side, which you can use to display your images and movies on a large HDTV screen for much greater viewing pleasure.
You can adjust the camera for 1080i or 720p video output with the Custom Menu > Disp/[Sound]/PC > HDMI > HDMI Out setting. You can even use a compatible HDTV remote to control the camera directly if you set the Custom Menu > Disp/[Sound]/PC > HDMI > HDMI Control to On.
To connect to an HDTV that has a standard HDMI port, you will need a cable with an HDMI type A connector for the HDTV and a micro-HDMI type D connector for the camera’s HDMI port. This cable is readily available online and at stores. Use the steps in the upcoming subsection called Configuring and Displaying a Slideshow to send video to the HDTV.
We will discuss connecting the camera to an HDTV in more detail in the chapter titled Custom Menu and the subsection called HDMI on page 329.
Output to SDTV via USB Port
The camera can send a slideshow to an older SDTV, VCR, or other device that has RCA jacks. You will need a proprietary USB A/V out cable, called Audio/Video Cable Replacement (CB-AVC4), from Olympus (http://www.getolympus.com).
Configuring and Displaying a Slideshow
There are five selections within the [Slideshow] menu, four of which are configurable. Most of the time you will not need to change the configurable settings, but you can if you want to. Here are descriptions of each setting:
• Start: Start begins the slideshow immediately, using the values found in the next four configurable settings.
• BGM: This acronym stands for background music. The camera comes with one song called “Joy.” You can download several other songs from the Olympus website to replace “Joy.”
• Slide: This setting controls the type of slideshow the camera will display. You can display only still pictures, only movies, or both within one slideshow.
• Slide Interval: This setting controls the interval of time between each image or movie in the slideshow. You can choose from 2 to 10 seconds.
• Movie Interval: This setting controls what happens when the slideshow displays a movie. You can show each movie in its entirety or only a few seconds at the beginning of each movie before you continue to the next movie.
First we’ll examine how to start a slideshow with the default settings. Then we’ll see how to configure a slideshow and take advantage of all the options.
Starting a Slideshow with Default Settings
If you want to display a slideshow right away, with no fuss or configuration, you can simply start it. The slideshow will use whatever settings are already configured, which will be either the factory default settings or settings you used for the previous slideshow.
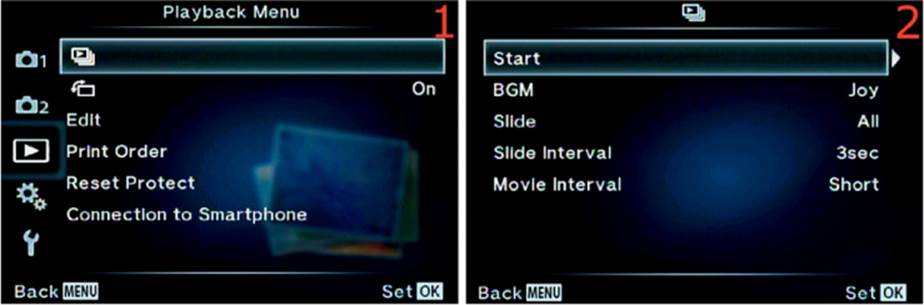
Figure 5.2A: Starting a slideshow with default options
Use the following steps to start a slideshow:
1. On the camera monitor, view the image or movie that you want to use as the first item in the slideshow.
2. Select the [Slideshow] symbol from the Playback Menu and scroll to the right (figure 5.2A, image 1).
3. Choose Start from the menu then scroll to the right. The slideshow will begin immediately with the default settings (figure 5.2A, image 2).
4. Press the OK button or Menu button to stop the slideshow. It will repeat until you stop it. If you want to restart the slideshow where it left off, repeat steps 1 and 2.
Note: The camera starts the slideshow on the most recently displayed image. If you want the slideshow to start with the first image on the memory card, you must view that image immediately before you start the slideshow. If you take a new picture just before you start a new slideshow, the camera will start the slideshow on that picture because it was the last picture displayed. Even removing the card and reinserting it does not cause the camera to start at the beginning of the memory card.
Modifying the Default Settings for Slideshows
You may want your slideshow to include only still images or only videos. You might not want to have the camera play background music during the show, or you might want to look at each image in the show for longer than the default time of 3 seconds.
You can configure these settings before you start a new slideshow. Let’s see how.
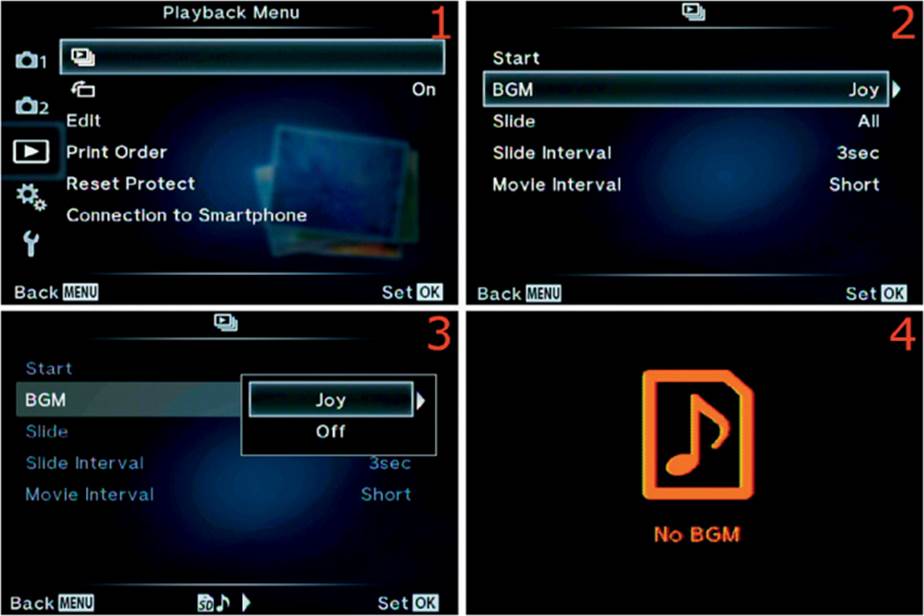
Figure 5.2B: Configuring settings before starting a slideshow
Use the following steps to configure then start a slideshow:
1. Select the [Slideshow] symbol from the Playback Menu and scroll to the right (figure 5.2B, image 1).
2. Select BGM (background music) then scroll to the right (figure 5.2B, image 2).
3. In figure 5.2B, image 3, you can see that the song Joy is available as the factory default. The song will play as soon as this screen appears so you can decide if you want to use it as background music.
4. An arrow appears beside the song name, so it looks like you can scroll to the right and select another song. If you do, you will see a big red musical note and No BGM (figure 5.2B, image 4). Joy is the only song included with the camera. If you want to use it, press the OK button with Joyhighlighted and playing, then move to the next step.
5. You can adjust the volume of the background music during the slideshow by pressing up or down on the Arrow pad keys. You can also adjust the balance of the background music for sound in a video by pressing left or right on the Arrow pad.
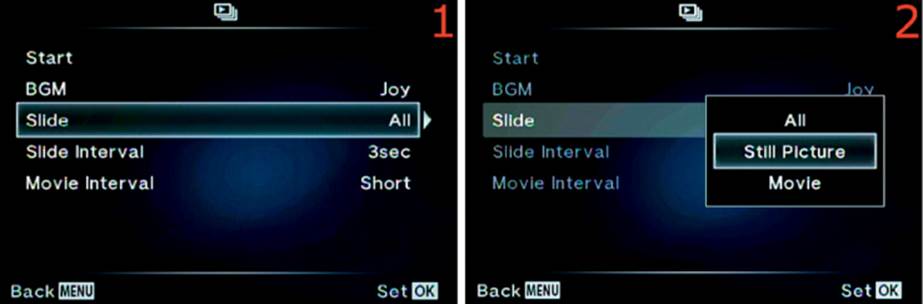
Figure 5.2C: Choosing what displays in a slideshow
6. Next you must decide whether you want to display only images (Still Picture), only videos (Movie), or both (All). First choose Slide and scroll to the right (figure 5.2C, image 1), then choose the type of slideshow you want to display from the menu that opens (figure 5.2C, image 2). After you have highlighted your selection, press the OK button to lock it in.
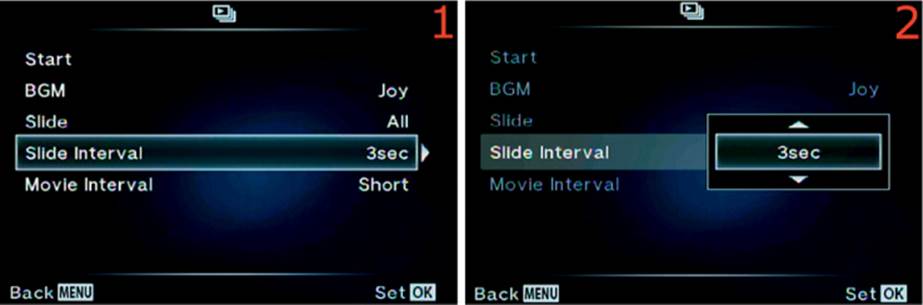
Figure 5.2D: Choosing a delay between items in a slideshow
7. Now you can choose a delay between each image or video. The default is 3 seconds (3sec), but you can choose an interval from 2 seconds to 10 seconds (2sec to 10sec). Select Slide Interval from the menu and scroll to the right (figure 5.2D, image 1). A small up/down menu will appear. Scroll up or down and choose from 2sec to 10sec (figure 5.2D, image 2). Press the OK button to lock in your time delay.
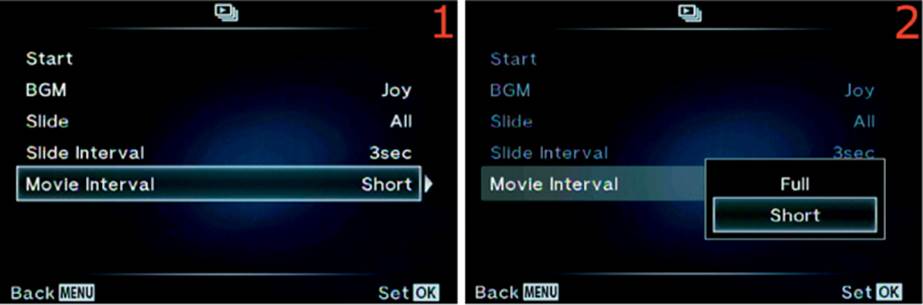
Figure 5.2E: Choosing entire (Full) or partial (Short) videos
8. You can choose whether your movies play all the way through or partially before the slideshow moves to the next movie or image. If you chose Still Picture in step 6, ignore this step. But if you chose Movie or All in step 6, you can decide how much of each movie will play. Select Movie Interval from the menu and scroll to the right (figure 5.2E, image 1). Choose Full or Short from the menu (figure 5.2E, image 2).
9. Now that you have configured all the settings for a slideshow, you select Start from the menu and scroll to the right to start it (figure 5.2A, image 2).
Downloading Alternate Slideshow Songs from Olympus
If you want to play a different song than “Joy” with your slideshow, you can download 10 other songs from Olympus at this website:
http://support.olympus-imaging.com/bgmdownload/
As of early 2015, the song choices are:
• “Beat”
• “Beautiful”
• “Cool”
• “Landscape”
• “Love”
• “Melancholy”
• “My Life”
• “Nostalgic”
• “Precious Memory”
• “The Drums”
Note: The download instructions on the Olympus website (right click > Save Target As) seem to be written for Internet Explorer. If you have problems downloading the songs, try pressing Alt+Click on the download graphic. That worked for me in Chrome, but not in Firefox. You may have to use Internet Explorer to download the songs.
If you download these songs, you cannot simply install them and select one from a list, as you might expect. When you install a new song, it replaces “Joy.” You can install only one song at a time, and it overwrites the current song. Unless you don’t want to ever use “Joy,” be sure to download it from the Olympus website because it will be overwritten when you replace it, and you will have to reinstall it if you want to use it later. That will give you 11 songs you can install in your camera.
You can listen to the songs on the Olympus website to see if you like them, then you can download one song or all of them. Each song is 6 MB and is in a nonstandard WAV format. I tried to play them on my computer but they would not play in iTunes, and I could not use a WAV file I created.
To use the songs, create a folder on your memory card named BGM. Copy all the songs into the BGM folder. When you reinsert the memory card into the camera and select a song, a list of songs will replace the No BGM error (figure 5.2F, image 4).
Use these steps to install a song other than “Joy” from the BGM folder on your memory card:
1. Select the [Slideshow] symbol from the Playback Menu and scroll to the right (figure 5.2F, image 1).
2. Select BGM then scroll to the right (figure 5.2F, image 2). You can see that Joy is currently selected (figure 5.2F, image 3). It will start to play as soon as this screen appears. Scroll to the right, and you can see the list of songs in the BGM folder on your memory card (figure 5.2F, image 4).
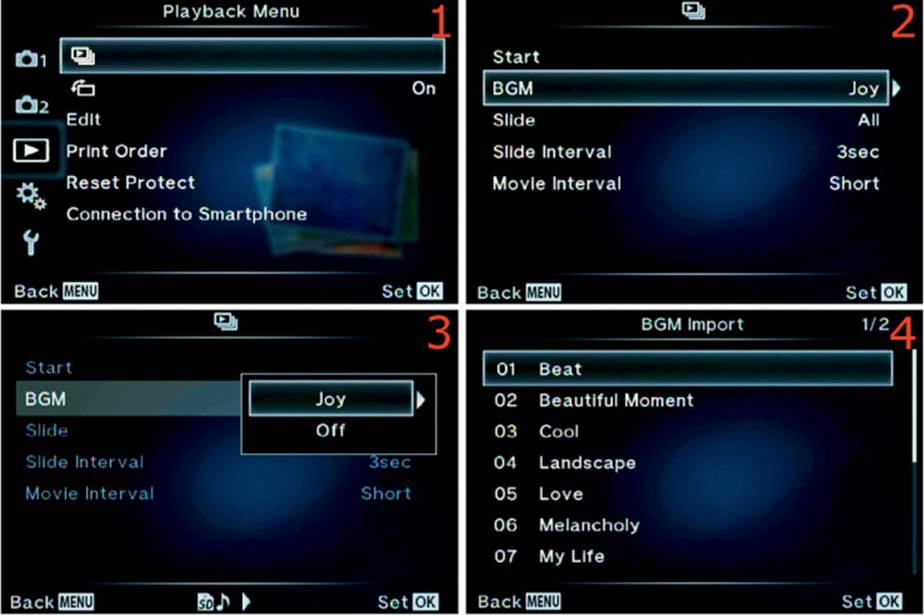
Figure 5.2F: Installing a song
3. Figure 5.2G takes over where figure 5.2F leaves off. Select a song from the BGM Import menu (figure 5.2G, image 1). I selected Beautiful Moment, which started playing immediately. Press the OK button to choose the song, and the screen in figure 5.2G, image 2, will appear. The wordsBGM is overwritten will appear. Select Yes from the menu and press the OK button. Your new song will be playing and its name will appear on the camera monitor (figure 5.2G, image 3).
4. When you start the next slideshow, your new song will play instead of Joy.
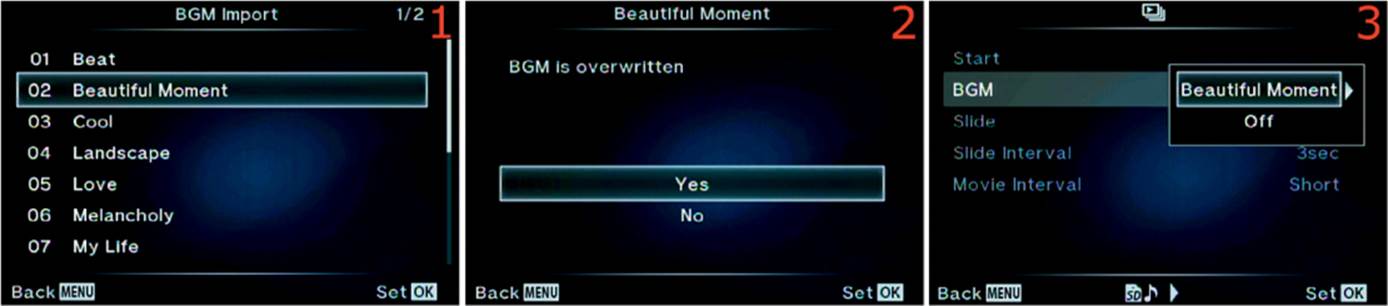
Figure 5.2G: Choosing a song from the BGM Import menu
Settings Recommendation: I configured my slideshow settings before I displayed my first slideshow, and I rarely change things. I might want to change the background music from time to time, but that’s about all. I normally turn off movie replay during a slideshow because I want to see just still images. If I want to watch a movie, or a series of movies, I find it more convenient to simply choose one from the monitor when I am ready to view it.
When you choose to display movies in a slideshow, they cleverly blend with still images. However, the music keeps playing through the movie, which I find distracting most of the time. Unless your movies are lovely nature videos, it may be better to leave music turned off in a slideshow that includes both movies and still images. You can adjust the balance of the recorded sound and the background music by pressing left and right on the Arrow pad while the movie is playing.
[Image Rotation]
[Image Rotation] allows you to choose if an image taken in portrait (vertical) orientation is displayed upright or rotated onto its side on the camera monitor.
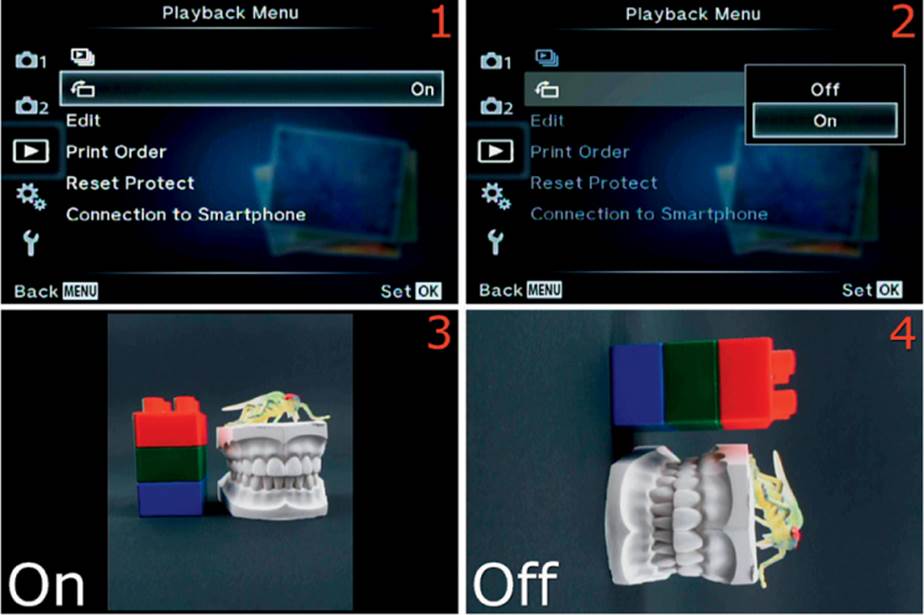
Figure 5.3: Choose how a vertical image will display on the camera monitor
Use these steps to choose how a vertical image will display:
1. Select the [Image Rotation] symbol from the Playback Menu and scroll to the right (figure 5.3, image 1).
2. A small menu with On and Off choices will open (figure 5.3, image 2). If you want a vertical image to display as shown in figure 5.3, image 3, choose On. If you want it to be rotated onto its side, as shown in figure 5.3, image 4, choose Off.
3. Press the OK button to lock in your choice.
Settings Recommendation: I leave this function set to On so the image on the monitor will be easier to review as I scroll through all my images. The E-M1 displays an image on the monitor for only about one-half second, which is not enough time to see it unless you change the default image review timeout setting in Setup Menu > Rec View. I leave Rec View set to one-half second so it won’t delay my ability to take the next picture.
If you change the Rec View default to a longer time, you may want to leave [Image Rotation] Off so you can review your image on the monitor in the same direction you were holding the camera when you took the picture.
Edit
If you don’t like working with images on the computer, or if you are on a tour in the wilds and don’t have a computer available, you can still do basic in-camera image processing. You can take an original RAW or JPEG image, modify it in various ways, then save it as a new JPEG image.
Sel. Image
Sel. Image (Select Image) is the first of the image editing tools, which also includes Image Overlay.
There are three basic ways to modify images with the Sel. Image tool: RAW Data Edit, JPEG Edit, and [Voice Annotation]. Let’s examine them.
RAW Data Edit
RAW Data Edit allows you to convert a file from RAW to JPEG in-camera. If you prefer to shoot in RAW for maximum image quality and quickly need a JPEG for some reason, you can create one without using a computer. Here are the conversion types:
• Current: You will choose a RAW image on the monitor and the camera will create a JPEG image using whatever camera settings are currently set on the camera.
• Custom1 and Custom2: These two functions allow you to select individual changes to image exposure settings. The camera will then convert a RAW image into a JPEG image with the settings you choose. You can save the Custom1 or Custom2 settings and use them later.
• ART BKT: You can choose a RAW file, apply one of the 12 Art Modes to it, then save it as a JPEG. This is a good way to apply an Art Mode to an image after the fact.
The RAW Data Edit function works only with RAW files. There is a separate JPEG Edit function for JPEG files, which we will discuss in the upcoming JPEG Edit subsection. If there are only JPEG images on the memory card, the RAW Data Edit choice will be grayed out and unavailable.
There are nine conversion factors to consider when you convert a file from RAW to JPEG. When you use the Current and Custom RAW Data Edit functions, you will notice that each has a different way to configure the nine settings.
RAW to JPEG conversion factors
• JPEG quality setting (e.g., LSF, LF, MN)
• Picture Mode (e.g., Vivid, Natural, Muted)
• White Balance (e.g., Sunny, Cloudy, Incandescent)
• Exposure Compensation (±3.0 EV)
• Brighten Area Adjust (Hi light using Highlight&Shadow Control, ±7 steps)
• Shadow Area Adjust (Shadow using Highlight&Shadow Control, ±7 steps)
• Image Aspect Ratio (e.g., 4:3, 16:9, 3:2)
• Noise Filter (i.e., Low, Std, High)
• Color Space (i.e., sRGB, Adobe RGB)
Let’s examine each of the three RAW to JPEG conversion types: Current; Custom1 and Custom2; and ART BKT.
Current
This form of RAW (ORF) to JPEG conversion uses the camera’s current settings as a guide to conversion. These nine settings are listed in the previous RAW to JPEG conversion factors list. Before you start the RAW Data Edit in Current mode, you must configure your camera settings for converting a file to JPEG.
After you have adjusted each of these items, you will execute the following steps to convert the image from RAW to JPEG.
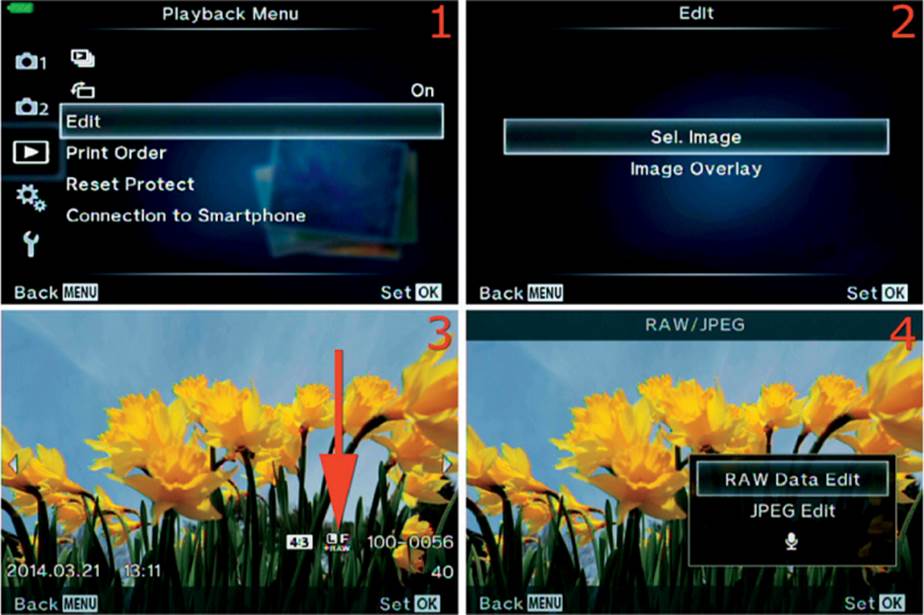
Figure 5.4A: Converting RAW to JPEG with Current camera settings (first four steps)
Use these steps to convert a RAW file on the memory card into a new JPEG file, which will have a new file number and show up as the last image on the memory card:
1. Choose Edit from the Playback Menu and scroll to the right (figure 5.4A, image 1).
2. Choose Sel. Image from the Edit Menu and press the OK button (figure 5.4A, image 2).
3. The camera will display the images on the memory card. Scroll through the images with the Arrow pad until you find the RAW file you want to convert. The format of the image will be displayed (figure 5.4A, image 3, red arrow). The picture in our example is stored in both RAW and JPEG formats on the memory card. Press the OK button.
4. The camera will display a menu with two choices: RAW Data Edit and JPEG Edit (figure 5.4A, image 4). Since the picture in image 4 has both RAW and JPEG versions available (JPEG+RAW), both choices are available on the menu. Choose RAW Data Edit and press the OK button.
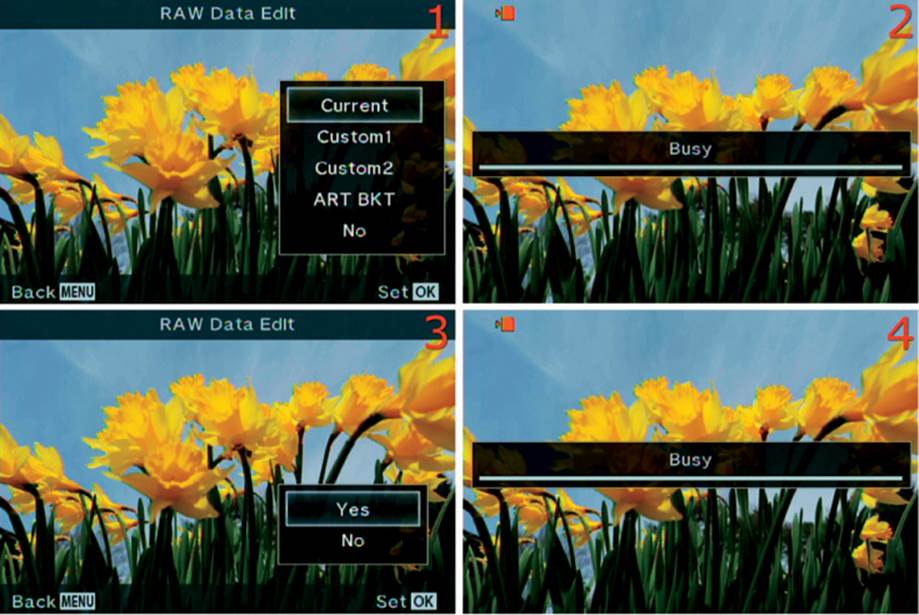
Figure 5.4B: Converting RAW to JPEG with Current camera settings (next two steps)
5. Figure 5.4B takes up where figure 5.4A leaves off. Select Current from the menu (figure 5.4B, image 1). This tells the camera to use its current settings (see the RAW to JPEG conversion factors list) to convert the file from RAW to JPEG. Press the OK button to continue, and you will briefly see a Busy screen (figure 5.4B, image 2).
6. Next you decide how the image will look on the camera monitor with the current settings applied (figure 5.4B, image 3). If you think it looks fine, select Yes and press the OK button, which will make a new JPEG file while a Busy screen is displayed (figure 5.4B, image 4). If you want to adjust the image further, select No and start over with new camera settings.
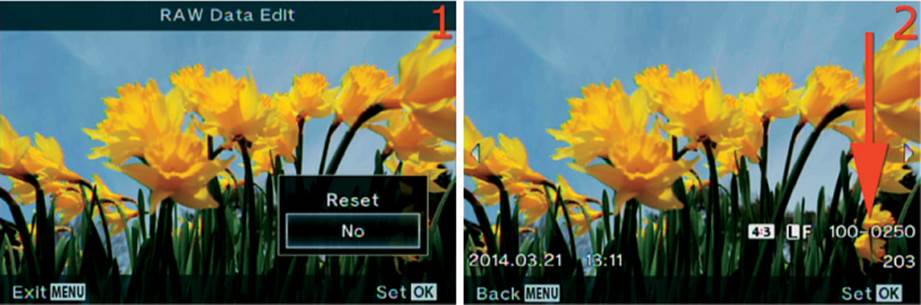
Figure 5.4C: Converting RAW to JPEG with Current camera settings (final step)
7. Figure 5.4C takes up where figure 5.4B leaves off. The camera gives you a preview of the conversion, which hasn’t yet been saved to the memory card. A menu with Reset and No choices will appear (figure 5,4C, image 1). If you select Reset, the camera will abandon the current conversion and jump back to the screen shown in figure 5.4B, image 1, so you can start over at step 5. If you select No—which, ironically, means you do want to save the newly converted JPEG image—the camera will save the JPEG to a new file name as the last image on the memory card. The image will appear on the monitor with the new file name displayed (figure 5.4C, image 2, red arrow).
Custom1 and Custom2
The two Custom RAW Data Edit modes let you choose nine factors for conversion. Unlike the Current RAW Data Edit mode discussed in the previous subsection, which used current camera settings for the conversion, the Custom functions allow you to adjust individual settings before you convert your image from RAW to JPEG.
The nine settings you can adjust are shown in the RAW to JPEG conversion factors list. These are the same nine functions used by the Current method. The difference between the Current and Custom RAW Data Edit settings is that the camera automatically saves the Custom settings so you can use them later. If you use the Custom function again without changing the settings, the camera will use your previous settings.
There are two Custom settings: Custom1 and Custom2. Configuring them works exactly the same way, so we will use Custom1 as an example. Remember that Custom1 and Custom2 can be configured with different settings and you can reuse them later. Maybe you will use one Custom setting to convert RAW images to high-quality JPEGs and the other to convert RAW images to smaller JPEGs for online use.
Note: Pressing the Movie button at any time while you configure any of the nine conversion factor settings will give you a Preview Update of what the image will look like after conversion. The Movie button is on top of the camera—just behind the Shutter button, next to the Fn2 button—and has a red dot. Preview Update will apply the current conversion settings, without saving the file, so you can see what the conversion looks like up to that point. You can test the conversion with each change if you want to. Each screen has a reminder that you can see a Preview Update (figure 5.4E, image 2, bottom red arrow).
Now, let’s see how to use the Custom RAW Data Edit function.
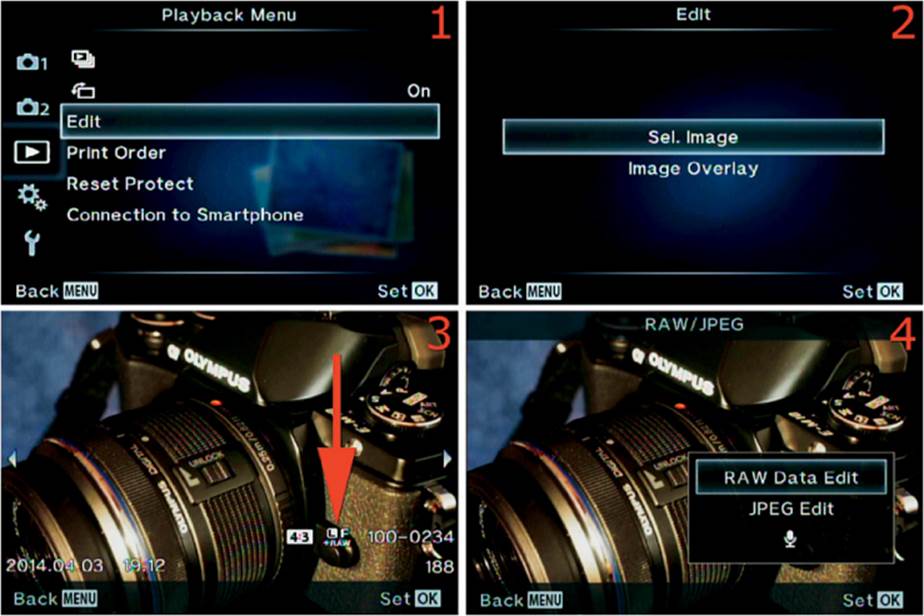
Figure 5.4D: Converting RAW to JPEG with Custom camera settings
1. Choose Edit from the Playback Menu and scroll to the right (figure 5.4D, image 1).
2. Choose Sel. Image from the Edit Menu and press the OK button (figure 5.4D, image 2).
3. The camera will now display the images on the memory card. Scroll through the images with the Arrow pad until you find the RAW file you want to convert. The format of the image will be displayed (figure 5.4D, image 3, red arrow). The picture in our example is stored in both RAW and JPEG formats on the memory card. Press the OK button.
4. The camera will display a menu with two choices: RAW Data Edit and JPEG Edit (figure 5.4D, image 4). Since the picture in image 4 has both RAW and JPEG versions available (JPEG+RAW), both choices are available on the menu. Choose RAW Data Edit and press the OK button.
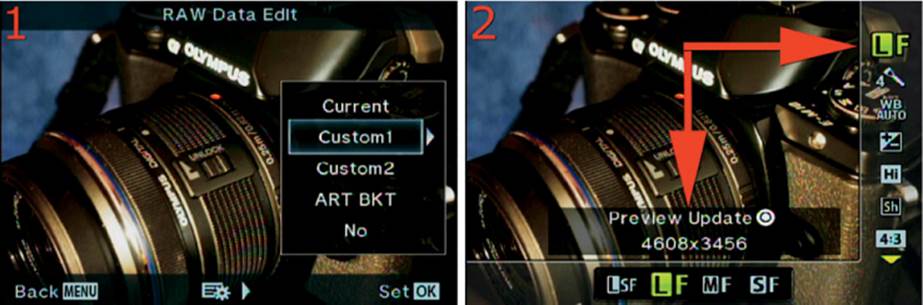
Figure 5.4E: Choosing a Record Mode (image size and quality) for the converted JPEG
5. Figure 5.4E takes up where figure 5.4D leaves off. You will see a menu with the two Custom settings. Select Custom1 or Custom2 and scroll to the right (figure 5.4E, image 1).
6. Figure 5.4E, image 2, shows the first of nine screens we will use to configure the RAW to JPEG conversion settings, shown in the RAW to JPEG conversion factors list. The first setting is Image size and quality (Record Mode). The items along the right side of the screen are headings, and their adjustments are shown at the bottom of the screen. Scroll up or down on the right side of the screen with the Arrow pad to select a conversion setting, and scroll left or right on the bottom of the screen to make adjustments to that conversion setting. The Record Mode heading on the right (LF) has the following choices at the bottom of the screen: LSF, LF, MF, and SF (figure 5.4E, image 2). Your camera may display LF, LN, MN, and SN instead. (You can adjust the display by changing Custom Menu > G. [Record Mode]/Color/WB > Set. I use LSF, LF, MF, andSF so I can always shoot JPEG Fine images instead of JPEG Normal. See page 175, under the heading [Record Mode], for more information about image size and quality settings.) Choose one of the Record Modes, such as LF (Large Fine JPEG), by scrolling left or right. Press the Movie button for a Preview Update to see how the conversion will look so far. Do not press the OK button unless you have completed all the changes you want to make. After you have chosen the Record Mode you want, scroll down one space on the right side of the screen to select a Picture Mode.
7. You can choose a Picture Mode to give a certain look to your new JPEG image (figure 5.4F). There are 21 modes available, including 12 Art Modes, so you can do all sorts of in-camera image processing. There are also six basic modes—including i-Enhance, Vivid, Natural, Muted, andPortrait—that are commonly used and do not have heavy effects. The Muted Picture Mode is selected in figure 5.4F. (See page 136, under the heading Picture Mode, for more information about Picture Modes.) Choose the Picture Mode you want to use for this conversion by scrolling left or right with the Arrow pad. Press the Movie button for a Preview Update to see how the image conversion will look so far. Do not press the OK button unless you have completed all the changes you want to make. Scroll down to the next setting, White Balance (WB).
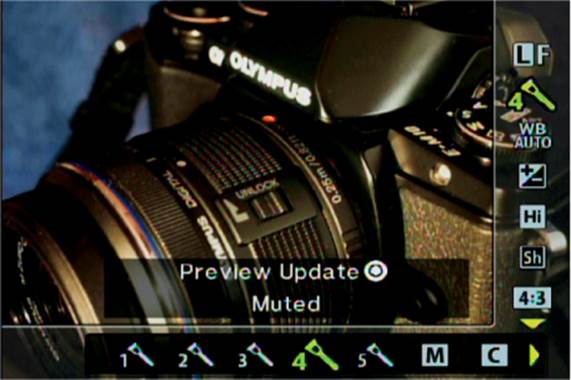
Figure 5.4F: Choosing a Picture Mode for the converted JPEG
8. The White Balance (WB) setting (figure 5.4G) lets you choose from 13 WB types, including eight standard settings (e.g., Auto, Sunny, Cloudy), four custom WB settings captured previously with a gray card, and a kelvin setting (2000K to 14000K). (See the chapter titled Custom Menuon page 396, under the White Balance (WB) heading, for more information about WB settings.) Choose the WB you want to use for this conversion by scrolling left or right with the Arrow pad. I chose the WB Auto setting in figure 5.4G. Press the Movie button for a Preview Update to see how the image conversion will look so far. Do not press the OK button unless you have completed all the changes you want to make. Scroll down to the next setting, Exposure compensation (+/–).
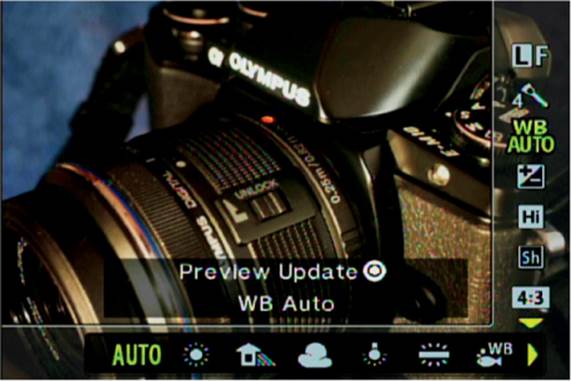
Figure 5.4G: Choosing a White Balance (WB) for the converted JPEG
The Exposure compensation setting (+/–) lets you add or subtract light from the converted image in 1/3 EV steps, with maximum increments from –3.0 to +3.0 EV steps (figure 5.4H). Choose an Exposure compensation value for this conversion by scrolling left or right with the Arrow pad. You will see the number next to the +/– symbol change in 1/3 EV step increments. Press the Movie button for a Preview Update to see how the image conversion will look so far. Do not press the OK button unless you have completed all the changes you want to make. Scroll down to the next setting, Brighten Area Adjust (Hi).
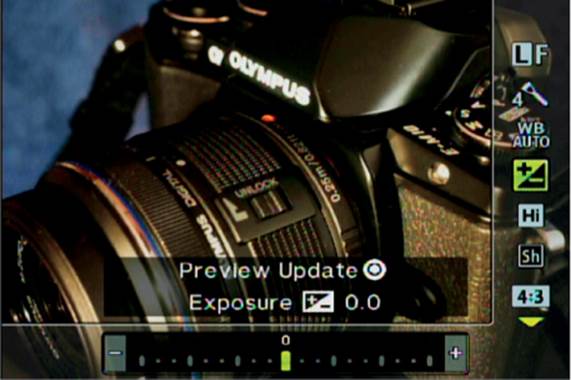
Figure 5.4H: Choosing an Exposure compensation value for the converted JPEG
9. The Brighten Area Adjust setting lets you add or subtract light from the highlights (Hi) of the image in +/–7 steps (e.g., +1, +2, –1, –2) (figure 5.4I). Choose a Brighten Area Adjust (Hi) value for this conversion by scrolling left or right with the Arrow pad. This adjustment will brighten or darken the bright areas of the image. You will see the number next to Brighten Area Adjust (Hi) change one step at a time. Press the Movie button for a Preview Update to see how the image conversion will look so far. Do not press the OK button unless you have completed all the changes you want to make. Scroll down to the next setting, Shadow Area Adjust (Sh).
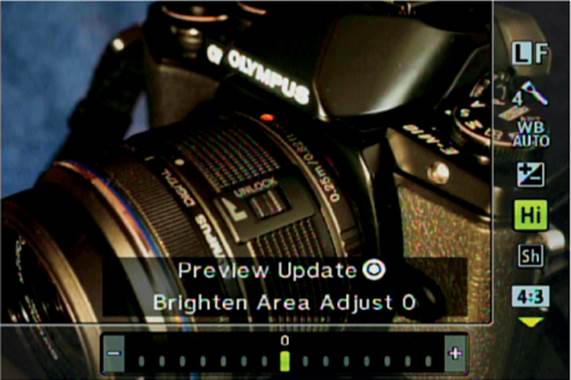
Figure 5.4I: Choosing a Brighten Area Adjust value for the converted JPEG
10. The Shadow Area Adjust setting lets you add or subtract light from the shadows (Sh) of the image, in +/–7 steps (e.g., +1, +7, –1, –7) (figure 5.4J). Choose a Shadow Area Adjust (Sh) value for this conversion by scrolling left or right with the Arrow pad. This adjustment will brighten or darken the dark areas of the image. You will see the number next to Shadow Area Adjust (Sh) change one step at a time. Press the Movie button for a Preview Update to see how the image conversion will look so far. Do not press the OK button unless you have completed all the changes you want to make. Now scroll down to the next setting, image Aspect Ratio (4:3).
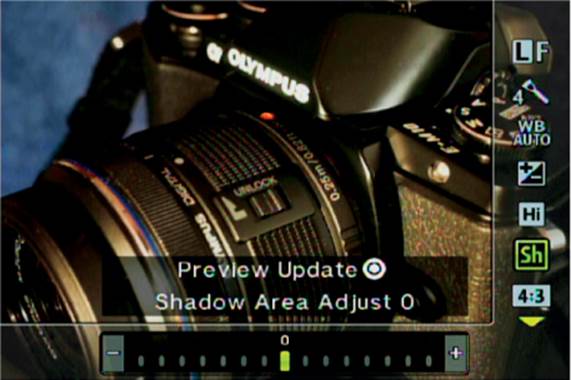
Figure 5.4J: Choosing a Shadow Area Adjust value for the converted JPEG
11. The image Aspect Ratio setting (4:3) lets you change the shape of the image (figure 5.4K). You can change it from the normal Micro Four Thirds setting (4:3) to a different Aspect Ratio, such as a long and narrow HD view (16:9); the shape of most non-Micro Four Thirds digital images (3:2); square (1:1); or vertical Micro Four Thirds portrait mode (3:4). Choose one of the Aspect Ratio values for the conversion by scrolling left or right with the Arrow pad. You will notice that the camera displays the pixel ratio for each Aspect Ratio (e.g., 4608×3456). To see how the change affects the image, press the Movie button for a Preview Update. Do not press the OK button unless you have completed all the changes you want to make. After you have selected the Aspect Ratio you want to use for the conversion, scroll down to the next setting, Noise Filter(NF).
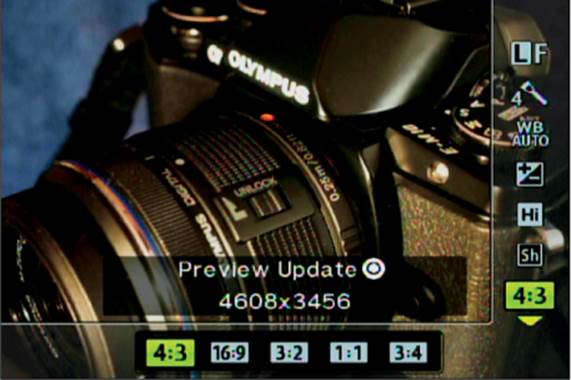
Figure 5.4K: Choosing an image Aspect Ratio value for the converted JPEG
12. The Noise Filter (NF) setting lets you select the strength of noise reduction (figure 5.4L). You can select from Off, Low, Std, and High. It will be hard to see how the noise reduction system affects the image on the small camera monitor. You may want to experiment with noise reduction in advance so you can make a better choice during the conversion process. (See the chapter titled Custom Menu, on page 363, under the heading Noise Reduct., for more information.) Most people leave Noise Filter (NF) set to Standard (Std). Press the Movie button for a Preview Update to see how the image conversion will look so far. Do not press the OK button unless you have completed all the changes you want to make. Scroll down to the next setting, Color Space (sRGB).
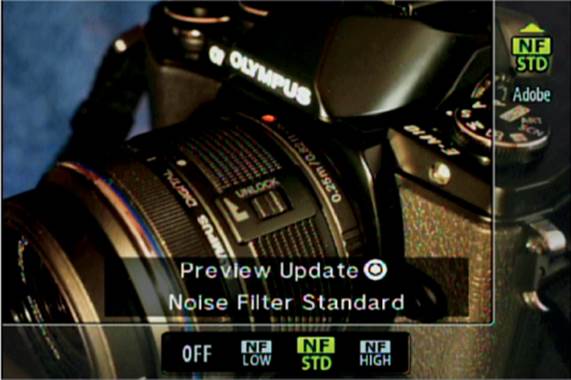
Figure 5.4L: Choosing a Noise Filter for the converted JPEG
13. The Color Space setting lets you choose whether to use the generally noncommercial sRGB color space or the commercial Adobe RGB color space (figure 5.4M). Most noncommercial photographers will leave Color Space set to sRGB because that works best for home, online, and superstore printing, and for display on social media sites and websites. If you are a stock photographer who submits images to a stock agency or are involved in other purely commercial photography endeavors where the images will be printed on an offset press, you will usually need to shoot with the Adobe RGB color space because it matches commercial CMYK color printing more closely. (See page 407 under the heading Color Space for more information.) Now it’s time to finish the RAW to JPEG conversion with all our settings. The camera saves your settings so you can make many more conversions using the settings you just prepared. Press the OK button to start the final conversion process.
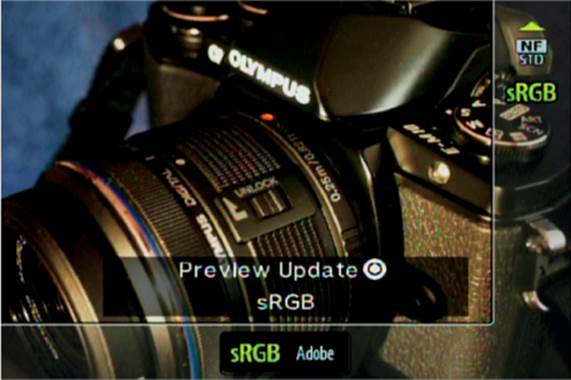
Figure 5.4M: Choosing a Color Space for the converted JPEG
14. The camera will display a final Preview Update of the image, with all your carefully crafted settings in place. You will also see a small menu with Yes and No choices (figure 5.4N, image 1). If you choose No the camera will revert to the image selection screen and you will have to start over. If you choose Yes the camera will execute the final conversion from RAW to JPEG, a Busy screen with a progress bar will display while the conversion is taking place (figure 5.4N, image 2), and finally you will see the converted JPEG image.
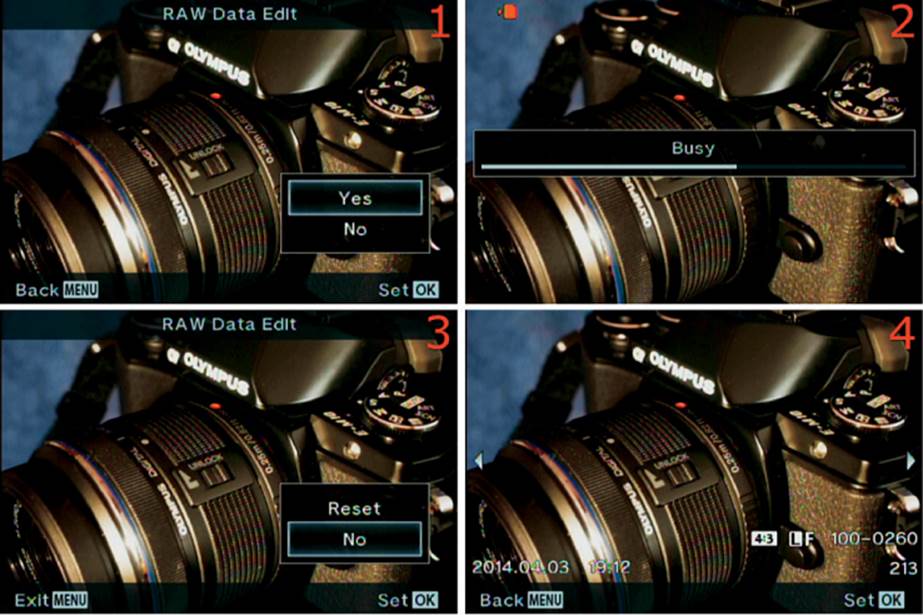
Figure 5.4N: Converting a RAW file to a new JPEG file
15. Before you save the new JPEG image to the memory card, the camera opens a menu with Reset and No options (figure 5.4N, image 3). If you select Reset the camera will not save the new image. Instead, it will jump back to the beginning of the conversion process and display the screen shown in figure 5.4E, image 1 (step 5), where you select the type of conversion you want to do. If you select No the camera will save the new JPEG image under a new file name as the last JPEG image on the memory card. The final converted image will be displayed on the cameramonitor (figure 5.4N, image 4).
Now, let’s consider how to use the third type of RAW to JPEG conversion: converting to JPEG with an Art Mode.
ART BKT
The ART BKT function allows you to choose a single RAW image and create up to 21 JPEG images from it. Each image can have a different Basic, Creative, or Art Mode applied to it, which is why the function has the letters BKT (bracket) in its name. In effect, when you create more than one JPEG image from a single RAW file, you are creating an Art Mode Bracketing series.
Note: The camera allows you to select all 21 Picture Modes in the ART BKT function, not just the Art Modes, as the function name implies. We discussed each Basic, Creative, and Art Mode in the chapter titled Shooting Menu 1: Preliminary and Basic Shooting Options, on page 136, under the subheading Picture Mode. For more information on each mode, see the corresponding subsection.
If you are unsure which of the Picture Modes—Basic, Creative, or Art—you want to use, and if you would like to make a test image with each one, you can do it with ART BKT. Or if you want to make a single JPEG image with only one of the special looks in Art Mode (e.g., Pop Art, Grainy Film, Soft Focus), you can do that too.
Now, let’s examine how to create a RAW to JPEG conversion with one or multiple JPEG files, each with a specific Picture Mode effect.
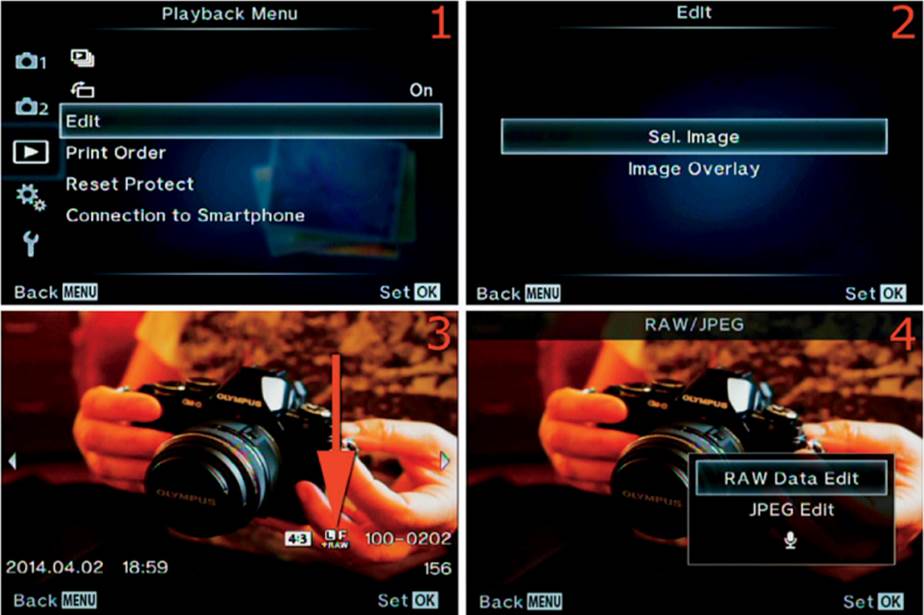
Figure 5.4O: Creating a RAW to JPEG ART BKT conversion (first four steps)
Use the following steps to make a RAW to JPEG conversion using one or more of the camera’s available Picture Modes:
1. Select Edit from the Playback Menu and scroll to the right (figure 5.4O, image 1).
2. Choose Sel. Image from the Edit Menu and press the OK button (figure 5.4O, image 2).
3. The camera will display the images on the memory card. Scroll through the images with the Arrow pad until you find the RAW file you want to convert. The format of the image will be displayed (figure 5.4O, image 3, red arrow). The picture in our example is stored in both RAW and JPEG formats on the memory card. Press the OK button.
4. The camera will display a menu with two choices: RAW Data Edit and JPEG Edit (figure 5.4O, image 4). Since the picture in image 4 has both RAW and JPEG versions available (JPEG+RAW), both choices are available on the menu. Choose RAW Data Edit and press the OK button.
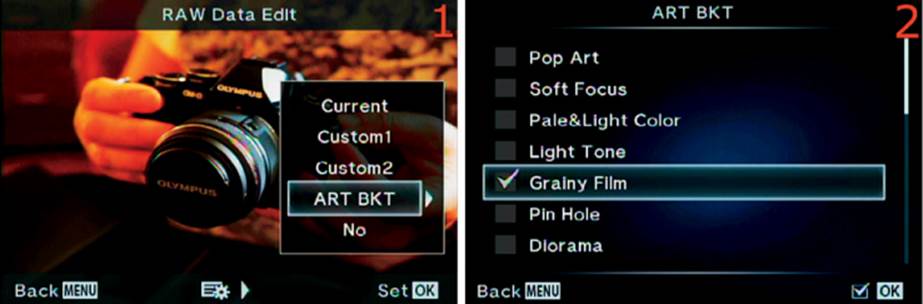
Figure 5.4P: Creating a RAW to JPEG ART BKT conversion (next two steps)
5. Figure 5.4P takes up where figure 5.4O leaves off. You will now see the RAW Data Edit Menu and a choice of conversion types (figure 5.4P, image 1). Highlight ART BKT and scroll to the right.
6. The ART BKT list of Picture Modes will now appear, with the Art Modes (e.g., Pop Art, Soft Focus) at the top (figure 5.4P, image 2). When this screen first appears it will have quite a few Picture Modes checked. Only 7 of the 21 available modes are visible on the screen in image 2; you must scroll down to see the rest. If you do the conversion with more than one Picture Mode checked, the camera will create a JPEG image for each of the checked Picture Modes. To check or uncheck a Picture Mode simply highlight it and press the OK button, and you will see the check mark appear or disappear. In image 2, all Picture Modes except Grainy Film are unchecked, which means only one JPEG file will be created with that Art Mode applied. Check however many of the modes you want to use and you will get one new JPEG, created from the original RAW file, for each of the modes you checked. After you check the modes you want to use, scroll to the left with the Arrow pad or press the Menu button once to get back to the previous screen (figure 5.4P, image 1) and execute the ART BKT conversion.
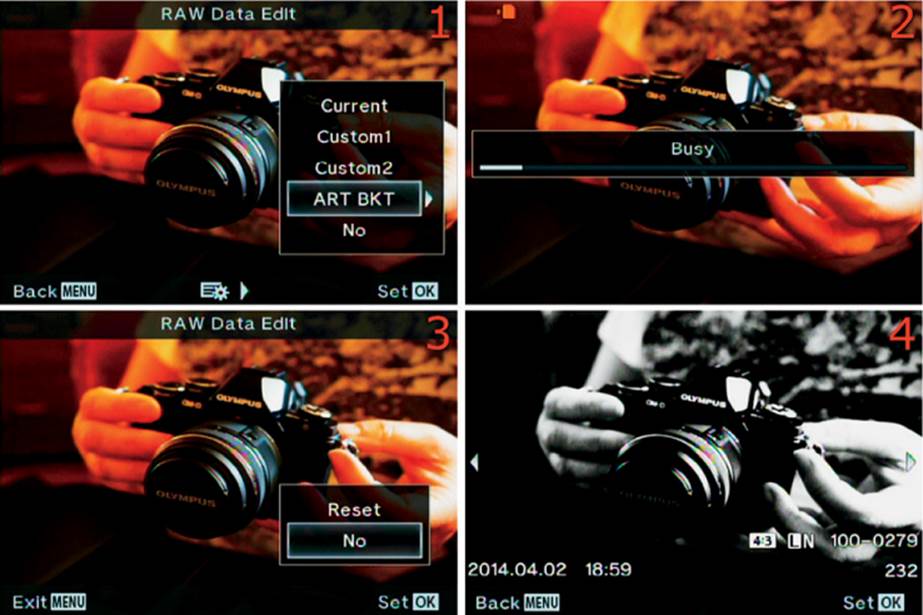
Figure 5.4Q: Creating a RAW to JPEG ART BKT conversion (final steps)
7. Figure 5.4Q takes up where figure 5.4P leaves off. The screen in figure 5.4Q, image 1, lets you select Picture Modes from the ART BKT list. Now you will execute the conversions and create a new JPEG file for each Picture Mode you selected in step 6. Make sure ART BKT is still highlighted, and press the OK button to start the conversions.
8. You will see a Busy screen with a progress indicator while the camera creates the new JPEG images (figure 5.4Q, image 2). The more images you are converting, the longer the Busy screen will be displayed. Allow some time if you checked a lot of Picture Modes in step 6.
9. When the conversion is complete, the camera will display one of the images from the conversion, along with a menu that has two choices: Reset and No (figure 5.4Q, image 3). If you select Reset at this point, the camera will return to the screen shown in figure 5.4Q, image 1, which stops the conversion and lets you select a different Picture Mode from the ART BKT list. If you choose No, the camera will save the new JPEG images to the memory card and display the last image in the series—or a single image if you chose only one Picture Mode—on the monitor (figure 5.4Q, image 4). If there are multiple JPEGs in the conversion, you can scroll to the left with the Arrow pad to see each of the images with the Picture Mode applied.
Now, let’s examine the next type of image editing, JPEG edit.
JPEG Edit
The JPEG Edit function lets you make in-camera changes to your existing JPEG image files and then save them as new files. It works only with JPEG files. There is a separate RAW Data Edit function for RAW files, which we discussed in the previous RAW Data Edit subsection.
When you select and modify a JPEG file, the original file is not changed. A new modified JPEG file is created and stored with a new file name as the last image on the memory card. If you don’t like using computers to modify files, or if you immediately need a modified JPEG, the JPEG Edit function is easy and quick to use.
There are nine adjustments for JPEG images:
• Shadow Adj: This setting automatically adjusts the shadows of an image to reveal more image data. Use it to brighten mildly underexposed images or to open the shadows on well-exposed images.
• Redeye Fix: The camera attempts to remove red eye when the subject has that strange-looking, red-eye reflection caused by flash.
• [Crop]: You can crop the image up to four ways: both horizontal and both vertical sides.
• Aspect: This setting changes the aspect ratio from the standard Micro Four Thirds 4:3 ratio to 3:2, 16:9, 1:1, or 3:4.
• Black & White: You can convert an image to a retro-looking, grayscale, black-and-white image.
• Sepia: The camera will give your image an old-fashioned sepia, brown-toned look.
• Saturation: This setting allows you to increase or decrease the color saturation by using a sliding +/- indicator.
• [File Size]: You can choose from three smaller file sizes: 1280×960 (1.2 MP), 640×480 (0.3 MP), and 320×240 (0.075 MP).
• e-Portrait: This setting makes skin tones smoother and adds translucense for an antiaging effect.
Adjusting a JPEG image is different from cumulatively setting the conversion factors on a RAW file, as we did in the previous subsection. You can apply a new adjustment to a previously adjusted image, but be careful because making repeated changes to one JPEG file results in data losses due to recompression of the image. To maintain maximum quality, think of these adjustments as effects that you can apply to different images, not as cumulative steps that you’ll apply to one JPEG image.
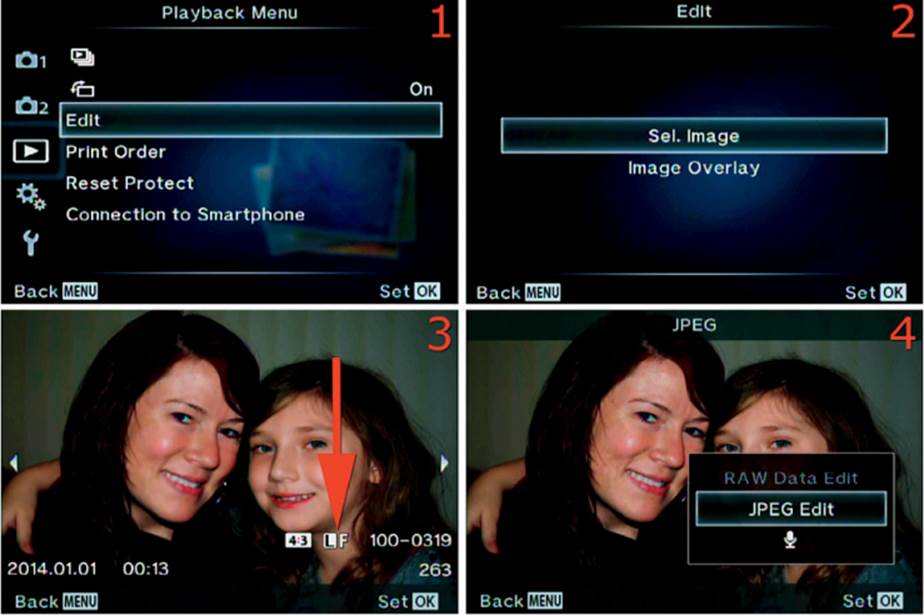
Figure 5.5A: Choosing a JPEG image and starting the JPEG Edit steps
Use the following steps to choose an image for modification and to make some or all of the available changes:
1. Select Edit from the Playback Menu and scroll to the right (figure 5.5A, image 1).
2. Choose Sel. Image from the Edit Menu and press the OK button (figure 5.5A, image 2).
3. The camera will display the images on the memory card. Scroll through the images with the Arrow pad until you find the JPEG file you want to convert. The format of the image will be displayed (figure 5.5A, image 3, red arrow). Press the OK button.
4. You will see a menu with three choices: RAW Data Edit, JPEG Edit, and the [Voice Annotation] microphone symbol (figure 5.5A, image 4). You can tell that this image is not a RAW file because it is labeled LF in image 3; also, in image 4 the RAW Data Edit choice is grayed out and unavailable. If this image had been shot in a JPEG+RAW format, the memory card would have both files and you could edit either the RAW file or the JPEG file. Choose JPEG Edit and press the OK button.
The images in figure 5.5A are the first four screens for the next nine subsections (figures 5.5B to 5.5J). Each of the upcoming adjustments will begin where figure 5.5A leaves off.
Shadow Adj (Opening the Shadows)
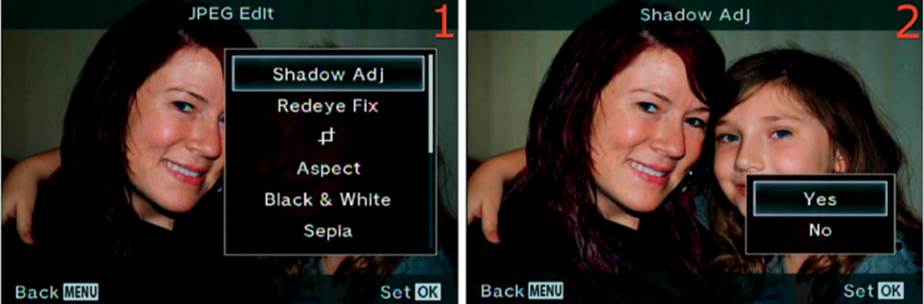
Figure 5.5B: Opening the shadows
1. Choose Shadow Adj from the JPEG Edit Menu and press the OK button (figure 5.5B, image 1).
2. You will briefly see a Busy screen with a progress bar as the camera adjusts the shadows. When it is done, you will see the adjusted image with a menu that has Yes and No choices (figure 5.5B, image 2). To make the Shadow Adj modification permanent, select Yes. The camera will apply the adjustment and save the new JPEG image with a new file name. To cancel and start over, select No.
Redeye Fix (Removing Red Eye)
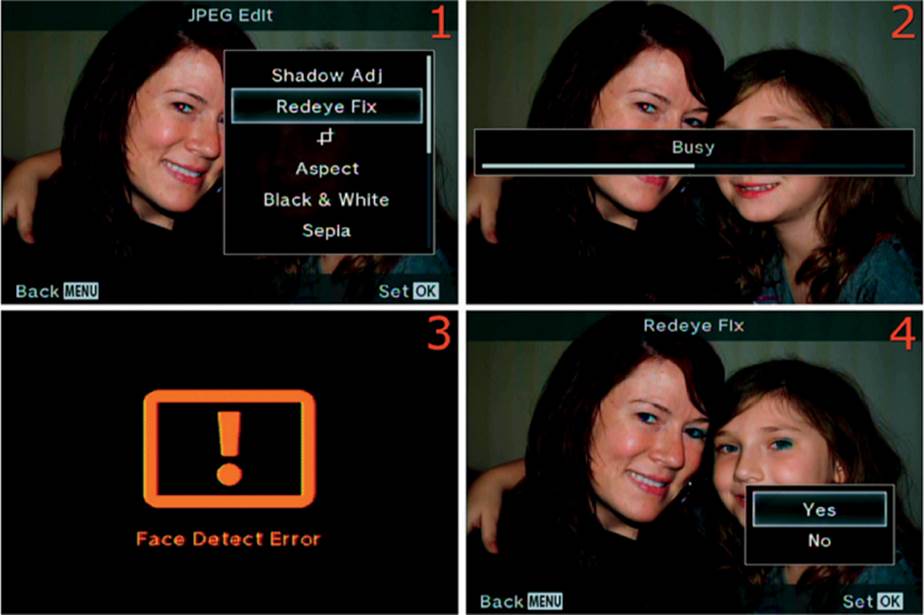
Figure 5.5C: Removing red eye
1. The Redeye Fix adjustment removes glowing red eyes that occur when the subject’s retinas reflect flash light back into the lens. Choose Redeye Fix from the menu and scroll to the right (figure 5.5C, image 1).
2. The camera will now find and remove red eye from the image. A Busy screen and progress bar will stay on the monitor for a few moments while face detection and red eye removal takes place (figure 5.5C, image 2). The camera will attempt to remove red eye even from images in which there is no red eye.
3. If the camera does not detect a human face, it will display an error message (figure 5.5C, image 3). Either the picture has no people in it, their faces are too small, or their faces are at a bad angle. If you see this screen, the camera cannot work with the image. If the camera does detect a human face, you will see the screen shown in image 4.
4. Since the camera can detect a human face in the example picture, you will see a menu with Yes and No choices (figure 5.5C, image 4). Choose Yes to save the new JPEG image with red eye removed, and No to cancel and start over.
[Crop] (In-Camera Image Cropping)
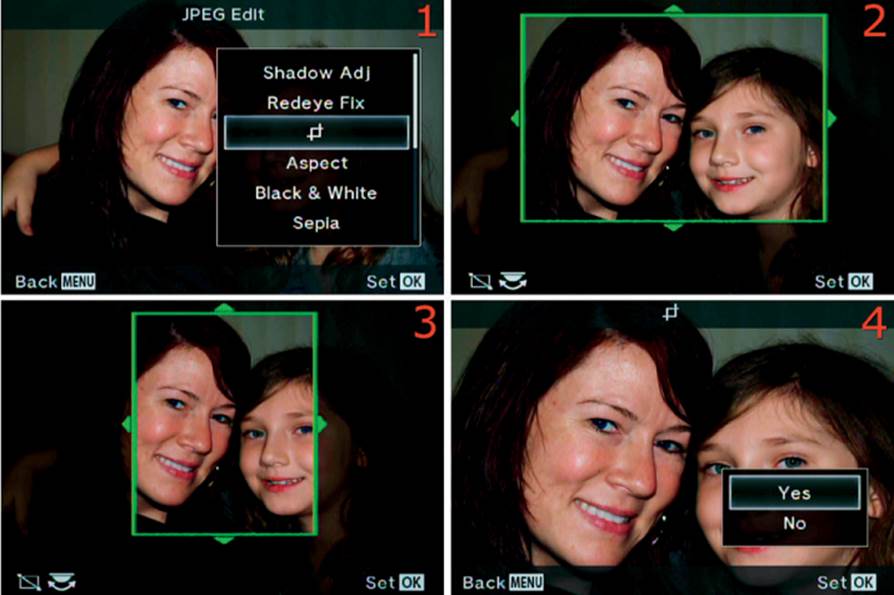
Figure 5.5D: Cropping the image
1. You can crop an image to remove unwanted surroundings and show only the most important part of the picture. Select [Crop] from the menu and press the OK button (figure 5.5D, image 1).
2. Rotate the Rear Dial to see a series of preset image crop sizes. Figure 5.5D, image 2, shows the largest horizontal crop, and image 3 shows the largest vertical crop. There are also two smaller crop sizes that you can see when you rotate the Rear Dial. Select one of the crop sizes, use theArrow pad to move the green crop rectangle to the desired location, and press the OK button to execute the crop. I have not found a way to resize these crops.
3. You will see an unsaved preview of the cropped image on the monitor (figure 5.5D, image 4). The screen will have a menu with Yes and No choices. Select Yes to save the new image and No to cancel and start over.
Aspect (Changing Image Proportions)
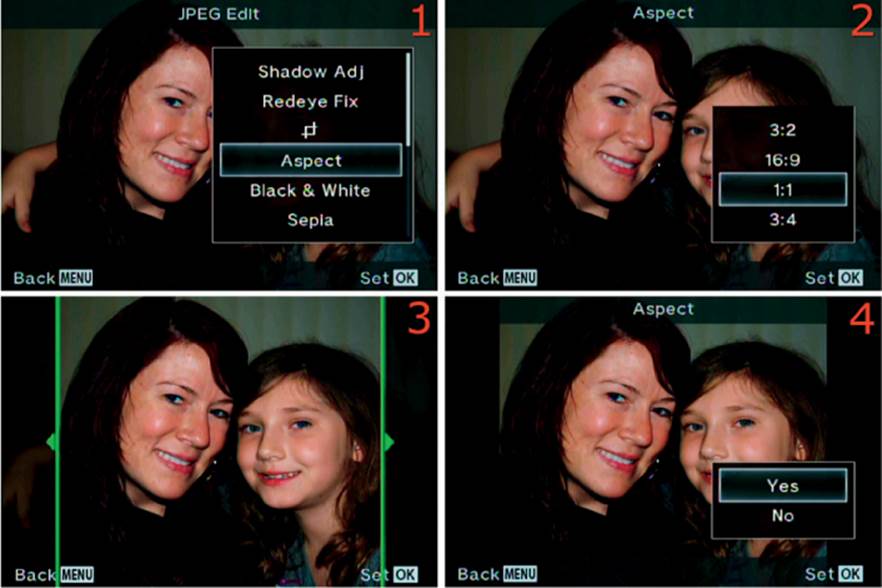
Figure 5.5E: Adjusting the Aspect ratio
1. The aspect ratio is the relationship of the picture’s horizontal sides to its vertical sides. The Aspect ratio setting allows you to choose from several preset image sizes. The basic Micro Four Thirds (4:3) ratio can be cropped to one of four additional ratios. Choose Aspect from the JPEG Edit Menu and press the OK button (figure 5.5E, image 1).
2. A menu will open with several aspect ratio choices: 3:2, 16:9, 1:1, and 3:4 (figure 5.5E, image 2). Choose the aspect ratio that best fits the subject matter and press the OK button.
3. A green aspect ratio frame will surround the subject (figure 5.5E, image 3). Use the Arrow pad buttons to move the green aspect ratio frame to the desired position, then press the OK button to execute the aspect ratio change. I selected a square (1:1) aspect ratio (figure 5.5E, image 3). All four sides are of equal length; that is, 1:1. If you do not like the aspect ratio you chose, simply press the Menu button and the camera will return to the screen shown in figure 5.5E, image 2, and you can choose a different one. After you have chosen a ratio, positioned the frame, and are ready to execute the change, press the OK button.
4. You will see an unsaved preview of the new image on the monitor (figure 5.5E, image 4). The screen will have a menu with Yes and No choices. Select Yes to save the new image and No to cancel and start over.
Black & White (Converting to Grayscale)
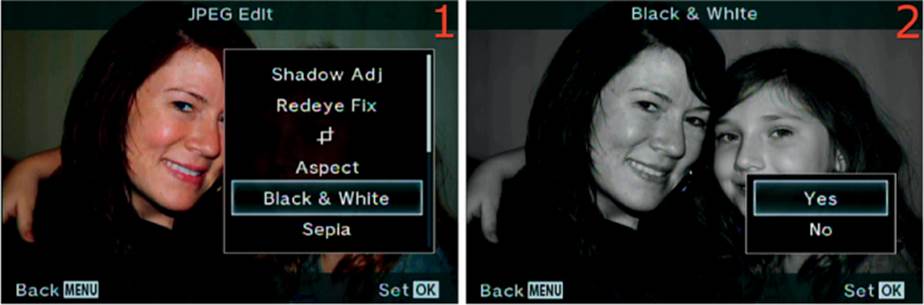
Figure 5.5F: Converting an image to Black & White
1. Black & White conversion lets you change a color image into a grayscale or monochrome picture. Choose Black & White from the JPEG Edit Menu and press the OK button (figure 5.5F, image 1).
2. You will see an unsaved preview of the new image on the monitor (figure 5.5F, image 2). The screen will have a menu with Yes and No choices. Select Yes to save the new image and No to cancel and start over.
Sepia (Converting to Antique Brown Tones)
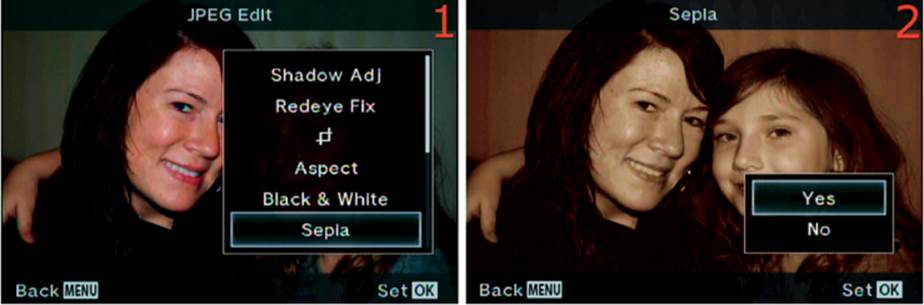
Figure 5.5G: Converting an image to Sepia
1. Sepia conversion lets you change a color image to a monochrome image with brown tones instead of gray tones. Choose Sepia from the JPEG Edit Menu and press the OK button (figure 5.5G, image 1).
2. You will see an unsaved preview of the new image on the monitor (figure 5.5G, image 2). The screen will have a menu with Yes and No choices. Select Yes to save the new image and No to cancel and start over.
Saturation (Changing Image Color Strength)
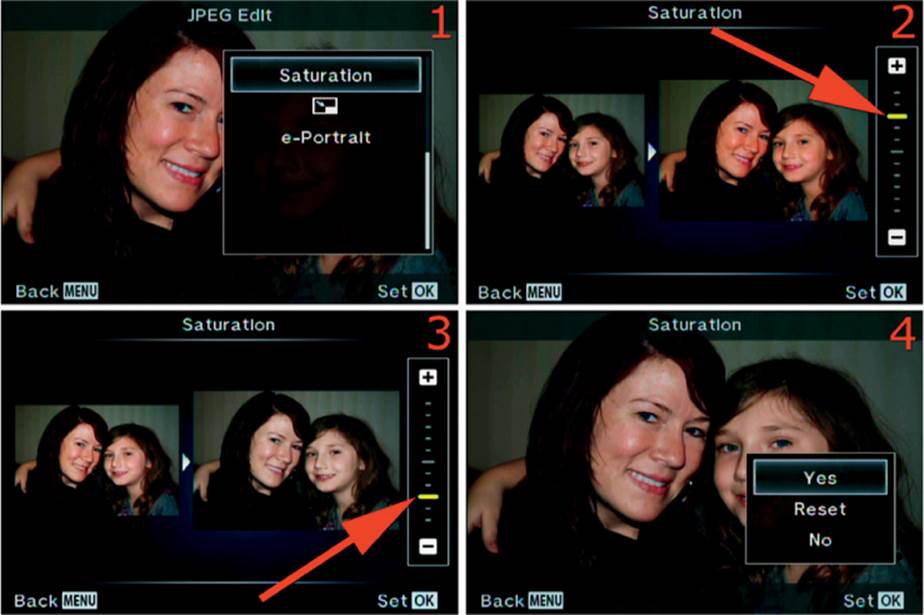
Figure 5.5H: Changing the color saturation
1. The Saturation setting lets you change the strength of the colors in the image. Choose Saturation from the JPEG Edit Menu and press the OK button (figure 5.5H, image 1).
2. You will see small before (left) and after (right) versions of the selected image (figure 5.5H, image 2). There will be a sliding scale with a green dash that indicates the current Saturation position. You can make the colors stronger (more saturated) by moving the slider up, or weaker (less saturated) by moving the slider down, on a scale of 10 steps. I moved the slider three steps toward increased Saturation (figure 5.5H, image 2, red arrow). Use the up and down buttons on the Arrow pad to change the Saturation level. I then reduced the Saturation level (figure 5.5H, image 3, red arrow). You can see the differences in Saturation on the left sides of images 2 and 3. When you are happy with the Saturation level, press the OK button.
3. You will see an unsaved preview of the new image on the monitor (figure 5.5H, image 4). The screen will have a menu with Yes and No choices. Select Yes to save the new image. Select Reset to move the slider back to the middle of the scale so you can make new adjustments. Select Noto cancel and start over. When you are done, press the OK button to create and save the new JPEG image.
[File Size] (Downsizing an Image)

Figure 5.5I: Downsizing an image
1. Normal 4:3 images from your E-M1 have 4608×3456 megapixels. That is equivalent to a 16 MP image, which is much too big to display on social media sites and usually too large to e-mail. You can quickly make a smaller JPEG by using the [File Size] function. Select the [File Size]symbol from the JPEG Edit Menu and press the OK button (figure 5.5I, image 1).
2. You will see a menu of file sizes: 1280×960 or 1.2 MP, 640×480 or 0.3 MP, and 320×240 or 0.075 MP. There is also a No option, which cancels the operation. Any of these smaller file sizes can be e-mailed or used on social media sites. Select the file size you want to use and press the OK button, or select No to cancel (figure 5.5I, image 2).
3. A Busy screen with a progress indicator will display on the camera monitor while the image is converted to the smaller size (figure 5.5I, image 3). Then the camera will display the new, smaller JPEG image (figure 5.5I, image 4), which is saved as the last image on the memory card.
e-Portrait (Smoothing Skin Tones)
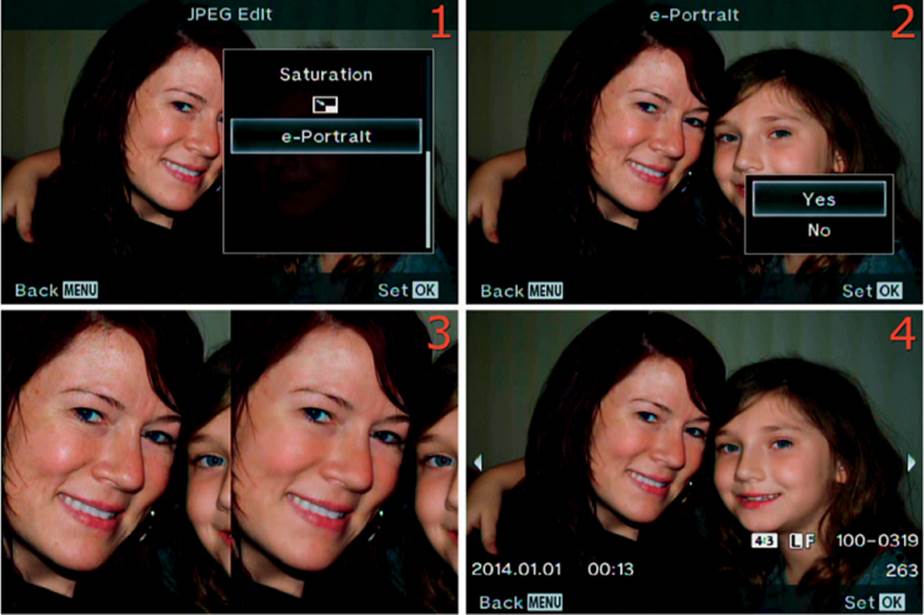
Figure 5.5J: Smoothing skin tones
1. The e-Portrait function converts a normal JPEG portrait into a new portrait with smoother skin tones. Choose e-Portrait from the JPEG Edit Menu and press the OK button (figure 5.5J, image 1).
2. You will see a small menu with Yes and No selections. Choose Yes to start the conversion process or No to cancel and start over (figure 5.5J, image 2).
3. A Busy screen with a progress indicator will display during the conversion process. When the conversion is done, a before-and-after screen will appear (figure 5.5J, image 3). This screen stays on the monitor for a few seconds, then the camera displays the final image that has been saved to the memory card (figure 5.5J, image 4).
Now let’s examine the final form of image editing, [Voice Annotation].
[Voice Annotation]
The [Voice Annotation] setting lets you add a voice message to an image file while you view it on the camera monitor. This is a powerful tool found only in professional-level cameras such as the E-M1.
How can voice annotation be useful for a professional, or an enthusiast, for that matter? Let’s say you are shooting a beautiful landscape on the Blue Ridge Parkway and you add a voice annotation to the first image in the series with important information from a sign so you can later create an accurate caption. Or maybe you are photographing the bride’s grandmother, Myrtle May, at a wedding and you want to remember her name later when you are preparing the wedding album. Voice annotation is an easy way to take notes about an image, without carrying anything extra.
The voice file is a standard WAV format that can be played by your computer, tablet, smartphone, or camera. That makes sense because you want to store the sound file with the image file so you can reference it years later, long after your camera is obsolete and we are using holographic imaging like on Star Trek.
If you use Olympus Viewer 3 software to transfer your images from your camera to your computer, you can listen to the voice sound files from within the software. Open the image in Viewer 3 and use the following menu selections to play the sound file: File Menu > Linked Sound > Play.
If you transfer images to your computer another way, do not overlook copying your sound files along with the image files. The sound files will have the same names as the image files, except the three-character extension is different. For instance, if you record a sound file for an image with a filename of P4000250.JPG, the linked sound file will have the filename of P4000250.WAV.
Let’s see how to make a voice recording for any image on the memory card.
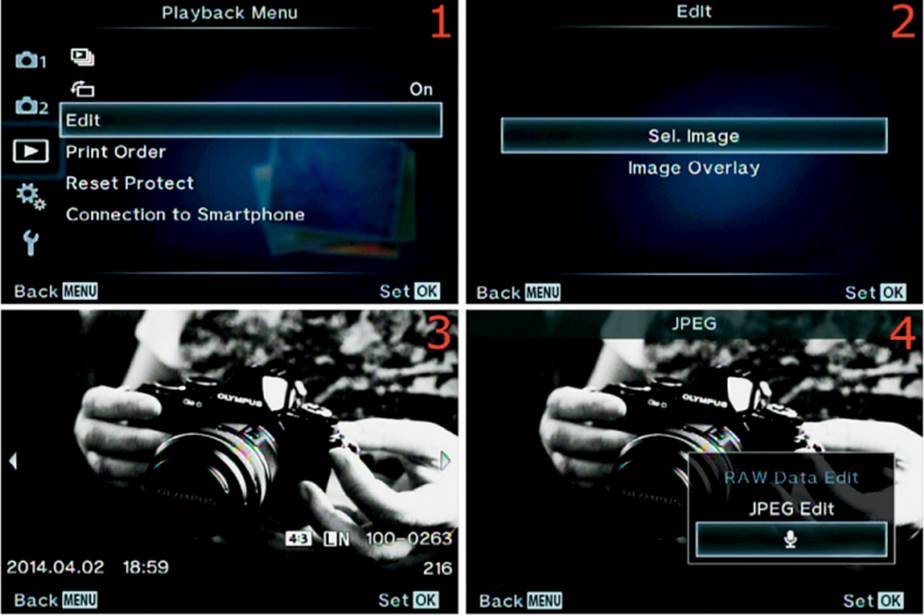
Figure 5.6A: Making a [Voice Annotation] for an individual image
Use these steps to make a [Voice Annotation] for any image you can view on your camera monitor:
1. Select Edit from the Playback Menu and scroll to the right (figure 5.6A, image 1).
2. Choose Sel. Image from the Edit Menu and press the OK button (figure 5.6A, image 2).
3. Images will be displayed on the camera monitor. Use the Arrow pad buttons to scroll back and forth until you find an image to which you want to add a voice annotation (figure 5.6A, image 3). After you have found the image, press the OK button.
4. I chose a JPEG image, and the camera displayed a menu with a speaker symbol, the [Voice Annotation] setting (figure 5.6A, image 4). Highlight it and press the OK button.
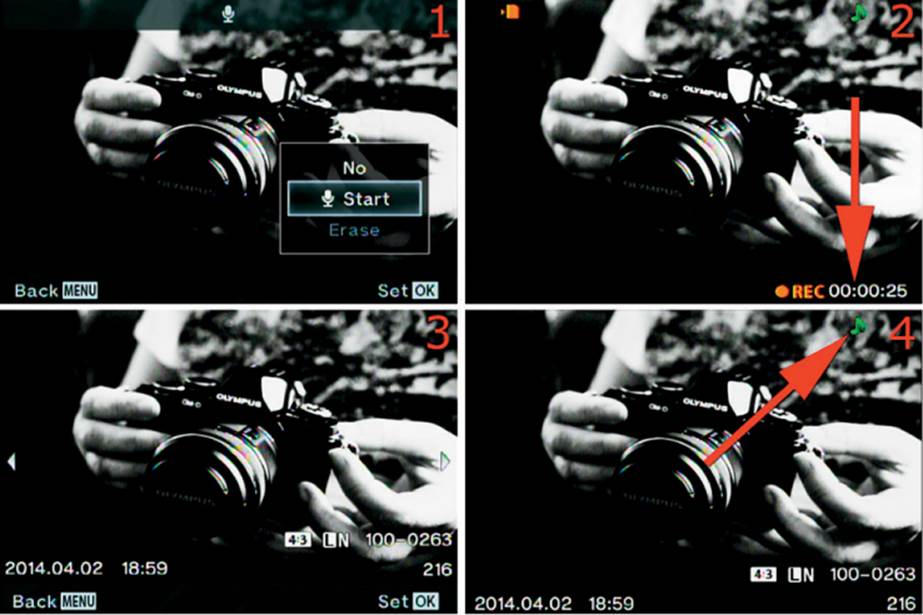
Figure 5.6B: Making the voice recording
5. Figure 5.6B picks up where figure 5.6A leaves off. Now you will record the actual voice annotation. Before you record your voice, you need to know where the Stereo microphone pickups are on your camera so you can talk directly at them for the best reception. Look at the front of your camera, at the Olympus logo on the viewfinder bump. On either side of the bump you will see a small hole. One of them is located just above the E-M1 logo. Each of the holes is a Stereo microphone pickup (left channel and right channel). The best recording will be made if you talk with your mouth near the top of the camera. Just act as if the Hot shoe is a microphone, and your voice will be picked up. In figure 5.6B, image 1, you can see the recording menu that appeared when you completed step 4. Select Start from the menu, and when you are ready to talk press theOK button to start recording.
6. Figure 5.6B, image 2, shows the screen that will be visible while you are recording a voice annotation. A red REC symbol will appear at the bottom of the screen (figure 5.6B, image 2, red arrow) along with a timer. The red card access symbol will blink in the top-left corner of the screen while you make the recording. Even though the timer seems to indicate that you could record for a long time, you are limited to 30 seconds. When you are done recording, press the OK button to stop. If you keep talking longer than 30 seconds, the camera will cut you off.
7. Nothing obvious appears on the screen when you are done making a voice recording. The camera continues to display the image for which you were making the voice annotation (figure 5.6B, image 3). If you want to hear the recording, press the Playback button to the right of the Menu button and the annotation will play back though the Speaker on the back of the camera, just to the right of the Erase button (red garbage can). Note: You can record new voice annotations for different images by pressing the OK button on a new image, selecting the microphone symbol (similar to figure 5.6A, image 4), then starting again at step 5.
8. A green musical note symbol will appear on the camera monitor for any image that has a voice annotation (figure 5.6B, image 4, red arrow). As soon as the camera displays an image with a music note symbol on the monitor, the recording will play. You can adjust the volume by using theArrow pad buttons; up increases the volume, and down decreases it. A volume indicator scale will appear on the right side of the monitor when you adjust the volume.
Settings Recommendation: Recording a voice annotation through the Edit Menu is really the long way around. You can record a voice recording any time you see an image on the camera monitor by pressing the OK button and selecting the [Voice Annotation] microphone symbol (review steps 5–8).
Image Overlay
Image Overlay allows you to take two or three images, vary their transparency, and overlay them into one image. This is an easy way to do something like add a picture of the moon to a nighttime landscape image.
This works differently than Multiple Exposures because there is no Auto Gain function to keep the backgrounds from overwhelming multiple subjects in different parts of the image. Instead you use a transparency adjustment to vary the transparency of each image in the overlay.
The effectiveness of this method will vary greatly depending on how complex the images are. Let’s examine how it works and see how you might use it to combine two or three images.
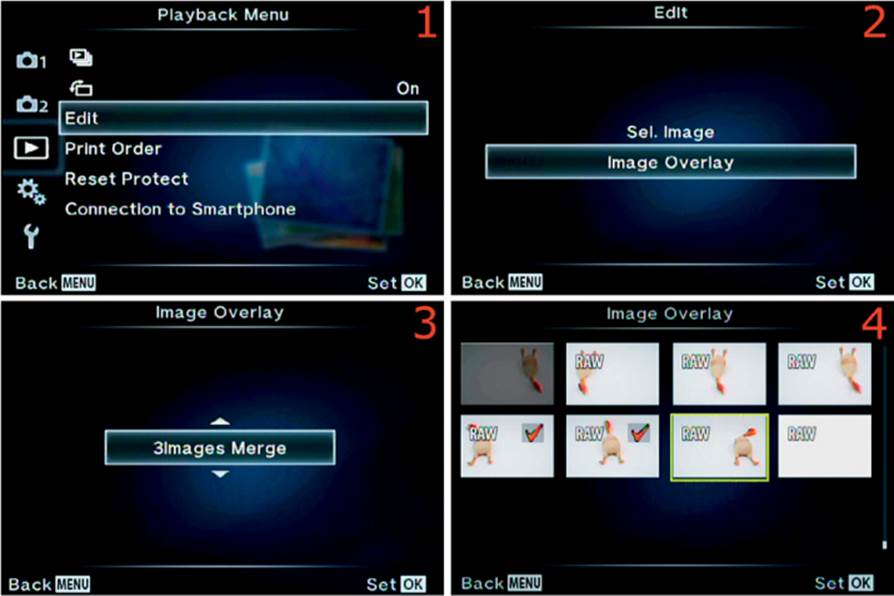
Figure 5.7A: Creating a three-image overlay (first four steps)
Use the following steps to start combining images:
1. Choose Edit from the Playback Menu and scroll to the right (figure 5.7A, image 1).
2. Select Image Overlay from the Edit Menu and press the OK button (figure 5.7A, image 2).
3. Choose 2Images Merge or 3Images Merge from the Image Overlay up/down menu, depending on whether you want to combine two or three images (figure 5.7A, image 3). I chose 3Images Merge.
4. The screen will display images from the memory card. Although it shows both JPEG and RAW images, only RAW images can be selected for overlaying. The word RAW will appear in the top-left corner of each available image. JPEG images are slightly grayed out and cannot be selected (figure 5.7A, image 4). Choose each image you want to use with the green selection frame and press the OK button, which will place a red check mark in the top-right corner of the image. On the bottom row of the rubber chicken images you can see that I have selected two images because they have red check marks. The third image I want to use in the overlay is surrounded by the green selection frame. As soon as you select the final image, the camera will start creating the overlay. You won’t see the check mark for the final image. When the overlay process begins, a Busy screen appears with a progress bar. When the overlay is done, figure 5.7B, image 1, appears.
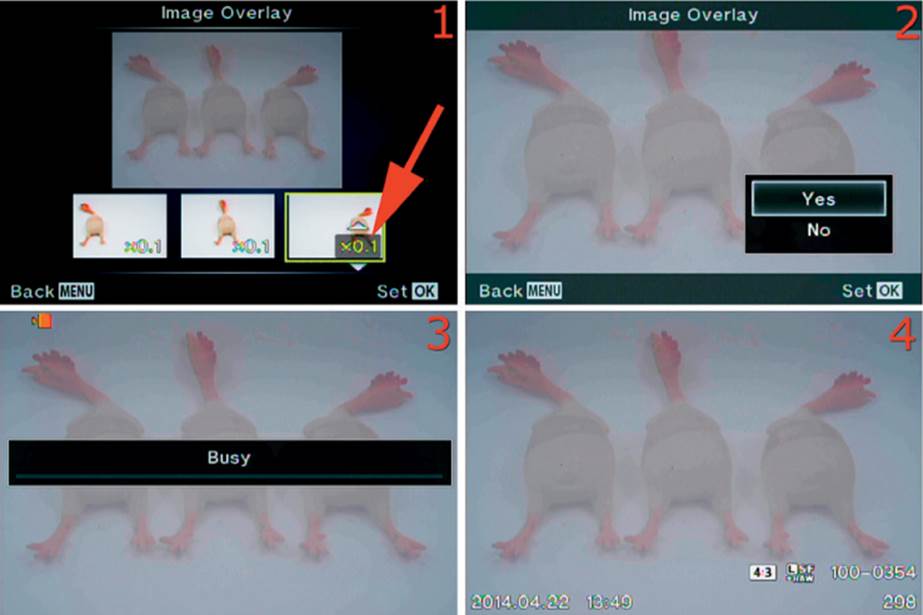
Figure 5.7B: Creating a three-image overlay (final three steps)
5. You will see before and after images on the screen. The after image is the larger one on top, and the before images are on the bottom (figure 5.7B, image 1). The red arrow points to an up/down menu with a range from x0.1 to x2.0. You adjust the transparency of each image with the up and down buttons of the Arrow pad. Each before image has this up/down menu. The range from x0.1 to x2.0 controls the transparency of the corresponding image. You can see that I set each image to the lowest setting of x0.1 so the combined backgrounds do not obscure the chicken. At first I was confused because my after image was pure white, and I couldn’t see any rubber chickens. That’s because each image contains both a chicken and a white background. Each chicken is positioned differently, but in the overlay the backgrounds of the other two images completely hide them. After I lowered the transparency of all the images, the three chickens appeared. Although you see three chickens in the after image, you also see the backgrounds of each one, with the transparency lowered to let the other pictures show through. Note: When you change the transparency level, allow a little time after each change for the camera to respond. It will seem to be locked up and nonresponsive, but the overlay takes a lot of processing power. After you have the transparency adjusted the way you want it on each picture, press the OK button.
6. The camera will display the overlaid image and a menu with Yes and No choices (figure 5.7B, image 2). Choose Yes to finish creating the new JPEG image or No to cancel and start over. Press the OK button.
7. A Busy screen will appear with a progress bar (figure 5.7B, image 3). When it is done, the finished JPEG image will appear, which is saved with a new file name as the last image on the memory card (figure 5.7B, image 4).
Settings Recommendation: The final picture in figure 5.7B, image 4, is not very colorful or useful. You may be able to come up with a better example of how to overlay two or three images than my rubber chicken and white background; however, if you are really into overlaying images, you might want to consider Multiple Exposure for better-looking images. You will need to experiment with Image Overlay and show off some of your creations on this book’s Facebook site:
https://www.facebook.com/groups/ODCPE/
Print Order
When you create a Print Order on your memory card, you can insert the card into a Digital Print Order Format (DPOF) printing device, such as a photo kiosk at a superstore or a DPOF-compatible inkjet printer. The kiosk or printer will then print the order without your camera. If you don’t like to post-process images or work with computers, you can print images without doing much more than inserting a memory card into a compatible printing device. It’s convenient even if you do like computers.
There are three things you need to know about the Print Order function:
• How to print one or several copies of a few selected images on the memory card
• How to print one copy of each image on the memory card
• How to clear a Print Order from the memory card
There can be only one Print Order at a time on a memory card. If you are the curious sort, you will find the Print Order in a folder named MISC on the memory card. The camera creates that folder and saves the Print Order inside it. The Print Order is held in a small file named AUTPRINT.MRK, which can be read by all DPOF-compatible printing devices.
Now, let’s examine each of the Print Order methods.
Selected Image(s) Print Order
This Print Order method lets you scroll through the images on your memory card. As each image is displayed on the camera monitor, you can select the number of prints (up to 10) you want to make for that image. Let’s see how it works.
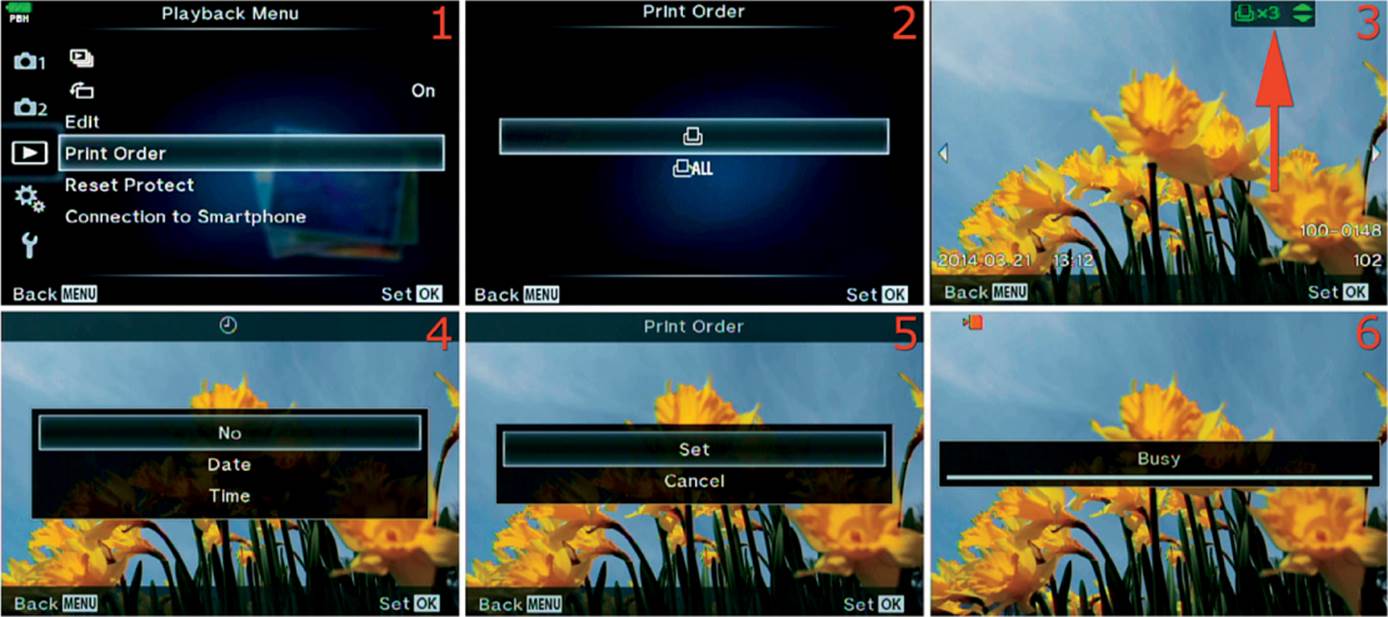
Figure 5.8A: Creating a Print Order for individual images
Use these steps to create a new Print Order for individual images. The upcoming steps assume there is no current Print Order on the memory card. If there is an existing Print Order, you will see an extra screen between images 2 and 3 in figure 5.8A, as we will discuss:
1. Choose Print Order from the Playback Menu and scroll to the right (figure 5.8A, image 1).
2. Select the printer symbol from the Print Order menu to choose how many prints you want for individual images. Press the OK button (figure 5.8A, image 2).
3. If there is an existing Print Order on the memory card, an additional screen will appear. Instead of figure 5.8A, image 3, you will see the screen shown in figure 5.8B, image 3, which allows you to Reset or Keep the current Print Order. If you Reset it, the camera will remove the currentPrint Order. If you Keep it, the camera will start displaying pictures, as seen in figure 5.8A, image 3, and it will leave any current Print Orders intact. In effect, you will update an existing Print Order.
4. Use the adjustable counter to select the number of copies you want of the current picture (figure 5.8A, image 3, red arrow). Scroll up and down with the Arrow pad to select a number from 0 to 10. I selected 3 copies. Scroll left or right to choose other images and select the number of copies you want. Leave any images you do not want printed set to 0. When you have selected the number of copies for each of the images you want to print, press the OK button to lock in the numbers.
5. The camera will now display the Date and Time screen (figure 5.8A, image 4). This allows you to have either the shooting Date or Time written on the print. Select Date for the shooting date, Time for the shooting time, or No for neither. Press the OK button to lock in your choice.
6. The camera will switch to the final Print Order menu where you can Set the order or Cancel it (figure 5.8A, image 5). If you select Set, the camera will display the Busy screen (figure 5.8A, image 6). The progress indicator will advance, and the red card symbol will blink in the top-left corner of the monitor as the camera writes the Print Order to the memory card. If you select Cancel the selections you made will be ignored and the camera will return to the Playback Menu.
If you simply want to clear the Print Order from your memory card, it is a straightforward process, as we will see in the next subsection.
Clearing a Print Order
You may want to remove an old Print Order after you print your images. To do so, use the Print Order Reset function.
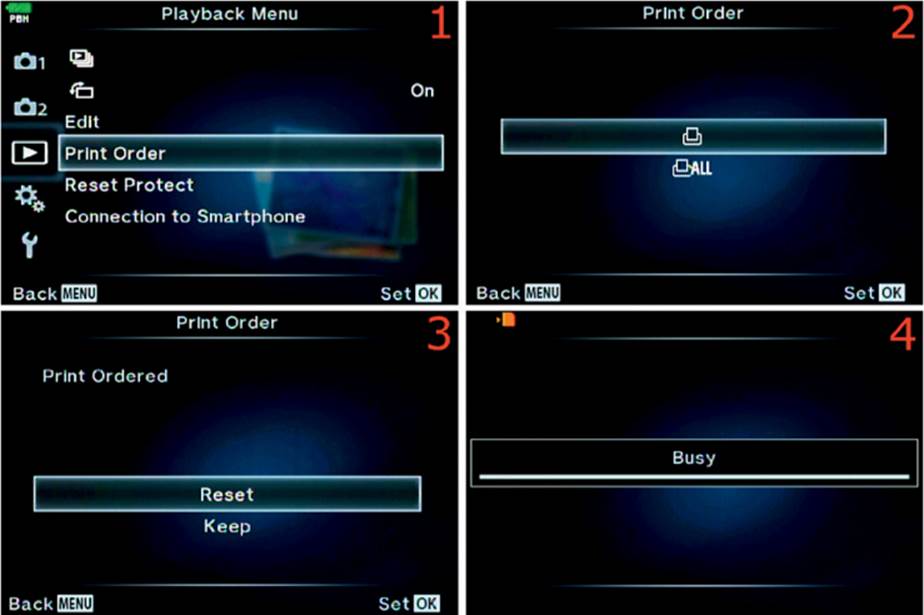
Figure 5.8B: Resetting a Print Order for individual images
Use these steps to clear an old Print Order from a memory card:
1. Choose Print Order from the Playback Menu and scroll to the right (figure 5.8B, image 1).
2. Select either of the two symbols from the Print Order menu. I chose the top symbol for individual images (figure 5.8B, image 2). The following instructions work the same way for the All selection, which we will discuss in the next subsection (All Print Order). Press the OK button with one of the Print Order items selected.
3. You will now have two choices: Reset and Keep (figure 5.8B, image 3). If you select Reset, the camera will immediately reset, or delete, the current Print Order. The Busy progress indicator will show the progress, and the red card activity symbol will flash in the top-left corner of the camera monitor (figure 5.8B, image 4). If you choose Keep, the camera will leave the existing Print Order on the memory card and return to the images in the existing Print Order, with the number of copies you selected, so you can make modifications.
Now, let’s see how to select a Print Order in which every image on the card is set to print one copy.
All Print Order
All Print Order allows you to create a Print Order that will cause a DPOF printing device to make one copy of each image. After we explore how this works, we’ll take a look at how you can have the camera print more than one copy of selected pictures and one copy of the rest of the pictures.
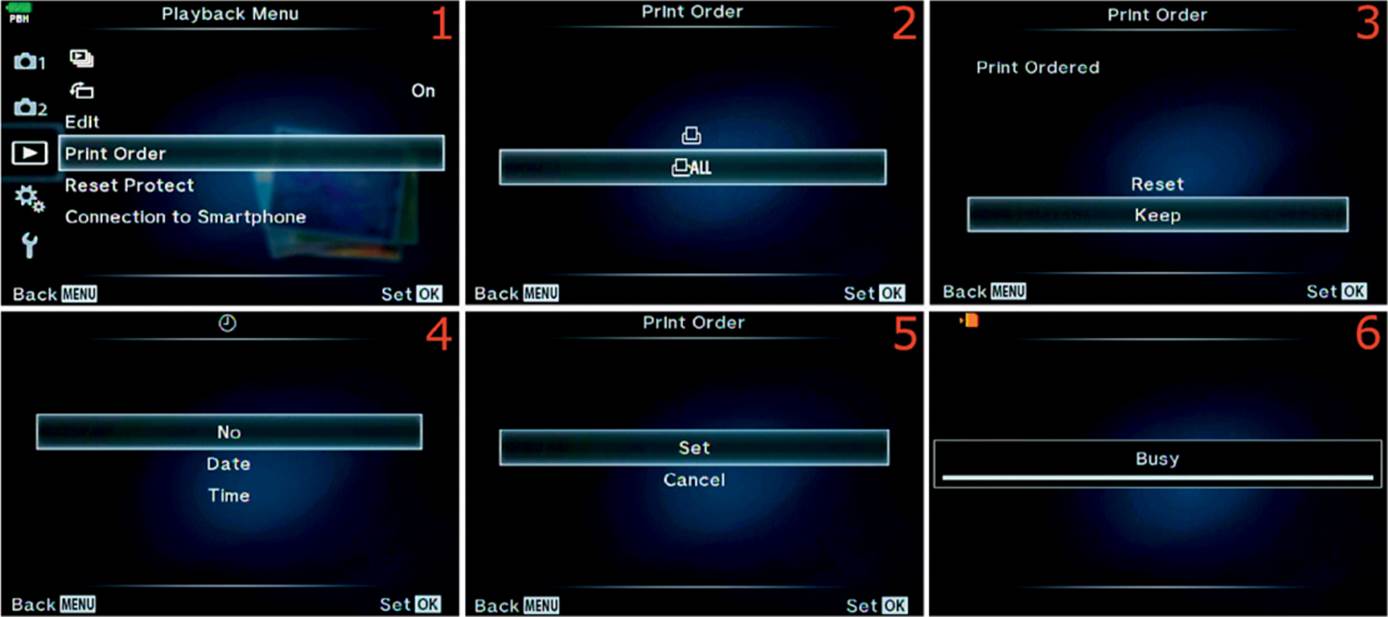
Figure 5.8C: Create or Reset a Print Order for all images
1. Choose Print Order from the Playback Menu and scroll to the right (figure 5.8C, image 1).
2. Select the bottom symbol from the Print Order menu. It looks like a printer with the word All after it. This will cause one copy of each image on the memory card to be printed. Press the OK button (figure 5.8C, image 2).
3. The screen shown in figure 5.8C, image 3, will not appear if there are no existing Print Orders on the memory card. If you are like me, you will forget to remove the last Print Order you created. Carefully read and understand this step through step 5 if you want to Keep an existing Print Order. If there is an old Print Order on the memory card, the screen shown in image 3 will appear and you will need to choose either Reset or Keep. Choosing Reset will immediately delete the old Print Order. Choosing Keep will leave the old Print Order in place only if you select Cancelin step 5 (figure 5.8C, image 5). Otherwise, it makes absolutely no difference whether you choose Reset or Keep, the old Print Order will be deleted anyway.
4. If you are creating a new Print Order you can choose whether a Date or Time stamp is applied to the printed image (figure 5.8C, image 4). If you selected Keep in the previous screen to prevent the deletion of the old Print Order, just select No and press the OK button to move forward—there is no point in selecting a Date or Time stamp because you must press Cancel in the next step to Keep an existing Print Order.
5. Pay careful attention here so you don’t lose the old Print Order you want to Keep. If you select Set the camera will merrily overwrite the Print Order you told it to Keep in step 3. Selecting Set always recreates the Print Order with one copy selected for each image. Select Cancel if you are working with an existing Print Order that you want to Keep, or select Set if you want to create a new one. You will see a Busy screen and a progress bar if you create a new Print Order (figure 5.8C, image 6). The Busy screen will show the progress of the images being marked for printing. When the Print Order has been created the camera will return to the Playback Menu.
The circular logic of these last few steps is quite confusing. It is a rather weak screen-flow design, in my opinion. Instead of continuing when you selected Keep in figure 5.8C, image 3, the camera should simply exit the screens and go back to the images on the monitor, with the number of copies still in place, so you can make direct modifications to the Print Order you decided to Keep. That is the way it works for individual images as described in the Selected Image(s) Print Order subsection.
Increasing the Number of Copies on a Few Images in an All Print Order
As you know, an All Print Order sets the number of printed copies to 1 for each image on the memory card. But what if you want more than 1 printed copy of a few images and 1 printed copy of the rest? I found a way to increase the number of copies to more than 1 for selected images within the All Print Order. Here’s how.
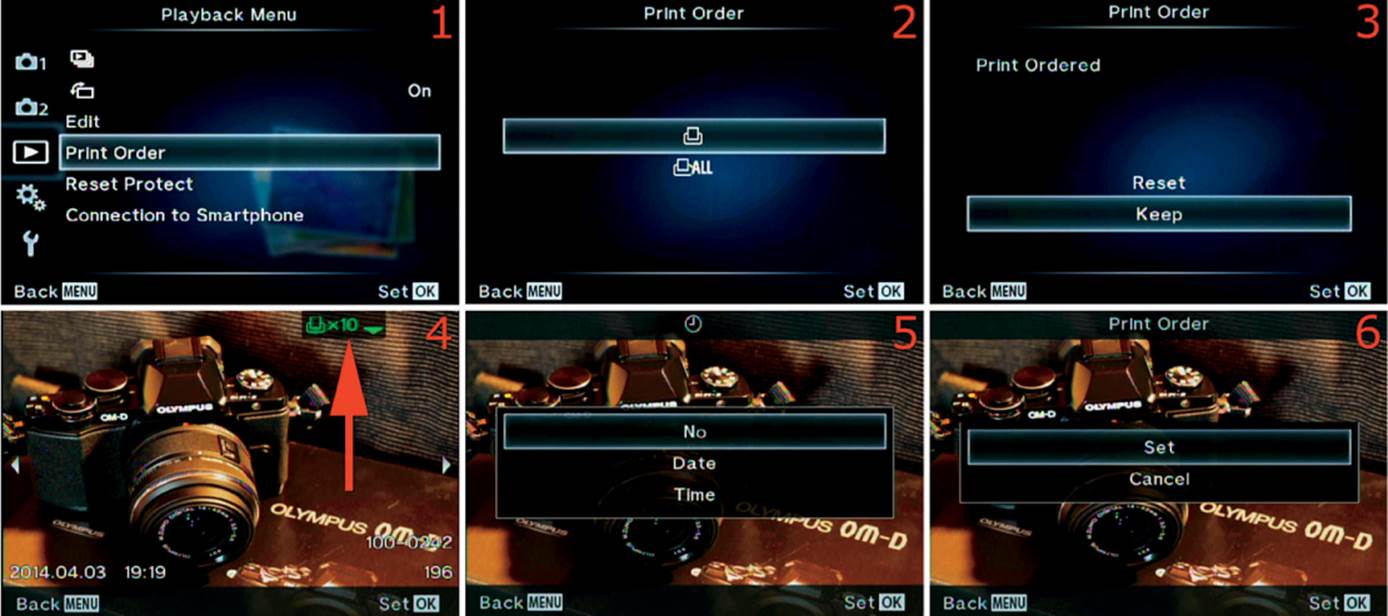
Figure 5.8D: Increasing the print count for a few images in an All Print Order
1. First you must create a new All Print Order by using the steps accompanying figure 5.8C. The next few steps assume that a new All Print Order is on the card with 1 selected as the print count for each image on the memory card.
2. Choose Print Order from the Playback Menu and scroll to the right (figure 5.8D, image 1).
3. Select the top symbol from the Print Order menu, which allows you to select the number of copies for individual images. Press the OK button (figure 5.8D, image 2).
4. Select Keep from the Print Order menu (figure 5.8D, image 3). Press the OK button to continue. You have just told the camera that you want to keep the All Print Order you created in step 1. Now, we will modify it!
5. The camera will display the images that are currently on the memory card, and each of them will have the number of printed copies set to 1 because we are looking at the results of an All Print Order. Scroll back and forth with the Arrow pad keys until you find an image for which you want to increase the number of printed copies. I chose a picture I took of my new Olympus E-M10. I want 10 copies of this image, so I increased the print count to 10 by scrolling up on the Arrow pad (figure 5.8D, image 4). You can keep scrolling back and forth to find other images you want more prints of and increase the numbers. When you are done increasing the numbers, press the OK button to modify the All Print Order. Now you will get one copy of most of the images, and you’ll get the number of copies you chose for the rest of the images.
6. On the Date and Time stamp screen, choose Date, Time, or No (neither) and press the OK button (figure 5.8D, image 5).
7. The final screen allows you to modify the existing All Print Order and make extra copies of a few images. Select Set and press the OK button (figure 5.8D, image 6). The camera will show the Busy screen progress indicator with a flashing red card icon in the top-left corner. When it’s done, the card is ready to insert into a DPOF-compatible device to print your custom All Print Order. Press Cancel and the OK button to cancel the process.
Settings Recommendation: Print Orders can be quite useful in some circumstances. You may want to print a few images, so you create a Selected Image(s) Print Order and make your prints. Or you may have shot an event and would like to deliver the images to your client so they can have them printed right away. You could create an All Print Order (and modify it if necessary) and then give the memory card to your client. They can go straight to a DPOF printing device and plug in the memory card. The DPOF device will do the rest.
Reset Protect
You can set an image protection lock on any of the images on a memory card, and Reset Protect cancels the protection lock.
Adding Image Protection
When you press the OK button while you view an image on the camera monitor, you will see a menu for editing that image. The menu has a key symbol, which means you can add protection to an image.
After you apply protection, the image will be displayed with a green key (lock) symbol, then it won’t be deleted during an All Erase operation (Shooting Menu 1 > Card Setup > All Erase). We discussed image protection in the chapter titled Screen Displays for Camera Control, on page 84, under the subheading Protecting Images. For more information on adding protection, please review that subheading.
It’s easy to remove image protection, as we’ll see in the next subsection.
Removing Image Protection
To remove image protection, you simply choose Reset Protect from the Playback Menu and answer Yes to the query.
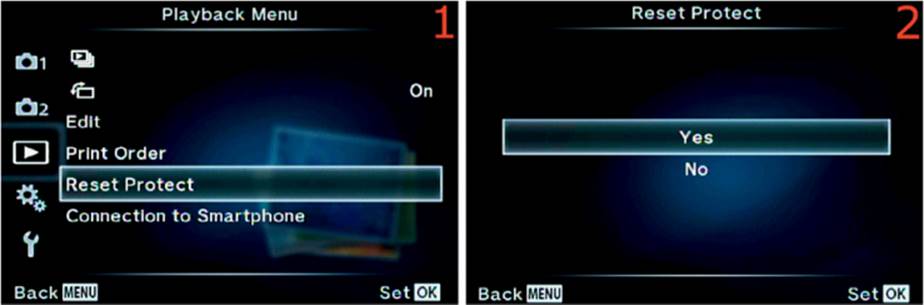
Figure 5.9: Removing image protection with Reset Protect
Use the following steps to remove image protection from all protected images on the memory card:
1. Select Reset Protect from the Playback Menu and scroll to the right (figure 5.9, image 1).
2. A menu with Yes and No choices will appear (figure 5.9, image 2). Choose Yes to reset the image protection or No to cancel.
3. Press the OK button to remove protection. A Busy screen with a progress bar will appear briefly, then the camera will return to the main screen of the Playback menu.
Settings Recommendation: This function resets all protected images at the same time. If that is too drastic, you can remove protection from individual images by following these steps:
1. Display an image with the green key protection symbol on the monitor.
2. Press the OK button and select the key symbol from the menu.
3. Scroll up or down with the Arrow pad until the green key symbol disappears.
4. Press the OK button to remove the protection.
This process is the opposite of adding protection. Adding protection is discussed in the chapter titled Screen Displays for Camera Control, on page 84.
Connection to Smartphone (or Tablet)
The E-M1 has a powerful feature that relatively few cameras have—the ability to become a Wi-Fi wireless access point. That means the camera can wirelessly communicate with your smartphone or tablet, which I’ll refer to collectively as a smart device.
You can use the screen of your smart device as a remote monitor and control the camera directly from the device. You can also transfer images wirelessly to your smart device for immediate use on social media sites, blogs, and websites.
There is a free Olympus app for both iOS (iPhone and iPad) and Android devices. Do a search for “Olympus Image Share” in your app store and download it to your smart device before you proceed with this section.
There are two parts to communicating with a smart device. First you must enable Wi-Fi on the camera, then you must create a relationship between the camera and the device. Let’s examine the process.
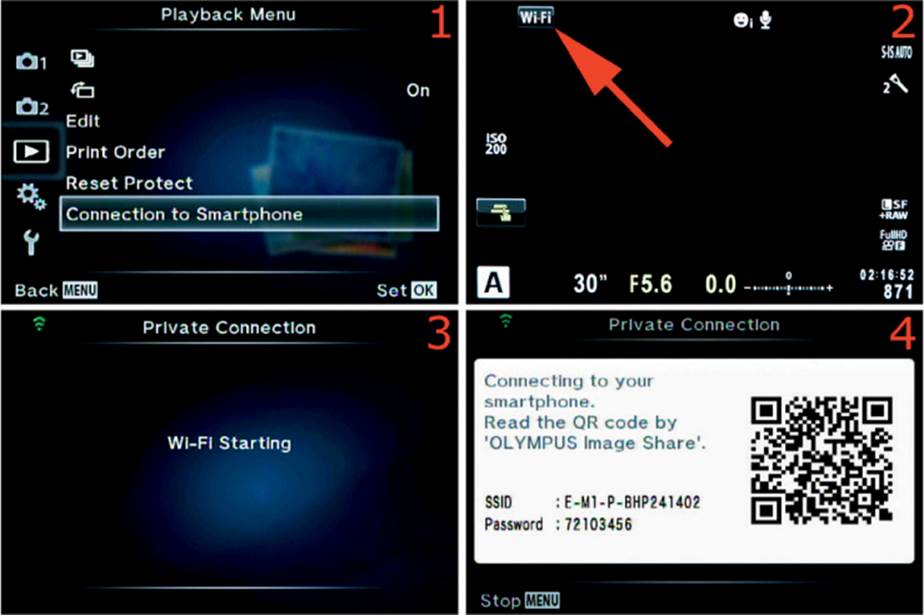
Figure 5.10A: Making a Wi-Fi connection to your smart device
Use the following steps to connect your camera to the Olympus Image Share (OI.Share) app:
1. Figure 5.10A, images 1 and 2, show two entry points to the Wi-Fi system. You will not see image 2 unless you are accessing the Wi-Fi system from the Live View screen instead of the Playback Menu. However, I wanted to show the alternate entry point (image 2, red arrow) so you can access it if you want to. You can touch the Wi-Fi icon on the touch screen, or you can select Connection to Smartphone on the Playback Menu and scroll to the right. Either one of these screens will take you to the screen in image 3.
2. Figure 5.10A, image 3, shows that Wi-Fi is in the process of activating. The green Wi-Fi broadcast symbol in the upper-left corner of image 3 will blink while Wi-Fi is starting up.
3. When Wi-Fi is active, you will see the screen shown in figure 5.10A, image 4. This screen contains all the information you need to connect your camera and your smart device. It even includes a QR code that the Olympus Image Share app can scan and use to connect with your camera.
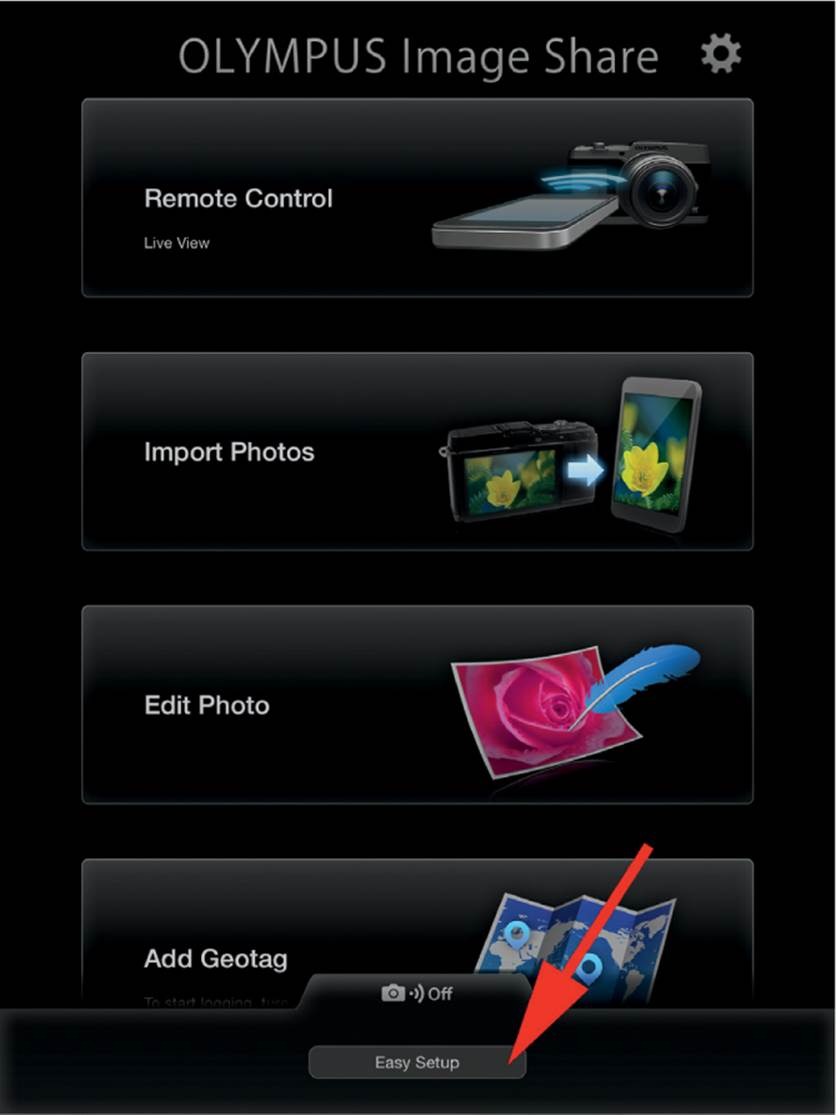
Figure 5.10B: Olympus Image Share setup
4. Figure 5.10B shows the main screen of the Olympus Image Share app on an iPad. Touch the bottom tab that has a camera symbol and Off, then touch the Easy Setup button (red arrow). The app will walk you through the process of scanning the QR code on the camera monitor, creating a profile on your smart device, and using the app.
Note: Within the camera’s Setup Menu is another menu called Wi-Fi Settings (see the chapter Setup Menu, on page 459, under the heading Wi-Fi Settings). Within the Wi-Fi Settings menu you can change the connection type and password, reset the share order, and completely reset the camera’s Wi-Fi settings.
Settings Recommendation: The Olympus Image Share app is great for controlling your camera. However, it is beyond the scope of this book to describe its many functions. That would take an extra chapter!
You can control many camera settings from within the app, including the shutter speed, aperture, exposure compensation, ISO, white balance, and shutter-release mode. Plus you can import your photos, edit them on your smart device, and even add a geotag (GPS information) to the pictures. You can also take pictures remotely by using the larger screen on your smart device.
There are many YouTube videos that demonstrate how to make a connection between the camera and a smart device. Do a YouTube search on the words “Olympus Image Share” to find literally thousands of how-to videos. Most people don’t have trouble making the connection because it is a fairly automated process. But if you do have problems, there are easily accessible resources.
Also, you can stop by the Facebook page for this book and discuss any problems you have in creating a connection between the camera and app:
https://www.facebook.com/groups/ODCPE/
Author’s Conclusions
This chapter covered different ways you can view and use images from your Olympus E-M1.
Our next chapter, Custom Menu, covers the dozens of functions you can customize on this camera. It is a primary reference chapter for many of the settings you will use when you configure buttons and dials on the camera. Although there are a lot of functions, you will be a master of your camera if you take time to carefully study the chapter.
Now, let’s customize our cameras!
All materials on the site are licensed Creative Commons Attribution-Sharealike 3.0 Unported CC BY-SA 3.0 & GNU Free Documentation License (GFDL)
If you are the copyright holder of any material contained on our site and intend to remove it, please contact our site administrator for approval.
© 2016-2026 All site design rights belong to S.Y.A.