3D Printing with SketchUp (2014)
Chapter 1. Concepts Every 3D Printing Designer Needs to Know
The 3D printer is a favorite tool among product designers. With a 3D printer often placed in the same room as the designer, rapid feedback and faster design cycles make it a staple in large companies. But corporations are not the only ones making use of this increasingly popular technology. Individuals are also increasingly using 3D printing for work and play.
Where does the attraction to 3D printing come from? Speed and automation of manufacturing, accessibility to the masses, and increased complexity of designs are some of the reasons.
The hardest part of the 3D printing process is making a 3D printable model. 3D printers automate the build process once a 3D model is complete. It's easy to buy a printer, but it's much more difficult to make or find good quality models.
Why should you learn how to design for 3D printing? Good designers charge $50 per hour and up, with complex designs taking dozens or hundreds of hours, so learning how to model can save you lots of cash if you're developing a model to print. Alternatively, 3D modeling is a skill you can contract out to produce models for others.
When designing for 3D printing, it is essential that you understand how the process works so that your designs actually work in the printer. Although 3D printers can make very complex models, those models must meet a specific criteria to be printable.
In this chapter, we'll discover what 3D printing is, how it works, who uses the technology, when it makes sense to use 3D printing, and why SketchUp is a good tool for the job.
A short background of 3D printing
What is 3D printing? 3D printing is a common term for a manufacturing process where parts are made by adding layers of material one upon other to form the final product. The process was developed in the 1980s, and is commonly known in the commercial industry as additive manufacturing or rapid prototyping. Prototyping is the process of creating a product by improving on a series of designs. Each change in the design is called an iteration.
Commercial 3D printers come with hefty price tags ranging from $20,000 to over $1 million. With the recent expiration of some 3D printing patents, hobbyists have developed small, open source 3D printers. These machines, called desktop 3D printers, are cheap enough to allow individuals to own and operate them, which has led to an explosion in both sales of the machines and interest in 3D printing in general.
The 3D printing process
A basic overview of the 3D printing process is as follows:
1. A 3D model is created with a computer program such as SketchUp.
2. The 3D model is exported to a format that a slicing program can read, usually Stereolithography (.STL).
3. The STL file is loaded into the slicing program that creates instructions (g-code) so that the printer knows how to make the model.
4. The printer builds the model, layer upon layer.
5. There may or may not be post processing necessary to finish the model.
3D printing can be compared to 2D printing in some ways. In both types of printing, a printhead moves back and forth across a printbed, depositing material. The difference in 3D printing is that the material has thickness and is repeated layer upon layer. Another similarity is print resolution. In 2D printing, this is described as dots per inch (DPI), whereas in 3D printing this is typically measured in fractions of millimeters or microns. Often 3D printers have settings to print higher or lower resolutions.
There are many different 3D printing processes, including plastic filament extrusion or fused filament fabrication (FFF), hardening liquid resin polymers, powder-based systems, and lost wax casting from 3D printed wax models. While there are more technologies, these are the most common at this point.
Watching videos of different 3D printing processes is one of the best ways to understand how the process is unique for each material. I've curated a few of the most popular kinds of processes at http://www.denali3ddesign.com/video-guide-to-3d-printing-technologies/.
Printing support material
An important function of 3D printing is support material that allows for the printing of overhangs. Commercial printers have a system built into the machine for support material. Support material can be uncured powder in the case of power-based machines, or a separate soluble material printed simultaneously in the case of FFF and other machines. Desktop printers are usually limited to printing supports out of the same material as the rest of the print, or applying workarounds that eliminate the need for support material.
In the following figure, you can clearly see the need for support material in the overhanging layers, where the material would otherwise be hanging over open space:
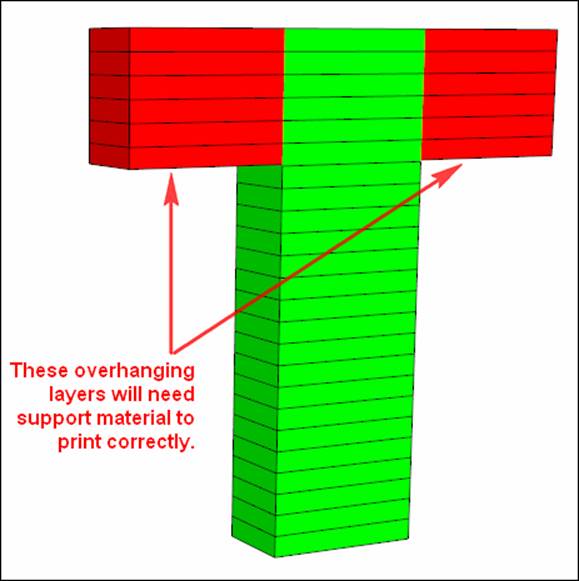
During the design phase, you should think about support material—whether it is necessary and how it can be removed. For example, printing a hollow box with a powder printer will mean designing escape holes for the uncured support powder inside; however, with FFF, escape holes aren't necessary. Often a small tweak in the design phase will make for a much better final print.
Own a printer or use a print service?
While it really depends on the situation, I'm in favor of using a print service for most folks, especially beginners. The following are the reasons:
· Quality is the biggest reason. Print services generally use commercial printers with finishes much better than the typical desktop printer. These services also offer post processing such as polishing or dying the parts with commercial grade equipment.
· Owning a printer also means an upfront investment in equipment and supplies. Much like computers, the technology is improving quickly, so in a few years your system may be outdated and you'll want to purchase a new one. With a print service, somebody else is investing their money, so you just have to pay for the finished parts.
· Print services offer a range of materials and finishes for each material, ranging from metal to plastic and ceramics. Each of these materials has its own set of equipment to maintain and supplies to have on hand, which is too costly for an individual.
· Consumer printers have a high learning curve compared to commercial printers. Desktop printers, especially those built from kits, are notoriously hard to maintain. To get good prints, printers need to be calibrated correctly, a time-consuming process.
On the other hand, the following are some very appealing reasons to own and operate a desktop printer:
· Although not for everyone, building a printer from a kit of parts holds outstanding educational value in learning how electromechanical systems work and how to maintain your printer.
· There are two major advantages to owning a printer, time being the big one. If you're developing a product, your cycle will move fastest if you have a printer in your office. You can walk over in a few hours and pick up your print rather than waiting several days or weeks to receive a part in the mail.
· If you have enough print volume, the overall part cost is also going to be as much as 95 percent cheaper on your desktop printer. Commercial machines are expensive to operate, and when you buy parts from a print service, you're paying for the cost of the printer as well as human labor to make that part.
Perhaps the best option, if your budget allows, is to prototype parts on your own desktop printer, and then use a print service for final, high quality parts. In this way you get the best of both worlds.
Making the most of 3D printing
In what situations does it make sense to use 3D printing technology? Here are a few examples of how people are successfully using 3D printing:
· Inventors use 3D printers to rapidly create prototypes for testing. When you can print an idea and test it a few hours later, your design cycle improves, which helps to get the product to market faster.
· Inventors may also sell 3D prints as finished products before mass-producing. The Glif is a great case study of a design team that 3D printed their first batch of iPhone-to-tripod adapters. (http://www.therussiansusedapencil.com/post/2794775825/idea-to-market-in-5-months-making-the-glif).
· Designers can use a 3D print service to make and sell their designs online. This works well because you can focus on making more designs, and let somebody else take care of producing and distributing the finished products. Bathsheba Grossman is a great case study of an artist using a print service for manufacturing and selling her designs online (http://www.bathsheba.com/).
· Hard-to-find replacement parts can be made with 3D printing. Some examples are old architectural hardware, antique car parts, and obsolete equipment. This case study explains how a landlord saved hundreds of dollars by printing window parts that are not manufactured any longer (http://www.denali3ddesign.com/landlord-3d-printing-replacement-window-parts/).
Designing for prototypes versus finished products
When modeling for 3D printing, there are two ways to approach the design—either you'll be prototyping before traditional manufacturing or designing products specifically for 3D printing and ready-to-use right out of the printer.
If you design for prototyping before traditional manufacturing such as injection molding, then you'll want to design as per the injection modeling guidelines and find a 3D printing technology to fit the specifications of your model. Do not change the design to accommodate a specific 3D printing process, but rather look for a 3D printing process that will meet your prototyping needs.
If you are designing specifically for 3D printing, then you must understand and design around the specific requirements for the material of your choice. For example, in SLS printing, no details smaller than 0.2 mm will show on your model, but for 3D printed ceramic, details must be larger than 2 mm. This is important to know, because if you're printing the same model in different materials, you may need to tweak the design for each material.
If using a 3D print service, look for guidelines on their website that describe how to design for each material. Alternatively, if operating a printer yourself, find the manufacturer's guidelines for model specifications.
Avoiding the pitfalls of 3D printing
I have already mentioned some advantages of 3D printing in one of the previous sections. While 3D printers can make very complex objects with ease, they're not the best solution in other cases for the following few reasons:
· No efficiency gain when making multiple prints of the same model
· It's expensive for parts larger than your hand, particularly on industrial printers
· There is often a lot of hands-on processing of the design, both in the CAD design as well as finishing off the part
· The range of materials is very limited compared to standard manufacturing
Let's discuss these points in more detail. 3D printing is expensive compared to mass manufactured parts (but not compared to one-off or hand-made parts). This is because each part takes just as long to make as the last—there is no time gained by making 50 parts versus just one part.
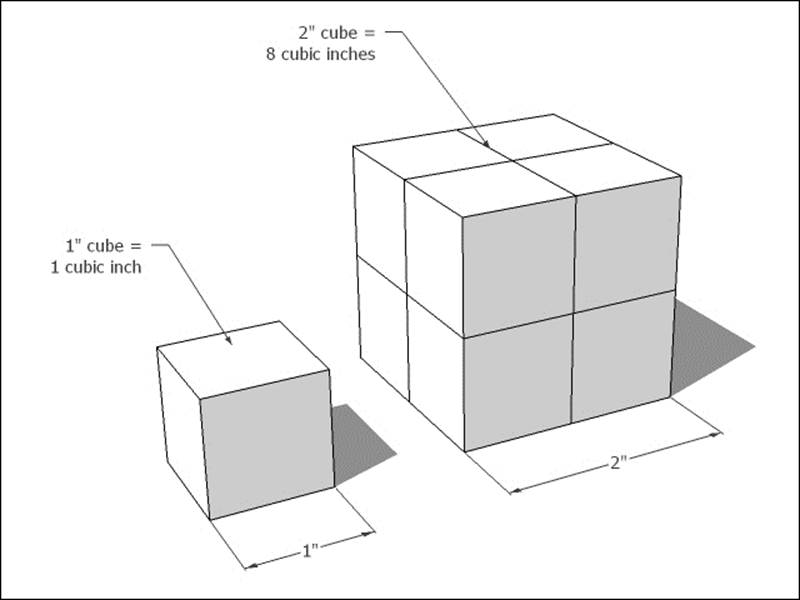
When doubling the size of a 3D print, you're actually increasing the time to print as well as the volume of the material by eight times. This increases the cost exponentially. For this reason, you'll often see light, airy, almost skeletal designs for 3D printing, as these decrease the volume of material needed. Creating holes in your design makes the part cheaper to print.
You can also print lower resolutions for thicker layer heights and a faster print, or higher resolutions for thinner, more detailed layers. Making each layer thinner increases the overall number of layers printed. Similar to increasing the size of a print, print time increases when printing a model at higher resolutions.
Visible layer lines are a fact of life with 3D prints. However, it is possible to get a smooth finish on your 3D printed part with some post processing work. Depending on the material, it may be tumbled, sanded, painted, or otherwise worked. This is typically done by hand—a time-consuming process.
Currently, nearly all printers just use one material. This means that if you need multiple materials in one print, you'll have to print them separately and assemble them later. Many materials are not compatible with 3D printing processes, limiting your choices even further.
Choosing a 3D modeling program
There are dozens of 3D modeling programs available, some are free while others cost thousands of dollars. Why use SketchUp?
SketchUp Make is free for non-commercial use, is easy to learn, has a great community of users that you can ask for personalized help, and is customizable through its extensions system. Concepts learned in SketchUp are transferrable if you decide to move on to another modeling program.
SketchUp works best on rectilinear and geometric-type models, but not as well on curvy, organic models. For these kinds of designs, there are tools better suited to the task.
This book is meant to instruct you in how to use SketchUp specifically for 3D printing, but will teach little general SketchUp modeling. If you're new to SketchUp, I recommend SketchUp's own video training series that are available athttp://www.sketchup.com/learn/videos, or refer to Google SketchUp 8 for Dummies, Aidan Chopra, December, 2010, or the website http://www.go-2-school.com/, in addition to using this book for the specifics of 3D printing.
Summary
3D printing is a fantastic new technology that takes many forms. Knowledge of these technologies is imperative to help you choose the right one for your application. Desktop and commercial printers work very differently and each has its own benefits. Use each for its own advantages.
You must understand the limitations of the technology, and play to its strengths. You wouldn't use a 3D printer to mass manufacture full size cars (yet), just as it's not feasible to manufacture customized phone cases with traditional methods.
Learn about the specifications of your chosen printer/material. Design your model around those specs. SketchUp is a good general purpose modeling tool, but it's not the only one. Learn about other modeling programs, and use the one that best fits your needs.
In the next chapter, you'll learn how to set up SketchUp for 3D printing success.