3D Printing with SketchUp (2014)
Chapter 2. Setting Up SketchUp for 3D Printing
In this chapter, we'll install SketchUp and learn the settings that will make modeling for 3D printing faster and easier. We'll learn about SketchUp extensions, which are essential add-ons for the work we'll be doing.
Downloading and installing SketchUp
SketchUp works on both Windows and Mac, and comes in a free version called SketchUp Make, or a commercial-use version called SketchUp Pro. To download, go to www.sketchup.com. You'll be asked how you plan to use the program, either for personal, commercial, or educational use, and then will be directed to a page to download SketchUp. Make, which is excellent for designing 3D-printable models for non-commercial use, comes with an 8-hour trial version of Pro.
This book uses commands and screenshots from SketchUp 2014 for Windows. Commands in earlier or later versions of SketchUp and SketchUp for Mac may vary slightly from those shown in the screenshots and written commands. All of the exercises in this book can be completed with either SketchUp Make or SketchUp Pro.
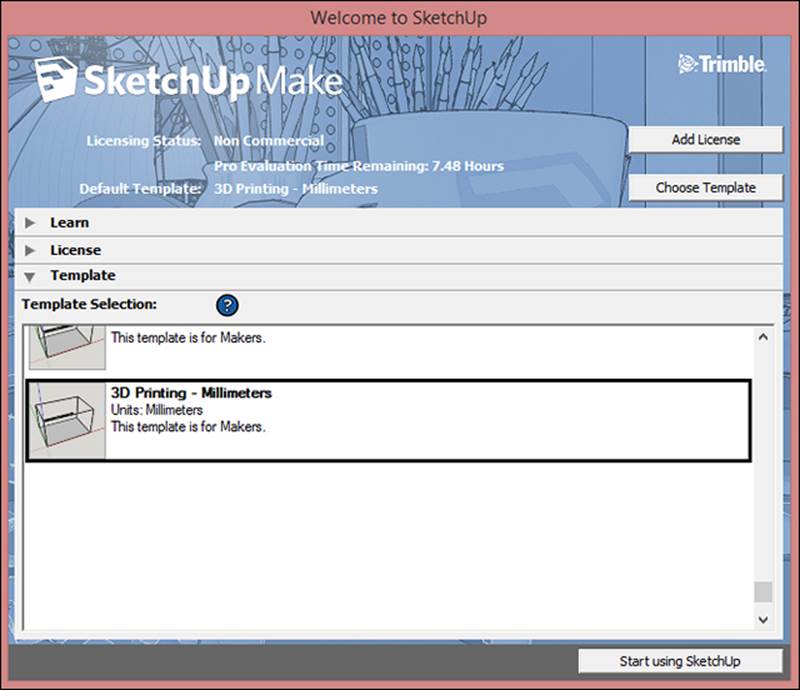
Once you've installed the program and opened it, you'll see a splash screen where you'll need to choose a default template as shown in the following screenshot. Scroll to the bottom of the list and choose the 3D Printing – Millimeters template. After the first time, you won't need to choose a template again, but you will see the splash screen every time SketchUp opens unless you purchase a Pro license:
The SketchUp interface
When opening SketchUp for the first time, you'll see a screen similar to the one shown in the following screenshot:
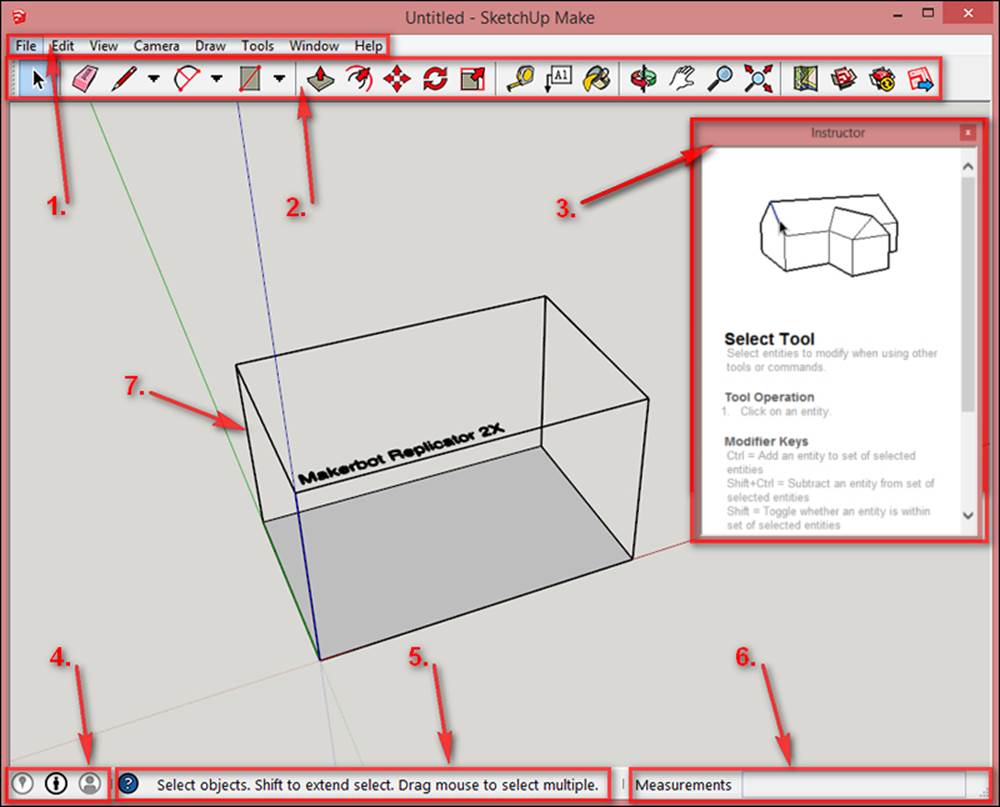
The interface is simple, yet is able to show all the information you need. Let's walk through each of the elements in more detail:
· Menu bar highlighted as (1): This is your command center, where you can access every tool and command in the program.
· Toolbar highlighted as (2): This is the Getting Started toolbar. There are many more toolbars, and they can be placed around the screen wherever you like.
· Dialog box highlighted as (3): This is Instructor, which shows you what each tool does as you choose it. There are more dialog boxes available in the Windows menu.
· Shortcuts highlighted as (4): This is a mini toolbar to various dialog boxes. You cannot move this toolbar.
· Status bar highlighted as (5): This area provides you with hints about how to use the active tool with modifier keys. Many tools in SketchUp use modifier keys, such as Shift, Ctrl, or Command (Mac), and Alt or Option (Mac) to extend the functionality of the tool. It's a good idea to keep an eye on this area, especially if you're a beginner.
· Value Control Box (VCB) highlighted as (6): Also called the Measurements toolbar, this provides you with measurement information about the current operation, and shows certain commands as you're typing. You don't click on it, only watch what's happening in it.
· 3D Printer Build Volume highlighted as (7): This area is new to SketchUp 2014 in the 3D Printing templates. It is a dynamic component that you can adjust to show the build area of the machine that will be printing your model.
· The drawing area: The rest of the window is dominated by the drawing area. This is where all the modeling action happens!
Setting up a template for fast modeling and troubleshooting
Templates allow you to save settings in your model and quickly access them later. Styles in SketchUp affect how your model looks on the screen, and are included in templates. With styles, you can add shadows, different color backgrounds, and line weights. While the settings are useful for presenting architectural models, they don't really help while modeling for 3D printing. Even worse, they make SketchUp run slower because the computer has to work harder displaying those extra visuals.
Style settings can be found by navigating to Window | Styles. Play around with different styles to see how they change the look of the model. The 3D Printing template that we chose when starting SketchUp has good settings such as a plain background and shadows turned off, but let's tweak it to help with troubleshooting. In the Styles dialog box, choose Default Styles, then 3D Printing Style.
Click on the Edit tab in the Styles dialog box, then click on the Face Settings tab, then click on the box beside Back color as shown in the following screenshot:
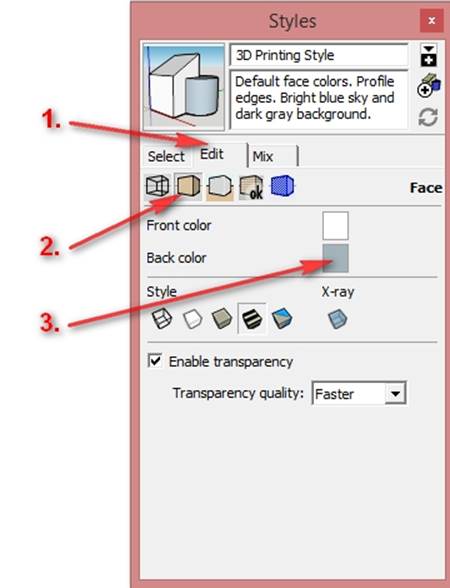
In the window that pops up, choose a nice bright color, say, orange. What this does is make it easy to differentiate front and back faces while modeling. This is important because all faces in SketchUp have a front side and a back side. The faces need to be oriented with the front faces pointing out, and all the back faces pointing inside, or the model will not print correctly.
Tip
Changing the back face to a bright color will allow you to see reversed faces easily, so you can fix them with a simple right-click on the screen and clicking on Reverse Faces.
Click on the Update Style with changes button at the top right of the Styles dialog box, and then close the Styles window.
Using the 3D printer's build volume component
The 3D printer build volume model included with the 3D printing templates in SketchUp 2014 gives you a visual representation of the 3D printer's build platform so that you can ensure that your model will fit in the printer properly. The build volume model is a dynamic component—a special model whose measurements you can define via the Component Options (or Component Attributes if you're using SketchUp Pro) dialog box.
This model will be especially useful if you have a desktop printer. If you're using a print service, you may wish to delete this component.
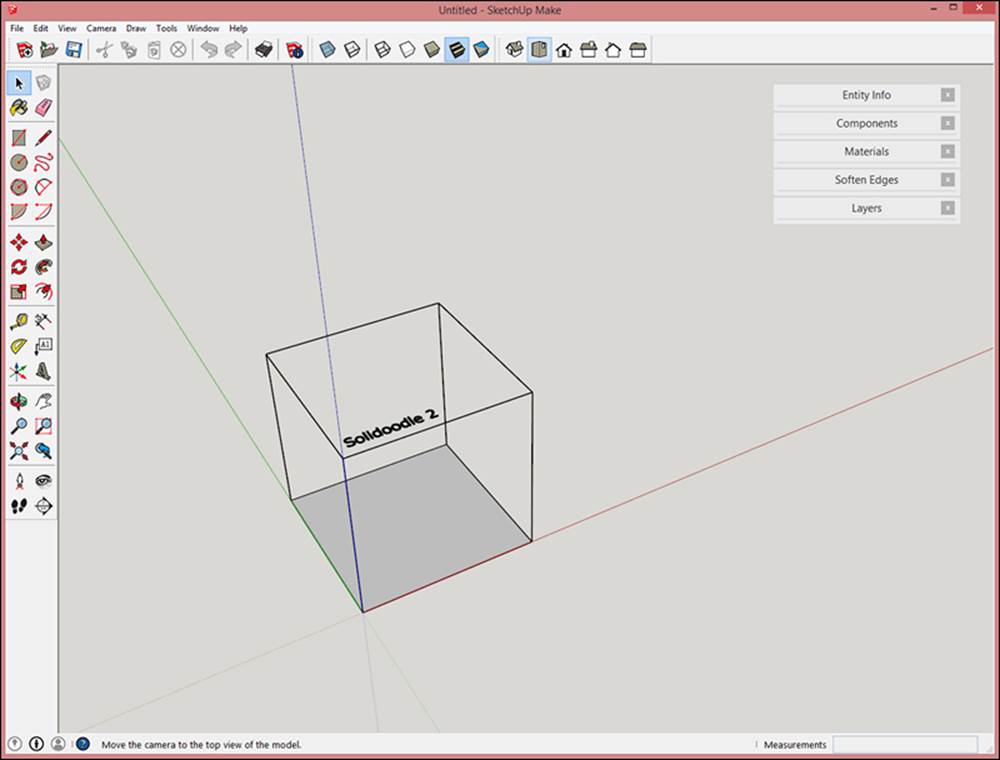
To set the size of the build volume to your printer, select the build volume component, then go to Window | Component Options. You'll see something like the following image.
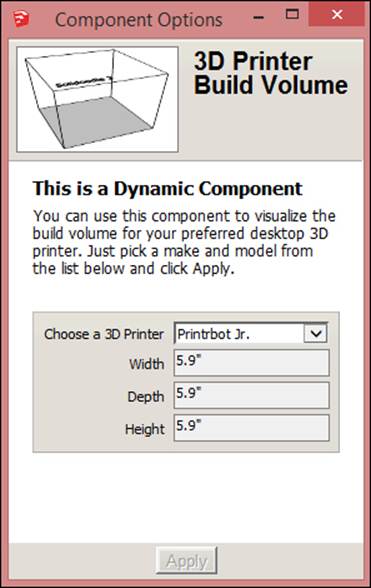
The drop-down menu lists about 20 of the most popular desktop 3D printers. Choosing a printer from the list and clicking on Apply at the bottom automatically resizes the build volume component to the precise size for that printer. My printer, the Solidoodle 2, was not listed. This was not surprising to me, because there are so many desktop printers on the market. In my case, the Printrbot Jr. printer listed is very close in size so I simply used that one.
If your printer is not listed and the available sizes are not close enough, you can easily make a similar component by drawing a box of the size of your printer's build volume, and deleting all faces of the box except the bottom, leaving all edges intact. Make the geometry into a component and delete the original 3D printer build volume component when you're done.
Model units of measurement
You can use SketchUp in either imperial (feet and inches) or metric units. To change the model units, navigate to Window | Model Info | Units. You can also switch back and forth between units in the middle of a modeling session with no negative consequences. This is useful when you are modeling in inches, but the 3D printing specs, such as wall thickness, are in metric units. You can design in inches, and then switch to metric units to check measurements and add details.
Many desktop printers are setup to work with mm as default. For this reason, I recommend you use mm for now, and change back to inches later if necessary. Using metric units now will likely save you having to convert units later in your work. If you mostly work with imperial measurements, you may find it easier to go ahead and switch to inches at this point.
Saving our template as the default template
Now that you've gone through all the work of customizing this template, you'll want to save it so you don't have to perform the same steps every time. Before saving, delete all the geometry from the file except the 3D printer build volume component if you want it and perform the following step:
1. Navigate to Model Info | Statistics, and click on Purge Unused. This clears out any unused styles, components, or other settings that increase the file size.
Tip
To save this template as the default that opens every time you start SketchUp, navigate to File | Save As Template... and save it with the name 3D printing mm. Make sure Set as Default is checked before saving. Optionally, fill out the description box with the changes you have made.
Later, as you develop a personalized workflow, you can modify this template to open with nearly any setting or geometry that you wish to begin modeling with. For example, if you model custom Arduino cases, you could start out with a base Arduino model already in your window so that you can start building on top of it right away.
Using other styles
Most of the time, your customized style is the best option, but some of the other styles will be useful as well. The Architectural Design Style has thicker lines with tick marks on each line end. This makes the lines easier to see in cases where you may need that option. The other styles are mostly for presentation, and may be useful if you're sharing images of your model with others.
Setting up toolbars
Toolbars allow you to access commands faster than using the drop-down menus in the menu bar. There are many pre-made toolbars, and you can create your own custom toolbars as well.
For starting out, I recommend you turn off the default Getting Started toolbar and place the Standard, Styles, and Views toolbars at the top of your screen, and the Large Tool Set along the left of your screen. The Large Tool Set has many of the tools you'll use while modeling. The Styles toolbar is useful for toggling X-ray mode, and turning colors on and off while modeling. The View toolbar is used for aligning the model to camera views such as Front, Top, or Iso views.
While toolbars are nice for beginners, I recommend you also learn the keyboard shortcuts to speed up your modeling. You can find a one page cheat sheet of keyboard shortcuts at http://help.sketchup.com/en/article/116693.
Minimizing dialog boxes
There are a few dialog boxes that you'll use frequently. While you can close them to make more drawing space, and get them back from the Window menu when needed, I like to keep the commonly used ones minimized on the right side of my screen. The ones I keep open are as follows:
· Entity Info
· Components
· Materials
· Soften Edges
· Layers
To minimize a dialog box, just click on the top of its window once, and it will roll up so just its name is visible. This way, it stays out of the way but is easily accessible. The boxes stick together, making it easy to keep them looking neat.
The following screenshot is what my screen looks like when I open SketchUp to begin modeling:
You can see how the drawing space dominates the window. The toolbars are arranged at the top and left side of the window, and the dialog boxes are neatly minimized near the upper right side of the screen.
Installing and using extensions
Extensions, also commonly called plugins or ruby scripts, transform SketchUp from a cool program for architects into a super versatile modeling tool that nearly anyone can customize to their needs. Extensions in SketchUp 2013 can be installed in a few different ways. The easiest way is via the Extensions Warehouse dialog box inside SketchUp. The first extension we install will allow importing and exporting of files for 3D printing.
Stereolithography [.STL] is the most common file format used as input for 3D printers. SketchUp doesn't natively have the option to export to [.STL], but a couple of generous programmers have written an extension that does just that. They released it for free, as the vast majority of extensions for SketchUp are, and now anybody can generate [.STL] files from their SketchUp models.
To install the extension, navigate to Window | Extensions Warehouse and sign in with your Google account. Search for "STL" in the upper-right corner of the screen, and click on the link titled SketchUp STL by the SketchUp team. Read the description for info on how to use the extension, and look at the pictures for more info. Click on the red Install button in the upper-right corner. A warning message will pop up as shown in the following screenshot:
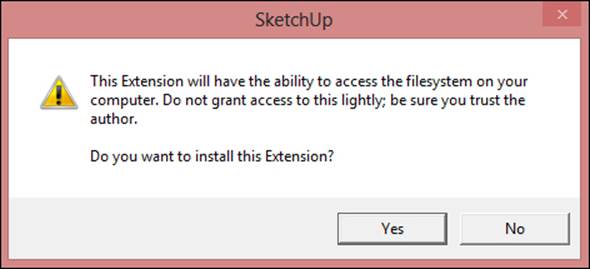
Click on Yes. A confirmation will appear and the extension is ready for use. The following are two more free essential extensions that you'll want to install right away:
· Solid Inspector as well as its required component TT_Lib2. See extension documentation for the link to TT_Lib2.
· CleanUp3.
As with all extensions, read the documentation for instructions on how to use these tools. For example, these three extensions are all accessed in different ways. The STL export/import functions are found under the File menu. Solid Inspector is found in the Toolsmenu, while Cleanup is in the newly formed Plugins menu. Other extensions may be accessed via a toolbar, a menu, or by right-clicking on the screen.
Installing more extensions
The Extensions Warehouse is relatively new, but extensions have been available for several years. How did users install them before the Warehouse? I'm glad you asked, because there are many useful extensions available scattered across the Web that are not in the Extensions Warehouse yet.
To use these other extensions, you must manually place the files into the correct folder on your computer. For more info, visit the help article at http://help.sketchup.com/en/article/38583.
The following are the two places to get good SketchUp extensions, besides the Extensions Warehouse:
· SketchUcation: This can be found at http://sketchucation.com/resources/plugin-store-download. This extension is much like the Extensions Warehouse, but allows installation and management of a huge selection of specialty extensions. SketchUcation is also the best help forum if you get stuck on installing extensions.
· Smustard: This can be found at http://www.smustard.com/.
You can find more extensions by searching online, but you should install them only if you trust the source.
A quick exercise
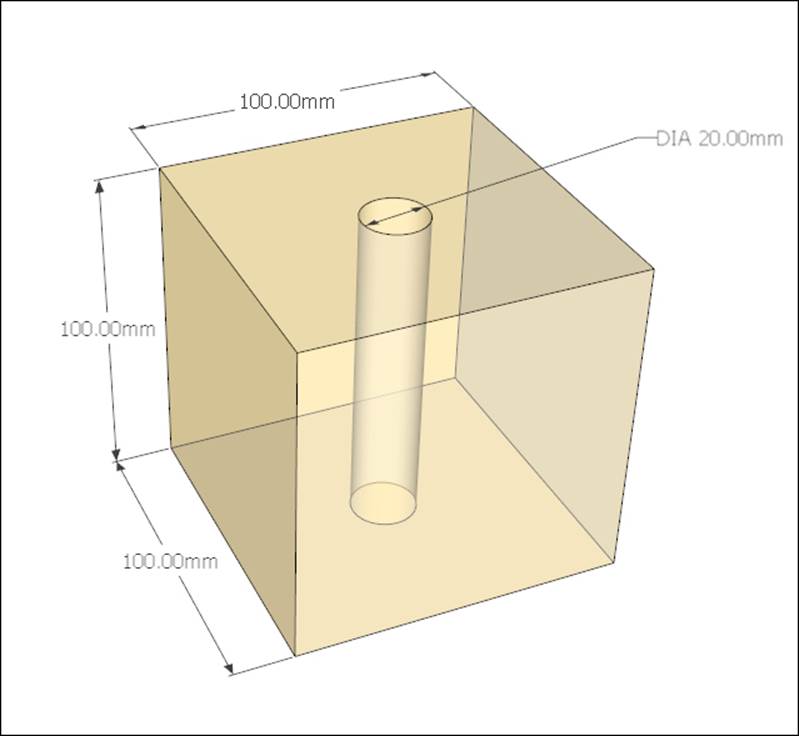
Let's make our first 3D-printable model, a simple box with a hole through it. We'll export it as an [.STL], and then import it back to SketchUp to see how the process works by performing the following steps:
1. Draw a 100 x 100 mm square with the Rectangle tool.
2. Using Push/Pull, pull the square into a 100 mm cube.
3. Draw a circle on top of the square with a 10 mm radius using the Circle tool.
4. Push this circle down to the bottom face so it creates a hole through the cube.
5. Select the entire box by triple-clicking on any of its faces.
6. Right-click on Make Group. If you look in the Entity Info dialog box, it should say Solid Group (1 in model). This is very important! If the model isn't solid, it will not print correctly, so you'll need to go back and fix it.
Tip
Use the Entity Info dialog box to ensure your model is solid.
You should have something like the following diagram with X-ray on, so you can see the hole goes all the way through:
Select the group, and then select Export STL... under File and save the file with Units as mm, and File Format as Binary. Name the file TestCube.stl, making sure to type .stl at the end.
Tip
Binary and ASCII STL files are identical for the most part, but binary files are compressed and therefore much smaller and easier to work with.
This file is now 3D printable. You could send this to a printer and have a plastic model in hand within minutes.
Importing .STL files
Select Import... under File, set the File type to [.STL] and navigate to where you saved the [.STL] file. Under Options, uncheck Merge Coplanar Faces, make sure Units are set to mm, and then click on Accept. Click on Open to import the [.STL]. If Preserve Drawing Origin is checked in the Import options, it will import directly on the first cube you drew, so move it to the side with the Move tool.
Now import the same file again, but this time in Import STL Options, and check the Merge Coplanar Faces box. Once again, move it to the side so you can see all the three boxes—the original SketchUp model and the two imported [.STLs]. You should have something like the following diagram:

Notice the differences between the three models. The .STL format triangulates the model shown by the extra lines you see on the center model. The Merge Coplanar Faces command deletes those extra lines upon import so that you can work with imported .STL files more easily. For example, you could easily push/pull the top face of the clean imported model, but for the center model it would be much more difficult because of the extra faces.
Also, notice the difference between the inside of the hole in the SketchUp model versus the imported models. The SketchUp model looks smooth, while the imports are faceted, meaning you can see each individual face that makes up the hole. By turning on hidden geometry, View | Hidden Geometry; you can see that these are the exact faces in the SketchUp model before exporting.
This is important to know because you can increase the number of sides your circle will have in SketchUp to make the final print smoother and more accurate if necessary. This is discussed further in Chapter 4, Understanding Model Resolution. You can also smooth the imported models easily by selecting their groups and adjusting the slider in the Soften Edges dialog box.
The CleanUp extension you installed earlier will also merge coplanar faces. This is useful if you're using an older version of SketchUp that doesn't have the option to merge coplanar faces in STL Import Options.
Summary
In this chapter, you installed SketchUp and customized a template that will allow you to model for 3D printing quickly. You learned what extensions are, how to install them, and where to find many more that are not available in the official Extensions Warehouse.
You made your first 3D-printable STL file, and imported the file back into SketchUp. Finally, you also learned why it's important to merge coplanar faces on imported STL files. In the next chapter, we'll learn how to design a 3D-printable model starting from a 2D sketch.
All materials on the site are licensed Creative Commons Attribution-Sharealike 3.0 Unported CC BY-SA 3.0 & GNU Free Documentation License (GFDL)
If you are the copyright holder of any material contained on our site and intend to remove it, please contact our site administrator for approval.
© 2016-2026 All site design rights belong to S.Y.A.