Android Application Development: A Beginner's Tutorial (2015)
Chapter 17. Working with Files
Reading from and writing to a file are some of the most common operations in any type of application, including Android. In this chapter, you will learn how Android structures its storage areas and how to use the Android File API.
Overview
Android devices offer two storage areas, internal and external. The internal storage is private to the application. The user and other applications cannot access it.
The external storage is where you store files that will be shared with other applications or that the user will be able to access. For example, the built-in Camera application stores digital image files in the external storage so the user can easily copy them to a computer.
Internal Storage
All applications can read from and write to internal storage. The location of the internal storage is /data/data/[app package], so if your application package is com.example.myapp, the internal directory for this application is /data/data/com.example.myapp. The Context class provides various methods to access the internal storage from your application. You should use these methods to access files you store in the internal storage and should not hardcode the location of the internal storage. (Recall that Activity is a subclass of Context, so you can call public and protected methods in Context from your activity class). Here are the methods in Context for working with files and streams in the internal storage.
public java.io.File getFilesDir()
Returns the path to the directory dedicated to your application in internal storage.
public java.io.FileOutputStream openFileOutput(
java.lang.String name, int mode)
Opens a FileOutputStream in the application’s section of internal storage.
public java.io.FileInputStream openFileInput(java.lang.String name)
Opens a FileInputStream for reading. The name argument is the name of the file to open and cannot contain path separators.
public java.io.File getFilesDir()
Obtains the absolute path to the file system directory where internal files are saved.
public java.io.File getDir(java.lang.String name, int mode)
Creates or retrieves an existing directory within the application’s internal storage space. The name argument is the name of the directory to retrieve and the mode argument should be given one of these:
MODE_PRIVATE for the default operation or MODE_WORLD_READABLE or MODE_WORLD_WRITEABLE to control permissions.
public boolean deleteFile(java.lang.String fileName)
Deletes a file saved on the internal storage. The method returns true if the file was successfully deleted.
public java.lang.String[] FileList()
Returns an array of strings naming the files associated with this Context’s application package.
External Storage
There are two types of files that can be written to external storage, private files and public files. Private files are private to the application and will be deleted when the application is uninstalled. Public files, on the other hand, are meant to be shared with other applications or accessible to the user.
External storage may be removable. As such, there is a difference between files stored in internal storage and files stored in external storage as public files. Files in internal storage are secure and cannot be accessed by the user or other applications. Public files in external storage do not enjoy the same level of security as the user can remove the storage and use some tool to access the files.
Since external storage can be removed, when you try to read from or write to it, you should first test if external storage is available. Trying to access external storage when it is unavailable may crash your application.
To inquire if external storage is available, use one of these methods.
public boolean isExternalStorageWritable() {
String state = Environment.getExternalStorageState();
return Environment.MEDIA_MOUNTED.equals(state);
}
public boolean isExternalStorageReadable() {
String state = Environment.getExternalStorageState();
return (Environment.MEDIA_MOUNTED.equals(state) ||
Environment.MEDIA_MOUNTED_READ_ONLY.equals(state));
}
You can use the getExternalFilesDir method on the Context to get the directory for storing private files on the external storage.
Public files can be stored in the directory returned by the getExternalStoragePublicDirectory method of the android.os.Environment class. Here is the signature of this method.
public static java.io.File getExternalStoragePublicDirectory(
java.lang.String type)
Here, type is a directory under the root directory. The Environment class provides the following fields that you can use for various file types.
§ Directory_ALARMS
§ Directory_DCIM
§ Directory_DOCUMENTS
§ Directory_DOWNLOADS
§ Directory_MOVIES
§ Directory_MUSIC
§ Directory_NOTIFICATIONS
§ Directory_PICTURES
§ Directory_PODCASTS
§ Directory_RINGTONES
For example, music files should be stored in the directory returned by this code.
File dir = Environment.getExternalStoragePublicDirectory(
Environment.DIRECTORY_PICTURES)
Writing to external storage requires user permission. To ask the user to grant you read and write access to external storage, add this in your manifest.
<uses-permission
android:name="android.permission.WRITE_EXTERNAL_STORAGE"/>
Currently, if your application only needs to read from external storage, you do not need special permissions. However, this will change in the future so you should declare this uses-permission element in your manifest if you need to read from external storage so that your application will keep working after the change takes effect.
<uses-permission
android:name="android.permission.READ_EXTERNAL_STORAGE"/>
Creating a Notes Application
The FileDemo1 application is a simple application for managing notes. A note has a title and a body and each note is stored as a file, using the title as the file name. The user can view a list of notes, view a note, create a new note, and delete a note.
The application has two activities, MainActivity and AddNoteActivity. The MainActivity activity uses a ListView that lists all note titles in the system. The main activity contains a ListView that lists all note titles. Selecting a note title from the ListView shows the note in the TextViewbeside the ListView.
Figures 17.1 and 17.2 show the MainActivity activity and AddNoteActivity activity, respectively. The MainActivity activity contains a ListView that lists all note titles and a TextView that shows the body of the selected note. Its action bar also contains two buttons, Add and Delete. Add starts the AddNoteActivity activity. Delete deletes the selected note.

Figure 17.1: MainActivity
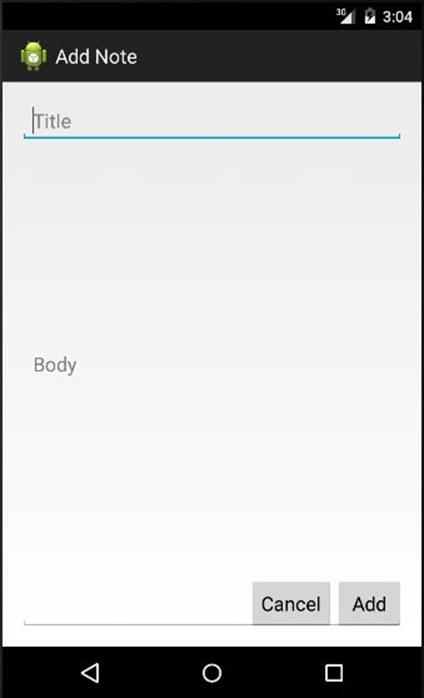
Figure 17.2: AddNoteActivity
Let’s now take a look at the application code. Listing 17.1 shows the AndroidManifest.xml file for this application.
Listing 17.1: The AndroidManifest.xml file
<?xml version="1.0" encoding="utf-8"?>
<manifest xmlns:android="http://schemas.android.com/apk/res/android"
package="com.example.filedemo1"
android:versionCode="1"
android:versionName="1.0" >
<uses-sdk
android:minSdkVersion="19"
android:targetSdkVersion="19" />
<application
android:allowBackup="true"
android:icon="@drawable/ic_launcher"
android:label="@string/app_name"
android:theme="@style/AppTheme" >
<activity
android:name="com.example.filedemo1.MainActivity"
android:label="@string/app_name" >
<intent-filter>
<action android:name="android.intent.action.MAIN"/>
<category
android:name="android.intent.category.LAUNCHER"/>
</intent-filter>
</activity>
<activity
android:name="com.example.filedemo1.AddNoteActivity"
android:label="@string/title_activity_add_note" >
</activity>
</application>
</manifest>
The manifest declares the two activities in the application. The activity class of the main activity, MainActivity, is shown in Listing 17.2.
Listing 17.2: The MainActivity class
package com.example.filedemo1;
import java.io.BufferedReader;
import java.io.File;
import java.io.FileReader;
import java.io.IOException;
import android.app.Activity;
import android.content.Intent;
import android.os.Bundle;
import android.view.Menu;
import android.view.MenuItem;
import android.view.View;
import android.widget.AdapterView;
import android.widget.AdapterView.OnItemClickListener;
import android.widget.ArrayAdapter;
import android.widget.ListView;
import android.widget.TextView;
public class MainActivity extends Activity {
private String selectedItem;
@Override
protected void onCreate(Bundle savedInstanceState) {
super.onCreate(savedInstanceState);
setContentView(R.layout.activity_main);
ListView listView = (ListView) findViewById(
R.id.listView1);
listView.setChoiceMode(ListView.CHOICE_MODE_SINGLE);
listView.setOnItemClickListener(
new OnItemClickListener() {
@Override
public void onItemClick(AdapterView<?> adapterView,
View view, int position, long id) {
readNote(position);
}
});
}
@Override
public void onResume() {
super.onResume();
refreshList();
}
@Override
public boolean onCreateOptionsMenu(Menu menu) {
getMenuInflater().inflate(R.menu.menu_main, menu);
return true;
}
@Override
public boolean onOptionsItemSelected(MenuItem item) {
// Handle presses on the action bar items
switch (item.getItemId()) {
case R.id.action_add:
startActivity(new Intent(this,
AddNoteActivity.class));
return true;
case R.id.action_delete:
deleteNote();
return true;
default:
return super.onOptionsItemSelected(item);
}
}
private void refreshList() {
ListView listView = (ListView) findViewById(
R.id.listView1);
String[] titles = fileList();
ArrayAdapter<String> arrayAdapter =
new ArrayAdapter<String>(
this,
android.R.layout.simple_list_item_activated_1,
titles);
listView.setAdapter(arrayAdapter);
}
private void readNote(int position) {
String[] titles = fileList();
if (titles.length > position) {
selectedItem = titles[position];
File dir = getFilesDir();
File file = new File(dir, selectedItem);
FileReader fileReader = null;
BufferedReader bufferedReader = null;
try {
fileReader = new FileReader(file);
bufferedReader = new BufferedReader(fileReader);
StringBuilder sb = new StringBuilder();
String line = bufferedReader.readLine();
while (line != null) {
sb.append(line);
line = bufferedReader.readLine();
}
((TextView) findViewById(R.id.textView1)).
setText(sb.toString());
} catch (IOException e) {
} finally {
if (bufferedReader != null) {
try {
bufferedReader.close();
} catch (IOException e) {
}
}
if (fileReader != null) {
try {
fileReader.close();
} catch (IOException e) {
}
}
}
}
}
private void deleteNote() {
if (selectedItem != null) {
deleteFile(selectedItem);
selectedItem = null;
((TextView) findViewById(R.id.textView1)).setText("");
refreshList();
}
}
}
The MainActivity class contains a ListView and its onCreate method sets the ListView’s choice mode and passes a listener to it.
ListView listView = (ListView) findViewById(
R.id.listView1);
listView.setChoiceMode(ListView.CHOICE_MODE_SINGLE);
listView.setOnItemClickListener( ... )
No list adapter is passed to the ListView in the onCreate method. Instead, the onResume method calls the refreshNotes method, which passes a new ListAdapter to the ListView every time onResume is called. The reason why a new ListAdapter needs to be created every time onResumeis called is because the main activity can call the AddNoteActivity for the user to add a note. If the user does add a note and leave the AddNoteActivity, the main activity needs to include the new note, hence the need to refresh the ListView.
Note
Automatic refresh in a ListView can be done using a Cursor. See Chapter 18, “Working with the Database.”
The readNote method, which gets called when a list item is selected, starts by getting all file names in the internal storage.
String[] titles = fileList();
It then retrieves the note title and uses it to create a file, using the directory returned by getFilesDir as the parent.
if (titles.length > position) {
selectedItem = titles[position];
File dir = getFilesDir();
File file = new File(dir, selectedItem);
The readNote method then uses a FileReader and a BufferedReader to read the note, one line at a time, and sets the value of the TextView.
FileReader fileReader = null;
BufferedReader bufferedReader = null;
try {
fileReader = new FileReader(file);
bufferedReader = new BufferedReader(fileReader);
StringBuilder sb = new StringBuilder();
String line = bufferedReader.readLine();
while (line != null) {
sb.append(line);
line = bufferedReader.readLine();
}
((TextView) findViewById(R.id.textView1)).
setText(sb.toString());
The AddNoteActivity class is shown in Listing 17.3.
Listing 17.3: The AddNoteActivity class
package com.example.filedemo1;
import java.io.File;
import java.io.PrintWriter;
import android.app.Activity;
import android.app.AlertDialog;
import android.os.Bundle;
import android.view.View;
import android.widget.EditText;
public class AddNoteActivity extends Activity {
@Override
protected void onCreate(Bundle savedInstanceState) {
super.onCreate(savedInstanceState);
setContentView(R.layout.activity_add_note);
}
public void cancel(View view) {
finish();
}
public void addNote(View view) {
String fileName = ((EditText)
findViewById(R.id.noteTitle))
.getText().toString();
String body = ((EditText) findViewById(R.id.noteBody))
.getText().toString();
File parent = getFilesDir();
File file = new File(parent, fileName);
PrintWriter writer = null;
try {
writer = new PrintWriter(file);
writer.write(body);
finish();
} catch (Exception e) {
showAlertDialog("Error adding note", e.getMessage());
} finally {
if (writer != null) {
try {
writer.close();
} catch (Exception e) {
}
}
}
}
private void showAlertDialog(String title, String message) {
AlertDialog alertDialog = new
AlertDialog.Builder(this).create();
alertDialog.setTitle(title);
alertDialog.setMessage(message);
alertDialog.show();
}
}
The AddNoteActivity class has two public methods that act as click listeners to the two buttons in its layout, cancel and addNote. The cancel method simply closes the activity. The addNote method reads the values in the TextViews and create a file in the internal storage using aPrintWriter.
Accessing the Public Storage
The second example in this chapter, FileDemo2, shows how you can access the public storage. FileDemo2 is a file browser that shows the content of a standard directory. There is only one activity in FileDemo2 and it is shown in Figure 17.3.
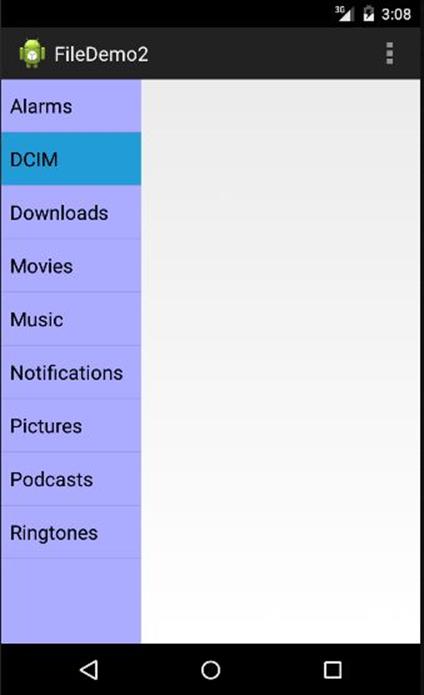
Figure 17.3: FileDemo2
The layout file for the activity is presented in Listing 17.4. It is a LinearLayout that contains two ListViews. The ListView on the left lists several frequently used directories. The ListView on the right shows the content of the selected directory.
Listing 17.4: The layout file for FileDemo2’s activity
<LinearLayout xmlns:android="http://schemas.android.com/apk/res/android"
android:layout_width="match_parent"
android:layout_height="match_parent"
android:orientation="horizontal">
<ListView
android:id="@+id/listView1"
android:layout_width="0sp"
android:layout_weight="1"
android:layout_height="match_parent"
android:background="#ababff"/>
<ListView
android:id="@+id/listView2"
android:layout_width="0sp"
android:layout_height="wrap_content"
android:layout_weight="2"/>
</LinearLayout>
The activity class for FileDemo2 is shown in Listing 17.5.
Listing 17.5: The MainActivity class
package com.example.filedemo2;
import java.io.File;
import java.util.Arrays;
import java.util.List;
import android.app.Activity;
import android.os.Bundle;
import android.os.Environment;
import android.view.Menu;
import android.view.View;
import android.widget.AdapterView;
import android.widget.AdapterView.OnItemClickListener;
import android.widget.ArrayAdapter;
import android.widget.ListView;
public class MainActivity extends Activity {
class KeyValue {
public String key;
public String value;
public KeyValue(String key, String value) {
this.key = key;
this.value = value;
}
@Override
public String toString() {
return key;
}
}
@Override
protected void onCreate(Bundle savedInstanceState) {
super.onCreate(savedInstanceState);
setContentView(R.layout.activity_main);
final List<KeyValue> keyValues = Arrays.asList(
new KeyValue("Alarms", Environment.DIRECTORY_ALARMS),
new KeyValue("DCIM", Environment.DIRECTORY_DCIM),
new KeyValue("Downloads",
Environment.DIRECTORY_DOWNLOADS),
new KeyValue("Movies", Environment.DIRECTORY_MOVIES),
new KeyValue("Music", Environment.DIRECTORY_MUSIC),
new KeyValue("Notifications",
Environment.DIRECTORY_NOTIFICATIONS),
new KeyValue("Pictures",
Environment.DIRECTORY_PICTURES),
new KeyValue("Podcasts",
Environment.DIRECTORY_PODCASTS),
new KeyValue("Ringtones",
Environment.DIRECTORY_RINGTONES)
);
ArrayAdapter<KeyValue> arrayAdapter = new
ArrayAdapter<KeyValue>(this,
android.R.layout.simple_list_item_activated_1,
keyValues);
ListView listView1 = (ListView)
findViewById(R.id.listView1);
listView1.setChoiceMode(ListView.CHOICE_MODE_SINGLE);
listView1.setAdapter(arrayAdapter);
listView1.setOnItemClickListener(new
OnItemClickListener() {
@Override
public void onItemClick(AdapterView<?> adapterView,
View view, int position, long id) {
KeyValue keyValue = keyValues.get(position);
listDir(keyValue.value);
}
});
}
@Override
public boolean onCreateOptionsMenu(Menu menu) {
getMenuInflater().inflate(R.menu.menu_main, menu);
return true;
}
private void listDir(String dir) {
File parent = Environment
.getExternalStoragePublicDirectory(dir);
String[] files = null;
if (parent == null || parent.list() == null) {
files = new String[0];
} else {
files = parent.list();
}
ArrayAdapter<String> arrayAdapter = new
ArrayAdapter<String>(this,
android.R.layout.simple_list_item_activated_1,
files);
ListView listView2 = (ListView)
findViewById(R.id.listView2);
listView2.setAdapter(arrayAdapter);
}
}
The first thing to note is the KeyValue class in the activity class. This is a simple class to hold a pair of strings. It is used in the onCreate method to pair selected keys with directories defined in the Environment class.
new KeyValue("Alarms", Environment.DIRECTORY_ALARMS),
new KeyValue("DCIM", Environment.DIRECTORY_DCIM),
new KeyValue("Downloads",
Environment.DIRECTORY_DOWNLOADS),
new KeyValue("Movies", Environment.DIRECTORY_MOVIES),
new KeyValue("Music", Environment.DIRECTORY_MUSIC),
new KeyValue("Notifications",
Environment.DIRECTORY_NOTIFICATIONS),
new KeyValue("Pictures",
Environment.DIRECTORY_PICTURES),
new KeyValue("Podcasts",
Environment.DIRECTORY_PODCASTS),
new KeyValue("Ringtones",
Environment.DIRECTORY_RINGTONES)
These KeyValue instances are then used to feed the first ListView.
ArrayAdapter<KeyValue> arrayAdapter = new
ArrayAdapter<KeyValue>(this,
android.R.layout.simple_list_item_activated_1,
keyValues);
ListView listView1 = (ListView)
findViewById(R.id.listView1);
listView1.setChoiceMode(ListView.CHOICE_MODE_SINGLE);
listView1.setAdapter(arrayAdapter);
The ListView also gets a listener that listens for its OnItemClick event and calls the listDir method when one of the directories in the ListView is selected.
listView1.setOnItemClickListener(new
OnItemClickListener() {
@Override
public void onItemClick(AdapterView<?> adapterView,
View view, int position, long id) {
KeyValue keyValue = keyValues.get(position);
listDir(keyValue.value);
}
});
The listDir method list all files in the selected directory and feed them to an ArrayAdapter that in turn gets passed to the second ListView.
private void listDir(String dir) {
File parent = Environment
.getExternalStoragePublicDirectory(dir);
String[] files = null;
if (parent == null || parent.list() == null) {
files = new String[0];
} else {
files = parent.list();
}
ArrayAdapter<String> arrayAdapter = new
ArrayAdapter<String>(this,
android.R.layout.simple_list_item_activated_1,
files);
ListView listView2 = (ListView)
findViewById(R.id.listView2);
listView2.setAdapter(arrayAdapter);
}
Summary
You use the File API to work with files in Android applications. In addition to mastering this API, in order to work with files effectively in Android, you need to know how Android structures its storage system and the file-related methods defined in the Context and Environment classes.
All materials on the site are licensed Creative Commons Attribution-Sharealike 3.0 Unported CC BY-SA 3.0 & GNU Free Documentation License (GFDL)
If you are the copyright holder of any material contained on our site and intend to remove it, please contact our site administrator for approval.
© 2016-2026 All site design rights belong to S.Y.A.