Introduction to Android Application Development, Fourth Edition (2014)
Part V. Publishing and Distributing Android Applications
Chapter 18. Testing Android Applications
Test early, test often, test on the device. That is the quality assurance mantra we consider most important when it comes to testing Android applications. Testing your applications need not be an onerous process. Instead, you can adapt traditional QA techniques, such as automation and unit testing, to the Android platform with relative ease. In this chapter, we discuss our tips and tricks for testing Android applications. We also warn you—the project managers, software developers, and testers of mobile applications—of the various and sundry pitfalls you should do your best to avoid. We also provide a practical unit example, in addition to introducing many tools available for automating Android application testing.
Best Practices in Testing Mobile Applications
Like all QA processes, mobile development projects benefit from a well-designed defect-tracking system, regularly scheduled builds, and planned, systematic testing. There are also plentiful opportunities for white-box and black-box testing as well as opportunities for automation.
Designing a Mobile Application Defect-Tracking System
You can customize most defect-tracking systems to work for the testing of mobile applications. The defect-tracking system must encompass tracking of issues for specific device defects and problems related to any centralized application servers (if applicable).
Logging Important Defect Information
A good mobile defect-tracking system includes the following information about a typical device defect:
![]() Application build version information, language, and so on
Application build version information, language, and so on
![]() Device configuration and state information, including device type, Android platform version, and important specs
Device configuration and state information, including device type, Android platform version, and important specs
![]() Screen orientation, network state, sensor information
Screen orientation, network state, sensor information
![]() Steps to reproduce the problem using specific details about exactly which input methods were used (touch versus click)
Steps to reproduce the problem using specific details about exactly which input methods were used (touch versus click)
![]() Device screenshots that can be taken using DDMS or the Hierarchy Viewer tool provided with the Android SDK
Device screenshots that can be taken using DDMS or the Hierarchy Viewer tool provided with the Android SDK
 Tip
Tip
It can be helpful to develop a simple glossary of standardized terms for certain actions on the devices, such as touch mode gestures, click versus tap, long click versus press and hold, clear versus back, and so on. This helps make the steps to reproduce a defect more precise for all parties involved.
Redefining the Term Defect for Mobile Applications
It’s also important to consider the larger definition of the term defect. Defects might occur on all devices or on only some devices. Defects might also occur in other parts of the application environment, such as on a remote application server. Some types of defects typical of mobile applications include the following:
![]() Crashing, unexpected terminations, forced closures, app not responding (ANR) events, and various other terms used for unexpected behavior that result in the application no longer running or responding
Crashing, unexpected terminations, forced closures, app not responding (ANR) events, and various other terms used for unexpected behavior that result in the application no longer running or responding
![]() Features not functioning correctly (improper implementation)
Features not functioning correctly (improper implementation)
![]() Using too much disk space on the device
Using too much disk space on the device
![]() Inadequate input validation (typically, “button mashing”)
Inadequate input validation (typically, “button mashing”)
![]() State management problems (startup, shutdown, suspend, resume, power off)
State management problems (startup, shutdown, suspend, resume, power off)
![]() Responsiveness problems (slow startup, shutdown, suspend, resume)
Responsiveness problems (slow startup, shutdown, suspend, resume)
![]() Inadequate state change testing (failures during interstate changes, such as an unexpected interruption during resume)
Inadequate state change testing (failures during interstate changes, such as an unexpected interruption during resume)
![]() Usability issues related to input methods, font sizes, and cluttered screen real estate; cosmetic problems that cause the screen to display incorrectly
Usability issues related to input methods, font sizes, and cluttered screen real estate; cosmetic problems that cause the screen to display incorrectly
![]() Pausing or “freezing” on the main UI thread (failure to implement asynchronous tasks, threading)
Pausing or “freezing” on the main UI thread (failure to implement asynchronous tasks, threading)
![]() Feedback indicators missing (failure to indicate progress)
Feedback indicators missing (failure to indicate progress)
![]() Integration with other applications on the device causing problems
Integration with other applications on the device causing problems
![]() Application “not playing nicely” on the device (draining battery, disabling power-saving mode, overusing network resources, incurring extensive user charges, obnoxious notifications)
Application “not playing nicely” on the device (draining battery, disabling power-saving mode, overusing network resources, incurring extensive user charges, obnoxious notifications)
![]() Using too much memory, not freeing memory or releasing resources appropriately, and not stopping worker threads when tasks are finished
Using too much memory, not freeing memory or releasing resources appropriately, and not stopping worker threads when tasks are finished
![]() Not conforming to third-party agreements, such as the Android SDK License Agreement, Google Maps API terms, marketplace terms, or any other terms that apply to the application
Not conforming to third-party agreements, such as the Android SDK License Agreement, Google Maps API terms, marketplace terms, or any other terms that apply to the application
![]() Application client or server not handling protected/private data securely, including ensuring that remote servers or services have adequate uptime and security measures taken
Application client or server not handling protected/private data securely, including ensuring that remote servers or services have adequate uptime and security measures taken
Managing the Testing Environment
Testing mobile applications poses a unique challenge to the QA team, especially in terms of configuration management. The difficulty of such testing is often underestimated. Don’t make the mistake of thinking that mobile applications are easier to test because they have fewer features than desktop applications and are, therefore, simpler to validate. The vast variety of Android devices available on the market today makes testing different installation environments tricky.
 Warning
Ensure that all changes in project scope are reviewed by the QA team. Adding new devices sometimes has little impact on the development schedule but can have significant consequences in terms of testing schedules.
Managing Device Configurations
Device fragmentation is one of the biggest challenges the mobile tester faces. Android devices come in various form factors with different screens, platform versions, and underlying hardware. They come with a variety of input methods such as hardware buttons, keyboards, and touchscreens. They come with optional features, such as cameras, enhanced graphics support, fingerprint readers, and even 3D displays. Many Android devices are smartphones, but non-phone devices such as Android tablets, TVs, and other devices are becoming more and more popular with each Android SDK release. Keeping track of all the devices, their abilities, and so on is a big job, and much of the work falls on the testing team.
QA personnel must have a detailed understanding of the functionality of each target device, including familiarity with what features are available and any device-specific idiosyncrasies that exist. Whenever possible, testers should test each device as it is used in the field, which might not be the device’s default configuration or language. This means changing input modes, screen orientations, and locale settings. It also means testing with battery power, not just plugging the device into a power source while sitting at a desk.
Tip
Be aware of how third-party firmware modifications can affect how your application works on the device. For example, let’s assume you’ve gotten your hands on an unbranded version of a target device and testing has gone well. However, if certain carriers take that same device but remove some default applications and load it up with others, this is valuable information to the tester. Many devices ditch the stock Android user experience for more custom user interfaces, like HTC’s Sense and Samsung’s TouchWiz user interfaces. Just because your application runs flawlessly on the “vanilla” device doesn’t mean that this is how most users’ devices are configured by default. Do your best to get test devices that closely resemble the devices users will have in the field. The various default styles may not display as you expect with your user interface.
One hundred percent testing coverage is impossible, so QA must develop priorities thoughtfully. As we discussed in Chapter 15, “Learning the Android Software Development Process,” developing a device database can greatly reduce the confusion of mobile configuration management, help determine testing priorities, and keep track of physical hardware available for testing. Using AVD configurations, the emulator is also an effective tool for extending coverage to simulate devices and situations that would not be covered otherwise.
Tip
If you have trouble configuring devices for real-life situations, you might want to look into the device “labs” available through some carriers. Instead of participating in loaner programs, developers visit the carrier’s onsite lab where they can rent time on specific devices. Here, a developer can install an application and test it—not ideal for recurring testing but much better than no testing—and some labs are staffed with experts to help out with device-specific issues.
Determining Clean Starting State on a Device
There is currently no good way to “image” a device so that you can return to the same starting state again and again. The QA testing team needs to define what a “clean” device is for the purposes of test cases. This can involve a specific uninstall process, some manual cleanup, or sometimes a factory reset.
Tip
Using the Android SDK tools, such as DDMS and ADB, developers and testers can have access to the Android file system, including application SQLite databases. These tools can be used to monitor and manipulate data on the emulator. For example, testers might use thesqlite3 command-line interface to “wipe” an application database or fill it with test data for specific test scenarios. For use on devices, you may need to “root” the devices first. Rooting a device is beyond the scope of this book, and we do not recommend doing so on test devices.
While we’re on the topic of “clean” states, here is another issue to consider. You may have heard that you can “root” most Android devices, allowing access to underlying device features not openly accessible through the public Android SDK. Certainly there are apps (and developers writing apps) that require this kind of access (some are even published on Google Play). Generally speaking, though, we feel that rooted devices do not make good testing and development devices for most teams. You want to develop and test on devices that resemble those in the hands of users; most users do not root their devices.
Mimicking Real-World Activities
It is nearly impossible (and certainly not cost-effective for most companies) to set up a complete isolated environment for mobile application testing. It’s fairly common for networked applications to be tested against test (mock) application servers and then go “live” on production servers with similar configurations. However, in terms of device configuration, mobile software testers must use real devices with real service to test mobile applications properly. If the device is a phone, it needs to be able to make and receive phone calls, send and receive text messages, determine location using LBS services, and basically do anything a phone would normally do.
Testing a mobile application involves more than just making sure the application works properly. In the real world, your application does not exist in a vacuum but is one of many installed on the device. Testing a mobile application involves ensuring that the software integrates well with other device functions and applications. For example, let’s say you were developing a game. Testers must verify that calls received while the game is being played cause the game to automatically pause (keep state) and that calls can be answered or ignored without issue.
This also means testers must install other applications on the device. A good place to start is with the most popular applications for the device. Testing your application with these other applications installed, combined with real use, can reveal integration issues or usage patterns that don’t mesh well with the rest of the device.
Sometimes testers need to be creative when it comes to reproducing certain types of events. For example, testers must ensure that an application behaves appropriately when mobile handsets lose network connectivity or coverage.
Tip
Unlike with some other mobile platforms, testers actually have to take special steps to make most Android devices lose coverage above and beyond holding them wrong. To test loss of signal, you could go out and test your application in a highway tunnel or elevator, or you could just place the device in the refrigerator. Don’t leave it in the cold too long, though, because this will drain the battery. Tin cans work great, too, especially those that have cookies in them. First, eat the cookies; then place the device in the can to seal off the signal. This advice also holds true for testing applications that leverage location-based services.
Maximizing Testing Coverage
All test teams strive for 100% testing coverage, but most also realize such a goal is not reasonable or cost-effective (especially with dozens of Android devices available around the world). Testers must do their best to cover a wide range of scenarios, the depth and breadth of which can be daunting—especially for those new to mobile. Let’s look at several specific types of testing and how QA teams have found ways—some tried-and-true and others innovative—to maximize coverage.
Validating Builds and Designing Smoke Tests
In addition to a regular build process, it can be helpful to institute a build acceptance test policy (also sometimes called build validation, smoke testing, or sanity testing). Build acceptance tests are short and targeted at key functionality to determine whether the build is good enough for more thorough testing to be completed. This is also an opportunity to quickly verify bug fixes expected to be in the build before a complete retesting cycle occurs. Consider developing build acceptance tests for multiple Android platform versions to run simultaneously.
Automating Testing
Mobile build acceptance testing is frequently done manually on the highest-priority target device; however, this is also an ideal situation for an automated “sanity” test. By creating an automated test script that runs using the Android SDK’s test tool, called monkeyrunner, the team can increase its level of confidence that a build is worth further testing, and the number of bad builds delivered to QA can be minimized. Based on a set of Python APIs, you can write scripts that install and run applications on emulators and devices, send specific keystrokes, and take screenshots. When combined with the JUnit unit-testing framework, you can develop powerful automated test suites.
Testing on the Emulator versus the Device
When you can get your hands on the actual device your users have, focus your testing there. However, devices and the service contracts that generally come with them can be expensive. Your test team cannot be expected to set up test environments on every carrier or in every country where your application is used. There are times when the Android emulator can reduce costs and improve testing coverage. Some of the benefits of using the emulator include
![]() Ability to simulate devices when they are not available or in short supply
Ability to simulate devices when they are not available or in short supply
![]() Ability to test difficult test scenarios not feasible on live devices
Ability to test difficult test scenarios not feasible on live devices
![]() Ability to be automated like any other desktop software
Ability to be automated like any other desktop software
Testing Before Devices Are Available Using the Emulator
Developers often target up-and-coming devices or platform versions not yet available to the general public. These devices are often highly anticipated, and developers who are ready with applications for these devices on Day 1 of release often experience a sales bump because fewer applications are available to these users—less competition, more sales.
The latest version of the Android SDK is usually released to developers several months prior to when the general public receives over-the-air updates. Also, developers can sometimes gain access to preproduction devices through carrier and manufacturer developer programs. However, developers and testers should be aware of the dangers of testing on preproduction devices. The hardware is generally beta quality. The final technical specifications and firmware can change without notice. Release dates can slip, and the device might never reach production.
When preproduction devices cannot be acquired, testers can do some functional testing using emulator AVD configurations that attempt to closely match the target platform, thus lessening the risks for a compact testing cycle when these devices go live and allowing developers to release applications faster.
Understanding the Dangers of Relying on the Emulator
Unfortunately, the emulator is more of a generic Android device that only simulates many of the device internals—despite all the options available within the AVD configuration.
Tip
Consider developing a document describing the specific AVD configurations used for testing different device configurations as part of the test plan.
The emulator does not represent the specific implementation of the Android platform that is unique to a given device. It does not use the same hardware to determine signal, networking, or location information. The emulator can “pretend” to make and receive calls and messages, or take pictures or video. At the end of the day, it doesn’t matter if the application works on the emulator if it doesn’t work on the actual device.
Testing Strategies: Black- and White-Box Testing
The Android tools provide ample tools for black-box and white-box testing:
![]() Black-box testers might require only testing devices and test documentation. For black-box testing, it is even more important that testers have a working knowledge of the specific devices, so providing device manuals and technical specifications also aids in more thorough testing. In addition to such details, knowing device nuances as well as device standards can greatly help with usability testing. For example, if a dock is available for the device, knowing that it’s either landscape or portrait mode is useful.
Black-box testers might require only testing devices and test documentation. For black-box testing, it is even more important that testers have a working knowledge of the specific devices, so providing device manuals and technical specifications also aids in more thorough testing. In addition to such details, knowing device nuances as well as device standards can greatly help with usability testing. For example, if a dock is available for the device, knowing that it’s either landscape or portrait mode is useful.
![]() White-box testing has never been easier on mobile. White-box testers can leverage the many affordable tools, including the Android IDE, Android Studio, and the Eclipse development environment (which all are available for free) and the many debugging tools available as part of the Android SDK. White-box testers use the Android emulator, DDMS, and ADB especially. They can also take advantage of the powerful unit-testing framework uiautomator and the Hierarchy Viewer for user interface debugging. For these tasks, the tester requires a computer with a development environment similar to the developer’s as well as knowledge of Java, Python, and the various typical tools available for developers.
White-box testing has never been easier on mobile. White-box testers can leverage the many affordable tools, including the Android IDE, Android Studio, and the Eclipse development environment (which all are available for free) and the many debugging tools available as part of the Android SDK. White-box testers use the Android emulator, DDMS, and ADB especially. They can also take advantage of the powerful unit-testing framework uiautomator and the Hierarchy Viewer for user interface debugging. For these tasks, the tester requires a computer with a development environment similar to the developer’s as well as knowledge of Java, Python, and the various typical tools available for developers.
Testing Mobile Application Servers and Services
Testers often focus on the client portion of the application and sometimes neglect to thoroughly test the server portion. Many mobile applications rely on networking or the cloud. If your application depends on a server or remote service to operate, testing the server side of your application is vital. Even if the service is not your own, you need to test thoroughly against it so you know it behaves as the application expects it to behave.
Warning
Users expect applications to be available anytime, day or night, 24/7. Minimize server or service downtimes and make sure the application notifies users appropriately (and doesn’t crash and burn) if a service is unavailable. If the service is outside your control, it might be worthwhile to look at what service-level agreements are offered.
Here are some guidelines for testing remote servers or services:
![]() Version your server builds. You should manage server rollouts like any other part of the build process. The server should be versioned and rolled out in a reproducible way.
Version your server builds. You should manage server rollouts like any other part of the build process. The server should be versioned and rolled out in a reproducible way.
![]() Use test servers. Often, QA tests against a mock server in a controlled environment. This is especially true if the live server is already operational with real users.
Use test servers. Often, QA tests against a mock server in a controlled environment. This is especially true if the live server is already operational with real users.
![]() Verify scalability. Test the server or service under load, including stress testing (many users, simulated clients).
Verify scalability. Test the server or service under load, including stress testing (many users, simulated clients).
![]() Test the server security (hacking, SQL injection, and such).
Test the server security (hacking, SQL injection, and such).
![]() Ensure data transmissions to and from the server are secure and not easily sniffed (SSL, HTTPS, valid certificates).
Ensure data transmissions to and from the server are secure and not easily sniffed (SSL, HTTPS, valid certificates).
![]() Ensure that your application handles remote server maintenance or service interruptions gracefully—scheduled or otherwise.
Ensure that your application handles remote server maintenance or service interruptions gracefully—scheduled or otherwise.
![]() Test your old clients against new servers to ensure expected, graceful application behavior. Consider versioning your server communications and protocols in addition to your client builds.
Test your old clients against new servers to ensure expected, graceful application behavior. Consider versioning your server communications and protocols in addition to your client builds.
![]() Test server upgrades and rollbacks and develop a plan for how you are going to inform users if and when services are down.
Test server upgrades and rollbacks and develop a plan for how you are going to inform users if and when services are down.
These types of testing offer yet more opportunities for automated testing to be employed.
Testing Application Visual Appeal and Usability
Testing a mobile application is not only about finding dysfunctional features, but also about evaluating the usability of the application. Report areas of the application that lack visual appeal or are difficult to navigate or use. We like to use the walking-and-chewing-gum analogy when it comes to mobile user interfaces. Mobile users frequently do not give the application their full attention. Instead, they walk or do something else while they use it. Applications should be as easy for the user as chewing gum.
Tip
Consider conducting usability studies to collect feedback from people who are not familiar with the application. Relying solely on the product team members, who see the application regularly, can blind the team to application flaws.
Leveraging Third-Party Standards for Android Testing
Make a habit of trying to adapt traditional software-testing principles to mobile. Encourage QA personnel to develop and share these practices within your company.
Again, no certification programs are specifically designed for Android applications at this time; however, nothing is stopping the mobile marketplaces from developing them. Consider looking over the certification programs available in other mobile platforms, such as the extensive testing scripts and acceptance guidelines used by Windows, Apple, and BREW platforms, and adjusting them for your Android applications. Regardless of whether you plan to apply for a specific certification, conforming to well-recognized quality guidelines can improve your application’s quality.
Handling Specialized Test Scenarios
In addition to functional testing, there are a few other specialized testing scenarios that any QA team should consider.
Testing Application Integration Points
It’s necessary to test how the application behaves with other parts of the Android operating system. For example:
![]() Ensuring that interruptions from the operating system are handled properly (incoming messages, calls, and powering off)
Ensuring that interruptions from the operating system are handled properly (incoming messages, calls, and powering off)
![]() Validating content provider data exposed by your application, including such uses as through a Live Folder
Validating content provider data exposed by your application, including such uses as through a Live Folder
![]() Validating functionality triggered in other applications via an Intent
Validating functionality triggered in other applications via an Intent
![]() Validating any known functionality triggered in your application via an Intent
Validating any known functionality triggered in your application via an Intent
![]() Validating any secondary entry points to your application as defined in AndroidManifest.xml, such as application shortcuts
Validating any secondary entry points to your application as defined in AndroidManifest.xml, such as application shortcuts
![]() Validating alternative forms of your application, such as App Widgets
Validating alternative forms of your application, such as App Widgets
![]() Validating service-related features, if applicable
Validating service-related features, if applicable
Testing Application Upgrades
When possible, perform upgrade tests of both the client and the server or service side of things. If upgrade support is planned, have development create a mock upgraded Android application so that QA can validate that data migration occurs properly, even if the upgraded application does nothing with the data.
Tip
Users receive Android platform updates over the air on a regular basis. The platform version on which your application is installed might change over time. Some developers have found that firmware upgrades have broken their applications, necessitating upgrades. Always retest your applications when a new version of the SDK is released, so that you can upgrade users before your applications have a chance to break in the field.
If your application is backed by an underlying database, you’ll want to test versioning your database. Does a database upgrade migrate existing data or delete it? Does the migration work from all versions of the application to the current version, or just the last version?
Testing Device Upgrades
Applications are increasingly using the cloud and backup services available on the Android platform. This means that users who upgrade their devices can seamlessly move their data from one device to another. So if they drop their smartphone in a hot tub or crack their tablet screen, their application data can often be salvaged. If your application leverages these services, make sure you test whether these transitions work.
Testing Product Internationalization
It’s a good idea to test internationalization support early in the development process—on both the client and the server or services. You’re likely to run into some problems in this area related to screen real estate and issues with strings, dates, times, and formatting.
Tip
If your application will be localized for multiple languages, test in a foreign language—especially a verbose one. The application might look flawless in English but be unusable in German, where words are generally longer.
Testing for Conformance
Make sure to review any policies, agreements, and terms to which your application must conform and make sure your application complies. For example, Android applications must by default conform to the Google Play Developer Distribution Agreement and, when applicable, other Google Play services terms of service. Other distribution means and add-on packages may add further terms that your application must abide by.
Installation Testing
Generally speaking, installation of Android applications is straightforward; however, you need to test installations on devices with low resources and low memory as well as test installation from the specific marketplaces when your application “goes live.” If the manifest install location allows external media, be sure to test various low or missing resource scenarios.
Backup Testing
Don’t forget to test features that are not readily apparent to the user, such as the backup and restore services and the sync features.
Performance Testing
Application performance matters in the mobile world. The Android SDK has support for calculating performance benchmarks within an application and monitoring memory and resource usage. Testers should familiarize themselves with these utilities and use them often to help identify performance bottlenecks and dangerous memory leaks and misused resources.
One common performance issue we see frequently with new Android developers is trying to do everything on the main UI thread. Time- and resource-intensive work, such as network downloads, XML parsing, graphics rendering, and other such tasks, should be moved off the main UI thread so that the user interface remains responsive. This helps avoid so-called force close (or FC) issues and negative reviews saying as much.
The Debug class (android.os.Debug) has been around since Android was first released. This class provides a number of methods for generating trace logs that can then be analyzed using the traceview test tool. Android 2.3 introduced a new class called StrictMode (android.os.StrictMode) that can be used to monitor applications, track down latency issues, and banish ANRs. There’s also a great write-up about StrictMode on the Android Developers Blog, available at http://android-developers.blogspot.com/2010/12/new-gingerbread-api-strictmode.html.
Here’s another good example of a common performance issue we see from new Android application developers. Many do not realize that, by default, Android screens (backed by activities) are restarted every time the screen orientation changes. Unless the developer takes the appropriate actions, nothing is cached by default. Even basic applications really need to take care of how their lifecycle management works. Tools are available to do this efficiently. Yet, we frequently run into very inefficient ways of doing this—usually due to not handling lifecycle events at all.
Testing In-App Billing
Billing is too important to leave to guesswork. Test it. The Google Play Developer Console allows developers to test application billing. Testing in-app billing requires an actual device with the most recent version of Google Play installed. Making sure billing works correctly could help prevent loss of revenue.
Testing for the Unexpected
Regardless of the workflow you design, understand that users do random, unexpected things—on purpose and by accident. Some users are “button mashers,” whereas others forget to set the keypad lock before putting the device in their pocket, resulting in a weird set of key presses. Rotating the screen frequently, sliding a physical keyboard in and out, or fiddling with other settings often triggers unexpected configuration changes. A phone call or text message inevitably comes in during the most remote edge cases. Your application must be robust enough to handle this. The Exerciser Monkey command-line tool can help you test for this type of event.
Testing to Increase Your Chances of Being a “Killer App”
Every mobile developer wants to develop a “killer app”—those applications that go viral, rocket to the top of the charts, and make millions a month. Most people think that if they just find the right idea, they’ll have a killer app on their hands. Developers are always scouring the top-ten lists and Google Play’s Editors’ Choice category, trying to figure out how to develop the next great app. But let us tell you a little secret: if there’s one thing that all “killer apps” share, it’s a higher-than-average quality standard. No clunky, slow, obnoxious, or difficult-to-use application ever makes it to the big leagues. Testing and enforcing quality standards can mean the difference between a mediocre application and a killer app.
If you spend any time examining the mobile marketplace, you’ll notice that a number of larger mobile development companies publish a variety of high-quality applications with a shared look and feel. These companies leverage user interface consistency as well as shared and above-average quality standards to build brand loyalty and increase market share, while hedging their bets that perhaps just one of their many applications will have that magical combination of great idea and quality design. Other, smaller companies often have the great ideas but struggle with the quality aspects of mobile software development. The inevitable result is that the mobile marketplace is full of fantastic application ideas badly executed with poor user interfaces and crippling defects.
Leveraging Android SDK Tools for Android Application Testing
The Android SDK and developer community provide a number of useful tools and resources for application testing and quality assurance. You might want to leverage the following tools during this phase of your development project:
![]() The physical devices for testing and bug reproduction
The physical devices for testing and bug reproduction
![]() The Android emulator for automated testing and testing of builds when devices are not available
The Android emulator for automated testing and testing of builds when devices are not available
![]() The Android DDMS tool for debugging and interaction with the emulator or device, as well as for taking screenshots
The Android DDMS tool for debugging and interaction with the emulator or device, as well as for taking screenshots
![]() The ADB tool for logging, debugging, and shell access tools
The ADB tool for logging, debugging, and shell access tools
![]() The Exerciser Monkey command-line tool for stress testing of input (available via the adb shell command)
The Exerciser Monkey command-line tool for stress testing of input (available via the adb shell command)
![]() The monkeyrunner API for automating running unit test suites and for writing functional and framework unit tests
The monkeyrunner API for automating running unit test suites and for writing functional and framework unit tests
![]() The uiautomator testing framework, a command-line tool and a set of APIs for automating user interface tests to run on one or more devices by writing UI functional test cases (requires API Level 16 and SDK Tools, Revision 21 or higher)
The uiautomator testing framework, a command-line tool and a set of APIs for automating user interface tests to run on one or more devices by writing UI functional test cases (requires API Level 16 and SDK Tools, Revision 21 or higher)
![]() The UiAutomation class is used for automating and simulating user interactions that span multiple applications and allows you to inspect the user interface to determine if your tests have passed or failed (added in API Level 18)
The UiAutomation class is used for automating and simulating user interactions that span multiple applications and allows you to inspect the user interface to determine if your tests have passed or failed (added in API Level 18)
![]() The logcat command-line tool, which can be used to view log data generated by the application (best used with debug versions of your application)
The logcat command-line tool, which can be used to view log data generated by the application (best used with debug versions of your application)
![]() The traceview application, which can be used to view and interpret the tracing log files you can generate from your app
The traceview application, which can be used to view and interpret the tracing log files you can generate from your app
![]() The sqlite3 command-line tool for application database access (available via the adb shell command)
The sqlite3 command-line tool for application database access (available via the adb shell command)
![]() The Hierarchy Viewer for user interface debugging, performance tweaking, and pixel-perfect screenshots of the device
The Hierarchy Viewer for user interface debugging, performance tweaking, and pixel-perfect screenshots of the device
![]() The lint tool, which can be used to optimize the layout resources of an application
The lint tool, which can be used to optimize the layout resources of an application
![]() The systrace tool for analyzing display and performance execution times of your application’s processes
The systrace tool for analyzing display and performance execution times of your application’s processes
![]() The bmgr command-line tool, which can help test backup management features of your application, if applicable
The bmgr command-line tool, which can help test backup management features of your application, if applicable
It should be noted that although we have used the Android tools, such as the Android emulator and DDMS debugging tools, with the Android IDE, these are standalone tools that can be used by QA personnel without the need for source code or a development environment.
Tip
The tools discussed in Appendix A, “Mastering the Android Development Tools,” and throughout this book are valuable not just to developers; these tools provide testers with much more control over device configuration.
Avoiding Silly Mistakes in Android Application Testing
Here are some of the frustrating and silly mistakes and pitfalls that Android testers should try to avoid:
![]() Not testing the server or service components used by an application as thoroughly as the client side.
Not testing the server or service components used by an application as thoroughly as the client side.
![]() Not testing with the appropriate version of the Android SDK (device versus development build versions).
Not testing with the appropriate version of the Android SDK (device versus development build versions).
![]() Not testing on the device and assuming the emulator is enough.
Not testing on the device and assuming the emulator is enough.
![]() Not testing the live application using the same system that users use (billing, installation, and such). Buy your own app.
Not testing the live application using the same system that users use (billing, installation, and such). Buy your own app.
![]() Neglecting to test all entry points to the application.
Neglecting to test all entry points to the application.
![]() Neglecting to test in different coverage areas and network speeds.
Neglecting to test in different coverage areas and network speeds.
![]() Neglecting to test using battery power. Don’t always have the device plugged in.
Neglecting to test using battery power. Don’t always have the device plugged in.
Android Application Testing Essentials
The Android SDK offers many different methods for testing your application. Some test methods available are runnable from within an IDE, others from the command line, but many times you are able to run them using either an IDE or the command line. Many of these test methods require writing a test program to run against your application.
Writing a test program to run against your application may sound intimidating at first. After all, you are writing a lot of code already just to build an application. If you are new to the concept of writing test code, you may be wondering why you should spend the time learning how to write more code to test your application.
The answer is simple. Writing tests helps automate a great amount of the testing process, rather than having to manually verify that your code is working correctly. An example should help. Let’s say you build an application that allows users to create, read, update, and delete data. Many times these actions are performed on a data model. Writing tests against the data model allows you to verify that the data model code is functioning as it should, providing the correct results when queried, storing the correct results when saved, and deleting the correct information when deleted.
On the other hand, when a user takes an action within your application, you usually would like to provide some sort of visual feedback. Writing tests against your views allows you to verify that when a user does take a particular action, the views are displaying the correct information every step of the way.
Tip
Tests should be designed to determine what the results of your application code should be. As long as your application’s requirements remain the same, your tests should always expect the same results, even if you change your application’s underlying code. In the case that one of your tests fails, as long as the expectation is the same and you have written your tests correctly, you probably have made a mistake somewhere in your application’s logic.
You may be thinking that your app is too simple for testing or that there is no way that an error could possibly be in your code because you are sure that you have covered every possible scenario. If you believe this to be true, and even though you programmed the application to do only what the app is supposed to do, just remember that your users are not programmers, nor do they limit their expectations to what you believe your application provides. Your users may think your application provides a scenario that you have not actually created for them, and when they try to use this imagined scenario, your application will more than likely explode in their hands. That is when the negative reviews start rolling in. Even if the feature never existed in the first place, your users most likely don’t care and will blame the problem on you even if it wasn’t your fault they tried to do something they weren’t supposed to.
Since you are the application programmer, you are bound to come across one or two errors while coding. As your application grows, and you release new features, how do you know for sure that the results you expected last week are still the same as the results your application is providing this week?
Unit Testing with JUnit
One way to ensure that your application is working properly, and continues to work properly over long periods of time, is to write unit tests. A unit test is designed to test small units of your application’s logic. For example, you may always expect a particular value to be created when a user does something. A unit test ensures that every time your code changes, the actual result of that unit of code is as expected. The alternative way to test that your application is creating that particular value properly would be to install your application and try out each and every feature in every possible order while taking into account every possible scenario to see if the result is as expected every time you update your code. This method quickly becomes cumbersome and time-consuming as your application grows and becomes very difficult to track.
Android provides unit testing based on the JUnit testing framework. Many of Android’s testing classes directly inherit their functionality from JUnit. This means that you can write unit tests to test Java code, or you could write more Android-specific tests. Both JUnit and the Android SDK tools test classes are available from within the Android IDE, Eclipse with the ADT plugin, and Android Studio. Unit testing is a very big topic. The following content is not meant to be comprehensive, but rather to serve as an introduction to how you can start unit testing your Android applications to create software that is less error prone.
There are two approaches to writing unit tests. One approach is to write the application first and to write the tests last. The other approach is to write the tests first and the application code last. We will be working with an application that has already been written to ease ourselves into understanding unit tests. There are many reasons you would want to write your tests before your application logic; this approach is known as Test Driven Development (TDD).
We will not cover TDD in this book, but once you have a feel for how we create our first working test project, you should be more comfortable moving on to the test-first approach. We will point out that using TDD helps with deciding up front what your application results should be, and therefore you write your unit tests with those results in mind. Knowing what the expected results should be without having written the application logic means that your tests will fail. Then you move on to writing your application, knowing what results to produce, until all your tests pass.
Just to clarify, this does not mean that you write every single one of your tests up front before writing any code. Instead, you write a single unit test and then move on to writing the application code to make that individual unit test pass. Once we are through, you should be able to see how TDD could have been applied to the following example. TDD is a vast topic, and there are many great resources out there for learning it.
Introducing the PasswordMatcher Application
In order to learn how to perform unit testing, we first need an application that we can unit test. We have provided a simple application that shows two EditText fields that have an inputType of textPassword. This means that any text typed into the fields will be anonymous. We also have aButton with an onClick listener that determines if the two passwords entered into each of the EditText boxes are equal. Figure 18.1 shows what the user interface for the application looks like.
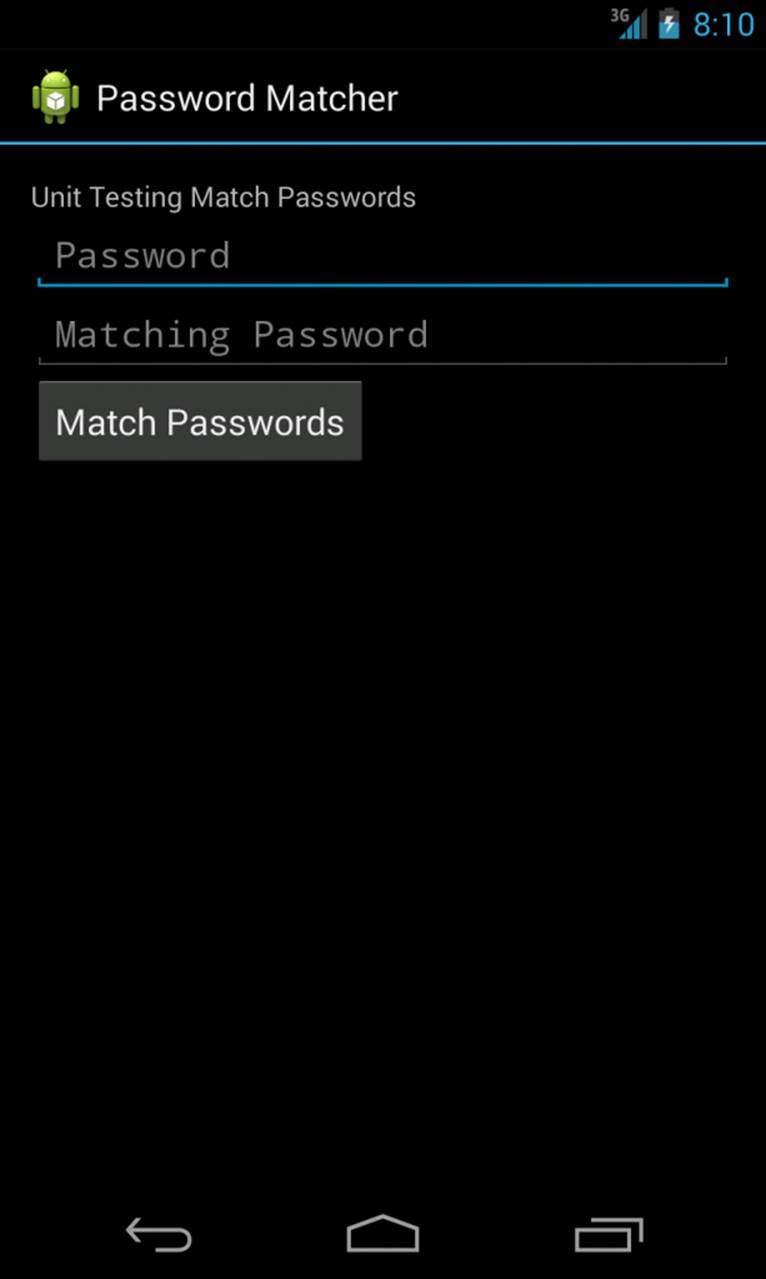
Figure 18.1 The PasswordMatcher application showing two EditText boxes and a Button.
Tip
Many of the code samples provided in this chapter are taken from the PasswordMatcher application and the PasswordMatcherTest application. The source code for these applications is provided for download on the book’s website.
Let’s take a look at the contents of the layout file for the PasswordMatcher application. The name of the file is activity_password_matcher.xml.
<LinearLayout xmlns:android="http://schemas.android.com/apk/res/android"
xmlns:tools="http://schemas.android.com/tools"
android:layout_width="match_parent"
android:layout_height="match_parent"
android:orientation="vertical"
android:paddingBottom="@dimen/activity_vertical_margin"
android:paddingLeft="@dimen/activity_horizontal_margin"
android:paddingRight="@dimen/activity_horizontal_margin"
android:paddingTop="@dimen/activity_vertical_margin"
tools:context=".PasswordMatcherActivity" >
<TextView
android:id="@+id/title"
android:layout_width="match_parent"
android:layout_height="wrap_content"
android:contentDescription="@string/display_title"
android:text="@string/match_passwords_title" />
<EditText
android:id="@+id/password"
android:layout_width="match_parent"
android:layout_height="wrap_content"
android:hint="@string/password"
android:inputType="textPassword"
android:text="" />
<EditText
android:id="@+id/matchingPassword"
android:layout_width="match_parent"
android:layout_height="wrap_content"
android:hint="@string/matching_password"
android:inputType="textPassword"
android:text="" />
<Button
android:id="@+id/matchButton"
android:layout_width="wrap_content"
android:layout_height="wrap_content"
android:contentDescription="@string/submit_match_password_button"
android:text="@string/match_password_button" />
<TextView
android:id="@+id/passwordResult"
android:layout_width="match_parent"
android:layout_height="wrap_content"
android:contentDescription="@string/match_password_notice"
android:visibility="gone" />
</LinearLayout>
The layout is a LinearLayout that contains a TextView for displaying our application title, two EditText views with the text initially set to be an empty string, a Button, and a final TextView for displaying the results of our Button onClick response that has a visibility of GONE. This visibility setting means that the TextView will not appear when the application is first launched, nor will it take up any visual space.
The code for our PasswordMatcherActivity is as follows:
public class PasswordMatcherActivity extends Activity {
EditText password;
EditText matchingPassword;
TextView passwordResult;
@Override
protected void onCreate(Bundle savedInstanceState) {
super.onCreate(savedInstanceState);
setContentView(R.layout.activity_password_matcher);
password = (EditText) findViewById(R.id.password);
matchingPassword = (EditText) findViewById(R.id.matchingPassword);
passwordResult = (TextView) findViewById(R.id.passwordResult);
Button button = (Button) findViewById(R.id.matchButton);
button.setOnClickListener(new View.OnClickListener() {
@Override
public void onClick(View v) {
String p = password.getText().toString();
String mp = matchingPassword.getText().toString();
if (p.equals(mp) && !p.isEmpty() && !mp.isEmpty()) {
passwordResult.setVisibility(View.VISIBLE);
passwordResult.setText(R.string.passwords_match_notice);
passwordResult.setTextColor(getResources().getColor(
R.color.green));
} else {
passwordResult.setVisibility(View.VISIBLE);
passwordResult.setText(R.string.passwords_do_not_match_notice);
passwordResult.setTextColor(getResources().getColor(
R.color.red));
}
}
});
}
}
As you see, the onClick method checks to see that our two passwords are equal and that they are not empty. If either of the passwords is empty or they are not equal, we change the visibility setting of the TextView to View.VISIBLE, set the text to display an error message, and set the text color to red. If the passwords are equal and not empty, we change the visibility setting of the TextView to View.VISIBLE, set the text to display a success message, and set the text color to green.
Determining What Our Tests Should Prove
Let’s think about what results our application should produce. Our application requests the user to input data into two text fields, and then responds with a result when the user clicks the button. Here are the results that we would like our tests to make sure our application produces:
![]() When a user leaves either one of the password fields empty or both password fields empty, assert that our application has displayed a red error message.
When a user leaves either one of the password fields empty or both password fields empty, assert that our application has displayed a red error message.
![]() When a user enters two passwords that do not match, assert that our application has displayed a red error message.
When a user enters two passwords that do not match, assert that our application has displayed a red error message.
![]() When a user enters two matching passwords, assert that our application has displayed a green success message.
When a user enters two matching passwords, assert that our application has displayed a green success message.
Now that we know what results our application should produce, we are set up pretty well for knowing how to write our tests. In order to make sure our application produces those results, we will write tests that assert these assumptions, and that the actual results are as expected.
Creating an Android Test Project
In order to write our tests, we must first create an Android test project. The test code is not part of our PasswordMatcher application. Instead, we create a PasswordMatcherTest package to house our test classes.
The steps for creating a test project are as follows:
1. In the Android IDE, go to File, New, Other, and under the Android folder, select Android Test Project, and press Next (see Figure 18.2).
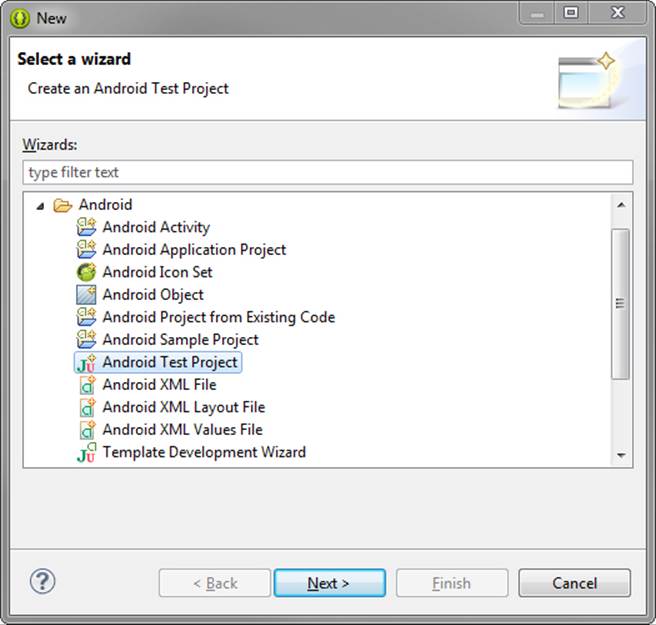
Figure 18.2 Creating an Android test project in the Android IDE.
2. On the Create Android Project page, type the Project Name of PasswordMatcherTest and click Next (see Figure 18.3).
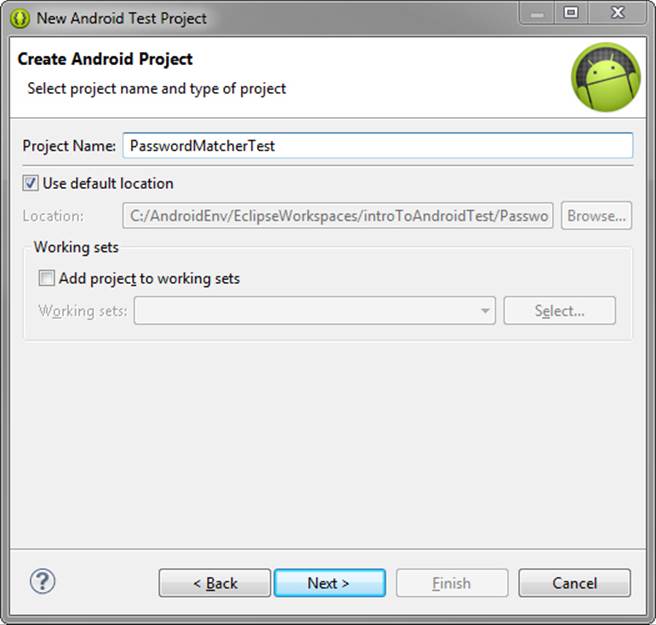
Figure 18.3 Naming the test project in the Android IDE.
3. On the Select Test Target page, make sure An existing Android Project is selected, choose the PasswordMatcher project, and click Next (see Figure 18.4).
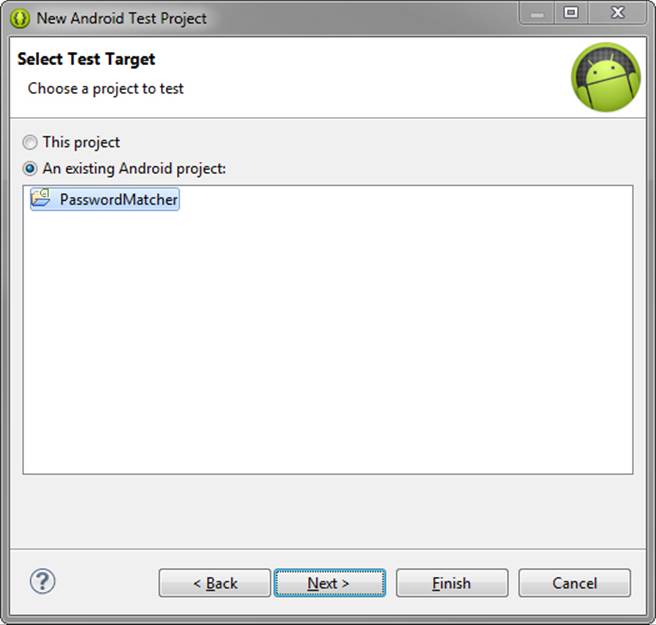
Figure 18.4 Linking the test project to the PasswordMatcher application in the Android IDE.
4. On the Select Build Target page, choose Android 4.3 and click Finish (see Figure 18.5).
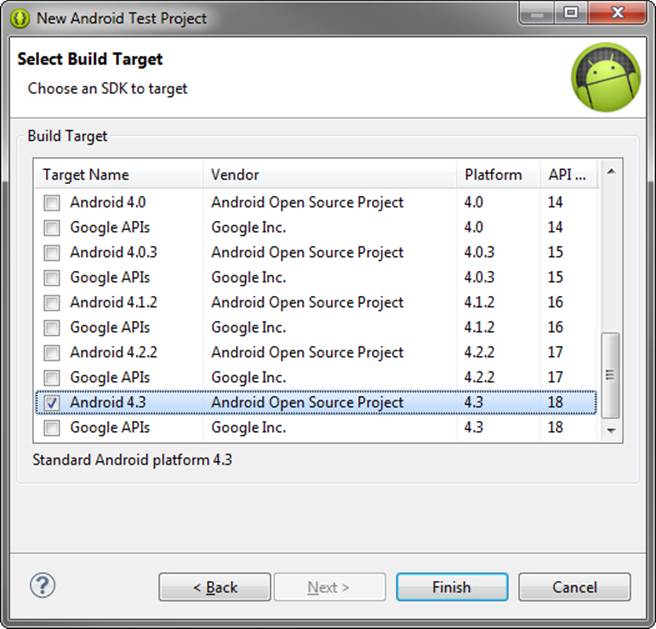
Figure 18.5 Selecting the Build Target of the test project within the Android IDE.
Now that our test project has been created, upon first glance the project looks very much like a regular Android application. As we can see in Figure 18.6, the folder structure is very similar and has many of the same files that we are used to seeing, such as the AndroidManifest.xml.
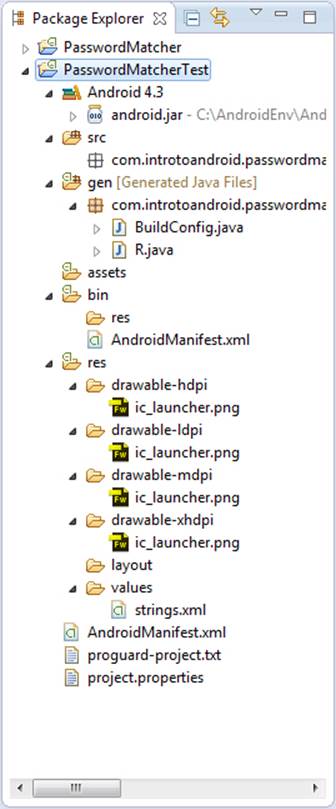
Figure 18.6 Viewing the test project directory structure within the Android IDE.
Upon looking at the contents of the manifest file, we can clearly see the differences (see Figure 18.7).

Figure 18.7 Viewing the manifest file of the test project within the Android IDE.
The manifest includes the following:
<instrumentation
android:name="android.test.InstrumentationTestRunner"
android:targetPackage="com.introtoandroid.passwordmatcher" />
<application
android:icon="@drawable/ic_launcher"
android:label="@string/app_name" >
<uses-library android:name="android.test.runner" />
</application>
The <instrumentation> element is required for our test projects. This declaration allows our test application to “hook” into the Android system. We specify the name of the InstrumentationTestRunner class and include our PasswordMatcher package as the targetPackage against which our tests will run. We can also see that this application has a <uses-library> element that references android.test.runner. Another important aspect is that the test package name is com.introtoandroid.passwordmatcher.test. This is almost the same as the target application package, except that.test has been added to the end of the package. All test projects created using the Android tools have .test appended to the name of the package under test.
We do not yet have a source file or any classes defined in our source package for this project. Let’s go ahead and create one within the Android IDE so we can begin writing code by following these steps:
1. From inside the Android IDE Package Explorer, right-click on the package com.introtoandroid.passwordmatcher.test found within the src folder of the project PasswordMatcherTest, choose New, and then choose Class. Type the name PasswordMatcherTest as the Class name (Figure 18.8). The Superclass default entry must be changed, so choose Browse, type android.test.ActivityInstrumentationTestCase2 into the “Choose a type” text field entry, and click OK (Figure 18.9). Finally, click Finish to create the Java class file.
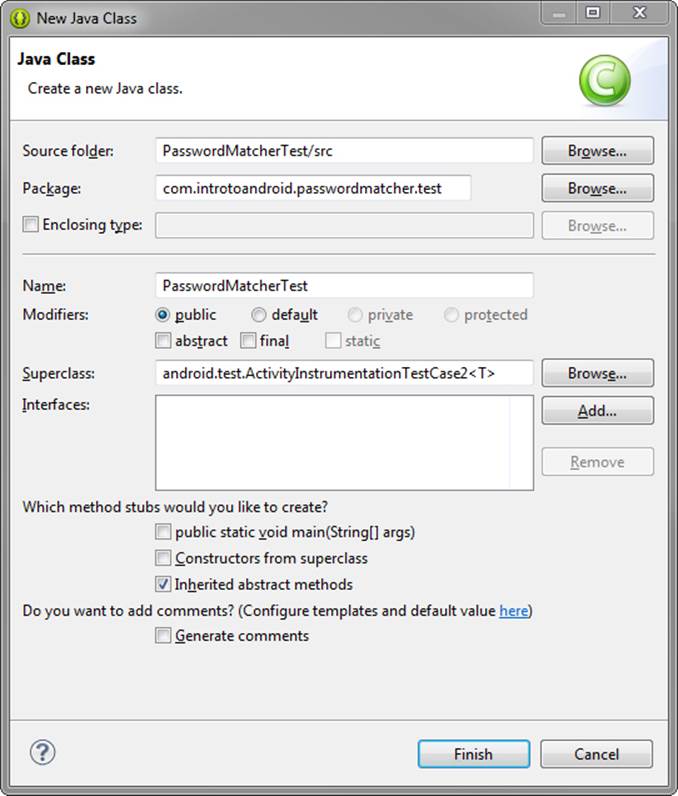
Figure 18.8 Creating the PasswordMatcherTest.java file.
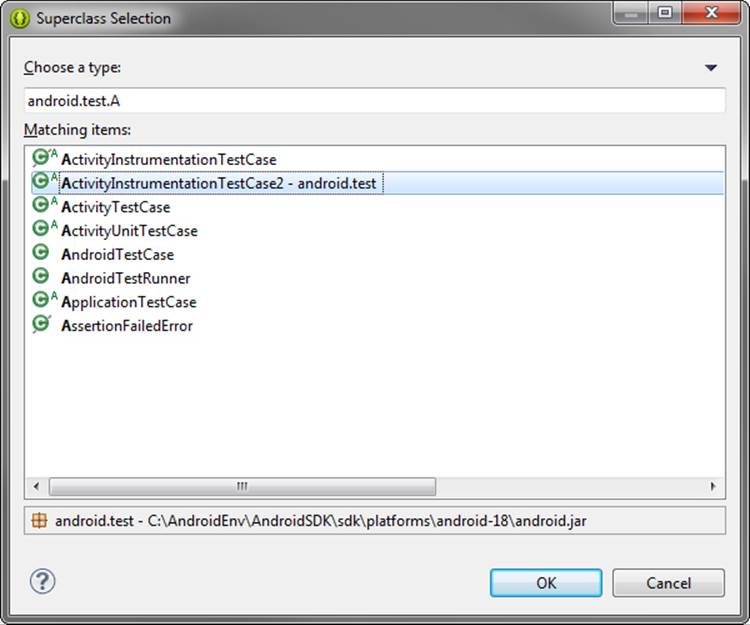
Figure 18.9 Choosing a superclass type for the test class.
2. Now that we have our class file created, there are a few errors that we need to fix. We must first import the PasswordMatcherActivity file and the resource files associated from our PasswordMatcher project. The import statements should be as follows:
import com.introtoandroid.passwordmatcher.PasswordMatcherActivity;
import com.introtoandroid.passwordmatcher.R;
3. We must also modify the extend class associated with the ActivityInstrumentationTestCase2<T> from T to PasswordMatcherActivity. Our new declaration should be ActivityInstrumentationTestCase2<PasswordMatcherActivity>.
4. We have one more error that needs to be fixed before we can write any code, and that is to add a class constructor. Go ahead and add the following code to your class:
public PasswordMatcherTest() {
super(PasswordMatcherActivity.class);
}
We are now ready to begin writing our tests for this project.
Writing the Tests
There are a few standard steps to take when writing tests. First, we need to create a setup method that will set up our test project with any information that we will need to access from within the tests. This is the place where we want to access our PasswordMatcherActivity, which will allow us to gain access to any of the views that we may need throughout the tests. We must create a few variables for accessing our views in addition to importing any classes that may be required. Here are the import statements:
import android.widget.Button;
import android.widget.EditText;
import android.widget.TextView;
Here are the variables we need to access in our test project:
TextView title;
EditText password;
EditText matchingPassword;
Button button;
TextView passwordResult;
PasswordMatcherActivity passwordMatcherActivity;
And here is our setUp() method:
protected void setUp() throws Exception {
super.setUp();
passwordMatcherActivity = getActivity();
title = (TextView) passwordMatcherActivity.findViewById(R.id.title);
password = (EditText) passwordMatcherActivity.findViewById(R.id.password);
matchingPassword = (EditText)
passwordMatcherActivity.findViewById(R.id.matchingPassword);
button = (Button) passwordMatcherActivity.findViewById(R.id.matchButton);
passwordResult = (TextView)
passwordMatcherActivity.findViewById(R.id.passwordResult);
}
This method gets the PasswordMatcherActivity using the getActivity() method, so that we can start accessing our views using the findViewById method.
Now we can begin writing test cases to ensure that our application is behaving correctly. We should start by testing the initial state of the application to make sure the starting state is correct. Even though the initial state will always be the same, it is a good idea to know that the application starts as expected, because if something is not working correctly when our application begins changing state, we have already verified that our starting state is as expected, and that rules out the starting state from being the culprit.
Tip
When using JUnit 3 for Android testing, all test case methods must begin with the word test, such as testPreConditions() or testMatchingPasswords(). Prepending the word test to method names lets JUnit know that the method is in fact a test method and not just a standard method. Only the methods that start with the word test will be run as test cases.
The elements of our application that change their state during execution are the two EditText elements and the TextView result notice. Ensuring that our test starts with the correct inputs gives us confidence that our actual test methods will start with the correct values. Let’s begin by writing our very first test case for making sure the starting state of our application is as expected.
public void testPreConditions() {
String t = title.getText().toString();
assertEquals(passwordMatcherActivity.getResources()
.getString(R.string.match_passwords_title), t);
String p = password.getText().toString();
String pHint = password.getHint().toString();
int pInput = password.getInputType();
assertEquals(EMPTY_STRING, p);
assertEquals(passwordMatcherActivity.getResources()
.getString(R.string.password), pHint);
assertEquals(129, pInput);
String mp = matchingPassword.getText().toString();
String mpHint = matchingPassword.getHint().toString();
int mpInput = matchingPassword.getInputType();
assertEquals(EMPTY_STRING, mp);
assertEquals(passwordMatcherActivity.getResources()
.getString(R.string.matching_password), mpHint);
assertEquals(129, mpInput);
String b = button.getText().toString();
assertEquals(passwordMatcherActivity.getResources()
.getString(R.string.match_password_button), b);
int visibility = passwordResult.getVisibility();
assertEquals(View.GONE, visibility);
}
Android Unit-Testing APIs and Assertions
Before we run our first test, let’s take a moment to introduce assertions. If you are new to unit testing, you probably have not yet been exposed to the assert methods. An assertion compares the expected value the application should be creating (the expected value provided by you) with the actual value that the test receives upon running the application.
There are many standard JUnit assertion methods that you have at your disposal, but there are also many Android-specific assertion methods.
The testPreConditions() method begins by getting the text value of the TextView with the id of title. We then use the assertEquals() method and pass in the value that our test expects the text attribute to be, with the value that the getText() method actually provides. When you run the test, if the values are equal, this means that one particular assertion of the test passes. We continue getting the text value, hint value, and inputType of both EditText fields and use the assertEquals() method to make sure the expected value matches the actual value. We also get the text value of the Button and check to see if it matches the expected value. We finish the method by making sure that the visibility of the passwordResult notice is not showing and is equal to the View.GONE value.
If all of the assertions pass, this means that the entire test should pass and that the starting values of our application are the values they are supposed to be.
Running Your First Test Using the Android IDE
To run your first test using the Android IDE or Eclipse with the ADT plugin installed, select your test project in the Android IDE, right-click the project, go to Debug As, then choose Android JUnit Test. We want to ensure that the testPreConditions() test method is starting with the correct values.
 Note
Note
Make sure that you have an emulator running on your computer, or that you have a real device connected to your computer in debug mode for your test to run. If you have more than one device or emulator attached to your computer, you may be presented with a selection UI to choose a device on which to run the test.
Your test should begin running, and you must wait until the test completes to determine if it passes.
Analyzing the Test Results
Once the test completes, you should see a new window open within the IDE titled JUnit. If your test has been written correctly, you should see the results as shown in Figure 18.10 that indicate the test has passed.
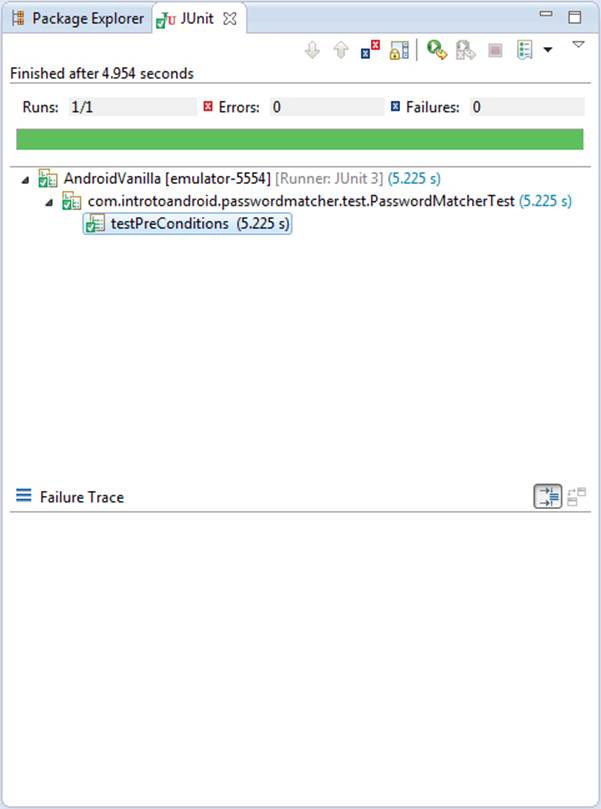
Figure 18.10 The Android IDE showing that the testPreConditions() method has passed.
The JUnit window provides a few useful details about the test once it has finished. You should see that the test was run on a particular device and port; in this particular case, the device was an emulator named AndroidVanilla on port 5554. You should also see that the test class that was run was com.introtoandroid.passwordmatcher.test.PasswordMatcherTest. Also notice that the testPreConditions() method was run. An icon (![]() ) provides a visual indication that the test run completed successfully. Also note the time it took to complete the overall test in addition to the time it took to complete the testPreConditions() method.
) provides a visual indication that the test run completed successfully. Also note the time it took to complete the overall test in addition to the time it took to complete the testPreConditions() method.
Notice the ![]() icon. This icon allows you to rerun your test without needing to use the Debug As option. The
icon. This icon allows you to rerun your test without needing to use the Debug As option. The ![]() icon allows you to rerun your failed tests. This is useful when you have quite a few tests and you just want to work on the failing tests and narrow in on tests that you need to correct.
icon allows you to rerun your failed tests. This is useful when you have quite a few tests and you just want to work on the failing tests and narrow in on tests that you need to correct.
A failed test means that the expected results do not match the actual results. The ![]() icon lets you know that a test has failed. In the case that the test failed, you would see a window like the one depicted in Figure 18.11.
icon lets you know that a test has failed. In the case that the test failed, you would see a window like the one depicted in Figure 18.11.
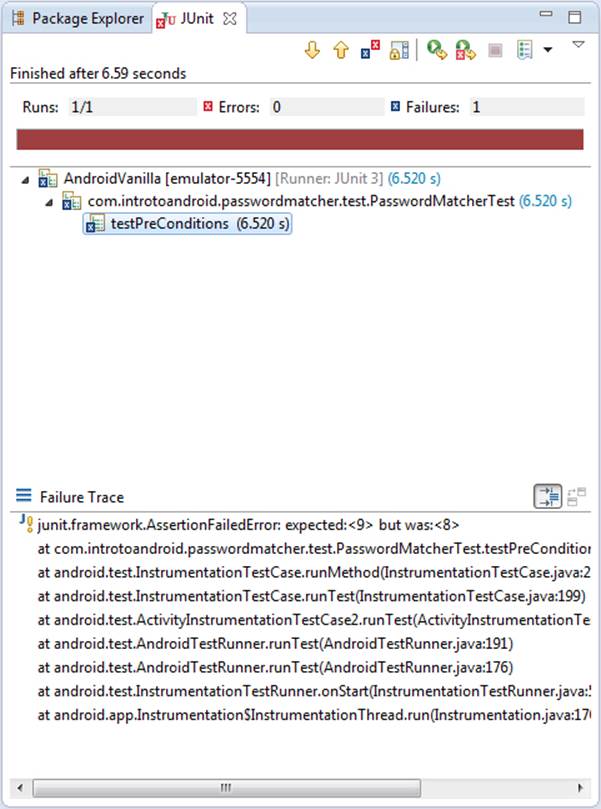
Figure 18.11 The Android IDE showing that the testPreConditions() method has failed the test.
You should also notice that the Failure Trace section of the JUnit window shown in Figure 18.11 lists a stack trace that could be useful to help you track down where the failure is originating.
An error in the test means that there is an error in the test code, and you must fix the error before you can determine if the test will pass or fail (see Figure 18.12). The ![]() icon lets you know if a particular test has an error present.
icon lets you know if a particular test has an error present.
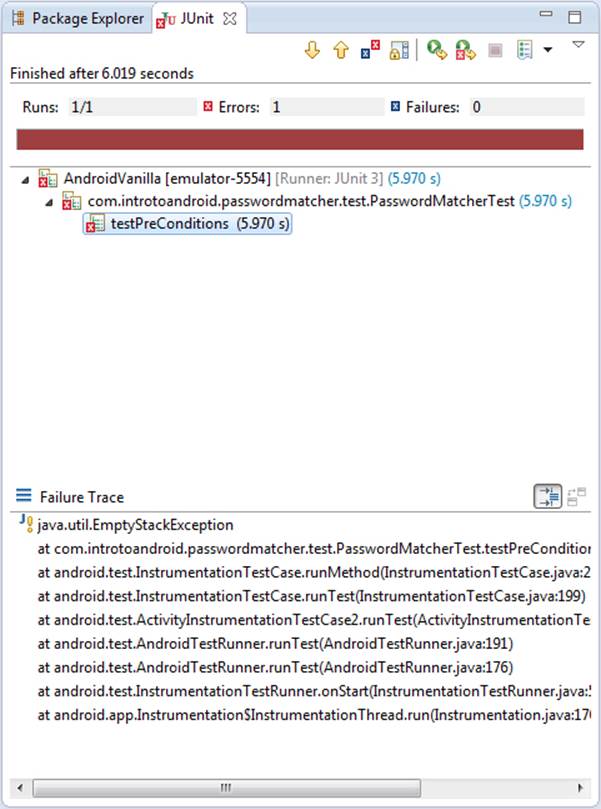
Figure 18.12 The Android IDE showing that the testPreConditions() method has an error that must be fixed before the test can pass or fail.
Again, the Failure Trace section of the JUnit window lets you know where the error is originating; in this case, the error is a NullPointerException.
Adding Additional Tests
The test project includes a few additional tests, but we will cover only one of those tests here, as they are very similar. Please see the PasswordMatcherTest project for the full code listing providing all the test methods. The test that we will discuss is the testMatchingPasswords() method. As the name of the method suggests, this test will determine if the passwords we provide the application match and, if so, will let us know if the expected visual outcome of the test matches what the application actually outputs when provided the matching password inputs.
Here is our testMatchingPasswords() method:
public void testMatchingPasswords() {
TouchUtils.tapView(this, password);
sendKeys(GOOD_PASSWORD);
TouchUtils.tapView(this, matchingPassword);
sendKeys(GOOD_PASSWORD);
TouchUtils.clickView(this, button);
String p = password.getText().toString();
assertEquals("abc123", p);
String mp = matchingPassword.getText().toString();
assertEquals("abc123", mp);
assertEquals(p, mp);
int visibility = passwordResult.getVisibility();
assertEquals(View.VISIBLE, visibility);
String notice = passwordResult.getText().toString();
assertEquals(passwordMatcherActivity.getResources()
.getString(R.string.passwords_match_notice), notice);
int noticeColor = passwordResult.getCurrentTextColor();
assertEquals(passwordMatcherActivity.getResources()
.getColor(R.color.green), noticeColor);
}
This test does a few things. Since we have initialized our views in the setUp() method, we can begin testing our application. We start the method by calling the TouchUtils.tapView() method. The TouchUtils class provides methods for simulating touch events within our application. Calling the tapView() method on the password EditText field grabs the focus of the field and allows the test to use the sendKeys() method to enter a GOOD_PASSWORD value into the EditText field. We continue the test by grabbing the focus of the matchingPassword EditText field and use the sendKeys()method for the test to enter the same GOOD_PASSWORD value into the second EditText field. We then use the getText() method to get the text value of each of the EditText values to ensure that the values are equals to the GOOD_PASSWORD value the test entered, and then check to make sure that bothEditText values are equal to each other. The test then checks the passwordResult TextView to see if the visibility has been set to View.VISIBLE and further checks to see if the value of the text is actually what we expect the value to be. Finally, we get the text color value of the passwordResultTextView and check to make sure that the value is equal to green.
When you run the test, you should see the PasswordMatcher application start up, and you should also notice that both EditText values automatically begin receiving password input into their respective fields, followed by the Button named Match Passwords receiving a click. After the Buttonreceives the click from the test, you should finally see the TextView display as visible, and the PasswordMatcherActivity should now display a green success notice that reads Passwords match! (see Figure 18.13).
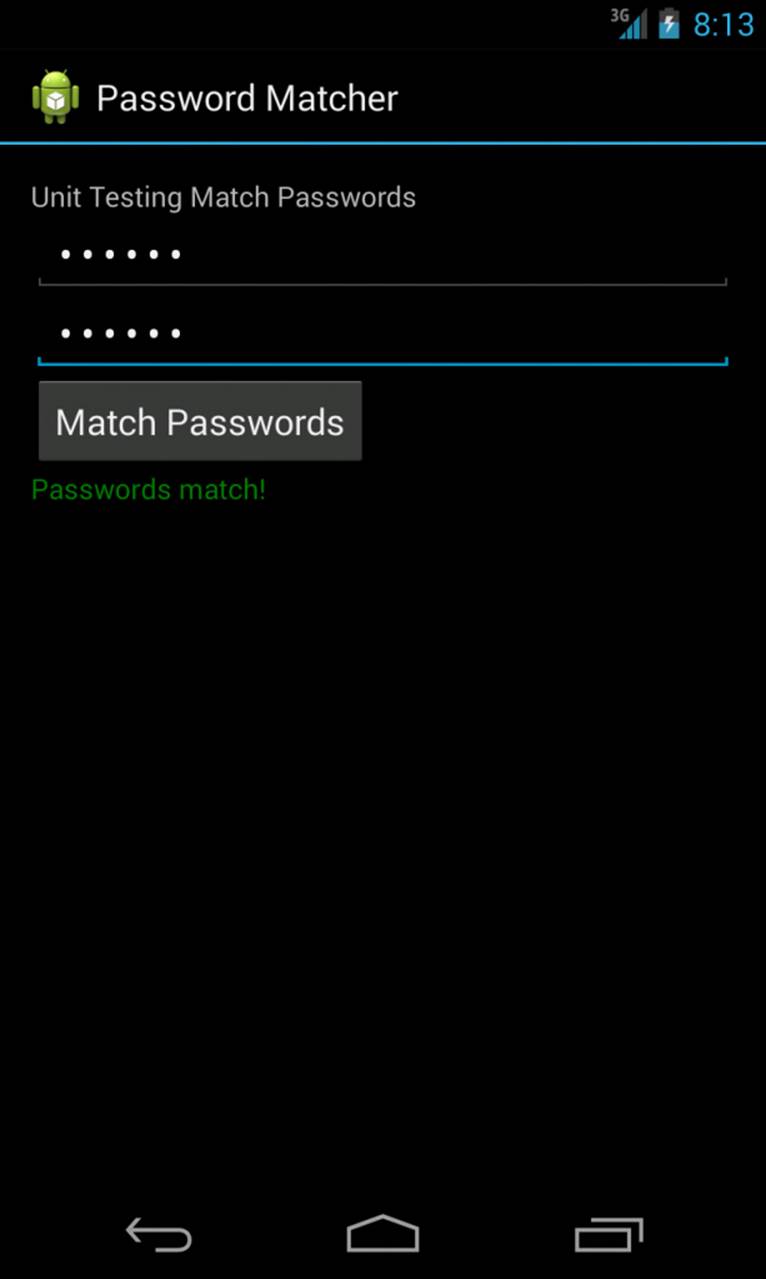
Figure 18.13 The PasswordMatcher application displaying a TextView with a green color indicating that the passwords entered match.
After we run our test, we should see that the test passes, and this means that the application responded as expected (see Figure 18.14).
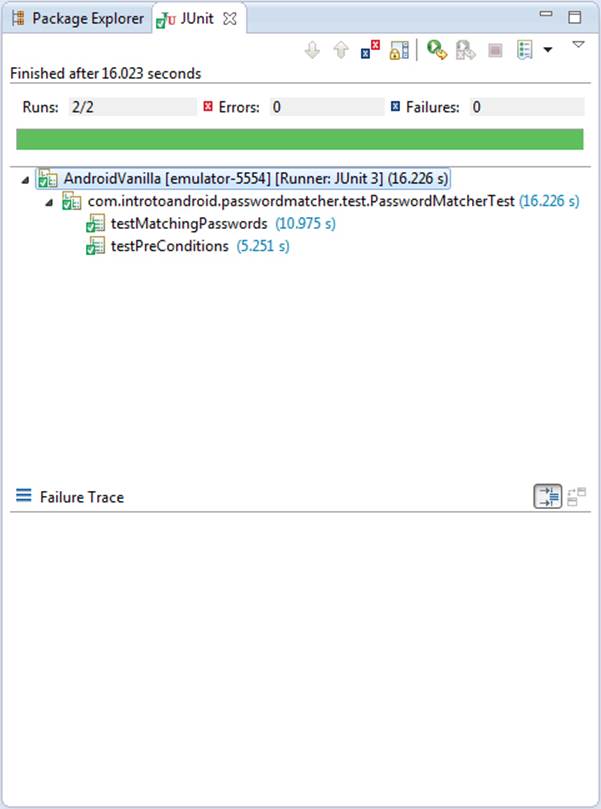
Figure 18.14 The Android IDE displaying a successful test run.
Here are just a few classes, located in the android.test package, that you may want to be aware of. For a full listing with descriptions, see the Android documentation.
![]() ActivityInstrumentationTestCase2<T>: used for functional testing of a single Activity
ActivityInstrumentationTestCase2<T>: used for functional testing of a single Activity
![]() MoreAsserts: additional assertion methods specific to Android
MoreAsserts: additional assertion methods specific to Android
![]() TouchUtils: used to perform touch events
TouchUtils: used to perform touch events
![]() ViewAsserts: assertion methods used for making assertions about views
ViewAsserts: assertion methods used for making assertions about views
More Android Automated Testing Programs and APIs
Automated testing is a very powerful tool that you should use when developing your Android applications. JUnit for Android is just one of the automated testing tools that the Android SDK provides. Other tools that the Android SDK provides for testing applications that deserve a mention are as follows:
![]() UI/Application Exerciser Monkey: This program, named monkey, can be run from the command line using an adb shell command. Use this tool for stress testing your application, which generates and sends your test device random events while your application is running. This is useful for uncovering bugs that may be present when random events are thrown at your application.
UI/Application Exerciser Monkey: This program, named monkey, can be run from the command line using an adb shell command. Use this tool for stress testing your application, which generates and sends your test device random events while your application is running. This is useful for uncovering bugs that may be present when random events are thrown at your application.
![]() monkeyrunner: This is a testing API for writing Python programs for taking control of the automated testing process. A monkeyrunner program runs outside the Android emulator or device and can be used for running unit tests, installing and uninstalling your .apk file, testing across multiple devices, taking screenshots of your application during a running test cycle, and many more useful features.
monkeyrunner: This is a testing API for writing Python programs for taking control of the automated testing process. A monkeyrunner program runs outside the Android emulator or device and can be used for running unit tests, installing and uninstalling your .apk file, testing across multiple devices, taking screenshots of your application during a running test cycle, and many more useful features.
![]() uiautomator: This is a testing framework and command-line tool that was added in API Level 16. The uiautomator tool is used for running tests from the command line using an adb shell command. You can use this tool for automating user interface tests across one or more devices and for automating the functional testing of your user interface.
uiautomator: This is a testing framework and command-line tool that was added in API Level 16. The uiautomator tool is used for running tests from the command line using an adb shell command. You can use this tool for automating user interface tests across one or more devices and for automating the functional testing of your user interface.
![]() UiAutomation: This is a testing class for simulating user events and for leveraging the AccessibilityService APIs for inspecting user interfaces during automated tests. You can use this class for simulating user events that span multiple applications. This class was added in API Level 18.
UiAutomation: This is a testing class for simulating user events and for leveraging the AccessibilityService APIs for inspecting user interfaces during automated tests. You can use this class for simulating user events that span multiple applications. This class was added in API Level 18.
Summary
In this chapter, we armed you—the keepers of application quality—with real-world knowledge for testing Android applications, in addition to introducing a real example of how to test your Android applications with unit tests.
Whether you’re a team of one or one hundred, testing your applications is critical for project success. Luckily, the Android SDK provides a number of tools for testing applications, as well as a powerful unit-testing framework and other sophisticated testing APIs. By following standard QA techniques and leveraging these tools, you can ensure that the application you deliver to your users is the best it can be.
Quiz Questions
1. True or false: One typical defect common to mobile applications is an application using too much disk space on the device.
2. Name three specialized test scenarios that any QA team should consider.
3. What is the name of the unit-testing library available for testing Android applications?
4. When creating an Android test project, what word is automatically appended to the end of the package name under test by the Android tools?
5. When using JUnit 3 for testing Android applications, what prefix must your test methods begin with?
6. True or false: Testing the default starting values of your application is overkill.
7. What Android test class is used for performing touch events from within unit tests?
Exercises
1. Read through the Testing topic within the Android documentation, at the following URL: http://d.android.com/tools/testing/index.html.
2. Using the PasswordMatcherTest project, determine how to run the test project from the command line and provide the command for doing so.
3. Add an additional test method to the PasswordMatcherTest project that uses a method from the ViewAsserts class to determine if each of the views of the PasswordMatcher application is on the screen. Write the method and make sure the test passes.
References and More Information
Android Tools: “Testing”:
http://d.android.com/tools/testing/index.html
Android Tools: “Testing Fundamentals”:
http://d.android.com/tools/testing/testing_android.html
Android Tools: “monkeyrunner”:
http://d.android.com/tools/help/monkeyrunner_concepts.html
Android Tools: “UI/Application Exerciser Monkey”:
http://d.android.com/tools/help/monkey.html
Android Tools: “UI Testing”:
http://d.android.com/tools/testing/testing_ui.html
Android Tools: “uiautomator”:
http://d.android.com/tools/help/uiautomator/index.html
Android Reference: “UiAutomation”:
http://d.android.com/reference/android/app/UiAutomation.html
Wikipedia on software testing:
http://en.wikipedia.org/wiki/Software_testing
Software Testing Help:
http://www.softwaretestinghelp.com