Introduction to Android Application Development, Fourth Edition (2014)
Part II. Android Application Basics
Chapter 4. Understanding the Anatomy of an Android Application
Classical computer science classes often define a program in terms of functionality and data, and Android applications are no different. They perform tasks, display information to the screen, and act upon data from a variety of sources.
Developing Android applications for mobile devices with limited resources requires a thorough understanding of the application lifecycle. Android uses its own terminology for these application building blocks—terms such as context, activity, and intent. This chapter familiarizes you with the most important terms, and their related Java class components, used by Android applications.
Mastering Important Android Terminology
This chapter introduces you to the terminology used in Android application development and provides you with a more thorough understanding of how Android applications function and interact with one another. Here are some of the important terms covered in this chapter:
![]() Context: The context is the central command center for an Android application. Most application-specific functionality can be accessed or referenced through the context. The Context class (android.content.Context) is a fundamental building block of any Android application and provides access to application-wide features such as the application’s private files and device resources as well as system-wide services. The application-wide Context object is instantiated as an Application object (android.app.Application).
Context: The context is the central command center for an Android application. Most application-specific functionality can be accessed or referenced through the context. The Context class (android.content.Context) is a fundamental building block of any Android application and provides access to application-wide features such as the application’s private files and device resources as well as system-wide services. The application-wide Context object is instantiated as an Application object (android.app.Application).
![]() Activity: An Android application is a collection of tasks, each of which is called an activity. Each activity within an application has a unique task or purpose. The Activity class (android.app.Activity) is a fundamental building block of any Android application, and most applications are made up of several activities. Typically, the purpose is to handle the display of a single screen, but thinking only in terms of “an activity is a screen” is too simplistic. An Activity class extends the Context class, so it also has all of the functionality of the Context class.
Activity: An Android application is a collection of tasks, each of which is called an activity. Each activity within an application has a unique task or purpose. The Activity class (android.app.Activity) is a fundamental building block of any Android application, and most applications are made up of several activities. Typically, the purpose is to handle the display of a single screen, but thinking only in terms of “an activity is a screen” is too simplistic. An Activity class extends the Context class, so it also has all of the functionality of the Context class.
![]() Fragment: An activity has a unique task or purpose, but it can be further componentized; each component is called a fragment. Each fragment within an application has a unique task or purpose within its parent activity. The Fragment class (android.app.Fragment) is often used to organize activity functionality in such a way as to allow a more flexible user experience across various screen sizes, orientations, and aspect ratios. A fragment is commonly used to hold the code and screen logic for placing the same user interface component in multiple screens, which are represented by multiple Activity classes.
Fragment: An activity has a unique task or purpose, but it can be further componentized; each component is called a fragment. Each fragment within an application has a unique task or purpose within its parent activity. The Fragment class (android.app.Fragment) is often used to organize activity functionality in such a way as to allow a more flexible user experience across various screen sizes, orientations, and aspect ratios. A fragment is commonly used to hold the code and screen logic for placing the same user interface component in multiple screens, which are represented by multiple Activity classes.
![]() Intent: The Android operating system uses an asynchronous messaging mechanism to match task requests with the appropriate activity. Each request is packaged as an intent. You can think of each such request as a message stating an intent to do something. Using the Intent class (android.content.Intent) is the primary method by which application components such as activities and services communicate with one another.
Intent: The Android operating system uses an asynchronous messaging mechanism to match task requests with the appropriate activity. Each request is packaged as an intent. You can think of each such request as a message stating an intent to do something. Using the Intent class (android.content.Intent) is the primary method by which application components such as activities and services communicate with one another.
![]() Service: Tasks that do not require user interaction can be encapsulated in a service. A service is most useful when the operations are lengthy (offloading time-consuming processing) or need to be done regularly (such as checking a server for new mail). Whereas activities run in the foreground and generally have a user interface, the Service class (android.app.Service) is used to handle background operations related to an Android application. The Service class extends the Context class.
Service: Tasks that do not require user interaction can be encapsulated in a service. A service is most useful when the operations are lengthy (offloading time-consuming processing) or need to be done regularly (such as checking a server for new mail). Whereas activities run in the foreground and generally have a user interface, the Service class (android.app.Service) is used to handle background operations related to an Android application. The Service class extends the Context class.
The Application Context
The application Context is the central location for all top-level application functionality. The Context class can be used to manage application-specific configuration details as well as application-wide operations and data. Use the application Context to access settings and resources shared across multiple Activity instances.
Retrieving the Application Context
You can retrieve the Context for the current process using the getApplicationContext() method, found in common classes such as Activity and Service, like this:
Context context = getApplicationContext();
Using the Application Context
After you have retrieved a valid application Context object, it can be used to access application-wide features and services, including the following:
![]() Retrieving application resources such as strings, graphics, and XML files
Retrieving application resources such as strings, graphics, and XML files
![]() Accessing application preferences
Accessing application preferences
![]() Managing private application files and directories
Managing private application files and directories
![]() Retrieving uncompiled application assets
Retrieving uncompiled application assets
![]() Accessing system services
Accessing system services
![]() Managing a private application database (SQLite)
Managing a private application database (SQLite)
![]() Working with application permissions
Working with application permissions
 Warning
Because the Activity class is derived from the Context class, you can sometimes use this instead of retrieving the application Context explicitly. However, don’t be tempted to just use your Activity Context in all cases, because doing so can lead to memory leaks. You can find a great article on this topic at http://android-developers.blogspot.com/2009/01/avoiding-memory-leaks.html.
Retrieving Application Resources
You can retrieve application resources using the getResources() method of the application Context. The most straightforward way to retrieve a resource is by using its resource identifier, a unique number automatically generated within the R.java class. The following example retrieves aString instance from the application resources by its resource ID:
String greeting = getResources().getString(R.string.hello);
We talk more about different types of application resources in Chapter 6, “Managing Application Resources.”
Accessing Application Preferences
You can retrieve shared application preferences using the getSharedPreferences() method of the application Context. The SharedPreferences class can be used to save simple application data, such as configuration settings or persistent application state information. We talk more about application preferences in Chapter 11, “Using Android Preferences.”
Accessing Application Files and Directories
You can use the application Context to access, create, and manage application files and directories private to the application as well as those on external storage. We talk more about application file management in Chapter 12, “Working with Files and Directories.”
Retrieving Application Assets
You can retrieve application resources using the getAssets() method of the application Context. This returns an AssetManager (android.content.res.AssetManager) instance that can then be used to open a specific asset by its name.
Performing Application Tasks with Activities
The Android Activity class (android.app.Activity) is core to any Android application. Much of the time, you define and implement an Activity class for each screen in your application. For example, a simple game application might have the following five activities, as shown in Figure 4.1:
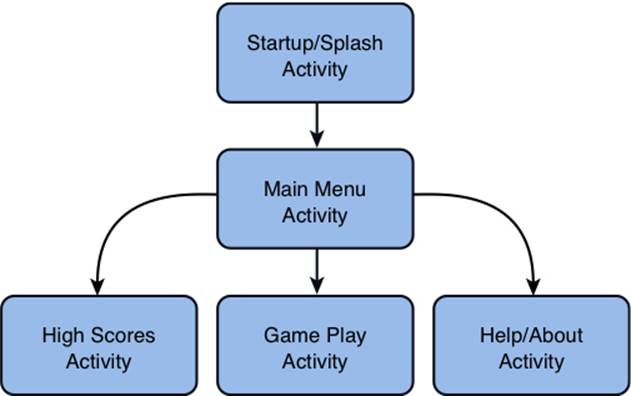
Figure 4.1 A simple game with five activities.
![]() A startup or splash screen: This activity serves as the primary entry point to the application. It displays the application name and version information and transitions to the main menu after a short interval.
A startup or splash screen: This activity serves as the primary entry point to the application. It displays the application name and version information and transitions to the main menu after a short interval.
![]() A main menu screen: This activity acts as a switch to drive the user to the core activities of the application. Here, the users must choose what they want to do within the application.
A main menu screen: This activity acts as a switch to drive the user to the core activities of the application. Here, the users must choose what they want to do within the application.
![]() A game play screen: This activity is where the core game play occurs.
A game play screen: This activity is where the core game play occurs.
![]() A high scores screen: This activity might display game scores or settings.
A high scores screen: This activity might display game scores or settings.
![]() A Help/About screen: This activity might display the information the user might need to play the game.
A Help/About screen: This activity might display the information the user might need to play the game.
The Lifecycle of an Android Activity
Android applications can be multiprocess, and the Android operating system allows multiple applications to run concurrently, provided memory and processing power are available. Applications can have background behavior, and applications can be interrupted and paused when events such as phone calls occur. Only one active application can be visible to the user at a time—specifically, a single application Activity is in the foreground at any given time.
The Android operating system keeps track of all Activity objects running by placing them on an Activity stack (see Figure 4.2). This Activity stack is referred to as the “back stack.” When a new Activity starts, the Activity on the top of the stack (the current foreground Activity) pauses, and the new Activity pushes onto the top of the stack. When that Activity finishes, it is removed from the Activity stack, and the previous Activity in the stack resumes.
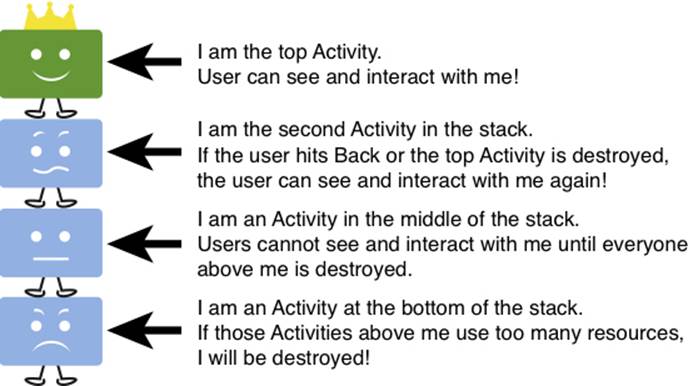
Figure 4.2 The Activity stack.
Android applications are responsible for managing their state and their memory, resources, and data. They must pause and resume seamlessly. Understanding the different states within the Activity lifecycle is the first step in designing and developing robust Android applications.
Using Activity Callbacks to Manage Application State and Resources
Different important state changes within the Activity lifecycle are punctuated by a series of important method callbacks. These callbacks are shown in Figure 4.3.
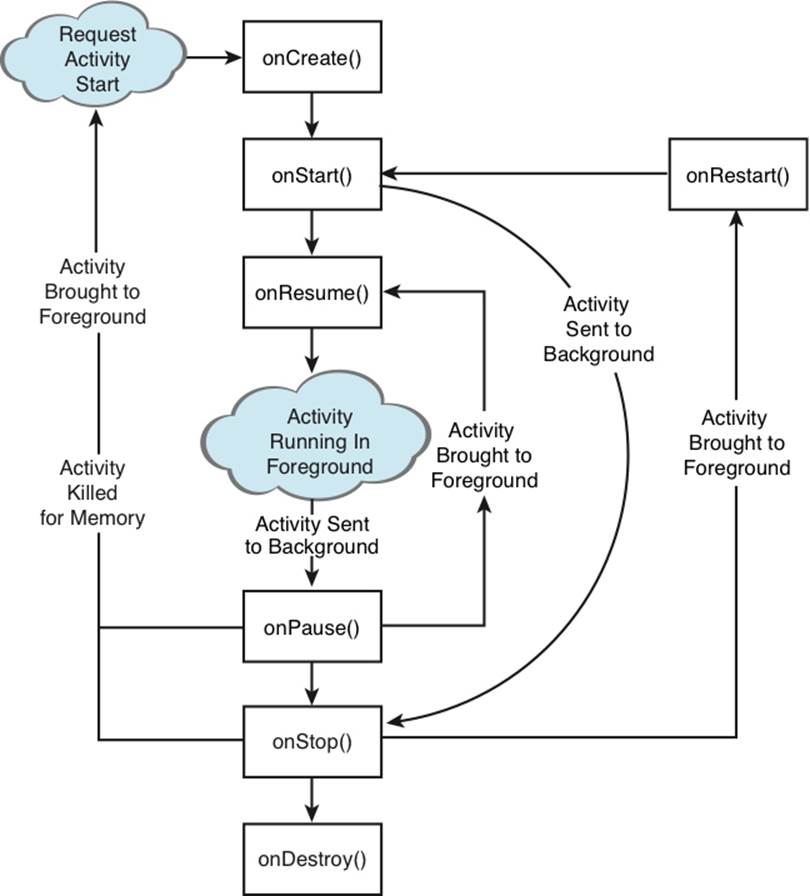
Figure 4.3 The lifecycle of an Android Activity.
Here are the method stubs for the most important callbacks of the Activity class:
public class MyActivity extends Activity {
protected void onCreate(Bundle savedInstanceState);
protected void onStart();
protected void onRestart();
protected void onResume();
protected void onPause();
protected void onStop();
protected void onDestroy();
}
Now let’s look at each of these callback methods, when they are called, and what they are used for.
Initializing Static Activity Data in onCreate()
When an Activity first starts, the onCreate() method is called. The onCreate() method has a single parameter, a Bundle, which is null if this is a newly started Activity. If this Activity was killed for memory reasons and is now restarted, the Bundle contains the previous state information for this Activity so that it can reinitiate. It is appropriate to perform any setup, such as layout and data binding, in the onCreate() method. This includes calls to the setContentView() method.
Initializing and Retrieving Activity Data in onResume()
When the Activity reaches the top of the Activity stack and becomes the foreground process, the onResume() method is called. Although the Activity might not be visible yet to the user, this is the most appropriate place to retrieve any instances of resources (exclusive or otherwise) that theActivity needs to run. Often, these resources are the most process intensive, so we keep them around only while the Activity is in the foreground.
 Tip
Tip
The onResume() method is often the appropriate place to start audio, video, and animations.
Stopping, Saving, and Releasing Activity Data in onPause()
When another Activity moves to the top of the Activity stack, the current Activity is informed that it is being pushed down the Activity stack by way of the onPause() method.
Here, the Activity should stop any audio, video, and animations it started in the onResume() method. This is also where you must deactivate resources such as database Cursor objects or other objects that should be cleaned up should your Activity be terminated. The onPause() method may be the last chance for the Activity to clean up and release any resources it does not need while in the background. You need to save any uncommitted data here, in case your application does not resume. The system reserves the right to kill an Activity without further notice after the call ononPause().
The Activity can also save state information to Activity-specific preferences or application-wide preferences. We talk more about preferences in Chapter 11, “Using Android Preferences.”
The Activity needs to perform anything in the onPause() method in a timely fashion, because the new foreground Activity is not started until the onPause() method returns.
 Warning
Generally speaking, any resources and data retrieved in the onResume() method should be released in the onPause() method. If they aren’t, there is a chance that these resources can’t be cleanly released if the process is terminated.
Avoiding Activities Being Killed
Under low-memory conditions, the Android operating system can kill the process for any Activity that has been paused, stopped, or destroyed. This essentially means that any Activity not in the foreground is subject to a possible shutdown.
If the Activity is killed after onPause(), the onStop() and onDestroy() methods will not be called. The more resources released by an Activity in the onPause() method, the less likely the Activity is to be killed while in the background without further state methods being called.
The act of killing an Activity does not remove it from the Activity stack. Instead, the Activity state is saved into a Bundle object, assuming the Activity implements and uses onSaveInstanceState() for custom data, although some View data is automatically saved. When the user returns to the Activity later, the onCreate() method is called again, this time with a valid Bundle object as the parameter.
Tip
So why does it matter if your application is killed when it is straightforward to resume? Well, it’s primarily about responsiveness. The application designer must maintain the data and resources the application needs to resume quickly without degrading the CPU and system resources while paused in the background.
Saving Activity State into a Bundle with onSaveInstanceState()
If an Activity is vulnerable to being killed by the Android operating system due to low memory, or in response to state changes like a keyboard opening, the Activity can save state information to a Bundle object using the onSaveInstanceState() callback method. This call is not guaranteed under all circumstances, so use the onPause() method for essential data commits. What we recommend doing is saving important data to persistent storage in onPause(), but using onSaveInstanceState() to start any data that can be used to rapidly restore the current screen to the state it was in (as the name of the method might imply).
Tip
You might want to use the onSaveInstanceState() method to store nonessential information such as uncommitted form field data or any other state information that might make the user’s experience with your application less cumbersome.
When this Activity is returned to later, this Bundle is passed in to the onCreate() method, allowing the Activity to return to the exact state it was in when the Activity paused. You can also read Bundle information after the onStart() callback method using the onRestoreInstanceState()callback. Thus, when the Bundle information is there, restoring the previous state will be faster and more efficient than starting from scratch.
Destroying Static Activity Data in onDestroy()
When an Activity is being destroyed in the normal course of operation, the onDestroy() method is called. The onDestroy() method is called for one of two reasons: the Activity has completed its lifecycle voluntarily, or the Activity is being killed by the Android operating system because it needs the resources but still has the time to gracefully destroy the Activity (as opposed to terminating it without calling the onDestroy() method).
Tip
The isFinishing() method returns false if the Activity has been killed by the Android operating system. This method can also be helpful in the onPause() method to know if the Activity is not going to resume right away. However, the Activity might still be killed in theonStop() method at a later time, regardless. You may be able to use this as a hint as to how much instance state information to save or permanently persist.
Organizing Activity Components with Fragments
Until Version 3.0 (API Level 11) of the Android SDK, usually a one-to-one relationship existed between an Activity class and an application screen. In other words, for each screen in your app, you defined an Activity to manage its user interface. This worked well enough for small-screen devices such as smartphones, but when the Android SDK started adding support for other types of devices such as tablets and televisions, this relationship did not prove flexible enough. There were times when screen functionality needed to be componentized at a lower level than the Activityclass.
Therefore, Android 3.0 introduced a new concept called fragments. A fragment is a chunk of screen functionality or user interface with its own lifecycle that can exist within an activity and is represented by the Fragment class (android.app.Fragment) and several supporting classes. AFragment class instance must exist within an Activity instance (and its lifecycle), but fragments need not be paired with the same Activity class each time they are instantiated.
Tip
Even though fragments were not introduced until API Level 11, the Android SDK includes a Compatibility Package (also called the Support Package) that enables Fragment library usage on all currently used Android platform versions (as far back as API Level 4). Fragment-based application design is considered a best practice when designing applications for maximum device compatibility. Fragments do make application design more involved, but your user interfaces will be much more flexible when designing for different-size screens.
Fragments, and how they make applications more flexible, are best illustrated by example. Consider a simple MP3 music player application that allows the user to view a list of artists, drill down to a list of their albums, and drill down further to see each track in an album. When the user chooses to play a song at any point, that track’s album art is displayed along with the track information and progress (with “Next,” “Previous,” “Pause,” and so on).
Now, if you were using the simple one-screen-to-one-activity rule of thumb, you’d count four screens here, which could be called List Artists, List Artist Albums, List Album Tracks, and Show Track. You could implement four activities, one for each screen. This would likely work just fine for a small-screen device such as a smartphone. But on a tablet or a television, you’re wasting a whole lot of space. Or, thought of another way, you have the opportunity to provide a much richer user experience on a device with more screen real estate. Indeed, on a large enough screen, you might want to implement a standard music library interface:
![]() Column 1 displays a list of artists. Selecting an artist filters the second column.
Column 1 displays a list of artists. Selecting an artist filters the second column.
![]() Column 2 displays a list of that artist’s albums. Selecting an album filters the third column.
Column 2 displays a list of that artist’s albums. Selecting an album filters the third column.
![]() Column 3 displays a list of that album’s tracks.
Column 3 displays a list of that album’s tracks.
![]() The bottom half of the screen, below the columns, always displays the artist, album, or track art and details, depending on what is selected in the columns above. If the user ever chooses the “Play” function, the application can display the track information and progress in this area of the screen as well.
The bottom half of the screen, below the columns, always displays the artist, album, or track art and details, depending on what is selected in the columns above. If the user ever chooses the “Play” function, the application can display the track information and progress in this area of the screen as well.
This sort of application design requires only a single screen, and thus a single Activity class, as shown in Figure 4.4.
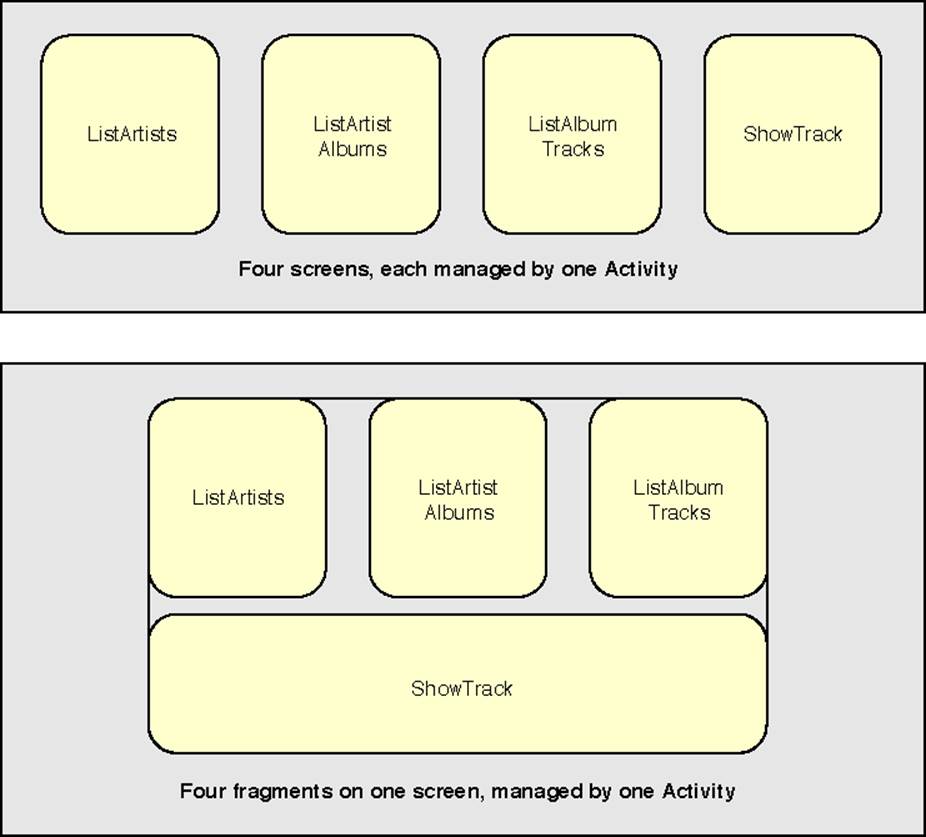
Figure 4.4 How fragments can improve application workflow flexibility.
But then you’re stuck with having to develop basically two separate applications: one to work on smaller screens, and another to work on larger ones. This is where fragments come in. If you componentize your features and make four fragments (List Artists, List Artist Albums, List Album Tracks, Show Track), you can mix and match them on the fly, while still having only one code base to maintain.
We discuss fragments in detail in Chapter 9, “Partitioning the User Interface with Fragments.”
Managing Activity Transitions with Intents
In the course of the lifetime of an Android application, the user might transition between a number of different Activity instances. At times, there might be multiple Activity instances on the Activity stack. Developers need to pay attention to the lifecycle of each Activity during these transitions.
Some Activity instances—such as the application splash/startup screen—are shown and then permanently discarded when the main menu screen Activity takes over. The user cannot return to the splash screen Activity without relaunching the application. In this case, use thestartActivity() and appropriate finish() methods.
Other Activity transitions are temporary, such as a child Activity displaying a dialog and then returning to the original Activity (which was paused on the Activity stack and now resumes). In this case, the parent Activity launches the child Activity and expects a result. For this, use thestartActivityForResult() and onActivityResult() methods.
Transitioning between Activities with Intents
Android applications can have multiple entry points. A specific Activity can be designated as the main Activity to launch by default within the AndroidManifest.xml file; we talk more about this file in Chapter 5, “Defining Your Application Using the Android Manifest File.”
Other activities might be designated to launch under specific circumstances. For example, a music application might designate a generic Activity to launch by default from the Application menu but also define specific alternative entry-point activities for accessing specific music playlists by playlist ID or artists by name.
Launching a New Activity by Class Name
You can start activities in several ways. The simplest method is to use the application Context object to call the startActivity() method, which takes a single parameter, an Intent.
An Intent (android.content.Intent) is an asynchronous message mechanism used by the Android operating system to match task requests with the appropriate Activity or Service (launching it, if necessary) and to dispatch broadcast Intent events to the system at large.
For now, though, we focus on the Intent object and how it is used with activities. The following line of code calls the startActivity() method with an explicit Intent. This Intent requests the launch of the target Activity named MyDrawActivity by its class. This class is implemented elsewhere within the package.
startActivity(new Intent(getApplicationContext(),
MyDrawActivity.class));
This line of code might be sufficient for some applications, which simply transition from one Activity to the next. However, you can use the Intent mechanism in a much more robust manner. For example, you can use the Intent structure to pass data between activities.
Creating Intents with Action and Data
You’ve seen the simplest case of using an Intent to launch a class by name. Intents need not specify the component or class they want to launch explicitly. Instead, you can create an intent filter and register it within the Android manifest file. An intent filter is used by activities, services, and broadcast receivers to specify which intents each is interested in receiving (and filter out the rest). The Android operating system attempts to resolve the Intent requirements and launch the appropriate Activity based on the filter criteria.
The guts of the Intent object are composed of two main parts: the action to be performed and, optionally, the data to be acted upon. You can also specify action/data pairs using Intent action types and Uri objects. As you saw in Chapter 3, “Writing Your First Android Application,” a Uriobject represents a string that gives the location and name of an object. Therefore, an Intent is basically saying “do this” (the action) to “that” (the URI describing to what resource to do the action).
The most common action types are defined in the Intent class, including ACTION_MAIN (describes the main entry point of an Activity) and ACTION_EDIT (used in conjunction with a URI to the data edited). You also find action types that generate integration points with activities in other applications, such as the browser or Phone Dialer.
Launching an Activity Belonging to Another Application
Initially, your application might be starting only activities defined within its own package. However, with the appropriate permissions, applications might also launch external activities within other applications. For example, a customer relationship management (CRM) application might launch the Contacts application to browse the Contacts database, choose a specific contact, and return that contact’s unique identifier to the CRM application for use.
Here is an example of how to create a simple Intent with a predefined action (ACTION_DIAL) to launch the Phone Dialer with a specific phone number to dial in the form of a simple Uri object:
Uri number = Uri.parse("tel:5555551212");
Intent dial = new Intent(Intent.ACTION_DIAL, number);
startActivity(dial);
You can find a list of commonly used Google application intents at http://d.android.com/guide/appendix/g-app-intents.html. Also available is the developer-managed Registry of Intents protocols at OpenIntents, found at http://openintents.org/en/intentstable. A growing list of intents is available from third-party applications and those within the Android SDK.
Passing Additional Information Using Intents
You can also include additional data in an Intent. The Extras property of an Intent is stored in a Bundle object. The Intent class also has a number of helper methods for getting and setting name/value pairs for many common data types.
For example, the following Intent includes two extra pieces of information—a string value and a boolean:
Intent intent = new Intent(this, MyActivity.class);
intent.putExtra("SomeStringData","Foo");
intent.putExtra("SomeBooleanData",false);
startActivity(intent);
Then in the onCreate() method of the MyActivity class, you can retrieve the extra data sent as follows:
Bundle extras = getIntent().getExtras();
if (extras != null) {
String myStr = extras.getString("SomeStringData");
Boolean myBool = extras.getBoolean("SomeBooleanData");
}
Tip
The strings you use to identify your Intent object extras can be whatever you want. However, the Android convention for the key name for “extra” data is to include a package prefix—for example, com.introtoandroid.Multimedia.SomeStringData. We also recommend defining the extra string names in the Activity for which they are used. (We’ve skipped doing this in the preceding example to keep it short.)
Organizing Application Navigation with Activities and Intents
As previously mentioned, your application likely has a number of screens, each with its own Activity. There is a close relationship between activities and intents, and application navigation. You often see a kind of menu paradigm used in several different ways for application navigation:
![]() Main menu or list-style screen: acts as a switch in which each menu item launches a different Activity in an application, for instance, menu items for launching the Play Game Activity, the High Scores Activity, and the Help Activity.
Main menu or list-style screen: acts as a switch in which each menu item launches a different Activity in an application, for instance, menu items for launching the Play Game Activity, the High Scores Activity, and the Help Activity.
![]() Drill-down-list-style screen: acts as a directory in which each menu item launches the same Activity, but each item passes in different data as part of the Intent (for example, a menu of all database records). Choosing a specific item might launch the Edit Record Activity, passing in that particular item’s unique identifier.
Drill-down-list-style screen: acts as a directory in which each menu item launches the same Activity, but each item passes in different data as part of the Intent (for example, a menu of all database records). Choosing a specific item might launch the Edit Record Activity, passing in that particular item’s unique identifier.
![]() Click actions: Sometimes you want to navigate between screens in the form of a wizard. You might set the click handler for a user interface control, such as a “Next” button, to trigger a new Activity to start and the current one to finish.
Click actions: Sometimes you want to navigate between screens in the form of a wizard. You might set the click handler for a user interface control, such as a “Next” button, to trigger a new Activity to start and the current one to finish.
![]() Options menus: Some applications like to hide their navigational options until the user needs them. The user can then click the Menu button on the device and launch an options menu, where each option listed corresponds to an Intent to launch a different Activity. Options menus are no longer recommended for use, as action bars are now the preferred method for presenting options.
Options menus: Some applications like to hide their navigational options until the user needs them. The user can then click the Menu button on the device and launch an options menu, where each option listed corresponds to an Intent to launch a different Activity. Options menus are no longer recommended for use, as action bars are now the preferred method for presenting options.
![]() Action-bar-style navigation: Action bars are functional title bars with navigational button options, each of which spawns an Intent and launches a specific Activity. To support action bars on devices running Android versions all the way back to 2.1 (API Level 7), you should use theandroid-support-v7-appcompat Support Library that comes packaged with the SDK.
Action-bar-style navigation: Action bars are functional title bars with navigational button options, each of which spawns an Intent and launches a specific Activity. To support action bars on devices running Android versions all the way back to 2.1 (API Level 7), you should use theandroid-support-v7-appcompat Support Library that comes packaged with the SDK.
We talk more about application navigation in Chapter 17, “Planning the Android Application Experience.”
Working with Services
Trying to wrap your head around activities and intents when you start with Android development can be daunting. We have tried to distill everything you need to know to start writing Android applications with multiple Activity classes, but we’d be remiss if we didn’t mention that there’s a lot more here, much of which is discussed throughout this book using practical examples. However, we need to give you a “heads up” about some of these topics now because we begin to touch on them in the next chapter when we cover configuring the Android manifest file for your application.
One application component we have briefly discussed is the service. An Android Service (android.app.Service) can be thought of as a developer-created component that has no user interface of its own. An Android Service can be one of two things, or both. It can be used to perform lengthy operations that may go beyond the scope of a single Activity. Additionally, a Service can be the server of a client/server for providing functionality through remote invocation via inter-process communication (IPC). Although often used to control long-running server operations, the processing could be whatever the developer wants. Any Service classes exposed by an Android application must be registered in the Android manifest file.
You can use services for different purposes. Generally, you use a Service when no input is required from the user. Here are some circumstances in which you might want to implement or use an Android Service:
![]() A weather, email, or social network app might implement a service to routinely check for updates on the network. (Note: There are other implementations for polling, but this is a common use of services.)
A weather, email, or social network app might implement a service to routinely check for updates on the network. (Note: There are other implementations for polling, but this is a common use of services.)
![]() A game might create a service to download and process the content for the next level in advance of when the user needs it.
A game might create a service to download and process the content for the next level in advance of when the user needs it.
![]() A photo or media app that keeps its data in sync online might implement a service to package and upload new content in the background when the device is idle.
A photo or media app that keeps its data in sync online might implement a service to package and upload new content in the background when the device is idle.
![]() A video-editing app might offload heavy processing to a queue on its service in order to avoid affecting overall system performance for nonessential tasks.
A video-editing app might offload heavy processing to a queue on its service in order to avoid affecting overall system performance for nonessential tasks.
![]() A news application might implement a service to “preload” content by downloading news stories in advance of when the user launches the application, to improve performance and responsiveness.
A news application might implement a service to “preload” content by downloading news stories in advance of when the user launches the application, to improve performance and responsiveness.
A good rule of thumb is that if the task requires the use of a worker thread, might affect application responsiveness and performance, and is not time sensitive to the application, consider implementing a service to handle the task outside the main application and any individual activity lifecycles.
Receiving and Broadcasting Intents
Intents serve yet another purpose. You can broadcast an Intent (via a call to sendBroadcast()) to the Android system at large, allowing any interested application (called a BroadcastReceiver) to receive that broadcast and act upon it. Your application might send off as well as listen for Intentbroadcasts. Broadcasts are generally used to inform the system that something interesting has happened. For example, a commonly listened-for broadcast Intent is ACTION_BATTERY_LOW, which is broadcast as a warning when the battery is low. If your application has a battery-hogging service of some kind, or might lose data in the event of an abrupt shutdown, it might want to listen for this kind of broadcast and act accordingly. There are also broadcast events for other interesting system events, such as SD card state changes, applications being installed or removed, and the wallpaper being changed.
Your application can also share information using this same broadcast mechanism. For example, an email application might broadcast an Intent whenever a new email arrives so that other applications (such as spam filters or antivirus apps) that might be interested in this type of event can react to it.
Summary
We have tried to strike a balance between providing a thorough reference and overwhelming you with details you won’t need to know when developing a typical Android application. We have focused on the details you need to know to move forward with developing Android applications and to understand every example provided within this book.
The Activity class is the core building block of any Android application. Each Activity performs a specific task within the application, generally represented by a single screen. Each Activity is responsible for managing its own resources and data through a series of lifecycle callbacks. Meanwhile, you can break your Activity class into functional components using the Fragment class. This allows more than one Activity to display similar components of a screen without duplicating code across multiple Activity classes. The transition from one Activity to the next is achieved through the Intent mechanism. An Intent object acts as an asynchronous message that the Android operating system processes and responds to by launching the appropriate Activity or Service. You can also use Intent objects to broadcast system-wide events to any interested applications listening.
Quiz Questions
1. Which class does the Activity class extend?
2. What is the method for retrieving the application Context discussed in this chapter?
3. What is the method for retrieving application resources discussed in this chapter?
4. What is the method for accessing application preferences discussed in this chapter?
5. What is the method for retrieving application assets discussed in this chapter?
6. What is another name for the Activity stack?
7. What is the method for saving Activity state discussed in this chapter?
8. What is the method for broadcasting an Intent discussed in this chapter?
Exercises
1. For each of the Activity callback methods, describe the method’s overall purpose during the Activity lifecycle.
2. Using the online documentation, determine the method names responsible for the lifecycle of a Fragment.
3. Create a list of ten Activity action intents using the online documentation, where an Activity is the target component of the Intent action.
4. Using the online documentation, determine the method names responsible for the lifecycle of a Service.
References and More Information
Android SDK Reference regarding the application Context class:
http://d.android.com/reference/android/content/Context.html
Android SDK Reference regarding the Activity class:
http://d.android.com/reference/android/app/Activity.html
Android SDK Reference regarding the Fragment class:
http://d.android.com/reference/android/app/Fragment.html
Android API Guides: “Fragments”:
http://d.android.com/guide/components/fragments.html
Android Tools: Support Library:
http://d.android.com/tools/extras/support-library.html
Android API Guides: “Intents and Intent Filters”:
http://d.android.com/guide/components/intents-filters.html