Introduction to Android Application Development, Fourth Edition (2014)
Part II. Android Application Basics
Chapter 5. Defining Your Application Using the Android Manifest File
Android projects use a special configuration file called the Android manifest file to determine application settings—settings such as the application name and version, as well as what permissions the application requires to run and what application components it is composed of. In this chapter, you explore the Android manifest file in detail and learn how applications use it to define and describe application behavior.
Configuring Android Applications Using the Android Manifest File
The Android application manifest file is a specially formatted XML file that must accompany each Android application. This file contains important information about the application’s identity. Here, you define the application’s name and version information as well as what application components the application relies upon, what permissions the application requires to run, and other application configuration information.
The Android manifest file is named AndroidManifest.xml and must be included at the top level of any Android project. The information in this file is used by the Android system to
![]() Install and upgrade the application package
Install and upgrade the application package
![]() Display the application details, such as the application name, description, and icon, to users
Display the application details, such as the application name, description, and icon, to users
![]() Specify application system requirements, including which Android SDKs are supported, what device configurations are required (for example, D-pad navigation), and which platform features the application relies upon (for example, multitouch capabilities)
Specify application system requirements, including which Android SDKs are supported, what device configurations are required (for example, D-pad navigation), and which platform features the application relies upon (for example, multitouch capabilities)
![]() Specify what features are required by the application for market-filtering purposes
Specify what features are required by the application for market-filtering purposes
![]() Register application activities and when they should be launched
Register application activities and when they should be launched
![]() Manage application permissions
Manage application permissions
![]() Configure other advanced application component configuration details, including defining services, broadcast receivers, and content providers
Configure other advanced application component configuration details, including defining services, broadcast receivers, and content providers
![]() Specify intent filters for your activities, services, and broadcast receivers
Specify intent filters for your activities, services, and broadcast receivers
![]() Enable application settings such as debugging and configuring instrumentation for application testing
Enable application settings such as debugging and configuring instrumentation for application testing
 Tip
Tip
When you use the Android IDE, the Android Project Wizard creates the initial AndroidManifest.xml file for you. If you are not using the Android IDE, the android command-line tool creates the Android manifest file for you as well.
Editing the Android Manifest File
The manifest resides at the top level of your Android project. You can edit the Android manifest file by using the Android IDE manifest file resource editor, which is a feature of the ADT Bundle, or by manually editing the XML.
Tip
For simple configuration changes, we recommend using the editor. However, if we are adding a bunch of Activity registrations, or something more complex, we usually edit the XML directly because the resource editor can be somewhat confusing and no support documentation is available. We’ve found that when a more complex configuration results in nested XML (such as an intent filter, for example), it’s too easy for users to end up with manifest settings at the wrong level in the XML tag hierarchy. Therefore, if you use the editor, you should always spot-check the resulting XML to make sure it looks correct.
Editing the Manifest File Using the Android IDE
You can use the Android IDE manifest file resource editor to edit the project manifest file. The Android IDE manifest file resource editor organizes the manifest information into categories:
![]() The Manifest tab
The Manifest tab
![]() The Application tab
The Application tab
![]() The Permissions tab
The Permissions tab
![]() The Instrumentation tab
The Instrumentation tab
![]() The AndroidManifest.xml tab
The AndroidManifest.xml tab
Let’s take a closer look at a sample Android manifest file. We’ve chosen a more complex sample project to illustrate a number of different characteristics of the Android manifest file, as opposed to the very simple default manifest file you configured for the MyFirstAndroidApp project. The application manifest we will be discussing is for an application named SimpleMultimedia.
Configuring Package-Wide Settings Using the Manifest Tab
The Manifest tab (see Figure 5.1) contains package-wide settings, including the package name, version information, and supported Android SDK information. You can also set any hardware or feature requirements here.
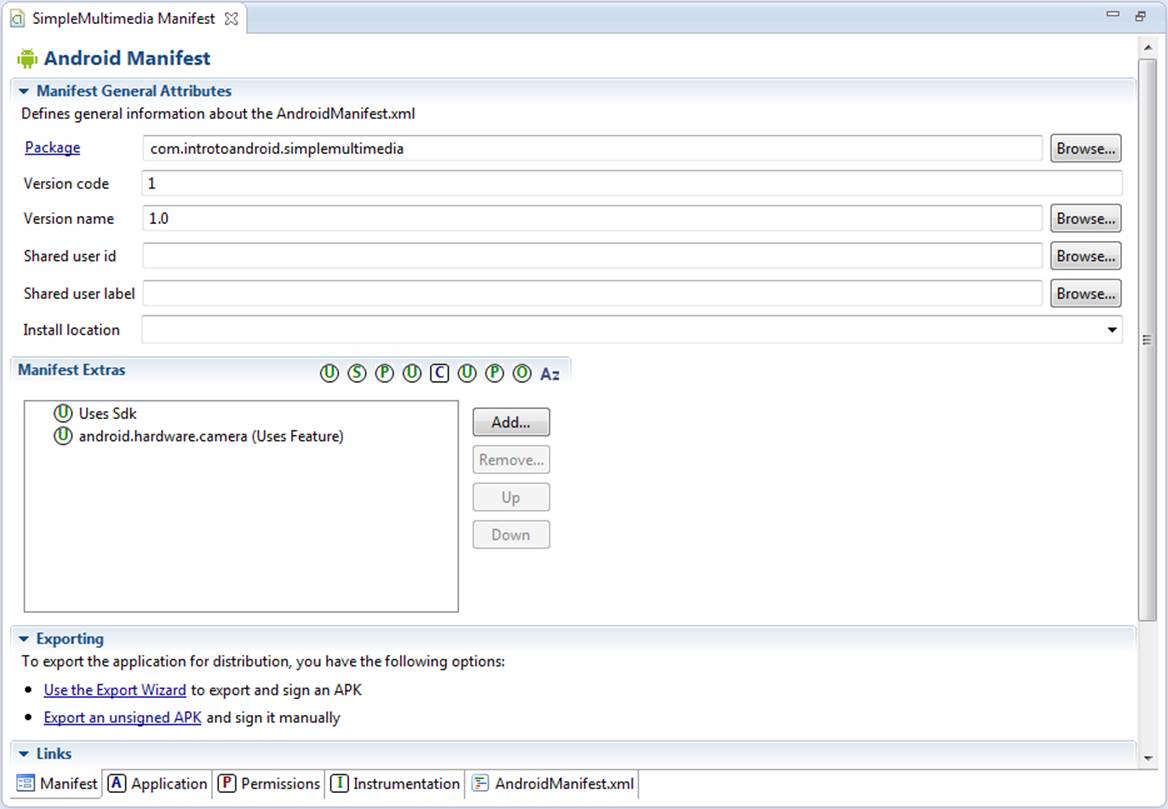
Figure 5.1 The Manifest tab of the Android IDE manifest file resource editor.
Managing Application and Activity Settings Using the Application Tab
The Application tab (see Figure 5.2) contains application-wide settings, including the application label and icon, as well as information about the application components, such as activities, and other application components, including configuration for services, intent filters, and content providers.
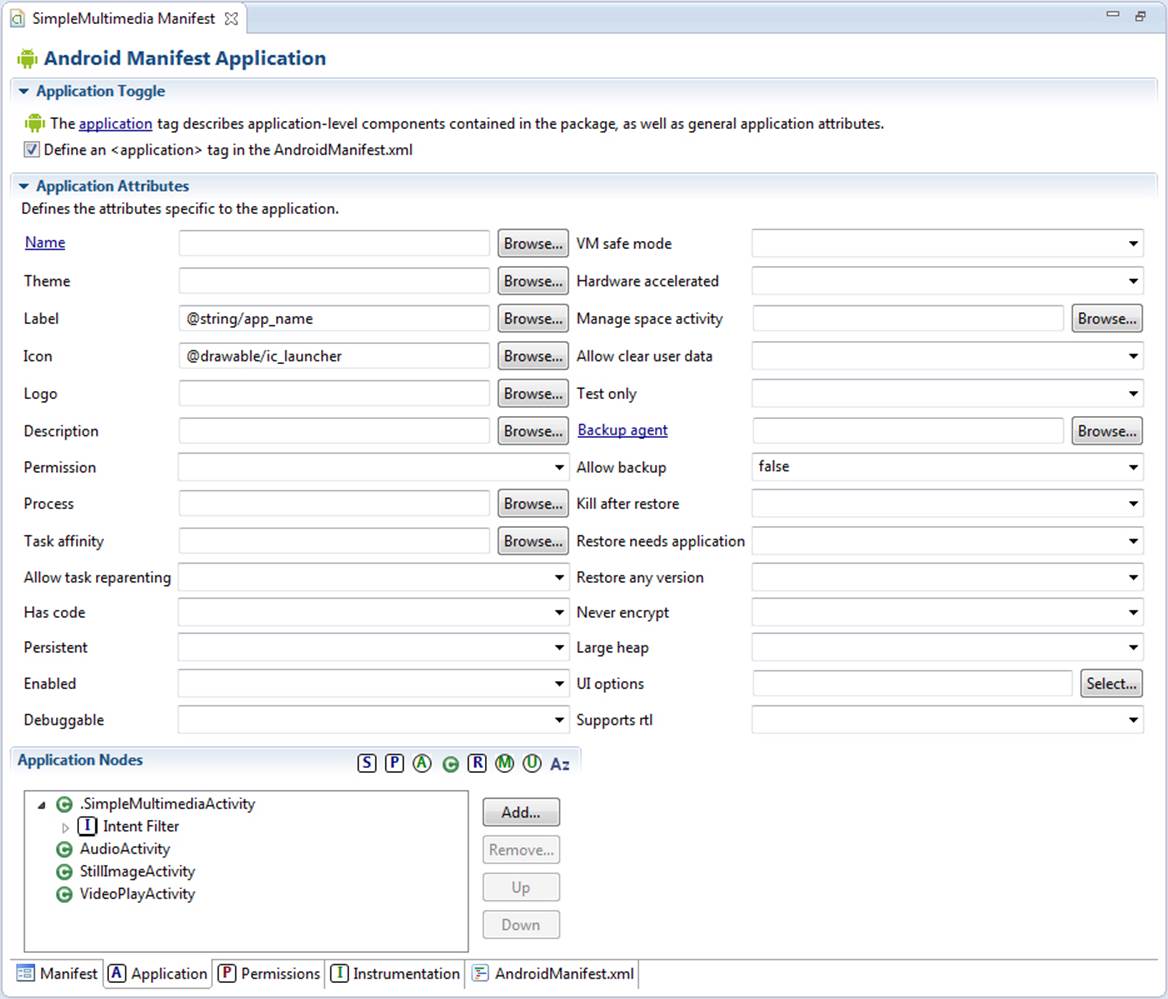
Figure 5.2 The Application tab of the Android IDE manifest file resource editor.
Enforcing Application Permissions Using the Permissions Tab
The Permissions tab (see Figure 5.3) contains any permission rules required by your application. This tab can also be used to enforce custom permissions created for the application.
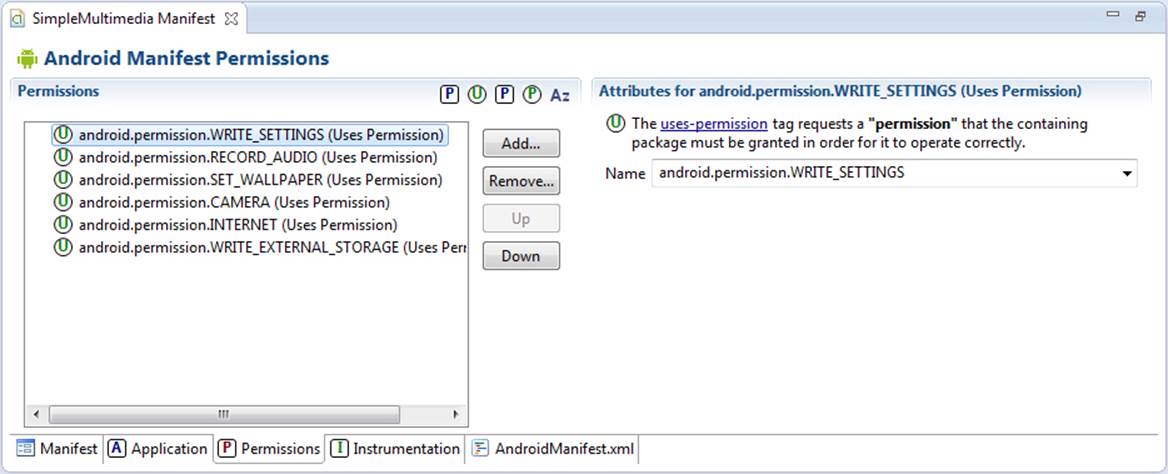
Figure 5.3 The Permissions tab of the Android IDE manifest file resource editor.
 Warning
Do not confuse the application Permission field (a drop-down list on the Application tab) with the Permissions tab features. Use the Permissions tab to define the permissions required by the application.
Managing Test Instrumentation Using the Instrumentation Tab
The Instrumentation tab (seen in Figure 5.4) allows the developer to declare any instrumentation classes for monitoring the application. We talk more about instrumentation and testing in Chapter 18, “Testing Android Applications.”

Figure 5.4 The Instrumentation tab of the Android IDE manifest file resource editor.
Editing the Manifest File Manually
The Android manifest file is a specially formatted XML file. You can edit the XML manually by clicking the AndroidManifest.xml tab.
Android manifest files generally include a single <manifest> tag with a single <application> tag. The following is a sample AndroidManifest.xml file for an application called SimpleMultimedia:
<?xml version="1.0" encoding="utf-8"?>
<manifest xmlns:android="http://schemas.android.com/apk/res/android"
package="com.introtoandroid.simplemultimedia"
android:versionCode="1"
android:versionName="1.0">
<application android:icon="@drawable/ic_launcher"
android:label="@string/app_name"
android:debuggable="true">
<activity android:name=".SimpleMultimediaActivity"
android:label="@string/app_name">
<intent-filter>
<action
android:name="android.intent.action.MAIN" />
<category
android:name="android.intent.category.LAUNCHER" />
</intent-filter>
</activity>
<activity android:name="AudioActivity" />
<activity android:name="StillImageActivity" />
<activity android:name="VideoPlayActivity" />
</application>
<uses-sdk
android:minSdkVersion="10"
android:targetSdkVersion="18" />
<uses-permission
android:name="android.permission.WRITE_SETTINGS" />
<uses-permission
android:name="android.permission.RECORD_AUDIO" />
<uses-permission
android:name="android.permission.SET_WALLPAPER" />
<uses-permission
android:name="android.permission.CAMERA" />
<uses-permission
android:name="android.permission.INTERNET" />
<uses-permission
android:name="android.permission.WRITE_EXTERNAL_STORAGE" />
<uses-feature
android:name="android.hardware.camera" />
</manifest>
Here is a summary of what this file tells us about the SimpleMultimedia application:
![]() The application uses the package name com.introtoandroid.simplemultimedia.
The application uses the package name com.introtoandroid.simplemultimedia.
![]() The application version name is 1.0.
The application version name is 1.0.
![]() The application version code is 1.
The application version code is 1.
![]() The application name and label are stored in the resource string called @string/app_name within the /res/values/strings.xml resource file.
The application name and label are stored in the resource string called @string/app_name within the /res/values/strings.xml resource file.
![]() The application is debuggable on an Android device.
The application is debuggable on an Android device.
![]() The application icon is the graphics file called ic_launcher (which could be a PNG, JPG, or GIF) stored within the /res/drawable-* directory (there are actually multiple versions for different pixel densities).
The application icon is the graphics file called ic_launcher (which could be a PNG, JPG, or GIF) stored within the /res/drawable-* directory (there are actually multiple versions for different pixel densities).
![]() The application has four activities (SimpleMultimediaActivity, AudioActivity, StillImageActivity, and VideoPlayActivity).
The application has four activities (SimpleMultimediaActivity, AudioActivity, StillImageActivity, and VideoPlayActivity).
![]() SimpleMultimediaActivity is the primary entry point for the application because it handles the action android.intent.action.MAIN. This Activity shows in the application launcher, because its category is android.intent.category.LAUNCHER.
SimpleMultimediaActivity is the primary entry point for the application because it handles the action android.intent.action.MAIN. This Activity shows in the application launcher, because its category is android.intent.category.LAUNCHER.
![]() The application requires the following permissions to run: the ability to write settings, the ability to record audio, the ability to set the wallpaper on the device, the ability to access the built-in camera, the ability to communicate over the Internet, and the ability to write to external storage.
The application requires the following permissions to run: the ability to write settings, the ability to record audio, the ability to set the wallpaper on the device, the ability to access the built-in camera, the ability to communicate over the Internet, and the ability to write to external storage.
![]() The application works from any API level from 10 to 18; in other words, Android SDK 2.3.3 is the lowest supported platform version, and the application was written to target Jelly Bean MR2 (for example, Android 4.3).
The application works from any API level from 10 to 18; in other words, Android SDK 2.3.3 is the lowest supported platform version, and the application was written to target Jelly Bean MR2 (for example, Android 4.3).
![]() Finally, the application requests to use the camera with the <uses-feature> tag.
Finally, the application requests to use the camera with the <uses-feature> tag.
Tip
When using the <uses-feature> tag, you can specify an optional attribute of android:required and set the value to true or false. This is used for configuring Google Play store filtering. If this attribute were set to true, Google Play would show your application listing only to users with devices that have that particular hardware or software feature, in this case, a camera. To learn more about Google Play store filtering, visit http://d.android.com/google/play/filters.html.
Now let’s talk about some of these important configurations in detail.
 Note
Note
Within the previous manifest code listing, you may be wondering why there is a dot (.) in front of the SimpleMultimedia name attribute of the <activity> tag. The dot is used as shorthand to specify that the SimpleMultimedia class belongs to the package name specified in the manifest. We could have specified the entire package name path, but we have used the shorthand to save on typing the extra characters.
Managing Your Application’s Identity
Your application’s Android manifest file defines the application properties. The package name must be defined in the Android manifest file within the <manifest> tag using the package attribute:
<manifest
xmlns:android="http://schemas.android.com/apk/res/android"
package="com.introtoandroid.simplemultimedia"
android:versionCode="1"
android:versionName="1.0">
Versioning Your Application
Versioning your application appropriately is vital to maintaining your application in the field. Intelligent versioning can help reduce confusion and make product support and upgrades simpler. Two different version attributes are defined within the <manifest> tag: the version name and the version code.
The version name (android:versionName) is a user-friendly, developer-defined version attribute. This information is displayed to users when they manage applications on their devices and when they download the application from marketplaces. Developers use this version information to keep track of their application versions in the field. We discuss appropriate versioning for mobile applications in detail in Chapter 15, “Learning the Android Software Development Process.”
Warning
Although you can use an @string resource reference for some manifest file settings, such as the android:versionName, some publishing systems don’t support this.
The Android operating system uses the version code (android:versionCode), which is a numeric attribute, to manage application upgrades. We talk more about publishing and upgrade support in Chapter 19, “Publishing Your Android Application.”
Setting the Application Name and Icon
Overall application settings are configured with the <application> tag of the Android manifest file. Here, you set information such as the application icon (android:icon) and friendly name (android:label). These settings are attributes of the <application> tag.
For example, here we set the application icon to an image resource provided with the application package, and the application label to a string resource:
<application android:icon="@drawable/ic_launcher"
android:label="@string/app_name">
You can also set optional application settings as attributes in the <application> tag, such as the application description (android:description) and the setting to enable the application for debugging on devices (android:debuggable=”true”).
Enforcing Application System Requirements
In addition to configuring your application’s identity, the Android manifest file is used to specify any system requirements necessary for the application to run properly. For example, an augmented reality application might require that the device have GPS, a compass, and a camera. Similarly, an application that relies on the Bluetooth APIs available within the Android SDK requires a device with an SDK version of API Level 5 or higher (Android 2.0), because that’s where those APIs were introduced.
These types of system requirements can be defined and enforced in the Android manifest file. When an application is installed on a device, the Android platform checks these requirements and will error out if necessary. Similarly, the Google Play store uses information in the Android manifest file to filter which applications to offer to which devices so that users install applications that should work on their devices.
Some of the application system requirements that developers can configure through the Android manifest file include
![]() The Android SDK versions supported by the application
The Android SDK versions supported by the application
![]() The Android platform features used by the application
The Android platform features used by the application
![]() The Android hardware configurations required by the application
The Android hardware configurations required by the application
![]() The screen sizes and pixel densities supported by the application
The screen sizes and pixel densities supported by the application
![]() Any external libraries that the application links to
Any external libraries that the application links to
Targeting Specific SDK Versions
Different Android devices run different versions of the Android platform. Often, you see old, less powerful, or even less expensive devices running older versions of the Android platform, whereas newer, more powerful devices that show up on the market often run the latest Android software.
There are now hundreds of different Android devices in users’ hands. Developers must decide who their target audience is for a given application. Are they trying to support the largest population of users and therefore want to support as many different versions of the platform as possible? Or are they developing a bleeding-edge game that requires the latest device hardware?
Tip
You can expand the range of target SDKs that your application supports by using the Android Support Package, or by using Java reflection to check for SDK features before using them. You can read more about using the Support Package athttp://d.android.com/tools/extras/support-library.html and more about backward compatibility at http://android-developers.blogspot.com/2009/04/backward-compatibility-for-android.html and http://android-developers.blogspot.com/2010/07/how-to-have-your-cupcake-and-eat-it-too.html. There are multiple revisions of the Support Package, and three different versions—v4, v7, and v13—which provide support libraries for adding newer API features to older Android versions, for API Level 4 and up, API Level 7 and up, or API Level 13 and up.
Developers can specify which versions of the Android platform an application supports within its Android manifest file using the <uses-sdk> tag. This tag has three important attributes:
![]() The minSdkVersion attribute: This attribute specifies the lowest API level that the application supports.
The minSdkVersion attribute: This attribute specifies the lowest API level that the application supports.
![]() The targetSdkVersion attribute: This attribute specifies the optimum API level that the application supports.
The targetSdkVersion attribute: This attribute specifies the optimum API level that the application supports.
![]() The maxSdkVersion attribute: This attribute specifies the highest API level that the application supports.
The maxSdkVersion attribute: This attribute specifies the highest API level that the application supports.
Tip
The Google Play store filters applications available to a given user based on settings such as the <uses-sdk> tag within an application’s manifest file. This is a required tag for applications that are to be published on Google Play. Neglecting to use this tag results in a warning in the build environment. To learn more about the <uses-sdk> tag, please read http://d.android.com/guide/topics/manifest/uses-sdk-element.html.
Each attribute of the <uses-sdk> tag is an integer that represents the API level associated with a given Android SDK. This value does not directly correspond to the SDK version. Instead, it is the revision of the API level associated with that SDK. The API level is set by the developers of the Android SDK. You need to check the SDK documentation to determine the API level value for each version. Table 5.1 shows the Android SDK versions available for shipping applications.
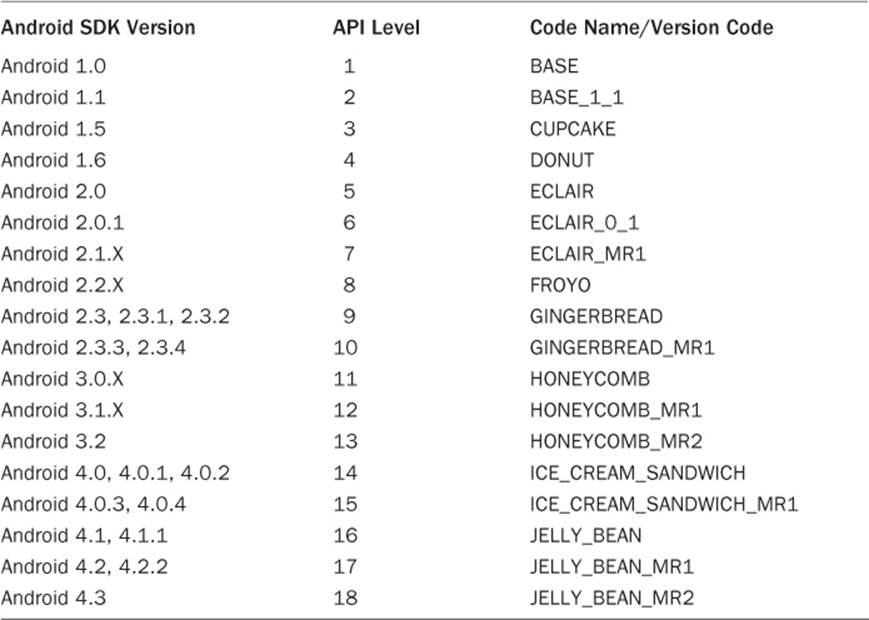
Table 5.1 Android SDK Versions and Their API Levels
Specifying the Minimum SDK Version
You should always specify the minSdkVersion attribute for your application. This value represents the lowest Android SDK version your application supports.
For example, if your application requires APIs introduced in Android SDK 1.6, you would check that SDK’s documentation and find that this release is defined as API Level 4. Therefore, add the following to your Android manifest file within the <manifest> tag block:
<uses-sdk android:minSdkVersion="4" />
It’s that simple. You should use the lowest API level possible if you want your application to be compatible with the largest number of Android devices. However, you must ensure that your application is tested sufficiently on any non-target platforms (any API level supported below your target SDK, as described in the next section).
Specifying the Target SDK Version
You should always specify the targetSdkVersion attribute for your application. This value represents the Android SDK version your application was built for and tested against.
For example, if your application was built using APIs that are backward compatible to Android 2.3.3 (API Level 10), but targeted and tested using Android 4.3 SDK (API Level 18), you would want to specify the targetSdkVersion attribute as 18. Therefore, add the following to your Android manifest file within the <manifest> tag block:
<uses-sdk android:minSdkVersion="10" android:targetSdkVersion="18" />
Why should you specify the target SDK version you used? Well, the Android platform has built-in functionality for backward compatibility (to a point). Think of it like this: A specific method of a given API might have been around since API Level 1. However, the internals of that method—its behavior—might have changed slightly from SDK to SDK. When you specify the target SDK version for your application, the Android operating system attempts to match your application with the exact version of the SDK (and the behavior as you tested it within the application), even when running a different (newer) version of the platform. This means that the application should continue to behave in “the old way” despite any changes or “improvements” to the SDK that might cause unintended consequences in the application.
Specifying the Maximum SDK Version
You will rarely want to specify the maxSdkVersion attribute for your application. This value represents the highest Android SDK version your application supports, in terms of API level. It restricts forward compatibility of your application.
One reason you might want to set this attribute is if you want to limit who can install the application to exclude devices with the newest SDKs. For example, you might develop a free beta version of your application with plans for a paid version for the newest SDK. By setting themaxSdkVersion attribute of the manifest file for your free application, you disallow anyone with the newest SDK to install it. The downside of this idea? If your users have devices that receive over-the-air SDK updates, your application would cease to work (and appear) on devices where it had previously functioned perfectly, which might upset your users and result in bad ratings on your market of choice. In short, use maxSdkVersion only when absolutely necessary and when you understand the risks associated with its use.
Enforcing Application Platform Requirements
Android devices have different hardware and software configurations. Some devices have built-in keyboards and others rely on the software keyboard. Similarly, certain Android devices support the latest 3D graphics libraries and others provide little or no graphics support. The Android manifest file has several informational tags for flagging the system features and hardware configurations supported or required by an Android application.
Specifying Supported Input Methods
The <uses-configuration> tag can be used to specify which hardware and software input methods the application supports. There are different configuration attributes for five-way navigation: the hardware keyboard and keyboard types; navigation devices such as the directional pad, trackball, and wheel; and touchscreen settings.
There is no “OR” support within a given attribute. If an application supports multiple input configurations, there must be multiple <uses-configuration> tags defined in your Android manifest file—one for each configuration supported.
For example, if your application requires a physical keyboard and touchscreen input using a finger or a stylus, you need to define two separate <uses-configuration> tags in your manifest file, as follows:
<uses-configuration android:reqHardKeyboard="true"
android:reqTouchScreen="finger" />
<uses-configuration android:reqHardKeyboard="true"
android:reqTouchScreen="stylus" />
For more information about the <uses-configuration> tag of the Android manifest file, see the Android SDK Reference at http://d.android.com/guide/topics/manifest/uses-configuration-element.html.
Warning
Make sure to test your application with all of the available types of input methods, as not all devices support all types. For example, Google TVs do not have touchscreens, and if you design your application for touchscreen inputs, your app will not work properly on Google TV devices.
Specifying Required Device Features
Not all Android devices support every Android feature. Put another way: there are a number of APIs (and related hardware) that Android device manufacturers and carriers may optionally include. For example, not all Android devices have multitouch capability or a camera flash.
The <uses-feature> tag is used to specify which Android features your application uses to run properly. These settings are for informational purposes only—the Android operating system does not enforce these settings, but publication channels such as the Google Play store use this information to filter the applications available to a given user. Other applications might check this information as well.
If your application requires multiple features, you must create a <uses-feature> tag for each feature. For example, an application that requires both a light and a proximity sensor requires two tags:
<uses-feature android:name="android.hardware.sensor.light" />
<uses-feature android:name="android.hardware.sensor.proximity" />
One common reason to use the <uses-feature> tag is for specifying the OpenGL ES versions supported by your application. By default, all applications function with OpenGL ES 1.0 (which is a required feature of all Android devices). However, if your application requires features available only in later versions of OpenGL ES, such as 2.0 or 3.0, you must specify this feature in the Android manifest file. This is done using the android:glEsVersion attribute of the <uses-feature> tag. Specify the lowest version of OpenGL ES that the application requires. If the application works with 1.0, 2.0, and 3.0, specify the lowest version (so that the Google Play store allows more users to install your application).
Tip
OpenGL ES 3.0 support has been added to Android Jelly Bean 4.3. The value for specifying the android:glEsVersion for OpenGL ES 3.0 support is 0x00030000. To learn more about this new addition to Android 4.3, see http://d.android.com/about/versions/android-4.3.html#Graphics.
For more information about the <uses-feature> tag of the Android manifest file, see the Android SDK Reference at http://d.android.com/guide/topics/manifest/uses-feature-element.html.
Tip
If a certain feature is not required for your application to function properly, rather than providing filters for the Google Play store to limit access to specific devices, you could check for certain device features at runtime and allow specific application functionality only if those particular features are present on the user’s device. That way, you maximize the number of users who can install and use your application. To check for specific features at runtime, use the hasSystemFeature() method. For example, to see if the device your application is running on has touchscreen capabilities and returns a Boolean value: getPackageManager().hasSystemFeature(“android.hardware.touchscreen”);
Specifying Supported Screen Sizes
Android devices come in many shapes and sizes. Screen sizes and pixel densities vary tremendously across the wide range of Android devices available on the market today. The <supports-screens> tag can be used to specify which Android types of screens the application supports. The Android platform categorizes screen types in terms of sizes (small, normal, large, and xlarge) and pixel density (LDPI, MDPI, HDPI, XHDPI, and XXHDPI, representing low-, medium-, high-, extra-high-, and extra-extra-high-density displays). These characteristics effectively cover the variety of screen types available within the Android platform.
For example, if the application supports QVGA screens (small) and HVGA, WQVGA, and WVGA screens (normal) regardless of pixel density, the application’s <supports-screens> tag is configured as follows:
<supports-screens android:resizable="false"
android:smallScreens="true"
android:normalScreens="true"
android:largeScreens="false"
android:compatibleWidthLimitDp="320"
android:anyDensity="true"/>
For more information about the <supports-screens> tag of the Android manifest file, see the Android SDK Reference at http://d.android.com/guide/topics/manifest/supports-screens-element.html as well as the Android Developers Guide on screen support athttp://d.android.com/guide/practices/screens_support.html#DensityConsiderations.
Working with External Libraries
You can register any shared libraries your application links to within the Android manifest file. By default, every application is linked to the standard Android packages (such as android.app) and is aware of its own package. However, if your application links to additional packages, they should be registered within the <application> tag of the Android manifest file using the <uses-library> tag. For example:
<uses-library android:name="com.sharedlibrary.sharedStuff" />
This feature is often used for linking to optional Google APIs. For more information about the <uses-library> tag of the Android manifest file, see the Android SDK Reference at http://d.android.com/guide/topics/manifest/uses-library-element.html.
Other Application Configuration Settings and Filters
You’ll want to be aware of several other lesser-used manifest file settings because they are also used by the Google Play store for application filtering:
![]() The <supports-gl-texture> tag is used to specify the GL texture compression format supported by the application. This tag is used by applications that use the graphics libraries and are intended to be compatible only with devices that support a specific compression format. For more information about this manifest file tag, see the Android SDK documentation at http://d.android.com/guide/topics/manifest/supports-gl-texture-element.html.
The <supports-gl-texture> tag is used to specify the GL texture compression format supported by the application. This tag is used by applications that use the graphics libraries and are intended to be compatible only with devices that support a specific compression format. For more information about this manifest file tag, see the Android SDK documentation at http://d.android.com/guide/topics/manifest/supports-gl-texture-element.html.
![]() The <compatible-screens> tag is used solely by the Google Play store to restrict installation of your application to devices with specific screen sizes. This tag is not checked by the Android operating system, and usage is discouraged unless you absolutely need to restrict the installation of your application on certain devices. For more information about this manifest file tag, see the Android SDK documentation at http://d.android.com/guide/topics/manifest/compatible-screens-element.html.
The <compatible-screens> tag is used solely by the Google Play store to restrict installation of your application to devices with specific screen sizes. This tag is not checked by the Android operating system, and usage is discouraged unless you absolutely need to restrict the installation of your application on certain devices. For more information about this manifest file tag, see the Android SDK documentation at http://d.android.com/guide/topics/manifest/compatible-screens-element.html.
Registering Activities in the Android Manifest
Each Activity within the application must be defined within the Android manifest file with an <activity> tag. For example, the following XML excerpt registers an Activity class called AudioActivity:
<activity android:name="AudioActivity" />
This Activity must be defined as a class within the com.introtoandroid.simplemultimedia package—that is, the package specified in the <manifest> element of the Android manifest file. You can also enforce the scope of the Activity class by using the dot as a prefix in the Activity class name:
<activity android:name=".AudioActivity" />
Or you can specify the complete class name:
<activity android:name="com.introtoandroid.simplemultimedia.AudioActivity" />
Warning
You must define the <activity> tag for each Activity or it will not run as part of your application. It is quite common for developers to implement an Activity and then forget to do this. They then spend a lot of time troubleshooting why it isn’t running properly, only to realize they forgot to register it in the Android manifest file.
Designating a Primary Entry Point Activity for Your Application Using an Intent Filter
You designate an Activity class as the primary entry point by configuring an intent filter using the Android manifest tag <intent-filter> in the Android manifest file with the MAIN action type and the LAUNCHER category.
For example, the following XML configures an Activity called SimpleMultimediaActivity as the primary launching point of the application:
<activity android:name=".SimpleMultimediaActivity"
android:label="@string/app_name">
<intent-filter>
<action android:name="android.intent.action.MAIN" />
<category android:name="android.intent.category.LAUNCHER" />
</intent-filter>
</activity>
Configuring Other Intent Filters
The Android operating system uses intent filters to resolve implicit intents—that is, intents that do not specify a specific activity or other component type to launch. Intent filters can be applied to activities, services, and broadcast receivers. An intent filter declares that this application component is capable of handling or processing a specific type of intent when it matches the filter’s criteria.
Different applications have the same sorts of intent filters and are able to process the same sorts of requests. In fact, this is how the “share” features and the flexible application launch system of the Android operating system work. For example, you can have several different Web browsers installed on a device, all of which can handle “browse the Web” intents by setting up the appropriate filters.
Intent filters are defined using the <intent-filter> tag and must contain at least one <action> tag but can also contain other information, such as <category> and <data> blocks. Here, we have a sample intent filter block that might be found within an <activity> block:
<intent-filter>
<action android:name="android.intent.action.VIEW" />
<category android:name="android.intent.category.BROWSABLE" />
<category android:name="android.intent.category.DEFAULT" />
<data android:scheme="geoname"/>
</intent-filter>
This intent filter definition uses a predefined action called VIEW, the action for viewing particular content. It also handles Intent objects in the BROWSABLE or DEFAULT category and uses a scheme of geoname so that when a URI starts with geoname://, the Activity with this intent filter can be launched to view the content.
Tip
You can define custom actions unique to your application. If you do so, be sure to document these actions if you want them to be used by third parties. You can document these however you want: your SDK documentation could be provided on your website, or confidential documents could be given directly to a client. For the most visibility, consider using an online registry, such as that at OpenIntents (http://openintents.org).
Registering Other Application Components
All application components must be defined within the Android manifest file. In addition to activities, all services and broadcast receivers must be registered within the Android manifest file.
![]() Services are registered using the <service> tag.
Services are registered using the <service> tag.
![]() Broadcast receivers are registered using the <receiver> tag.
Broadcast receivers are registered using the <receiver> tag.
![]() Content providers are registered using the <provider> tag.
Content providers are registered using the <provider> tag.
Both services and broadcast receivers use intent filters. If your application acts as a content provider, effectively exposing a shared data service for use by other applications, it must declare this capability within the Android manifest file using the <provider> tag. Configuring a content provider involves determining what subsets of data are shared and what permissions are required to access them, if any. We begin our discussion of content providers in Chapter 13, “Leveraging Content Providers.”
Working with Permissions
The Android operating system has been locked down so that applications have limited capability to adversely affect operations outside their process space. Instead, Android applications run within the bubble of their own virtual machine, with their own Linux user account (and related permissions).
Registering Permissions Your Application Requires
Android applications have no permissions by default. Instead, any permissions for shared resources or privileged access—whether it’s shared data, such as the Contacts database, or access to underlying hardware, such as the built-in camera—must be explicitly registered within the Android manifest file. These permissions are granted when the application is installed.
The following XML excerpt for the preceding Android manifest file defines a permission using the <uses-permission> tag to gain access to the built-in camera:
<uses-permission android:name="android.permission.CAMERA" />
A complete list of the permissions can be found in the android.Manifest.permission class. Your application manifest should include only the permissions required to run. The user is informed what permissions each Android application requires at install time.
Tip
You might find that, in certain cases, permissions are not enforced (you can operate without the permission) by one device or another. In these cases, it is prudent to request the permission anyway for two reasons. First, the user is informed that the application is performing those sensitive actions, and second, that permission could be enforced in a later device update. Also be aware that in early SDK versions, not all permissions were necessarily enforced at the platform level.
Warning
Be aware that users will see these permissions before they install your application. If the application description or type of application you are providing does not clearly justify the permissions requested, you may get low ratings simply for asking for unnecessary permissions. We see many applications requesting permissions they do not need or have no reason to ask for. Many people who realize this will not follow through and install the application. Privacy is a big concern for many users, so be sure to respect it.
Registering Permissions Your Application Enforces
Applications can also define and enforce their own permissions via the <permission> tag to be used by other applications. Permissions must be described and then applied to specific application components, such as activities, using the android:permission attribute.
Tip
Use Java-style scoping for unique naming of application permissions (for example, com.introtoandroid.SimpleMultimedia.ViewMatureMaterial).
Permissions can be enforced at several points:
![]() When starting an Activity or Service
When starting an Activity or Service
![]() When accessing data provided by a content provider
When accessing data provided by a content provider
![]() At the method call level
At the method call level
![]() When sending or receiving broadcasts by an Intent
When sending or receiving broadcasts by an Intent
Permissions can have three primary protection levels: normal, dangerous, and signature. The normal protection level is a good default for fine-grained permission enforcement within the application. The dangerous protection level is used for higher-risk activities, which might adversely affect the device. Finally, the signature protection level permits any application signed with the same certificate to use that component for controlled application interoperability. You will learn more about application signing in Chapter 19, “Publishing Your Android Application.”
Permissions can be broken down into categories, called permission groups, which describe or warn why specific activities require permission. For example, permissions might be applied for activities that expose sensitive user data such as location and personal information (android.permission-group.LOCATION and android.permission-group.PERSONAL_INFO), access underlying hardware (android.permission-group.HARDWARE_CONTROLS), or perform operations that might incur fees to the user (android.permission-group.COST_MONEY). A complete list of permission groups is available within the Manifest.permission_group class.
For more information about applications and how they can enforce their own permissions, check out the <permission> manifest tag SDK documentation at http://d.android.com/guide/topics/manifest/permission-element.html.
Exploring Other Manifest File Settings
We have now covered the basics of the Android manifest file, but many other settings are configurable within the Android manifest file using different tag blocks, not to mention attributes within each tag we have already discussed.
Some other features you can configure within the Android manifest file include
![]() Setting application-wide themes within the <application> tag attributes
Setting application-wide themes within the <application> tag attributes
![]() Configuring unit-testing features using the <instrumentation> tag
Configuring unit-testing features using the <instrumentation> tag
![]() Aliasing activities using the <activity-alias> tag
Aliasing activities using the <activity-alias> tag
![]() Creating broadcast receivers using the <receiver> tag
Creating broadcast receivers using the <receiver> tag
![]() Creating content providers using the <provider> tag, along with managing content provider permissions using the <grant-uri-permission> and <path-permission> tags
Creating content providers using the <provider> tag, along with managing content provider permissions using the <grant-uri-permission> and <path-permission> tags
![]() Including other data within your activity, service, or receiver component registrations with the <meta-data> tag
Including other data within your activity, service, or receiver component registrations with the <meta-data> tag
For more detailed descriptions of each tag and attribute available in the Android SDK (and there are many), please review the Android SDK Reference on the Android manifest file at http://d.android.com/guide/topics/manifest/manifest-intro.html.
Summary
Each Android application has a specially formatted XML configuration file called AndroidManifest.xml. This file describes the application’s identity in great detail. Some information that you must define within the Android manifest file includes the application’s name and version information, what application components it contains, which device configurations it requires, and what permissions it needs to run. The Android manifest file is used by the Android operating system to install, upgrade, and run the application package. Some details of the Android manifest file are also used by third parties, including the Google Play publication channel.
Quiz Questions
1. What are the names of the five tabs of the Android IDE manifest file resource editor?
2. What are the two different attributes for defining version within the <manifest> tag?
3. What is the manifest XML tag for specifying which versions of the Android SDK your application supports?
4. What is the manifest XML tag for specifying the input methods your application supports?
5. What is the manifest XML tag for specifying the required device features for your application?
6. What is the manifest XML tag for specifying screen sizes supported by your application?
7. What is the manifest XML tag for working with external libraries?
8. What is the manifest XML tag for registering permissions your application enforces?
Exercises
1. Define a fictitious <application> manifest XML tag; include the icon, label, allowBackup, enabled, debuggable, and testOnly attributes; and include values for each.
2. Describe why it is important to choose a target SDK.
3. Using the Android documentation, list all the potential string values available for defining the reqNavigation attribute of the <uses-configuration> tag.
4. Using the Android documentation, create a list of five hardware features of the name attribute of the <uses-feature> tag.
5. Using the Android documentation, name all of the possible attributes and their value types of the <supports-screens> manifest XML tag.
6. Using the Android documentation, create a list of ten different values that could be used for defining the name attribute of the <uses-permission> manifest XML tag.
References and More Information
Android Developers Guide: “The AndroidManifest.xml File”:
http://d.android.com/guide/topics/manifest/manifest-intro.html
Android Developers Guide: “What Is API Level”:
http://d.android.com/guide/topics/manifest/uses-sdk-element.html#ApiLevels
Android Developers Guide: “Supporting Multiple Screens”:
http://d.android.com/guide/practices/screens_support.html
Android Developers Guide: “Security Tips”:
http://d.android.com/training/articles/security-tips.html
Android Google Services: “Filters on Google Play”:
http://d.android.com/google/play/filters.html
All materials on the site are licensed Creative Commons Attribution-Sharealike 3.0 Unported CC BY-SA 3.0 & GNU Free Documentation License (GFDL)
If you are the copyright holder of any material contained on our site and intend to remove it, please contact our site administrator for approval.
© 2016-2026 All site design rights belong to S.Y.A.