Android Programming: Pushing the Limits (2014)
Part II. Getting the Most Out of Components
Chapter 9. Data Storage and Serialization Techniques
This chapter is all about storing and representing data on a local device. Storing data is an important aspect
of all software applications. Developers usually use the term persistence when talking about storing data, and
serialization to describe how data is represented in its stored state. Without persistence, data would be able to
keep its state only in RAM and would be lost after the relevant process finishes. Achieving persistence often
involves compromises among performance, latency, size, and complexity. For instance, if data must be read fast,
you’ll usually go with a slower than usual write operation. Serialization is all about how the data is structured,
both in its persisted state as well as in-memory.
In this chapter, I cover the two most common techniques used in Android applications for persistence and
serialization,—namely, SQLite and SharedPreferences—as well as two alternative methods that also allow
you to transport data over a network or between two devices.
Storing data on a cloud-storage service such as Google Drive or Dropbox is beyond the scope of this
chapter, but you can learn more about storing data on Google Drive in Chapter 19.
Persistence Options for Android
When you store persistent data on an Android device, the standard APIs provide two readymade methods for
storing structured data, preference files and SQLite databases. Preference files are stored in an XML format and
managed by the SharedPreferences class. SQLite databases have a more complex API and are usually
wrapped in a ContentProvider component.
The names of these methods indicate what they should be used for. You use SharedPreferences for
settings, options, user preferences, and other simple values. In preference files, you don’t store arrays and tables
of values or any binary data. Instead, data represented in Java as lists or arrays is more likely to go into an SQLite
database through a ContentProvider. There are, of course, exceptions to these rules, so always consider the
best choice for your application.
Binary data, which is usually media such as image, video, or audio files, should not be stored directly in
an SQLite database or a preference file. It’s usually better to store binary data as regular files, either in an
app’s internal storage or on external public storage. However, in many cases, it may be a good idea to use a
ContentProvider to handle the persistence of binary files as well; doing so provides convenient ways to
deal with files and keep them in sync with the records in your database.
Storing Data in Preference Files
The files backing your SharedPreferences objects are regular XML files stored in the app’s data directory.
The structure is quite simple because it allows only key/value pairs to be stored, but the Android APIs also
provide a very convenient abstraction that allows you to read and write data in a type-safe way.
The easiest way to create a SharedPreferences object is to use the PreferenceManager.
getDefaultSharedPreferences() method, which gives you the default preference object for your
application. Using this approach as your main storage for preferences is convenient because the framework
manages the name of the file. However, if you have multiple preference files in your application, you’re
better off using the Context.getSharedPreference() method, which allows you to freely name the
file. If you want to create a preference file that is relevant to only one activity, you can use the Activity.
getPreference() method, which gets its name from the Activity calling the method.
The name for preference files created by PreferenceManager.
getDefaultSharedPreferences() is formed by the package name with the suffix _
preferences—for instance, com.aaptl.code_preferences. Although you rarely need this
name, it becomes important when you want to implement a backup agent for this file, as I describe in
the section “Application Data Backup” near the end of this chapter.
The types of values you can store in a preference file using the SharedPreferences class are int, float,
long, boolean, String, and a Set of String objects (string arrays). The name of the key must always be a
valid String, and the common practice is to use a dot notation for the keys in order to structure multiple keys
into groups.
For instance, if your preference file contains values that will be used to configure networking as well as user-
interface settings, you can group these values by prefixing each key with the term network or ui. In this
way, you can easily manage and avoid conflicting names. In the following example, you see how to structure
preferences this way by using a prefix and defining the keys in a separate Java interface:
public interface Constants {
public static final String NETWORK_PREFIX = “network.”;
public static final String UI_PREFIX = “ui.”;
public static final String NETWORK_RETRY_COUNT
= NETWORK_PREFIX + “retryCount”;
public static final String NETWORK_CONNECTION_TIMEOUT
= NETWORK_PREFIX + “connectionTimeout”;
public static final String NETWORK_WIFI_ONLY
= NETWORK_PREFIX + “wifiOnly”;
public static final String UI_BACKGROUND_COLOR
= UI_PREFIX + “backgroundColor”;
public static final String UI_FOREGROUND_COLOR
= UI_PREFIX + “foregroundColor”;
public static final String UI_SORT_ORDER
= UI_PREFIX + “sortOrder”;
public static final int SORT_ORDER_NAME = 10;
public static final int SORT_ORDER_AGE = 20;
public static final int SORT_ORDER_CITY = 30;
}
The preceding method is the preferred way for accessing the preference values instead of hardcoding the key
names for each access. Doing so removes the chance of misspelling the names of the keys, a common source of
bugs.
The following code is an example of using preferences together with a Constants class:
public class MainActivity extends Activity {
private void readUiPreferences() {
SharedPreferences preferences
= PreferenceManager.getDefaultSharedPreferences(this);
int defaultBackgroundColor = getResources().
getColor(R.color.default_background);
int backgroundColor = preferences.getInt(
Constants.UI_BACKGROUND_COLOR,
defaultBackgroundColor);
View view = findViewById(R.id.background_view);
view.setBackgroundColor(backgroundColor);
}
}
To change the values in a preference, you first retrieve an Editor instance, which provides the appropriate
PUT method as well as methods for committing your changes. Prior to Android version 2.3 (API level 9), you
committed changes using the commit() method, which did the writing to disk synchronously. However, in
version 2.3, the Editor class provides an apply() method that performs the actual disk write operation
asynchronously. Because you always want to avoid blocking operations in your main thread as much as
possible, the apply() method is preferable to the old commit() method. This makes it safe to update
SharedPreference on the main thread directly from a UI operation (for instance, in an onClick()
method, as shown in the following example).
public class MainActivity extends Activity {
public void doToggleWifiOnlyPreference(View view) {
SharedPreferences preferences = PreferenceManager.
getDefaultSharedPreferences(this);
boolean currentValue = preferences.
getBoolean(Constants.NETWORK_WIFI_ONLY, false);
preferences.edit()
.putBoolean(Constants.NETWORK_WIFI_ONLY, !currentValue)
.apply();
}
}
The preceding code shows where you use a click listener to toggle the preference value stored in Constants.
NETWORK_WIFI_ONLY. If you were to use the old commit() method, the main thread could have been
blocked, causing a degraded user experience. With apply(), you no longer have to worry about that issue.
Every preference file has a single instance within the same process. So even though you retrieve a
SharedPreference object from two different components (but in the same application) with the two
objects having the same name, they share the same backing instance, so every change will immediately be
reflected in both objects.
In order to get a notification when a value is updated, you can register a callback listener that is triggered
whenever apply() or commit() is called. The most common use for this is when you change a value in
a preference from an Activity that should affect the behavior of a background service, as shown in this
example:
public class NetworkService extends IntentService
implements SharedPreferences.OnSharedPreferenceChangeListener {
public static final String TAG = “NetworkService”;
private boolean mWifiOnly;
@Override
public void onCreate() {
super.onCreate();
SharedPreferences preferences = PreferenceManager
.getDefaultSharedPreferences(this);
preferences.registerOnSharedPreferenceChangeListener(this);
mWifiOnly = preferences.getBoolean(Constants.NETWORK_WIFI_ONLY,
false);
}
@Override
public void onDestroy() {
super.onDestroy();
SharedPreferences preferences = PreferenceManager
.getDefaultSharedPreferences(this);
preferences.unregisterOnSharedPreferenceChangeListener(this);
}
@Override
public void onSharedPreferenceChanged(SharedPreferences preferences,
String key) {
if (Constants.NETWORK_WIFI_ONLY.equals(key)) {
mWifiOnly = preferences
.getBoolean(Constants.NETWORK_WIFI_ONLY, false);
if(mWifiOnly) cancelNetworkOperationIfNecessary();
}
}
@Override
protected void onHandleIntent(Intent intent) {
ConnectivityManager connectivityManager
= (ConnectivityManager)
getSystemService(CONNECTIVITY_SERVICE);
NetworkInfo networkInfo
= connectivityManager.getActiveNetworkInfo();
int type = networkInfo.getType();
if (mWifiOnly && type != ConnectivityManager.TYPE_WIFI) {
Log.d(TAG, “We should only perform network I/O over WiFi.”);
return;
}
performNetworkOperation(intent);
}
}
User Options and Settings UI
In many applications, it’s common to provide a separate UI that allows users to change the options and settings
of the application. Android provides a set of readymade Activity and Fragment classes that make creating
such a UI easy—PreferenceActivity and PreferenceFragment.
Start by creating an XML file, placed in the XML resources directory, which follows the PreferenceScreen
syntax. This is a simple XML structure that specifies all the preferences you’ll allow users to change and also
how they interact with the preferences. You can provide simple text fields for entering text strings, check
boxes, and lists of choices. For each option, you can specify a title and description, and you can group a
number of preferences together in different categories. You don’t need to deal with saving changed values
because that’s managed by the PreferenceFragment. The instance of the SharedPreferences
that a PreferenceFragment is working against is the same as you get from PreferenceManaget.
getDefaultSharedPreferences().
The following code shows a PreferenceScreen XML for two user-configurable options relating to the
previous examples.
<?xml version=”1.0” encoding=”utf-8”?>
<PreferenceScreen xmlns:android=”http://schemas.android.com/apk/res/
android”>
<PreferenceCategory android:title=”@string/network_preferences_title”>
<CheckBoxPreference
android:title=”@string/network_wifi_only_title”
android:summaryOn=”@string/network_wifi_only_summary_on”
android:summaryOff=”@string/network_wifi_only_summary_off”
android:key=”network.wifiOnly”
android:defaultValue=”false”/>
<ListPreference
android:title=”@string/network_retry_count_title”
android:summary=”@string/network_retry_count_summary”
android:key=”network.retryCount”
android:defaultValue=”3”
android:entryValues=”@array/network_retry_count_option_values”
android:entries=”@array/network_retry_count_options” />
</PreferenceCategory>
</PreferenceScreen>
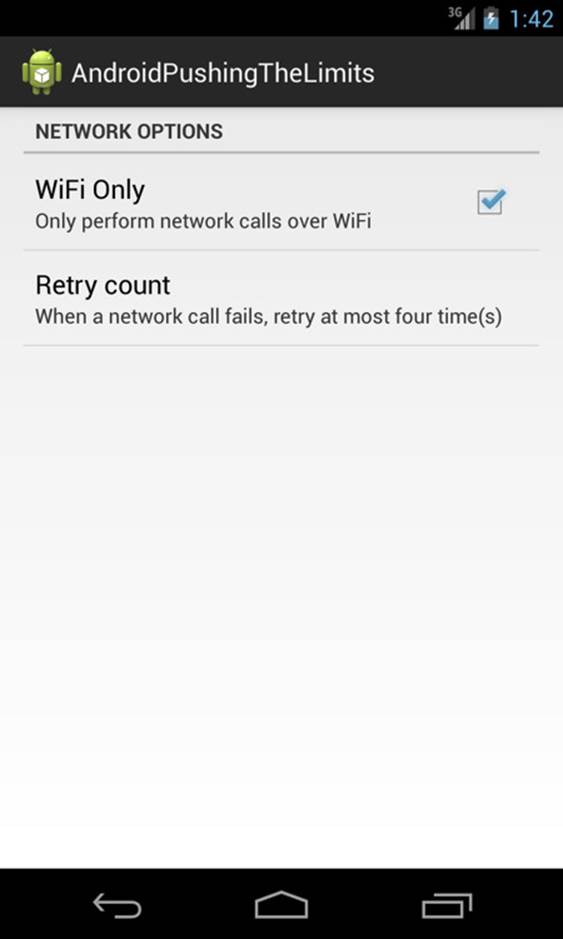
Next, you implement a PreferenceActivity, add a PreferenceFragment as its UI, and then call
PreferenceFragment.addPreferencesFromResource() to specify the XML used for displaying the
settings UI. The Android framework will generate a UI that follows the style and theme of your application (see
Figure 9-1).
Figure 9-1 The result of a simple PreferenceScreen
In the following code, you specify which XML file to use from the resources. You also call
PreferenceManager.setDefaultValues() so that the preference file is populated with the default
values specified in the XML file.
public class SettingsFragment extends PreferenceFragment {
@Override
public void onCreate(Bundle savedInstanceState) {
super.onCreate(savedInstanceState);
PreferenceManager.setDefaultValues(getActivity(),
R.xml.preferences, false);
addPreferencesFromResource(R.xml.preferences);
}
}
The most common way to start this Activity is through an Intent where you specify the ComponentName,
instead of using an action string. Also make sure that you set the android:exported flag to false in the
manifest so that it can be started only within your application.
High-Performance ContentProviders
When you choose to store data in an SQLite database, I always recommend that you create a ContentProvider,
even if you store data only for internal use. My reason is that Android provides several utility and UI-related classes
that work on top of ContentProviders and make things much easier. Also, these classes provide an easy
mechanism for notifying clients whenever an update occurs to the data, which makes it easier for developers to
keep the list in the UI in sync with the actual content.
When you create the tables for your database, be sure to consider its main purpose. Will the database mostly
be read and displayed in a UI (for instance, a ListView), or are you designing a database that will have more
write than read operations and that will happen in the background (for instance, an activity logger or a sports
application tracking the user’s position during training)? Depending on the use, read performance may be more
important than fast write operations, or vice versa.
Android Database Design
Design of a relational database is usually done through a process called database normalization. This process
tries to minimize dependency and redundancy in a database using a number rule called normal form. There
are a number of normal forms, but in most situations, only the first three are relevant. When a database design
fulfills the first three normal forms, it’s considered normalized.
In many cases, you may want to disregard the traditional database design and normalization rules. Unless you’ll
be storing hundreds of thousands of records in your database, each containing a huge amount of text and
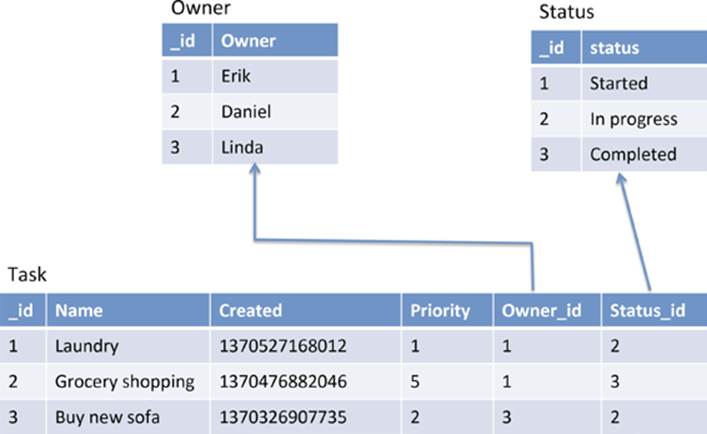
maybe even binary data, you can generally use a much simpler database design. Consider an application that
keeps track of tasks. Each task has a name, a date when it was created, a priority, a status, and an owner. If you
were to make an optimal database design, it probably would look something like the one shown in Figure 9-2.
Figure 9-2 A database with three tables where the task table has two foreign keys
This design requires two foreign keys in the task table, which is perfectly okay, but it will make your application
code more complex. The choice of statuses isn’t likely to change for this application, so the better option would
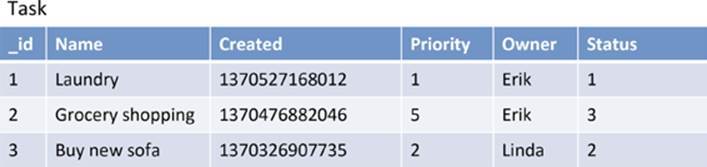
be to remove the extra table and just interpret the column as a reference to a set of constants. The Owner field
is at this moment a more complex matter. It may be okay just to store the name—in fact, doing so is okay for
most occasions. If you need additional data for each person, you can rely on the ContactsProvider and
store a reference to a contact in your table instead. The result is a much simpler table, as illustrated in Figure 9-3.
Figure 9-3 A simplified version of the database for storing tasks
Creating and Upgrading Databases
I recommend that you always wrap your SQLite databases in Android using the ContentProvider
component. In this way, you can manage all calls to the database from one place and also use several
readymade utilities for working with databases.
In this section, I give an example of a provider that stores tasks that can be given different priorities, status, and
owners. I’ll start with the basics of creating the actual database.
The following code shows the provider without the query methods (query(), insert(), update(), and
delete()). I show some of these in the section “Database Transactions,” later in this chapter. The important
thing here is the class MyDatabaseHelper that extends SQLiteOpenHelper. This class helps in opening
SQLiteDatabase objects and in managing database upgrades. The onCreate() method for this class is
called once when the application starts and the provider is accessed the first time—more specifically, the first
time getReadableDatabase() or getWritableDatabase() is called.
public class TaskProvider extends ContentProvider {
public static final String AUTHORITY = “com.aptl.code.provider”;
public static final int ALL_TASKS = 10;
public static final int SINGLE_TASK = 20;
public static final String TASK_TABLE = “task”;
public static final String[] ALL_COLUMNS =
new String[]{TaskColumns._ID, TaskColumns.NAME,
TaskColumns.CREATED, TaskColumns.PRIORITY,
TaskColumns.STATUS, TaskColumns.OWNER};
public static final String DATABASE_NAME = “TaskProvider”;
public static final int DATABASE_VERSION = 2;
public static final String TAG = “TaskProvider”;
public static final String CREATE_SQL = “CREATE TABLE “
+ TASK_TABLE + “ (“
+ TaskColumns._ID + “ INTEGER PRIMARY KEY AUTOINCREMENT, “
+ TaskColumns.NAME + “ TEXT NOT NULL, “
+ TaskColumns.CREATED + “ INTEGER DEFAULT NOW, “
+ TaskColumns.PRIORITY + “ INTEGER DEFAULT 0, “
+ TaskColumns.STATUS + “ INTEGER DEFAULT 0, “
+ TaskColumns.OWNER + “ TEXT);”;
public static final String CREATED_INDEX_SQL = “CREATE INDEX “
+ TaskColumns.CREATED + “_idx ON “ + TASK_TABLE + “ (“
+ TaskColumns.CREATED + “ ASC);”;
public static final String OWNER_INDEX_SQL = “CREATE INDEX “
+ TaskColumns.OWNER + “_idx ON “ + TASK_TABLE + “ (“
+ TaskColumns.CREATED + “ ASC);”;
public static UriMatcher mUriMatcher
= new UriMatcher(UriMatcher.NO_MATCH);
public MyDatabaseHelper mOpenHelper;
static {
mUriMatcher.addURI(AUTHORITY, “task”, ALL_TASKS);
mUriMatcher.addURI(AUTHORITY, “task/#”, SINGLE_TASK);
}
@Override
public boolean onCreate() {
mOpenHelper = new MyDatabaseHelper(getContext());
return true;
}
// Query methods omitted for brevity...
public interface TaskColumns extends BaseColumns {
public static final String NAME = “name”;
public static final String CREATED = “created”;
public static final String PRIORITY = “priority”;
public static final String STATUS = “status”;
public static final String OWNER = “owner”;
}
private class MyDatabaseHelper extends SQLiteOpenHelper {
public MyDatabaseHelper(Context context) {
super(context, DATABASE_NAME, null, DATABASE_VERSION);
}
@Override
public void onCreate(SQLiteDatabase database) {
Log.d(TAG, “Create SQL : “ + CREATE_SQL);
database.execSQL(CREATE_SQL);
database.execSQL(CREATED_INDEX_SQL);
}
@Override
public void onUpgrade(SQLiteDatabase db,
int oldVersion, int newVersion) {
if (oldVersion < 2) {
db.execSQL(“ALTER TABLE “ + TASK_TABLE
+ “ ADD COLUMN “ + TaskColumns.OWNER + “ TEXT” );
db.execSQL(OWNER_INDEX_SQL);
}
}
}
}
Every time the MyDatabaseHelper class is created, it compares the internal version number that the SQLite
database currently has (stored in the internal table called android_metadata) with the one provided to
the constructor of SQLiteOpenHelper. Thus you can perform database upgrades and add new columns to
existing tables or perform any other SQL commands. This capability is efficient because it doesn’t require you to
drop all tables and their content when you need to change the database.
In the preceding example, the Owner column is part of the CREATE_SQL as well as the ALTER TABLE
statement called in onUpgrade(). This is because there are two possible scenarios. In the first scenario,
a new installation of the application will first call onCreate(), followed by onUpgrade(). Because the
if statement in onUpgrade() is false, the ALTER TABLE statement won’t be called. However, for an
upgrade of the application from an older version, onCreate() won’t be called, and the if statement in
onUpgrade() is true, the new column will be created. By incrementally increasing the version number
for your database and adding a new if statement for each alteration to the database, you have a simple yet
powerful method for upgrading the database.
In the code examples in this chapter I use String constants for declaring the SQL statements to
make the examples more clear. A better alternative is to store them in text files in the raw application
resources. This makes them easier to work with as well as simplifies testing.
Implementing Query Methods
When your database is queried (generally using ContentResolver.query()), the method
ContentProvider.query() is called. Your implementation must take care of interpreting the incoming
Uri to decide which query should be executed and check that all incoming parameters are safe.
The following code shows the implementation of the query() method as well as two utility methods used for
modifying the selection and selectionArgs parameters. Also, here you make a simple check to see if the
incoming projection parameter is null, and if so you set it to the default value. The same check is made on
the sortOrder parameter where you use the column named priority as the default for sorting.
public static String[] fixSelectionArgs(String[] selectionArgs,
String taskId) {
if (selectionArgs == null) {
selectionArgs = new String[]{taskId};
} else {
String[] newSelectionArg =
new String[selectionArgs.length + 1];
newSelectionArg[0] = taskId;
System.arraycopy(selectionArgs, 0,
newSelectionArg, 1, selectionArgs.length);
}
return selectionArgs;
}
public static String fixSelectionString(String selection) {
selection = selection == null ? TaskColumns._ID + “ = ?” :
TaskColumns._ID + “ = ? AND (“ + selection + “)”;
return selection;
}
@Override
public Cursor query(Uri uri, String[] projection,
String selection, String[] selectionArgs,
String sortOrder) {
projection = projection == null ? ALL_COLUMNS : projection;
sortOrder = sortOrder == null ? TaskColumns.PRIORITY : sortOrder;
SQLiteDatabase database = mOpenHelper.getReadableDatabase();
switch (mUriMatcher.match(uri)) {
case ALL_TASKS:
return database.query(TASK_TABLE, projection,
selection, selectionArgs,
null, null, sortOrder);
case SINGLE_TASK:
String taskId = uri.getLastPathSegment();
selection = fixSelectionString(selection);
selectionArgs = fixSelectionArgs(selectionArgs, taskId);
return database.query(TASK_TABLE, projection,
selection, selectionArgs,
null, null, sortOrder);
default:
throw new IllegalArgumentException(“Invalid Uri: “ + uri);
}
}
The two utility methods for modifying the selection and selectionArgs parameters are used only when
addressing a specific record in the database using an Uri. Note: You prepend (in the fixSelectionString()
and fixSelectionArgs() methods) the ID column to the existing selection. This makes the query faster
because comparison on the primary key column is always very fast and thus speeds up the entire query.
When writing database queries, keep the simplest comparisons in the WHERE clause before the
more complex ones. Doing so makes the query execute faster because it can determine much earlier
whether the record should be included.
Database Transactions
When you execute a piece of SQL on an SQLite database, you always perform a transaction. Unless you
specifically manage the transaction yourself, as I show next, it will be created for you automatically for that
statement. Because most calls to a ContentProvider result in only one SQL statement, there’s’ little need
for handling transactions manually in these cases. However, if your application will execute multiple SQL
statements, such as inserting many new records in one batch, always manage your own transactions.
The ContentProvider class provides two methods for transaction management, ContentProvider.
bulkInsert() and ContentProvider.applyBatch(). In the following code, you see how to implement
the bulkInsert() methods, which will insert multiple records in one single transaction. This approach is
significantly faster than calling ContentProvider.insert() for every new piece of data you want to store.
private Uri doInsert(Uri uri, ContentValues values, SQLiteDatabase
database) {
Uri result = null;
switch (mUriMatcher.match(uri)) {
case ALL_TASKS:
long id = database.insert(TASK_TABLE, “”, values);
if (id == -1) throw new SQLException(“Error inserting data!”);
result = Uri.withAppendedPath(uri, String.valueOf(id));
}
return result;
}
@Override
public Uri insert(Uri uri, ContentValues values) {
SQLiteDatabase database = mOpenHelper.getWritableDatabase();
Uri result = doInsert(uri, values, database);
return result;
}
@Override
public int bulkInsert(Uri uri, ContentValues[] contentValueses) {
SQLiteDatabase database = mOpenHelper.getWritableDatabase();
int count = 0;
try {
database.beginTransaction();
for (ContentValues values : contentValueses) {
Uri resultUri = doInsert(uri, values, database);
if (resultUri != null) {
count++;
} else {
count = 0;
throw new SQLException(“Error in bulk insert”);
}
}
database.setTransactionSuccessful();
} finally {
database.endTransaction();
}
return count;
}
The semantics for transactions are simple. You begin a new transaction by calling SQLiteDatabase.
beginTransaction(). After you insert all the records successfully, you call SQLiteDatabase.
setTransactionSuccessful() and then end the transaction with SQLiteException.
endTransaction(). If something goes wrong in one of the insertions, you throw a SQLException,
and all the previous insertions will be rolled back because the call to SQLiteDatabase.
setTransactionSuccessful() was never called.
I highly recommend that you implement this method for your own providers because it will increase the
performance on insertions significantly. However, because this method works only for insert operations, you
may need to implement another method for handling more complex operations.
If you need to perform multiple update() or delete() statements within a single transaction, you must
implement your own version of ContentProvider.applyBatch().
@Override
public ContentProviderResult[] applyBatch(ArrayList<ContentProviderOperat
ion>
operations)
throws OperationApplicationException {
SQLiteDatabase database = mOpenHelper.getWritableDatabase();
ContentProviderResult[] result
= new ContentProviderResult[operations.size()];
try {
database.beginTransaction();
for (int i = 0; i < operations.size(); i++) {
ContentProviderOperation operation = operations.get(i);
result[i] = operation.apply(this, result, i);
}
database.setTransactionSuccessful();
} finally {
database.endTransaction();
}
return result;
}
As with the buildInsert() method shown earlier, you begin a transaction, apply the operations, set the
transaction successfully, and finally end the transaction. This API is designed for complex providers like the
ContactsProvider, where there are many connected tables, each with its own Uri. Also, if you need to
perform batch inserts to multiple tables, this API can still be useful in your own application.
Storing Binary Data in ContentProvider
Binary data includes anything that cannot be represented using the simple data types in Java, usually an image
or some other media file, though it can be any type of file of a proprietary format. Working with such content
can be tricky, but luckily the ContentProvider class provides a number of methods for dealing with this
issue. Say that you want to store a JPG photo with each task in your database. First, you need to add another
column to your task table with the name _data and the type TEXT, as shown here:
db.execSQL(“ALTER TABLE “ + TASK_TABLE + “ ADD COLUMN _data TEXT”);
The ContentProvider.openFileHelper() method uses this internally. You just store the path to the
future file belonging to each record at each insertion. To do so, you modify the doInsert() method shown
earlier.
private Uri doInsert(Uri uri, ContentValues values,
SQLiteDatabase database) {
Uri result = null;
switch (sUriMatcher.match(uri)) {
case ALL_TASKS:
long id = database.insert(TASK_TABLE, “”, values);
if (id == -1) throw new SQLException(“Error inserting data: “
+ values.toString());
result = Uri.withAppendedPath(uri, String.valueOf(id));
// Update row with _data field pointing at a file...
File dataFile = Environment.getExternalStoragePublicDirectory(
Environment.DIRECTORY_
PICTURES);
dataFile = new File(dataFile, FILE_PREFIX + id + FILE_SUFFIX);
ContentValues valueForFile = new ContentValues();
valueForFile.put(“_data”, dataFile.getAbsolutePath());
update(result, values, null, null);
}
return result;
}
In this case, you write the JPG to the PICTURES directory on the external storage. Next, you override the
method ContentProvider.openFile(), which will return a ParcelFileDescriptor to the client.
You can then use that object for reading and writing directly to the file.
@Override
public ParcelFileDescriptor openFile(Uri uri, String mode) throws
FileNotFoundException {
if(sUriMatcher.match(uri) == SINGLE_TASK)
return openFileHelper(uri, mode);
else
return super.openFile(uri, mode);
}
Using openFileHelper()handles the actual opening of the file and passes it to the calling client. When you
want to read a Bitmap for a certain record in your ContentProvider, you can simply use the same Uri as
for the record, and the framework takes care of the rest, as shown here:
public Bitmap readBitmapFromProvider(int taskId, ContentResolver
resolver)
throws FileNotFoundException {
Uri uri = Uri.parse(“content://” + TaskProvider.AUTHORITY
+ “/” + TaskProvider.TASK_TABLE + “/” + taskId);
return BitmapFactory.decodeStream(resolver.openInputStream(uri));
}
Storing a file works similarly with ContentResolver.openOutputStream() with the correct Uri. This is
especially useful when you want to display data from your ContentProvider in a ListView that contains
both text and images, such as in the preceding example.
Serializing Data for Persistence
Using the ContentValues and Cursor classes when handling persistent data in your application is fine
when working with your ContentProvider, but if you ever need to send the data over the Internet or
share it with another device, you have a completely different challenge. To resolve this challenge, you need to
transform your data to a format that the receiving end can work with and that is suitable for sending over the
network. This technique is called serialization.
Serialization is the concept of taking an object in memory and writing it to a file (or other output) such that
the exact same memory representation can later be read (called deserialization). Android provides its internal
serialization API with the Parcelable interface, but it isn’t designed or well-suited for persistent storage on
files or for transferring over a network.
In this section, I discuss two suitable formats for persisting complex data, JSON and Google Protocol Buffers.
Both are well-supported by Android and have open-source implementations for most platforms, meaning that
they’re’ well-suited for transporting over networks.
JavaScript Object Notation
JSON is an abbreviation for JavaScript Object Notation, and it’s a subset of the JavaScript standard. The official
Android API has built-in support for reading and writing JSON data. This format is excellent for representing
complex objects that don’t contain binary values. It has also become somewhat of a de-facto standard for
sharing data with web services online.
The following example shows a simple JSON array with three objects containing the same information that was
stored in the TaskProvider in an earlier example. This format is excellent for sending tasks with an online
web service or for sharing directly with a friend.
[
{
“name”: “Laundry”,
“created”: 1370527168012,
“priority”: 5,
“owner”: “Erik”,
“status”: 1
},
{
“name”: “Groceries”,
“created”: 1370476882046,
“priority”: 3,
“owner”: “Linda”,
“status”: 2
},
{
“name”: “Buy new sofa”,
“created”: 1370326907735,
“priority”: 2,
“owner”: “Linda”,
“status”: 1
}
]
Reading JSON data from an InputStream is best done using the JsonReader API, as shown following:
public JSONArray readTasksFromInputStream(InputStream stream) {
InputStreamReader reader = new InputStreamReader(stream);
JsonReader jsonReader = new JsonReader(reader);
JSONArray jsonArray = new JSONArray();
try {
jsonReader.beginArray();
while (jsonReader.hasNext()) {
JSONObject jsonObject
= readSingleTask(jsonReader);
jsonArray.put(jsonObject);
}
jsonReader.endArray();
} catch (IOException e) {
// Ignore for brevity
} catch (JSONException e) {
// Ignore for brevity
}
return jsonArray;
}
private JSONObject readSingleTask(JsonReader jsonReader)
throws IOException, JSONException {
JSONObject jsonObject = new JSONObject();
jsonReader.beginObject();
JsonToken token;
do {
String name = jsonReader.nextName();
if (“name”.equals(name)) {
jsonObject.put(“name”, jsonReader.nextString());
} else if (“created”.equals(name)) {
jsonObject.put(“created”, jsonReader.nextLong());
} else if (“owner”.equals(name)) {
jsonObject.put(“owner”, jsonReader.nextString());
} else if (“priority”.equals(name)) {
jsonObject.put(“priority”, jsonReader.nextInt());
} else if (“status”.equals(name)) {
jsonObject.put(“status”, jsonReader.nextInt());
}
token = jsonReader.peek();
} while (token != null && !token.equals(JsonToken.END_OBJECT));
jsonReader.endObject();
return jsonObject;
}
Although it’s also possible to read the entire contents of the InputStream to a String and then pass that
to the constructor of JSONArray, the preceding method consumes less memory and will most likely be faster.
Likewise, the JsonWriter class allows you to efficiently write JSON data to an OutputStream, as shown here:
public void writeJsonToStream(JSONArray array, OutputStream stream) throws
JSONException {
OutputStreamWriter writer = new OutputStreamWriter(stream);
JsonWriter jsonWriter = new JsonWriter(writer);
int arrayLength = array.length();
jsonWriter.beginArray();
for(int i = 0; i < arrayLength; i++) {
JSONObject object = array.getJSONObject(i);
jsonWriter.beginObject();
jsonWriter.name(“name”).
value(object.getString(“name”));
jsonWriter.name(“created”).
value(object.getLong(“created”));
jsonWriter.name(“priority”).
value(object.getInt(“priority”));
jsonWriter.name(“status”).f
value(object.getInt(“status”));
jsonWriter.name(“owner”).
value(object.getString(“owner”));
jsonWriter.endObject();
}
jsonWriter.endArray();
jsonWriter.close();
}
Advanced JSON Handling with Gson
The JSONObject and JSONArray classes are convenient to work with as value objects in your code, but
they have some limitations and usually consume more memory than necessary. Likewise, JsonReader and
JsonWriter result in quite a lot of code if you have several different types of value objects. If you need more
advanced serialization and deserialization of JSON data, you can find an excellent open-source library called Gson.
You can find the documentation for Gson at https://code.google.com/p/google-gson. To
include Gson in your Gradle configuration, add the following to the dependencies: compile ‘com.
google.code.gson:gson:2.2.4’.
This library allows you to convert a Plain Old Java Objects (POJOs) into JSON and back. All you need to do is to
define your data as regular Java objects with getters and setters and include the Gson library in your project.
The following class shows a simple Java object that represents a task:
public class Task {
private String mName;
private String mOwner;
private Status mStatus;
private int mPriority;
private Date mCreated;
public Task() {
}
public Task(String name, String owner,
Status status, int priority, Date created) {
mName = name;
mOwner = owner;
mStatus = status;
mPriority = priority;
mCreated = created;
}
// Getters and setter omitted for brevity...
@Override
public boolean equals(Object o) {
if (this == o) return true;
if (o == null || getClass() != o.getClass()) return false;
Task task = (Task) o;
return mCreated.equals(task.mCreated) && mName.equals(task.mName);
}
@Override
public int hashCode() {
int result = mName.hashCode();
result = 31 * result + mCreated.hashCode();
return result;
}
public enum Status {
CREATED, ASSIGNED, ONGOING, CANCELLED, COMPLETED
}
}
Notice the use of Java enum for the status of the task. This object is much easier to work with in your application
than the raw JSONObject.
The following code shows how to read and write a Collection of Task objects. The serialized form is always
valid JSON data, so this choice becomes very convenient when working toward web services that publish data
in JSON format. When you’re also in control of the server-side code and it happens to be written in Java, you can
easily share the same set of Java code between your server and Android application.
public Collection<Task> readTasksFromStream(InputStream stream) {
InputStreamReader reader = new InputStreamReader(stream);
JsonReader jsonReader = new JsonReader(reader);
Gson gson = new Gson();
Type type = new TypeToken<Collection<Task>>(){}.getType();
return gson.fromJson(jsonReader, type);
}
public void writeTasksToStream(Collection<Task> tasks, OutputStream
outputStream) {
OutputStreamWriter writer = new OutputStreamWriter(outputStream);
JsonWriter jsonWriter = new JsonWriter(writer);
Gson gson = new Gson();
Type type = new TypeToken<Collection<Task>>(){}.getType();
gson.toJson(tasks, type, jsonWriter);
}
To make it simpler to use your POJOs toward a ContentProvider, you can implement two methods that
convert your objects to and from ContentValues and Cursor objects, as shown here:
public ContentValues toContentValues() {
ContentValues values = new ContentValues();
values.put(TaskProvider.TaskColumns.NAME, mName);
values.put(TaskProvider.TaskColumns.OWNER, mOwner);
values.put(TaskProvider.TaskColumns.STATUS, mStatus.ordinal());
values.put(TaskProvider.TaskColumns.PRIORITY, mPriority);
values.put(TaskProvider.TaskColumns.CREATED, mCreated.getTime());
return values;
}
public static Task fromCursor(Cursor cursor) {
Task task = new Task();
int nameColumnIdx
= cursor.getColumnIndex(TaskProvider.TaskColumns.NAME);
task.setName(cursor.getString(nameColumnIdx));
int ownerColumnIdx
= cursor.getColumnIndex(TaskProvider.TaskColumns.OWNER);
task.setOwner(cursor.getString(ownerColumnIdx));
int statusColumnIdx
= cursor.getColumnIndex(TaskProvider.TaskColumns.STATUS);
int statusValue = cursor.getInt(statusColumnIdx);
for (Status status : Status.values()) {
if(status.ordinal() == statusValue) {
task.setStatus(status);
}
}
int priorityColumnIdx
= cursor.getColumnIndex(TaskProvider.TaskColumns.PRIORITY);
task.setPriority(cursor.getInt(priorityColumnIdx));
int createdColumnIdx
= cursor.getColumnIndex(TaskProvider.TaskColumns.CREATED);
task.setCreated(new Date(cursor.getLong(createdColumnIdx)));
return task;
}
If your application will have many different POJOs and tables, it may be easier to integrate an ORM
(Object-Relational-Mapping) library to handle the serialization and deserialization between your
SQLite database and Java objects. Two ORM libraries present a good option for Android today,
greenDAO (http://greendao-orm.com) and OrmLight (http://ormlite.com).
Google Protocol Buffers
Google Protocol Buffer, or protobuf, is a way of encoding structured data in an efficient and extensible format.
It differs from JSON in that it supports binary data mixed with simple data types and also has an advanced and
extensible schema support. Protobuf has implementations for most software platforms, including a lite Java
variant suitable for Android.
You can find documentation, download links, and installation instructions for Google Protocol Buffers
at https://developers.google.com/protocol-buffers. Remember that for Android
you have to build the lite version of the tool, so you cannot use the one found in the central Maven
repository. Executing “mvn package –P lite” in the Java source directory does this. Check the
installation instructions for further details.
Although JSON lets you read and write arbitrary data to a JSONObject, protobuf requires the use of a schema
that defines the data you want to store. The schema defines a number of messages, where each message has a
number of name-value pair fields. Each field can be either one of the supported built-in primitive data types,
an enum, or another message. You can also specify whether a field is required or optional as well as some other
parameters. Once your protobuf schema is complete, you use the protobuf tools to generate the Java code for
your data. The generated Java classes can now be used for reading and writing protobuf data in a convenient
way.
The following code is a sample of a simple protobuf schema that defines the information similar to the
TaskProvider shown earlier:
package com.aptl.code.task;
option optimize_for = LITE_RUNTIME;
option java_package = “com.aptl.code.task”;
option java_outer_classname = “TaskProtos”;
message Task {
enum Status {
CREATED = 0;
ONGOING = 1;
CANCELLED = 2;
COMPLETED = 3;
}
message Owner {
required string name = 1;
optional string email = 2;
optional string phone = 3;
}
message Comment {
required string author = 1;
required uint32 timestamp = 2;
required string content = 3;
}
required string name = 1;
required uint64 created = 2;
required int32 priority = 3;
required Status status = 4;
optional Owner owner = 5;
repeated Comment comments = 6;
}
Note: Declarations in the beginning tell the protobuf tool what Java package and class name to use when
generating the code. There is also an instruction to generate a lite version that is supported by Android.
Deserializing a protobuf object from an InputStream is easy, as shown in the following example. The
generated Java code gives you a number of functions for merging the content from byte arrays, ByteBuffer,
and InputStream objects.
public TaskProtos.Task readBrotoBufFromStream(InputStream inputStream)
throws IOException {
TaskProtos.Task task = TaskProtos.Task.newBuilder()
.mergeFrom(inputStream).build();
Log.d(“ProtobufDemo”, “Read Task from stream: “
+ task.getName() + “, “
+ new Date(task.getCreated()) + “, “
+ (task.hasOwner() ?
task.getOwner().getName() : “no owner”) + “, “
+ task.getStatus().name() + “, “
+ task.getPriority()
+ task.getCommentsCount() + “ comments.”);
return task;
}
In this example, you see how to retrieve the values in a protobuf object. Note: Protobuf objects are
immutable. The only way to make a modification is to create a new builder from an existing object, set the new
value, and generate a Task object that will replace the old one. This makes protobuf a bit harder to work with
but forces you to use a better design when working with persistence of complex objects.
The following method shows how to construct a new protobuf object for a task. You start by creating a new
Builder for the specific object you want to construct and then you set the desired values and call Builder.
build() to create your immutable protobuf object.
public TaskProtos.Task buildTask(String name, Date created,
String ownerName, String ownerEmail,
String ownerPhone,
TaskProtos.Task.Status status,
int priority,
List<TaskProtos.Task.Comment> comments) {
TaskProtos.Task.Builder builder = TaskProtos.Task.newBuilder();
builder.setName(name);
builder.setCreated(created.getTime());
builder.setPriority(priority);
builder.setStatus(status);
if(ownerName != null) {
TaskProtos.Task.Owner.Builder ownerBuilder
= TaskProtos.Task.Owner.newBuilder();
ownerBuilder.setName(ownerName);
if(ownerEmail != null) {
ownerBuilder.setEmail(ownerEmail);
}
if(ownerPhone != null) {
ownerBuilder.setPhone(ownerPhone);
}
builder.setOwner(ownerBuilder);
}
if (comments != null) {
builder.addAllComments(comments);
}
return builder.build();
}
When you need to write a protobuf object to a file or to a network stream, the API provides a set of methods
for that. In the following code, you see an example where you can serialize (that is, write) a Task object to an
OutputStream.
public void writeTaskToStream(TaskProtos.Task task,
OutputStream outputStream)
throws IOException {
task.writeTo(outputStream);
}
The main advantage of protobuf is that it consumes much less memory and is faster to read and write than
JSON. Protobuf objects are also immutable, which is useful when you want to ensure that the values of the
object remain the same during its lifetime.
Application Data Backup
After you resolve all your persistence needs for your application, consider whether your application will benefit
from using the backup service for Android provided by Google. This service lets you back up your application’s
persistence data and restore it if the user performs a factory reset or upgrades to a new Android device.
Android provides a convenient API for managing backups, and it’s’ a feature that will be greatly appreciated by
users if they lose their device. The backup is securely stored on a cloud and will be restored only to a device with
the same Google ID.
The following XML snippet is a piece from a typical AndroidManifest.xml file:
<application
android:allowBackup=”true”
android:backupAgent=”MyBackupAgent”
android:icon=”@drawable/ic_launcher”
android:label=”@string/app_name”
android:theme=”@style/AppTheme”>
<meta-data android:name=”com.google.android.backup.api_key”
android:value=” backup-key-string”/>
...
</application>
To enable backup of your application’s data, you only need to specify the class name of your backup agent in
the android:backupAgent attribute. This class deals with the backup and restoration of application data
that you choose to back up for the user. The meta-data attribute in the preceding example specifies the API
key that you get once you register your application on the Google backup service. You can find the site for
registering your applications at https://developer.android.com/google/backup/signup.html.
When you register and receive your API key, paste it into the android:value attribute, as just shown.
Although the key is bound to your application’s package and cannot be used for other applications (that is, one
key per application), you should take care not to share it publicly in any code you publish.
The following class shows a simple backup agent used to back up and restore your default preferences file. Note:
The filename for the preference file you get from PreferenceManager.getDefaultPreferences() is
named <package-name>_preferences. This is an undocumented detail that makes a big difference when
it comes to backing up your preference files.
public class MyBackupAgent extends BackupAgentHelper {
public static final String PREFS_BACKUP_KEY = “prefsBackup”;
@Override
public void onCreate() {
super.onCreate();
SharedPreferencesBackupHelper sharedPreferencesBackupHelper
= new SharedPreferencesBackupHelper(this,
getPackageName() + “_preferences”);
addHelper(PREFS_BACKUP_KEY, sharedPreferencesBackupHelper);
}
}
The BackupAgentHelper class automatically handles both backup and restoration of the preference
files you choose to add to this helper. You can also add backup for other, regular files using the class
FileBackupHelper.
The backup agent provided for Android applications by Google is appropriate for small amounts of
data. Although it would be technically possible to back up a SQLite database, you would probably
be better off to first dump the contents of the database to a serialized format, compress the file, and
perform your backup on that dump.
In the Android SDK, you can find the command-line tool bmgr that allows you to force backup and restoration
operations on your application. This is useful when you’re developing your applications because you can check
that everything is working correctly.
Summary
Persisting data is central to most software development. The most common solution for Android applications
is either through the SharedPreference class or by using a ContentProvider with an SQLite database.
The SharedPreferences and ContentProvider API are both powerful and easy to use. Being able to get
the most out of these APIs can make a huge difference in the overall user experience.
However, when you need to transport data over the network, a number of options are available that aren’t
part of the Android APIs. Serializing data with JSON, and more specifically using the Gson library, is a powerful
technique that you should master. For the even more advanced situations where performance and size are
crucial, using Google Protocol Buffers can help you solve your problems.
Finally, consider the use of a backup agent in your application in order to provide users with a smooth
experience when they switch to a new Android device. Use the backup agent to store user preferences and
options that let them keep the same configuration between multiple devices.
Further Resources Documentation
Guide to Settings: http://developer.android.com/guide/topics/ui/settings.html
Guide to Content Providers: http://developer.android.com/guide/topics/providers/content providers.html
Websites
Full documentation and information about SQLite: www.sqlite.org
Google Gson: https://code.google.com/p/google-gson
Google Protocol Buffers—Tutorial for Java: https://developers.google.com/protocol-buffers/docs/javatutorial. Also see https://developers.google.com/protocol-
buffers for additional information
Two ORM frameworks suitable for Android are greeDAO (http://greendao-orm.com) and OrmLight (http://ormlite.com)
Documentation for the Backup Agent: https://developer.android.com/google/backup/signup.html
All materials on the site are licensed Creative Commons Attribution-Sharealike 3.0 Unported CC BY-SA 3.0 & GNU Free Documentation License (GFDL)
If you are the copyright holder of any material contained on our site and intend to remove it, please contact our site administrator for approval.
© 2016-2026 All site design rights belong to S.Y.A.