Android Programming: Pushing the Limits (2014)
Part II. Getting the Most Out of Components
Chapter 10. Writing Automated Tests
If I had to pick one thing that developers of mobile apps often miss, it would be testing, despite the fact that
high-quality software is the result of thorough testing. Consequently, this may be the most important chapter in
this book.
The traditional way of developing software has been to design the software architecture, implement the code,
and finally test the code, maybe by using automated tests to some degree. However, when testing is the last
thing done in the development cycle, often too little testing is done or the wrong things are tested.
Test Driven Development (TDD) takes a different approach to software development, and its principles lead to
high-quality software. With TDD, you start by defining your tests based on how your application will be used.
Then you start implementing code that fulfills these tests, continuing until all the tests are satisfied. At this
point, you can refactor your application code to optimize it for performance and to improve the overall design.
Using TDD involves a number of tools and techniques. First, you need a unit-testing framework for writing
the automated tests. This framework, which is included in the Android APIs, is the main focus of this chapter.
Second, you need a continuous integration and build server. This server automatically builds your application
and performs all the automated tests for every change in the code. Finally, you need a code-coverage tool that
tells you how much of the application’s code is really being tested.
Android Testing Principles
On Android, you can divide tests into two categories: unit and instrumentation tests. Although within the field
of TDD, there are other types of tests (for example, integration, functional, system, and component tests) in the
context of Android, I’m focusing on unit and instrumentation tests.
Unit testing works on a very fine-grained level, usually on individual methods and classes with all external
dependencies removed. On the other hand, instrumentation tests focus on verifying the behavior of a
component (Activity, Service, BroadcastReceiver or ContentProvider) in the overall system.
The goal with unit testing is to verify that your methods behave as expected and that they can handle
erroneous input without crashing. A framework called JUnit was developed for the Java programming
language. JUnit is also part of the official Android APIs in the junit package along with the Android-specific
testing framework under android.test. To do unit testing, you call a method in your application code and
test its result for the expected output. This is called, asserting the result, and there is a ready-made utility class
named Assert for this purpose. Each test you write should perform an assertion on the value, which in turn
tells the testing framework whether the test passed.
Each test is called a test case, and a set of test cases is called a test suite. Each test case starts with a setup where
all dependencies are created and initialized. When the test case is complete, a teardown is performed to release
the resources that were created during setup.
Because the methods in your application code often have dependencies to the system or other components,
you need a way to isolate a method when running a test. To do so, you use mock objects that simulate the
behavior of the dependent objects. The Android API provides a set of mock classes that you can use in your
tests. Mock objects are usually created in the setup of each test case and released during teardown.
When using the new Android build system based on Gradle (which I describe in Chapter 1), the default place
for all your test code is under <project root>/src/instrumentTest. The name of the default package
for tests is the same as your application package name with .test appended. All of this is configurable in
gradle.build.
What to Test
When you write your automated tests, test only your code. There’s no point in writing automated tests that
verify system functions and services. For instance, you don’t need to write a unit test that verifies a button is
pressed. Instead, write a test that verifies the button has an onClick listener and that the listener behaves as
expected.
Tests for user interfaces are some of the more complex tests you’ll write. However, again, keep in mind that you
should test your own code, not the functionality of Android’s UI classes. For instance, you don’t need to write
a test that verifies scrolling works in a ListView. Instead, focus on writing tests that verify the content of the
ListView and that a click on a specific element performs the expected action.
Because it’s hard to test large and complex methods, keep your tests as limited and focused as possible. Also,
make sure you test only one thing at a time, which makes it easier to detect where a bug occurred and to do
refactoring. It’s better to have many small test cases than a single large, complex test case for your Activity.
This approach also affects how you write your code because writing small test cases in advance will result in
better overall design in your code.
Refactoring your code to extract smaller methods from a single large method is good practice. Use code
coverage to detect which methods are covered by your tests and where you need to add additional test cases.
Make sure you run all your test cases for every code commit. This is where a continuous integration server
comes in handy. Be sure to configure your development environment so that it will trigger a new job on the
build server for every commit.
Basic Unit Testing
When you test classes that don’t depend on a component lifecycle, do the simplest form of unit testing using
the AndroidTestCase class. Doing so is useful when you can construct an object independently from any
component or other part of the Android framework.
public class Util {
public static int byteArrayToInt(byte[] bytes) {
return bytes[3] & 0xFF |
(bytes[2] & 0xFF) << 8 |
(bytes[1] & 0xFF) << 16 |
(bytes[0] & 0xFF) << 24;
}
}
Consider the preceding utility class with a method for converting four bytes to an integer. You don’t need to
perform special setup or teardown for this test because the method takes simple inputs and is static. Only one
testing method is needed for the method in the Util class. Running the test on a device generates a pass, and
everything looks good.
public class UtilTest extends AndroidTestCase {
public void testBytesToIntConversion() {
int result = Util.byteArrayToInt(new byte[] {(byte) 127,
(byte) -1, (byte) -1, (byte) -1});
assertEquals(Integer.MAX_VALUE, result);
result = Util.byteArrayToInt(new byte[] {(byte) 0,
(byte) 0, (byte) 0, (byte) 0});
assertEquals(0, result);
result = Util.byteArrayToInt(new byte[] {(byte) -128,
(byte) 0, (byte) 0, (byte) 0});
assertEquals(Integer.MIN_VALUE, result);
}
}
The preceding code verifies that the method gives the correct answer given a valid input, but it doesn’t test
what happens when you give the method an invalid input. To do so, you add three test methods for the possible
invalid input: for a null array, for an array that is too short, and for when an array is too long. Here is the code for
the three test methods:
public void testBytesToIntWithNull() {
try {
int result = Util.byteArrayToInt(null);
} catch (IllegalArgumentException e) {
return;
}
fail();
}
public void testBytesToIntWithTooShortInput() {
try {
int result = Util.byteArrayToInt(new byte[] {1,2,3});
} catch (IllegalArgumentException e) {
return;
}
fail();
}
public void testBytesToIntWithTooLongInput() {
try {
int result = Util.byteArrayToInt(new byte[] {1,2,3,4,5,6,7,8,9});
} catch (IllegalArgumentException e) {
return;
}
fail();
}
You should expect to get an IllegalArgumentException when you have invalid input, or the test will fail.
If you run the tests now, all three new test methods will fail, indicating that you need to fix your utility method.
In the following code example I’ve modified the utility method to handle incorrect input. If you run the previous
tests again, they should all pass. This is an example of TDD, although very simplified.
public class Util {
public static int byteArrayToInt(byte[] bytes)
throws IllegalArgumentException {
if(bytes == null || bytes.length != 4) {
throw new IllegalArgumentException();
}
return bytes[3] & 0xFF |
(bytes[2] & 0xFF) << 8 |
(bytes[1] & 0xFF) << 16 |
(bytes[0] & 0xFF) << 24;
}
}
It’s a good practice to write the tests for your classes before you implement them completely so that you can
verify that they work as expected. As shown here, you should not only check for correct behavior in normal
cases but also test what happens when they receive a bad or unexpected input. Using this approach, you’ll
greatly improve the quality of your code.
Testing Activities
Testing your user interfaces means testing all your Activity classes. You’ll generally use either
ActivityUnitTestCase or ActivityInstrumentationTestCase2 when writing tests for your
Activities. The first class provides a more isolated testing where you have only a minimal connection to
the system infrastructure. This approach is helpful when you test methods in your Activity that in turn call
methods that interact with the system (such as Context.startService()) and you want to limit the scope
of your test.
The following code shows a simple Activity that sets up a View to be displayed, along with the method
startBackgroundJob() that will be used as a click listener in your view:
public class MainActivity extends Activity {
public static final String ACTION_START_BACKGROUND_JOB
= “startBackgroundJob”;
@Override
protected void onCreate(Bundle savedInstanceState) {
super.onCreate(savedInstanceState);
setContentView(R.layout.activity_main);
}
public void startBackgroundJob(View view) {
Intent backgroundJob = new Intent(ACTION_START_BACKGROUND_JOB);
startService(backgroundJob);
}
}
In the XML layout, you assign the click listener using the attribute android:onClick:
<RelativeLayout xmlns:android=”http://schemas.android.com/apk/res/android”
xmlns:tools=”http://schemas.android.com/tools”
android:layout_width=”match_parent”
android:layout_height=”match_parent”
tools:context=”.MainActivity”>
<Button android:id=”@+id/background_job_btn”
android:layout_width=”wrap_content”
android:layout_height=”wrap_content”
android:layout_centerInParent=”true”
android:gravity=”center”
android:text=”@string/start_background_job_label”
android:onClick=”startBackgroundJob” />
</RelativeLayout>
You now have two things to test for in your Activity: the existence of a click listener for the Button and that
the click listener calls Context.startService() with the correct Intent.
In the following example, you have two test methods, testIfButtonHasClickListener() and
testIfClickListenerStartsServiceCorrectly().
public class MainActivityTest extends ActivityUnitTestCase<MainActivity> {
private Intent mServiceIntent;
public MainActivityTest() {
super(MainActivity.class);
}
public void testIfButtonHasClickListener() {
startActivity(new Intent(Intent.ACTION_MAIN), null, null);
View testButton = getActivity().
findViewById(R.id.background_job_btn);
assertTrue(“Button is missing onClick listener!”,
testButton.hasOnClickListeners());
}
public void testIfClickListenerStartsServiceCorrectly() {
setActivityContext(new MyMockContext(getInstrumentation().
getTargetContext()));
startActivity(new Intent(Intent.ACTION_MAIN), null, null);
View testButton = getActivity().
findViewById(R.id.background_job_btn);
TouchUtils.clickView(this, testButton);
assertEquals(“Wrong Intent action for starting service!”,
“startBackgroundJob”, mServiceIntent.getAction());
}
public class MyMockContext extends ContextWrapper {
public MyMockContext(Context base) {
super(base);
}
@Override
public ComponentName startService(Intent serviceIntent) {
mServiceIntent = serviceIntent;
return new ComponentName(“com.aptl.code”, “NetworkService”);
}
}
}
The first test retrieves the Button in the current UI layout and verifies that it has a click listener. This is a
useful test for Button and similar views where you have assigned the click listener using the XML attribute
android:onClick.
The second test is a bit more complicated. Before the Activity in this test is started, you create a mocked
Context with your own implementation of Context.startService() and assign it as the Activity
context for the test. When the method Context.startService() is called in the click listener, your own
implementation is the one called. Here you store the incoming Intent so you can use it to verify the test. If the
Intent action string is what you’re expecting, then the test passes.
Testing Services
The Android testing APIs provide a class named ServiceTestCase that helps with setting up tests for a
service. In the following example you can see a very simple Service that I’ve created a test case for. This code
implements a simple Service according to the local binder pattern explained in Chapter 6:
public class MyService extends Service {
private LocalBinder mLocalBinder = new LocalBinder();
public IBinder onBind(Intent intent) {
return mLocalBinder;
}
public class LocalBinder extends Binder {
public MyService getService() {
return MyService.this;
}
}
}
The next code example is a simple ServiceTestCase to verify the implementation:
public class MyServiceTest extends ServiceTestCase<MyService> {
public MyServiceTest() {
super(MyService.class);
}
@Override
public void setUp() throws Exception {
super.setUp();
setupService();
}
public void testBinder() throws Exception {
Intent serviceIntent = new Intent(getContext(), MyService.class);
IBinder binder = bindService(serviceIntent);
assertTrue(binder instanceof MyService.LocalBinder);
MyService myService = ((MyService.LocalBinder) binder).
getService();
assertSame(myService, getService());
}
@Override
public void tearDown() throws Exception {
shutdownService();
super.tearDown();
}
}
In this code you call setupService() to create all the necessary dependencies for the Service being
tested. In the testBinder() method you call the test-specific bindService() method, which returns the
IBinder instance that should be returned by onBind() in MyService. After you verify the correct class for
the IBinder instance, you call getService() and verify that the object returned is the same instance as the
Service already started by the test case.
While this example is very simple, it demonstrates how to use the ServiceTestCase for writing tests
for Service components. You should use this as much as possible for testing the Services in your own
applications.
Testing ContentProviders
Testing your ContentProvider is straightforward when you use the ProviderTestCase2 class. The goal
of testing your provider is to verify its public contract, which is to say that you test that a client receives the data
it requests.
The ProviderTestCase2 allows you to do tests on your ContentProvider against a Context (and
database) that is isolated from the default environment of your application. The following example shows a
number of tests for the TaskProvider that I cover in Chapter 9.
public class TaskProviderTest extends ProviderTestCase2<TaskProvider> {
private Uri ALL_TASKS_URI
= Uri.parse(“content://com.aptl.code.provider/task”);
private MockContentResolver mResolver;
public TaskProviderTest() {
super(TaskProvider.class, TaskProvider.AUTHORITY);
}
@Override
protected void setUp() throws Exception {
super.setUp();
mResolver = getMockContentResolver();
}
public void testDatabaseCreated() {
Cursor cursor = null;
try {
cursor = mResolver.
query(ALL_TASKS_URI, null, null, null, null);
// Database should be empty
assertNotNull(cursor);
assertFalse(cursor.moveToNext());
// Verify that we got all the columns
String[] allColumnsSorted
= new String[TaskProvider.ALL_COLUMNS.length];
System.arraycopy(TaskProvider.ALL_COLUMNS, 0,
allColumnsSorted, 0, allColumnsSorted.length);
Arrays.sort(allColumnsSorted);
String[] columnNames = cursor.getColumnNames();
Arrays.sort(columnNames);
assertTrue(Arrays.equals(allColumnsSorted, columnNames));
} finally {
if (cursor != null) {
cursor.close();
}
}
}
public void testCreateTaskWithDefaults() {
ContentValues values = new ContentValues();
values.put(TaskProvider.TaskColumns.NAME, “Do laundry”);
values.put(TaskProvider.TaskColumns.OWNER, “Erik”);
Uri insertedUri = mResolver.insert(ALL_TASKS_URI, values);
assertNotNull(insertedUri);
Cursor cursor = mResolver.query(insertedUri,
null, null, null, null);
assertNotNull(cursor);
assertTrue(cursor.moveToNext());
int nameColumnIdx
= cursor.getColumnIndex(TaskProvider.TaskColumns.NAME);
assertEquals(cursor.getString(nameColumnIdx), “Do laundry”);
int ownerColumnIdx
= cursor.getColumnIndex(TaskProvider.TaskColumns.OWNER);
assertEquals(cursor.getString(ownerColumnIdx), “Erik”);
int statusColumnIdx
= cursor.getColumnIndex(TaskProvider.TaskColumns.STATUS);
assertEquals(cursor.getInt(statusColumnIdx), 0);
int priorityColumnIdx
= cursor.getColumnIndex(TaskProvider.TaskColumns.PRIORITY);
assertEquals(cursor.getInt(priorityColumnIdx), 0);
int createdColumnIdx
= cursor.getColumnIndex(TaskProvider.TaskColumns.CREATED);
SystemClock.sleep(500);
assertTrue(cursor.getLong(createdColumnIdx)
< System.currentTimeMillis());
}
public void testInsertUpdateDelete() {
ContentValues values = new ContentValues();
values.put(TaskProvider.TaskColumns.NAME, “Do laundry”);
values.put(TaskProvider.TaskColumns.OWNER, “Erik”);
Uri insertedUri = mResolver.insert(ALL_TASKS_URI, values);
assertNotNull(insertedUri);
values.put(TaskProvider.TaskColumns.PRIORITY, 5);
values.put(TaskProvider.TaskColumns.STATUS, 1);
int updated = mResolver.update(insertedUri, values, null, null);
assertEquals(updated, 1);
Cursor cursor = null;
try {
cursor = mResolver.query(insertedUri, null, null, null, null);
assertNotNull(cursor);
assertTrue(cursor.moveToNext());
int statusColumnIdx
= cursor.getColumnIndex(TaskProvider.TaskColumns.STATUS);
assertEquals(cursor.getInt(statusColumnIdx), 1);
int priorityColumnIdx
= cursor.getColumnIndex(TaskProvider.TaskColumns.PRIORITY);
assertEquals(cursor.getInt(priorityColumnIdx), 5);
} finally {
if (cursor != null) {
cursor.close();
}
}
try {
int deleted = mResolver.delete(insertedUri, null, null);
assertEquals(deleted, 1);
cursor = mResolver.query(insertedUri, null, null, null, null);
assertNotNull(cursor);
assertFalse(cursor.moveToNext());
} finally {
if (cursor != null) {
cursor.close();
}
}
}
public void testInsertInvalidColumn() {
try {
ContentValues values = new ContentValues();
values.put(TaskProvider.TaskColumns.NAME, “Do laundry”);
values.put(TaskProvider.TaskColumns.OWNER, “Erik”);
values.put(“nonExistingColumn”, “someData”);
Uri uri = mResolver.insert(ALL_TASKS_URI, values);
fail(“Should throw SQLException on wrong column name.”);
} catch (Exception e) {
assertTrue(e instanceof SQLException);
}
}
public void testInvalidUri() {
try {
Cursor cursor = mResolver.
query(Uri.parse(“content://”
+ TaskProvider.AUTHORITY + “/wrongPath”),
null, null, null, null);
fail(“Expected IllegalArgumentException!”);
} catch (Exception e) {
assertTrue(e instanceof IllegalArgumentException);
}
}
}
These tests verify that the database is created with the expected table and columns. Next, they verify that the
default values are created correctly when those columns are excluded in an insert-call. One test verifies that
inserts, updates, and deletes work as expected. Finally, you see a test verifying that you cannot insert records
using an invalid column name and a test for handling an invalid Uri.
In a real-life application, you would add additional tests that cover many more cases to ensure that everything is
handled correctly. Let this serve as a guideline for how to write tests for your own ContentProviders.
Running Tests
To run your test, you can either use the built-in feature of Android Studio or execute Gradle from the command
line with the task connectedInstrumentTest. During a normal development cycle, using the built-in
runner from Android Studio is recommended because it gives you full integration between the test results and
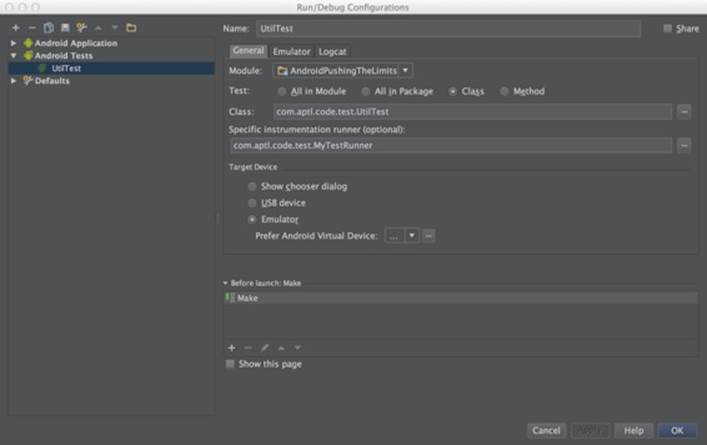
your code. Figure 10-1 shows an example of how to configure a test-runner from within Android Studio.
Figure 10-1 Custom test run configuration in Android Studio
When developing a new feature, the temptation to run all your test cases every time you want to verify your
code can be impractical because of the time involved in your development cycle. To manage this issue, you can
define custom test suites and test runners that execute only a partial set of your tests cases.
The following example shows how to create a test runner that executes only the tests from
MainActivityTest shown earlier. This approach is useful when you’re focusing on developing a new UI
feature and want to perform only the tests that relate to that feature.
public class MyTestRunner extends InstrumentationTestRunner {
@Override
public TestSuite getAllTests() {
return new TestSuite(MainActivityTest.class);
}
}
You can construct your test runners and test suites multiple ways. Use the classes from android.unit.
suitebuilder to construct your custom set of tests for your needs.
Continuous Integration
When you have a team of developers working on the same project, it’s good practice to use a continuous
integration (CI) system for automatically running the tests whenever there is a change committed to your main
branch. Several CI servers are available. A free and open-source alternative is Jenkins CI, which you can find
at http://jenkins-ci.org. It has plug-in support for both the Gradle build system and Android, which
makes it a convenient choice.
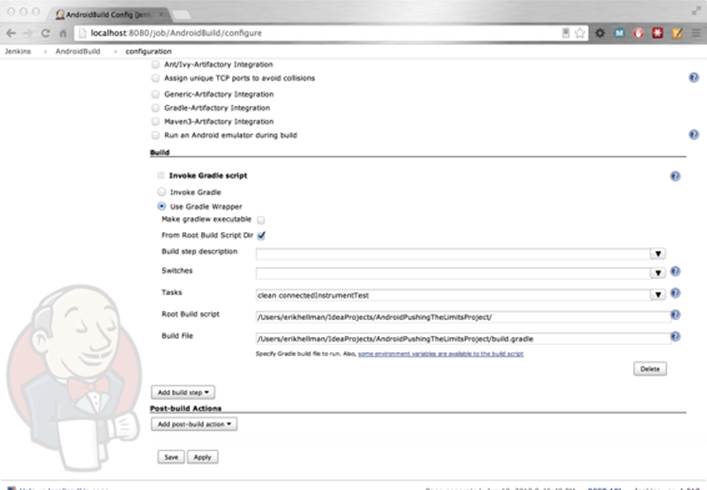
To configure Jenkins CI to run your project, all you need to do is to setup a free-f-form project in Jenkins CI, add
a build step for invoking a Gradle script, and point out the root directory and Gradle build file for your project,
as shown in Figure 10-2.
Figure 10-2 Setting up Jenkins CI for executing the Gradle script for an Android project
Summary
In this chapter, I covered how to write automated unit and instrumentation tests for your Android applications.
Writing instrumentation tests is the best way to find and eliminate bugs in your code. It is also the only way to
verify use-cases that can be very difficult to replicate in real life.
If you’re new at testing, below I recommend that you read the “Android Testing Guidelines,” as well as find out
more about TDD in general.
Further Resources Android Testing Guidelines
Extensive guidelines for writing tests for Android: http://developer.android.com/tools/testing/index.html
Books
Beck, Kent. Test Driven Development: By Example. Addison-Wesley, 2002.
Websites
More information about Jenkins CI: http://jenkins-ci.org