Android Programming: Pushing the Limits (2014)
Part III. Pushing the Limits
Chapter 12. Secure Android Applications
Security is such a complex topic that it deserves its own chapter in this book. Although security is composed of
many aspects, in this chapter I focus on how you as an application developer can manage the security around
your application and its data. Because of Andoid’s current, excellent API, I also include a section on device
administration.
Android Security Concepts
Android has an advanced security model for protecting application data and services from other applications.
Every application runs with its own unique user ID that provides basic protection. Each application is signed
with its unique key, which works as a foundation around the security model in the Android framework.
Moreover, Android’s permission system lets a given application share access to its component only to other
applications that explicitly declare the right permission in their manifest. Apps can also define permissions such
that only apps signed with the same key can use them. Finally, the Android APIs provide methods for verifying
signatures, for verifying the user ID of calling processes, and for using strong encryption schemes.
Signatures and Keys
All applications running in Android are signed with a key, including the Android system itself. During normal
development, you will use the auto-generated debug key for signing your application (which is done
automatically by the Gradle build system or the IDE). When you publish your application on the Google Play
Store, be sure to use a unique key that you generate manually using the keytool application.
You can use the same key for all the applications you publish, but I recommend that you create a unique
key for each application. The only reasons for using the same key for multiple applications is when the
applications need to access each other’s data directly, or you have defined permissions with the protection level
signature.
The following command shows how to generate a new, unique key for your application. A good practice is to
give the alias the same name as the package name for your application. Also, if you’re maintaining application
keys for multiple organizations, I suggest you use a separate keystore for each organization.
$ keytool -genkey -v -keystore <keystore filename> \
-alias <alias for key> -keyalg RSA -keysize 2048 -validity 10000
When you generate a new key, the keytool asks you for a password. If you don’t provide a password, anyone
with access to the keystore file can create a properly signed application. Thus it’s highly recommended that you
use a unique password for each keystore file.
Always back up your keystore files online—using, for example, Google Drive or Dropbox. Otherwise,
if you lose your keystore file or forget the password, you’ll no longer be able to sign new versions of
your application and that effectively makes it impossible to provide upgrades for your users.
Android Permissions
Using a feature in Android that requires a special permission is only a matter of adding a uses-permission
tag in the AndroidManifest.xml file. This tells the system that your application requires that particular
permission, and notifies the user about this requirement before installation.
Android defines five protection levels: normal, dangerous, signature, signatureOrSystem, and
system. The default level, unless otherwise specified, is normal, which is generally used to signal the system
that an application requires the functions for this permission. The user is notified before installation (usually in
the Google Play Store application) only when the permission is defined as dangerous.
A signature protection level requires that the application be signed with the same certificate as the
application that defined the permission, which can be useful for device vendors because they can define
permissions that only applications signed with the same certificate as the system can use. In this way, it’s
possible for device vendors to release new applications for their devices that use protected system services.
The signatureOrSystem and system protection levels tell the Android system that applications must
reside on the system partition of the device in order to be able to use the permission. The most common
examples of this feature are the Google applications (Gmail, Google Play Services, YouTube, and so on)
that come pre-installed on the system partition. These applications can use many of the permissions that
normal applications cannot reach, even though Google, and not the device manufacturer, signed them. The
signatureOrSystem is basically a combination of the two protection levels.
Declaring Custom Permissions
In most cases, your application will be self-contained, so there will be little need to declare any new permissions.
However, if you will provide an API for other applications to use, for instance a plug-in feature, I recommend
defining your own permissions.
The following example shows the relevant parts for defining a read and write permission on a
ContentProvider.
<?xml version=”1.0” encoding=”utf-8”?>
<manifest xmlns:android=”http://schemas.android.com/apk/res/android”
package=”com.aaptl.security”
android:versionCode=”1”
android:versionName=”1.0” >
<permission android:name=”com.aaptl.security.READ_DATA”
android:description=”@string/read_perm_desc”
android:label=”@string/read_perm_label”
android:protectionLevel=”dangerous” />
<permission android:name=”com.aptl.security.WRITE_DATA”
android:descriptiona=”@string/write_perm_desc”
android:label=”@string/write_perm_label”
android:protectionLevel=”signature” />
...
<provider
android:name=”.TaskProvider”
android:authorities=”com.aaptl.security.provider”
android:readPermission=”com.aaptl.security.READ_DATA”
android:writePermission=”com.aaptl.security.WRITE_DATA”
android:exported=”true”/>
...
</manifest>
The read permission’s protection level is set to dangerous, which will show up when the user wants to install
an application that uses this permission. The write permission, on the other hand, has its protection level set to
signature, which limits the user of this permission to applications signed with the same certificate.
You can also add the attribute android:permissionFlags=”costsMoney” , which signals
the user that an application using this permission will generate a cost. Common examples are
applications that want to send SMS. Whenever your application provides an API that could result in a
monetary cost for users, protect the API with a permission that has this flag set.
Protecting User Data
If your application creates content that shouldn’t be accessible to other applications, store it in the default data
directory for the application. Storing data on external storage is never safe, unless you encrypt the content (see
the section “Client-Side Data Encryption,” later in this chapter). Files stored in an application’s data directory can
be accessed only by that application or an application with the same user ID (which requires the applications to
be signed by the same certificate).
When you create databases using the SQLiteOpenHelper, as shown in Chapter 9, they end up in the
application’s data directory by default, so these SQLite databases are always protected from other applications.
To create ordinary files, however, you use the method Context.openFileOutput(), which creates a new
file (or opens an existing file for appending data) in the application’s data directory.
The following method is an example of how to append data to a private file.
public static void appendStringToPrivateFile(Context context,
String data, String filename)
{
FileOutputStream outputStream
= context.openFileOutput(filename,
Context.MODE_APPEND|Context.MODE_PRIVATE);
outputStream.write(data.getBytes(“UTF-8”));
outputStream.close();
}
You open files for reading using Context.openFileInput(). Notice the use of both Context.MODE_
APPEND and Context.MODE_PRIVATE as flags to openFileOutput(). These flags will make the file
always append data to the end when writing and accessible only to your application, respectively. To protect
your data, always use MODE_PRIVATE (which is also the default flag). To provide a file that other applications
can read, you should instead use a ContentProvider and define the appropriate permissions.
The two flags Context.MODE_WORLD_READABLE and Context.MODE_WORLD_WRITABLE make
files in the application’s data directory world readable and writable. However, these flags are now
deprecated, and you’re strongly encouraged not to use them.
Because the MODE_PRIVATE flag sets the correct Linux file permissions, they protect files from being accessed
by other applications. However, simply using the method described in the preceding example should not be
considered a secure solution. If you’re storing very sensitive information on a device, I strongly advise applying
some encryption to the files.
Verifying Calling Applications
Although permissions provide a way of ensuring that the user accepts that an application can access your
services or providers, at times it’s necessary to identify the application of an incoming call. Consider a
ContentProvider that provides a way for third-party applications to add (insert) data. However, you want
applications to be capable of accessing only the records they’ve’ created, so you need some way of securely
identifying the remote process in each call to query(), insert(), update(), and delete().
The following method shows how to use the Binder to retrieve the UID (User ID) for the calling applications.
From there, you can retrieve the package names (that is, applications) that have this UID.
private String getPackageNameForCaller(Context context) {
int callingUid = Binder.getCallingUid();
PackageManager packageManager = context.getPackageManager();
String[] packages = packageManager.getPackagesForUid(callingUid);
if(packages != null && packages.length > 0) {
return packages[0]; // Return the first matching package...
}
return null;
}
Because you can have the same UID for multiple applications, signed with the same key, by using the
android:sharedUserId attribute in the manifest, you may receive multiple package names in this lookup.
So, in the public documentation of your provider, you need to state that applications using your API can’t share
the UID with another application.
After you get the package name for the application, you can use it when querying the database. For each insert,
make sure that you populate a column with the value of the calling application’s package name. In the query,
update and delete, you modify the selection and selection argument so that the package name is prepended,
as shown here:
private String prependSelection(String selection) {
return Columns.PACKAGE_NAME + “ = ? AND (“ + selection + “)”;
}
private String[] prependSelectionArgs(String[] selectionArgs) {
String[] newSelArgs = new String[selectionArgs.length + 1];
System.arraycopy(selectionArgs, 0, newSelArgs, 1, selectionArgs.
length);
newSelArgs[0] = getPackageNameForCaller(getContext());
return newSelArgs;
}
In this way, you can provide a single ContentProvider that other applications can work with while
simultaneously providing protection so that data cannot leak. This approach is suitable for applications
that aggregate data from different sources and in which you enable the use of plug-ins from third-party
developers.
Client-Side Data Encryption
Imagine an app that syncs user-generated data to a cloud service. However, in this case, the data stored on the
cloud service must be encrypted so that no one but the user can decrypt the data. This scenario means that
the encryption and decryption must happen on the client-side. A couple of examples today are LastPass, which
manages all your passwords, and Wuala, a cloud-storage service where all data is encrypted on the client-side,
which effectively protects the user’s data even if the cloud service is compromised.
The challenge with such an application is that you wouldn’t want to store anything on the device that isn’t
encrypted. For instance, if you have a notebook application for storing secure notes, you can’t store decrypted
notes in the application’s data directory, because if the user were to lose the device, it wouldn’t take much effort
for a hacker to gain access to the file system and read the unencrypted files. To solve this problem, only keep
unencrypted data in memory. Although it’s still possible to read the state of a memory, doing so is significantly
harder than reading the file system.
In this section, I explain how to encrypt and decrypt data using a password and how to create a memory-based
database that you can use in your application like any other ContentProvider.
Android Crypto API
The API for encrypting and decrypting data in Android is based on the API found in the javax.crypto
package in Java SE. The actual implementation is based on the open-source Bouncy Castle Crypto APIs, a clean
room implementation of the JCE 1.2.1 specification. As a result, you can use most Java libraries that use the
javax.crypto APIs from Java SE when writing Android applications.
Generating a Key
When using encryption and decryption functions, you need to generate a key that is secure, unique, and
capable of being re-created based on the user’s input (that is, a password or other secure method).
The following code shows how to generate a SecretKey for the AES algorithm, which is secure enough
for most situations. The salt is the input to the generation of the key that you need to keep track of. In
cryptography, a salt is a random piece of data used as input for the one-way function in the encryption
algorithms.
public static SecretKey generateKey(char[] password, byte[] salt)
throws Exception {
int iterations = 1000;
int outputKeyLength = 256;
SecretKeyFactory secretKeyFactory
= SecretKeyFactory.getInstance(“PBKDF2WithHmacS
HA1”);
KeySpec keySpec = new PBEKeySpec(password, salt,
iterations, outputKeyLength);
byte[] keyBytes = secretKeyFactory.generateSecret(keySpec).
getEncoded();
return new SecretKeySpec(keyBytes, “AES”);
}
Encrypting Data
To encrypt data, you must generate the salt and an initialization vector as an input to the Cipher used for
encrypting.
The following method generates a salt of 8 bytes using the SecureRandom class. Note: You never manually
seed the SecureRandom class because the system takes care of that for you. You create an initialization
vector, initiate the Cipher, and encrypt your plain text to a byte array. When you have your cipher data, you
generate a normal String from those bytes by using the Base64 utility class. You append the initialization
vector and salt in the same way, separated by a non-base64 character.
public static String encryptClearText(char[] password, String plainText)
throws Exception {
SecureRandom secureRandom = new SecureRandom();
int saltLength = 8;
byte[] salt = new byte[saltLength];
secureRandom.nextBytes(salt);
SecretKey secretKey = generateKey(password, salt);
Cipher cipher = Cipher.getInstance(“AES/CBC/PKCS5Padding”);
byte[] initVector = new byte[cipher.getBlockSize()];
secureRandom.nextBytes(initVector);
IvParameterSpec ivParameterSpec = new IvParameterSpec(initVector);
cipher.init(Cipher.ENCRYPT_MODE, secretKey, ivParameterSpec);
byte[] cipherData = cipher.doFinal(plainText.getBytes(“UTF-8”));
return Base64.encodeToString(cipherData,
Base64.NO_WRAP | Base64.NO_PADDING)
+ “]” + Base64.encodeToString(initVector,
Base64.NO_WRAP | Base64.NO_PADDING)
+ “]” + Base64.encodeToString(salt,
Base64.NO_WRAP | Base64.NO_PADDING);
}
The returned String can be securely sent over the network or stored on the external storage. An application
using this approach for securing data should require the user to input a password that is secure enough. How
to choose such a password is beyond the scope of this book, but I recommend using a regular expression
for checking the complexity of a password. A good source for various regular expressions that you can use is
available at http://regexlib.com/.
Decrypting Data
Decrypting data works very much like encryption. You take the String generated by a previous call to
encryptClearText() and split it on the separator that you choose.
In the following method, you see how the Cipher, the initialization vector, and the SecretKey are re-created
from the input string. As long as the passwords match, you’ll be able to decode the encoded data.
public static String decryptData(char[] password, String encodedData)
throws Exception {
String[] parts = encodedData.split(“]”);
byte[] cipherData = Base64.decode(parts[0], Base64.DEFAULT);
byte[] initVector = Base64.decode(parts[1], Base64.DEFAULT);
byte[] salt = Base64.decode(parts[2], Base64.DEFAULT);
Cipher cipher = Cipher.getInstance(“AES/CBC/PKCS5Padding”);
IvParameterSpec ivParams = new IvParameterSpec(initVector);
SecretKey secretKey = generateKey(password, salt);
cipher.init(Cipher.DECRYPT_MODE, secretKey, ivParams);
return new String(cipher.doFinal(cipherData), “UTF-8”);
}
This method is useful for fairly small sets of data. If you need to encrypt and decrypt larger files, check the
CipherInputStream and CipherOutputStream as they support streaming data that is too large to fit in
memory all at once.
Working with Encrypted Data
After you encode the data, you can safely write it to a file or send it over the network without the risk of leaking the
user’s private information. The only one who can decrypt the data is the person who knows the password, which
means that you could basically store the encrypted data on a public server without anyone, including yourself,
being able to read its content. This is a great way to gain your users’ trust—as long as you can explain it in terms
that nontechnical people can grasp. A couple of services already use this capability as their main selling point.
Considering the example of a secure notebook application, you could use the approach just described for
encrypting and decrypting the notes. When the user makes an update to his notes, you can upload the file to
his Google Drive or similar service, and the notes will then be accessible from his other devices. (See Chapter 19
for an example of storing data in Google Drive.)
Consider the following Java object for representing notes in a notebook application:
public class NoteData {
private UUID mID;
private String mTitle;
private String mContent;
private String mCategory;
private Date mLastChange;
public NoteData() {
mID = UUID.randomUUID();
}
// Getters and setters omitted for brevity...
}
You can use Google Gson, as shown in Chapter 9, to serialize and deserialize objects of this class to the JSON
format. The JSON data can be represented as a normal String object, which you then can use for encrypting
your notes. Decrypting and deserializing works the same way.
The following example shows a simplified method for use in a notebook application that securely encrypts and
decrypts the users’ notes based on their passwords. The encrypted data can then be transferred online, which I
cover in more detail in Chapter 17.
public String encryptNoteDataCollection(Collection<NoteData> notes,
char[] password) {
StringWriter writer = new StringWriter();
JsonWriter jsonWriter = new JsonWriter(writer);
Gson gson = new Gson();
Type type = new TypeToken<Collection<NoteData>>(){}.getType();
gson.toJson(notes, type, jsonWriter);
String clearText = writer.toString();
try {
return encryptClearText(password, clearText);
} catch (Exception e) {
// Ignore for brevity
return null;
}
}
public static Collection<NoteData> decryptAndDecode(char[] password,
String encryptedData)
{
try {
String jsonData = decryptData(password, encryptedData);
Gson gson = new Gson();
Type type = new TypeToken<Collection<NoteData>>(){}.getType();
JsonReader jsonReader = new JsonReader(new
StringReader(jsonData));
return gson.fromJson(jsonReader, type);
} catch (Exception e) {
// Ignore for brevity...
return null;
}
}
If you prefer to work toward a ContentProvider, you can create an SQLite database in memory using the
following code:
mDatabase = SQLiteDatabase.create(null);
This database instance will be destroyed as soon as the database object is closed. This means that your
application should store the encrypted content to a local file for every change (insert, update or delete) to the
database and must repopulate the database content each time it is opened.
Android Key Chain Management
A feature that was long missing from Android was central secure credential storage and a way to control the
system’s trusted Certificate Authorities, which are crucial in order to build secure applications for enterprise and
other sensitive services.
In this section I’m assuming that you’re familiar with the basics of certificates, CA and PKI. If not, refer to the
“Further Resources” section at the end of this chapter. Although permissions can protect the data from other
applications and encryption can prevent access of the data even when the file is copied from the device, your
application still needs a secure method for verifying that the remote host it communicates with is indeed the
one it claims to be. Because you cannot assume that the user will always be on a safe, well-known, and secure
network, you need to verify any host that you communicate with using its certificates.
Explaining the details of certificate authority, key chains, and how they make the Internet secure is beyond the
scope of this book. However, I do show how you can use the key chain API that was made available in Android
4.0/ICS to store a new key pair, as well as how to verify the source of the data and sign it so that a recipient can
verify its authenticity.
First, you need to generate a new certificate that you can use for testing your application, which you do using
the same keytool shown earlier in this chapter for creating the signature for your application.
The following example shows how to generate a simple certificate using the keytool command. The result is
written to a file named MyKeyStore.pfx. In a real-world situation, the IT department of a company usually
generates these certificates for each user and distributes them securely. Next, the enterprise application imports
this certificate and stores it in the central credential storage.
$ keytool -genkeypair -alias MyCertificate -keystore MyKeyStore.pfx
-storepass thepassword -validity 10000 -keyalg RSA -keysize 2048
-storetype pkcs12
What is your first and last name?
[Unknown]: Erik Hellman
What is the name of your organizational unit?
[Unknown]: Development
What is the name of your organization?
[Unknown]: Hellsoft
What is the name of your City or Locality?
[Unknown]: Malmoe
What is the name of your State or Province?
[Unknown]: Skaane
What is the two-letter country code for this unit?
[Unknown]: SE
Is CN=Erik Hellman, OU=Development, O=Hellsoft, L=Malmoe, ST=Skaane,
C=SE correct?
[no]: yes
In the following code, you see how to install a certificate from a file (represented as a byte array).
public class SigningActivity extends Activity {
private static final int INSTALL_CERT_CODE = 1001;
private static final String CERT_FILENAME = “MyKeyStore.pfx”;
private static final String CERTIFICATE_NAME = “MyCertificate”;
@Override
protected void onActivityResult(int requestCode, int resultCode,
Intent data) {
if(requestCode == INSTALL_CERT_CODE) {
if(resultCode == RESULT_OK) {
// Certificate successfully installed
} else {
// User cancelled certificate installation
}
}
}
// click-listener for installing certificate
public void doInstallCertificate(View view) {
byte[] certData = readFile(CERT_FILENAME);
Intent installCert = KeyChain.createInstallIntent();
installCert.putExtra(KeyChain.EXTRA_NAME, CERTIFICATE_NAME)
installCert.putExtra(KeyChain.EXTRA_PKCS12, certificateData);
startActivityForResult(installCert, INSTALL_CERT_CODE);
}
...
}
The code will activate a dialog box where a user can enter the password for the chosen keystore. Next, another
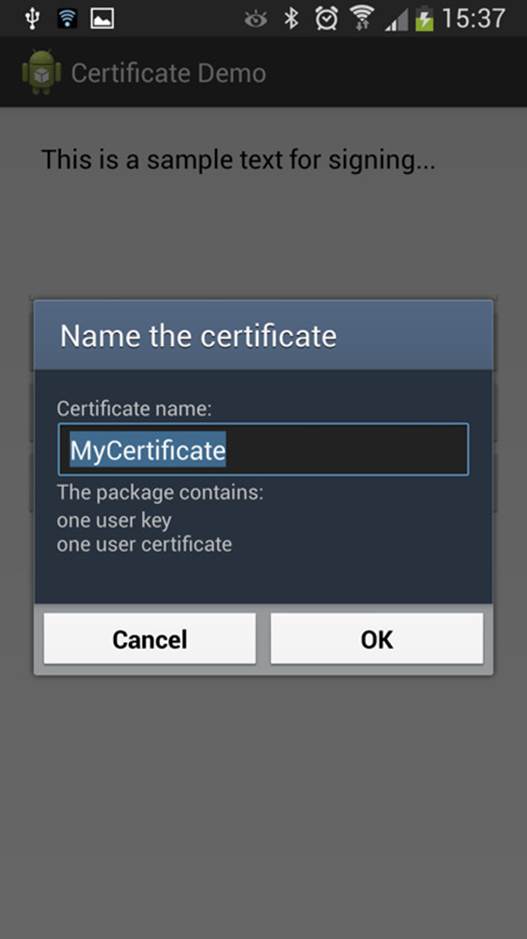
dialog box, as shown in Figure 12-1, is activated in which the user can choose the alias for the certificate.
Figure 12-1 Dialog box asking for the name of the
certificate that is being installed by the application
When your application wants to use a certificate, it must first ask users which one they want to use, which is
done by calling KeyChain.choosePrivateKeyAlias(), as shown in the following code.
public void doSignNoteData(View view) {
KeyChain.choosePrivateKeyAlias(this, new KeyChainAliasCallback() {
@Override
public void alias(String alias) {
EditText editText = (EditText) findViewById(R.id.input_text);
String textToSign = editText.getText().toString();
new MySigningTask().execute(textToSign, alias);
}
}, null, null, null, -1, null);
}
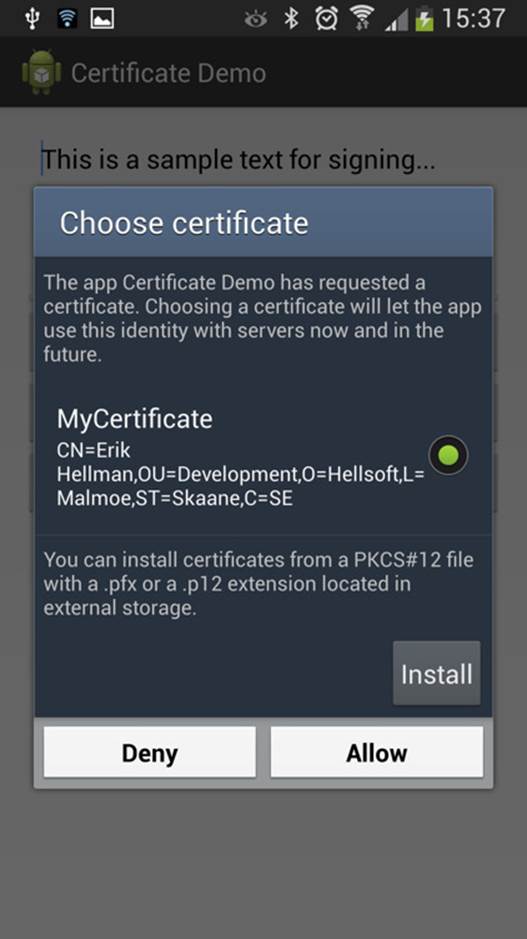
This activates a system dialog box, as shown in Figure 12-2.
Figure 12-2 System dialog box that allows the user to
pick a certificate from the trusted storage
The preceding callback will receive the alias for the chosen certificate, and you can now continue with retrieving
the certificate and the signing process. Note: The callback is executed on a Binder thread and not on the main
thread. Because the signing process could potentially block the thread it’s running on, you use an AsyncTask
for the actual signing.
The following method shows how to retrieve the private key of the certificate pair and use it to create a
signature of the String you want to sign. You use the same approach as in the earlier encryption example to
build two Base64 encoded Strings with a separator.
public String createSignedNote(String textToSign, String alias) {
try {
byte[] textData = textToSign.getBytes(“UTF-8”);
PrivateKey privateKey
= KeyChain.getPrivateKey(getApplicationContext(), alias);
Signature signature
= Signature.getInstance(“SHA1withRSA”);
signature.initSign(privateKey);
signature.update(textData);
byte[] signed = signature.sign();
return Base64.encodeToString(textData,
Base64.NO_WRAP | Base64.NO_PADDING)
+ “]” + Base64.encodeToString(signed,
Base64.NO_WRAP | Base64.NO_PADDING);
} catch (Exception e) {
Log.e(TAG, “Error signing data.”, e);
}
return null;
}
To verify the signature of signed data, your application must first retrieve the PublicKey from the certificate.
In the following code, it’s assumed that the chain contains only one entry, but in real-life situations, you will
probably have at least two entries (one for the organization and one for the user).
private boolean verifySignature(String dataAndSignature, String alias) {
try {
String[] parts = dataAndSignature.split(“]”);
byte[] decodedText = Base64.decode(parts[0], Base64.DEFAULT);
byte[] signed = Base64.decode(parts[1], Base64.DEFAULT);
X509Certificate[] chain = KeyChain.getCertificateChain(this,
alias);
PublicKey publicKey = chain[0].getPublicKey();
Signature signature = Signature.getInstance(“SHA1withRSA”);
signature.initVerify(publicKey);
signature.update(decodedText);
return signature.verify(signed);
} catch (Exception e) {
Log.e(TAG, “Error verifying signature.”, e);
}
return false;
}
You can also use the public and private keys to encrypt data. If two parties (for instance, the company server
and an application on an employee’s smartphone) need to communicate securely, you use the receiving party’s
public key to encrypt data, which then can be decrypted only by using the private key.
Most webservers today support the secure HTTP protocol called HTTPS. This protocol has built-in support to
set up the connection between the client and the server using this approach, so all you do is provide the
client-side certificate. Refer to the documentation for the HttpsURLConnection for more information on
this topic.
Device Management API
Although encrypting and verifying data are important parts of security, they’re often not enough for
most organizations. Within the domain of enterprise applications is a need to set certain restrictions on a
device before allowing it to communicate with a company’s intranet. This situation is resolved via a Device
Management API available in Android that provides a number of functions to handle enterprise requirements.
This API provides a number of policies that an application can apply to a device to ensure that it is secure. There
are policies for limiting and resetting the password, for locking and wiping a device, and for encrypting the
storage. Check the documentation for the Device Administration API (see http://developer.android.
com/guide/topics/admin/device-admin.html) for a full list of policies.
The first thing you need to enable this in your application is an XML file in the resources that defines which
device policies your application needs to apply.
The following example shows a simple device policy XML that you store in the XML resources. It enables your
application to register when a user logs in (unlocks the device), to limit and reset the password, to force the
device to lock down, and to encrypt the storage when required.
<?xml version=”1.0” encoding=”utf-8”?>
<device-admin xmlns:android=”http://schemas.android.com/apk/res/android”>
<uses-policies>
<watch-login/>
<force-lock/>
<limit-password/>
<encrypted-storage/>
<reset-password/>
</uses-policies>
</device-admin>
Next, you need to define a BroadcastReceiver that will be called when the device administration is
enabled for your application.
<receiver
android:name=”.MyDeviceAdminReceiver”
android:label=”@string/device_admin_label”
android:description=”@string/device_admin_description”
android:permission=”android.permission.BIND_DEVICE_ADMIN”>
<meta-data
android:name=”android.app.device_admin”
android:resource=”@xml/device_admin”/>
<intent-filter>
<action android:name=”android.app.action.DEVICE_ADMIN_ENABLED”/>
</intent-filter>
</receiver>
Now you need to implement a custom BroadcastReceiver (extending DeviceAdminReceiver) where
you configure the manifest entry, as in the preceding example. First, you specify that the permission for the
receiver and add a meta-data tag that specifies the XML also shown in the preceding example.
public class MyDeviceAdminReceiver extends DeviceAdminReceiver {
@Override
public void onEnabled(Context context, Intent intent) {
super.onEnabled(context, intent);
PackageManager packageManager = context.getPackageManager();
ComponentName deviceAdminService
= new ComponentName(context, MyDeviceAdminService.class);
packageManager.setComponentEnabledSetting(deviceAdminService,
PackageManager.COMPONENT_ENABLED_STATE_ENABLED, 0);
context.startService(new Intent(context,
MyDeviceAdminService.class));
}
@Override
public void onDisabled(Context context, Intent intent) {
super.onDisabled(context, intent);
context.stopService(new Intent(context,
MyDeviceAdminService.class));
PackageManager packageManager = context.getPackageManager();
ComponentName deviceAdminService
= new ComponentName(context, MyDeviceAdminService.class);
packageManager.setComponentEnabledSetting(deviceAdminService,
PackageManager.COMPONENT_ENABLED_STATE_DISABLED, 0);
}
}
The receiver is notified when device administration for your application is enabled or disabled. There are also
callbacks for certain device policy events, such as password expiration. In the preceding example, you see how
to enable and disable a service in your application, depending on the state of device administration for this
application.
To enable device administration for your application, you need to start a system Activity that asks for the
user’s permission (see Figure 12-3).

Figure 12-3 The system Activity that asks for permission
to enable device administration rights for an application .
The first paragraph under the title is the same as the text in
the EXTRA_ADD_EXPLANATION parameter .
The following example shows how to request the user to enable device administration for your application.
Note: You send the ComponentName for the receiver and you can add an extra explanation that is displayed
to the user. This is recommended for applications using the Device Administration API; otherwise, what the
prompted dialog box means may be confusing.
public static void enableDeviceAdmin(Context context) {
Intent enableDeviceAdmin
= new Intent(DevicePolicyManager.ACTION_ADD_DEVICE_ADMIN);
ComponentName deviceAdminReceiver
= new ComponentName(context, MyDeviceAdminReceiver.class);
enableDeviceAdmin.putExtra(DevicePolicyManager.EXTRA_DEVICE_ADMIN,
deviceAdminReceiver);
enableDeviceAdmin.putExtra(DevicePolicyManager.EXTRA_ADD_EXPLANATION,
context.getString(R.string.device_admin_explanation));
context.startActivity(enableDeviceAdmin);
}
After the user accepts the device administration request, your application can start applying its policies and
control the device to a certain degree.
The following method is a simple example in which you reset the password and lock the device immediately.
private void changePasswordAndLockDevice(String password) {
mDevicePolicyManager = (DevicePolicyManager)
getSystemService(DEVICE_POLICY_SERVICE);
if(mDevicePolicyManager.resetPassword(password, 0)) {
mDevicePolicyManager.lockNow();
}
}
Doing so can be useful for a remote security feature. By sending a verified message (as shown earlier in this
chapter) to the device, the user or someone with the right authorization can lock the device if it’s stolen or
lost. The message could come from an SMS, which I describe in Chapter 15, or from a Google Cloud Messaging
(GCM) service, which I cover in Chapter 19.
Summary
In this chapter, I described how you can use the Android permissions to restrict what and how other
applications can access your application. I also showed how to identify the calling application in order to isolate
data you receive from multiple applications. This feature is especially powerful when your application is working
with aggregated data from several sources.
I then demonstrated how to encrypt and decrypt data using the crypto APIs in Android, which can often
provide enough security when the user’s data for your application is stored externally or on a remote server.
If your application will involve external parties, such as a remote server, simply performing encryption of
the data may not be enough. You also need to be able to verify that data your application receives is coming
from a verified source. The new Key Chain API in Android 4.0 and later provides secure and trusted storage for
application-specific certificates.
Finally, I showed how to use the Device Administration API in order to programmatically control the security
features. As a result, you can write applications that can lock a device or reset the password. The Device
Administration API combined with the other security features described in this chapter give you a set of
powerful tools for creating applications that fulfill the security requirements of most enterprises.
Further Resources Books
Adams, Carlisle, and Steve Lloyd. Understanding PKI: Concepts, Standards, and Deployment Considerations,
2nd edition. Addison-Wesley, 2002.
Documentation
Documentation on the Device Administration APIs: http://developer.android.com/guide/topics/admin/device-admin.html
Websites
Android Developers Blog. “Using Cryptography to Store Credentials Safely” : http://android-developers.blogspot.se/2013/02/using-cryptography-to-store-credentials.html
Android Developers Blog. “Unifying Key Store Access in ICS”: http://android-developers.blogspot.se/2012/03/unifying-key-store-access-in-ics.html
Android Explorations. “Using the ICS KeyChain API”: http://nelenkov.blogspot.se/2011/11/using-ics-keychain-api.html
“Sample CodeC for Using the ICS KeyChain API and Related Articles”: https://github.com/nelenkov/keystore-test#readme