Android Programming: Pushing the Limits (2014)
Part III. Pushing the Limits
Chapter 11. Advanced Audio, Video, and Camera Applications
Although basic APIs are sufficient for working with audio, video, and camera, more advanced applications often
require more functionality. Ordinary recording and playback is possible with the Java APIs in Android; however,
the latency involved with higher-level APIs may sometimes be too much for them. And working with camera
applications such as augmented reality and other real-time scenarios can be difficult.
In this chapter, you find out how to get the most out of different media features in Android. Android allows you to
use both high-performance and low-level APIs, such as OpenGL ES for graphics and OpenSL ES for audio. I show
you how to use these APIs together and present some cases for using advanced audio, video, and camera features.
Some of the examples in this chapter include native C code, specifically the example related to
OpenSL ES. If you are not familiar with using the Android NDK for building applications with native C
code, you may want to read Chapter 14 before proceeding with this chapter.
Advanced Audio Applications
Music players were the first audio-centric applications for Android. Some could play music from an online
streaming server and some played music from locally stored files. As the Android platform evolved, more
advanced audio APIs were needed, and Google added APIs to allow low-latency audio streaming and recording.
The audio APIs in Android today provide some advanced features that you can integrate into your applications.
It’s now much easier to implement VoIP ( V oice o ver I nternet P rotocol) applications, build custom-streaming
music clients, and implement low-latency sound effects for your games. Also available are APIs to provide text-
to-speech and speech recognition features, allowing users to interact with applications using audio rather than
visual UI or touch technologies.
In this section, I explain how to use these features and provide example code that can help you get started.
Low-Latency Audio
Android has four APIs for doing audio playback (five, if you count MIDI) and three APIs for audio recording. The
following sections provide you with a brief overview of these APIs, along with code exemplifying the more
advanced ones.
Audio Playback APIs
The default class for audio playback is the MediaPlayer class. This class provides basic audio playback
suitable for music players (or video) and a convenient API for playing audio from both streaming sources (such
as an online Internet radio) and local files. An advanced state machine is associated with a MediaPlayer
class that your application needs to track. You can use this API to embed music or video playback within your
application without extra processing or latency requirements.
The second option for audio playback is the SoundPool class, which provides a low-latency support useful for
sound effects and other short audio samples. You use this API to play samples of sound in a game. However, it
doesn’t support audio streaming, so you can’t use it for real-time audio streaming applications like VoIP.
The third option for audio playback is the AudioTrack class, which allows you to push a single audio stream
as raw PCM buffers to the audio hardware, allowing low-latency playback even for streaming scenarios.
AudioTrack usually provides latency low enough to be used in VoIP and similar applications.
The following code shows how to set up an AudioTrack instance for a typical VoIP scenario:
public class AudioTrackDemo {
private final AudioTrack mAudioTrack;
private final int mMinBufferSize;
public AudioTrackDemo() {
mMinBufferSize = AudioTrack.getMinBufferSize(16000,
AudioFormat.CHANNEL_OUT_MONO,
AudioFormat.ENCODING_PCM_16BIT);
mAudioTrack = new AudioTrack(AudioManager.STREAM_VOICE_CALL,
16000,
AudioFormat.CHANNEL_OUT_MONO,
AudioFormat.ENCODING_PCM_16BIT,
mMinBufferSize * 2,
AudioTrack.MODE_STREAM);
}
public void playPcmPacket(byte[] pcmData) {
if(mAudioTrack != null
&& mAudioTrack.getState() == AudioTrack.STATE_INITIALIZED)
{
if(mAudioTrack.getPlaybackRate()
!= AudioTrack.PLAYSTATE_PLAYING) {
mAudioTrack.play();
}
mAudioTrack.write(pcmData, 0, pcmData.length);
}
}
public void stopPlayback() {
if(mAudioTrack != null) {
mAudioTrack.stop();
mAudioTrack.release();
}
}
}
First, you determine the minimum buffer size for the audio stream. To do so, you need to know the sample rate,
whether the data is mono or stereo, and whether you will use 8-bit or 16-bit PCM encoding. The sample rate and
sample size are the parameters to AudioTrack.getMinBufferSize(), which returns the minimum buffer
size in bytes for this AudioTrack instance.
You create the AudioTrack instance with the correct parameters according to your needs. You adapt the first
parameter to the type of audio you’ll be working with. For a VoIP application, use STREAM_VOICE_CALL, and
for a streaming music application, use STREAM_MUSIC.
The second, third, and fourth parameters for the AudioTrack differ according to the situation. These are the
sample rate, stereo or mono, and sample size. A VoIP application would use 16 kHz in 16-bit mono while regular
music CDs use 44.1 kHz in 16-bit stereo. A high sample rate in 16-bit stereo requires a larger buffer and also
more data transfer, but will give you better quality playback. All Android devices support PCM playback in 8, 16,
and 44.1 kHz sample rates in either 8- or 16-bit stereo.
The buffer size parameter for the AudioTrack should be a multiple of the minimum buffer size. Deciding the
size of this buffer depends on your needs and may even vary because of network latency and other factors.
Always avoid having an empty buffer because that will cause glitches in the audio playback.
The final parameter to the constructor determines whether you’ll send audio data only once (MODE_STATIC)
or as a continuous stream of data (MODE_STREAM). In the first case, you need to send the entire audio clip at
once. When streaming, you can send arbitrary sized pieces of PCM data, which is probably what you want to do
when handling streaming music or a VoIP call.
Audio Recording APIs
The first API for recording audio (and also video) is the MediaRecorder API. This API is similar to
the MediaPlayer in that it maintains an internal state that you need to track in your code. With the
MediaRecorder, it’s only possible to capture recording to a file, so this API is not suitable for streaming
solutions.
If you need to stream the audio you’re recording, you can use the AudioRecord API, which is very similar to
the AudioTrack described in the previous section.
The following example shows how to set up an AudioRecord instance for recording 16-bit mono in 16 kHz
samples:
public class AudioRecordDemo {
private final AudioRecord mAudioRecord;
private final int mMinBufferSize;
private boolean mDoRecord = false;
public AudioRecordDemo() {
mMinBufferSize = AudioTrack.getMinBufferSize(16000,
AudioFormat.CHANNEL_OUT_MONO,
AudioFormat.ENCODING_PCM_16BIT);
mAudioRecord = new AudioRecord(
MediaRecorder.AudioSource.VOICE_COMMUNICATION,
16000,
AudioFormat.CHANNEL_IN_MONO,
AudioFormat.ENCODING_PCM_16BIT,
mMinBufferSize * 2);
}
public void writeAudioToStream(OutputStream stream) {
mDoRecord = true;
mAudioRecord.startRecording();
byte[] buffer = new byte[mMinBufferSize * 2];
while(mDoRecord) {
int bytesWritten = mAudioRecord.read(buffer, 0, buffer.
length);
try {
stream.write(buffer, 0, bytesWritten);
} catch (IOException e) {
// Ignore for brevity...
mDoRecord = false;
}
}
mAudioRecord.stop();
mAudioRecord.release();
}
public void stopRecording() {
mDoRecord = false;
}
}
Because this is very similar to what you do for setting up an AudioTrack, this setup makes it useful to
combine these two classes when using VoIP and similar applications.
OpenSL ES for Android
Earlier in this chapter, I said there are four APIs for audio playback and three for audio recording. So far, I’ve
covered three for playback and two for recording. In this section, you find out about the final API, OpenSL ES,
which supports both playback and recording. This API is a standard from the Khronos Group (the same group
responsible for the OpenGL APIs).
This API provides low-level audio hardware access and low-latency features for dealing with audio playback
and recording. Whereas the other audio APIs in Android have a convenient Java API, OpenSL ES is currently
accessible only in native C using the Android NDK. In this section, I describe only the native part of the OpenSL
ES API . You can turn to Chapter 14 to find out how you can use the Android NDK and write JNI code to bridge
between Java and native C.
For this section, I assume that you have some knowledge of the C programming language.
The first part of this OpenSL ES example includes the declarations of the required include files and the global
objects that will be used in the code, as shown here:
#include <pthread.h>
// for native OpenSL ES audio
#include <SLES/OpenSLES.h>
#include <SLES/OpenSLES_Android.h>
static pthread_cond_t s_cond;
static pthread_mutex_t s_mutex;
static SLObjectItf engineObject = NULL;
static SLEngineItf engineEngine;
static SLObjectItf outputMixObject = NULL;
static SLObjectItf bqPlayerObject = NULL;
static SLPlayItf bqPlayerPlay;
static SLAndroidSimpleBufferQueueItf bqPlayerBufferQueue;
The following code contains the callback function bqPlayerCallback() that’s called by the OpenSL ES
framework when a sample plays:
static void waitForPlayerCallback()
{
pthread_mutex_lock(&s_mutex);
pthread_cond_wait(&s_cond, &s_mutex);
pthread_mutex_unlock(&s_mutex);
}
SLresult enqueueNextSample(short* sample, int size, short waitForCallback)
{
if(waitForCallback)
{
waitForPlayerCallback();
}
return (*bqPlayerBufferQueue)->Enqueue(bqPlayerBufferQueue,
nextBuffer,
nextSize);
}
void bqPlayerCallback(SLAndroidSimpleBufferQueueItf bq, void *context)
{
pthread_cond_signal(&s_cond);
}
In this case, you’re feeding the output buffer from a different thread through the enqueueNextSample()
function. In order to synchronize the thread where the callback occurs with the thread calling the enqueue
function, you use a pthread_mutex. A call to waitForPlayerCallback() will block the thread until
pthread_cond_signal() is called in the callback (similar to how Object.wait()blocks in Java).
The initialization of the OpenSL ES engine is shown in the following code:
SLresult initOpenSLES()
{
// Use this to check the result of each operation..
SLresult result;
int speakers;
int channels = 2;
// We first create the mutex needed for our playback later
pthread_cond_init(&s_cond, NULL);
pthread_mutex_init(&s_mutex, NULL);
// Create and realize the engine
result = slCreateEngine(&engineObject, 0, NULL, 0, NULL, NULL);
if(result != SL_RESULT_SUCCESS) return result;
result = (*engineObject)->Realize(engineObject,
SL_BOOLEAN_FALSE);
if(result != SL_RESULT_SUCCESS) return result;
result = (*engineObject)->GetInterface(engineObject,
SL_IID_ENGINE,
&engineEngine);
if(result != SL_RESULT_SUCCESS) return result;
// Create and realise the output mixer
const SLInterfaceID outputIds[1] = {SL_IID_VOLUME};
const SLboolean outputReq[1] = {SL_BOOLEAN_FALSE};
result = (*engineEngine)->CreateOutputMix(engineEngine,
&outputMixObject,
1,
outputIds,
outputReq);
if(result != SL_RESULT_SUCCESS) return result;
result = (*outputMixObject)->Realize(outputMixObject,
SL_BOOLEAN_FALSE);
if(result != SL_RESULT_SUCCESS) return result;
// Setup the output buffer and sink
SLDataLocator_AndroidSimpleBufferQueue bufferQueue =
{SL_DATALOCATOR_ANDROIDSIMPLEBUFFERQUEUE, 2};
speakers = SL_SPEAKER_FRONT_LEFT | SL_SPEAKER_FRONT_RIGHT;
SLDataFormat_PCM formatPcm = {SL_DATAFORMAT_PCM,
channels,
SL_SAMPLINGRATE_44_1,
SL_PCMSAMPLEFORMAT_FIXED_16,
SL_PCMSAMPLEFORMAT_FIXED_16,
speakers, SL_BYTEORDER_LITTLEENDIAN};
SLDataSource audioSource = {&bufferQueue, &formatPcm};
SLDataLocator_OutputMix dataLocOutputMix =
{SL_DATALOCATOR_OUTPUTMIX,
outputMixObject};
SLDataSink audioSink = {&dataLocOutputMix, NULL};
// Create a realize the player object
const SLInterfaceID playerIds[] =
{SL_IID_ANDROIDSIMPLEBUFFERQUEUE};
const SLboolean playerReq[] = {SL_BOOLEAN_TRUE};
result = (*engineEngine)->CreateAudioPlayer(engineEngine,
&bqPlayerObject,
&audioSource,
&audioSink,
1,
playerIds,
playerReq);
if(result != SL_RESULT_SUCCESS) return result;
result = (*bqPlayerObject)->Realize(bqPlayerObject,
SL_BOOLEAN_FALSE);
if(result != SL_RESULT_SUCCESS) return result;
result = (*bqPlayerObject)->GetInterface(bqPlayerObject,
SL_IID_PLAY,
&bqPlayerPlay);
if(result != SL_RESULT_SUCCESS) return result;
// Get the player buffer queue object
result = (*bqPlayerObject)->GetInterface(bqPlayerObject,
SL_IID_ANDROIDSIMPLEBUFFERQUEUE, &bqPlayerBufferQueue);
if(result != SL_RESULT_SUCCESS) return result;
// Register the callback function
result = (*bqPlayerBufferQueue)->RegisterCallback(bqPlayerBufferQueue,
bqPlayerCallback,
NULL);
if(result != SL_RESULT_SUCCESS) return result;
return SL_RESULT_SUCCESS;
}
The basic concept for all initialization here is that you first create an object (for instance, the engine) and then
realize it. Next, you retrieve the interface to control the object.
In this example, you start by creating the engine, followed by the player object. You also create an output
buffer object where you write the audio samples to be played. The player is configured to play 16-bit stereo
(2 channels) in 44.1 kHz. Finally, you set the callback for the player buffer. The callback function will be called
after the buffer is ready to receive a new sample for playback.
Also notice that in the beginning of this function, you create the objects related to the mutex used in the
callback and the function for adding new samples.
The final part of this example gives two functions for controlling the state of the player object (play and pause)
and the shutdown function that does the entire cleanup.
The following example shows how to use OpenSL ES for low-latency audio playback. This API is very useful for
the extreme low-latency scenarios or when most of your code is already in native C. For recording, you use this
API in much the same way as when doing playback but with different interfaces.
SLresult pausePlayback()
{
return (*bqPlayerPlay)->SetPlayState(bqPlayerPlay,
SL_PLAYSTATE_PAUSED);
}
SLresult startPlayback()
{
return (*bqPlayerPlay)->SetPlayState(bqPlayerPlay,
SL_PLAYSTATE_PLAYING);
}
void shutdownOpenSLES()
{
if (bqPlayerObject != NULL) {
(*bqPlayerObject)->Destroy(bqPlayerObject);
bqPlayerObject = NULL;
bqPlayerPlay = NULL;
bqPlayerBufferQueue = NULL;
}
if (outputMixObject != NULL) {
(*outputMixObject)->Destroy(outputMixObject);
outputMixObject = NULL;
}
if (engineObject != NULL) {
(*engineObject)->Destroy(engineObject);
engineObject = NULL;
engineEngine = NULL;
}
pthread_cond_destroy(&s_cond);
pthread_mutex_destroy(&s_mutex);
}
Text-to-Speech (TTS)
Although visual feedback is usually the fastest way to provide information to the user, doing so also requires the
user’s full attention to the device. When the user is not able to look at the device, you need some other means of
communicating. Android comes with a powerful API to do text-to-speech (TTS), which enables you to add voice
notifications and other spoken feedback in your application that don’t require users to look at the screen.
The following code shows how to use the TTS API:
public class TextToSpeechDemo implements TextToSpeech.OnInitListener {
private final TextToSpeech mTextToSpeech;
// Used to queue up messages before the TTS engine is initialized...
private final ConcurrentLinkedQueue<String> mBufferedMessages;
private Context mContext;
private boolean mIsReady;
public TextToSpeechDemo(Context context) {
mContext = context;
mBufferedMessages = new ConcurrentLinkedQueue<String>();
mTextToSpeech = new TextToSpeech(mContext, this);
}
@Override
public void onInit(int status) {
if (status == TextToSpeech.SUCCESS) {
mTextToSpeech.setLanguage(Locale.ENGLISH);
synchronized (this) {
mIsReady = true;
for (String bufferedMessage : mBufferedMessages) {
speakText(bufferedMessage);
}
mBufferedMessages.clear();
}
}
}
public void release() {
synchronized (this) {
mTextToSpeech.shutdown();
mIsReady = false;
}
}
public void notifyNewMessages(int messageCount) {
String message = mContext.getResources().
getQuantityString(R.plurals.msg_count,
messageCount, messageCount);
synchronized (this) {
if (mIsReady) {
speakText(message);
} else {
mBufferedMessages.add(message);
}
}
}
private void speakText(String message) {
HashMap<String, String> params = new HashMap<String, String>();
params.put(TextToSpeech.Engine.KEY_PARAM_STREAM,
“STREAM_NOTIFICATION”);
mTextToSpeech.speak(message, TextToSpeech.QUEUE_ADD, params);
mTextToSpeech.playSilence(100, TextToSpeech.QUEUE_ADD, params);
}
}
Because the initialization of the TTS engine happens asynchronously, you may need to queue up messages
before you can perform the actual text-to-speech operation.
You can send several parameters to the TTS engine. In the preceding, you see how to decide which audio stream
to use for the spoken message. In this case, you use the same audio stream as the notification sounds.
Finally, if you are going to “speak” multiple messages, it’s a good practice to add a brief silence at the end of
each message. Doing so makes it clearer to the user when one message ends and another one starts.
Speech Recognition
Besides text-to-speech synthesis, Android can perform speech recognition. This feature is a bit more
complicated and doesn’t support as many languages as the text-to-speech API. However, it’s still a powerful
feature for providing an alternative input from the user when touch interaction is limited.
Note: You need to declare the user of the permission android.permission.RECORD_AUDIO before you
can use the speech recognition feature.
In the following code, you start by creating the SpeechRecognizer object and set the listener for the
callback. When the click listener doSpeechRecognition() is called, the speech recognition is initialized
with a language parameter and a flag indicating that you want partial results delivered during the processing.
public class SpeechRecognitionDemo extends Activity {
private SpeechRecognizer mSpeechRecognizer;
@Override
protected void onCreate(Bundle savedInstanceState) {
super.onCreate(savedInstanceState);
setContentView(R.layout.speech_recognition_demo);
mSpeechRecognizer = SpeechRecognizer.createSpeechRecognizer(this);
mSpeechRecognizer.
setRecognitionListener(new MyRecognitionListener());
}
@Override
protected void onDestroy() {
super.onDestroy();
mSpeechRecognizer.destroy();
}
public void doSpeechRecognition(View view) {
view.setEnabled(false);
Intent recognitionIntent =
new Intent(RecognizerIntent.ACTION_RECOGNIZE_SPEECH);
recognitionIntent.putExtra(RecognizerIntent.EXTRA_PARTIAL_RESULTS,
true);
recognitionIntent.putExtra(RecognizerIntent.EXTRA_LANGUAGE,
“en-US”);
mSpeechRecognizer.startListening(recognitionIntent);
}
private class MyRecognitionListener implements RecognitionListener {
@Override
public void onReadyForSpeech(Bundle bundle) {
}
@Override
public void onBeginningOfSpeech() {
((TextView) findViewById(R.id.speech_result)).setText(“”);
}
@Override
public void onRmsChanged(float rmsdB) {
// Not used
}
@Override
public void onBufferReceived(byte[] bytes) {
}
@Override
public void onEndOfSpeech() {
findViewById(R.id.do_speech_recognition_btn).setEnabled(true);
}
@Override
public void onError(int i) {
// Something went wrong...
findViewById(R.id.do_speech_recognition_btn).setEnabled(true);
}
@Override
public void onResults(Bundle bundle) {
ArrayList<String> partialResults =
bundle.getStringArrayList(SpeechRecognizer.RESULTS_RECOGNITION);
if (partialResults != null && partialResults.size() > 0) {
String bestResult = partialResults.get(0);
((TextView) findViewById(R.id.speech_result)).
setText(bestResult + “.”);
}
}
@Override
public void onPartialResults(Bundle bundle) {
ArrayList<String> partialResults =
bundle.getStringArrayList(SpeechRecognizer.RESULTS_RECOGNITION);
if (partialResults != null && partialResults.size() > 0) {
String bestResult = partialResults.get(0);
((TextView) findViewById(R.id.speech_result)).
setText(bestResult);
}
}
@Override
public void onEvent(int i, Bundle bundle) {
// Not used...
}
}
}
The listener now receives a call to each method in turn. In this example, you display the partially recognized
result (best match) in onPartialResult() and keep doing so until you get the final result on onResult().
A more advanced application could also interpret the words and listen for certain commands. This way, your
application can keep performing speech recognition until the user explicitly tells it to stop—for example,
a dictation application that allows the user to add periods between sentences with the single word “stop”
followed by a brief silence.
Video Processing with OpenGL ES 2.0
Android supports hardware-accelerated graphics through the OpenGL ES 2.0 and 3.0 APIs. While OpenGL is
already used for the standard UI rendering and composition in Android, it is more commonly known as the API
used for building graphics-engines for 2D and 3D games. However, as OpenGL ES 2.0 and later require a dedicated
GPU for processing, it can also be used for real-time processing of input from a video or a camera feed. In this
section I show how to use OpenGL ES 2.0 on Android for adding real-time effects, starting with the video example.
In this section, I assume that the reader has some basic understanding of OpenGL ES 2.0.
In later versions of Android (starting from API level 11), you can use an extension called streaming texture to
continuously feed streams of images, like a video, to the OpenGL ES 2.0 context as a texture. Although it may be
interesting to show a video playing on a rotating cube, a more practical use is to add visual effects to a video.
In the following two examples I include only the relevant parts for using the streaming texture feature. For full
OpenGL ES 2.0 examples, see the “Further Resources” section as well as the OpenGL ES examples in the Android
SDK samples.
In the following code snippet you can see the beginning of a Renderer implementation that will be used by a
GLSurfaceView:public class MyVideoRenderer implements:
GLSurfaceView.Renderer, SurfaceTexture.OnFrameAvailableListener {
private static int GL_TEXTURE_EXTERNAL_OES = 0x8D65;
private MediaPlayer mMediaPlayer;
private float[] mSTMatrix = new float[16];
private int muSTMatrixHandle;
The GL extension used for supporting this feature is called GL_TEXTURE_EXTERNAL_OES and is not defined
in the Android SDK. However, it’s just a constant that you can define yourself in your code as just shown.
The renderer also has a reference to the MediaPlayer that will be used to playback the video. Finally, a
transformation matrix and corresponding shader handle are defined. This matrix is later used when mapping
the texture coordinates from the video or camera feed in the fragment shader.
In the onSurfaceCreated() method shown in the following example, I show how to set up the texture that
will be used as an input.
public void onSurfaceCreated(GL10 glUnused, EGLConfig config) {
... omitted for brevity ...
muSTMatrixHandle = GLES20.glGetUniformLocation(mProgram, “uSTMatrix”);
checkGlError(“glGetUniformLocation uSTMatrix”);
if (muSTMatrixHandle == -1) {
throw new RuntimeException(“Unable to retrieve uSTMatrix”);
}
// Setup the texture
int[] textures = new int[1];
GLES20.glGenTextures(1, textures, 0);
mTextureID = textures[0];
GLES20.glBindTexture(GL_TEXTURE_EXTERNAL_OES, mTextureID);
GLES20.glTexParameterf(GL_TEXTURE_EXTERNAL_OES,
GLES20.GL_TEXTURE_MIN_FILTER,
GLES20.GL_NEAREST);
GLES20.glTexParameterf(GL_TEXTURE_EXTERNAL_OES,
GLES20.GL_TEXTURE_MAG_FILTER,
GLES20.GL_LINEAR);
// Define the SurfaceTexture and assign it to our MediaPlayer
mSurface = new SurfaceTexture(mTextureID);
mSurface.setOnFrameAvailableListener(this);
Surface surface = new Surface(mSurface);
mMediaPlayer.setSurface(surface);
surface.release();
synchronized (this) {
updateSurface = false;
}
mMediaPlayer.start();
}
Instead of GLES20.GL_TEXTURE2D, you use the constant defined earlier referring to the extension. Next, you
create a SurfaceTexture and add it to a Surface object, which in turn is used as the rendering surface for
the MediaPlayer. Doing so causes each video frame to be rendered into a streaming texture instead of to
the screen. A callback is also added that will update the variable updateSurface as soon as a new frame is
available. Finally, you start the playback of the video on the MediaPlayer.
In the onDrawFrame() method shown in the following code, you start by checking whether a new frame
is available. If so, the SurfaceTexture is updated and the transformation matrix relevant for this frame is
stored in mSTMatrix. This will be used to transform the texture coordinates to the proper sampling location
in the frame. Also, note that the binding of the texture is also changed to use the extension constant GL_
TEXTURE_EXTERNAL_OES.
public void onDrawFrame(GL10 glUnused) {
synchronized (this) {
if (updateSurface) {
mSurface.updateTexImage();
mSurface.getTransformMatrix(mSTMatrix);
updateSurface = false;
}
}
... omitted for brevity ...
GLES20.glActiveTexture(GLES20.GL_TEXTURE0);
GLES20.glBindTexture(GL_TEXTURE_EXTERNAL_OES, mTextureID);
GLES20.glUniformMatrix4fv(muMVPMatrixHandle, 1, false, mMVPMatrix, 0);
GLES20.glUniformMatrix4fv(muSTMatrixHandle, 1, false, mSTMatrix, 0);
GLES20.glDrawArrays(GLES20.GL_TRIANGLE_STRIP, 0, 4);
checkGlError(“glDrawArrays”);
GLES20.glFinish();
}
In the following code you can see the vertex shader used in this example. Here, the uSTMatrix uniform is used
together with the regular transformation matrix and vertex position to calculate the final vTextureCoord.
uniform mat4 uMVPMatrix;
uniform mat4 uSTMatrix;
attribute vec4 aPosition;
attribute vec4 aTextureCoord;
varying vec2 vTextureCoord;
void main() {
gl_Position = uMVPMatrix * aPosition;
vTextureCoord = (uSTMatrix * aTextureCoord).xy;
}
The fragment shader starts by specifying that the GL_OES_EGL_image_external extension is used and
is required for this shader to work, as shown in the following code. Next, the sTexture changes its type to
samplerExternalOES.
#extension GL_OES_EGL_image_external : require
precision mediump float;
varying vec2 vTextureCoord;
uniform samplerExternalOES sTexture;
void main() {
gl_FragColor = texture2D(sTexture, vTextureCoord);
}
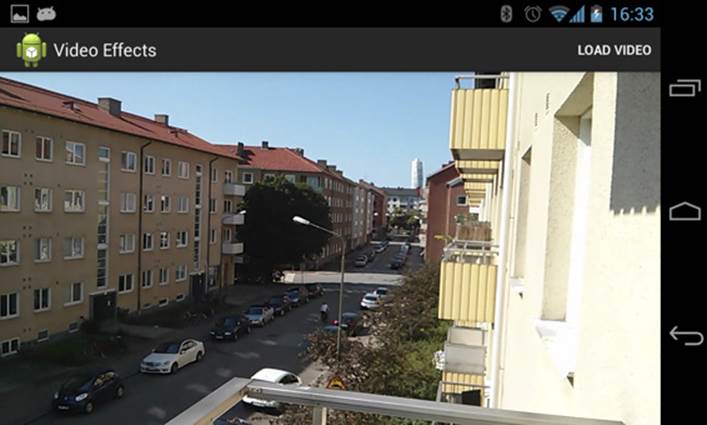
This simply renders the video as-is without changes to the screen, as shown in Figure 11-1.
Figure 11-1 Rendering a video using OpenGL ES 2 .0 and SurfaceTexture
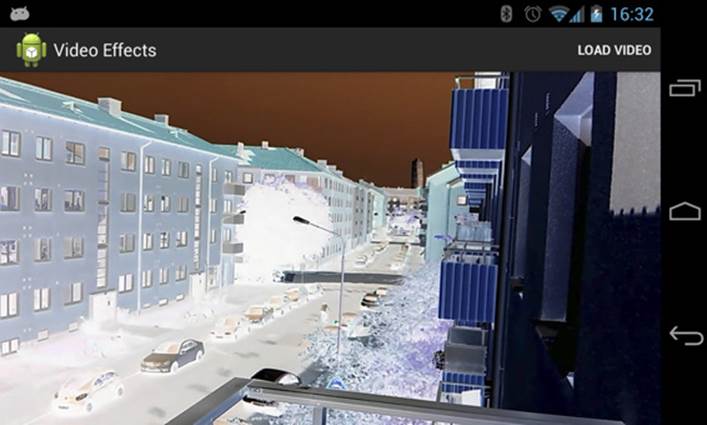
By changing only the fragment shader, you can now achieve some cool effects on the video.
The following code applies a negative effect to the video in runtime (see Figure 11-2):
#extension GL_OES_EGL_image_external : require
precision mediump float;
varying vec2 vTextureCoord;
uniform samplerExternalOES sTexture;
uniform float uResS;
uniform float uResT;
void main() {
vec2 onePixel = vec2(1.0 / uResS, 1.0 / uResT);
float T = 1.0;
vec2 st = vTextureCoord.st;
vec3 irgb = texture2D(sTexture, st).rgb;
vec3 neg = vec3(1., 1., 1.)-irgb;
gl_FragColor = vec4(mix(irgb, neg, T), 1.);
}
This shader takes two extra parameters telling how large the texture is. These two parameters are useful in other
types of filter effects as well. Refer to the OpenGL ES 2.0 resource listed in the “Further Resources” section at the
end of this chapter for more information.
Figure 11-2 Rendering a video with OpenGL ES 2 .0 and using a filter for negative effect
Camera Processing with OpenGL ES 2.0
Using OpenGL ES 2.0, you can follow the same process with the camera as you did with video in the previous
section. You can connect the stream of preview frames to the same type of streaming texture and perform
real-time processing of these frames. In this way, you can create powerful augmented reality (AR) applications,
showing image filters in real time or run some powerful computations on the image that would take much
more time if done on the CPU.
mSurface = new SurfaceTexture(mTextureID);
mSurface.setOnFrameAvailableListener(this);
try {
mCamera.setPreviewTexture(mSurface);
mCamera.startPreview();
} catch (IOException e) {
e.printStackTrace();
}
The only difference from the previous example is in the onDrawFrame() method, where instead of working
with a MediaPlayer, you give the SurfaceTexture directly to the Camera as a preview texture.
The fragment shader used in this example will perform edge detection on the preview frames. The result of this
can be seen in Figure 11-3.
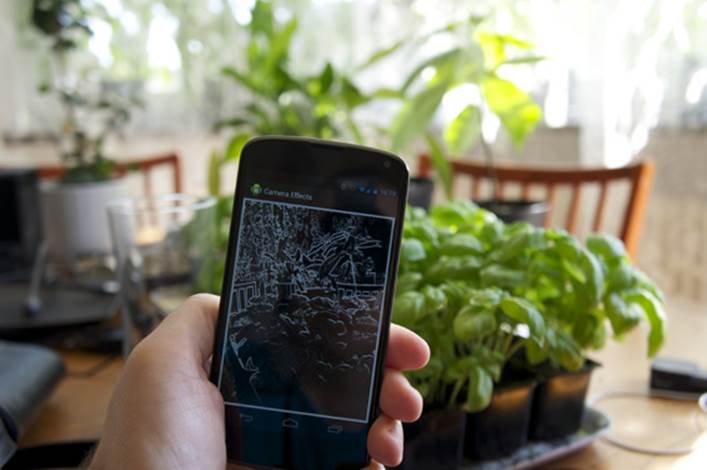
Figure 11-3 The edge detection effect on the camera preview frames running on a Nexus 4
The following code shows the code for this shader:
#extension GL_OES_EGL_image_external : require
precision mediump float;
varying vec2 vTextureCoord;
uniform samplerExternalOES sTexture;
uniform float uResS;
uniform float uResT;
void main() {
vec3 irgb = texture2D(sTexture, vTextureCoord).rgb;
float ResS = uResS;
float ResT = uResT;
vec2 stp0 = vec2(1./ResS, 0.);
vec2 st0p = vec2(0., 1./ResT);
vec2 stpp = vec2(1./ResS, 1./ResT);
vec2 stpm = vec2(1./ResS, -1./ResT);
const vec3 W = vec3(0.2125, 0.7154, 0.0721);
float i00 = dot(texture2D(sTexture, vTextureCoord).rgb, W);
float im1m1 = dot(texture2D(sTexture, vTextureCoord-stpp).rgb, W);
float ip1p1 = dot(texture2D(sTexture, vTextureCoord+stpp).rgb, W);
float im1p1 = dot(texture2D(sTexture, vTextureCoord-stpm).rgb, W);
float ip1m1 = dot(texture2D(sTexture, vTextureCoord+stpm).rgb, W);
float im10 = dot(texture2D(sTexture, vTextureCoord-stp0).rgb, W);
float ip10 = dot(texture2D(sTexture, vTextureCoord+stp0).rgb, W);
float i0m1 = dot(texture2D(sTexture, vTextureCoord-st0p).rgb, W);
float i0p1 = dot(texture2D(sTexture, vTextureCoord+st0p).rgb, W);
float h = -1.*im1p1 - 2.*i0p1 - 1.*ip1p1 + 1.*im1m1 + 2.*i0m1 + 1.*ip1m1;
float v = -1.*im1m1 - 2.*im10 - 1.*im1p1 + 1.*ip1m1 + 2.*ip10 + 1.*ip1p1;
float mag = length(vec2(h, v));
vec3 target = vec3(mag, mag, mag);
gl_FragColor = vec4(mix(irgb, target, 1.0),1.);
}
Encoding Media
Android 4.3, more specifically API level 18, includes a number of improvements to the media APIs in Android.
The two significant classes in this API are MediaCodec and MediaMuxer. The MediaCodec class, introduced
earlier in a more limited version in Android 4.2 (with API level 16), provides application developers access to
low-level media codec functionality. With API level 18, the MediaCodec class also supports encoding from a
Surface, which means it is possible to record OpenGL ES 2.0 scenes into a video stream.
The MediaMuxer class allows developers to mux raw media streams into a media file for playback. By using
both of these classes, you can add the functionality of recording a game session. You can also use these classes
with the previous examples of processing a video or camera feed to store the result as a new MP4 file.
Recording an OpenGL Scene
The following example shows the basics of using the MediaCodec and MediaMuxer for recording the result of
an OpenGL ES 2.0 scene to an MP4 file. This method should work with any OpenGL ES 2.0 content. With this code,
you create the encoder and the muxer, and use the MediaFormat to specify the parameters for the encoder:
private void prepareEncoder() {
mBufferInfo = new MediaCodec.BufferInfo();
MediaFormat format = MediaFormat.createVideoFormat(“video/avc”,
VIDEO_WIDTH, VIDEO_HEIGHT);
format.setInteger(MediaFormat.KEY_COLOR_FORMAT,
MediaCodecInfo.CodecCapabilities.COLOR_FormatSurface);
format.setInteger(MediaFormat.KEY_BIT_RATE, 6000000); // 6 Mbps
format.setInteger(MediaFormat.KEY_FRAME_RATE, 30);
format.setInteger(MediaFormat.KEY_I_FRAME_INTERVAL, 10);
// Create a MediaCodec encoder, and configure it with our format.
mEncoder = MediaCodec.createEncoderByType(MIME_TYPE);
mEncoder.configure(format, null, null,
MediaCodec.CONFIGURE_FLAG_ENCODE);
mMuxer = new MediaMuxer(mOutputFile.getAbsolutePath(),
MediaMuxer.OutputFormat.MUXER_OUTPUT_MPEG_4);
mSurface = mEncoder.createInputSurface();
}
This example uses H.264 as the output format, with a bitrate of 6 Mbps and 30 frames per second with 10
frames between each I-frame. You also create the Surface that will be used as the input for the encoder.
After the encoder and muxer are created, you next set up the EGL context that will be used for recording, as
shown in the following code:
private static final int EGL_RECORDABLE_ANDROID = 0x3142;
private void recorderEglSetup() {
mEGLDisplay = EGL14.eglGetDisplay(EGL14.EGL_DEFAULT_DISPLAY);
if (mEGLDisplay == EGL14.EGL_NO_DISPLAY) {
throw new RuntimeException(“EGL Get Display failed!”);
}
int[] version = new int[2];
if (!EGL14.eglInitialize(mEGLDisplay, version, 0, version, 1)) {
mEGLDisplay = null;
throw new RuntimeException(“EGL init error!”);
}
int[] attribList = {
EGL14.EGL_RED_SIZE, 8,
EGL14.EGL_GREEN_SIZE, 8,
EGL14.EGL_BLUE_SIZE, 8,
EGL14.EGL_RENDERABLE_TYPE, EGL14.EGL_OPENGL_ES2_BIT,
EGL_RECORDABLE_ANDROID, 1,
EGL14.EGL_NONE
};
EGLConfig[] configs = new EGLConfig[1];
int[] numConfigs = new int[1];
if (!EGL14.eglChooseConfig(mEGLDisplay, attribList,
0, configs, 0, configs.length,
numConfigs, 0)) {
throw new RuntimeException(“EGL Config error!”);
}
int[] glAttribs = {
EGL14.EGL_CONTEXT_CLIENT_VERSION, 2,
EGL14.EGL_NONE
};
mEGLContext = EGL14.eglCreateContext(mEGLDisplay, configs[0],
EGL14.eglGetCurrentContext(),
glAttribs, 0);
int[] surfaceAttribs = {
EGL14.EGL_NONE
};
mEGLSurface = EGL14.eglCreateWindowSurface(mEGLDisplay, configs[0],
mSurface, surfaceAttribs,
0);
}
public void releaseRecorder() {
mEncoder.stop();
mEncoder.release();
mEncoder = null;
mMuxer.stop();
mMuxer.release();
mMuxer = null;
EGL14.eglDestroySurface(mEGLDisplay, mEGLSurface);
EGL14.eglDestroyContext(mEGLDisplay, mEGLContext);
EGL14.eglReleaseThread();
EGL14.eglTerminate(mEGLDisplay);
mSurface.release();
mSurface = null;
mEGLDisplay = null;
mEGLContext = null;
mEGLSurface = null;
}
The two most important parts are marked in bold. The constant defined before the method is used when
setting up EGL to tell Android that this is a recordable context. The mSurface variable is the same as the one
created in the prepareEncoder() method.
The release() method must be called after recording is completed in order to clean up all the resources held
by your application. Note that releasing this EGL context doesn’t release the same context used for rendering to
the display.
Because recording a scene requires two rendering passes, once to the physical display and once to the
Surface used for encoding, you need two methods for saving and restoring the rendering state of OpenGL.
The following code shows these two methods.
private void storeRenderState() {
System.arraycopy(mProjMatrix,
0, mSavedProjMatrix,
0, mProjMatrix.length);
mSavedEglDisplay = EGL14.eglGetCurrentDisplay();
mSavedEglDrawSurface = EGL14.eglGetCurrentSurface(EGL14.EGL_DRAW);
mSavedEglReadSurface = EGL14.eglGetCurrentSurface(EGL14.EGL_READ);
mSavedEglContext = EGL14.eglGetCurrentContext();
}
private void restoreRenderState() {
if (!EGL14.eglMakeCurrent(mSavedEglDisplay,
mSavedEglDrawSurface,
mSavedEglReadSurface,
mSavedEglContext)) {
throw new RuntimeException(“eglMakeCurrent failed!”);
}
System.arraycopy(mSavedProjMatrix,
0, mProjMatrix, 0, mProjMatrix.length);
}
Next, you need a method for transferring the encoded video stream to the muxer used for writing to the MP4
file:
private void drainEncoder(boolean endOfStream) {
if (endOfStream) {
mEncoder.signalEndOfInputStream();
}
ByteBuffer[] encoderOutputBuffers = mEncoder.getOutputBuffers();
while (true) {
int encoderStatus = mEncoder.dequeueOutputBuffer(mBufferInfo, 0);
if (encoderStatus == MediaCodec.INFO_TRY_AGAIN_LATER) {
break;
} else if (encoderStatus ==
MediaCodec.INFO_OUTPUT_BUFFERS_CHANGED) {
encoderOutputBuffers = mEncoder.getOutputBuffers();
} else if (encoderStatus ==
MediaCodec.INFO_OUTPUT_FORMAT_CHANGED) {
MediaFormat newFormat = mEncoder.getOutputFormat();
mTrackIndex = mMuxer.addTrack(newFormat);
mMuxer.start();
mMuxerStarted = true;
} else {
ByteBuffer encodedData = encoderOutputBuffers[encoderStatus];
if ((mBufferInfo.flags &
MediaCodec.BUFFER_FLAG_CODEC_CONFIG) != 0) {
mBufferInfo.size = 0;
}
if (mBufferInfo.size != 0) {
encodedData.position(mBufferInfo.offset);
encodedData.limit(mBufferInfo.offset + mBufferInfo.size);
mMuxer.writeSampleData(mTrackIndex, encodedData,
mBufferInfo);
}
mEncoder.releaseOutputBuffer(encoderStatus, false);
if ((mBufferInfo.flags
& MediaCodec.BUFFER_FLAG_END_OF_STREAM) != 0) {
break;
}
}
}
}
The while loop in this example will continue until it has exhausted any remaining data from the encoder
output.
In the following code you can see a typical onSurfaceChanged() method used for OpenGL ES scenes in
Android, with the addition of setting up the encoder and EGL context for recording the scene:
public void onSurfaceChanged(GL10 gl10, int width, int height) {
GLES20.glViewport(0, 0, width, height);
float ratio = (float) width / height;
Matrix.frustumM(mProjMatrix, 0, -ratio, ratio, -1, 1, 3, 7);
prepareEncoder(mContext);
if (mEncoder != null) {
storeRenderState();
recorderEglSetup();
mEncoder.start();
if (!EGL14.eglMakeCurrent(mEGLDisplay, mEGLSurface,
mEGLSurface, mEGLContext)) {
throw new RuntimeException(“eglMakeCurrent failed”);
}
restoreRenderState();
mFrameCount = 0;
}
}
The onDrawFrame() method in the following code first draws the scene to the main display, followed by
a check to determine if the encoder is valid. The remaining code changes the EGL context, configures the
viewport for the second rendering, and draws the scene to the new viewport.
public void onDrawFrame(GL10 gl10) {
drawFrame();
if(mEncoder != null) {
storeRenderState();
if (!EGL14.eglMakeCurrent(mEGLDisplay, mEGLSurface,
mEGLSurface, mEGLContext)) {
throw new RuntimeException(“eglMakeCurrent failed”);
}
Matrix.orthoM(mProjMatrix, 0, 0, mWidth,
0, mHeight, -1, 1);
GLES20.glViewport(mViewportXoff, mViewportYoff,
mViewportWidth, mViewportHeight);
drawFrame();
drainEncoder(false);
long when = System.nanoTime();
EGLExt.eglPresentationTimeANDROID(mEGLDisplay, mEGLSurface, when);
EGL14.eglSwapBuffers(mEGLDisplay, mEGLSurface);
restoreRenderState();
}
}
After the second drawing is complete the encoder is drained of any data.
The method in the following code shows how to signal to stop the encoder and release all its related resources:
public void stopRecording() {
drainEncoder(true);
releaseRecorder();
}
This method should be called either when the user leaves the application or when recording should be stopped.
Summary
With the later versions of Android, the possibilities for doing advanced media operations in applications have
become much better. The examples in this chapter serve to demonstrate some of the more advanced APIs. You
can build a complete application from a single example, or combine them into a more complex experience.
While the examples in this chapter are not complete implementations of an application, they should be enough
for experienced developers to get started.
Further Resources Documentation
From the Khronos Group on the OpenSL ES API: www.khronos.org/opensles
Specification for the OpenGL extension GL_OES_EGL_image_external: www.khronos.org/registry/gles/extensions/OES/OES_EGL_image_external.txt
LittleCheeseCake by Yu Lu using OpenGL ES 2.0 shaders on Android: http://littlecheesecake.me/blog/13804700/opengles-shader
Using the MediaCodec and MediaMuxer in Android: http://bigflake.com/mediacodec/