Android Programming: Pushing the Limits (2014)
Part II. Getting the Most Out of Components
Chapter 3. Components, Manifests, and Resources
So far I’ve covered the more general aspects of development, much of which you can apply to generic
Java development as well. In this chapter, I start going through some more Android-specific information.
( Note: I’m assuming that you’re familiar with the basic concepts of Android and have already written
applications for this platform.)
The three core concepts of any Android application are the components, the manifest, and the resources. Every
Android application uses all of these, so you need to fully understand them. Although your IDE will most likely
assist you in setting up the basics, you can do a lot more by optimizing them yourself.
I start with an overview of the Android components and how to use them optimally for the software
architecture of your applications. Next, I cover some of the details of the Android manifest and explain how you
can fine-tune the parameters to suit your application. Finally, I cover some advanced details of the resources
and assets and how you can work with these.
Android Components
When you write an Android application, you usually start by defining a main Activity. In fact, your IDE
will probably ask you for the name of the main Activity and create it for you. You continue by setting up
Services, BroadcastReceivers, and ContentProviders and then tie them all together using the
Intents. The common name for these parts is components.
These four types of components (Activity, Services, BroadcastReceivers, and
ContentProviders) are the ones most frequently used. Activities are responsible for the user interface,
Services implement operations running in the background, BroadcastReceivers listen for system
events, and ContentProviders store application data.
They all come with a base class that you extend and a section in the application manifest XML file that exposes
them to the Android system. There is also a fifth type of component with the name Application that, though
rarely utilized, is useful in some situations.
Allow me to walk you through these five components and put them into context before moving on to the
software architecture for a standard Android application. (I cover each component in more detail in later
chapters, as indicated in the following sections.)
The Activity Component
User interfaces for an Android application are managed by extensions of the Activity class. Your application
can have several Activities for different functions, but only one Activity can be displayed at any given
time. As with all other components, a number of lifecycle callbacks will notify you of the current state.
The general guide regarding Activities is that they handle only UI-related operations. Although you can
use AsyncTask or Handler (as I describe in Chapter 2) to execute things off the main thread, the preferred
practice is to always delegate long-running operations to a Service and execute them on a separate
thread there—because the state of an Activity is very much controlled by the user, and it becomes a bit
complicated if you need to cancel a running operation because the user happens to press the Home button.
Instead, let a Service handle these operations and focus on the user interface in your Activities.
Starting with Android 3.0 (Honeycomb), the Fragments API became available for building dynamic user
interfaces. This API was specifically designed to allow application developers to implement user interfaces
that will adapt to the size of the devices they’ll be running on. Instead of simply scaling the entire application
when running on a 10-inch tablet, you can use Fragments to show more details than when running the same
application on a 4-inch device.
The Service Component
The second most-common component is the Service. Basically, anything that doesn’t involve normal user-
interface operations goes into a Service. Remember that all components run on the same main thread, so
you still have to make sure that your potentially long-running operations are executed on a separate thread
using either a Handler or an AsyncTask. You want to move these operations to a Service, and not simply
keep them in a background thread inside your Activity, because you want to complete the operation even
if the user presses the Back or Home button during the Activity. By allowing a Service to control long-
running operations, you can more easily keep track of the state of these operations.
I recommend that each task have a dedicated Service. You can use one Service for storing data and
another one for communicating with an online web Service. For instance, if you’re building a music player,
create one Service for the playback and another Service for tasks that aren’t related to music. You want
different Services for different operations so that Services can be started and restarted differently; it’s
easier to have multiple Services than to try to build one Service that handles everything.
You learn more about Services and background operations on Android in Chapter 6.
The BroadcastReceiver Component
BroadcastReceivers are special components because they are stateless, which means that the
BroadcastReceiver object is valid only during the onReceive() call. Therefore, you can’t keep a
reference to the BroadcastReceiver instance that’s declared in the manifest anywhere in your code.
Also, you can’t add the instance as a listener or callback to an asynchronous operation. Basically, the only
thing you can and should do in the onReceive() method of a BroadcastReceiver is to delegate
the call to another component, either through the Context.startActivity() or the Context.
startService() method.
This limitation makes BroadcastReceivers useful for one thing only: listening to system events. Many
BroadcastIntents are defined in the Android SDK, and they’re spread out in different classes in the API. All
you can do is check the part of the API you’re interested in to see if a BroadcastIntent is there that provides
what you’re looking for.
The BroadcastReceiver component is also a bit special because it can also be programmatically declared
inside a Service or an Activity. These instances are manually registered and unregistered from the system
in your code. Always unregister a programmatically defined BroadcastReceiver or you will leak a reference
and waste memory.
A programmatically defined BroadcastReceiver is sometimes the only way you can listen for a
certain broadcast. Some BroadcastIntents don’t allow you to register them through the manifest. For
instance, the broadcast defined by Intent.ACTION_BATTERY_CHANGED can be received only from a
BroadcastReceiver registered with Context.registerReceiver().
You find out more about BroadcastReceivers in Chapter 8.
The ContentProvider Component
You don’t need to define a ContentProvider in order to store data for your Android application. In many
cases, a simple key/value storage using SharedPreferences is sufficient, and you can store data in an
SQLite database using the SQLite API directly from your Services and Activities. Storing files inside your
application’s data folder is another way of persisting application data.
However, if the application data you’re going to store is suitable for SQL, it’s usually easier to implement
a ContentProvider even if you won’t be sharing the data with other applications. Doing so becomes
especially useful when you want to display the application data using an AdapterView (like a list or a grid)
because the Loader API provides readymade implementations for loading data from a ContentProvider.
I go into the details of different data storage techniques for Android in Chapter 9.
The Application Component
There is also a fifth component, simply called Application , that is rarely used but can come in handy
sometimes. You can consider the Application component as a top-level component that’s created before
Activities, Services, and BroadcastReceivers.
Your Android app will always have an Application component, and unless you define one, a default one
will be created for you. You can always retrieve a reference to the Application component through the
method Context.getApplication(). Because all Android apps will have one and only one instance of
this component, you can use it to share variables and communicate across the other components within your
app. Although sharing a global state can be solved using a singleton class as well, using the Application
component has the advantage that it also implements application lifecycle callbacks.
The following code exemplifies code for a custom Application component. This example also shows how
to use this component for sharing global variables and notifying listeners whenever these variables are added,
changed, or removed. Although simplistic, this example demonstrates how you can utilize an already-existing
Android component to solve a problem that would otherwise require a singleton class.
public class MyApplication extends Application {
private ConcurrentHashMap<String, String> mGlobalVariables;
private Set<AppStateListener> mAppStateListeners;
@Override
public void onCreate() {
super.onCreate();
// Called before any other component is created
mGlobalVariables = new ConcurrentHashMap<String, String>();
mAppStateListeners = Collections.synchronizedSet(new
HashSet<AppStateListener>());
}
public String getGlobalVariable(String key) {
return mGlobalVariables.get(key);
}
public String removeGlobalVariable(String key) {
String value = mGlobalVariables.remove(key);
notifyListeners(key, null);
return value;
}
public void putGlobalVariable(String key, String value) {
mGlobalVariables.put(key, value);
notifyListeners(key, value);
}
public void addAppStateListener(AppStateListener appStateListener) {
mAppStateListeners.add(appStateListener);
}
public void removeAppStateListener(AppStateListener appStateListener)
{
mAppStateListeners.remove(appStateListener);
}
private void notifyListeners(String key, String value) {
for (AppStateListener appStateListener : mAppStateListeners) {
appStateListener.onStateChanged(key, value);
}
}
public interface AppStateListener {
void onStateChanged(String key, String value);
}
}
The manifest file (AndroidManifest.xml) will always have an application element. However, in order for
Android to recognize that your custom Application component is to be used, instead of the default, you
need to declare the custom Application component in a android:name attribute (see the bold text in the
following example).
<application android:label=”@string/app_name”
android:icon=”@drawable/app_icon”
android:name=”.MyApplication” >
<!—- All other components are declared here -->
</application>
As just shown, you declare your custom Application component much as you declare an Activity or a
Service. Simply add the class name in the android:name attribute, and you’re set to go.
public class MyActivity extends Activity
implements MyApplication.AppStateListener {
@Override
protected void onResume() {
super.onResume();
MyApplication myApplication = (MyApplication) getApplication();
myApplication.addAppStateListener(this);
}
@Override
protected void onPause() {
super.onPause();
MyApplication myApplication = (MyApplication) getApplication();
myApplication.removeAppStateListener(this);
}
@Override
public void onStateChanged(String key, String value) {
// Handle state change...
}
}
When you need to access your custom Application component from somewhere in your code, you simply
call Context.getApplication() and cast it to your custom class, as shown in the preceding example.
Because you’re using a listener pattern in this example, make sure that you register and unregister the listener
correctly in the onResume() and onPause() methods.
Application Architecture
Generally, Android developers start a new project by creating an Activity and designing the user interface.
Although this approach is okay, my suggestion is that you first consider the overall application architecture
from a broader perspective. If you plan to do network calls, moving them to a separate Service is a
good approach. If you need to be notified about certain system broadcasts, it’s probably wise to set up a
BroadcastReceiver and decide where to delegate those events. If your application needs to store data
beyond simple key/value pairs, I suggest making a ContentProvider responsible for that scenario. Finally, if
you have a complicated application, it may be worth your time to add a custom Application component as
well to track global states and communicate between the other components.
I usually sketch an overall architecture using the components as a base. I ask myself what Activities and
Services are needed at first and then move on to consider broadcast events and ContentProviders. This
architecture doesn’t need to reflect the actual user interface of your application because Activities can
have a dynamic user interface with the help of Fragments. I tend to rely on the readymade extensions of the
basic components as much as possible. For instance, the PreferenceActivity class is great for building the
user interface for the settings part of your application.
Figure 3-1 shows a simple diagram that exemplifies how you can combine the components in Android to create
a well-designed architecture. By always making sure that each component handles only the operations it’s
designed for, you’ll have a stable foundation for the development of your application.
Settings
User settings
Main
Activity
Activity
Call service
Notify on
over local
data changes
Binder
Query data
Service for
Settings
background
Activity
Content
Delegate events operations
Update data
Provider
Call web service
Figure 3-1 A high-level diagram showing the relationships among components in a
typical Android application
You now have a general understanding of the components in Android, but along with the Java code that you
write to implement your own versions of these components, you also need to know how to add them to the
application manifest, which is the topic of the next section.
The Android Application Manifest
The manifest is an XML file where you define each component and declare everything else about your
application. The manifest is the core of any Android application, so it’s important to fully understand how to
structure such files. Small mistakes in manifests can cause performance issues with your application (which
could affect the entire system), unnecessary power consumption (which could cause the battery to drain), and
security issues (which could leak sensitive information to other applications), and under certain conditions, they
can cause your application to crash.
Fortunately, the lint tool (refer to Chapter 1) in the Android SDK provides inspections for the manifest file, so your
IDE will let you know about areas in the file that need to be fixed. In this section, I provide some tips that you can
use to optimize your application and that will be useful when you start doing more advanced development.
The Manifest Element
The top-level element in the AndroidManifest.xml file is named manifest. This is where the package
name, the unique identifier for your application, is defined. You can also define the Linux user ID and name that
your application will be running under, the version information about your application, and where the APK file
should be installed.
The following example shows the manifest tag with all the possible attributes set. The first attribute,
package, defines the unique identifier for you application in the Android system, the name of the application
process, and the name of the default task affinity for Activities. Be sure to choose the package name well
because it cannot be changed after the application is released.
<?xml version=”1.0” encoding=”utf-8”?>
<manifest xmlns:android=”http://schemas.android.com/apk/res/android”
package=”com.aaptl.pushingthelimits.sample”
android:sharedUserId=”com.apptl.userid”
android:sharedUserLabel=”@string/userLabel”
android:installLocation=”auto”
android:versionCode=”1”
android:versionName=”1.0”>
</manifest>
When deciding on the package name, it’s best to use the domain name of the company or organization
that publishes the application and append a shortened, lowercase version of the name the application
will have on Google Play. If you’re working as a consultant or a freelance developer, be sure to use a
name based on your customer’s domain name, and not your own.
The android:sharedUserId and android:sharedUserLabel are the Linux user ID and name that
your application will run on. By default, these are assigned by the system, but if you set them to the same value
for all the applications you publish using the certificate, you can access the same data and even share the
process of these applications. If you’re building a suite of applications or if you have a free and a paid version,
this can be very helpful.
In regard to free and paid versions of your game, when people try your free version and decide to
purchase the paid version, they don’t want to lose all the progress they achieved before the purchase.
To solve this issue, make sure that both your versions share the same user ID and simply synchronize
the data from the free to the paid version on startup.
When multiple applications share the same process, you can save the total amount of RAM your applications
use. However, all the applications that share the same process will also crash if one of the applications
experiences a runtime error.
You can use the android:installLocation attribute to control where the application is installed. You can
install it either on the device’s internal storage (the data partition) or the external storage (for instance, the SD
card). Note: You control only the location of the APK file through this attribute. The application data is still stored
safely on the internal storage.
The version information is important when you publish your application on Google Play. android:versionCode
is the value that is read by the Google Play Store, whereas android:versionName is what is presented to
the user. My recommendation is to use a version code that makes it easy for you. The simplest solution is to start
at 1 and simply increment it with 1 with every new version. You can set up your build script on your continuous
integration system to increment this for each nightly build (highly recommended!), or you can increase it manually
before you commit new code to your repository. Either way, increment the value before trying to publish a new
version to Google Play.
Google Play Filters and Permissions
The next part of your manifest should contain the details about how it is made visible in Google Play and
the features in the platform you’re using. Here, you also declare the permissions you use as well as the new
permissions that your application requires when providing interfaces for other applications.
You can find more about permissions in Chapters 12. At this point, just remember to declare the permissions
you need, or you’ll get a nasty error when your application tries to access a restricted API. If your application will
provide an interface (through a Service, content provider, or custom BroadcastIntent), be sure to define
your own permissions in the manifest.
One of the most important parts of your AndroidManifest.xml file, but which is also often forgotten, is the
uses-features element. This is what Google Play uses when it filters which applications will be visible on
each device. For example, if your application needs the capability to send SMS, you probably want to exclude
the devices that lack support for this (Wi-Fi–only tablets), and add an element saying that you need telephony
support.
Also, with new types of Android devices appearing, some features we’ve come to expect on an Android device
aren’t always there. For instance, although most Android devices have a touch screen, you won’t find one on
a device that runs on TV. If your application requires a touch screen and cannot work via a mouse pointer, be
sure to declare this in your manifest. The following example shows how to specify that your application needs
telephony support and a touchscreen supporting full “Jazz Hands” multi-touch.
<uses-feature android:name=”android.hardware.microphone” />
<uses-feature android:name=”android.hardware.telephony” />
<uses-feature android:name=”android.hardware.touchscreen.multitouch.
jazzhand” />
You can find a complete list of all the standard features in Android at http://developer.android.
com/guide/topics/manifest/uses-feature-element.html#features-reference
Android supports many different screen sizes by default, but you won’t always want your application to be
available for all of them. For instance, if you’re developing an application that’s intended for tablets, you may
want to limit it to only devices with that screen size. You can do so by using the supports-screens element,
which allows you to specify which screen sizes your application works on as well as the smallest width required
for a device screen. The following is an example of what to use for a tablet-only application.
<supports-screens android:smallScreens=”false”
android:normalScreens=”false”
android:largeScreens=”false”
android:xlargeScreens=”true” />
Another important function of the manifest is determining the API levels your application supports.
You can define minimum, target and maximum levels: Minimum defines the lowest Android version you
support, whereas maximum defines the highest. The latter is useful when you have multiple APKs for
different Android versions for a single application or if you want to delay publishing an application for new
versions of Android until you’ve had time to verify your application. My recommendation is to avoid the
android:maxSdkVersion attribute if possible.
The interesting attribute in the uses-sdk element is the android:targetSdkVersion. This attribute
tells a device which API level you’re targeting. Although android:minSdkVersion lets you limit the lowest
Android version you support, it tells Android not to enable any compatibility behaviors with the target version.
More specifically, this combination allows you to gracefully degrade feature support in your application for
older versions while still maintaining an up-to-date user interface and functionality for later versions.
<uses-sdk android:minSdkVersion=”11” android:targetSdkVersion=”16”/>
My recommendation is to always specify android:minSdkVersion and android:targetSdkVersion,
as shown in the preceding example. Unless you specify android:minSdkVersion, it will default to 1 (that is,
Android version 1), which you probably want to avoid. By specifying android:targetSdkVersion, you can
easily increase your support for new versions.
You can find a complete list of all API levels and which Android version they represent at http://
developer.android.com/guide/topics/manifest/uses-sdk-element.html.
The Application Element
As I described earlier, there is a fifth, rarely used, type of component named Application. This component
is represented by the application element in the manifest file. Unless you provide your custom Application
class using the android:name attribute, the system default will be used.
A number of other important attributes are on the application element. Some of these attributes provide
additional functions to your application and others are only for information. I’ll go through those I consider
most important, as shown here:
<application
android:label=”@string/app_name”
android:description=”@string/app_description”
android:icon=”@drawable/app_icon”
android:name=”.MyApplication”
android:backupAgent=”.MyBackupAgent”
android:largeHeap=”false”
android:process=”com.aaptl.sharedProcess”>
<!-- activities, services, receivers and providers go here. -->
</application>
Because users may have hundreds of different applications installed, it helps if you provide as much information
about your application as possible to the system. I recommend that you set both the android:label and
the android:description attributes to values that are localized (that is, with translations in different
languages). The description attribute should also contain detailed text about what your application does so that
when the user looks at your app in the settings, he immediately can tell what the app does.
Eventually, users will change their smartphones, and they’ll want to be able to move all their applications,
including the data, to their new device. Fortunately, Google provides a backup Service that helps to solve
this issue, but you have to declare this in your application and implement your own backup agent. You do so
using the android:backupAgent attribute, which points to the class that implements this. I go through the
details of the backup agent in Chapter 9, but it’s a good idea to always provide this from the start so that you
don’t forget it.
If you’re building an application that requires a large amount of memory, you’ll soon run into a problem with the
default limit of the heap size of the Dalvik VM. You can solve this issue by adding the android:largeHeap
attribute to your application manifest to let the system know you require more memory. However, never add
this unless you really need to; doing so will waste resources, and also the system will terminate your application
much sooner. For most applications this attribute is not necessary and should be avoided.
If you have a suite of applications sharing the same user ID (as described earlier for the manifest element),
you can also force them to share the same process by setting the same value to the android:process
attribute. This helps to reduce the use of your applications’ resources but also leaves them all vulnerable if one
of them crashes; the most likely situation is when you have one application that supports plug-ins that can be
installed from Google Play. Note: All applications must share the same user ID and be signed with the same
certificate in order for this to work.
Finally, you have the android:theme attribute that can be set either for the entire application (in the
applications element) or on individual Activities.
Component Elements and Attributes
Each of the standard components (Activity, Service, BroadcastReceiver, and ContentProvider)
has its own elements in the manifest. While the default attributes created by Android Studio is usually good
enough for most situations, you should always review them in order to ensure you have the optimal values.
Every component you define is enabled by default. You can change this by setting
android:enabled=”false”, which will prevent them from receiving Intents. Disabled Activities
won’t show up in the application launcher, Services won’t respond to startService() calls,
BroadcastReceivers won’t listen to BroadcastIntents, and ContentProviders won’t respond to
the ContentResolver. You can change this setting in your code, which is especially efficient if you want to
make sure that parts of your application remain disabled until the user completes certain configuration steps.
In the following XML, you see two Activities declared where the second one is disabled by default. You
want the user to start and complete the setup process before you show the main Activity. You also want to
hide the setup Activity once it’s completed.
<activity
android:name=”.SetupActivity”
android:label=”@string/app_name_setup”
android:icon=”@drawable/app_setup_icon”
android:enabled=”true”>
<intent-filter>
<action android:name=”android.intent.action.MAIN”/>
<category android:name=”android.intent.category.LAUNCHER”/>
</intent-filter>
</activity>
<activity
android:name=”.MainActivity”
android:label=”@string/app_name”
android:icon=”@string/app_icon”
android:enabled=”false”>
<intent-filter>
<action android:name=”android.intent.action.MAIN”/>
<category android:name=”android.intent.category.LAUNCHER”/>
</intent-filter>
</activity>
The following code is a simple example of where you use the PackageManager API to toggle the enabled state
for the Activities. This way, you can change which Activity is shown in the launcher as well.
private void toggleActivities() {
PackageManager packageManager = getPackageManager();
// Enable the main activity
packageManager.setComponentEnabledSetting(new ComponentName(this,
MainActivity.class),
PackageManager.COMPONENT_ENABLED_STATE_ENABLED,
PackageManager.DONT_KILL_APP);
// Disable the setup activity
packageManager.setComponentEnabledSetting(new ComponentName(this,
SetupActivity.class),
PackageManager.COMPONENT_ENABLED_STATE_DISABLED,
PackageManager.DONT_KILL_APP);
}
Sometimes you have a component, usually a Service, that you don’t want to expose to the rest of the
system for security purposes. To do this, you can set the android:exported attribute to false, which will
effectively hide that component from the rest of the system.
If you want a component to be available for other applications but want to provide a level of security, you
can provide a permission that the calling application needs to specify in its own manifest (by using uses-
permission). Usually, you define your own permission (using a permission element under the manifest
element) and then apply it to the components that require it. You apply a permission requirement to a
component through the android:permission attribute.
Intent Filtering
All components in Android are accessed using Intents. An Intent is an abstract description of
an operation that you want to perform. Intents are either sent to an Activity, a Service, or a
BroadcastReceiver. Once sent, Android’s Intent resolution kicks in to decide where the Intent should
be delivered.
The first thing during Intent resolution is to determine if it is an explicit or implicit Intent. Explicit
Intents contain information about the package and the name of the component, and these can be delivered
immediately because there can be only one match. This method is generally used for application-internal
communication. Implicit Intent resolution depends on three factors: the action of the Intent, the data URI
and type, and the category. Extras and flags on Intents carry no meaning when it comes to deciding where
they should be delivered.
Action is the most important test and usually the one you should focus on. Android has a number of predefined
actions, and you can define your own actions as well. When defining your own actions, it’s customary to
prepend the string with your package name so that you don’t end up with conflicting action strings between
applications.
Data doesn’t really carry actual data but contains a URI and a MIME-type, which is useful when you want to use
an Activity to open only certain file types.
The category is mostly relevant for Activities. All implicit Intents sent by startActivity() will
always have at least one category defined (android.intent.category.DEFAULT), so unless the
intent-filter for your Activity also this category, it won’t pass the Intent resolution test. The only
exception here is for intent-filters for the launcher.
The following XML shows an Activity with two intent-filters, one for the launcher and one for
opening files with the MIME type starting with video.
<activity
android:name=”.VideoPlayer”
android:label=”@string/app_name_setup”
android:icon=”@drawable/app_setup_icon”
android:enabled=”true”>
<intent-filter>
<action android:name=”android.intent.action.MAIN”/>
<category android:name=”android.intent.category.LAUNCHER”/>
</intent-filter>
<intent-filter>
<action android:name=”android.intent.action.VIEW” />
<category android:name=”android.intent.category.DEFAULT” />
<data android:mimeType=”video/*” />
</intent-filter>
</activity>
The first intent-filter doesn’t need a category android.intent.category.DEFAULT because it
will be managed by the launcher application. The second intent-filter will match when the user triggers
a VIEW action on a video file. The file can be stored on the local storage or on a web server as long as the MIME
type starts with video.
You can read more about Intents and Intent resolution for Android at http://developer.
android.com/guide/components/intents-filters.html.
Resources and Assets
Although most of your development work for an application will go into the source code, there is also the
embedded content like XML layouts, icons, and text values, to name a few. This static content is either stored as
resources or assets in your application’s APK file. All resources belong to a certain type (such as layout, drawable,
and so on), whereas assets are simply generic files stored inside your application. Most of your application’s
content that is not code will be represented as resources because they are tightly integrated into the Android APIs.
The resource feature in Android is one of the most powerful features of the platform from a developer’s
standpoint. It allows you to provide multiple versions of each resource depending on screen size, localization
parameters, device capabilities, and so on. The most common solution is to use the resource feature to support
multiple languages by having several versions of the text strings in different files and to support various screen
sizes through different layouts and icons of varying sizes.
When you start to define your resources in an application, you need to keep a few rules in mind. First, always
have a default resource for every resource type in your application, which means that you need to keep default
images and icons, text strings, and layouts in a resource directory without any qualifiers. Doing so ensures that
your application won’t crash if it runs on a device with a resource qualifier that doesn’t match those you’ve
provided. The easiest way to ensure this is to start with the default resources and create the alternate versions
once you know which variations you need.
Also, use resources whenever possible and avoid hard-coded strings and values. Don’t keep strings in your
application’s code that will be printed in the user interface; instead, externalize them by putting them in the
strings.xml file. Values that can be placed in a resource file should be moved there. Doing so may require
some extra effort, but once you get used to always defining strings and other values in the resources, you’ll see
that other more complicated tasks become easier. Localization, adding support for more languages, becomes
easier if everything is defined as resources from the start. Changing sizes on fonts, margins, paddings, and other
properties becomes easier if they’re all defined in one place.
Resources are filtered using a number of qualifiers that you specify. For instance, if you want to provide a high-
resolution set of icons for devices with very high-density pixel displays, you can do so by storing a separate
set of them in a directory named drawable-xhdpi. The most common qualifiers are for screen rotation and
size, language, and region. It’s important to name the directory with the resource qualifiers in the correct order;
otherwise, Android will ignore that directory. For instance, language and region should always come before
screen size.
You can find a list of all the resource qualifiers, their order of precedence, and their meaning at
http://developer.android.com/guide/topics/resources/providing-resources.
html#table2
You can access resources in two ways: in XML or in Java code. When accessing the resources, you don’t need to
specify qualifiers; the system handles this automatically.
Now, it’s time to take a look at some more advanced examples of using resources. I cover user-interface
resources, such as drawables, in Chapter 4 and focus on the more generic types here.
Advanced String Resources
Basically, every string in your application should be externalized into a string resource. As you can see in the
following example, several options provide an advantage over Java’s String handling and eliminate many of
the problems, especially when it comes to formatting and localization.
<?xml version=”1.0” encoding=”utf-8”?>
<resources>
<string name=”personal_welcome_message”>Welcome %s!</string>
<plurals name=”inbox_message_count”>
<item quantity=”zero”>Your inbox is completely empty!</item>
<item quantity=”one”>You one message in your inbox!</item>
<item quantity=”two”>You two messages waiting to be read!</item>
<item quantity=”few”>You have %d messages waiting!</item>
<item quantity=”many”>%1$d messages in your inbox! %2$s, you
should really login here more often!</item>
<item quantity=”other”>%1$d messages in your inbox! %2$s, you
should really login here more often!</item>
</plurals>
<string-array name=”default_categories”>
<item>Work</item>
<item>Personal</item>
<item>Private</item>
<item>Spam</item>
<item>Trash</item>
<item>Draft</item>
</string-array>
</resources>
This example defines three different types of string resources. The file should be named strings.xml
(although the name doesn’t matter as long as it ends with .xml) and placed in the resources directory named
values. You then duplicate this file for each language you support and put the file in a values-<language
qualifier> directory.
The preceding example is a simple string that takes one string parameter as its input and inserts it where the %s
is placed. The following code snippet shows how you can use the getString method to retrieve the resource
and pass a String variable as input.
public void showWelcomeMessage(String name) {
((TextView) findViewById(R.id.welcome_message_field)).
setText(getString(R.string.personal_welcome_message, name));
}
You can find detailed rules on formatting resource strings in the JavaDoc for the java.util.
Formatter class at http://developer.android.com/reference/java/util/
Formatter.html.
The preceding code snippet is a plurals resource that allows you to define different strings depending on the
amount of input. This is especially useful because the grammar for a language can be very hard to manage
using normal string operations. The following example shows how you first retrieve the Resources object and
then call getQuantityString to get the right string value depending on the input. This method can also
take formatting parameters if one of the choices requires that.
public void showInboxCountMessage(int inboxCount, String name) {
Resources res = getResources();
String inboxCountMessage = res.
getQuantityString(R.plurals.inbox_message_count, inboxCount,
name);
((TextView) findViewById(R.id.inbox_count_field)).
setText(inboxCountMessage);
}
The preceding example shows how to provide an array of strings. These are useful when you want to provide
an array of constant string values. In the following code, you see an example where you populate a ListView
using an ArrayAdapter with the string array declared earlier.
public void displayCategories() {
ListView listView = (ListView) findViewById(R.id.category_list);
Resources res = getResources();
String[] categories = res.getStringArray(R.array.default_categories);
ArrayAdapter<String> categoriesadapter = new
ArrayAdapter<String>(this,
android.R.layout.simple_list_item_1, android.R.id.text1,
categories);
listView.setAdapter(categoriesadapter);
}
Localization
As I described earlier, resources in Android can be efficiently used for providing localization support. To do so,
you copy the default string resources into a new directory with the appropriate language and region qualifier
and then start translating the text.
Although no tool is available in the Android SDK to help you with the actual translation of one language
to another, the built-in lint tool (described in Chapter 1) shows whether you have a resource directory for a
language without a translation.
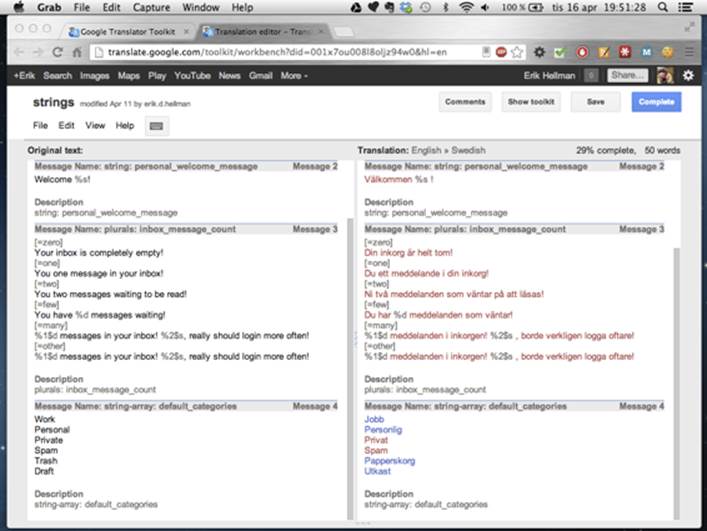
Because you probably don’t know all the languages you want to support (if you do, please let me know so we
can be friends!), you will need some help translating your resources. Your first choice, especially if you’re on a
tight budget, is to use Google Translator Toolkit (see Figure 3-2). This is a Service from Google that allows
you to upload an Android resource XML and have it automatically translate your strings to a new language. The
result might not be perfect, but the Service is getting better all the time, thanks to the efforts of Google.
Figure 3-2 Google Translator Toolkit after translating a string.xml file from English to Swedish
You can access the Google Translator Toolkit at http://translate.google.com/toolkit.
You can also hire a professional translation service to do the work. Although the quality will most likely be much
better than when using an automatic tool, a professional service will also cost quite a bit if you have many
different languages. Also, if you update your application and add new strings in your default resources, you’ll
need to submit the new strings, further increasing the cost of developing your application.
Using Resource Qualifiers
Providing alternative resources for different screen sizes and locales (language and region) is fairly straightforward,
so I won’t cover that topic much more in this chapter. There are, however, other things you can use the resource
qualifiers for.
You can use Android resources in your application to control the application logic based on things that can be
expressed as resource qualifiers.
Consider the following example: You have a very popular game that you provide for free on Google Play.
The game is financed through in-game advertisement that the user can disable by doing a simple in-game
purchase. However, a major carrier has offered to buy an ad-free version of your game for all its customers.
One way to approach this issue is to build a duplicate version of the game and publish that version on Google
Play for a specific region and carrier. Although this will work technically, you’ll have to do more work because
you’ll have to publish two distinct versions of the game. Also, customers who suddenly find two versions of
the game on Google Play might become confused. A possible solution is to turn ads on or off in the game
depending on which carrier the game belongs to. You can do this programmatically in Java, but a smoother way
is to use a Boolean resource.
A great site for finding the mobile country codes (MCC) and mobile network code (MNC) values for
various carriers and countries is www.mcc-mnc.com.
The following code shows the default resource file containing the Boolean expression. Put this file in the default
values directory (that is, res/values) and then create a new resource directory with the correct qualifier. For
instance, if the carrier is Vodafone UK, the resource directory is named values-mcc234-mnc15. Then you
simply copy this resource file and change the value to true.
<?xml version=”1.0” encoding=”utf-8”?>
<resources>
<bool name=”disable_ads_by_default”>false</bool>
</resources>
Whenever the application is opened on a device with a SIM-card belonging to Vodafone UK, the following code
example returns true.
public boolean disableAdsByDefault() {
return getResources().getBoolean(R.bool.disable_ads_by_default);
}
The preceding code shows how to retrieve the resource in Java code. Although trivial, it serves as a useful
example of how powerful Android’s resource feature is. The preceding example using Boolean could be
replaced with an integer resource telling how much in-game cash a player should start with or by providing
higher-quality icons and images (using drawables with qualifiers) for customers on a certain carrier.
Using a resource with a MCC and MNC qualifier to control application logic isn’t actually secure. A
technically skilled user could bypass this check with relative ease. However, for the most part, you can
consider this safe enough. Remember, though, that filtering on MCC and MNC requires that the device
have telephony support.
Although the qualifiers are mostly used to provide localization and various screen size support, you can use
them in many other ways as well. Don’t be afraid to experiment with resource qualifiers, as long as you always
provide a default version as a fallback.
Using Assets
Until Android 2.3, the maximum limit of a resource file was 1MB, which caused problems if you used resources
that were larger—which is why you also had the option of storing arbitrary files in your project’s assets
directory. This limitation is no longer a problem, so you can now safely store arbitrary files in the raw resource
directory. However, because the assets directory supports subfolders, in some situations, you may still want to
use assets instead of resources.
Consider an example where you have a game and you have a number of sound effects that you want to put in
the game. You start by creating a directory in the assets folder named soundfx and place all your audio files
for the effect there.
The following code shows how to use the SoundPool API and the AssetManager to load the audio files
contained in the soundfx directory of your assets. Remember that you need to close the files that you open
from the AssetManager, or your application could leak memory.
public HashMap<String, Integer> loadSoundEffects(SoundPool soundPool)
throws IOException {
AssetManager assetManager = getAssets();
String[] soundEffectFiles = assetManager.list(“soundfx”);
HashMap<String, Integer> soundEffectMap = new HashMap<String,
Integer>();
for (String soundEffectFile : soundEffectFiles) {
AssetFileDescriptor fileDescriptor = assetManager.
openFd(“soundfx/” + soundEffectFile);
int id = soundPool.load(fileDescriptor, 1);
soundEffectMap.put(soundEffectFile, id);
fileDescriptor.close();
}
return soundEffectMap;
}
The preceding example could, of course, be changed to use raw resources as well, but I’m leaving that as an
exercise for you to explore.
Summary
I’ve now covered the three central elements that are part of any Android application: the components, the
manifest, and its resources. Understanding how these work and how to use the features they provide will take
you a long way toward becoming a master Android developer.
Try to design your application around your components because they provide lifecycle callbacks that are
managed by the system, allowing you to focus on what is important in your application. By always making the
components a first priority, you’ll find it easier to build an application without ending up with tons of boilerplate
code, something I’ve encountered far too often.
The manifest is the actual definition of your application, and you need to take extra care in structuring it
and the attributes you use for each element. Remember to declare all the features that your application
requires, even the ones that may be obvious, such as a touchscreen or camera. A common error that I’ve seen
during development is missing permissions. Be sure you always add a uses-permission element for the
permissions your application requires.
By using the android:enabled and android:exported attributes on selected components, you have
access to a powerful control for dynamically changing the behavior and protecting your components. You
should, at the very least, make sure none of your Services and content providers are exported, unless they
need to be accessed from other applications.
Make sure you are fully aware of how Intent resolution works. A small mistake here could cause your app to
respond in unexpected ways (or not respond at all).
When it comes to the static content in your application, move as much as possible into the resources. Make sure
every constant text string that is printed somewhere comes from the string resources, and not a constant value
in your code. Remember to define the resource in the default resource directory (that is, a directory without any
qualifiers appended to the name) and copy it to the new qualifier when needed.
Google Translator Toolkit can help you with localization of your string resources. Also consider using resources
for application logic where qualifiers like network carrier or region can be part of the factors.
Further Resources Documentation
http://developer.android.com/guide/components/fundamentals.html
http://developer.android.com/guide/topics/manifest/manifest-intro.html
http://developer.android.com/guide/topics/resources/index.html