Android Programming: Pushing the Limits (2014)
Part II. Getting the Most Out of Components
Chapter 6. Services and Background Tasks
An important part of any Android application is making sure that long-running and blocking operations are
executed in the background so that the main thread is left alone as much as possible. Although you can simply
start a new thread in your Activities, a better approach is to move many of the background operations to
a separate Service. The Service component in Android provides an efficient way of separating application
logic for background tasks from the code that handles the user interface.
In this chapter, I cover the use of a Service component when performing background operations. I start
with explaining when it’s appropriate to use a Service and how to design and configure the component
in an optimal way. I also give a detailed description of the lifecycles that a Service runs through. I explain
communication with a Service from the other components in detail and finish this chapter with some best
practices for how to move the work on a Service to a background thread.
When and How to Use a Service
The Android documentation for Service components starts by describing a Service as follows (I suggest
keeping this in mind when developing your Android application):
A Service is an application component representing either an application’s desire to perform a
longer-running operation while not interacting with the user or to supply functionality for other
applications to use.
In this chapter, I focus on performing long-running operations and cover the second part of the quotation in
Chapter 7, where I describe how to communicate between two applications.
Because all Android components are running on the main thread of the application process, it might seem
unnecessary to use a Service as you still need to use some thread mechanism to move the operation off
the main thread. The reason for using a Service is based on the difference in how the lifecycle works in
Services and in Activities. I go into the details of the Service lifecycle in the section “Understanding
the Service Lifecycle” later in this chapter, but basically, the Service is better adapted to act as the component
for managing long-running operations in Android than an Activity.
Other questions to consider: Should an operation be long-running? When should you move an operation to a
background thread? Is it ever okay to use a background thread like an AsyncTask from within the Activity,
instead of moving it to a Service?
I recommend moving any operation that doesn’t focus on the user interface to a background thread and
making sure that this thread is started and controlled by a Service. That said, I tend to bend that rule
depending on the situation. For instance, I always, with no exception, perform network operations from a
Service. However, it’s usually okay to write data to local storage, such as a content provider or a preferences
file, within the Activity if the data being written is also generated from the user interface, as in editing a
contact’s information.
Another example is when you’re playing audio in your app. A Service typically controls a music player’s
MediaPlayer or AudioTrack object, whereas an Activity handles the sound effects in games and
applications. If in doubt, it is usually safe to move the operation to a background thread in a Service.
Service Types
I like to divide Services into two different types. First is the one that performs work for the application
independent of the user’s input. For instance, a music player is able to play music, even if the user doesn’t have
the app in the foreground. When playback of the current track is complete, a Service in the music player app
starts playing the next track in the playlist. Another example is a messaging application that needs to receive
incoming messages at all times and needs to remain running until the user explicitly logs out.
The other type of Service is one that’s directly triggered by an action from the user—for example, a photo-
sharing application. The user takes a photo, and the application sends it (or rather, a Uri to the locally stored
photo) to a Service using an Intent. The Service starts, parses the data in the Intent, and spawns
a background thread that uploads the photo. When the operation is complete, the Service is stopped
automatically by the system.
Understanding the Service Lifecycle
Services in Android have a slightly different lifecycle than Activities do. First of all, the Service
lifecycle isn’t directly affected by user interactions. In an Activity, when the user taps the Home button, the
onPause() callback is always called. For a Service, no callbacks are directly triggered in the same way by
the user’s actions. Instead, there are only two callbacks that will always be called for a Service: onCreate()
and onDestroy().
(There are also other callbacks that may be called depending on the interaction with the Service or at system
and device changes such as, when the screen orientation changes from landscape to portrait mode.)
Simplified, a Service is either started or stopped, which makes it much easier to handle than the more
complicated lifecycle of an Activity. All you really need to remember is to create expensive objects in
onCreate() and do all cleanup in onDestroy().
Service Creation and Destruction
Because you have only two lifecycle callbacks for a Service, this is where you should do most of the
initialization and cleanup. In the onCreate() method, you initialize new Handler objects, retrieve system
Services, register new BroadcastReceivers, and perform other initializations that are required for the
Service operations. Remember that this method is executed on the main thread, so you should still delegate
any long-running and potentially blocking operations to a background thread using an AsyncTask, Handler
or one of the other methods described in Chapter 2.
You do all the cleanup for your Service in the onDestroy() method. You especially need to stop any
HandlerThreads that you started and unregister BroadcastReceivers that you registered earlier in
the Service. Again, it’s important to remember that what you do here is executed on the main thread, so
any cleanup that takes a long time may require you to launch a new thread where you perform that work. For
instance, you may need an AsyncTask to gracefully shut down a network server.
The onDestory() method is called when the system determines that the Service is ready to be shut down
and removed. This usually happens when the application of the Service is no longer in the foreground.
Starting Services
A Service can be started in two ways: Either it receives an Intent through the Context.startService()
method, or a client (either local or remote) binds to it using the Context.bindService() method. Both of
these methods will result in the Service moving to the “started” state.
When calling Context.startService(), an Intent is sent that must match the intent filter for
the Service. (It’s also possible to use an explicit Intent with the ComponentName of the Service without
having to define an intent filter.) This method doesn’t provide any reference to the Service for normal
synchronized method calls but it is useful for performing message-based triggering of an operation. This is
normally something you do as a result of a user interaction that could take an arbitrary amount of time, such as
uploading a photo or sending a status update to a server. It’s also a useful way of providing a simple interface
for other applications, as I describe in more detail in Chapter 7.
When you start a Service using Context.startService(), the onStartCommand() callback is
triggered on your Service. In this method, you receive the Intent that was sent to your Service, and you
return a constant telling the Android system how your Service should react if the system shuts it down. This
is one of the most complicated parts of how Services work and is easy to get wrong. You need to remember
three return values (there’s also a fourth value for compatibility reasons that I won’t cover in this book): START_
STICKY, START_NOT_STICKY, and START_REDELIVER_INTENT.
When you return START_STICKY, it signals that you want your Service to be restarted if the system
shuts it down for some reason (usually when running low on memory). However, when the system restarts
the Service, the onStartCommand() is called with the Intent parameters set to null, so you have to
take care of this in your code. A typical example of this return value is a music player where the Service is
always started in the same way. This means that you need to store the internal state of you Service when
onDestroy() is called.
When you return START_NOT_STICKY, your Service won’t restart after the system shuts it down. This
is probably useful when you send an Intent to the Service to perform a one-shot operation, such as
uploading something to a server. If the Service is shut down before completing its task, it shouldn’t try to
repeat the operation.
The third return constant, START_REDELIVER_INTENT, works like START_STICKY, except that the original
Intent is redelivered when the system restarts your Service.

Regardless of what you choose to return from onStartCommand() in your Service, consider not only how
the Service is started but also how it will be stopped. Choosing START_REDELIVER_INTENT or START_
STICKY could have unforeseen consequences if you’re not careful.
When you receive a call to the onStartCommand() in your Service, you have three parameters to
deal with. The first is the Intent, which can be null depending on what you returned in previous calls to
onStartCommand(). The second parameter is a flag indicating what this call represents. It can be either
0, START_FLAG_RETRY, or START_FLAG_REDELIVERY. The third parameter, named startId, can
sometimes be useful when you need to safely stop the Service and you have received multiple calls to
onStartCommand() during the lifecycle.
Because using Context.startService() can be considered as asynchronous (see Figure 6-1), you may
also need a way to signal back to the Activity that your operation is complete. One way of doing so is to use
a programmatic BroadcastReceiver (see the section “Asynchronous Messaging with Intents” later in this
chapter, where I briefly discuss this topic; see also Chapter 8, where I go into more detail).
Figure 6-1 Sequence diagram over an asynchronous Service interaction
Binding Services
The second way to start a Service is through Context.bindService(). When you bind to a Service, it
will continue operating until the last client disconnects. Binding to a Service in the same application process
is a simple way to access a reference to the Service object from another component and call methods directly
on it. This is called a local binder and is illustrated in Figure 6-2.
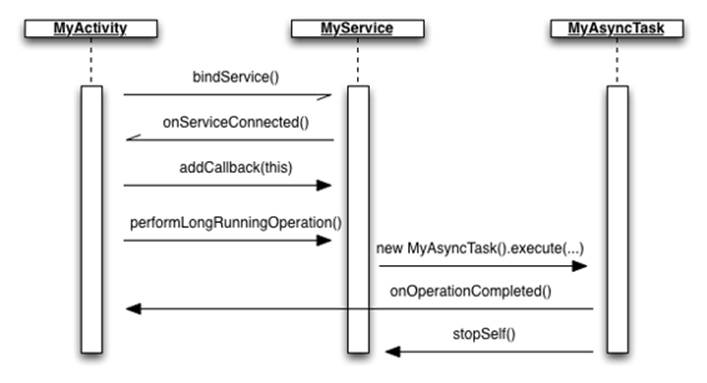
Figure 6-2 Sequence diagram illustrating the use of the local binder pattern
The following code shows how to implement a local Binder for your Service that you use when it is
accessed only within your application. This approach doesn’t work if your Service will be accessed from other
applications. In those cases, you need to use an AIDL, Android’s method for serializing method calls across
process, which I describe in detail in Chapter 7.
public class MyLocalService extends Service {
private LocalBinder mLocalBinder = new LocalBinder();
public IBinder onBind(Intent intent) {
return mLocalBinder;
}
public void doLongRunningOperation() {
// TODO Start new thread for long running operation...
}
public class LocalBinder extends Binder {
public MyLocalService getService() {
return MyLocalService.this;
}
}
}
When your Service returns only null in the method onBind(), you can bind to it from another
component. When doing so in an Activity, you usually implement the binding and unbinding in the
onResume() and onPause() methods, as shown here:
public class MyActivity extends Activity implements ServiceConnection {
private MyLocalService mService;
@Override
public void onCreate(Bundle savedInstanceState) {
super.onCreate(savedInstanceState);
setContentView(R.layout.main);
}
@Override
protected void onResume() {
super.onResume();
Intent bindIntent = new Intent(this, MyLocalService.class);
bindService(bindIntent, this, BIND_AUTO_CREATE);
}
@Override
protected void onPause() {
super.onPause();
if (mService != null) {
unbindService(this);
}
}
@Override
public void onServiceConnected(ComponentName componentName,
IBinder iBinder) {
mService = ((MyLocalService.LocalBinder) iBinder).getService();
}
@Override
public void onServiceDisconnected(ComponentName componentName) {
mService = null;
}
}
In this Activity example, the call to bindService() is asynchronous, and the actual IBinder interface
that you return on onBind() is passed to the callback onServiceConnected(). The second callback,
onServiceDisconnected(), is triggered from the call to unbindService() in the onPause() method.
This design provides an efficient binding and unbinding to the Service, for when the Activity is active and
dismissed, respectively. You can also use the callback where you receive the actual reference to the Service,
onServiceConnected(), to update the UI and enable buttons or other components that require the Service
to be available. Once you have a reference to the actual Service object, you can treat it as any other Java object.
However, it’s important to always release any references between an Activity and a Service in onPause().
Staying Alive
When your Service starts and the application is running in the foreground (that is, when an Activity of
the application is shown) your Service will be the last one shut down by the system. However, as soon as the
user leaves your application, the Service will no longer be running in the foreground and may be targeted for
shutdown by the system. If you need to keep your Service in the foreground even if your application is not
the active one, you can do so by calling the method Service.startForeground()
The system tries to keep Services alive and running for as long as possible. Only when it is running
out of resources, usually free RAM, does it start to stop Services. However, you should always
assume that the system may stop your Services at any given point.
In the following code, you see an example of the onStartCommand() method for a Service that uploads
a photo to an online server. In this method, also make sure that you’re running in the foreground and that you
provide the user with a notification that you have a background operation running.
@Override
public int onStartCommand(Intent intent, int flags, int startId) {
if (intent != null) {
String action = intent.getAction();
if (ACTION_SHARE_PHOTO.equals(action)) {
// Build the notification to be shown
Notification.Builder builder = new Notification.Builder(this);
builder.setSmallIcon(R.drawable.notification_icon);
builder.setContentTitle(getString(R.string.notification_title));
builder.setContentText(getString(R.string.notification_text));
Notification notification = builder.build();
// Start the service in the foreground
startForeground(NOTIFICATION_ID, notification);
// Perform out background operation…
String photoText = intent.getStringExtra(EXTRA_PHOTO_TEXT);
Bitmap photoBitmap =
intent.getParcelableExtra(EXTRA_PHOTO_BITMAP);
uploadPhotoWithText(photoBitmap, photoText);
}
}
return START_NOT_STICKY;
}
First, you create a notification that you will use for your background operation. Next, you call startForeground()
together with a unique ID and the notification you just created. The result is a new notification that appears in the
status bar until the Service is either stopped (see the next section) or you call stopForeground()with the
parameter true.
Although this is the recommended way of making sure your Service remains operating even though your
application is running in the background, don’t do so unless you really need to—because you could easily end
up wasting system resources. Also, when the operation is complete, make sure you exit everything properly so
that, again, you won’t waste system resources.
Stopping Services
Once your Service starts, it will remain running for as long as possible. Depending on how it was started, the
system will restart the Service if it’s shut down due to lack of resources.
Some unexpected results can occur when a Service suddenly restarts, even though the user didn’t
launch the application. So, it’s important to properly stop your Services once the user’s work is
complete.
If your Service started from Context.bindService(), it will be automatically stopped when the last
client disconnects (that is, called Context.unbindService()). The exception is if you also call Service.
startForeground() in your Service to keep it alive after the last client disconnects, which is why it’s
important to call Service.stopForeground() properly.
If you start your Service by using Context.startService(), then the only way to ensure that your
Service is stopped is by calling either Service.stopSelf() or Context.stopService(). This
signals to the system that it should stop and remove the Service. The only way to restart the Service
is with an explicit call to Context.startService() or Context.bindService(). Also, calling
Service.stopSelf() or Context.stopService() on a Service that was started with Context.
startService() will always stop it, regardless of how many times onStartCommand() was executed
(that is, calls to Context.startService() don’t stack).
The code example that follows shows a (very) simple Service for a music player. Its only feature is
adding tracks to a play queue. If the queue is empty when a new track arrives, it will start playing the track
immediately; otherwise, it will place the track at the end of the queue. Once a track is finished, the callback
onCompletion()is called, and a check is made to determine whether the queue is empty. If there are more
tracks, the MediaPlayer is prepared with the next track, and playback starts again; if the queue is empty, you
call Service.stopSelf(), which causes the Service to shut down and release the MediaPlayer.
public class MyMusicPlayer extends Service
implements MediaPlayer.OnCompletionListener {
public static final String ACTION_ADD_TO_QUEUE =
“com.aptl.services.ADD_TO_QUEUE”;
private ConcurrentLinkedQueue<Uri> mTrackQueue;
private MediaPlayer mMediaPlayer;
public IBinder onBind(Intent intent) {
return null;
}
@Override
public void onCreate() {
super.onCreate();
mTrackQueue = new ConcurrentLinkedQueue<Uri>();
}
@Override
public int onStartCommand(Intent intent, int flags, int startId) {
String action = intent.getAction();
if (ACTION_ADD_TO_QUEUE.equals(action)) {
Uri trackUri = intent.getData();
addTrackToQueue(trackUri);
}
return START_NOT_STICKY;
}
@Override
public void onDestroy() {
super.onDestroy();
if(mMediaPlayer != null) {
mMediaPlayer.release();
mMediaPlayer = null;
}
}
/**
* Add track to end of queue if already playing,
* otherwise create a new MediaPlayer and start playing.
*/
private synchronized void addTrackToQueue(Uri trackUri) {
if(mMediaPlayer == null) {
try {
mMediaPlayer = MediaPlayer.create(this, trackUri);
mMediaPlayer.setOnCompletionListener(this);
mMediaPlayer.prepare();
mMediaPlayer.start();
} catch (IOException e) {
stopSelf();
}
} else {
mTrackQueue.offer(trackUri);
}
}
// Track completed, start playing next or stop service...
@Override
public void onCompletion(MediaPlayer mediaPlayer) {
mediaPlayer.reset();
Uri nextTrackUri = mTrackQueue.poll();
if(nextTrackUri != null) {
try {
mMediaPlayer.setDataSource(this, nextTrackUri);
mMediaPlayer.prepare();
mMediaPlayer.start();
} catch (IOException e) {
stopSelf();
}
} else {
stopSelf();
}
}
}
This example illustrates how to use Service.stopSelf() to ensure that your Service doesn’t use any
more resources than necessary. A good Android application needs to always release as many resources as
possible, as soon as possible.
Running in the Background
A Service can be running when your application isn’t in the foreground, but this doesn’t mean that it
won’t be executing any work on the main thread. Because all components’ lifecycle callbacks are executed on
the application’s main thread, you need to make sure that any long-running operation you perform in your
Service is moved to a new thread. (Refer to Chapter 2, where I explain how you can use a Handler or an
AsyncTask to launch an operation on the main thread. In this section, I cover two additional methods for
executing things on the main thread.)
IntentService
Using a Handler together with a Service has proven so efficient that Google implemented a utility class
named IntentService that wraps the background thread handling of a Handler in a Service. All you
need to do is extend the class, implement the onHandleIntent() method, and add the actions you want
the Service to be able to receive, as illustrated here:
public class MyIntentService extends IntentService {
private static final String NAME = “MyIntentService”;
public static final String ACTION_UPLOAD_PHOTO =
“com.aptl.services.UPLOAD_PHOTO”;
public static final String EXTRA_PHOTO = “bitmapPhoto”;
public static final String ACTION_SEND_MESSAGE =
“com.aptl.services.SEND_MESSAGE”;
public static final String EXTRA_MESSAGE = “messageText”;
public static final String EXTRA_RECIPIENT = “messageRecipient”;
public MyIntentService() {
super(NAME);
// We don’t want intents redelivered
// in case we’re shut down unexpectedly
setIntentRedelivery(false);
}
/**
* This method is executed on its own thread, one intent at a time...
*/
@Override
protected void onHandleIntent(Intent intent) {
String action = intent.getAction();
if(ACTION_SEND_MESSAGE.equals(action)) {
String messageText = intent.getStringExtra(EXTRA_MESSAGE);
String messageRecipient =
intent.getStringExtra(EXTRA_RECIPIENT);
sendMessage(messageRecipient, messageText);
} else if(ACTION_UPLOAD_PHOTO.equals(action)) {
Bitmap photo = intent.getParcelableExtra(EXTRA_PHOTO);
uploadPhoto(photo);
}
}
private void sendMessage(String messageRecipient,
String messageText) {
// TODO Make network call...
// TODO Send a broadcast that operation is completed
}
private void uploadPhoto(Bitmap photo) {
// TODO Make network call...
// TODO Send a broadcast that operation is completed
}
}
The preceding example shows a class extending IntentService that handles two different actions,
one for uploading a photo and one for sending a message. Each action needs to be added to the intent
filter for the Service in the manifest as well. If you want to trigger an action, you simply call Context.
startService() with an Intent carrying the specific action and extras. Multiple calls will result in them
being queued up by the internal handler, so this class ensures that only one Intent is processed at any given
time. A Service based on the IntentService will be kept in started state until no more operations are
queued for processing.
Parallel Execution
The specialized Service class just described is very useful for most situations in which you simply want to
spawn a background operation and don’t care too much about when it starts. If you send five Intents to an
IntentService, they will be executed in sequential order, one at a time. This is usually a good practice but
can sometimes cause problems. To ensure that each background operation you spawn is executed as soon as
possible, you need some kind of parallel execution. Because the IntentService is built around a Handler
that has only one thread, you need to use some other thread mechanism to handle this kind of situation.
As I describe in Chapter 2, you can set up an AsyncTask to use an Executor for spawning instances in
parallel. However, because AsyncTask is designed for operations running only a few seconds at most, you
may need to do some more work if your operations are running for a significant amount of time.
The following example shows the stub for a Service used for transcoding media to a new format (for instance,
WAV to MP3). I left out the actual transcoding step here and focused on the use of the ExecutorService
API for setting up parallel execution. In order to ensure that the Service is kept alive even if the application
is not in the foreground, you call Service.startForeground() on the Service. Because Service.
startForeground() and Service.stopForeground() don’t stack, you need to maintain an internal
counter of how many active jobs you have and call Service.stopForeground() once the counter reaches
0 again.
public class MediaTranscoder extends Service {
private static final int NOTIFICATION_ID = 1001;
public static final String ACTION_TRANSCODE_MEDIA =
“com.aptl.services.TRANSCODE_MEDIA”;
public static final String EXTRA_OUTPUT_TYPE = “outputType”;
private ExecutorService mExecutorService;
private int mRunningJobs = 0;
private final Object mLock = new Object();
private boolean mIsForeground = false;
public IBinder onBind(Intent intent) {
return null;
}
@Override
public void onCreate() {
super.onCreate();
mExecutorService = Executors.newCachedThreadPool();
}
@Override
public int onStartCommand(Intent intent, int flags, int startId) {
String action = intent.getAction();
if(ACTION_TRANSCODE_MEDIA.equals(action)) {
String outputType = intent.getStringExtra(EXTRA_OUTPUT_TYPE);
// Start new job and increase the running job counter
synchronized (mLock) {
TranscodeRunnable transcodeRunnable =
new TranscodeRunnable(intent.getData(), outputType);
mExecutorService.execute(transcodeRunnable);
mRunningJobs++;
startForegroundIfNeeded();
}
}
return START_NOT_STICKY;
}
@Override
public void onDestroy() {
super.onDestroy();
mExecutorService.shutdownNow();
synchronized (mLock) {
mRunningJobs = 0;
stopForegroundIfAllDone();
}
}
public void startForegroundIfNeeded() {
if(!mIsForeground) {
Notification notification = buildNotification();
startForeground(NOTIFICATION_ID, notification);
mIsForeGround = true;
}
}
private Notification buildNotification() {
Notification notification = null;
// TODO Build the notification here...
return notification;
}
private void stopForegroundIfAllDone() {
if(mRunningJobs == 0 && mIsForeground) {
stopForeground(true);
mIsForeground = false;
}
}
private class TranscodeRunnable implements Runnable {
private Uri mInData;
private String mOutputType;
private TranscodeRunnable(Uri inData, String outputType) {
mInData = inData;
mOutputType = outputType;
}
@Override
public void run() {
// TODO Perform transcoding here...
// Decrease counter when we’re done...
synchronized (mLock) {
mRunningJobs--;
stopForegroundIfAllDone();
}
}
}
}
Because most of the boilerplate code for dealing with threads is done in the ExecutorService API, this
method for implementing parallel execution is recommended. Also, the ExecutorService shown in this
example won’t consume resources when not in use and will keep a cache of threads to minimize the creation of
new threads.
Communicating with Services
Once you know when to use a Service and how it’s executing, you need some way of communicating
with it from your other component. You can communicate with a Service in two ways: by using the
method Context.startService() or by using the Context.bindService() method. Context.
startService()delivers the Intent to the method Service.onStartCommand() where you
can trigger the background operation and later deliver the result back to the calling component through a
broadcast or some other means. Context.bindService()is a way to retrieve a Binder that can be used
to make synchronous method calls directly to the Service object. I start by describing how to communicate
with a Service through Intents.
Asynchronous Messaging with Intents
The IntentService example shown earlier in this chapter provides an easy-to-use one-way communication
between a component (usually an Activity) and the Service. But usually you want know the result of the
operation you start, so you need some way for the Service to report back once it completes its task. You can

do so several ways, but if you want to maintain the asynchronous behavior of the IntentService, the best
approach is to send a broadcast, which is just as simple as starting an operation in your IntentService.
You just need to implement a BroadcastReceiver that listens for the response. Figure 6-3 shows a simple
diagram of this sort of communication.
Figure 6-3 Diagram of asynchronous communication between an Activity, a Service, and a
BroadcastReceiver
The following code is the modified version of the uploadPhoto() method from the earlier example. Here
you send only a simple broadcast without any extras, but you’re free to use this method to send back a more
complex response as long as it can fit into an Intent.
private void uploadPhoto(Bitmap photo) {
// TODO Make network call...
sendBroadcast(new Intent(BROADCAST_UPLOAD_COMPLETED));
}
The advantage of this approach is that you have everything you need in Android and don’t need to build some
complex message handling system between your components. You just declare the actions that represent the
asynchronous messages and register them appropriately for each component. This approach works even if your
Service resides in a different application or runs in a separate process.
The drawback to this solution is that you’re limited to what an Intent can carry. Also, you cannot use this
solution for multiple, fast updates between the IntentService and your Activity, such as progress
updates, because doing so will choke the system. If you need to do something like that, look at using a bound
Service instead (see the next section).
I go into the details of declaring and setting up BroadcastReceivers in Chapter 8.
Locally Bound Services
In an earlier example in this chapter, I showed how to bind to a Service in the same application using
the local binder pattern. This solution is very useful when your Service provides interfaces that are too
complicated to solve using only Intent messaging and where normal Java methods are easy to implement.
Another reason for binding to a local Service is that you can provide a more complex way of doing callback
from the Service back to the Activity. Because long-running operations still must be moved to a
background thread in the Service, most of the calls to the Service should be asynchronous in their design.
The actual call triggers a background operation and returns immediately. Once the operation is complete, the
Service uses a callback interface to notify the Activity about the result.
In the following example, I’ve modified the earlier example with a local Binder. I’ve added a callback interface
and a class implementing AsyncTask for performing the hypothetical background operation. The Service
returns a LocalBinder object in the onBind() method, from which the client can retrieve an object
reference to the Service object and call the method doLongRunningOperation(). This method creates
a new AsyncTask and executes it with the parameters sent from the client. During the run on the operation,
the callback instance is called to notify the client of the progress and eventually of the result.
public class MyLocalService extends Service {
private static final int NOTIFICATION_ID = 1001;
private LocalBinder mLocalBinder = new LocalBinder();
private Callback mCallback;
public IBinder onBind(Intent intent) {
return mLocalBinder;
}
public void doLongRunningOperation(MyComplexDataObject dataObject) {
new MyAsyncTask().execute(dataObject);
}
public void setCallback(Callback callback) {
mCallback = callback;
}
public class LocalBinder extends Binder {
public MyLocalService getService() {
return MyLocalService.this;
}
}
public interface Callback {
void onOperationProgress(int progress);
void onOperationCompleted(MyComplexResult complexResult);
}
private final class MyAsyncTask
extends AsyncTask<MyComplexDataObject, Integer,
MyComplexResult> {
@Override
protected void onPreExecute() {
super.onPreExecute();
startForeground(NOTIFICATION_ID, buildNotification());
}
@Override
protected void onProgressUpdate(Integer... values) {
if(mCallback != null && values.length > 0) {
for (Integer value : values) {
mCallback.onOperationProgress(value);
}
}
}
@Override
protected MyComplexResult doInBackground(MyComplexDataObject...
myComplexDataObjects) {
MyComplexResult complexResult = new MyComplexResult();
// Actual operation left out for brevity...
return complexResult;
}
@Override
protected void onPostExecute(MyComplexResult myComplexResult) {
if(mCallback != null ) {
mCallback.onOperationCompleted(myComplexResult);
}
stopForeground(true);
}
@Override
protected void onCancelled(MyComplexResult complexResult) {
super.onCancelled(complexResult);
stopForeground(true);
}
}
private Notification buildNotification() {
// Create a notification for the service..
return notification;
}
}
Also, the AsyncTask implemented will call startForeground() and stopForeground(), respectively
to make sure the Service is kept alive until the long-running operation is finished, even if no clients are
bound to the Service. (It’s outside the scope of this example to keep a count of how many times the method
is called, as shown in the earlier example with parallel execution.)
The following code shows how the updated Activity looks. The noticeable change comes from
implementing the MyLocalService.Callback interface on the Activity. When you receive a reference
to the Service in onServiceConnected(), you can set the callback to the Service object so that you
receive notifications when a long-running operation is running. Here it becomes very important to remove the
callback (that is, set it to null) when the user leaves the Activity and onPause() is called, or you will leak
memory.
public class MyActivity extends Activity
implements ServiceConnection, MyLocalService.Callback {
private MyLocalService mService;
@Override
public void onCreate(Bundle savedInstanceState) {
super.onCreate(savedInstanceState);
setContentView(R.layout.main);
}
@Override
protected void onResume() {
super.onResume();
Intent bindIntent = new Intent(this, MyLocalService.class);
bindService(bindIntent, this, BIND_AUTO_CREATE);
}
@Override
protected void onPause() {
super.onPause();
if (mService != null) {
mService.setCallback(null); // Important to avoid memory leaks
unbindService(this);
}
}
// Callback method assigned to onClick for the button in the UI
public void onTriggerLongRunningOperation(View view) {
if(mService != null) {
mService.doLongRunningOperation(new MyComplexDataObject());
}
}
@Override
public void onOperationProgress(int progress) {
// TODO Update user interface with progress..
}
@Override
public void onOperationCompleted(MyComplexResult complexResult) {
// TODO Show result to user...
}
@Override
public void onServiceConnected(ComponentName componentName,
IBinder iBinder) {
mService = ((MyLocalService.LocalBinder) iBinder).getService();
mService.setCallback(this);
// Once we have a reference to the service, we can update the UI
and
// enable buttons that should otherwise be disabled.
findViewById(R.id.trigger_operation_button).setEnabled(true);
}
@Override
public void onServiceDisconnected(ComponentName componentName) {
// Disable the button as we are losing the
// reference to the service.
findViewById(R.id.trigger_operation_button).setEnabled(false);
mService = null;
}
}
Also, in the onServiceConnected() and onServiceDisconnected() methods, you can update the
parts of the user interface that depend on the Service. In this case, you enable and disable the button that is
used to trigger the long-running operation.
If the user leaves the Activity (that is, presses Home or Back) before the operation is completed, the
Service still keeps running because startForeground() was called. If the Activity resumes before
a previously started operation is finished, it will receive the callbacks about the progress as soon as it is
successfully bound to the Service. This behavior makes it easy to separate a long-running task from the user
interface while still allowing your Activity to retrieve the current state once it resumes.
If your Service maintains some kind of internal state, it’s a good practice to allow clients (like Activities)
to retrieve the current state as well as subscribe (using a callback as just shown) to changes in the state because
the state may have changed when an Activity resumes and binds to the Service.
Summary
The Service class is a powerful component that can easily become very complicated to use. You discovered
two ways to start a Service and how the lifecycle is affected by the chosen method. You saw a few examples
of how to implement and control your Service to make sure that it can be safely disconnected and
reconnected with the user interface.
When it comes to Services in Android, my best advice is to have one Service for each type of operation
you want to perform that’s not related to the user interface. At times, you may start by implementing everything
within an Activity and then later discover that doing so was a mistake that now requires a lot of work to
move all the operations to a Service in a less optimal way. I strongly recommend that you create Services
from the start in your project to avoid this problem. It’s easier to move operations from a Service to an
Activity than to do the opposite.
Also, remember to be careful about how you start your Services. When using Context.
startService(), you need to return the appropriate value from onStartCommand(). Returning the
wrong value can have unforeseen consequences when the system eventually shuts down your Service
because of lack of resources. Explicitly stopping your Service when it no longer has any operations to execute
is a good practice.
If you need bidirectional communication between your Service and an Activity, I recommend using
the local binder pattern and using a callback interface that your Activity can implement. Another way is to
use Intent messaging and let the Service send broadcasts when operations are done. The first approach
is more powerful and will allow you to do frequent progress updates from the Service to your Activity,
whereas the second method requires less code but isn’t as powerful.
Finally, remember that the lifecycle callbacks, like onCreate(), onStartCommand() and onDestroy(),
are all executing on the main thread of your application. This is the same main thread that your Activities
and other components use. Whenever you perform something that could potentially block the thread for more
than a few milliseconds, you should move it to a Handler or an AsyncTask.
Further Resources Blogs
Google’s changes to the Service API at http://android-developers.blogspot.se/2010/02/service-api-changes-starting-with.html
Dianne Hackborn at http://android-developers.blogspot.se/2010/04/multitasking-android-way.html