Android Programming: Pushing the Limits (2014)
Part II. Getting the Most Out of Components
Chapter 5. Android User Interface Operations
In Chapter 4, I discuss how to design a good user interface, but that’s only half the work. Equally important
is knowing how to implement the interface using the Android APIs. Although the tutorials and guidelines
available on the Android Developers site are useful for more general cases, writing custom Views or detecting
advanced multi-touch gestures that aren’t directly available from the standard APIs is more complicated.
This chapter begins with a brief discussion about the Activity component and Fragments, followed by an
explanation of how you can use the new Presentation API to display a UI on a secondary screen.
Activities and Fragments are central to the user interfaces on Android. However, I cover them only very
briefly because they are covered to a great extent on the Android developer site and in other tutorials. Also,
because they’re such a crucial component for Android applications, I assume that most readers are familiar
with them.
Then comes an overview of how the View system works on Android, including the crucial issues involved in
implementing a custom View and how to manage the drawing across different screen sizes.
Next, I explain how to implement advanced multi-touch features in your application. Android has built-in
support for some multi-touch gestures, but for more advanced situations you need to build your own gesture
detection components.
Activities and Fragments
If you’re familiar with the lifecycle diagram for the Activity and Fragment classes shown in Figure 5-1, you
probably won’t have any problems with this part of Android UI. What is important with the lifecycles shown
in these diagrams is that you should try to perform cleanup operations (stopping and unbinding a Service,
closing connections etc.) in the callback method that matches the callback method where you performed the
initialization. For instance, if you bind to a Service in Activity.onResume(), you should always perform
the unbind operation in Activity.onPause(). This way, you reduce the chance that your application will
leak resources accidentally.
You’ll find Fragments beneficial when you need to reuse a part of your UI for different screen sizes. You aren’t
required to use Fragments, but doing so is recommended if your application will have one UI for handsets
and another UI for tablets.
Figure 5-1 The lifecycle diagrams for Activity and Fragment
Android Studio provides a great template for building a master/detail flow UI. This UI presents two Fragments
side by side on tablets (see Figure 5-2) and uses two separate Activities on handsets with smaller screens.
I recommend using this UI when you need to build an Android application that must support multiple screen
sizes in the same Android application package file (APK).
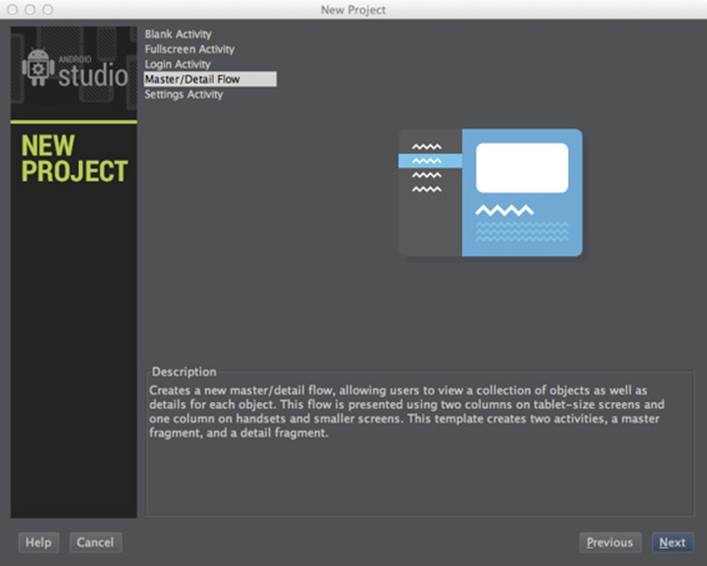
Figure 5-2 The Master/Detail Flow template set up in Android Studio
Using Multiple Screens
With the release of Android 4.2 came the ability to use multiple screens to display a UI from an Activity. This
action is managed through the Presentation API that enables you to enumerate the available Displays and
assign a separate View to each.
Android defines a secondary screen as an abstract Presentation output where you add a View. The actual
physical display could be something connected by HDMI or a wireless display like a Miracast receiver. As a
developer, you don’t need to be concerned about the different types of displays, and you can work easily using
the Display class.
The following example shows how to use the DisplayManager to enumerate all the available Displays:
public class SecondDisplayDemo extends Activity {
private Presentation mPresentation;
@Override
protected void onCreate(Bundle savedInstanceState) {
super.onCreate(savedInstanceState);
setContentView(R.layout.device_screen);
}
@Override
protected void onResume() {
super.onResume();
setupSecondDisplay();
}
@Override
protected void onPause() {
super.onPause();
if (mPresentation != null) {
mPresentation.cancel();
}
}
private void setupSecondDisplay() {
DisplayManager displayManager = (DisplayManager)
getSystemService(Context.DISPLAY_SERVICE);
Display defaultDisplay = displayManager.
getDisplay(Display.DEFAULT_DISPLAY);
Display[] presentationDisplays = displayManager.
getDisplays(DisplayManager.DISPLAY_CATEGORY_PRESENTATION);
if (presentationDisplays.length > 0) {
for (Display presentationDisplay : presentationDisplays) {
if (presentationDisplay.getDisplayId()
!= defaultDisplay.getDisplayId()) {
Presentation presentation =
new MyPresentation(this, presentationDisplay);
presentation.show();
mPresentation = presentation;
return;
}
}
}
Toast.makeText(this, “No second display found!”,
Toast.LENGTH_SHORT).show();
}
private class MyPresentation extends Presentation {
public MyPresentation(Context context, Display display) {
super(context, display);
// The View for the second screen
setContentView(R.layout.second_screen);
}
}
}
In executing this example, you pick the first Display that isn’t the default (that is, the physical screen on the
device). You extend the Presentation class with your own implementation and add a different View as its
content view. The Presentation instance is bound to the same lifecycle as your Activity, so when the
user leaves the app, the default behavior for the second screen will kick in (usually cloning the default screen).
It may be a bit tricky to test the use of multiple screens during development, but you can find a developer
setting using the Settings➪Developer Options➪Simulate Secondary Displays commands. The simulated screen
appears where you can create a simulated display to use during development.
Designing Custom Views
Although the Android APIs provide a number of UI widgets that can be combined to form more complicated
components, sometimes it’s necessary to design your own custom View from scratch. Before you start
implementing a custom View there are a few details that you should be aware of, which I will explain next.
By following the example in this section, you’ll be constructing a custom View for a piano keyboard. This View
will display the keyboard and also play the right tone and change the look of the key when it’s pressed. Before I
show the code for this View, allow me to first take you through its lifecycle.
View Life Cycle
Just as a Fragment or an Activity has a lifecycle, so to do Views have their version of a lifecycle. This
cycle is not directly connected to the Fragment or Activity that displays the View; instead, the cycle is
connected to the state of the window it’s shown in and the rendering loop.
The first thing that happens when a View is added to the View hierarchy is that it gets a call to View.
onAttachedToWindow(), which signals to the View that it can now load things that it needs to work
properly. When building a custom View, you should override this method where you perform the loading of all
the resources and initiate any dependencies that the View needs. Basically, this is where you need to perform
any time-consuming initialization.
There is also a matching callback named View.onDetachedFromWindow(), which is called when the View
is removed from the View hierarchy. Here, you need to take care of all resources loaded, Services started, or
other dependencies that need explicit cleanup.
When the View is added to a View hierarchy, it will go through a loop where animations are calculated, followed
by View.onMeasure(), View.onLayout(), and finally View.onDraw(), as shown in Figure 5-3. The
system guarantees that these methods will be called in exactly that order every time.
View added
View.onAttachedToWindow()
Animate View
Rendering loop
View.onMeasure()
View.onLayout()
View.onDraw()
View removed
View.onAttachedToWindow()
Figure 5-3 A diagram of the View lifecycle
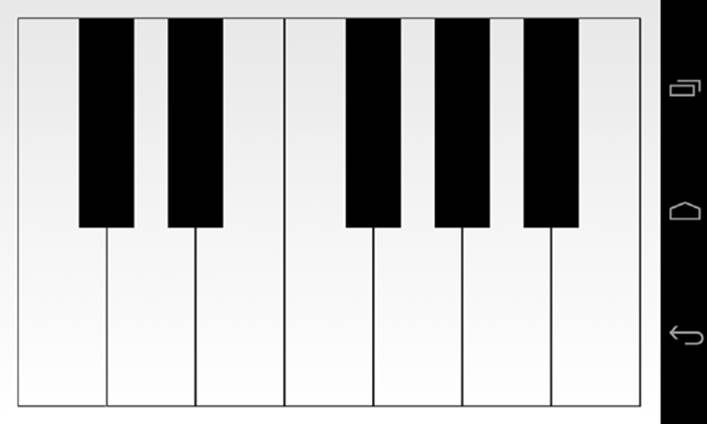
Piano Keyboard Widget
The View described in this section (see Figure 5-4) allows a user to tap a key that will then play a note. Everything
is managed by the View, so it needs to load all the audio clips for playback as well as manage the different states.
Finally, the user should be able to play with more than one finger, which requires properly using the multi-touch
features of the Android APIs.
Figure 5-4 A custom View showing a piano keyboard
The following is the first part of the new custom View:
public class PianoKeyboard extends View {
public static final String TAG = “PianoKeyboard”;
public static final int MAX_FINGERS = 5;
public static final int WHITE_KEYS_COUNT = 7;
public static final int BLACK_KEYS_COUNT = 5;
public static final float BLACK_TO_WHITE_WIDTH_RATIO = 0.625f;
public static final float BLACK_TO_WHITE_HEIGHT_RATIO = 0.54f;
private Paint mWhiteKeyPaint, mBlackKeyPaint,
mBlackKeyHitPaint, mWhiteKeyHitPaint;
// Support up to five fingers
private Point[] mFingerPoints = new Point[MAX_FINGERS];
private int[] mFingerTones = new int[MAX_FINGERS];
private SoundPool mSoundPool;
private SparseIntArray mToneToIndexMap = new SparseIntArray();
private Paint mCKeyPaint, mCSharpKeyPaint, mDKeyPaint,
mDSharpKeyPaint, mEKeyPaint, mFKeyPaint,
mFSharpKeyPaint, mGKeyPaint, mGSharpKeyPaint,
mAKeyPaint, mASharpKeyPaint, mBKeyPaint;
private Rect mCKey = new Rect(), mCSharpKey = new Rect(),
mDKey = new Rect(), mDSharpKey = new Rect(),
mEKey = new Rect(), mFKey = new Rect(),
mFSharpKey = new Rect(), mGKey = new Rect(),
mGSharpKey = new Rect(), mAKey = new Rect(),
mASharpKey = new Rect(), mBKey = new Rect();
private MotionEvent.PointerCoords mPointerCoords;
public PianoKeyboard(Context context) {
super(context);
}
public PianoKeyboard(Context context, AttributeSet attrs) {
super(context, attrs);
}
public PianoKeyboard(Context context, AttributeSet attrs,
int defStyle) {
super(context, attrs, defStyle);
}
@Override
protected void onAttachedToWindow() {
super.onAttachedToWindow();
mPointerCoords = new MotionEvent.PointerCoords();
Arrays.fill(mFingerPoints, null);
Arrays.fill(mFingerTones, -1);
loadKeySamples(getContext());
setupPaints();
}
@Override
protected void onDetachedFromWindow() {
super.onDetachedFromWindow();
releaseKeySamples();
}
private void setupPaints() {
... omitted for brevity
}
private void loadKeySamples(Context context) {
mSoundPool = new SoundPool(5, AudioManager.STREAM_MUSIC, 0);
mToneToIndexMap.put(R.raw.c, mSoundPool.load(context, R.raw.c,
1));
... omitted for brevity
}
public void releaseKeySamples() {
mToneToIndexMap.clear();
mSoundPool.release();
}
This code shows the member variables needed for the PianoKeyboard class as well as the constructors and
the attached/detached callbacks. Following this example, in onAttachedToWindows(), you reset the
member variables and load the audio clips. You create the different Paint objects, one for each possible state
for each key. The SoundPool is also populated with the audio clips stored in the raw resources.
Also, note that you create the Rect objects for each key as member variables with a default initialization.
Although you can create these objects on-the-fly in the onDraw() method, the method shown in the
preceding example will reduce the number of garbage collection (GC) calls which might impact the
performance negatively.
The next part is the onLayout() and onDraw() methods:
@Override
protected void onLayout(boolean changed, int left, int top,
int right, int bottom) {
super.onLayout(changed, left, top, right, bottom);
// Calculate the sizes for the keys.
int width = getWidth();
int height = getHeight();
int whiteKeyWidth = width / WHITE_KEYS_COUNT;
int blackKeyWidth = (int) (whiteKeyWidth *
BLACK_TO_WHITE_WIDTH_RATIO);
int blackKeyHeight = (int) (height * BLACK_TO_WHITE_HEIGHT_RATIO);
// Define the rectangles for each key
mCKey.set(0, 0, whiteKeyWidth, height);
mCSharpKey.set(whiteKeyWidth - (blackKeyWidth / 2), 0,
whiteKeyWidth + (blackKeyWidth / 2), blackKeyHeight);
//... Remaining keys omitted for brevity
}
@Override
protected void onDraw(Canvas canvas) {
super.onDraw(canvas);
// Start by drawing the white keys
canvas.drawRect(mCKey, mCKeyPaint);
canvas.drawRect(mDKey, mDKeyPaint);
canvas.drawRect(mEKey, mEKeyPaint);
canvas.drawRect(mFKey, mFKeyPaint);
canvas.drawRect(mGKey, mGKeyPaint);
canvas.drawRect(mAKey, mAKeyPaint);
canvas.drawRect(mBKey, mBKeyPaint);
// Draw black keys last since they will “cover” the white keys
canvas.drawRect(mCSharpKey, mCSharpKeyPaint);
canvas.drawRect(mDSharpKey, mDSharpKeyPaint);
canvas.drawRect(mFSharpKey, mFSharpKeyPaint);
canvas.drawRect(mGSharpKey, mGSharpKeyPaint);
canvas.drawRect(mASharpKey, mASharpKeyPaint);
}
In the onLayout() method, which is called during the layout pass, you calculate the size and position for
each key. In the onDraw() method you should avoid performing any heavy calculations and focus on the
actual drawing, which avoids potential drops in performance. Note: A custom onMeasure() method isn’t
implemented; that’s because the default measuring is sufficient in this case.
The final part is the onTouchEvent() callback that performs the actual playback of the audio clips and
changes the drawing state of the keys.
@Override
public boolean onTouchEvent(MotionEvent event) {
int pointerCount = event.getPointerCount();
int cappedPointerCount = pointerCount > MAX_FINGERS ?
MAX_FINGERS :
pointerCount;
int actionIndex = event.getActionIndex();
int action = event.getActionMasked();
int id = event.getPointerId(actionIndex);
// Check if we received a down or up action for a finger
if ((action == MotionEvent.ACTION_DOWN ||
action == MotionEvent.ACTION_POINTER_DOWN) &&
id < MAX_FINGERS) {
mFingerPoints[id] = new Point((int) event.getX(actionIndex),
(int) event.getY(actionIndex));
} else if ((action == MotionEvent.ACTION_POINTER_UP ||
action == MotionEvent.ACTION_UP)
&& id < MAX_FINGERS) {
mFingerPoints[id] = null;
invalidateKey(mFingerTones[id]);
mFingerTones[id] = -1;
}
for (int i = 0; i < cappedPointerCount; i++) {
int index = event.findPointerIndex(i);
if (mFingerPoints[i] != null && index != -1) {
mFingerPoints[i].set((int) event.getX(index),
(int) event.getY(index));
int tone = getToneForPoint(mFingerPoints[i]);
if (tone != mFingerTones[i] && tone != -1) {
invalidateKey(mFingerTones[i]);
mFingerTones[i] = tone;
invalidateKey(mFingerTones[i]);
if (!isKeyDown(i)) {
int poolIndex =
mToneToIndexMap.get(mFingerTones[i]);
event.getPointerCoords(index, mPointerCoords);
float volume = mPointerCoords.
getAxisValue(MotionEvent.AXIS_PRESSURE);
volume = volume > 1f ? 1f : volume;
mSoundPool.play(poolIndex, volume, volume,
0, 0, 1f);
}
}
}
}
updatePaints();
return true;
}
// Check if the key touch by this finger is
// already pressed by another finger
private boolean isKeyDown(int finger) {
int key = getToneForPoint(mFingerPoints[finger]);
for (int i = 0; i < mFingerPoints.length; i++) {
if (i != finger) {
Point fingerPoint = mFingerPoints[i];
if (fingerPoint != null) {
int otherKey = getToneForPoint(fingerPoint);
if (otherKey == key) {
return true;
}
}
}
}
return false;
}
private void invalidateKey(int tone) {
switch (tone) {
case R.raw.c:
invalidate(mCKey);
break;
// Remaining cases omitted for brevity...
}
}
private void updatePaints() {
// Start by clearing all keys
mCKeyPaint = mWhiteKeyPaint;
... remaining keys omitted for brevity
// Set “hit” paint on all keys touched by a finger
// starting with black keys
for (Point fingerPoint : mFingerPoints) {
if (fingerPoint != null) {
if (mCSharpKey.contains(fingerPoint.x, fingerPoint.y)) {
mCSharpKeyPaint = mBlackKeyHitPaint;
} else if (mDSharpKey.contains(fingerPoint.x,
fingerPoint.y)) {
... Remaining keys omitted for brevity
}
}
}
}
private int getToneForPoint(Point point) {
// Start by checking the black keys
if (mCSharpKey.contains(point.x, point.y))
return R.raw.c_sharp;
... remaining keys omitted for brevity
return -1;
}
}
For each MotionEvent, you check to see whether a new finger (pointer) has touched the screen. If so, you
create a new Point and store it in the array for tracking the user’s fingers. If an up event occurred, you remove
the Point for that finger instead.
Next, you go through all the pointers that are tracked by this MotionEvent and check whether they’ve moved
since the last call to this method. If so, you play the tone for the key currently being pressed. There is also a
check to ensure you don’t play a tone for a key that’s already being pressed when a second finger just moves
over the key.
Whenever a MotionEvent occurs, you also check which parts of the View need to be invalidated using
the invalidateKey() method. This check takes the ID for a key as a parameter and invalidates only that
rectangle. Whenever you need to invalidate your View in order to redraw it, call this method with only the
affected region. Doing so will significantly speed up the rendering of your View.
Multi-Touching
Ever since Android first achieved support for multi-touch technology, users have become accustomed to
doing some of the more advanced navigation in Android applications using two or more fingers. Most
prominent in this area is probably the Google Maps application. It combines most of the touch gestures—for
example, pinch-zoom, tilting, and rotating. Games requiring more than one finger for control is another area
in which multi-touch has become popular, and as shown in the PianoKeyboard example in the previous
section, multi-touch interaction is also useful in other areas.
The challenge when working with multi-touch is to keep track of the individual fingers. Android’s
MotionEvent class is the core for all pointer-related interactions, which means fingers, a stylus, a regular
computer mouse, or an external touchpad.
Take a look at another example for multi-touch. In this example, you create a custom View for finger painting.
You use the Path class from the android.graphics package to keep track of what the user’s fingers are
drawing. The same principle (that is, the methods involved in a custom View) that applied to the earlier piano
example is used here, but in this case there’s much less code to keep track of.
Specifically, the following code is a very simple example for creating a multi-touch–enabled finger painting
application.
public class PaintView extends View {
public static final int MAX_FINGERS = 5;
private Path[] mFingerPaths = new Path[MAX_FINGERS];
private Paint mFingerPaint;
private ArrayList<Path> mCompletedPaths;
private RectF mPathBounds = new RectF();
public PaintView(Context context) {
super(context);
}
public PaintView(Context context, AttributeSet attrs) {
super(context, attrs);
}
public PaintView(Context context, AttributeSet attrs, int defStyle) {
super(context, attrs, defStyle);
}
@Override
protected void onAttachedToWindow() {
super.onAttachedToWindow();
mCompletedPaths = new ArrayList<Path>();
mFingerPaint = new Paint();
mFingerPaint.setAntiAlias(true);
mFingerPaint.setColor(Color.BLACK);
mFingerPaint.setStyle(Paint.Style.STROKE);
mFingerPaint.setStrokeWidth(6);
mFingerPaint.setStrokeCap(Paint.Cap.BUTT);
}
@Override
protected void onDraw(Canvas canvas) {
super.onDraw(canvas);
for (Path completedPath : mCompletedPaths) {
canvas.drawPath(completedPath, mFingerPaint);
}
for (Path fingerPath : mFingerPaths) {
if (fingerPath != null) {
canvas.drawPath(fingerPath, mFingerPaint);
}
}
}
@Override
public boolean onTouchEvent(MotionEvent event) {
int pointerCount = event.getPointerCount();
int cappedPointerCount = pointerCount > MAX_FINGERS ?
MAX_FINGERS :
pointerCount;
int actionIndex = event.getActionIndex();
int action = event.getActionMasked();
int id = event.getPointerId(actionIndex);
if ((action == MotionEvent.ACTION_DOWN ||
action == MotionEvent.ACTION_POINTER_DOWN) &&
id < MAX_FINGERS) {
mFingerPaths[id] = new Path();
mFingerPaths[id].moveTo(event.getX(actionIndex),
event.getY(actionIndex));
} else if ((action == MotionEvent.ACTION_POINTER_UP ||
action == MotionEvent.ACTION_UP)
&& id < MAX_FINGERS) {
mFingerPaths[id].setLastPoint(event.getX(actionIndex),
event.getY(actionIndex));
mCompletedPaths.add(mFingerPaths[id]);
mFingerPaths[id].computeBounds(mPathBounds, true);
invalidate((int) mPathBounds.left, (int) mPathBounds.top,
(int) mPathBounds.right, (int) mPathBounds.bottom);
mFingerPaths[id] = null;
}
for(int i = 0; i < cappedPointerCount; i++) {
if(mFingerPaths[i] != null) {
int index = event.findPointerIndex(i);
mFingerPaths[i].lineTo(event.getX(index),
event.getY(index));
mFingerPaths[i].computeBounds(mPathBounds, true);
invalidate((int) mPathBounds.left, (int) mPathBounds.top,
(int) mPathBounds.right,
(int) mPathBounds.bottom);
}
}
return true;
}
}
Note how you use the Path class to add a new line for each new event. Although this class isn’t completely
accurate (you should check that a pointer has actually moved before adding a new line), it illustrates how to
create a more complex drawing application.
PointerCoordinates
Each MotionEvent contains all the information about each pointer. Because a pointer can be the result
of many different types of input devices (such as a finger, a stylus, or a mouse), it can also contain more
information than the x, y coordinates. The APIs in Android support all the input devices defined by the Linux
kernel. Because the parameters for an input can vary between devices, the design is such that each pointer has
a number of axes. The two most commonly used axes are the x, y coordinates for the pointer, but there is also
axis information for pressure, distance, and orientation. Also, because the MotionEvent class can be used
for inputs other than those for generating pointer coordinates, this class also has support for axis information
related to gaming controllers and other ways of doing input, such as throttle, rudder, tilt, or scroll wheel. Use
this class when you want to support external inputs such as game controllers.
The following code is a snippet from the previous PianoKeyboard example:
event.getPointerCoords(index, mPointerCoords);
float volume = mPointerCoords.getAxisValue(MotionEvent.AXIS_PRESSURE);
volume = volume > 1f ? 1f : volume;
mSoundPool.play(poolIndex, volume, volume, 0, 0, 1f);
This code shows how to populate a PointerCoords object with the data for a specific pointer. In this case,
you use the pressure axis to set the volume for the audio clip playback.
The pressure axis (AXIS_PRESSURE) in the preceding example is usually a virtual value that’s
calculated by determining the surface covered by a finger. Normally, the capacitive touchscreens on
modern smartphones don’t support a real touch pressure value.
Rotate Gesture
In the Android APIs, you can find two utility classes that help you detect a number of touch gestures: the
GestureDetector and ScaleGestureDetector classes. The first class supports a number of simple
single-touch gestures, such a long press, double tap, and fling. The second class provides a way to detect the
pinch-zoom gesture used in Google Maps and when zooming in on images. However, one gesture that lacks
support in the Android APIs is rotation.
The following class exemplifies how to implement a rotation gesture detector for a View. The relevant code is
marked in bold.
public class RotateView extends View {
public static final String TAG = “RotateView”;
private static final double MAX_ANGLE = 1e-1;
private Paint mPaint;
private float mRotation;
private Float mPreviousAngle;
public RotateView(Context context) {
super(context);
}
public RotateView(Context context, AttributeSet attrs) {
super(context, attrs);
}
public RotateView(Context context, AttributeSet attrs, int defStyle) {
super(context, attrs, defStyle);
}
@Override
protected void onAttachedToWindow() {
super.onAttachedToWindow();
mPaint = new Paint();
mPaint.setColor(Color.BLACK);
mPaint.setStyle(Paint.Style.STROKE);
mPaint.setStrokeWidth(10);
mPaint.setAntiAlias(true);
mPreviousAngle = null;
}
@Override
protected void onDraw(Canvas canvas) {
super.onDraw(canvas);
int width = getWidth();
int height = getHeight();
int radius = (int) (width > height ?
height * 0.666f : width * 0.666f) / 2;
canvas.drawCircle(width / 2, height / 2, radius, mPaint);
canvas.save();
canvas.rotate(mRotation, width / 2, height / 2);
canvas.drawLine(width / 2, height * 0.1f,
width / 2, height * 0.9f, mPaint);
canvas.restore();
}
@Override
public boolean onTouchEvent(MotionEvent event) {
if(event.getPointerCount() == 2) {
float currentAngle = (float) angle(event);
if(mPreviousAngle != null) {
mRotation -= Math.toDegrees(clamp(mPreviousAngle –
currentAngle,
-MAX_ANGLE, MAX_ANGLE));
invalidate();
}
mPreviousAngle = currentAngle;
} else {
mPreviousAngle = null;
}
return true;
}
private static double angle(MotionEvent event) {
double deltaX = (event.getX(0) - event.getX(1));
double deltaY = (event.getY(0) - event.getY(1));
return Math.atan2(deltaY, deltaX);
}
private static double clamp(double value, double min, double max) {
if (value < min) {
return min;
}
if (value > max) {
return max;
}
return value;
}
}
The trick comes from using Math.atan2() to calculate the current angle. This method implements the two
argument arctangent function, which is used for calculating the angle between the positive x-axis on a plane
and the coordinates defined by the two parameters. Next, you subtract the previously calculated angle from
the current one and clamp the result between a maximum and a minimum for each event. Finally, because the
rotation operations on the Canvas use degrees, you convert the result using Math.toDegrees().
OpenGL ES
Although most Android applications can be built using the widgets provided by the SDK or through a custom
View, at times you may need a more low-level and high-performance API for graphics, most often for games.
The API you will use in this case is OpenGL ES (Embedded Subsystem) and Android supports all versions up
to 3.0 (depending on the hardware and Android version). The latest OpenGL ES standard, version 3.0, was
added to Android version 4.3. This is the first mobile platform to support OpenGL ES, and it’s expected to allow
developers to create more advanced graphics for their games.
Android is already using OpenGL ES 2.0 for its standard UI framework to enable hardware-accelerated graphics,
but it’s hidden from developers. In this section, I introduce you to OpenGL ES 2.0 and 3.0. The 3.0 version is fully
backward-compatible with 2.0, so you can build applications that do a graceful degradation to version 2.0 if the
device doesn’t support the later API.
For an introduction to OpenGL ES on Android, I recommend the guide from the Android Developers site
(http://developer.android.com/guide/topics/graphics/opengl.html). However, when you need to use OpenGL ES in your application or game, you will most likely not write all the OpenGL ES code
described in this guide. Instead, you should use a scene graph framework or game engine, which hides most of
the complex details involved with OpenGL ES in an easy-to-use API.
Scene Graphs and Graphics Engines
The easiest way to work with OpenGL ES is to use a scene graph, which is basically a graph where each node
contains information about something being rendered in your scene. You could write your own scene graph,
but using one of the many that exist online is usually better. Some of the different options are free and open
source licensed and some are commercial. Scene graphs are also called 3D, graphics, or game engines because
they also contain functionality specific for advanced graphics and games.
One of the better and most active open source 3D engines is Rajawali, developed by Dennis Ippel. You can
find all of the information, including a number of great tutorials, for Rajawali at https://github.com/
MasDennis/Rajawali.
One of the better commercial alternatives you can find is Unity3D from Unity Technology. This is much more
than a game engine and contains a complete development studio for game developers. You can find more
information about Unity3D at http://unity3d.com.
Always consider the needs of your application or game before you pick a 3D engine because changing it later
can be very difficult. One of the most important things to consider is whether you want to be able to easily port
your game to a different platform (for instance, iOS). In that case, choose one that supports all the platforms you
intend to target (Unity3D has very good multi-platform support).
Summary
With the advanced UI operations covered in this chapter, you have a set of tools that can help you enhance your
application’s performance. For example, perhaps your app would benefit by supporting a secondary screen
using HDMI or Miracast, which is when the new Presentation API will be useful.
Eventually, all Android developers create custom View classes for their applications. When you do so, be sure to
follow the lifecycle for a View and use the different callbacks correctly.
When you need to support advanced multi-touch interactions, you must distinguish between different pointers
and track them individually. As I’ve shown in this chapter, all MotionEvents contain the current information
about all the pointers.
When you create advanced and high-performance graphics, you’ll probably need to use OpenGL ES. At the
very least, use OpenGL ES 2.0; and for even more advanced graphics, consider using OpenGL ES 3.0 when it
is available on the user’s device. Also, I strongly recommend utilizing a complete 3D or game engine when
developing games; doing so will make your work much easier.
The Android UI is probably the biggest single area of the entire platform. You can find numerous tutorials,
guidelines, samples, and books online on this topic; I mention some of my favorites in the following “Further
Resources” section. The important thing to remember when you implement your UI is to stick with what you can
manage.
Further Resources Books
Lehtimäki, Juhani. Smashing Android UI. Wiley, 2012.
Websites
The OpenGL ES guide from the Android Developers site: http://developer.android.com/guide/topics/graphics/opengl.html
Training on working with the Fragments API: http://developer.android.com/training/basics/fragments/index.html
How to write a custom View: https://developers.google.com/events/io/sessions/325615129