The Android Developer’s Cookbook: Building Applications with the Android SDK, Second Edition (2013)
Chapter 11. Data Storage Methods
Complicated and robust Android applications often need to use some type of data storage. Depending on the situation, different data storage methods are available to the developer:
![]() SharedPreferences for lightweight usage, such as saving application settings and the UI state
SharedPreferences for lightweight usage, such as saving application settings and the UI state
![]() A built-in SQLite database for more complicated usage, such as saving application records
A built-in SQLite database for more complicated usage, such as saving application records
![]() The standard Java flat file storage methods: InputFileStream and OutputFileStream
The standard Java flat file storage methods: InputFileStream and OutputFileStream
These are discussed in this chapter. Also discussed is the ContentProvider Android component that is used to share data between applications. It should be noted that another basic data storage method managed by the Android system, the onSaveInstanceState() andonRestoreInstanceState() pair, was already discussed in Chapter 2, “Application Basics: Activities and Intents.” The optimal method to use depends on the situation, as discussed in each recipe.
Shared Preferences
SharedPreferences is an interface that an application can use to quickly and efficiently save data in name-value pairs, similar to a bundle. The information is stored in an XML file on the Android device. For example, if the application com.cookbook.datastorage creates a shared preference, the Android system creates a new XML file under the /data/data/com.cookbook.datastorage/shared_prefs directory.
Shared preferences are usually used for saving application settings such as user settings, theme, and other general application properties. They can also save login information such as username, password, auto-login flag, and remember-user flag. The shared preferences data is accessible by every component of the application that created it.
Recipe: Creating and Retrieving Shared Preferences
The shared preferences for an activity can be accessed using the getPreferences() method, which specifies the operating mode for the default preferences file. If instead multiple preference files are needed, each can be specified using the getSharedPreferences() method. If the shared preferences XML file exists in the data directory, it is opened; otherwise, it is created. The operating mode provides control over the different kinds of access permission to the preferences:
![]() MODE_PRIVATE—Only the calling application has access to the XML file.
MODE_PRIVATE—Only the calling application has access to the XML file.
![]() MODE_WORLD_READABLE—All applications can read the XML file. This setting has been deprecated in API Level 17; use ContentProvider, BroadcastReceiver, or a service instead.
MODE_WORLD_READABLE—All applications can read the XML file. This setting has been deprecated in API Level 17; use ContentProvider, BroadcastReceiver, or a service instead.
![]() MODE_WORLD_WRITEABLE—All applications can write to the XML file. This setting has been deprecated in API Level 17; use ContentProvider, BroadcastReceiver, or a service instead.
MODE_WORLD_WRITEABLE—All applications can write to the XML file. This setting has been deprecated in API Level 17; use ContentProvider, BroadcastReceiver, or a service instead.
After a SharedPreferences object is retrieved, an Editor object is needed to write the name-value pairs to the XML file using the put() method. Currently, five primitive types are supported: int, long, float, String, and boolean. The following code shows how to create and store shared preferences data:
SharedPreferences prefs = getSharedPreferences("myDataStorage",
MODE_PRIVATE);
Editor mEditor = prefs.edit();
mEditor.putString("username","datastorageuser1");
mEditor.putString("password","password1234");
mEditor.apply();
Note that when developing with Android 2.3 (Level 9) or above, the apply() method should be used to commit changes, as this will trigger an async request to update the file. Previous versions of Android require using the commit() method.
The following shows how to retrieve shared preferences data:
SharedPreferences prefs = getSharedPreferences("myDataStorage",
MODE_PRIVATE);
String username = prefs.getString("username", "");
String password = prefs.getString("password", "");
Recipe: Using the Preferences Framework
Android provides a standardized framework for setting preferences across all applications. The framework uses category preferences and screens to group related settings. PreferenceCategory is used to declare a set of preferences into one category. PreferenceScreen presents a group of preferences in a new screen.
This recipe uses the preferences defined in the XML file in Listing 11.1. A PreferenceScreen is the root element with two EditTextPreference elements for username and password. Other possible elements are CheckBoxPreference, RingtonePreference, and DialogPreference. The Android system then generates a UI to manipulate the preferences, as shown in Figure 11.1. These preferences are stored in shared preferences, which means they can be retrieved by calling getPreferences().
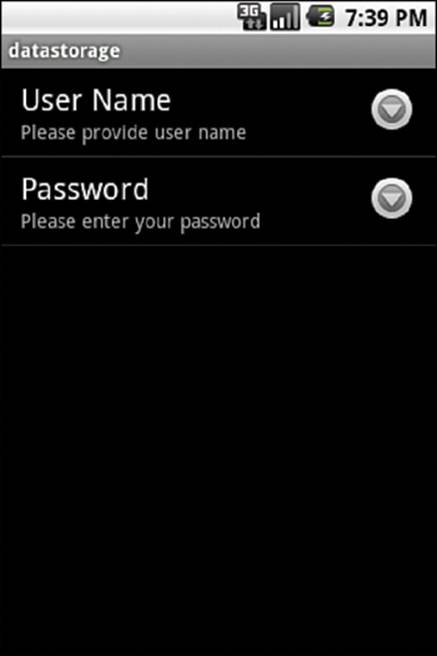
Figure 11.1 The preferences UI generated by the Android system from an XML preferences file
Listing 11.1. res/xml/preferences.xml
<?xml version="1.0" encoding="utf-8"?>
<PreferenceScreen xmlns:android="http://schemas.android.com/apk/res/android">
<EditTextPreference
android:title="User Name"
android:key="username"
android:summary="Please provide user name">
</EditTextPreference>
<EditTextPreference
android:title="Password"
android:password="true"
android:key="password"
android:summary="Please enter your password">
</EditTextPreference>
</PreferenceScreen>
Then, an activity extending PreferenceActivity calls the addPreferencesFromResource() method to include these preferences in the activity, as shown in Listing 11.2. Note that when developing with an API level of 11 or higher, a PreferenceFragment must be used to call theaddPreferencesFromResource() method.
Listing 11.2. src/com/cookbook/datastorage/MyPreferences.java
package com.cookbook.datastorage;
import android.os.Bundle;
import android.preference.PreferenceActivity;
public class MyPreferences extends PreferenceActivity {
@Override
public void onCreate(Bundle savedInstanceState) {
super.onCreate(savedInstanceState);
addPreferencesFromResource(R.xml.preferences);
}
}
The main activity merely needs to launch PreferenceActivity when needed (for example, when the Menu key is pressed). Listing 11.3 shows a simple example of showing the preferences upon start-up of the activity.
Listing 11.3. src/com/cookbook/datastorage/DataStorage.java
package com.cookbook.datastorage;
import android.app.Activity;
import android.content.Intent;
import android.os.Bundle;
public class DataStorage extends Activity {
/** called when the activity is first created */
@Override
public void onCreate(Bundle savedInstanceState) {
super.onCreate(savedInstanceState);
setContentView(R.layout.main);
Intent i = new Intent(this, MyPreferences.class);
startActivity(i);
}
}
The AndroidManifest.xml file needs to include all activities, including the new PreferenceActivity, as shown in Listing 11.4. This creates the preferences screen shown in Figure 11.1.
Listing 11.4. AndroidManifest.xml
<?xml version="1.0" encoding="utf-8"?>
<manifest xmlns:android="http://schemas.android.com/apk/res/android"
package="com.cookbook.datastorage"
android:versionCode="1"
android:versionName="1.0">
<application android:icon="@drawable/icon" android:label="@string/app_name">
<activity android:name=".DataStorage"
android:label="@string/app_name">
<intent-filter>
<action android:name="android.intent.action.MAIN" />
<category android:name="android.intent.category.LAUNCHER"
/>
</intent-filter>
</activity>
<activity android:name=".MyPreferences" />
</application>
<uses-sdk android:minSdkVersion="7" />
</manifest>
Recipe: Changing the UI Based on Stored Data
The DataStorage activity of the previous recipe can be extended to check the shared preferences when loading, altering the behavior accordingly. In this recipe, if a username and password are already saved in the SharedPreferences file, a login page is displayed. After a successful login, the activity can successfully continue. If no login information is on file, the activity continues directly.
The main.xml layout file can be modified to be a login page, as shown in Listing 11.5. This uses two EditText objects for username and password, as covered in Chapter 5, “User Interface Layout.”
Listing 11.5. res/layout/main.xml
<?xml version="1.0" encoding="utf-8"?>
<LinearLayout xmlns:android="http://schemas.android.com/apk/res/android"
android:orientation="vertical"
android:layout_width="match_parent"
android:layout_height="match_parent">
<TextView
android:layout_width="match_parent"
android:layout_height="wrap_content"
android:text="username"
/>
<EditText
android:id="@+id/usertext"
android:layout_width="match_parent"
android:layout_height="wrap_content"
/>
<TextView
android:layout_width="match_parent"
android:layout_height="wrap_content"
android:text="password"
/>
<EditText
android:id="@+id/passwordtext"
android:layout_width="match_parent"
android:layout_height="wrap_content"
android:password="true"
/>
<Button
android:id="@+id/loginbutton"
android:layout_width="wrap_content"
android:layout_height="wrap_content"
android:text="login"
android:textSize="20dp"
/>
</LinearLayout>
The main activity DataStorage, as shown in Listing 11.6, is modified to first read the username and password data from the SharedPreferences instance. If this data is not set, the application launches the MyPreferences activity (Listing 11.2) directly to set the preferences. If the data is set, the application displays the login layout main.xml shown in Figure 11.2.
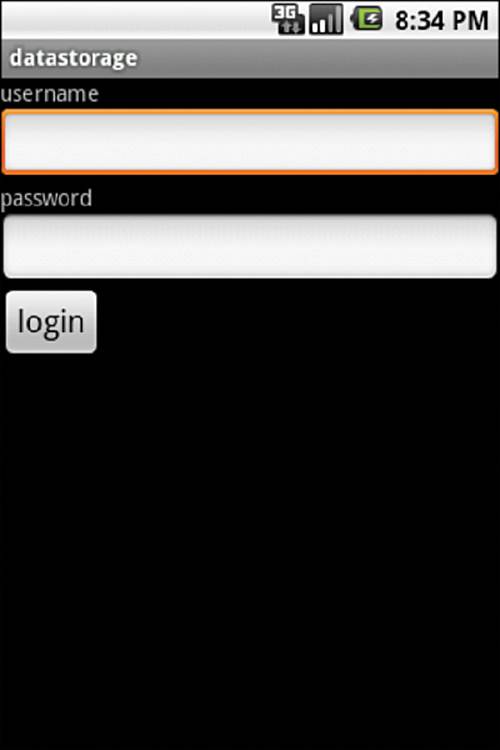
Figure 11.2 The login screen described by Listing 11.5
The button has an onClickListener that verifies whether the login information matches the username and password from the SharedPreferences file. A successful login enables the application to continue, which in this case just launches the MyPreferences activity. Any login attempt shows a toast message of success or failure for illustration purposes.
Listing 11.6. src/com/cookbook/datastorage/DataStorage.java
package com.cookbook.datastorage;
import android.app.Activity;
import android.content.Intent;
import android.content.SharedPreferences;
import android.os.Bundle;
import android.preference.PreferenceManager;
import android.view.View;
import android.view.View.OnClickListener;
import android.widget.Button;
import android.widget.EditText;
import android.widget.Toast;
public class DataStorage extends Activity {
SharedPreferences myprefs;
EditText userET, passwordET;
Button loginBT;
@Override
public void onCreate(Bundle savedInstanceState) {
super.onCreate(savedInstanceState);
myprefs = PreferenceManager.getDefaultSharedPreferences(this);
final String username = myprefs.getString("username", null);
final String password = myprefs.getString("password", null);
if (username != null && password != null){
setContentView(R.layout.main);
userET = (EditText)findViewById(R.id.usertext);
passwordET = (EditText)findViewById(R.id.passwordtext);
loginBT = (Button)findViewById(R.id.loginbutton);
loginBT.setOnClickListener(new OnClickListener() {
public void onClick(View v) {
try {
if(username.equals(userET.getText().toString())
&& password.equals(
passwordET.getText().toString())) {
Toast.makeText(DataStorage.this,
"login passed!!",
Toast.LENGTH_SHORT).show();
Intent i = new Intent(DataStorage.this,
MyPreferences.class);
startActivity(i);
} else {
Toast.makeText(DataStorage.this,
"login failed!!",
Toast.LENGTH_SHORT).show();
}
} catch (Exception e) {
e.printStackTrace();
}
}
});
} else {
Intent i = new Intent(this, MyPreferences.class);
startActivity(i);
}
}
}
Recipe: Adding an End User License Agreement
As discussed in Chapter 1, “Overview of Android,” it is often useful to display an end user license agreement (EULA) when a user first installs and runs an app. If the user does not accept it, the downloaded application does not run. After a user does accept it, the EULA is never shown again.
This EULA functionality is already implemented and available publicly under the Apache License as the Eula class shown in Listing 11.7. It uses SharedPreferences with the Boolean PREFERENCE_EULA_ACCEPTED to determine whether the EULA was previously accepted or not accepted.
Listing 11.7. src/com/cookbook/eula_example/Eula.java
/*
* Copyright (C) 2008 The Android Open Source Project
*
* Licensed under the Apache License, Version 2.0 (the "License");
* you may not use this file except in compliance with the License.
* You may obtain a copy of the License at
*
* http://www.apache.org/licenses/LICENSE-2.0
*
* Unless required by applicable law or agreed to in writing, software
* distributed under the License is distributed on an "AS IS" BASIS,
* WITHOUT WARRANTIES OR CONDITIONS OF ANY KIND, either expressed or implied.
* See the License for the specific language governing permissions and
* limitations under the License.
*/
package com.cookbook.eula_example;
import android.app.Activity;
import android.app.AlertDialog;
import android.content.DialogInterface;
import android.content.SharedPreferences;
import java.io.IOException;
import java.io.BufferedReader;
import java.io.InputStreamReader;
import java.io.Closeable;
/**
* displays a EULA ("End User License Agreement") that the user has to accept before
* using the application
*/
class Eula {
private static final String ASSET_EULA = "EULA";
private static final String PREFERENCE_EULA_ACCEPTED = "eula.accepted";
private static final String PREFERENCES_EULA = "eula";
/**
* callback to let the activity know when the user accepts the EULA
*/
static interface OnEulaAgreedTo {
void onEulaAgreedTo();
}
/**
* displays the EULA if necessary
*/
static boolean show(final Activity activity) {
final SharedPreferences preferences =
activity.getSharedPreferences(
PREFERENCES_EULA, Activity.MODE_PRIVATE);
//to test:
// preferences.edit()
// .putBoolean(PREFERENCE_EULA_ACCEPTED, false).commit();
if (!preferences.getBoolean(PREFERENCE_EULA_ACCEPTED, false)) {
final AlertDialog.Builder builder =
new AlertDialog.Builder(activity);
builder.setTitle(R.string.eula_title);
builder.setCancelable(true);
builder.setPositiveButton(R.string.eula_accept,
new DialogInterface.OnClickListener() {
public void onClick(DialogInterface dialog, int which) {
accept(preferences);
if (activity instanceof OnEulaAgreedTo) {
((OnEulaAgreedTo) activity).onEulaAgreedTo();
}
}
});
builder.setNegativeButton(R.string.eula_refuse,
new DialogInterface.OnClickListener() {
public void onClick(DialogInterface dialog, int which) {
refuse(activity);
}
});
builder.setOnCancelListener(
new DialogInterface.OnCancelListener() {
public void onCancel(DialogInterface dialog) {
refuse(activity);
}
});
builder.setMessage(readEula(activity));
builder.create().show();
return false;
}
return true;
}
private static void accept(SharedPreferences preferences) {
preferences.edit().putBoolean(PREFERENCE_EULA_ACCEPTED,
true).commit();
}
private static void refuse(Activity activity) {
activity.finish();
}
private static CharSequence readEula(Activity activity) {
BufferedReader in = null;
try {
in = new BufferedReader(new InputStreamReader(activity.getAssets().
open(ASSET_EULA)));
String line;
StringBuilder buffer = new StringBuilder();
while ((line = in.readLine()) != null)
buffer.append(line).append('\n');
return buffer;
} catch (IOException e) {
return "";
} finally {
closeStream(in);
}
}
/**
* closes the specified stream
*/
private static void closeStream(Closeable stream) {
if (stream != null) {
try {
stream.close();
} catch (IOException e) {
// Ignore
}
}
}
}
The Eula class needs to be customized as follows:
1. The actual text of the EULA needs to be put in a text file called EULA (as specified by the ASSET_EULA variable in Listing 11.7) and placed in the assets/ directory of the Android project. This is loaded by the readEula() method of the Eula class.
2. A few strings need to be specified for the Acceptance dialog box. These can be collected in the string’s resource file. Example wording is shown in Listing 11.8.
Listing 11.8. res/values/strings.xml
<?xml version="1.0" encoding="utf-8"?>
<resources>
<string name="hello">Welcome to MyApp</string>
<string name="app_name">MyApp</string>
<string name="eula_title">License Agreement</string>
<string name="eula_accept">Accept</string>
<string name="eula_refuse">Don\'t Accept</string>
</resources>
Then, any application can automatically have the EULA functionality if the following line in the onCreate() method of the main activity of the application is included:
Eula.show(this);
SQLite Database
For more complex data structures, a database provides a quicker and more flexible access method than flat files or shared preferences. Android provides a built-in database called SQLite that provides full relational database capability using SQL commands. Each application that uses SQLite has its own instance of the database, which is by default accessible only from the application itself. The database is stored in the /data/data/<package_name>/databases folder of an Android device. A content provider can be used to share the database information between applications. The steps for using SQLite follow:
1. Create a database.
2. Open the database.
3. Create a table.
4. Create an insert interface for datasets.
5. Create a query interface for datasets.
6. Close the database.
The next recipe provides a general method to accomplish these steps.
Recipe: Creating a Separate Database Package
A good modular structure of classes is essential for more complicated Android projects. Here, the database class is put in its own package, com.cookbook.data, so it is easy to reuse. This package contains three classes: MyDB, MyDBhelper, and Constants.
The MyDB class is shown in Listing 11.9. It contains a SQLiteDatabase instance and a MyDBhelper class (described in the following) with the methods that follow:
![]() MyDB()—Initializes a MyDBhelper instance (the constructor).
MyDB()—Initializes a MyDBhelper instance (the constructor).
![]() open()—Initializes a SQLiteDatabase instance using MyDBhelper. This opens a writeable database connection. If SQLite throws any exception, it tries to get a readable database instead.
open()—Initializes a SQLiteDatabase instance using MyDBhelper. This opens a writeable database connection. If SQLite throws any exception, it tries to get a readable database instead.
![]() close()—Closes the database connection.
close()—Closes the database connection.
![]() insertDiary()—Saves a diary entry to the database as name-value pairs in a ContentValues instance and then passes the data to the SQLiteDatabase instance to do an insert.
insertDiary()—Saves a diary entry to the database as name-value pairs in a ContentValues instance and then passes the data to the SQLiteDatabase instance to do an insert.
![]() getDiaries()—Reads the diary entries from the database, saves them in a Cursor class, and returns them from the method.
getDiaries()—Reads the diary entries from the database, saves them in a Cursor class, and returns them from the method.
Listing 11.9. src/com/cookbook/data/MyDB.java
package com.cookbook.data;
import android.content.ContentValues;
import android.content.Context;
import android.database.Cursor;
import android.database.sqlite.SQLiteDatabase;
import android.database.sqlite.SQLiteException;
import android.util.Log;
public class MyDB {
private SQLiteDatabase db;
private final Context context;
private final MyDBhelper dbhelper;
public MyDB(Context c){
context = c;
dbhelper = new MyDBhelper(context, Constants.DATABASE_NAME, null,
Constants.DATABASE_VERSION);
}
public void close()
{
db.close();
}
public void open() throws SQLiteException
{
try {
db = dbhelper.getWriteableDatabase();
} catch(SQLiteException ex) {
Log.v("Open database exception caught", ex.getMessage());
db = dbhelper.getReadableDatabase();
}
}
public long insertDiary(String title, String content)
{
try{
ContentValues newTaskValue = new ContentValues();
newTaskValue.put(Constants.TITLE_NAME, title);
newTaskValue.put(Constants.CONTENT_NAME, content);
newTaskValue.put(Constants.DATE_NAME,
java.lang.System.currentTimeMillis());
return db.insert(Constants.TABLE_NAME, null, newTaskValue);
} catch(SQLiteException ex) {
Log.v("Insert into database exception caught",
ex.getMessage());
return -1;
}
}
public Cursor getDiaries()
{
Cursor c = db.query(Constants.TABLE_NAME, null, null,
null, null, null, null);
return c;
}
}
The MyDBhelper class, shown in Listing 11.10, extends SQLiteOpenHelper. The SQLiteOpenHelper framework provides methods to manage database creation and upgrades. The database is initialized in the class constructor MyDBhelper(). This requires the context and database name to be specified for creation of the database file under /data/data/com.cookbook.datastorage/databases and the database schema version to determine whether the onCreate() or onUpgrade() method is called.
Tables can be added in the onCreate() method using a custom SQL command such as:
create table MyTable (key_id integer primary key autoincrement,
title text not null, content text not null,
recordDate long);
Whenever a database needs to be upgraded (when a user downloads a new version of an application, for example), the change in database version number calls the onUpgrade() method. This can be used to alter or drop tables as needed to update the tables to the new schema.
Listing 11.10. src/com/cookbook/data/MyDBhelper.java
package com.cookbook.data;
import android.content.Context;
import android.database.sqlite.SQLiteDatabase;
import android.database.sqlite.SQLiteException;
import android.database.sqlite.SQLiteOpenHelper;
import android.database.sqlite.SQLiteDatabase.CursorFactory;
import android.util.Log;
public class MyDBhelper extends SQLiteOpenHelper{
private static final String CREATE_TABLE="create table "+
Constants.TABLE_NAME+" ("+
Constants.KEY_ID+" integer primary key autoincrement, "+
Constants.TITLE_NAME+" text not null, "+
Constants.CONTENT_NAME+" text not null, "+
Constants.DATE_NAME+" long);";
public MyDBhelper(Context context, String name, CursorFactory factory,
int version) {
super(context, name, factory, version);
}
@Override
public void onCreate(SQLiteDatabase db) {
Log.v("MyDBhelper onCreate","Creating all the tables");
try {
db.execSQL(CREATE_TABLE);
} catch(SQLiteException ex) {
Log.v("Create table exception", ex.getMessage());
}
}
@Override
public void onUpgrade(SQLiteDatabase db, int oldVersion,
int newVersion) {
Log.w("TaskDBAdapter", "Upgrading from version "+oldVersion
+" to "+newVersion
+", which will destroy all old data");
db.execSQL("drop table if exists "+Constants.TABLE_NAME);
onCreate(db);
}
}
The third file of the com.cookbook.data package is the Constants class, shown in Listing 11.11. This class is used to hold all the String constants because they are used in both MyDB and MyDBhelper.
Listing 11.11. src/com/cookbook/data/Constants.java
package com.cookbook.data;
public class Constants {
public static final String DATABASE_NAME="datastorage";
public static final int DATABASE_VERSION=1;
public static final String TABLE_NAME="diaries";
public static final String TITLE_NAME="title";
public static final String CONTENT_NAME="content";
public static final String DATE_NAME="recordDate";
public static final String KEY_ID="_id";
}
Recipe: Using a Separate Database Package
This recipe demonstrates SQLite data storage using the previous recipe’s database package. It also ties together the login screen from the “Changing the UI Based on Stored Data” recipe and enables the creation and listing of personal diary entries. First, a layout XML file for creating diary entries—diary.xml—is shown in Listing 11.12 and its output screen in Figure 11.3.
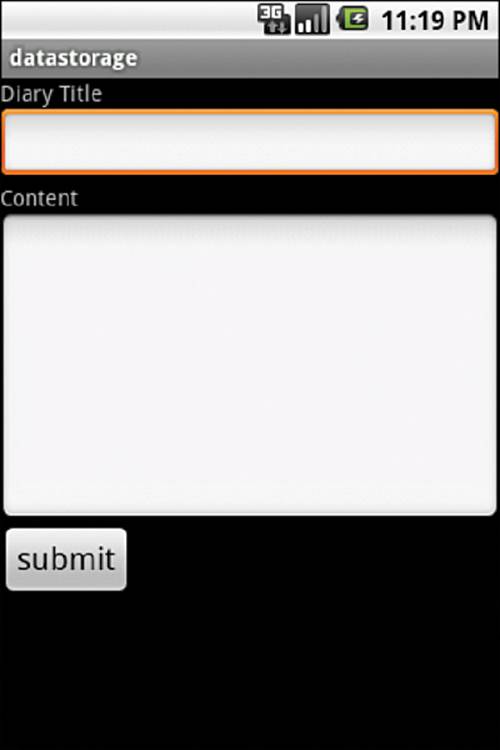
Figure 11.3 The diary entry creation screen
Listing 11.12. res/layout/diary.xml
<?xml version="1.0" encoding="utf-8"?>
<LinearLayout xmlns:android="http://schemas.android.com/apk/res/android"
android:orientation="vertical"
android:layout_width="match_parent"
android:layout_height="match_parent"
>
<TextView
android:layout_width="match_parent"
android:layout_height="wrap_content"
android:text="Diary Title"
/>
<EditText
android:id="@+id/diarydescriptiontext"
android:layout_width="match_parent"
android:layout_height="wrap_content"
/>
<TextView
android:layout_width="match_parent"
android:layout_height="wrap_content"
android:text="Content"
/>
<EditText
android:id="@+id/diarycontenttext"
android:layout_width="match_parent"
android:layout_height="200dp"
/>
<Button
android:id="@+id/submitbutton"
android:layout_width="wrap_content"
android:layout_height="wrap_content"
android:text="submit"
android:textSize="20dp"
/>
</LinearLayout>
The main activity is Diary.java, shown in Listing 11.13. The com.cookbook.data package needs to be imported, and the MyDB object is declared, initialized, and opened for use. It also displays the diary.xml layout and handles the “submit” button press to save data to the database.
Listing 11.13. src/com/cookbook/datastorage/Diary.java
package com.cookbook.datastorage;
import android.app.Activity;
import android.content.Intent;
import android.os.Bundle;
import android.view.View;
import android.view.View.OnClickListener;
import android.widget.Button;
import android.widget.EditText;
import com.cookbook.data.MyDB;
public class Diary extends Activity {
EditText titleET, contentET;
Button submitBT;
MyDB dba;
@Override
public void onCreate(Bundle savedInstanceState) {
super.onCreate(savedInstanceState);
setContentView(R.layout.diary);
dba = new MyDB(this);
dba.open();
titleET = (EditText)findViewById(R.id.diarydescriptiontext);
contentET = (EditText)findViewById(R.id.diarycontenttext);
submitBT = (Button)findViewById(R.id.submitbutton);
submitBT.setOnClickListener(new OnClickListener() {
public void onClick(View v) {
try {
saveItToDB();
} catch (Exception e) {
e.printStackTrace();
}
}
});
}
public void saveItToDB() {
dba.insertDiary(titleET.getText().toString(),
contentET.getText().toString());
dba.close();
titleET.setText("");
contentET.setText("");
Intent i = new Intent(Diary.this, DisplayDiaries.class);
startActivity(i);
}
}
The DataStorage.java class is the same as in Listing 11.6 with MyPreferences.class changed to launch Diary.class when the login is successful:
Toast.makeText(DataStorage.this, "login passed!!",
Toast.LENGTH_SHORT).show();
Intent i = new Intent(DataStorage.this, Diary.class);
startActivity(i);
Finally, the AndroidManifest.xml file must be updated to include the new activities, as shown in Listing 11.14.
Listing 11.14. AndroidManifest.xml
<?xml version="1.0" encoding="utf-8"?>
<manifest xmlns:android="http://schemas.android.com/apk/res/android"
package="com.cookbook.datastorage"
android:versionCode="1" android:versionName="1.0">
<application android:icon="@drawable/icon"
android:label="@string/app_name">
<activity android:name=".DataStorage"
android:label="@string/app_name">
<intent-filter>
<action android:name="android.intent.action.MAIN" />
<category android:name="android.intent.category.LAUNCHER" />
</intent-filter>
</activity>
<activity android:name=".MyPreferences" />
<activity android:name=".Diary"/>
</application>
<uses-sdk android:minSdkVersion="7" />
</manifest>
Now that a separate database has been integrated, the layout for the list of entries is discussed in the next recipe to complete the diary application.
Recipe: Creating a Personal Diary
This recipe leverages the ListView object to display multiple entries from a SQLite database table. It shows these items in a vertically scrolling list. The ListView needs a data adapter to tell the view whenever the underlying data changes. Two XML files need to be created: diaries.xml, which populates the ListView shown in Listing 11.15, and diaryrow.xml, which populates the row inside the ListView shown in Listing 11.16.
Listing 11.15. res/layout/diaries.xml
<?xml version="1.0" encoding="utf-8"?>
<LinearLayout xmlns:android="http://schemas.android.com/apk/res/android"
android:orientation="vertical"
android:layout_width="match_parent"
android:layout_height="match_parent">
<ListView
android:layout_width="match_parent" android:dividerHeight="1px"
android:layout_height="match_parent"
android:id="list">
</ListView>
</LinearLayout>
Listing 11.16. res/layout/diaryrow.xml
<?xml version="1.0" encoding="utf-8"?>
<RelativeLayout android:layout_width="wrap_content"
android:layout_height="wrap_content"
android:layout_alignLeft="@+id/name" android:layout_below="@+id/name"
xmlns:android="http://schemas.android.com/apk/res/android"
android:padding="12dip">
<TextView android:layout_width="wrap_content"
android:layout_height="wrap_content" android:id="@+id/name"
android:layout_marginRight="4dp" android:text="Diary Title"
android:textStyle="bold" android:textSize="16dip" />
<TextView android:id="@+id/datetext"
android:layout_width="wrap_content"
android:layout_height="wrap_content" android:text="Date Recorded"
android:textSize="14dip" />
</RelativeLayout>
The activity DisplayDiaries.java extends ListActivity to display a ListView. Inside this class, two inner classes are defined: MyDiary is a data class to hold the content of the diary entry (title, content, and date), and DiaryAdapter is a BaseAdapter class to handle data retrieval from the database (using getData()). The following methods are derived from BaseAdapter and called by ListView:
![]() getCount()—Returns how many items are on the adapter
getCount()—Returns how many items are on the adapter
![]() getItem()—Returns the item specified
getItem()—Returns the item specified
![]() getItemID()—Returns the ID of the item (for this example, there is no item ID)
getItemID()—Returns the ID of the item (for this example, there is no item ID)
![]() getView()—Returns a view for each item
getView()—Returns a view for each item
Note that ListView calls getView() to draw the view for each item. To improve the UI rendering performance, the view returned by getView() should be recycled as much as possible. This is done by creating a ViewHolder class to hold the views.
When getView() is called, the view currently displayed to the user is also passed in, which is when it is saved in the ViewHolder and tagged. On subsequent calls to getView() with the same view, the tag identifies the view as already in the ViewHolder. In this case, the content can be changed on the existing view rather than a newly created one.
The main activity is shown in Listing 11.17, and the resulting view of diary entries in a ListView is shown in Figure 11.4 on page 307.
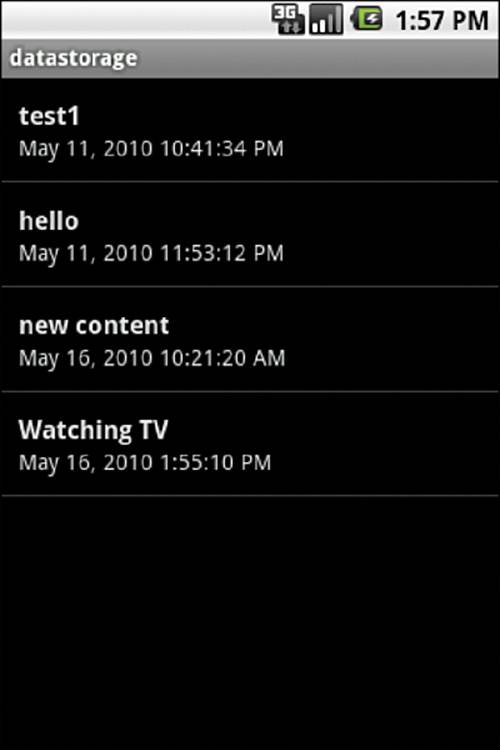
Figure 11.4 The ListView of diary entries
Listing 11.17. src/com/cookbook/datastorage/DisplayDiaries.java
package com.cookbook.datastorage;
import java.text.DateFormat;
import java.util.ArrayList;
import java.util.Date;
import android.app.ListActivity;
import android.content.Context;
import android.database.Cursor;
import android.os.Bundle;
import android.view.LayoutInflater;
import android.view.View;
import android.view.ViewGroup;
import android.widget.BaseAdapter;
import android.widget.TextView;
import com.cookbook.data.Constants;import com.cookbook.data.MyDB;
public class DisplayDiaries extends ListActivity {
MyDB dba;
DiaryAdapter myAdapter;
private class MyDiary{
public MyDiary(String t, String c, String r){
title=t;
content=c;
recordDate=r;
}
public String title;
public String content;
public String recordDate;
}
@Override
protected void onCreate(Bundle savedInstanceState) {
dba = new MyDB(this);
dba.open();
setContentView(R.layout.diaries);
super.onCreate(savedInstanceState);
myAdapter = new DiaryAdapter(this);
this.setListAdapter(myAdapter);
}
private class DiaryAdapter extends BaseAdapter {
private LayoutInflater mInflater;
private ArrayList<MyDiary> diaries;
public DiaryAdapter(Context context) {
mInflater = LayoutInflater.from(context);
diaries = new ArrayList<MyDiary>();
getData();
}
public void getData(){
Cursor c = dba.getDiaries();
startManagingCursor(c);
if(c.moveToFirst()){
do{
String title =
c.getString(c.getColumnIndex(Constants.TITLE_NAME));
String content =
c.getString(c.getColumnIndex(Constants.CONTENT_NAME));
DateFormat dateFormat =
DateFormat.getDateTimeInstance();
String dateData = dateFormat.format(new
Date(c.getLong(c.getColumnIndex(
Constants.DATE_NAME))).getTime());
MyDiary temp = new MyDiary(title,content,dateData);
diaries.add(temp);
} while(c.moveToNext());
}
}
@Override
public int getCount() {return diaries.size();}
public MyDiary getItem(int i) {return diaries.get(i);}
public long getItemId(int i) {return i;}
public View getView(int arg0, View arg1, ViewGroup arg2) {
final ViewHolder holder;
View v = arg1;
if ((v == null) || (v.getTag() == null)) {
v = mInflater.inflate(R.layout.diaryrow, null);
holder = new ViewHolder();
holder.mTitle = (TextView)v.findViewById(R.id.name);
holder.mDate = (TextView)v.findViewById(R.id.datetext);
v.setTag(holder);
} else {
holder = (ViewHolder) v.getTag();
}
holder.mdiary = getItem(arg0);
holder.mTitle.setText(holder.mdiary.title);
holder.mDate.setText(holder.mdiary.recordDate);
v.setTag(holder);
return v;
}
public class ViewHolder {
MyDiary mdiary;
TextView mTitle;
TextView mDate;
}
}
}
Content Provider
Every application has its own sandbox and cannot access data from other applications. If access to functions not provided by its own sandbox is required, the application must explicitly declare permission up front before installation. Android provides an interface called ContentProvider to act as a bridge between applications, enabling them to share and change each other’s data. A content provider allows a clean separation between the application layer and the data layer. It requires a permission setting in the AndroidManifest.xml file and can be accessed using a simple URI model.
Following are some of the native databases Android makes available as content providers:
![]() Browser—Read or modify bookmarks, browser history, or web searches.
Browser—Read or modify bookmarks, browser history, or web searches.
![]() CallLog—View or update the call history.
CallLog—View or update the call history.
![]() Contacts—Retrieve, modify, or store personal contacts. Contact information is stored in a three-tier data model of tables under a ContactsContract object:
Contacts—Retrieve, modify, or store personal contacts. Contact information is stored in a three-tier data model of tables under a ContactsContract object:
![]() ContactsContract.Data—Contains all kinds of personal data. There is a predefined set of common data, such as phone numbers and email addresses, but the format of this table can be application-specific.
ContactsContract.Data—Contains all kinds of personal data. There is a predefined set of common data, such as phone numbers and email addresses, but the format of this table can be application-specific.
![]() ContactsContract.RawContacts—Contains a set of data objects associated with a single account or person.
ContactsContract.RawContacts—Contains a set of data objects associated with a single account or person.
![]() ContactsContract.Contacts—Contains an aggregate of one or more RawContacts, presumably describing the same person.
ContactsContract.Contacts—Contains an aggregate of one or more RawContacts, presumably describing the same person.
![]() LiveFolder—A special folder whose content is provided by a content provider.
LiveFolder—A special folder whose content is provided by a content provider.
![]() MediaStore—Access audio, video, and images.
MediaStore—Access audio, video, and images.
![]() Setting—View and retrieve Bluetooth settings, ringtones, and other device preferences.
Setting—View and retrieve Bluetooth settings, ringtones, and other device preferences.
![]() SearchRecentSuggestions—Configure to operate with a search-suggestions provider.
SearchRecentSuggestions—Configure to operate with a search-suggestions provider.
![]() SyncStateContract—View the content provider contract for associating data with a data array account. Providers that want to store this data in a standard way can use this.
SyncStateContract—View the content provider contract for associating data with a data array account. Providers that want to store this data in a standard way can use this.
![]() UserDictionary—Store user-defined words used by input methods during predictive text input. Applications and input methods can add words to the dictionary. Words can have associated frequency information and locale information.
UserDictionary—Store user-defined words used by input methods during predictive text input. Applications and input methods can add words to the dictionary. Words can have associated frequency information and locale information.
To access a content provider, the application needs to get a ContentResolver instance to query, insert, delete, and update the data from the content provider, as shown in the following example:
ContentResolver crInstance = getContentResolver(); //Get a ContentResolver instance
crInstance.query(People.CONTENT_URI, null, null, null, null); //Query contacts
ContentValues new_Values= new ContentValues();
crInstance.insert(People.CONTENT_URI, new_Values); //Insert new values
crInstance.delete(People_URI, null, null); //Delete all contacts
ContentValues update_Values= new ContentValues();
crInstance.update(People_URI, update_Value, null,null); //Update values
Each content provider needs to have a URI, which is used for registration and permission access. The URI must be unique from provider to provider and have the generic suggested format:
content://<package name>.provider.<custom ContentProvider name>/<DataPath>
For simplicity, it can also be just content://com.cookbook.datastorage/diaries, which is used in the next recipe. The UriMatcher class is used in the ContentProvider interface to ensure that a proper URI is passed.
Recipe: Creating a Custom Content Provider
Having seen how to use a content provider, it is time to integrate one into the diary project used in previous recipes. This recipe shows how to expose diary entries to other selected applications. A custom content provider just extends the Android ContentProvider class, which contains six methods to optionally override:
![]() query()—Allows third-party applications to retrieve content
query()—Allows third-party applications to retrieve content
![]() insert()—Allows third-party applications to insert content
insert()—Allows third-party applications to insert content
![]() update()—Allows third-party applications to update content
update()—Allows third-party applications to update content
![]() delete()—Allows third-party applications to delete content
delete()—Allows third-party applications to delete content
![]() getType()—Allows third-party applications to read each of the URI structures supported
getType()—Allows third-party applications to read each of the URI structures supported
![]() onCreate()—Creates a database instance to help retrieve the content
onCreate()—Creates a database instance to help retrieve the content
For example, if other applications are allowed to read only content from the provider, just onCreate() and query() need to be overridden.
A custom ContentProvider class is shown in Listing 11.18; it has one URI added to UriMatcher based on the package com.cookbook.datastorage and the database table name diaries. The onCreate() method forms a MyDB object with code from Listing 11.9. It is responsible for the database access. The query() method retrieves all records from the diaries database, which is passed as the uri argument. In case of a more specific selection of records, the other arguments of this method would be used.
Listing 11.18. src/com/cookbook/datastorage/DiaryContentProvider.java
package com.cookbook.datastorage;
import android.content.ContentProvider;import android.content.ContentValues;
import android.content.UriMatcher;
import android.database.Cursor;
import android.database.sqlite.SQLiteQueryBuilder;
import android.net.Uri;
import com.cookbook.data.Constants;
import com.cookbook.data.MyDB;
public class DiaryContentProvider extends ContentProvider {
private MyDB dba;
private static final UriMatcher sUriMatcher;
//the code returned for URI match to components
private static final int DIARIES=1;
public static final String AUTHORITY = "com.cookbook.datastorage";
static {
sUriMatcher = new UriMatcher(UriMatcher.NO_MATCH);
sUriMatcher.addURI(AUTHORITY, Constants.TABLE_NAME,
DIARIES);
}
@Override
public int delete(Uri uri, String selection, String[] selectionArgs) {
return 0;
}
public String getType(Uri uri) {return null;}
public Uri insert(Uri uri, ContentValues values) {return null;}
public int update(Uri uri, ContentValues values, String selection,
String[] selectionArgs) {return 0;}
@Override
public boolean onCreate() {
dba = new MyDB(this.getContext());
dba.open();
return false;
}
@Override
public Cursor query(Uri uri, String[] projection, String selection,
String[] selectionArgs, String sortOrder) {
Cursor c=null;
switch (sUriMatcher.match(uri)) {
case DIARIES:
c = dba.getDiaries();
break;
default:
throw new IllegalArgumentException(
"Unknown URI" + uri);
}
c.setNotificationUri(getContext().getContentResolver(), uri);
return c;
}
}
The provider needs to be specified in the AndroidManifest.xml file to be accessible, as shown in Listing 11.19.
Listing 11.19. AndroidManifest.xml
<?xml version="1.0" encoding="utf-8"?>
<manifest xmlns:android="http://schemas.android.com/apk/res/android"
package="com.cookbook.datastorage"
android:versionCode="1"
android:versionName="1.0">
<application android:icon="@drawable/icon"
android:label="@string/app_name">
<activity android:name=".DataStorage"
android:label="@string/app_name">
<intent-filter>
<action android:name="android.intent.action.MAIN" />
<category android:name="android.intent.category.LAUNCHER" />
</intent-filter>
</activity>
<activity android:name=".MyPreferences" />
<activity android:name=".Diary"/>
<activity android:name=".DisplayDiaries"/>
<provider android:name="DiaryContentProvider"
android:authorities="com.cookbook.datastorage" />
</application>
<uses-sdk android:minSdkVersion="7" />
</manifest>
Now the content provider is ready for other applications to use. To test this content provider, a new Android project can be created called DataStorageTester with main activity DataStorageTester. This is shown in Listing 11.20. An instance of ContentResolver is created to query the data from the DataStorage content provider. After a Cursor is returned, the testing function parses the second column of each data entry and concatenates it into a String to display on the screen using a StringBuilder object.
Listing 11.20. src/com/cookbook/datastorage_tester/DataStorageTester.java
package com.cookbook.datastorage_tester;
import android.app.Activity;
import android.content.ContentResolver;import android.database.Cursor;import android.net.Uri;
import android.os.Bundle;
import android.widget.TextView;
public class DataStorageTester extends Activity {
TextView tv;
@Override
public void onCreate(Bundle savedInstanceState) {
super.onCreate(savedInstanceState);
setContentView(R.layout.main);
tv = (TextView) findViewById(R.id.output);
String myUri = "content://com.cookbook.datastorage/diaries";
Uri CONTENT_URI = Uri.parse(myUri);
//Get ContentResolver instance
ContentResolver crInstance = getContentResolver();
Cursor c = crInstance.query(CONTENT_URI, null, null, null, null);
startManagingCursor(c);
StringBuilder sb = new StringBuilder();
if(c.moveToFirst()){
do{
sb.append(c.getString(1)).append("\n");
}while(c.moveToNext());
}
tv.setText(sb.toString());
}
}
Inside the main.xml layout file, an ID needs to be added for the TextView output, as shown in Listing 11.21.
Listing 11.21. res/layout/main.xml
<?xml version="1.0" encoding="utf-8"?>
<LinearLayout xmlns:android="http://schemas.android.com/apk/res/android"
android:orientation="vertical"
android:layout_width="match_parent"
android:layout_height="match_parent"
>
<TextView
android:id="@+id/output"
android:layout_width="match_parent"
android:layout_height="wrap_content"
android:text="@string/hello"
/>
</LinearLayout>
Running the testing function displays the diary entry titles, as shown in Figure 11.5.

Figure 11.5 The result of a query in a content provider to the separate diary application
File Saving and Loading
In addition to the Android-specific data storage methods mentioned previously, the standard java.io.File Java package is available. This provides for flat file manipulation, such as FileInputStream, FileOutputStream, InputStream, and OutputStream. An example is reading from and writing to a file:
FileInputStream fis = openFileInput("myfile.txt");
FileOutputStream fos = openFileOutput("myfile.txt",
Context.MODE_WORLD_WRITEABLE);
Another example is saving the bitmap camera picture to a PNG file, as follows:
Bitmap takenPicture;
FileOutputStream out = openFileOutput("mypic.png",
Context.MODE_WORLD_WRITEABLE);
takenPicture.compress(CompressFormat.PNG, 100, out);
out.flush();
out.close();
The files in the resources directories can also be opened. For example, to open myrawfile.txt located in the res/raw folder, use the following:
InputStream is = this.getResource()
.openRawResource(R.raw.myrawfile.txt);
Recipe: Using AsyncTask for Asynchronous Processing
To maximize application performance, it is best to ensure that the main thread is not blocked. Tasks can be offloaded to separate threads that will run in the background. This recipe uses the AsyncTask class to perform some logic off the main thread.
The AsyncTask class takes three arguments: Params, Progress, and Result. Using all of them is not required, and in such a case passing Void is acceptable. The four main methods that are used as logical steps when executed using AsyncTask are as follows:
![]() onPreExecute()—This method runs on the main thread and is generally used for setup of the asynchronous task.
onPreExecute()—This method runs on the main thread and is generally used for setup of the asynchronous task.
![]() doInBackground()—This method is where the logic of a task is run. A separate thread is used so that thread blocking does not exist. It uses the publishProgress() method to pass updates back to the main thread.
doInBackground()—This method is where the logic of a task is run. A separate thread is used so that thread blocking does not exist. It uses the publishProgress() method to pass updates back to the main thread.
![]() onProgressUpdate()—This method is used during the publishProgress() method to update the main thread with visual updates.
onProgressUpdate()—This method is used during the publishProgress() method to update the main thread with visual updates.
![]() onPostExecute()—This method is called immediately after the doInBackground() method completes, and it includes a parameter passed from that method.
onPostExecute()—This method is called immediately after the doInBackground() method completes, and it includes a parameter passed from that method.
Note that when using the AsyncTask class, any threads that are used will be destroyed when the current view is removed or destroyed.
The code in Listing 11.22 will take a sentence and look for the word meow. As it processes, the progress bar will be updated.
Listing 11.22. src/com/cookbook/async/MainActivity.java
package com.cookbook.async;
import java.util.regex.Matcher;
import java.util.regex.Pattern;
import android.app.Activity;
import android.os.AsyncTask;
import android.os.Bundle;
import android.view.View;
import android.widget.ProgressBar;
import android.widget.TextView;
public class MainActivity extends Activity {
TextView mainTextView;
ProgressBar mainProgress;
@Override
protected void onCreate(Bundle savedInstanceState) {
super.onCreate(savedInstanceState);
setContentView(R.layout.activity_main);
mainTextView = (TextView) findViewById(R.id.maintextview);
mainProgress = (ProgressBar) findViewById(R.id.mainprogress);
}
private class MyAsyncTask extends AsyncTask<String, Integer, String> {
@Override
protected String doInBackground(String... parameter) {
String result = "";
Pattern pattern = Pattern.compile("meow");
Matcher matcher = pattern.matcher(parameter[0]);
int count = 0;
while (matcher.find()){
count++;
try {
Thread.sleep(100);
} catch (InterruptedException e) {
// Remember to error handle
}
publishProgress(count + 20);
}
result = "meow was found "+count+" times";
return result;
}
@Override
protected void onProgressUpdate(Integer... progress) {
mainProgress.setProgress(progress[0]);
}
@Override
protected void onPostExecute(String result) {
mainTextView.setText(result);
}
}
public void executeAsync(View view) {
MyAsyncTask task = new MyAsyncTask();
task.execute("Meow, meow, meow many times do you have meow?");
}
}