The Android Developer’s Cookbook: Building Applications with the Android SDK, Second Edition (2013)
Chapter 12. Location-Based Services
Location-based services (LBSs) enable some of the most popular mobile applications. Location can be integrated with many functions, such as Internet searching, picture taking, gaming, and social networking. Developers can leverage the available location technology to make their applications more relevant and local.
This chapter introduces methods to obtain the device’s location and then track, geocode, and map it. In addition, there are recipes for overlaying the map with markers and views.
Location Basics
An application requires the following to access the location services from the Android system:
![]() LocationManager—Class providing access to Android system location services
LocationManager—Class providing access to Android system location services
![]() LocationListener—Interface for receiving notifications from the LocationManager when the location has changed
LocationListener—Interface for receiving notifications from the LocationManager when the location has changed
![]() Location—Class representing a geographic location determined at a particular time
Location—Class representing a geographic location determined at a particular time
The LocationManager class needs to be initialized with the Android system service called LOCATION_SERVICE. This provides the application with the device’s current location and movement and can also alert when the device enters or leaves a defined area. An example of initialization follows:
LocationManager mLocationManager;
mLocationManager = (LocationManager)
getSystemService(Context.LOCATION_SERVICE);
After the LocationManager instance is initiated, a location provider needs to be selected. Different location technologies might be available on the device (such as Assisted Global Positioning System (AGPS), Wi-Fi, and so on), and a general way to find a proper location provider is to define the accuracy and power requirements. This can be done using the Criteria class defined in android.location.Criteria. This enables the Android system to find the best available location technology for the specified requirements. Following is an example of selecting a location provider based on criteria:
Criteria criteria = new Criteria();
criteria.setAccuracy(Criteria.ACCURACY_FINE);
criteria.setPowerRequirement(Criteria.POWER_LOW);
String locationprovider =
mLocationManager.getBestProvider(criteria, true);
It is also possible to specify the location estimation technology using the location manager’s getProvider() method. The two most common providers are the satellite-based GPS (specified by LocationManager.GPS_PROVIDER) and cell-tower/Wi-Fi identification (specified byLocationManager.NETWORK_PROVIDER). The former is more accurate, but the latter is useful when a direct view of the sky is not available, such as indoors.
Unless otherwise noted, all recipes in this chapter will use the following two support files. First, the main layout needs a TextView, as shown in Listing 12.1, for displaying the location data.
Listing 12.1. res/layout/main.xml
<?xml version="1.0" encoding="utf-8"?>
<LinearLayout xmlns:android="http://schemas.android.com/apk/res/android"
android:orientation="vertical"
android:layout_width="match_parent"
android:layout_height="match_parent"
>
<TextView
android:id="@+id/tv1"
android:layout_width="match_parent"
android:layout_height="wrap_content"
android:text="@string/hello"
/>
</LinearLayout>
Second, permission to use location information needs to be granted in the AndroidManifest.xml file, as shown in Listing 12.2 (only the package name needs to be changed for each recipe). For a more accurate location, such as GPS, add the ACCESS_FINE_LOCATION permission. Otherwise, add the ACCESS_COARSE_LOCATION permission. It should be noted that ACCESS_FINE_LOCATION also enables the same sensors that are used for ACCESS_COARSE_LOCATION.
Listing 12.2. AndroidManifest.xml
<?xml version="1.0" encoding="utf-8"?>
<manifest xmlns:android="http://schemas.android.com/apk/res/android"
package="com.cookbook.mylocationpackage"
android:versionCode="1"
android:versionName="1.0">
<uses-permission android:name="android.permission.ACCESS_FINE_LOCATION"/>
<application android:icon="@drawable/icon"
android:label="@string/app_name">
<activity android:name=".MyLocation"
android:label="@string/app_name">
<intent-filter>
<action android:name="android.intent.action.MAIN" />
<category android:name="android.intent.category.LAUNCHER" />
</intent-filter>
</activity>
</application>
<uses-sdk android:minSdkVersion="4" />
</manifest>
Recipe: Retrieving Last Location
Because it might take time to produce a location estimation, getLastKnownLocation() can be called to retrieve the location last saved for a given provider. The location contains a latitude, longitude, and Coordinated Universal Time (CUT) timestamp. Depending on the provider, information on altitude, speed, and bearing might also be included (use getAltitude(), getSpeed(), and getBearing() on the location object to retrieve these and getExtras() to retrieve satellite information). Latitude and longitude are displayed to the screen in this recipe. Another option that may be used isPASSIVE_PROVIDER, which is a constant that is a special location provider that stores the last request for location. The main activity is shown in Listing 12.3.
Listing 12.3. src/com/cookbook/lastlocation/MyLocation.java
package com.cookbook.lastlocation;
import android.app.Activity;
import android.content.Context;import android.location.Criteria;import android.location.Location;import android.location.LocationManager;
import android.os.Bundle;
import android.widget.TextView;
public class MyLocation extends Activity {
LocationManager mLocationManager;
TextView tv;
@Override
public void onCreate(Bundle savedInstanceState) {
super.onCreate(savedInstanceState);
setContentView(R.layout.main);
tv = (TextView) findViewById(R.id.tv1);
mLocationManager = (LocationManager)
getSystemService(Context.LOCATION_SERVICE);
Criteria criteria = new Criteria();
criteria.setAccuracy(Criteria.ACCURACY_FINE);
criteria.setPowerRequirement(Criteria.POWER_LOW);
String locationprovider =
mLocationManager.getBestProvider(criteria,true);
Location mLocation =
mLocationManager.getLastKnownLocation(locationprovider);
tv.setText("Last location lat:" + mLocation.getLatitude()
+ "long:" + mLocation.getLongitude());
}
}
Recipe: Updating Location Upon Change
The LocationListener interface is used to receive notifications when the location has changed. The location manager’s requestLocationUpdates() method needs to be called after a location provider is initialized to specify when the current activity is to be notified of changes. It depends on the following parameters:
![]() provider—The location provider the application uses
provider—The location provider the application uses
![]() minTime—The minimum time between updates in milliseconds (although the system might increase this time to conserve power)
minTime—The minimum time between updates in milliseconds (although the system might increase this time to conserve power)
![]() minDistance—The minimum distance change before updates in meters
minDistance—The minimum distance change before updates in meters
![]() listener—The location listener that should receive the updates
listener—The location listener that should receive the updates
The location listener’s onLocationChanged() method can be overridden to specify an action to be done with the new location. Listing 12.4 shows how this is put together for 5 seconds of time and changes of more than 2 meters between updates. An actual implementation should use larger values between updates to save battery life. Also note that no heavy processing should be done in the onLocationChanged() method. Rather, copy the data and pass it off to a thread.
Listing 12.4. src/com/cookbook/update_location/MyLocation.java
package com.cookbook.update_location;
import android.app.Activity;
import android.content.Context;
import android.location.Criteria;
import android.location.Location;
import android.location.LocationListener;
import android.location.LocationManager;
import android.os.Bundle;
import android.widget.TextView;
public class MyLocation extends Activity implements LocationListener {
LocationManager mLocationManager;
TextView tv;
Location mLocation;
@Override
public void onCreate(Bundle savedInstanceState) {
super.onCreate(savedInstanceState);
setContentView(R.layout.main);
tv = (TextView) findViewById(R.id.tv1);
mLocationManager = (LocationManager)
getSystemService(Context.LOCATION_SERVICE);
Criteria criteria = new Criteria();
criteria.setAccuracy(Criteria.ACCURACY_FINE);
criteria.setPowerRequirement(Criteria.POWER_LOW);
String locationprovider =
mLocationManager.getBestProvider(criteria,true);
mLocation =
mLocationManager.getLastKnownLocation(locationprovider);
mLocationManager.requestLocationUpdates(
locationprovider, 5000, 2.0, this);
}
@Override
public void onLocationChanged(Location location) {
mLocation = location;
showupdate();
}
// These methods are required
public void onProviderDisabled(String arg0) {}
public void onProviderEnabled(String provider) {}
public void onStatusChanged(String a, int b, Bundle c) {}
public void showupdate(){
tv.setText("Last location lat:"+mLocation.getLatitude()
+ "long:" + mLocation.getLongitude());
}
}
Note that rather than implementing the LocationListener at the activity level, it can also be declared as a separate inner class as follows. This can easily be added to any of the following recipes to provide an update mechanism to the location:
mLocationManager.requestLocationUpdates(
locationprovider, 5000, 2.0, myLocL);
}
private final LocationListener myLocL = new LocationListener(){
@Override
public void onLocationChanged(Location location){
mLocation = location;
showupdate();
}
// These methods are required
public void onProviderDisabled(String arg0) {}
public void onProviderEnabled(String provider) {}
public void onStatusChanged(String a, int b, Bundle c) {}
};
Recipe: Listing All Enabled Providers
This recipe lists the different location providers available on a given Android device. One example output is shown in Figure 12.1, but output may be different depending on the device. The main activity is shown in Listing 12.5. To see a list of possible providers, the getProviders(true)method is used. To contrast with the previous recipe, LocationListener is declared as an anonymous inner class without loss of functionality.
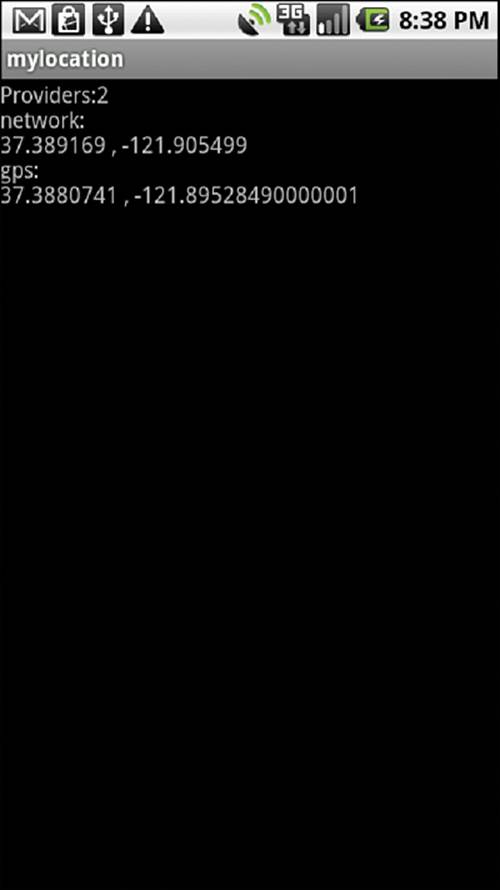
Figure 12.1 Example output of all enabled location providers at their last known location using an actual Android device
Listing 12.5. src/com/cookbook/show_providers/MyLocation.java
package com.cookbook.show_providers;
import java.util.List;
import android.app.Activity;
import android.content.Context;
import android.location.Criteria;
import android.location.Location;
import android.location.LocationListener;
import android.location.LocationManager;
import android.os.Bundle;
import android.widget.TextView;
public class MyLocation extends Activity {
LocationManager mLocationManager;
TextView tv;
Location mLocation;
@Override
public void onCreate(Bundle savedInstanceState) {
super.onCreate(savedInstanceState);
setContentView(R.layout.main);
tv = (TextView) findViewById(R.id.tv1);
mLocationManager = (LocationManager)
getSystemService(Context.LOCATION_SERVICE);
Criteria criteria = new Criteria();
criteria.setAccuracy(Criteria.ACCURACY_FINE);
criteria.setPowerRequirement(Criteria.POWER_LOW);
String locationprovider =
mLocationManager.getBestProvider(criteria,true);
List<String> providers = mLocationManager.getProviders(true);
StringBuilder mSB = new StringBuilder("Providers:\n");
for(int i = 0; i<providers.size(); i++) {
mLocationManager.requestLocationUpdates(
providers.get(i), 5000, 2.0f, new LocationListener(){
// These methods are required
public void onLocationChanged(Location location) {}
public void onProviderDisabled(String arg0) {}
public void onProviderEnabled(String provider) {}
public void onStatusChanged(String a, int b, Bundle c) {}
});
mSB.append(providers.get(i)).append(": \n");
mLocation =
mLocationManager.getLastKnownLocation(providers.get(i));
if(mLocation != null) {
mSB.append(mLocation.getLatitude()).append(" , ");
mSB.append(mLocation.getLongitude()).append("\n");
} else {
mSB.append("Location cannot be found");
}
}
tv.setText(mSB.toString());
}
}
Recipe: Translating a Location to an Address (Reverse Geocoding)
The Geocoder class provides a method to translate from an address into latitude-longitude coordinates (geocoding) and from latitude-longitude coordinates into an address (reverse geocoding). Reverse geocoding might produce only a partial address, such as city and postal code, depending on the level of detail available to the location provider.
This recipe uses reverse geocoding to get an address from the device’s location and display to the screen, as shown in Figure 12.2. The Geocoder instance needs to be initiated with a context and optionally with a locale if different from the system locale. Here, it is explicitly set toLocale.ENGLISH. Then the getFromLocation() method provides a list of addresses associated with the area around the provided location. Here, the maximum number of returned results is set to one (for instance, the most likely address).
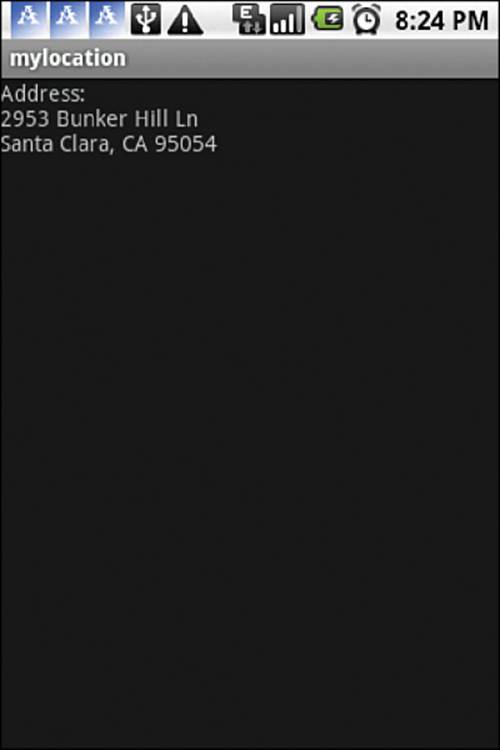
Figure 12.2 Reverse geocoding example, which converts latitude-longitude coordinates into an address
The geocoder returns a list of android.location.Address objects. This translation to an address depends on a backend service that is not included in the core Android Framework. The Google Maps API provides a client geocoder service, for example. However, the translation returns an empty list if no such service exists on the target device. The address as a list of strings is dumped line by line into a String for display on the screen. The main activity is shown in Listing 12.6.
Listing 12.6. src/com/cookbook/rev_geocoding/MyLocation.java
package com.cookbook.rev_geocoding;
import java.io.IOException;import java.util.List;import java.util.Locale;
import android.app.Activity;
import android.content.Context;
import android.location.Address;
import android.location.Criteria;
import android.location.Geocoder;
import android.location.Location;
import android.location.LocationListener;
import android.location.LocationManager;
import android.os.Bundle;
import android.util.Log;
import android.widget.TextView;
public class MyLocation extends Activity {
LocationManager mLocationManager;
Location mLocation;
TextView tv;
@Override
public void onCreate(Bundle savedInstanceState) {
super.onCreate(savedInstanceState);
setContentView(R.layout.main);
tv = (TextView) findViewById(R.id.tv1);
mLocationManager = (LocationManager)
getSystemService(Context.LOCATION_SERVICE);
Criteria criteria = new Criteria();
criteria.setAccuracy(Criteria.ACCURACY_FINE);
criteria.setPowerRequirement(Criteria.POWER_LOW);
String locationprovider =
mLocationManager.getBestProvider(criteria,true);
mLocation =
mLocationManager.getLastKnownLocation(locationprovider);
List<Address> addresses;
try {
Geocoder mGC = new Geocoder(this, Locale.ENGLISH);
addresses = mGC.getFromLocation(mLocation.getLatitude(),
mLocation.getLongitude(), 1);
if(addresses != null) {
Address currentAddr = addresses.get(0);
StringBuilder mSB = new StringBuilder("Address:\n");
for(int i=0; i<currentAddr.getMaxAddressLineIndex(); i++) {
mSB.append(currentAddr.getAddressLine(i)).append("\n");
}
tv.setText(mSB.toString());
}
} catch(IOException e) {
tv.setText(e.getMessage());
}
}
}
Recipe: Translating an Address to a Location (Geocoding)
This recipe shows how to translate an address to longitude-latitude coordinates, which is the geocoding process. It is almost the same as the reverse geocoding process used in the previous recipe, except the getFromLocationName() method is used instead of getFromLocation(). Listing 12.7takes a specific address in the String myAddress, converts it to a location, and then displays it to the screen, as shown in Figure 12.3.
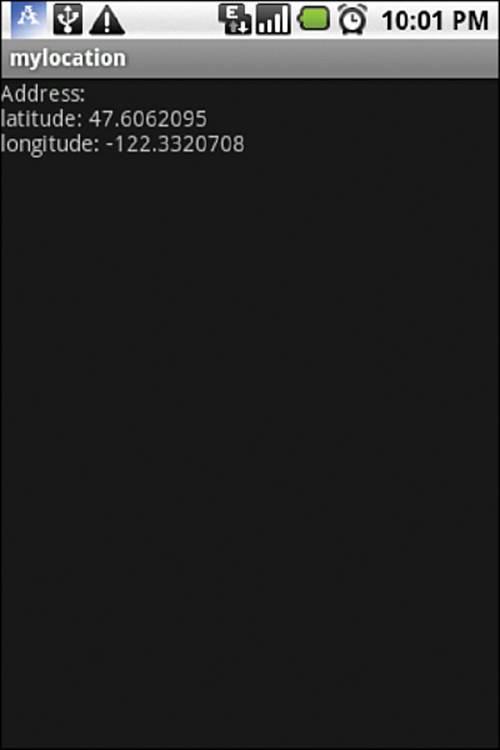
Figure 12.3 Geocoding example, which converts an address string into latitude-longitude coordinates
Listing 12.7. src/com/cookbook/geocoding/MyLocation.java
package com.cookbook.geocoding;
import java.io.IOException;import java.util.List;import java.util.Locale;
import android.app.Activity;
import android.content.Context;
import android.location.Address;
import android.location.Criteria;
import android.location.Geocoder;
import android.location.Location;
import android.location.LocationListener;
import android.location.LocationManager;
import android.os.Bundle;
import android.widget.TextView;
public class MyLocation extends Activity {
LocationManager mLocationManager;
Location mLocation;
TextView tv;
@Override
public void onCreate(Bundle savedInstanceState) {
super.onCreate(savedInstanceState);
setContentView(R.layout.main);
tv = (TextView) findViewById(R.id.tv1);
mLocationManager = (LocationManager)
getSystemService(Context.LOCATION_SERVICE);
Criteria criteria = new Criteria();
criteria.setAccuracy(Criteria.ACCURACY_FINE);
criteria.setPowerRequirement(Criteria.POWER_LOW);
String locationprovider =
mLocationManager.getBestProvider(criteria,true);
mLocation =
mLocationManager.getLastKnownLocation(locationprovider);
List<Address> addresses;
String myAddress="Seattle,WA";
Geocoder gc = new Geocoder(this);
try {
addresses = gc.getFromLocationName(myAddress, 1);
if(addresses != null) {
Address x = addresses.get(0);
StringBuilder mSB = new StringBuilder("Address:\n");
mSB.append("latitude: ").append(x.getLatitude());
mSB.append("\nlongitude: ").append(x.getLongitude());
tv.setText(mSB.toString());
}
} catch(IOException e) {
tv.setText(e.getMessage());
}
}
}
Using Google Maps
Google Maps can be used on the Android system in two ways: user access through a browser, and application access through the Google Maps API. The MapView class is a wrapper around the Google Maps API. To use MapView and version 1 of Google Maps, the following setup is needed:
1. Download and install the Google API’s SDK as follows:
![]() Use the Android SDK and AVD manager in Eclipse to download the Google API.
Use the Android SDK and AVD manager in Eclipse to download the Google API.
![]() Right-click the project that uses the API, and then select Properties.
Right-click the project that uses the API, and then select Properties.
![]() Select Android, and then select Google API to enable it for this project.
Select Android, and then select Google API to enable it for this project.
2. Obtain a valid Maps API key to use the Google Maps service as follows (see http://code.google.com/android/add-ons/google-apis/mapkey.html):
![]() Use the keytool command to generate an MD5 certificate fingerprint for the key alias _ name:
Use the keytool command to generate an MD5 certificate fingerprint for the key alias _ name:
> keytool -list -alias alias_name -keystore my.keystore
> result:(Certificate fingerprint (MD5):
94:1E:43:49:87:73:BB:E6:A6:88:D7:20:F1:8E:B5)
![]() Use the MD5 keystore to sign up for the Google Maps service at http://code.google.com/android/maps-api-signup.html.
Use the MD5 keystore to sign up for the Google Maps service at http://code.google.com/android/maps-api-signup.html.
![]() A Maps API key is provided upon signup. Use this key with MapView.
A Maps API key is provided upon signup. Use this key with MapView.
3. Include <uses-library android:name="com.google.android.maps" /> in the AndroidManifest.xml file to inform the Android system that the application uses the com.google.android.maps library from the Google API’s SDK.
4. Add the android.permission.INTERNET permission to the AndroidManifest.xml file so the application is allowed to use the Internet to receive data from the Google Maps service.
5. Include a MapView in the layout XML file.
More specifically, the two supporting files needed for a Google Maps activity follow. First, the AndroidManifest.xml file needs the proper maps library and permissions, as shown in Listing 12.8.
Listing 12.8. AndroidManifest.xml
<?xml version="1.0" encoding="utf-8"?>
<manifest xmlns:android="http://schemas.android.com/apk/res/android"
package="com.cookbook.using_gmaps"
android:versionCode="1"
android:versionName="1.0">
<application android:icon="@drawable/icon"
android:label="@string/app_name">
<activity android:name=".MyLocation"
android:label="@string/app_name">
<intent-filter>
<action android:name="android.intent.action.MAIN" />
<category android:name="android.intent.category.LAUNCHER" />
</intent-filter>
</activity>
<uses-library android:name="com.google.android.maps" />
</application>
<uses-sdk android:minSdkVersion="4" />
<uses-permission android:name="android.permission.INTERNET" /><uses-permission android:name="android.permission.ACCESS_FINE_LOCATION"/>
</manifest>
Second, the layout XML file needs the proper MapView declared in order to display the Google map, as shown in Listing 12.9. It can also declare whether the user can interact with the map by declaring the clickable element, which is false by default. This is used in the following recipes.
Listing 12.9. res/layout/main.xml
<?xml version="1.0" encoding="utf-8"?>
<LinearLayout xmlns:android="http://schemas.android.com/apk/res/android"
android:orientation="vertical"
android:layout_width="match_parent"
android:layout_height="match_parent"
>
<TextView
android:id="@+id/tv1"
android:layout_width="match_parent"
android:layout_height="wrap_content"
android:text="@string/hello"
/>
<com.google.android.maps.MapView
android:id="@+id/map1"
android:layout_width="match_parent"
android:layout_height="match_parent"
android:clickable="true"
android:apiKey="0ZDUMMY13442HjX491CODE44MSsJzfDVlIQ"
/>
</LinearLayout>
Note that there are several changes in Google Maps API version 2:
![]() Acquiring an API key is now done through the Google API console (https://code.google.com/apis/console/).
Acquiring an API key is now done through the Google API console (https://code.google.com/apis/console/).
![]() The following permissions are now required:
The following permissions are now required:
android.permission.INTERNET
android.permission.ACCESS_NETWORK_STATE
android.permission.WRITE_EXTERNAL_STORAGE
com.google.android.providers.gsf.permission.READ_GSERVICES
![]() OpenGL ES version 2 is now required and is obtained by including the following <uses-feature> element:
OpenGL ES version 2 is now required and is obtained by including the following <uses-feature> element:
<uses-feature
android:glEsVersion="0x00020000"
android:required="true"/>
![]() In the main layout XML file, add the following fragment:
In the main layout XML file, add the following fragment:
<fragment xmlns:android="http://schemas.android.com/apk/res/android"
android:id="@+id/map"
android:layout_width="match_parent"
android:layout_height="match_parent"
android:name="com.google.android.gms.maps.MapFragment"/>
![]() In onCreate(), make sure to use setContentView to the XML file that contains the fragment. For example:
In onCreate(), make sure to use setContentView to the XML file that contains the fragment. For example:
setContentView(R.layout.main);
For more information about using Google Maps Android API version 2, visit https://developers.google.com/maps/documentation/android/start.
Recipe: Adding Google Maps to an Application
To display a Google map, the main activity should extend MapActivity, as shown in Listing 12.10. It also must point to the layout ID for the map in the main layout XML file, called map1 here. Note that the isRouteDisplayed() method needs to be implemented, too. The resulting display is shown in Figure 12.4.
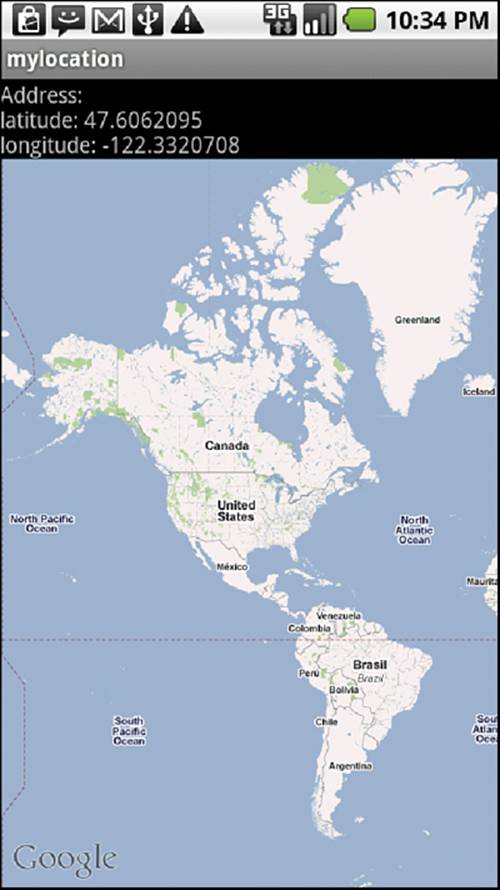
Figure 12.4 Example of Google Maps used from inside an application
Listing 12.10. src/com/cookbook/using_gmaps/MyLocation.java
package com.cookbook.using_gmaps;
import android.content.Context;
import android.location.Criteria;
import android.location.Location;
import android.location.LocationManager;
import android.os.Bundle;
import android.widget.TextView;
import com.google.android.maps.MapActivity;import com.google.android.maps.MapView;
public class MyLocation extends MapActivity {
LocationManager mLocationManager;
Location mLocation;
TextView tv;
@Override
public void onCreate(Bundle savedInstanceState) {
super.onCreate(savedInstanceState);
setContentView(R.layout.main);
MapView mapView = (MapView) findViewById(R.id.map1);
tv = (TextView) findViewById(R.id.tv1);
mLocationManager = (LocationManager)
getSystemService(Context.LOCATION_SERVICE);
Criteria criteria = new Criteria();
criteria.setAccuracy(Criteria.ACCURACY_FINE);
criteria.setPowerRequirement(Criteria.POWER_LOW);
String locationprovider =
mLocationManager.getBestProvider(criteria,true);
mLocation =
mLocationManager.getLastKnownLocation(locationprovider);
tv.setText("Last location lat:" + mLocation.getLatitude()
+ "long:" + mLocation.getLongitude());
}
@Override
protected boolean isRouteDisplayed() {
// This method is required
return false;
}
}
Recipe: Adding Markers to a Map
The ItemizedOverlay class provides a way to draw markers and overlays on top of a MapView. It manages a set of OverlayItem elements, such as an image, in a list and handles the drawing, placement, click handling, focus control, and layout optimization for each element. Create a class that extends ItemizedOverlay and override the following:
![]() addOverlay()—Adds an OverlayItem to the ArrayList. This calls populate(), which reads the item and prepares it to be drawn.
addOverlay()—Adds an OverlayItem to the ArrayList. This calls populate(), which reads the item and prepares it to be drawn.
![]() createItem()—Called by populate() to retrieve the given OverlayItem.
createItem()—Called by populate() to retrieve the given OverlayItem.
![]() size()—Returns the number of OverlayItem elements in the ArrayList.
size()—Returns the number of OverlayItem elements in the ArrayList.
![]() onTap()—Callback method when a marker is clicked.
onTap()—Callback method when a marker is clicked.
The newly created class is given in Listing 12.11, and Figure 12.5 shows the result.
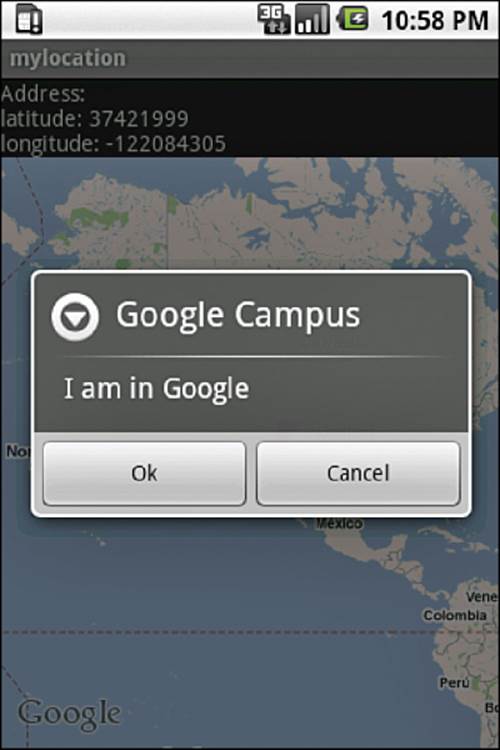
Figure 12.5 Adding a clickable marker to a map
Listing 12.11. src/com/cookbook/adding_markers/MyMarkerLayer.java
package com.cookbook.adding_markers;
import java.util.ArrayList;
import android.app.AlertDialog;
import android.content.DialogInterface;
import android.graphics.drawable.Drawable;
import com.google.android.maps.ItemizedOverlay;import com.google.android.maps.OverlayItem;
public class MyMarkerLayer extends ItemizedOverlay {
private ArrayList<OverlayItem> mOverlays =
new ArrayList<OverlayItem>();
public MyMarkerLayer(Drawable defaultMarker) {
super(boundCenterBottom(defaultMarker));
populate();
}
public void addOverlayItem(OverlayItem overlay) {
mOverlays.add(overlay);
populate();
}
@Override
protected OverlayItem createItem(int i) {
return mOverlays.get(i);
}
@Override
public int size() {
return mOverlays.size();
}
@Override
protected boolean onTap(int index) {
AlertDialog.Builder dialog =
new AlertDialog.Builder(MyLocation.mContext);
dialog.setTitle(mOverlays.get(index).getTitle());
dialog.setMessage(mOverlays.get(index).getSnippet());
dialog.setPositiveButton("OK",
new DialogInterface.OnClickListener() {
public void onClick(DialogInterface dialog, int whichButton) {
dialog.cancel();
}
});
dialog.setNegativeButton("Cancel",
new DialogInterface.OnClickListener() {
public void onClick(DialogInterface dialog, int whichButton) {
dialog.cancel();
}
});
dialog.show();
return super.onTap(index);
}
}
A few comments on the MyMarkerLayer class that are highlighted in Listing 12.11:
![]() An OverlayItem container mOverlays is declared to save all the items passed to the overlay.
An OverlayItem container mOverlays is declared to save all the items passed to the overlay.
![]() A binding point for where all overlaid items are attached to the map needs to be defined before any overlay item is drawn. To specify the bottom center of the map as that point, boundCenterBottom is added to the class constructor.
A binding point for where all overlaid items are attached to the map needs to be defined before any overlay item is drawn. To specify the bottom center of the map as that point, boundCenterBottom is added to the class constructor.
![]() The required methods are overridden: addOverlay(), createItem(), size(), and onTap(). Here, the onTap() method provides a dialog box when the item is clicked.
The required methods are overridden: addOverlay(), createItem(), size(), and onTap(). Here, the onTap() method provides a dialog box when the item is clicked.
![]() The populate() method is added to the end of the constructor and addOverlay(). This tells the MyMarkerLayer class to prepare all OverlayItem elements and draw each one on the map.
The populate() method is added to the end of the constructor and addOverlay(). This tells the MyMarkerLayer class to prepare all OverlayItem elements and draw each one on the map.
Now this ItemizedOverlay can be added to the MapActivity created in the previous recipe. As highlighted in Listing 12.12, the activity:
![]() Retrieves the existing map overlay items using the getOverlays() method from MapView. The marker layer is added to this container at the end of the function.
Retrieves the existing map overlay items using the getOverlays() method from MapView. The marker layer is added to this container at the end of the function.
![]() Defines an instance of the MyMarkerLayer to handle the overlay items.
Defines an instance of the MyMarkerLayer to handle the overlay items.
![]() Retrieves the latitude and longitude (in degrees) of the address. This defines the point of interest using a GeoPoint class. GeoPoint takes input in microdegrees, so the latitude and longitude need to be multiplied by one million (1E6).
Retrieves the latitude and longitude (in degrees) of the address. This defines the point of interest using a GeoPoint class. GeoPoint takes input in microdegrees, so the latitude and longitude need to be multiplied by one million (1E6).
![]() Uses a map controller to animate to the GeoPoint and zoom the view. Also, it enables user-controlled zoom using setBuiltInZoomControls().
Uses a map controller to animate to the GeoPoint and zoom the view. Also, it enables user-controlled zoom using setBuiltInZoomControls().
![]() Defines an OverlayItem as a message at the GeoPoint of interest.
Defines an OverlayItem as a message at the GeoPoint of interest.
![]() Adds the item to the MyMarkerLayer using the addOverlayItem() method. It then puts the now-defined MyMarkerLayer into the existing overlay list retrieved in step 1.
Adds the item to the MyMarkerLayer using the addOverlayItem() method. It then puts the now-defined MyMarkerLayer into the existing overlay list retrieved in step 1.
Listing 12.12. src/com/cookbook/adding_markers/MyLocation.java
package com.cookbook.adding_markers;
import java.io.IOException;import java.util.List;
import android.content.Context;import android.graphics.drawable.Drawable;import android.location.Address;import android.location.Geocoder;
import android.os.Bundle;
import android.widget.TextView;
import com.google.android.maps.GeoPoint;import com.google.android.maps.MapActivity;import com.google.android.maps.MapController;import com.google.android.maps.MapView;import com.google.android.maps.Overlay;
public class MyLocation extends MapActivity {
TextView tv;
List<Overlay> mapOverlays;
MyMarkerLayer markerlayer;
private MapController mc;
public static Context mContext;
@Override
public void onCreate(Bundle savedInstanceState) {
super.onCreate(savedInstanceState);
mContext = this;
setContentView(R.layout.main);
MapView mapView = (MapView) findViewById(R.id.map1);
tv = (TextView) findViewById(R.id.tv1);
mapOverlays = mapView.getOverlays();
Drawable drawable =
this.getResources().getDrawable(R.drawable.icon);
markerlayer = new MyMarkerLayer(drawable);
List<Address> addresses;
String myAddress="1600 Amphitheatre Parkway, Mountain View, CA";
int geolat = 0;
int geolon = 0;
Geocoder gc = new Geocoder(this);
try {
addresses = gc.getFromLocationName(myAddress, 1);
if(addresses != null) {
Address x = addresses.get(0);
geolat = (int)(x.getLatitude()*1E6);
geolon = (int)(x.getLongitude()*1E6);
}
} catch(IOException e) {
tv.setText(e.getMessage());
}
mapView.setBuiltInZoomControls(true);
GeoPoint point = new GeoPoint(geolat,geolon);
mc = mapView.getController();
mc.animateTo(point);
mc.setZoom(3);
OverlayItem overlayitem =
new OverlayItem(point, "Google Campus", "I am at Google");
markerlayer.addOverlayItem(overlayitem);
mapOverlays.add(markerlayer);
}
@Override
protected boolean isRouteDisplayed() { return false; }
}
Recipe: Adding Views to a Map
Developers can add any View or ViewGroup to the MapView. This recipe shows the addition of two simple elements to a map: TextView and Button. When the button is clicked, the text in the TextView changes.
These two views are added to MapView by calling the addView() method with LayoutParams. Here, the location of the elements is specified in (x,y) screen coordinates, but developers can also provide a GeoPoint class to LayoutParams instead. Listing 12.13 shows the main activity, which also requires the MyMarkerLayer class defined in the previous recipe (Listing 12.11 with the first line changed to reflect the proper package). This results in the MapView shown in Figure 12.6.
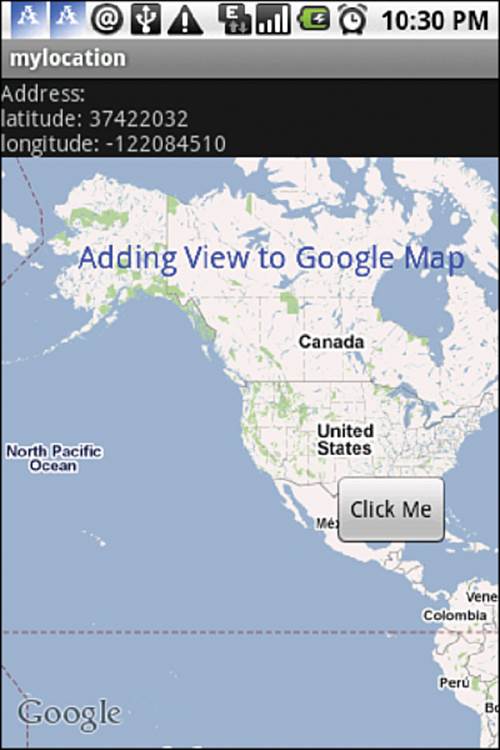
Figure 12.6 Adding a TextView and a button to a map
Listing 12.13. src/com/cookbook/mylocation/MyLocation.java
package com.cookbook.mylocation;
import java.io.IOException;
import java.util.List;
import android.content.Context;
import android.content.Intent;
import android.graphics.Color;
import android.graphics.drawable.Drawable;
import android.location.Address;
import android.location.Geocoder;
import android.os.Bundle;
import android.view.View;import android.view.View.OnClickListener;import android.widget.Button;import android.widget.TextView;import com.google.android.maps.GeoPoint;import com.google.android.maps.MapActivity;import com.google.android.maps.MapController;import com.google.android.maps.MapView;import com.google.android.maps.Overlay;
public class MyLocation extends MapActivity {
TextView tv;
List<Overlay> mapOverlays;
MyMarkerLayer markerlayer;
private MapController mc;
MapView.LayoutParams mScreenLayoutParams;
public static Context mContext;
@Override
public void onCreate(Bundle savedInstanceState) {
super.onCreate(savedInstanceState);
mContext = this;
setContentView(R.layout.main);
MapView mapView = (MapView) findViewById(R.id.map1);
mc = mapView.getController();
tv = (TextView) findViewById(R.id.tv1);
mapOverlays = mapView.getOverlays();
Drawable drawable =
this.getResources().getDrawable(R.drawable.icon);
markerlayer = new MyMarkerLayer(drawable);
List<Address> addresses;
String myAddress="1600 Amphitheatre Parkway, Mountain View, CA";
int geolat = 0;
int geolon = 0;
Geocoder gc = new Geocoder(this);
try {
addresses = gc.getFromLocationName(myAddress, 1);
if(addresses != null) {
Address x = addresses.get(0);
StringBuilder mSB = new StringBuilder("Address:\n");
geolat =(int)(x.getLatitude()*1E6);
geolon = (int)(x.getLongitude()*1E6);
mSB.append("latitude: ").append(geolat).append("\n");
mSB.append("longitude: ").append(geolon);
tv.setText(mSB.toString());
}
} catch(IOException e) {
tv.setText(e.getMessage());
}
int x = 50;
int y = 50;
mScreenLayoutParams =
new MapView.LayoutParams(MapView.LayoutParams.WRAP_CONTENT,
MapView.LayoutParams.WRAP_CONTENT,
x,y,MapView.LayoutParams.LEFT);
final TextView tv = new TextView(this);
tv.setText("Adding View to Google Map");
tv.setTextColor(Color.BLUE);
tv.setTextSize(20);
mapView.addView(tv, mScreenLayoutParams);
x = 250;
y = 250;
mScreenLayoutParams =
new MapView.LayoutParams(MapView.LayoutParams.WRAP_CONTENT,
MapView.LayoutParams.WRAP_CONTENT,
x,y,
MapView.LayoutParams.BOTTOM_CENTER);
Button clickMe = new Button(this);
clickMe.setText("Click Me");
clickMe.setOnClickListener(new OnClickListener() {
public void onClick(View v) {
tv.setTextColor(Color.RED);
tv.setText("Let's play");
}
});
mapView.addView(clickMe, mScreenLayoutParams);
}
@Override
protected boolean isRouteDisplayed() { return false; }
}
Recipe: Setting Up a Proximity Alert
LocationManager provides a method to set a proximity alert. This triggers an alert when a user enters or leaves a defined area. The area is specified by creating variables for latitude-longitude coordinates as well as a variable containing the radius in meters. The alert is specified with aPendingIntent that will be launched whenever a user enters or leaves the specified area. An expiration time, set in milliseconds, for the alert can also be defined. An example of how to implement this is shown in Listing 12.14.
Listing 12.14. Creating a Proximity Alert without an Expiration
double mlatitude=35.41;
double mlongitude=139.46;
float mRadius=500f; // in meters
long expiration=-1; //-1 never expires or use milliseconds
Intent mIntent = new Intent("You entered the defined area");
PendingIntent mFireIntent
= PendingIntent.getBroadCast(this, -1, mIntent, 0);
mLocationManager.addProximityAlert(mlatitude, mlongitude,
mRadius, expiration, mFireIntent);
Using the Little Fluffy Location Library
Dealing with location accuracy as well as maintaining sensible battery usage can at times be tricky. If a user must leave the GPS on in order to get a location fix, the application will use a considerable amount of battery power. If an application needs only a rough estimate of where the user is, some battery power can be saved by using coarse location. However, many applications benefit from using both coarse and fine location, and this leaves developers trying to plan how to handle getting a location, balancing which location method to use (fine or coarse), and how to deal with acquiring the location when the application has been moved into the background without using more battery power than is necessary.
Kenton Price of Little Fluffy Toys Ltd. has written a library for Android 2.1+ called Little Fluffy Location Library that has taken these issues into account. Projects that include his library can tap into a broadcast action that contains a LocationInfo object with the following fields:
![]() lastLocationUpdateTimestamp—Time of the last location update in milliseconds
lastLocationUpdateTimestamp—Time of the last location update in milliseconds
![]() lastLocationBroadcastTimestamp—Time of the last location update broadcast in milliseconds
lastLocationBroadcastTimestamp—Time of the last location update broadcast in milliseconds
![]() lastLat—Latitude of the last update in degrees
lastLat—Latitude of the last update in degrees
![]() lastLong—Longitude of the last update in degrees
lastLong—Longitude of the last update in degrees
![]() lastAccuracy—Accuracy of the last update in meters
lastAccuracy—Accuracy of the last update in meters
In addition, the object also contains the following utility methods:
![]() refresh—Refreshes all fields with the latest information
refresh—Refreshes all fields with the latest information
![]() anyLocationDataReceived—Determines if any location data has been received since the last reboot
anyLocationDataReceived—Determines if any location data has been received since the last reboot
![]() anyLocationDataBroadcast—Determines if any location information has been broadcast since the last reboot
anyLocationDataBroadcast—Determines if any location information has been broadcast since the last reboot
![]() hasLatestDataBeenBroadcast—Determines if the data contained in the LocationInfo object has already been broadcast
hasLatestDataBeenBroadcast—Determines if the data contained in the LocationInfo object has already been broadcast
![]() getTimestampAgeInSeconds—Returns how old the last location update is in seconds
getTimestampAgeInSeconds—Returns how old the last location update is in seconds
To start using the Little Fluffy Location Library, download the littleflufffylocationlibrary.jar file from http://code.google.com/p/little-fluffy-location-library/ and include it in the project by copying it into the /libs folder. After it has been copied, right-click on the file and choose Build Path → Add to Build Path.
Recipe: Adding a Notification with the Little Fluffy Location Library
To use the Little Fluffy Location Library in a project, add the following permissions to the manifest:
![]() ACCESS_FINE_LOCATION
ACCESS_FINE_LOCATION
![]() INTERNET
INTERNET
![]() RECEIVE_BOOT_COMPLETED
RECEIVE_BOOT_COMPLETED
![]() ACCESS_COARSE_LOCATION
ACCESS_COARSE_LOCATION
![]() ACCESS_FINE_LOCATION
ACCESS_FINE_LOCATION
The following features should also be added to the manifest:
![]() Android.hardware.location
Android.hardware.location
![]() Android.hardware.location.gps
Android.hardware.location.gps
The following elements will also be needed inside the application element:
<service android:name="com.littlefluffytoys.littlefluffylocationlibrary.LocationBroadcastService" />
<receiver android:name="com.littlefluffytoys.littlefluffylocationlibrary.StartupBroadcastReceiver" android:exported="true">
<intent-filter>
<action android:name="android.intent.action.BOOT_COMPLETED" />
</intent-filter>
</receiver>
<receiver android:name="com.littlefluffytoys.littlefluffylocationlibrary.PassiveLocation ChangedReceiver" android:exported="true" />
<receiver android:name=".FluffyBroadcastReceiver">
<intent-filter>
<action android:name="com.cookbook.fluffylocation.littlefluffylocationlibrary. LOCATION_CHANGED" android:exported="true"/>
</intent-filter>
</receiver>
The added elements will set up a service as well as a receiver that is used to get data from the Little Fluffy Location Library. The last block will set up a broadcast receiver that will be used to trigger notifications. Listing 12.15 shows the class that is referenced in the manifest file as the receiver.
Listing 12.15. /src/com/cookbook/fluffylocation/FluffyBroadcastReceiver.java
package com.cookbook.fluffylocation;
import android.app.Notification;
import android.app.NotificationManager;
import android.app.PendingIntent;
import android.content.BroadcastReceiver;
import android.content.Context;
import android.content.Intent;
import android.util.Log;
import com.littlefluffytoys.littlefluffylocationlibrary.LocationInfo;
import com.littlefluffytoys.littlefluffylocationlibrary.LocationLibraryConstants;
public class FluffyBroadcastReceiver extends BroadcastReceiver{
@Override
public void onReceive(Context context, Intent intent) {
Log.d("LocationBroadcastReceiver", "onReceive: received location update");
final LocationInfo locationInfo = (LocationInfo) intent
.getSerializableExtra(LocationLibraryConstants
.LOCATION_BROADCAST_EXTRA_LOCATIONINFO);
// For API 16+ use Notification.Builder instead of Notification
Notification notification = new Notification(R.drawable.ic_launcher,
"Locaton updated " +
locationInfo.getTimestampAgeInSeconds() +
" seconds ago", System.currentTimeMillis());
Intent contentIntent = new Intent(context, MainActivity.class);
PendingIntent contentPendingIntent = PendingIntent.getActivity(context,
0, contentIntent, PendingIntent.FLAG_UPDATE_CURRENT);
notification.setLatestEventInfo(context, "Location update broadcast received",
"Timestamped " +
LocationInfo
.formatTimeAndDay(locationInfo.lastLocationUpdateTimestamp, true),
contentPendingIntent);
((NotificationManager) context
.getSystemService(Context.NOTIFICATION_SERVICE))
.notify(1234, notification);
}
}
Listing 12.15 shows the basic setup for a broadcast receiver. Using the Log.d() method shows that logging has been put in place to help debug the application.
Something else to take into account is how the notification is built. The notify() method currently uses a value of 1234; this is an ID that is tied to the notification. If there already is a global notification port, such as NOTIFICATION_PORT, it can be substituted here. The current notification will work from Gingerbread to Honeycomb; however, the Notification constructor has been deprecated starting with API Level 16 (Jelly Bean). For future development, the Notification constructor must be converted to Notification.Builder.
Now that a receiver is in place, an application class needs to be set up. To do this, make sure that the application has been named. In the manifest file, the application element should contain the following property:
android:name="com.cookbook.fluffylocation.FluffyApplication"
The full path to the application class must be referenced. In this example snippet, com.cookbook.fluffylocation.FluffyApplication was used. Listing 12.16 shows the class file found in this location.
Listing 12.16. /src/com/cookbook/fluffylocation/FluffyApplication.java
package com.cookbook.fluffylocation;
import com.littlefluffytoys.littlefluffylocationlibrary.LocationLibrary;
import android.app.Application;
import android.util.Log;
public class FluffyApplication extends Application {
@Override
public void onCreate() {
super.onCreate();
// Show debugging information
Log.d("FluffyApplication", "onCreate()");
LocationLibrary.showDebugOutput(true);
// Default call would be the following:
// LocationLibrary.initialiseLibrary(getBaseContext(),
// "com.cookbook.fluffylocation");
// For testing, make request every 1 minute, and force a location update
// if one hasn't happened in the last 2 minutes
LocationLibrary.initializeLibrary(getBaseContext(),
60 * 1000, 2 * 60 * 1000, "com.cookbook.fluffylocation");
}
}
Listing 12.16 shows an onCreate() method setting up logging by use of the Log.d() method as well as enabling extra debug information by using showDebugOutput(true). This debug information will be useful because it indicates when the library has been loaded and when information is passed to and from the application. The call to initialize the Little Fluffy Location Library can be seen in both the comments and near the end of the onCreate() method. The call being used is overkill for getting location data but for development purposes will inform the user every minute if new location data has been retrieved. Figure 12.7 shows the Little Fluffy Location Library in use.

Figure 12.7 A notification displaying information gathered from the Little Fluffy Location Library
All materials on the site are licensed Creative Commons Attribution-Sharealike 3.0 Unported CC BY-SA 3.0 & GNU Free Documentation License (GFDL)
If you are the copyright holder of any material contained on our site and intend to remove it, please contact our site administrator for approval.
© 2016-2025 All site design rights belong to S.Y.A.