The Android Developer’s Cookbook: Building Applications with the Android SDK, Second Edition (2013)
Chapter 13. In-App Billing
Creating applications that have the ability to up-sell, allow the purchase of items, or add functionality can fill an important role in the application’s marketing strategy. Most users are familiar with “pay-to-win” strategies as well as “gifting” systems. Pay-to-win systems often allow users to download the application for free but penalize them with lesser power-ups or limited playing time unless they purchase upgrades. Gifting systems work on a similar principle, allowing users to purchase items for others instead of powering up themselves.
Until recently, Google did not have an official support system in place for these models for the Android Platform, and developers had to create their own system or integrate with third parties for selling additional services or products. Google has since changed that and now provides a very robust system for billing integration. This chapter explains how to implement the official in-app billing solution from Google.
Google Play In-App Billing
Google has provided an API that developers can use to add in-app billing to applications. Only digital goods can be sold; no physical items or tangible goods may be sold with any version of the API. Items that are sold as an in-app purchase are either owned by the user (such as premium upgrades) or consumed by the user (such as power-ups or currency). Purchases made with in-app billing are nonrefundable.
There are currently two versions of the API, although version 2 has been suspended and Google is urging users to upgrade to version 3. While there is not a final date for when support for version 2 of the API will be dropped, new developers getting started with the API should use version 3. In early 2013, it was announced that version 3 of the API would be upgraded to allow for subscriptions and add support for all features that were introduced in version 2 of the API. API version 2 requires at least Android 1.6 (API Level 4) and requires Google Play version 3.5. API version 3 requires a minimum installation of Android 2.2 (API Level 8) with Google Play 3.9.16.
A stipulation for using any version of the Google-provided in-app billing API is that an application must be offered in the Google Play store and abide by the terms of service for app distribution. The application must also be able to communicate with the Google Play servers over a network connection.
Developers who wish to use in-app billing through Google Play must have a merchant account. If a developer account has already been created in the Play market, log in to the developer console (https://play.google.com/apps/publish/) and find the link to set up a merchant account at Google Checkout. This page shows step by step how to set up a merchant account and link it to a developer account. A merchant account can also be set up directly at the Google Checkout Merchant section (www.google.com/wallet/merchants.html). While testing in-app billing in an application, an actual credit card must be used; however, any transactions made will be refunded.
Google is currently transitioning the developer console; if the link to add a merchant account cannot be found, add a new application and the link should appear under the Price and Distribution section.
Recipe: Installing Google’s In-App Billing Service
Google provides a library named the Google Play Billing Library. This library contains all of the classes and interfaces needed to connect to Google’s in-app billing services. It can be installed from the Android SDK under the Extras section of the SDK Manager. Figure 13.1 shows where this is located.
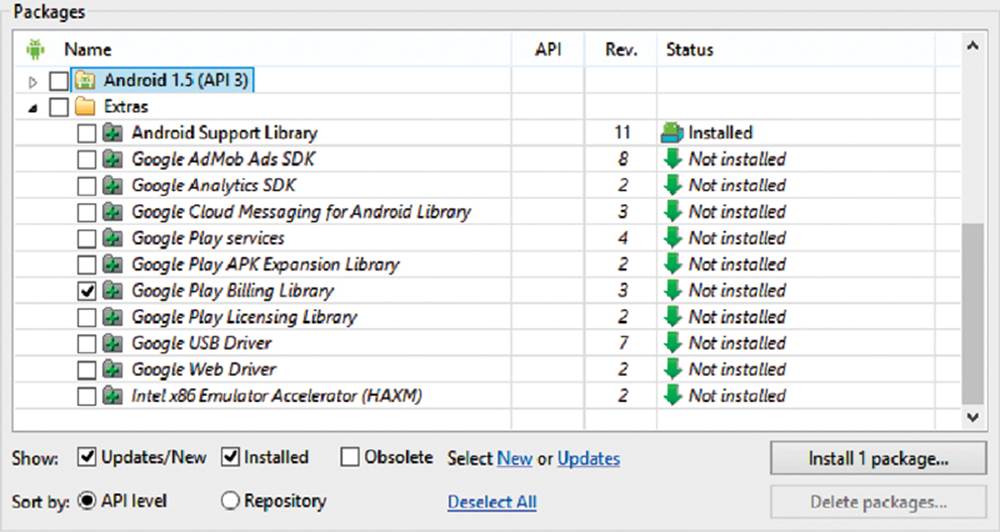
Figure 13.1 Installing the Google Play Billing Library version 3
Installing the Google Play Billing Library adds some folders and files to the SDK installation directory, including an in-app billing sample application that can be used for reference. These items can be found in the SDKInstallationDirectory/extras/google/play_billing/in-app-billing-v03or SDKInstallationDirectory/google-marker-billing/in-app-billing-v03 folder on the filesystem. The file IInAppBillingService.aidl can be found in that folder and will need to be included in any project that includes in-app billing.
After the required files are in the development environment, a public key must be generated. Log in to the developer console and create a new application. Name the application and click on the Prepare Store Listing button. On the new page that appears, there are several tabs on the left side of the screen; locate the Service & APIs tab and copy the generated public license key for the application.
To experiment with the Google-provided sample application TrivialDrive, create a new project (using the default options, including naming the activity MainActivity) and copy the assets of the sample application over the new ones. Then, perform a little maintenance on the application by refactoring the classes to the chosen package name and then modifying the application manifest XML to match the package name.
To add in-app billing to an existing application, copy the IInAppBillingService.aidl file into the src directory of the project. Note that if Eclipse is not being used as the IDE, the following path needs to be created in the src directory and the IInAppBillingService.aidl file placed into it:
com/android/vending/billing
To confirm proper installation, build the project and make sure the gen folder contains the IinAppBillingService.java file.
Recipe: Adding In-App Billing to an Activity
To provide in-app billing, an application must be able to communicate with the billing service. The BILLING permission needs to be added to the application manifest XML file to ensure this functionality. In addition to any of the other permissions that the app requires, add the following:
<uses-permission android:name="android.permission.BILLING"/>
To establish a connection from an activity to the Google Play in-app billing service, create an IabHelper object. Pass IabHelper the current context as well as the public key that was generated in the developer console for the application. Note that when using the public key, consider building the string at run-time. This will deter users from replacing the public key with their own and faking out the service to avoid having to pay for items in the application.
After creating the IabHelper object, bind the service by calling the startSetup() method on it. This will be passed another method, OnIabSetupFinishedListener(), which is called after some asynchronous setup is complete. An object will be returned to the method that can be used to determine if setup with the in-app billing servers was successful. If there is a problem, the message is passed back in the object.
When the activity is closed, remove the binding to the in-app billing service. Doing so will help with overall system resources and performance. This can be done by calling the dispose() method on the IabHelper object.
Listing 13.1 shows boilerplate code for establishing in-app billing through Google Play.
Listing 13.1. In-App Billing Boilerplate
IabHelper mHelper;
@Override
public void onCreate(Bundle savedInstanceState) {
super.onCreate(savedInstanceState);
setContentView(R.layout.activity_main);
// Consider building the public key at run-time
String base64EncodedPublicKey = "YourGeneratedPublicKey";
mHelper = new IabHelper(this, base64EncodedPublicKey);
mHelper.startSetup(new IabHelper.OnIabSetupFinishedListener() {
public void onIabSetupFinished(IabResult result) {
if (!result.isSuccess()) {
// Replace Toast with error-handling logic
Toast.makeText(context, "iab fail: "+result, Toast.LENGTH_LONG).show();
return;
}
// iab successful, handle success logic here
}
});
}
@Override
public void onDestroy() {
if (mHelper != null) mHelper.dispose();
mHelper = null;
}
Recipe: Listing Items for In-App Purchase
For users to make an in-app purchase, they need to know what is available for purchase. Items that are available for purchase can be set up in the developer console. Each item is created with an item number or SKU and can cost between $0.99 and $200. Once there is at least one item for a user to buy, Google Play can be asked programmatically to list the items through the in-app billing service.
To query Google Play for the list of items for an application, use the queryInventoryAsync() method and then programmatically determine the logic based on the returned object. To build on Listing 13.1, add a call to the queryInventoryAsync() method in the onCreate() method when the in-app billing setup is complete. The following line could be added after a successful installation:
mHelper.queryInventoryAsync(mCurrentInventoryListener);
Listing 13.2 shows how to set up a Listener that is used in the queryInventoryAsync() method. The listener is used to listen for the inventory transaction back from Google Play services.
Listing 13.2. Creating a Listener for Inventory Results
IabHelper.QueryInventoryFinishedListener mGotInventoryListener = new
IabHelper.QueryInventoryFinishedListener() {
public void onQueryInventoryFinished(IabResult result, Inventory inventory) {
if (result.isFailure()) {
Toast.makeText(context, "inventory fail: "+result, Toast.LENGTH_LONG).show();
return;
}
// Inventory has been returned, create logic with it
// Do UI updating logic here
}
};
To allow a user to purchase an item from an app, use the launchPurchaseFlow() method. This method takes five arguments: Activity, product ID (String), request code value (int), listener to notify (OnIabPurchaseFinishedListener), and a payload (String). Google recommends using the payload for storing customer-identifying information for purchase verification, although this can be any randomly generated string. The call to this method appears as follows; it can be called from inside a triggering event such as a button click:
mHelper.launchPurchaseFlow(this, YOUR_SKU, 12345,
mPurchaseFinishedListener, "R4nd0mb17+0hs7r1nGz/");
When the order succeeds, a Purchase object is returned. This can be handled similarly to how the queryInventoryAsync() method was handled; set up logic for the returned Purchase object inside the Listener. Listing 13.3 gives an example of how this is done.
Listing 13.3. Completing a Purchase
IabHelper.OnIabPurchaseFinishedListener
mPurchaseFinishedListener = new IabHelper.OnIabPurchaseFinishedListener() {
public void onIabPurchaseFinished(IabResult result, Purchase purchase) {
if (result.isFailure()) {
Toast.makeText(context, "Purchase failed: "+result, Toast.LENGTH_LONG).show();
return;
}
if (purchase.getSku().equals(YOUR_SKU)) {
// Do something with this item
} else if (purchase.getSku().equals(ANOTHER_SKU)) {
// Do something with this item
}
}
};
All materials on the site are licensed Creative Commons Attribution-Sharealike 3.0 Unported CC BY-SA 3.0 & GNU Free Documentation License (GFDL)
If you are the copyright holder of any material contained on our site and intend to remove it, please contact our site administrator for approval.
© 2016-2025 All site design rights belong to S.Y.A.