The Android Developer’s Cookbook: Building Applications with the Android SDK, Second Edition (2013)
Chapter 14. Push Messages
Push messaging is a communication method in which a connected client is informed of an event in a remote system by receiving notifications from that system. As opposed to pull messages, where the client needs to query the remote system at given time intervals, pushed messages are triggered by the remote system itself without having the client ask for a status update. Android supports message push through the Google Cloud Messaging (GCM) library. GCM is available on all Android devices running API Level 8 or higher, which should include most active devices. This chapter shows how to integrate with GCM and how to send and receive messages.
Google Cloud Messaging Setup
Google Cloud Messaging relies on the presence of both the Google Play store and a logged-in Google user account on the device. For sending messages, an API key is needed. This key is tied to the Google account that will be used for publishing the application on the Google Play store later, so be sure to set up an account for this first.
Recipe: Preparing for Google Cloud Messaging
First, an API key must be obtained. To do this, log in to the Google developer account and go to https://code.google.com/apis/console. A new API project will have to be created to use GCM. If this is the first API project, click the Create Project button. Otherwise, click the drop-down at the top left and choose Create. In both cases, enter a name for the project, such as cookbook. After the project is created, a screen similar to Figure 14.1 will be shown.
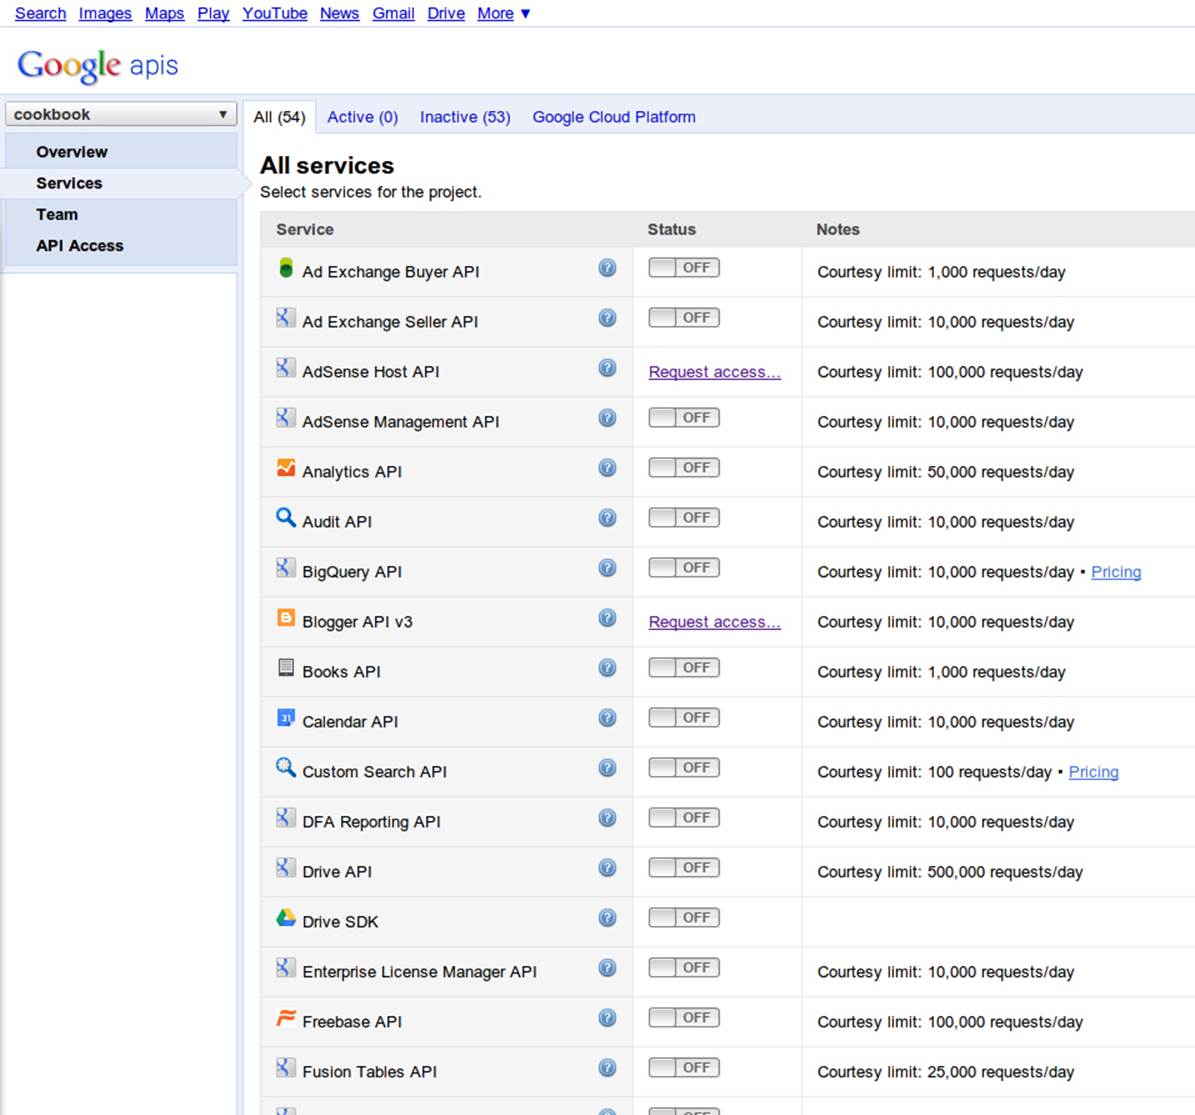
Figure 14.1 API services overview
Notice two things in this figure. First, there is a huge list of available APIs to work with. Finding GCM requires scrolling down quite a bit. Second, the URL has changed to something like https://code.google.com/apis/console/b/0/?pli=1#project:123456. Make a note of the number behind#project:. It is the unique project number and will act as the sender ID later on. The sender ID ensures that GCM sends messages to the correct app even if more than one application with a channel for push messages exists on the device.
Now, scroll down to Google Cloud Messaging and set the toggle to ON. Agree to the terms of service on the next page. To get the actual API key, navigate to the API Access page from the menu on the left. It should look similar to Figure 14.2.
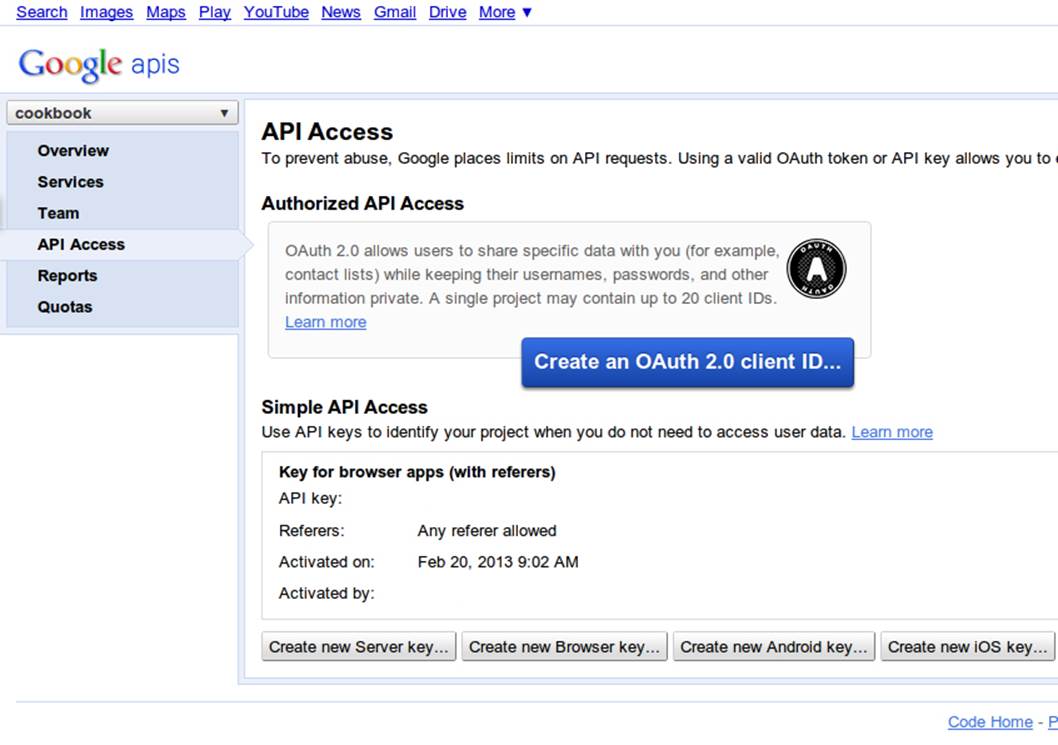
Figure 14.2 API Access page
Click the Create New Server Key... button. A window will appear where the server’s IP address can be entered if needed. It is OK to leave this blank and just press Create. There will then be a newly created server key on the API Access screen. Save this number to a text file or write it down; it will be used to send messages later.
Next, the add-on library must be integrated into the project. Open the Android SKD Manager, go to the Extras section, and tick the check boxes for Google Cloud Messaging for Android Library. After installing GCM, the directory ./extras/google/gcm will be found in the Android SDK folder. Gather the .jar files from both the gcm-client and gcm-server subdirectories and put them in the /libs folder of the project.
Sending and Receiving Push Messages
In most use cases, push notifications would be sent through a server system, informing the user or the application about events happening somewhere in the backend systems. There is, however, no immediate need to send push notifications this way. Because this book is about Android, and because dealing with servers can be a complex topic on its own, this method will not be used. Instead, a short ping will be sent to the GCM endpoint from within the app itself. While sending a push notification to one’s own device might seem useless, sending it from one phone to another could well be appealing. Adding this functionality to an application would be easy.
Recipe: Preparing the Manifest
A bunch of permissions are needed in order to send and receive messages. First, android.permission.INTERNET is needed for all data transfers. A WakeLock is needed to make sure messages are received even when the receiving device is turned off or in standby, so addandroid.permission.WAKE_LOCK. GCM relies on Google accounts, which means android.permission.GET_ACCOUNTS is required to access them. And to be able to actually receive the messages, a custom permission called com.google.android.c2dm.permission.RECEIVE, defined by the GCM library, must be added. (Although the service is now known as GCM, the old name of C2DM still shows up from time to time, which can be confusing.)
On top of those permissions, one permission, your.package.name.C2D_MESSAGE, must be created, where your.package.name is the package name given in the manifest tag. This permission is not needed if only Android 4.1 and higher is targeted.
Next, a BroadcastReceiver class is needed to receive the messages, and an IntentService class is needed to handle them. The service is declared as <serviceandroid:name=".receive.GCMService"></service>. It is recommended that the service name be set to your.package.name.GCMService; doing so will make the GCM library pick up the service name automatically. Because the service name used here has an additional subpackage, the part of the BroadcastReceiver class that determines the service name must be overridden, as will be seen later.
The BroadcastReceiver class is named .receive.GCMBroadcastReceiver and requires its own permission, com.google.android.c2dm.permission.SEND. The intent filter holds two actions, RECEIVE and SEND, as well as a category of your.app.package.
Now all that is needed is to add the rest of the application’s activities and other components. The full AndroidManifest.xml file for this recipe is given in Listing 14.1.
Listing 14.1. AndroidManifest.xml
<manifest xmlns:android="http://schemas.android.com/apk/res/android"
package="cc.dividebyzero.android.cookbook.chapter14"
android:versionCode="1"
android:versionName="1.0">
<uses-sdk android:minSdkVersion="8" android:targetSdkVersion="15" />
<permission
android:name="cc.dividebyzero.android.cookbook.chapter14.permission.C2D_MESSAGE"
android:protectionLevel="signature" />
<uses-permission
android:name="cc.dividebyzero.android.cookbook.chapter14.permission.C2D_MESSAGE"
/>
<!-- App receives GCM messages -->
<uses-permission android:name="com.google.android.c2dm.permission.RECEIVE" />
<!-- GCM connects to Google Services -->
<uses-permission android:name="android.permission.INTERNET" />
<!-- GCM requires a Google account -->
<uses-permission android:name="android.permission.GET_ACCOUNTS" />
<!-- Keeps the processor from sleeping when a message is received -->
<uses-permission android:name="android.permission.WAKE_LOCK" />
<!-- Use this for sending out registration and other messages
to a potential server -->
<uses-permission android:name="android.permission.INTERNET"/>
<application android:label="@string/app_name"
android:icon="@drawable/ic_launcher"
android:theme="@style/AppTheme"
>
<receiver
android:name=".receive.GCMBroadcastReceiver"
android:permission="com.google.android.c2dm.permission.SEND" >
<intent-filter>
<action android:name="com.google.android.c2dm.intent.RECEIVE" />
<action android:name="com.google.android.c2dm.intent.REGISTRATION" />
<category android:name="my_app_package" />
</intent-filter>
</receiver>
<activity android:name=".Chapter14">
<intent-filter>
<action android:name="android.intent.action.MAIN" />
<category android:name="android.intent.category.LAUNCHER" />
</intent-filter>
</activity>
<activity android:name=".GCMPushReceiver"/>
<service android:name=".receive.GCMService"></service>
</application>
</manifest>
Receiving Messages
In order to receive messages, a few things need to be done. First, the device needs to register itself within GCM. The registration ID must then somehow be given to the custom server, so that the system knows where to send the messages. Because the message is sent from the device itself, this ID can just be saved locally. Then, the code in place that actually reacts to incoming messages needs to be in place. This leaves three things that must be added: the BroadcastReceiver class, the IntentService class, and some boilerplate registration code in the main activity.
Recipe: Adding the BroadcastReceiver Class
The BroadcastReceiver class must extend com.google.android.gcm.GCMBroadcastReceiver in order to work. The good news is that not much needs to be done here besides returning the name of the service to start; the rest of this process is handled by the superclass. Because the service is in a subpackage, GCMService.class.getCanonicalName() must return. Listing 14.2 shows the complete implementation.
Listing 14.2. GCMBroadcastReceiver.java
public class GCMBroadcastReceiver extends com.google.android.gcm.GCMBroadcastReceiver {
@Override
protected String getGCMIntentServiceClassName(Context context)
return GCMService.class.getCanonicalName();
}
}
Recipe: Adding the IntentService Class
The IntentService class must extend GCMBaseIntentService and implement its abstract methods. The registered and unregistered event hooks that can be used to send the registration ID to some backend must be handled. The onError event is handled just by logging errors to the system log. The onMessage event is given an intent that holds the actual payload of the push message itself in the "msg" extra. Here, the device can react to incoming messages in any way that makes sense for the application, for instance, using the incoming push as a wake-up signal for syncing user data.Listing 14.3 provides a simple example by sending plain text messages, which are displayed in a toast.
Listing 14.3. GCMService
public class GCMService extends GCMBaseIntentService {
private static final String LOG_TAG = GCMService.class.getSimpleName();
private Handler mToaster = new Handler(new Handler.Callback() {
@Override
public boolean handleMessage(Message msg) {
Toast.makeText(
GCMService.this,
((String) msg.obj),
Toast.LENGTH_SHORT
).show();
return true;
}
});
@Override
protected void onError(final Context ctx, final String errorMsg) {
android.util.Log.v(LOG_TAG, "error registering device; " + errorMsg);
}
@Override
protected void onMessage(final Context ctx, final Intent intent) {
android.util.Log.v(LOG_TAG,
"on Message, Intent="
+ intent.getExtras().toString()
);
Message msg = mToaster.obtainMessage(
1,
-1,
-1,
intent.getStringExtra("msg")
);
mToaster.sendMessage(msg);
}
@Override
protected void onRegistered(Context ctx, String gcmRegistrationId) {
android.util.Log.v(LOG_TAG,
"onRegistered: gcmRegistrationId>>"
+ gcmRegistrationId + "<<"
);
sendRegistrationToServer(gcmRegistrationId);
}
@Override
protected void onUnregistered(Context ctx, String gcmRegistrationId) {
sendDeregistrationToServer(gcmRegistrationId);
}
private void sendRegistrationToServer(String gcmRegistrationId) {
SharedPreferences.Editor editor = getSharedPreferences(
AppConstants.SHARED_PREF,
Context.MODE_PRIVATE
).edit();
editor.putString(AppConstants.PREF_REGISTRATION_ID, gcmRegistrationId);
editor.commit();
}
private void sendDeregistrationToServer(String gcmRegistrationId) {
SharedPreferences.Editor editor = getSharedPreferences(
AppConstants.SHARED_PREF,
Context.MODE_PRIVATE
).edit();
editor.clear();
editor.commit();
}
}
Because the service was started from a different thread, the incoming message is channeled to a handler, which then displays the toast. As the handler can only ever receive one type of message, it can be created with all default values and the text put as a string into the message.obj field by calling the following:
mToaster.obtainMessage(1, -1, -1, intent.getStringExtra("msg"));
In the onRegistered method, sendRegistrationToServer(gcmRegistrationId) is called, and in the onUnregistered method, sendDeregistrationToServer (String gcmRegistrationId) is called. These two custom private methods should normally be used to make sure the backend system knows the ID of the device as well as additional information to tie it to a user account. Because the messages are sent from the same device that will receive them, there is no communication with the network here; instead, the registration ID is saved into a sharedpreferences file.
Recipe: Registering a Device
All that is left to do to be able to receive messages is register the device once the app is started. This is done by calling the private method registerGCM() in the onCreate method of the main activity, as shown in Listing 14.4.
Listing 14.4. registerGCM()
private void registerGCM() {
GCMRegistrar.checkDevice(this);
GCMRegistrar.checkManifest(this);
final String regId = GCMRegistrar.getRegistrationId(this);
if (regId.equals("")) {
GCMRegistrar.register(this, getString(R.string.sender_id));
} else {
android.util.Log.v(LOG_TAG, "Already registered");
}
}
GCM creates a device ID once and stores it safely on the device, so it is a good idea always to check if an ID already exists before calling GCMRegistrar.register(..). The sender_id class is the one obtained at GCM registration. This ID is stored in an extra XML file in /res/values calledsender_id.xml. It is declared as a string resource, so it gets added to the R.string class. This is shown in Listing 14.5.
The calls checkDevice() and checkManifest() are mandatory and ensure that the device and application are configured correctly to use GCM. They throw an exception if the check is not successful.
Listing 14.5. sender_id.xml
<?xml version="1.0" encoding="utf-8"?>
<resources>
<string name="sender_id">12345678</string>
</resources>
Sending Messages
Sending a message to a client is done by delivering the target ID and the message payload to the GCM servers. Usually one would do that from an application’s backend systems. Several libraries for common web languages are available. The Java library will be used here for connecting to the GCM servers directly from the device. A small activity will be used to read in text and hand it over to the GCM servers by using an AsyncTask for communication. The gcm-server.jar file obtained while installing the GCM add-on earlier will be used, so make sure it is in the /libsdirectory of the application.
Recipe: Sending Text Messages
Here, simple text messages, read from an input field in the layout, will be sent whenever the Send button is pressed. Listing 14.6 shows the very simple layout used.
Listing 14.6. gcm_acv.xml
<?xml version="1.0" encoding="utf-8"?>
<LinearLayout xmlns:android="http://schemas.android.com/apk/res/android"
android:layout_width="match_parent"
android:layout_height="match_parent"
android:orientation="vertical"
>
<EditText
android:id="@+id/message"
android:layout_height="wrap_content"
android:layout_width="match_parent"
/>
<Button
android:id="@+id/message"
android:layout_height="wrap_content"
android:layout_width="match_parent"
android:text="send"
android:onClick="sendGCMMessage"
/>
</LinearLayout>
To send the message, an AsyncTask class is used that gets fired in the sendGCMMessage() method defined as the onClick target in the XML layout. The message string is read from the text field and the target ID from the shared preferences, where the service stored the registered device ID. The layout gets loaded in onCreate. The main activity is shown in full in Listing 14.7.
Listing 14.7. Main Activity
public class GCMPushReceiver extends Activity{
private static final String LOG_TAG = GCMPushReceiver.class.getSimpleName();
private EditText mMessage;
public void onCreate(Bundle savedState) {
super.onCreate(savedState);
setContentView(R.layout.gcm_acv);
mMessage = (EditText) findViewById(R.id.message);
registerGCM();
}
private void registerGCM() {
GCMRegistrar.checkDevice(this);
GCMRegistrar.checkManifest(this);
final String regId = GCMRegistrar.getRegistrationId(this);
if (regId.equals("")) {
GCMRegistrar.register(this, getString(R.string.sender_id));
} else {
android.util.Log.v(LOG_TAG, "Already registered");
}
}
public void sendGCMMessage(final View view) {
final String message = mMessage.getText().toString();
SendGCMTask sendTask = new SendGCMTask(getApplicationContext());
SharedPreferences sp = getSharedPreferences(
AppConstants.SHARED_PREF,
Context.MODE_PRIVATE
);
final String targetId = sp.getString(
AppConstants.PREF_REGISTRATION_ID,
null
);
sendTask.execute(message, targetId);
}
}
Recipe: Sending Messages with AsyncTask
The good news about using the GCM server library is that developers don’t have to deal with things like HTTP connections themselves. Instead, they can just initialize a Sender object with the API key obtained when registering for GCM. The API key is stored in an extra XML file as a string resource, just like the sender ID, as can be seen in Listing 14.8.
Listing 14.8. api_key.xml
<?xml version="1.0" encoding="utf-8"?>
<resources>
<string name="api_key">12345678</string>
</resources>
The message itself is created by a simple builder pattern. It is then passed to the sender for processing with sender.sendNoRetry(gcmMessage, targetId). That’s basically all there is to it. Some result handling and boilerplate code is needed, which is shown in Listing 14.9.
Listing 14.9. SendGCMTask.java
public class SendGCMTask extends AsyncTask<String, Void, Boolean> {
private static final int MAX_RETRY = 5;
private static final String LOG_TAG = SendGCMTask.class.getSimpleName();
private Context mContext;
private String mApiKey;
public SendGCMTask(final Context context) {
mContext = context;
mApiKey = mContext.getString(R.string.api_key);
}
@Override
protected Boolean doInBackground(String . . . params) {
final String message = params[0];
final String targetId = params[1];
android.util.Log.v(LOG_TAG,
"message>>" + message + "<< "
+"targetId>>"+ targetId + "<<"
);
Sender sender = new Sender(mApiKey);
Message gcmMessage = new Message.Builder()
.addData("msg", message)
.build();
Result result;
try {
result = sender.sendNoRetry(gcmMessage, targetId);
if (result.getMessageId() != null) {
String canonicalRegId = result.getCanonicalRegistrationId();
SharedPreferences.Editor editor = mContext
.getSharedPreferences(
AppConstants.SHARED_PREF,
Context.MODE_PRIVATE
).edit();
String error = result.getErrorCodeName();
if (canonicalRegId != null) {
// Same device has more than one registration ID: update
// database
editor.putString(
AppConstants.PREF_REGISTRATION_ID,
canonicalRegId
); editor.commit();
} else if (error != null
&& error.equals(Constants.ERROR_NOT_REGISTERED)) {
// Application has been removed from device: unregister
// database
editor.clear();
editor.commit();
}
}
return true;
} catch (IOException e) {
// TODO autogenerated catch block
e.printStackTrace();
}
return false;
}
}
Context is given in the constructor and is needed only to read the API key from the resource file. The message string and the target device ID are passed to the execute method from the activity. The corresponding callback can be seen in Listing 14.7.
The Message.Builder.addData(..) method is used to set the message payload. The key used for setting the string message is the same one used in the service in Listing 14.3 to retrieve the string from the incoming push message.
The result of the send method will flag errors by setting the corresponding fields, and a check is run to see if the .getErrorCodeName() value equals ERROR_NOT_REGISTERED. This means the device is no longer available to receive push messages (or never was), and its ID should be removed from the database. This is done by clearing the shared preferences. If result.getCanonicalRegistrationId() is not null, the device has been registered more than once, and the canonical ID should then be used for sending messages. In that case, the shared preferences are updated to the new device ID.