The Android Developer’s Cookbook: Building Applications with the Android SDK, Second Edition (2013)
Chapter 15. Android Native Development
This chapter shows two different strategies for integrating native C code into Android applications. One strategy is to use Java Native Interface (JNI) to write wrapper functions in C and then Java to access a library of C code. The other strategy is to make use of the native activity, which allows an application not to have any Java code at all.
Android Native Components
When a computationally intensive function is critical to an Android application, it might be worthwhile to move the intensive computation to native C or C++ for efficiency. The Android Native Development Kit (NDK) exists to help in the development of a native component. The NDK is a companion to the Android SDK and includes a bundle of libraries that can be used to build C/C++ libraries. Steps to set up and build an Android native component follow:
1. Download the Android NDK from http://developer.android.com/sdk/ndk/, which includes detailed documents on usage.
2. Install the Eclipse C/C++ Development Tooling (CDT).
3. Download the Eclipse NDK plugin from https://dl-ssl.google.com/android/eclipse/.
4. Set the NDK path by going to Eclipse → Window → Preferences → Android → NDK → set path to NDK.
5. Create an Android project through the normal means.
6. Right-click and select Android Tools → Add Native Support.
7. Give a name to the native library.
8. Click Finish. The /jni folder, an Android.mk make file, and a stub cpp file are created.
9. Run Project → Build Project to compile both C and Java files.
Using the Eclipse IDE, the native libraries are properly bundled with the application upon build.
Recipe: Using Java Native Interface
In this recipe, a C program is used to create a numerical factorial function. Then, an activity in Java calls the C library function and shows the result on the screen. First of all, the C program is shown in Listing 15.1.
Listing 15.1. jni/cookbook.c
#include <string.h>
#include <jni.h>
jint factorial(jint n){
if(n == 1){
return 1;
}
return factorial(n-1)*n;
}
jint Java_com_cookbook_advance_ndk_ndk_factorial( JNIEnv* env,
jobject this, jint n ) {
return factorial(n);
}
Inside this C program, there is a special type, jint, which is the Java type defined in C/C++. This provides a way to pass native types to Java. If return values from Java to C are necessary, a casting can be done. Table 15.1 summarizes the type mapping between Java and native description.
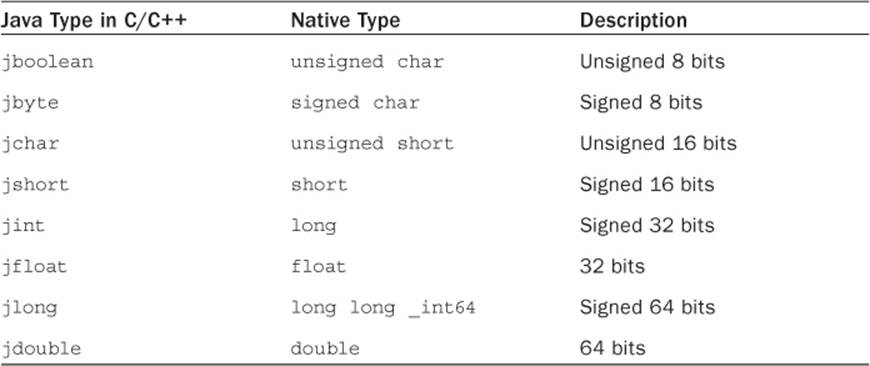
Table 15.1 Type Mapping between Java and Native
There are two functions inside the C program. The first factorial function is used to do actual calculations. The second function, named Java_com_cookbook_advance_ndk_ndk_factorial, will be called from within a Java class. The name of the function should always be defined as theJAVA_CLASSNAME_METHOD format for interface.
There are three parameters in the second function: a JNIEnv pointer, a jobject pointer, and a Java argument the Java method declares. JNIEnv is a Java Native Interface pointer passed as an argument for each native function. These functions are mapped to a Java method that is the structure that contains the interface to the Java Virtual Machine (JVM). It includes the functions necessary to interact with the JVM and to work with Java objects. In this example, it does not use any Java functions. The only argument needed for this program is the Java argument jint n.
The make file for the builder is shown in Listing 15.2. It should be placed in the same location as the C program. It contains a definition of LOCAL_PATH for the builder and a call to CLEAR_VARS to clean up all LOCAL_* variables before each build. Then, LOCAL_MODULE is identified as the name of the custom library ndkcookbook, which is used to identify the source code files to build. After all these declarations, it includes BUILD_SHARED_LIBRARY. This is a generic make file for building a simple program. More detailed information on the make file format is provided in the ANDROID-MK.HTML file under the docs/ directory of the NDK.
Listing 15.2. jni/Android.mk
LOCAL_PATH := $(call my-dir)
include $(CLEAR_VARS)
LOCAL_MODULE := ndkcookbook
LOCAL_SRC_FILES := cookbook.c
include $(BUILD_SHARED_LIBRARY)
The next step is to build the native library. With NDK-r4 or higher, calling the provided build script ndk-build at the NDK root directory of the project builds the libraries with an associated make file. For older versions, the command makeAPP=NAME_OF_APPLICATION is needed. After the libraries are built, a lib/ folder is created containing the native library libndkcookbook.so. In NDK-r4, it also contains two GDB files that help with debugging.
The Android activity that uses this library calls System.loadLibrary() to load the ndkcookbook library. Then, the native function needs to be declared. This is shown in Listing 15.3. The output is shown in Figure 15.1.
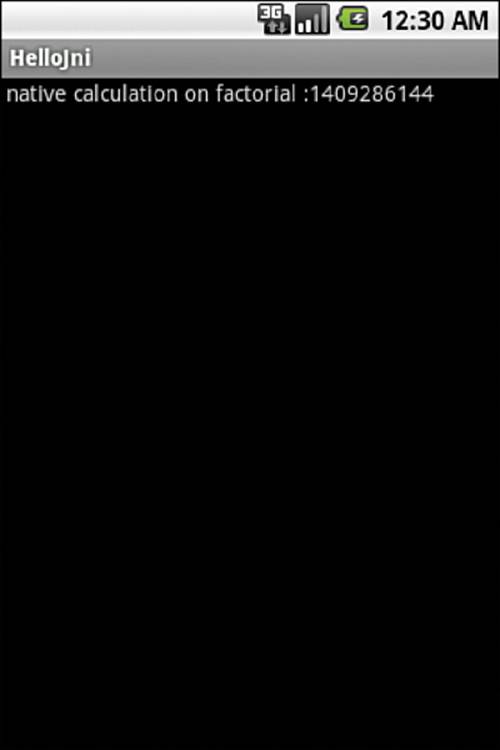
Figure 15.1 Output of the NDK application
Listing 15.3. src/com/cookbook/advance/ndk/ndk.java
package com.cookbook.advance.ndk;
import android.app.Activity;
import android.widget.TextView;
import android.os.Bundle;
public class ndk extends Activity {
@Override
public void onCreate(Bundle savedInstanceState) {
super.onCreate(savedInstanceState);
TextView tv = new TextView(this);
tv.setText(" native calculation on factorial :"+factorial(30));
setContentView(tv);
}
public static native int factorial(int n);
static {
System.loadLibrary("ndkcookbook");
}
}
Recipe: Using the NativeActivity
NativeActivity is a helper class that handles communication between C code and the Android Framework. This allows applications to be written using only C. The steps to create a project using a native activity follow:
1. Create an Android project through the normal means in Eclipse.
2. Right-click and select Android Tools → Add NativeSupport.
3. Give a name to the native library.
4. Press Finish. The /jni folder, an Android.mk make file, and a stub cpp file are created.
5. Edit the manifest to hold a reference to the native activities.
6. Edit the Android.mk file to add libraries if needed.
7. Run Project → Build Project to compile both C and Java files.
To declare a native activity, simply drop it in the AndroidManifest.xml file as seen in Listing 15.4.
Listing 15.4. AndroidManifest.xml
<manifest xmlns:android="http://schemas.android.com/apk/res/android"
package="com.cookbook.nativeactivitydemo"
android:versionCode="1"
android:versionName="1.0" >
<uses-sdk
android:minSdkVersion="14"
android:targetSdkVersion="17" />
<application
android:allowBackup="true"
android:icon="@drawable/ic_launcher"
android:label="@string/app_name"
android:theme="@style/AppTheme"
android:hasCode="true"
>
<activity android:name="android.app.NativeActivity"
android:label="@string/app_name"
android:configChanges="orientation|keyboardHidden"
>
<meta-data android:name="android.app.lib_name"
android:value="native-activity"
/>
<intent-filter>
<action android:name="android.intent.action.MAIN" />
<category android:name="android.intent.category.LAUNCHER" />
</intent-filter>
</activity>
</application>
</manifest>
The android:name attribute of the activity tag must be set to android.app.NativeActivity. The metadata tag tells the system which library to load. Its android:name attribute must be set to "android.app.lib_name". The android:value attribute of the metadata tag must be in the filename of the module without the lib prefix and .so suffix. Filenames must not have spaces in them and must be all lowercase. To ensure that the compiled native libs are exported and installed properly, set the application attribute android:hasCode="true".
There are two ways to implement a native activity. The first way is to use the native_activity.h header directly, which defines all structs and callbacks needed to implement the activity. The second and recommended way is to use android_native_app_glue.h. The app glue interface ensures that callbacks are handled in a way that does not block the UI thread. Native applications still run in their own virtual machine, and all callbacks to the activity are executed on the application’s main thread. If those callbacks are handled in a way that blocks the UI thread, the app will receive Application Not Responding errors. The easiest way to solve this is by using app glue interfaces. App glue creates another thread that will handle all callbacks and input events and send them as commands into the code’s main function.
To be able to compile code with app glue, it must be added as a static library to the Android.mk file. Here, the log library and some OpenGL libs are also added. Because a native activity is responsible for drawing its own window, EGL will most likely be used for drawing things on the screen. The Android.mk file is shown in Listing 15.5.
Listing 15.5. /jni/Android.mk
LOCAL_PATH := $(call my-dir)
include $(CLEAR_VARS)
LOCAL_MODULE := NativeActivityDemo
LOCAL_SRC_FILES := NativeActivityDemo.cpp
LOCAL_LDLIBS := -landroid -llog -lEGL -lGLESv1_CM
LOCAL_STATIC_LIBRARIES := android_native_app_glue
include $(BUILD_SHARED_LIBRARY)
$(call import-module,android/native_app_glue)
A native activity needs to have a void android_main(struct android_app* androidApp) function. This will act as the main entry point for starting the activity. It works very similarly to main functions from Java threads or other common event-based systems, meaning a main event loop ofwhile(1) is needed to ensure that the code keeps running until it is stopped from the outside.
The android_app struct is a helper class that handles some of the boilerplate, needed for running. Its userData field can be used for anything. In this case code it should hold the current state information of the activity. As the same instance of the android_app is passed to all the following functions, the state can always be retrieved from here.
The other two things that need to be set into this struct are two function pointers: one for handling input events (such as touch or keyboard events) and one for handling the activity lifecycle. Because those are defined as static later in the code, here they can just be passed as pointers. Theandroid_main function is shown in Listing 15.6.
Listing 15.6. android_main
void android_main(struct android_app* androidApp) {
struct activity_state activity;
// Make sure glue isn't stripped
app_dummy();
memset(&activity, 0, sizeof(activity));
androidApp->userData = &activity;
androidApp->onAppCmd = handle_lifecycle_cmd;
androidApp->onInputEvent = handle_input;
activity.androidApp = androidApp;
LOGI("starting");
if (androidApp->savedState != NULL) {
// We are starting with a previous saved state; restore from it
activity.savedState = *(struct saved_state*)androidApp->savedState;
}
// Loop waiting for stuff to do
while (1) {
// Read all pending events
int ident;
int events;
struct android_poll_source* source;
// Wait for events
while ((ident=ALooper_pollAll(-1, NULL, &events,(void**)&source)) >= 0) {
// Process this event
if (source != NULL) {
source->process(androidApp, source);
}
// Check if the app has exited
if (androidApp->destroyRequested != 0) {
close_display(&activity);
return;
}
}
}
}
Calling app_dummy() first ensures that app glue is not stripped from the library. This call should always be in a native activity. The pointers for event handling are set, the state is saved, and then the event loop is started. If the application is stopped, the android_app->destroyRequested flag will be set, and the loop will have to be exited.
The activity lifecycle is handled in the handle_lifecycle_cmd function given to app glue as a pointer. There are integer command constants for all lifecycle events of an activity, as well as some window-related commands for focus and resizing. The handle_lifecycle_cmd function is shown in Listing 15.7.
Listing 15.7. handle_lifecycle_cmd
static void handle_lifecycle_cmd(struct android_app* app, int32_t cmd) {
struct activity_state* activity = (struct activity_state*)app->userData;
switch (cmd) {
case APP_CMD_SAVE_STATE:
// The system has asked us to save our current state. Do so.
activity->androidApp->savedState = malloc(sizeof(struct saved_state));
*((struct saved_state*)activity->androidApp->savedState) =
activity->savedState;
activity->androidApp->savedStateSize = sizeof(struct saved_state);
break;
case APP_CMD_INIT_WINDOW:
// activity window shown, init display
if (activity->androidApp->window != NULL) {
init_display(activity);
draw_frame(activity);
}
break;
case APP_CMD_TERM_WINDOW:
// activity window closed, stop EGL
close_display(activity);
break;
case APP_CMD_INPUT_CHANGED:
break;
case APP_CMD_START:
//activity onStart event
LOGI("nativeActivity: onStart");
android_app_pre_exec_cmd(app, cmd);
break;
case APP_CMD_RESUME:
//activity onResume event
LOGI("nativeActivity: onResume");
android_app_pre_exec_cmd(app, cmd);
break;
case APP_CMD_PAUSE:
//activity onPause event
LOGI("nativeActivity: onPause");
android_app_pre_exec_cmd(app, cmd);
break;
case APP_CMD_STOP:
//activity onStop event
LOGI("nativeActivity: onStop");
android_app_pre_exec_cmd(app, cmd);
break;
case APP_CMD_DESTROY:
//activity onDestroy event
LOGI("nativeActivity: onDestroy");
android_app_pre_exec_cmd(app, cmd);
break;
}
}
The init and termination events here are acted on only for initializing the EGL display. All other lifecycle events are just logged to the system log with LOGI("message"). The call to android_app_pre_exec_cmd(app, cmd); serves as the replacement for the mandatory super.onCreate,super.onPause, ..., calls in Java code.
The other function needed to react to events is handle_input. The function arguments are a pointer to the app and a pointer to the event. The event type can be extracted by calling AInputEvent_getType(event), which will return an integer constant. The coordinates of the touch event are read by calling AMotionEvent_getX(..) or AMotionEvent_getY(..), respectively. This is shown in Listing 15.8.
Listing 15.8. handle_input
static int32_t handle_input(struct android_app* app, AInputEvent* event) {
struct activity_state* activity = (struct activity_state*)app->userData;
if (AInputEvent_getType(event) == AINPUT_EVENT_TYPE_MOTION) {
activity->savedState.x = AMotionEvent_getX(event, 0);
activity->savedState.y = AMotionEvent_getY(event, 0);
draw_frame(activity);
return 1;
}
return 0;
}
It is evident that there is more boilerplate code to be written in C, even if the app glue library takes away some of it. The benefits of the native activity are that it allows a whole application to be written purely in C/C++, which makes it ideal for heavy computation or cross-platform development.
All materials on the site are licensed Creative Commons Attribution-Sharealike 3.0 Unported CC BY-SA 3.0 & GNU Free Documentation License (GFDL)
If you are the copyright holder of any material contained on our site and intend to remove it, please contact our site administrator for approval.
© 2016-2026 All site design rights belong to S.Y.A.