The Android Developer’s Cookbook: Building Applications with the Android SDK, Second Edition (2013)
Chapter 6. User Interface Events
The two aspects of a UI are screen layout and event handling. Chapter 5, “User Interface Layout,” discussed how layouts are made up of View objects, such as text and buttons. This chapter shows how to handle events from a user, such as physical key presses, touch events, and menu navigation. It also shows how to use a few advanced user interface libraries, namely, gestures and 3D graphics.
Event Handlers and Event Listeners
Most user interaction with an Android device is captured by the system and sent to a corresponding callback method. For example, if the physical BACK key is pressed, the onBackPressed() method is called. Such events can be handled by extending the class and overriding the methods, called event handlers.
User interaction with View or ViewGroup objects can also support event listeners. These are methods that wait for the registered event and then trigger the system to send the event information to the corresponding callback method. For example, the OnClickListener event listener can be registered for a button and when it is pressed by using setOnClickListener().
Event listeners are the preferred method when available because they avoid the class extension overhead. Furthermore, an activity implementing an event listener gets a callback for all the layout objects it contains, allowing for more concise code. Both event listeners and event handlers are demonstrated in this chapter within the context of handling physical key press events and screen touch events.
Recipe: Intercepting a Physical Key Press
A standard Android device has multiple physical keys that can trigger events, as listed in Table 6.1.
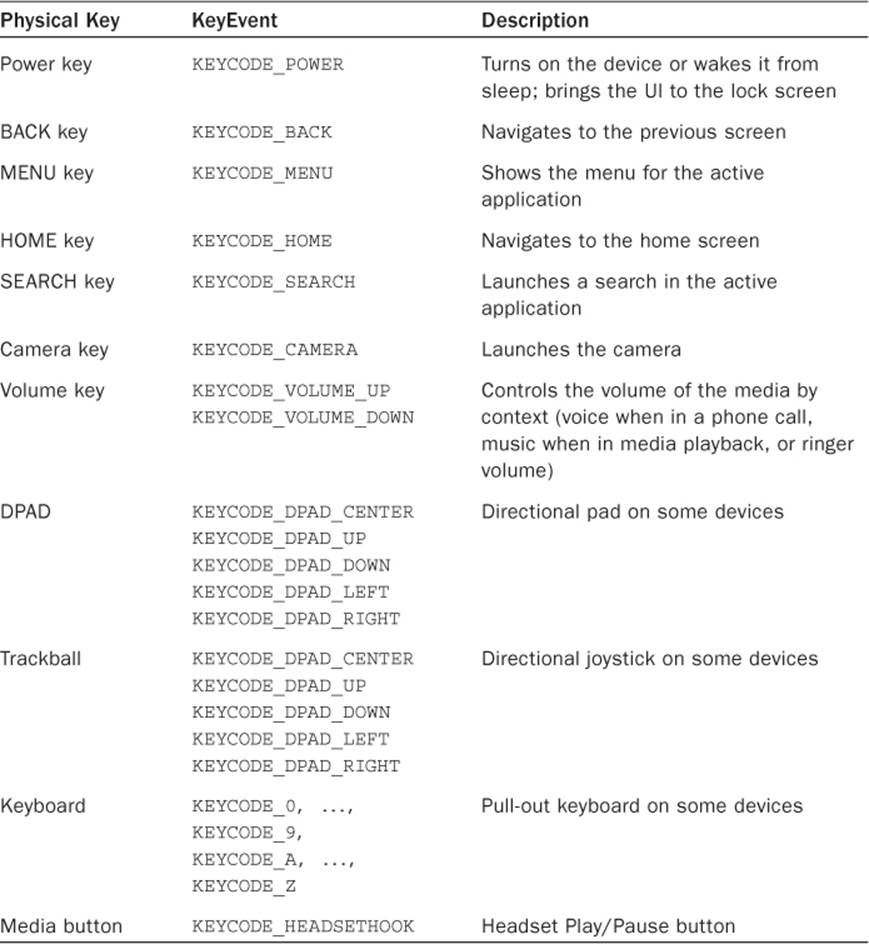
Table 6.1 Possible Physical Keys on an Android Device
The system first sends any KeyEvent to the appropriate callback method in the in-focus activity or view. These callback methods are:
![]() onKeyUp(), onKeyDown(), onKeyLongPress()—Physical key press callbacks
onKeyUp(), onKeyDown(), onKeyLongPress()—Physical key press callbacks
![]() onTrackballEvent(), onTouchEvent()—Trackball and touchscreen press callbacks
onTrackballEvent(), onTouchEvent()—Trackball and touchscreen press callbacks
![]() onFocusChanged()—Called when the view gains or loses focus
onFocusChanged()—Called when the view gains or loses focus
These can be overridden by the application to customize with different actions. For example, to turn off the camera button (to avoid accidental presses), just consume the event in the onKeyDown() callback method for the activity. This is done by intercepting the method for the eventKeyEvent.KEYCODE_CAMERA and returning true:
public boolean onKeyDown(int keyCode, KeyEvent event) {
if (keyCode == KeyEvent.KEYCODE_CAMERA) {
return true; // Consume event, hence do nothing on camera button
}
return super.onKeyDown(keyCode, event);
}
Because the event is consumed, it does not get passed on to other Android components. There are a few exceptions to this:
![]() The power button and HOME key are intercepted by the system and do not reach the application for customization.
The power button and HOME key are intercepted by the system and do not reach the application for customization.
![]() The BACK, MENU, HOME, and SEARCH keys should not intercept the KeyDown but instead the KeyUp. This coincides with Android 2.0 suggestions because these buttons might not be physical keys in other platforms.
The BACK, MENU, HOME, and SEARCH keys should not intercept the KeyDown but instead the KeyUp. This coincides with Android 2.0 suggestions because these buttons might not be physical keys in other platforms.
Listing 6.1 shows a variety of examples of intercepting physical key presses, including the following:
![]() The Camera and DPAD left keys are intercepted in onKeyDown() to show a message to the screen, and then the method is consumed (by returning true).
The Camera and DPAD left keys are intercepted in onKeyDown() to show a message to the screen, and then the method is consumed (by returning true).
![]() The Volume Up key is intercepted to show a message to the screen, but it is not consumed (returning false) and hence also actually increases the volume.
The Volume Up key is intercepted to show a message to the screen, but it is not consumed (returning false) and hence also actually increases the volume.
![]() The SEARCH key is intercepted in onKeyDown(), and the startTracking() method is used to track it through to the KeyUp where a message is sent to the screen.
The SEARCH key is intercepted in onKeyDown(), and the startTracking() method is used to track it through to the KeyUp where a message is sent to the screen.
![]() The BACK key is intercepted in onBackPressed().
The BACK key is intercepted in onBackPressed().
A note on the latter: An Android guideline for usability is that the BACK key should generally not be customized. However, if needed for some reason in an activity or dialog, there is a separate callback method available with API Level 5 (Eclair) and higher to intercept the BACK key:onBackPressed().
For backward compatibility with earlier SDKs, the KeyEvent.KEYCODE_BACK can be intercepted, and the onBackPressed() method can be explicitly called for earlier SDKs, as shown in Listing 6.1. (Note: This code can be compiled only with Android 2.0 or higher due to the explicit mention of Eclair, but it is backward compatible at run-time on all devices.) To intercept the BACK key in a view (not shown here) requires using the startTracking() method, which is similar to the SEARCH key example in Listing 6.1.
Listing 6.1. src/com/cookbook/PhysicalKeyPress.java
package com.cookbook.physkey;
import android.app.Activity;
import android.os.Bundle;
import android.view.KeyEvent;
import android.widget.Toast;
public class PhysicalKeyPress extends Activity {
@Override
public void onCreate(Bundle savedInstanceState) {
super.onCreate(savedInstanceState);
setContentView(R.layout.main);
}
@Override
public boolean onKeyDown(int keyCode, KeyEvent event) {
switch (keyCode) {
case KeyEvent.KEYCODE_CAMERA:
Toast.makeText(this, "Pressed Camera Button",
Toast.LENGTH_LONG).show();
return true;
case KeyEvent.KEYCODE_DPAD_LEFT:
Toast.makeText(this, "Pressed DPAD Left Button",
Toast.LENGTH_LONG).show();
return true;
case KeyEvent.KEYCODE_VOLUME_UP:
Toast.makeText(this, "Pressed Volume Up Button",
Toast.LENGTH_LONG).show();
return false;
case KeyEvent.KEYCODE_SEARCH:
//example of tracking through to the KeyUp
if(event.getRepeatCount() == 0)
event.startTracking();
return true;
case KeyEvent.KEYCODE_BACK:
// Make new onBackPressed compatible with earlier SDKs
if (android.os.Build.VERSION.SDK_INT
< android.os.Build.VERSION_CODES.ECLAIR
&& event.getRepeatCount() == 0) {
onBackPressed();
}
}
return super.onKeyDown(keyCode, event);
}
@Override
public void onBackPressed() {
Toast.makeText(this, "Pressed BACK Key",
Toast.LENGTH_LONG).show();
}
@Override
public boolean onKeyUp(int keyCode, KeyEvent event) {
if (keyCode == KeyEvent.KEYCODE_SEARCH && event.isTracking()
&& !event.isCanceled()) {
Toast.makeText(this, "Pressed SEARCH Key",
Toast.LENGTH_LONG).show();
return true;
}
return super.onKeyUp(keyCode, event);
}
}
Recipe: Building Menus
A developer can implement three types of menus in Android, and this recipe creates an example of each:
![]() Options menu—The main menu for an activity that displays when the MENU key is pressed. For Android API Levels 10 and below, it contains an icon menu and possibly an expanded menu when the More menu item is selected. For newer levels of Android, only the original options menu is available.
Options menu—The main menu for an activity that displays when the MENU key is pressed. For Android API Levels 10 and below, it contains an icon menu and possibly an expanded menu when the More menu item is selected. For newer levels of Android, only the original options menu is available.
![]() Context menu—A floating list of menu items that displays when a view is long pressed.
Context menu—A floating list of menu items that displays when a view is long pressed.
![]() Submenu—A floating list of menu items that displays when a menu item is pressed.
Submenu—A floating list of menu items that displays when a menu item is pressed.
The options menu is created the first time the MENU key is pressed in an activity. This launches the onCreateOptionsMenu() method that usually contains menu methods, such as:
menu.add(GROUP_DEFAULT, MENU_ADD, 0, "Add")
.setIcon(R.drawable.ic_launcher);
The first argument of the add() method labels the group of the menu item. Groups of items can be manipulated together. The second argument is an integer ID that represents the menu item. It is passed to the callback function to determine which menu item was selected. The third argument is the order of the item in the menu. If it is not used, the order falls back to the order in which the items were added to the Menu object. The last argument is the text that displays with the menu item. It can be a String or a string resource such as R.string.myLabel. This is the only menu that also supports adding icons to the menu choices using the setIcon() method.
This method is called only once, and the menu does not need to be built again for the rest of the activity. However, the onPrepareOptionsMenu() method can be used if any of the menu options need to change during run-time.
When an item from the options menu is clicked, the onOptionsItemSelected() method is called. This passes the selected item ID, and a switch statement can be used to determine which option was selected.
For this recipe, the options are to add a note, delete a note, or send a note. These are represented as simple mock functions that increment a counter (itemNum), decrement a counter, or show a Toast to the screen of the current counter value. To show an example of changing the menu options at run-time, the delete option is available only if a note has already been added in the past. This is done by grouping the delete option in a separate group and hiding the group when the itemNum is zero. The activity is shown in Listing 6.2.
Listing 6.2. src/com/cookbook/building_menus/BuildingMenus.java
package com.cookbook.building_menus;
import android.app.Activity;
import android.os.Bundle;
import android.view.ContextMenu;import android.view.Menu;import android.view.MenuItem;import android.view.SubMenu;
import android.view.View;
import android.view.ContextMenu.ContextMenuInfo;
import android.widget.TextView;
import android.widget.Toast;
public class BuildingMenus extends Activity {
private final int MENU_ADD=1, MENU_SEND=2, MENU_DEL=3;
private final int GROUP_DEFAULT=0, GROUP_DEL=1;
private final int ID_DEFAULT=0;
private final int ID_TEXT1=1, ID_TEXT2=2, ID_TEXT3=3;
private String[] choices = {"Press Me", "Try Again", "Change Me"};
private static int itemNum=0;
private static TextView bv;
@Override
public void onCreate(Bundle savedInstanceState) {
super.onCreate(savedInstanceState);
setContentView(R.layout.main);
bv = (TextView) findViewById(R.id.focus_text);
registerForContextMenu((View) findViewById(R.id.focus_text));
}
@Override
public boolean onCreateOptionsMenu(Menu menu) {
menu.add(GROUP_DEFAULT, MENU_ADD, 0, "Add")
.setIcon(R.drawable.ic_launcher); //example of adding icon
menu.add(GROUP_DEFAULT, MENU_SEND, 0, "Send");
menu.add(GROUP_DEL, MENU_DEL, 0, "Delete");
return super.onCreateOptionsMenu(menu);
}
@Override
public boolean onPrepareOptionsMenu(Menu menu) {
if(itemNum>0) {
menu.setGroupVisible(GROUP_DEL, true);
} else {
menu.setGroupVisible(GROUP_DEL, false);
}
return super.onPrepareOptionsMenu(menu);
}
@Override
public boolean onOptionsItemSelected(MenuItem item) {
switch(item.getItemId()) {
case MENU_ADD:
create_note();
return true;
case MENU_SEND:
send_note();
return true;
case MENU_DEL:
delete_note();
return true;
}
return super.onOptionsItemSelected(item);
}
@Override
public void onCreateContextMenu(ContextMenu menu, View v,
ContextMenuInfo menuInfo) {
super.onCreateContextMenu(menu, v, menuInfo);
if(v.getId() == R.id.focus_text) {
SubMenu textMenu = menu.addSubMenu("Change Text");
textMenu.add(0, ID_TEXT1, 0, choices[0]);
textMenu.add(0, ID_TEXT2, 0, choices[1]);
textMenu.add(0, ID_TEXT3, 0, choices[2]);
menu.add(0, ID_DEFAULT, 0, "Original Text");
}
}
@Override
public boolean onContextItemSelected(MenuItem item) {
switch(item.getItemId()) {
case ID_DEFAULT:
bv.setText(R.string.hello);
return true;
case ID_TEXT1:
case ID_TEXT2:
case ID_TEXT3:
bv.setText(choices[item.getItemId()-1]);
return true;
}
return super.onContextItemSelected(item);
}
void create_note() { // mock code to create note
itemNum++;
}
void send_note() { // mock code to send note
Toast.makeText(this, "Item: "+itemNum,
Toast.LENGTH_SHORT).show();
}
void delete_note() { // mock code to delete note
itemNum--;
}
}
The activity in Listing 6.2 also shows an example of a context menu and submenu. A TextView focus_text is added to the layout, as shown in Listing 6.3, and registered for a context menu using the registerForContextMenu() function in the onCreate() method of the activity.
When the view is pressed and held, the onCreateContextMenu() method is called to build the context menu. Here, the SubMenu is implemented using the addSubMenu() method for the Menu instance. The submenu items are specified along with the main menu items, and theonContextItemSelected() method is called when an item from either menu is clicked. Here, the recipe shows a change of text based on the menu choice.
Listing 6.3. res/layout/main.xml
<?xml version="1.0" encoding="utf-8"?>
<LinearLayout xmlns:android="http://schemas.android.com/apk/res/android"
android:orientation="vertical"
android:layout_width="match_parent"
android:layout_height="match_parent"
>
<TextView android:id="@+id/focus_text"
android:layout_width="match_parent"
android:layout_height="wrap_content"
android:textSize="40sp"
android:text="@string/hello"
/>
</LinearLayout>
Figures 6.1 and 6.2 show how the menus look for the different cases.
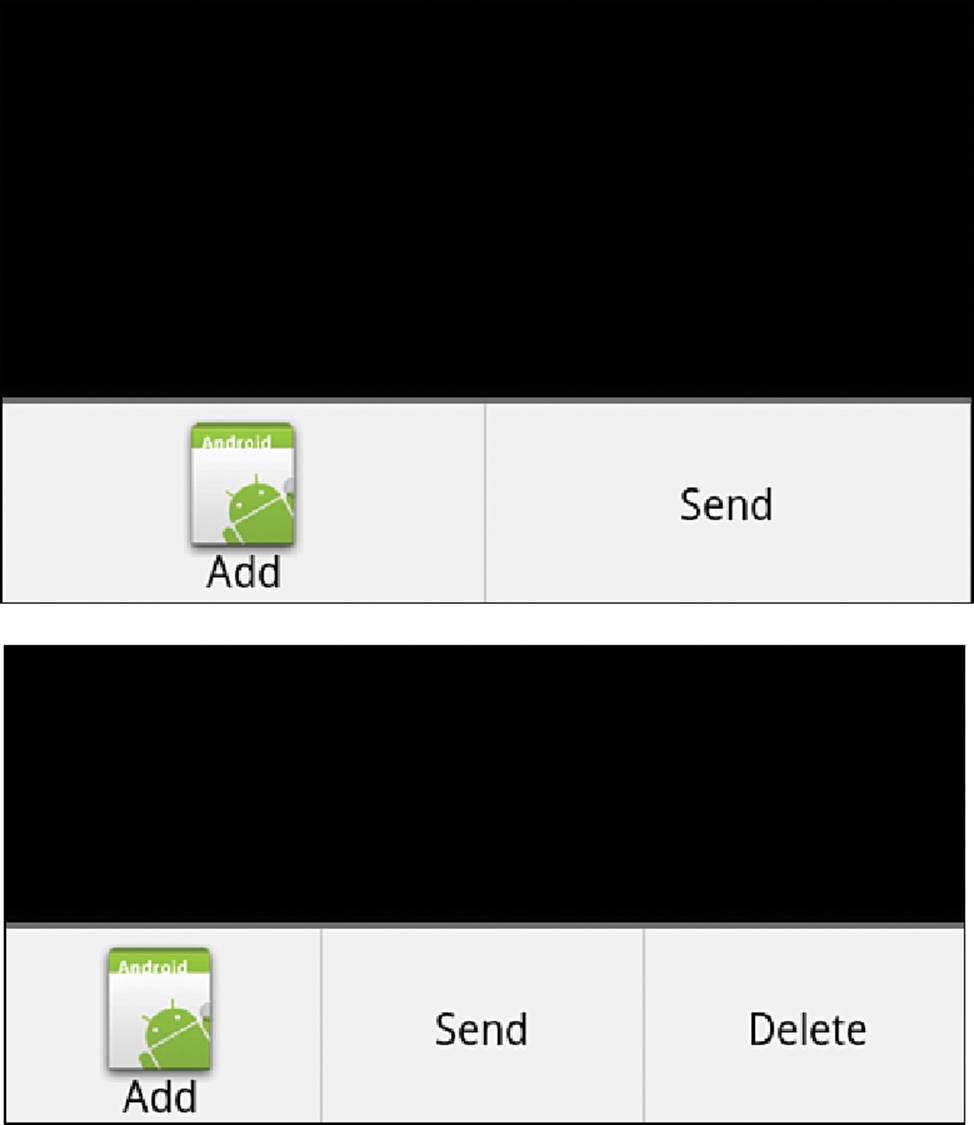
Figure 6.1 Options menu (top) and an added option at run-time (bottom)
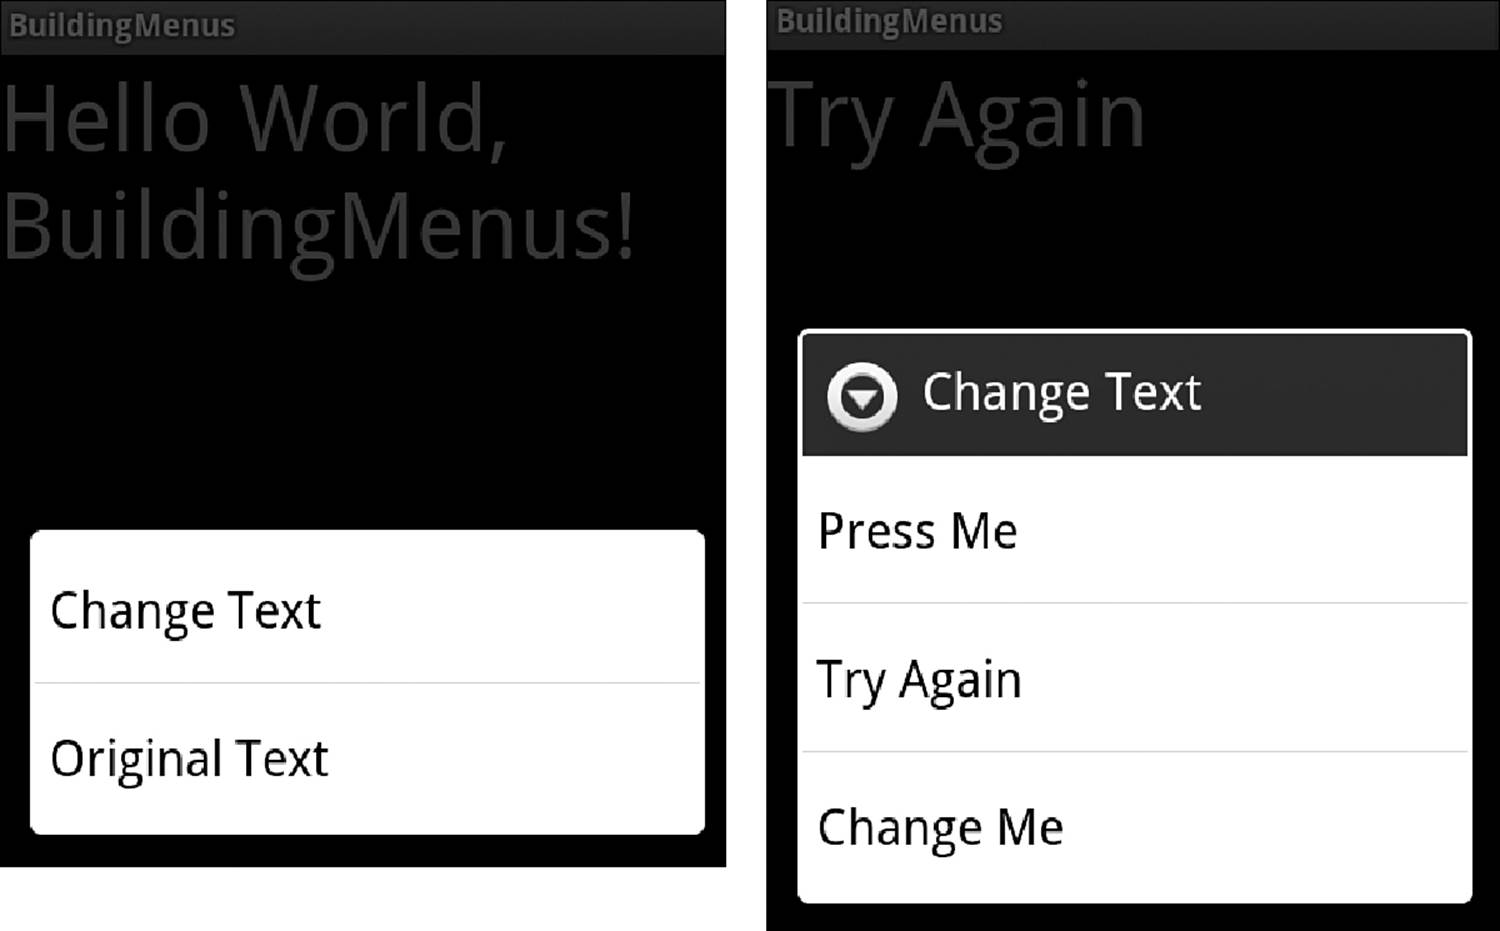
Figure 6.2 The context menu that displays with a long click on the text (left) and the submenu for the Change Text option that provides three alternate strings for the text view (right)
Recipe: Defining Menus in XML
Menus can also be built in XML and inflated with the appropriate callback method from the previous recipe. This is a useful context for larger menus. Dynamic choices can still be handled in Java.
Menu files are usually kept in the res/menu/ resources directory. For example, to make the context menu from the previous section, just create the XML file with nested menus, as shown in Listing 6.4.
Listing 6.4. res/menu/context_menu.xml
<?xml version="1.0" encoding="utf-8"?>
<menu xmlns:android="http://schemas.android.com/apk/res/android">
<item android:id="@+id/submenu" android:title="Change Text">
<menu xmlns:android="http://schemas.android.com/apk/res/android">
<item android:id="@+id/text1" android:title="Press Me" />
<item android:id="@+id/text2" android:title="Try Again" />
<item android:id="@+id/text3" android:title="Change Me" />
</menu>
</item>
<item android:id="@+id/orig" android:title="Original Text" />
</menu>
Then, inflate this XML in the creation of the menu, and reference the IDs from the item selection method. The two methods in Listing 6.2 that would be replaced are shown in Listing 6.5.
Listing 6.5. Changed Methods in the Main Activity
@Override
public void onCreateContextMenu(ContextMenu menu, View v,
ContextMenuInfo menuInfo) {
super.onCreateContextMenu(menu, v, menuInfo);
MenuInflater inflater = getMenuInflater();
inflater.inflate(R.menu.context_menu, menu);
}
@Override
public boolean onContextItemSelected(MenuItem item) {
switch(item.getItemId()) {
case R.id.orig:
bv.setText(R.string.hello);
return true;
case R.id.text1:
bv.setText(choices[0]);
return true;
case R.id.text2:
bv.setText(choices[1]);
return true;
case R.id.text3:
bv.setText(choices[2]);
return true;
}
return super.onContextItemSelected(item);
}
Recipe: Creating an Action Bar
The action bar is a window feature that was introduced in the release of Android 3.0 (Honeycomb). This was the release of Android that removed the need for a dedicated menu button. To replace it, the ActionBar was created. The action bar can be used to display user actions and global menu options. It can be used to reinforce a brand (as it will display an icon or app logo) as well as to switch between fragments, offer dropdown navigation, and display user actions such as search and share.
To get started with an action bar, the Holo theme should be used, and the android:targetSdkVersion should be set to 11 or higher. For versions prior to 11, the ActionBarSherlock, which is covered later in this chapter, can be used. The following snippet is an example of what can be used in the AndroidManifest.xml file:
<uses-sdk android:minSdkVersion="11" android:targetSdkVersion="16" />
This recipe shows how to create an action bar. The menu is shown in Listing 6.6.
Listing 6.6. res/menu/activity_action_bar.xml
<menu xmlns:android="http://schemas.android.com/apk/res/android">
<item android:id="@+id/menu_share"
android:title="Share"
android:icon="@drawable/ic_launcher"
android:orderInCategory="0"
android:showAsAction="ifRoom|withText" />
<item
android:id="@+id/menu_settings"
android:orderInCategory="100"
android:showAsAction="never"
android:title="@string/menu_settings"/>
</menu>
The action bar works like a menu and is defined in XML. This will be inflated in the ActionBarActivity. This is shown in Listing 6.7.
Listing 6.7. src/com/cookbook/actionbar/ActionBarActivity.java
package com.cookbook.actionbar;
import android.app.Activity;
import android.os.Bundle;
import android.view.Menu;
import android.view.MenuInflater;
import android.view.MenuItem;
import android.widget.Toast;
public class ActionBarActivity extends Activity {
@Override
protected void onCreate(Bundle savedInstanceState) {
super.onCreate(savedInstanceState);
setContentView(R.layout.activity_action_bar);
}
@Override
public boolean onCreateOptionsMenu(Menu menu) {
MenuInflater inflater = getMenuInflater();
inflater.inflate(R.menu.activity_action_bar, menu);
return true;
}
@Override
public boolean onOptionsItemSelected(MenuItem item) {
switch (item.getItemId()) {
case R.id.menu_share:
Toast.makeText(this, "Implement share options here",Toast.LENGTH_SHORT).show();
default:
return super.onOptionsItemSelected(item);
}
}
}
The bold section in Listing 6.7 shows the section of code that is added to the default activity in order to handle interaction with the Share menu item. Currently a Toast will be shown when the Share button is tapped, but this could be changed to work with providers to allow integration into other applications and services.
Figures 6.3 and 6.4 show this example on a tablet running Ice Cream Sandwich and a phone running Jelly Bean.
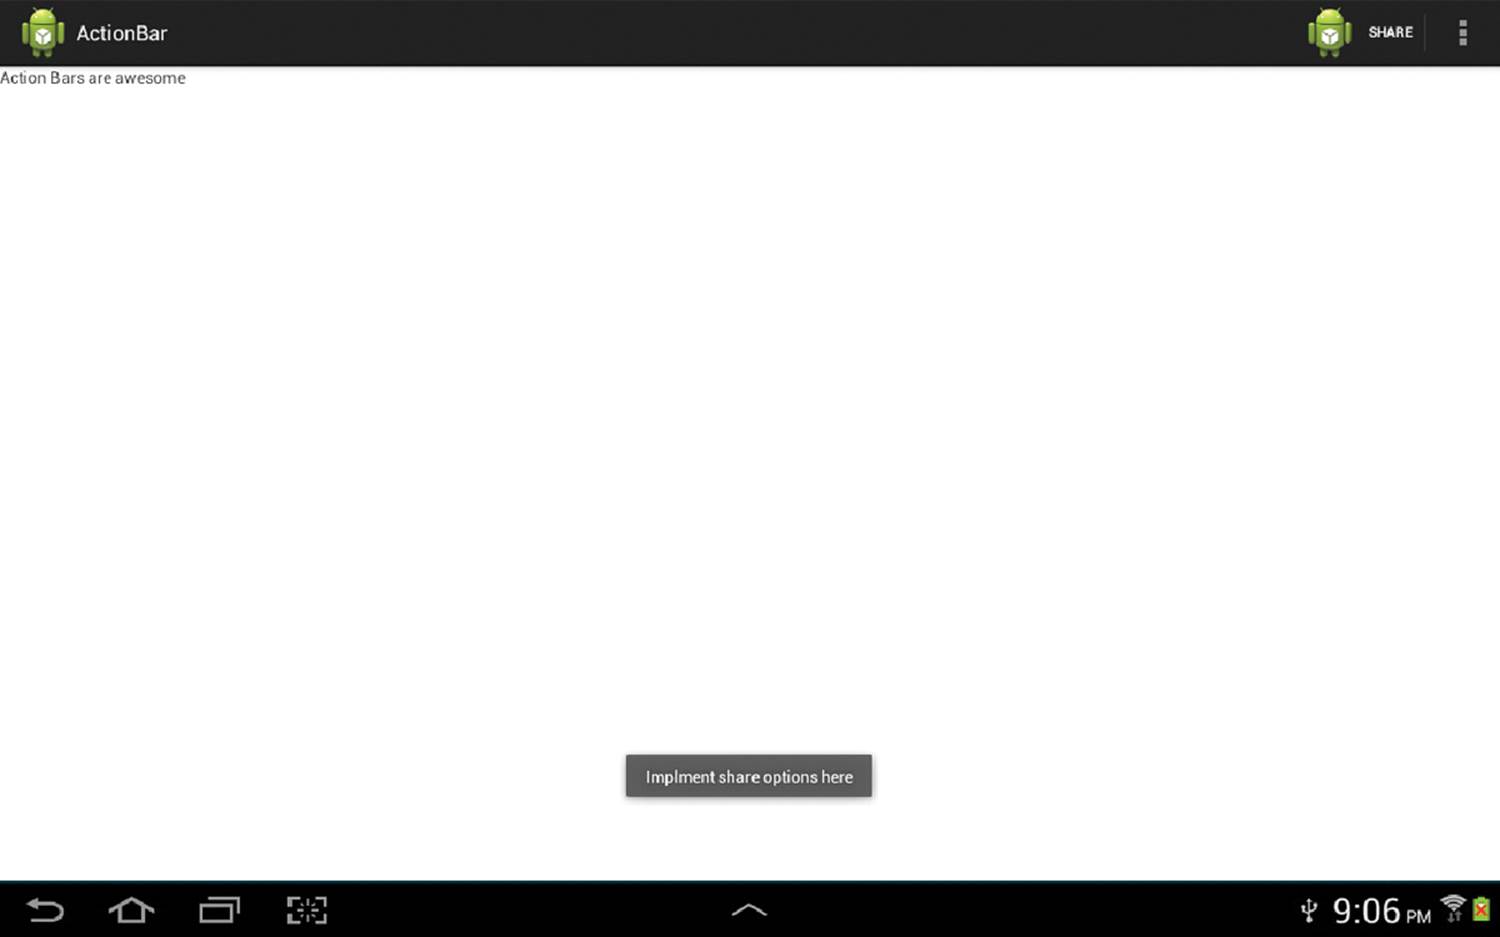
Figure 6.3 An action bar with a toast message displayed on a tablet running Ice Cream Sandwich
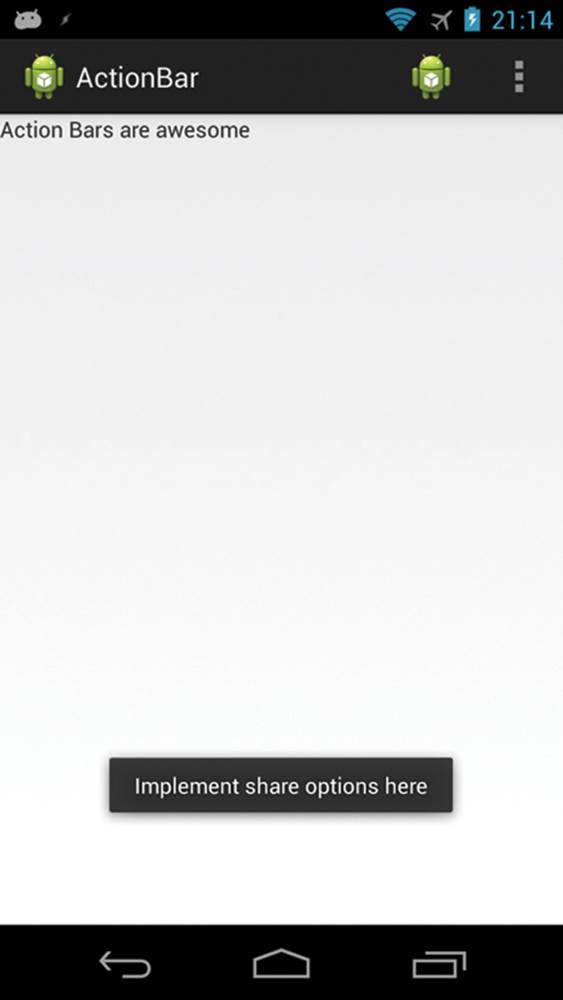
Figure 6.4 An action bar with a toast message displayed on a phone running Jelly Bean
Recipe: Using ActionBarSherlock
The previous section described how to add an action bar to an application when run on Android devices that have Android 3.0 or higher, but what about users with legacy devices? This is where ActionBarSherlock comes into play. ActionBarSherlock bridges the gap between API levels and allows the use of an action bar in Android API levels below 11.
First, go to http://actionbarsherlock.com/ and download ActionBarSherlock. Uncompress the downloaded file, then add the library folder as an “Android Project from Existing Code.” After the project has been imported into the workspace, it needs to be added as a library in the Android section of the project properties. Ant or Maven can also be used to build ActionBarSherlock into a project. For details on how, visit http://actionbarsherlock.com/usage.html.
After the project is set up to use the ActionBarSherlock library, it is time to make a few small alterations to the project made in Listing 6.7. The Android Support Library will need to be added, as this is part of what ActionBarSherlock uses to make the action bar work on the versions of Android prior to Honeycomb (API Level 11). If Eclipse is being used as the development IDE, simply right-click on the project folder and choose Android Tools → Add Support Library. A download will begin and the Support Library will be added to the project when the download has completed.
Now only a few modifications need to be made to add ActionBarSherlock to a project. Listing 6.8 shows the required changes to ActionBarActivity.
Listing 6.8. src/com/cookbook/actionbar/ActionBarActivity.java
package com.cookbook.actionbar;
import com.actionbarsherlock.app.SherlockActivity;
import android.os.Bundle;
import com.actionbarsherlock.view.Menu;import com.actionbarsherlock.view.MenuInflater;import com.actionbarsherlock.view.MenuItem;
import android.widget.Toast;
public class ActionBarActivity extends SherlockActivity {
@Override
protected void onCreate(Bundle savedInstanceState) {
super.onCreate(savedInstanceState);
setContentView(R.layout.activity_action_bar);
}
@Override
public boolean onCreateOptionsMenu(Menu menu) {
MenuInflater inflater = getSupportMenuInflater();
inflater.inflate(R.menu.activity_action_bar, menu);
return true;
}
@Override
public boolean onOptionsItemSelected(MenuItem item) {
switch (item.getItemId()) {
case R.id.menu_share:
Toast.makeText(this, "Implement share options here",
Toast.LENGTH_SHORT).show();
default:
return super.onOptionsItemSelected(item);
}
}
}
The boldface code displays the changes from Listing 6.7. These changes are the imports required as well as a change from extends Activity to extends SherlockActivity. A change is also made to the menu inflater, as it will now need to use getSupportMenuInflater instead ofgetMenuInflater.
In order for the action bar to work on older versions of Android, the Android Manifest.xml file must be changed. The following line is an example of what will work:
<uses-sdk android:minSdkVersion="7" android:targetSdkVersion="16" />
While changes are made to the AndroidManifest.xml file, the theme of the application will also need to be changed to allow ActionBarSherlock to display and work properly. The following is an example of what the application settings could look like:
<application
android:allowBackup="true"
android:icon="@drawable/ic_launcher"
android:label="@string/app_name"
android:theme="@style/Theme.Sherlock" >
Note that the bolded theme setting has been changed to use the provided Sherlock theme. More information about using themes with ActionBarSherlock can be found at http://actionbarsherlock.com/theming.html.
Figure 6.5 shows a portrait screenshot and Figure 6.6 shows a landscape screenshot taken from an Android device running Gingerbread (Android 2.3, API Level 9). Notice how the word SHARE is removed in portrait mode to conserve space.
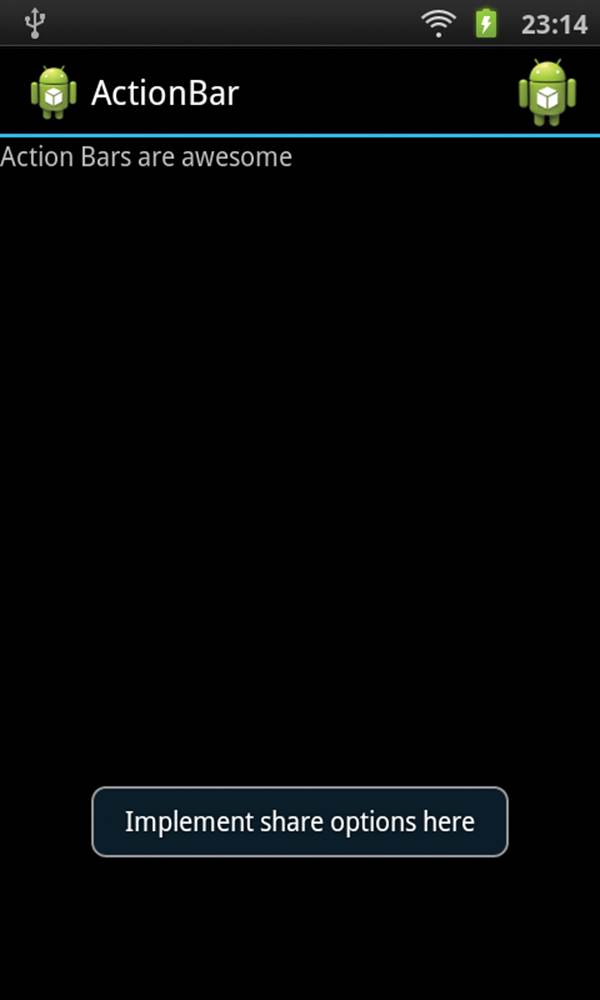
Figure 6.5 An action bar working on a device running Gingerbread displayed in portrait
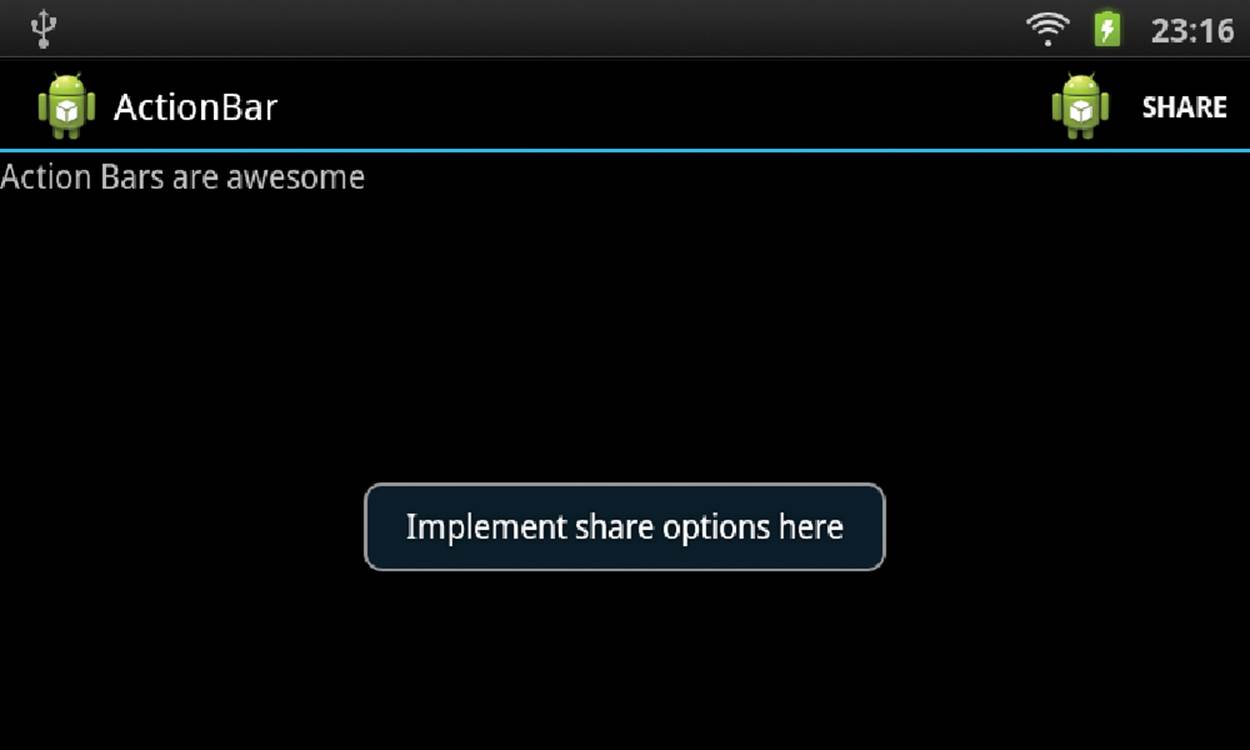
Figure 6.6 An action bar working on a device running Gingerbread displayed in landscape
Recipe: Using the SEARCH Key
As of Android 4.1 (Jelly Bean), the SEARCH key on all devices has been hard-coded by Google to be the shortcut key to invoke the Google Now service. This means that developers can no longer redefine this key for their applications. However, those building applications for pre-Jelly Bean devices can map the SEARCH key to trigger custom behavior. If an activity in the in-focus application is defined to be searchable, the SEARCH key invokes it. A menu choice or equivalent should always be a redundant way to call the searchable activity to accommodate devices without a SEARCH key. The menu choice simply needs a call to onSearchRequested().
The searchable activity ideally should be declared as singleTop launch mode, as discussed in Chapter 2, “Application Basics: Activities and Intents.” This enables multiple searches to take place without clogging the stack with multiple instances of the activity. The manifest file would have the following lines:
<activity android:name=".SearchDialogExample"
android:launchMode="singleTop" >
<intent-filter>
<action android:name="android.intent.action.SEARCH" />
</intent-filter>
<meta-data android:name="android.app.searchable"
android:resource="@xml/my_search"/>
</activity>
The XML file referencing the details of setting up the search configuration is shown in Listing 6.9. This file must be included when defining search in an application.
Listing 6.9. res/xml/my_search.xml
<?xml version="1.0" encoding="utf-8"?>
<searchable xmlns:android="http://schemas.android.com/apk/res/android"
android:label="@string/app_name" android:hint="Search MyExample Here">
</searchable>
This recipe provides a search interface. The simplest main activity is shown in Listing 6.10 with a default main.xml file.
Listing 6.10. src/com/cookbook/search_diag/MainActivity.java
package com.cookbook.search_diag;
import android.app.Activity;
import android.os.Bundle;
public class MainActivity extends Activity {
@Override
protected void onCreate(Bundle savedInstanceState) {
super.onCreate(savedInstanceState);
setContentView(R.layout.main);
}
}
Then, if the SEARCH key is selected, the searchable activity is activated. The onCreate() method checks whether the intent is an ACTION_SEARCH, and if it is, it acts on it. Listing 6.11 shows the main activity, which just displays the query to the screen.
Listing 6.11. src/com/cookbook/search_diag/SearchDialogExample.java
package com.cookbook.search_diag;
import android.app.Activity;
import android.app.SearchManager;
import android.content.Intent;
import android.os.Bundle;
import android.widget.Toast;
public class SearchDialogExample extends Activity {
/** called when the activity is first created */
@Override
public void onCreate(Bundle savedInstanceState) {
super.onCreate(savedInstanceState);
setContentView(R.layout.main);
Intent intent = getIntent();
if (Intent.ACTION_SEARCH.equals(intent.getAction())) {
String query = intent.getStringExtra(SearchManager.QUERY);
Toast.makeText(this, "The QUERY: " + query,
Toast.LENGTH_LONG).show();
}
}
}
Recipe: Reacting to Touch Events
Any interaction with the screen, be it a touch or a navigated selection using the trackball, is an interaction with the corresponding view at that location. Because the screen layout is a hierarchy of views, as described in Chapter 5, “User Interface Layout,” the system starts at the top of this hierarchy and passes the event down the tree until it is handled by a view. Some events, if not consumed, can continue to pass down the tree after being handled.
Listing 6.12 shows a button called ex_button that handles both a click and a long click (press and hold) by setting two event listeners. When the event occurs, the corresponding callback method is called and displays a Toast to the screen to show that the method was triggered.
Listing 6.12. src/com/cookbook/touch_examples/TouchExamples.java
package com.cookbook.touch_examples;
import android.app.Activity;
import android.os.Bundle;
import android.view.View;
import android.view.View.OnClickListener;
import android.view.View.OnLongClickListener;
import android.widget.Button;
import android.widget.Toast;
public class TouchExamples extends Activity {
@Override
public void onCreate(Bundle savedInstanceState) {
super.onCreate(savedInstanceState);
setContentView(R.layout.main);
Button ex = (Button) findViewById(R.id.ex_button);
ex.setOnClickListener(new OnClickListener() {
public void onClick(View v) {
Toast.makeText(TouchExamples.this, "Click",
Toast.LENGTH_SHORT).show();
}
});
ex.setOnLongClickListener(new OnLongClickListener() {
public boolean onLongClick(View v) {
Toast.makeText(TouchExamples.this, "LONG Click",
Toast.LENGTH_SHORT).show();
return true;
}
});
}
}
The layout providing the button is given in Listing 6.13.
Listing 6.13. res/layout/main.xml
<?xml version="1.0" encoding="utf-8"?>
<LinearLayout
xmlns:android="http://schemas.android.com/apk/res/android"
android:orientation="vertical"
android:layout_width="match_parent"
android:layout_height="match_parent">
<Button android:id="@+id/ex_button"
android:text="Press Me"
android:layout_width="wrap_content"
android:layout_height="wrap_content" />
</LinearLayout>
For compactness, this callback method is defined in place in Listing 6.12, but it can also be defined explicitly for readability and reusability:
View.OnClickListener myTouchMethod = new View.OnClickListener() {
public void onClick(View v) {
//Insert relevant action here
}};ex.setOnClickListener(myTouchMethod);
Another way is to have the activity implement the OnClickListener interface. Then, the method is at the activity level and avoids an extra class load:
public class TouchExamples extends Activity implements OnClickListener {
@Override
public void onCreate(Bundle savedInstanceState) {
super.onCreate(savedInstanceState);
setContentView(R.layout.main);
Button ex = (Button) findViewById(R.id.ex_button);
ex.setOnClickListener(this);
}
public void onClick(View v) {
if(v.getId() == R.id.directory_button) {
// Insert relevant action here
}
}
}
This implementation of the onClick() method at the activity level helps to show how a parent view can handle touch events for multiple children.
Recipe: Listening for Fling Gestures
As discussed in the beginning of the chapter, each view has an onTouchEvent() method associated with it. In this recipe, it is overridden with a gesture detector that sets a gesture listener. The possible gestures in the OnGestureListener interface are
![]() onDown()—Notifies when a tap-down event occurs
onDown()—Notifies when a tap-down event occurs
![]() onFling()—Notifies when a tap-down, movement, and matching-up event occurs
onFling()—Notifies when a tap-down, movement, and matching-up event occurs
![]() onLongPress()—Notifies when a long press occurs
onLongPress()—Notifies when a long press occurs
![]() onScroll()—Notifies when a scroll occurs
onScroll()—Notifies when a scroll occurs
![]() onShowPress()—Notifies when a tap-down event occurs before any movement or release
onShowPress()—Notifies when a tap-down event occurs before any movement or release
![]() onSingleTapUp()—Notifies when a tap-up event occurs
onSingleTapUp()—Notifies when a tap-up event occurs
When only a subset of gestures is needed, the SimpleOnGestureListener class can be extended instead. It returns false for any of the previous methods not explicitly implemented.
A fling consists of two events: a touch down (the first MotionEvent) and a release (the second MotionEvent). Each motion event has a specified location on the screen given by an (x,y) coordinate pair, where x is the horizontal axis and y is the vertical axis. The (x,y) velocity of the event is also provided.
Listing 6.14 shows an activity that implements the onFling() method. When the movement is large enough (here, defined as 60 pixels), the event is consumed and appends the statement describing the event to the screen.
Listing 6.14. src/com/cookbook/fling_ex/FlingExample.java
package com.cookbook.fling_ex;
import android.app.Activity;
import android.os.Bundle;
import android.view.GestureDetector;import android.view.MotionEvent;import android.view.GestureDetector.SimpleOnGestureListener;
import android.widget.TextView;
public class FlingExample extends Activity {
private static final int LARGE_MOVE = 60;
private GestureDetector gestureDetector;
TextView tv;
@Override
public void onCreate(Bundle savedInstanceState) {
super.onCreate(savedInstanceState);
setContentView(R.layout.main);
tv = (TextView) findViewById(R.id.text_result);
gestureDetector = new GestureDetector(this,
new SimpleOnGestureListener() {
@Override
public boolean onFling(MotionEvent e1, MotionEvent e2,
float velocityX, float velocityY) {
if (e1.getY() - e2.getY() > LARGE_MOVE) {
tv.append("\nFling Up with velocity " + velocityY);
return true;
} else if (e2.getY() - e1.getY() > LARGE_MOVE) {
tv.append("\nFling Down with velocity " + velocityY);
return true;
} else if (e1.getX() - e2.getX() > LARGE_MOVE) {
tv.append("\nFling Left with velocity " + velocityX);
return true;
} else if (e2.getX() - e1.getX() > LARGE_MOVE) {
tv.append("\nFling Right with velocity " + velocityX);
return true;
}
return false;
} });
}
@Override
public boolean onTouchEvent(MotionEvent event) {
return gestureDetector.onTouchEvent(event);
}
}
The TextView that contains the descriptive text in the previous activity is defined in the main XML layout shown in Listing 6.15.
Listing 6.15. res/layout/main.xml
<?xml version="1.0" encoding="utf-8"?>
<LinearLayout
xmlns:android="http://schemas.android.com/apk/res/android"
android:orientation="vertical"
android:layout_width="match_parent"
android:layout_height="match_parent">
<TextView android:id="@+id/text_result"
android:layout_width="match_parent"
android:layout_height="match_parent"
android:textSize="16sp"
android:text="Fling right, left, up, or down\n" />
</LinearLayout>
Recipe: Using Multitouch
A multitouch event is when more than one pointer (such as a finger) touches the screen at the same time. This is identified by using a touch listener OnTouchListener, which receives multiple types of motion events:
![]() ACTION_DOWN—A press gesture has started with a primary pointer (finger).
ACTION_DOWN—A press gesture has started with a primary pointer (finger).
![]() ACTION_POINTER_DOWN—A secondary pointer (finger) has gone down.
ACTION_POINTER_DOWN—A secondary pointer (finger) has gone down.
![]() ACTION_MOVE—A change in press location has occurred during a press gesture.
ACTION_MOVE—A change in press location has occurred during a press gesture.
![]() ACTION_POINTER_UP—A secondary pointer was released.
ACTION_POINTER_UP—A secondary pointer was released.
![]() ACTION_UP—A primary pointer was released, and the press gesture has completed.
ACTION_UP—A primary pointer was released, and the press gesture has completed.
This recipe displays an image to the screen and allows the multitouch events to zoom the image in or out. It also checks for single pointer events to drag the picture around the screen. This is shown in the activity in Listing 6.16. First, the activity implements the OnTouchListener that is set in the onCreate() method. When a touch event occurs, the onTouch() method checks the motion event and acts as follows:
![]() If a first pointer touches the screen, the touch state is declared to be a drag motion, and the touch-down position and Matrix are saved.
If a first pointer touches the screen, the touch state is declared to be a drag motion, and the touch-down position and Matrix are saved.
![]() If a second pointer touches the screen when the first pointer is still down, the distance between the two touch-down positions is calculated. As long as it is larger than some threshold (50 pixels here), the touch state is declared to be a zoom motion, and the distance and midpoint of the two events, as well as the Matrix, are saved.
If a second pointer touches the screen when the first pointer is still down, the distance between the two touch-down positions is calculated. As long as it is larger than some threshold (50 pixels here), the touch state is declared to be a zoom motion, and the distance and midpoint of the two events, as well as the Matrix, are saved.
![]() If a move occurs, the figure is translated for a single touch-down event and scaled for a multitouch event.
If a move occurs, the figure is translated for a single touch-down event and scaled for a multitouch event.
![]() If a pointer goes up, the touch state is declared to be no motion.
If a pointer goes up, the touch state is declared to be no motion.
Listing 6.16. src/com/cookbook/multitouch/MultiTouch.java
package com.cookbook.multitouch;
import android.app.Activity;
import android.graphics.Matrix;
import android.os.Bundle;
import android.util.FloatMath;
import android.view.MotionEvent;
import android.view.View;
import android.view.View.OnTouchListener;
import android.widget.ImageView;
public class MultiTouch extends Activity implements OnTouchListener {
// Matrix instances to move and zoom image
Matrix matrix = new Matrix();
Matrix eventMatrix = new Matrix();
// possible touch states
final static int NONE = 0;
final static int DRAG = 1;
final static int ZOOM = 2;
int touchState = NONE;
@Override
public void onCreate(Bundle savedInstanceState) {
super.onCreate(savedInstanceState);
setContentView(R.layout.main);
ImageView view = (ImageView) findViewById(R.id.imageView);
view.setOnTouchListener(this);
}
final static float MIN_DIST = 50;
static float eventDistance = 0;
static float centerX =0, centerY = 0;
@Override
public boolean onTouch(View v, MotionEvent event) {
ImageView view = (ImageView) v;
switch (event.getAction() & MotionEvent.ACTION_MASK) {
case MotionEvent.ACTION_DOWN:
//Primary touch event starts: remember touch-down location
touchState = DRAG;
centerX = event.getX(0);
centerY = event.getY(0);
eventMatrix.set(matrix);
break;
case MotionEvent.ACTION_POINTER_DOWN:
//Secondary touch event starts: remember distance and center
eventDistance = calcDistance(event);
calcMidpoint(centerX, centerY, event);
if (eventDistance > MIN_DIST) {
eventMatrix.set(matrix);
touchState = ZOOM;
}
break;
case MotionEvent.ACTION_MOVE:
if (touchState == DRAG) {
//single finger drag, translate accordingly
matrix.set(eventMatrix);
matrix.setTranslate(event.getX(0) - centerX,
event.getY(0) - centerY);
} else if (touchState == ZOOM) {
//multifinger zoom, scale accordingly around center
float dist = calcDistance(event);
if (dist > MIN_DIST) {
matrix.set(eventMatrix);
float scale = dist / eventDistance;
matrix.postScale(scale, scale, centerX, centerY);
}
}
// Perform the transformation
view.setImageMatrix(matrix);
break;
case MotionEvent.ACTION_UP:
case MotionEvent.ACTION_POINTER_UP:
touchState = NONE;
break;
}
return true;
}
private float calcDistance(MotionEvent event) {
float x = event.getX(0) - event.getX(1);
float y = event.getY(0) - event.getY(1);
return FloatMath.sqrt(x * x + y * y);
}
private void calcMidpoint(float centerX, float centerY,
MotionEvent event) {
centerX = (event.getX(0) + event.getX(1))/2;
centerY = (event.getY(0) + event.getY(1))/2;
}
}
The layout that specifies a picture to zoom is shown in Listing 6.17. For this recipe, it is taken as the icon.png, which is automatically created in Eclipse; however, it can be replaced by any picture.
Listing 6.17. res/layout/main.xml
<?xml version="1.0" encoding="utf-8"?>
<FrameLayout
xmlns:android="http://schemas.android.com/apk/res/android"
android:layout_width="match_parent"
android:layout_height="match_parent" >
<ImageView android:id="@+id/imageView"
android:layout_width="match_parent"
android:layout_height="match_parent"
android:src="@drawable/ic_launcher"
android:scaleType="matrix" >
</ImageView>
</FrameLayout>
Advanced User Interface Libraries
Some user interface features require complex algorithmic computations. Optimizing this for an embedded system can sometimes be challenging and time-consuming. It is in a developer’s best interest to leverage any available UI libraries. The following two recipes provide some illustrative examples to use as a starting point.
Recipe: Using Gestures
A gesture is a hand-drawn shape on a touchscreen. The android.gesture package provides libraries to recognize and handle these in a simple way. First, every SDK has a sample program that can be used to build a collection of gestures in platforms/android-2.0/samples/GestureBuilder/. The Gesture Builder project can be imported and run on an Android device. It produces a file called /sdcard/gestures, which can be copied off of the device and used as a raw resource for this recipe.
As an example, a file of handwritten numbers can be generated as shown in Figure 6.7. Multiple gestures can have the same name, so providing different examples of the same gesture is useful to improve pattern recognition.
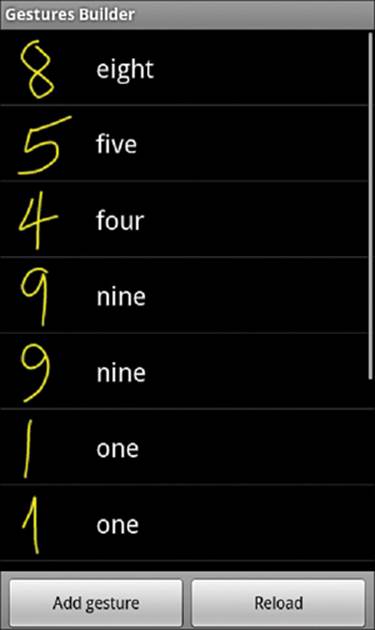
Figure 6.7 The Gesture Builder application, which comes with the Android SDK, can be used to create a gesture library
After this file is created for all numbers from 0 to 9 in all variants of interest, it can be copied to res/raw/numbers, for example. The layout is shown in Listing 6.18, and the main activity is shown in Listing 6.19. In the activity, the GestureLibrary is initialized with this raw resource.
This recipe adds a GestureOverlayView on top of the screen and implements an OnGesturePerformedListener. When a gesture is drawn, the gesture is passed to the onGesturePerformed() method, which compares it with all the gestures in the library and returns an ordered list of predictions, starting with the most likely. Each prediction has the name as defined in the library and the score for how correlated the gesture is to the input gesture. As long as the first entry has a score greater than one, it is generally a match.
Listing 6.18. res/layout/main.xml
<?xml version="1.0" encoding="utf-8"?>
<LinearLayout xmlns:android="http://schemas.android.com/apk/res/android"
android:orientation="vertical"
android:layout_width="match_parent"
android:layout_height="match_parent"
>
<TextView
android:layout_width="match_parent"
android:layout_height="wrap_content"
android:gravity="center_horizontal" android:textSize="20sp"
android:text="Draw a number"
android:layout_margin="10dip"/>
<android.gesture.GestureOverlayView
android:id="@+id/gestures"
android:layout_width="match_parent"
android:layout_height="0dip"
android:layout_weight="1.0" />
<TextView android:id="@+id/prediction"
android:layout_width="match_parent"
android:layout_height="wrap_content"
android:gravity="center_horizontal" android:textSize="20sp"
android:text=""
android:layout_margin="10dip"/>
</LinearLayout>
For illustration, this recipe compiles all the predictions in a String and displays them on the screen. An example output is shown in Figure 6.8. This shows that even though a visual match is not complete, the partial number can match a library number well.
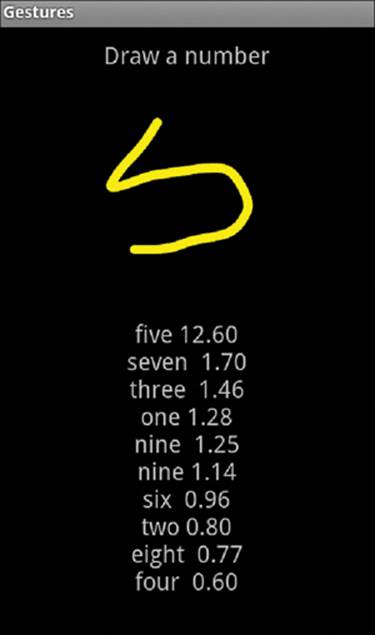
Figure 6.8 The gesture recognition example that shows prediction scores
Listing 6.19. src/com/cookbook/gestures/Gestures.java
package com.cookbook.gestures;
import java.text.DecimalFormat;
import java.text.NumberFormat;
import java.util.ArrayList;
import android.app.Activity;
import android.gesture.Gesture;import android.gesture.GestureLibraries;import android.gesture.GestureLibrary;import android.gesture.GestureOverlayView;import android.gesture.Prediction;import android.gesture.GestureOverlayView.OnGesturePerformedListener;
import android.os.Bundle;
import android.widget.TextView;
public class Gestures extends Activity
implements OnGesturePerformedListener {
private GestureLibrary mLibrary;
private TextView tv;
@Override
public void onCreate(Bundle savedInstanceState) {
super.onCreate(savedInstanceState);
setContentView(R.layout.main);
tv = (TextView) findViewById(R.id.prediction);
mLibrary = GestureLibraries.fromRawResource(this, R.raw.numbers);
if (!mLibrary.load()) finish();
GestureOverlayView gestures =
(GestureOverlayView) findViewById(R.id.gestures);
gestures.addOnGesturePerformedListener(this);
}
public void onGesturePerformed(GestureOverlayView overlay,
Gesture gesture) {
ArrayList<Prediction> predictions = mLibrary.recognize(gesture);
String predList = "";
NumberFormat formatter = new DecimalFormat("#0.00");
for(int i=0; i<predictions.size(); i++) {
Prediction prediction = predictions.get(i);
predList = predList + prediction.name + " "
+ formatter.format(prediction.score) + "\n";
}
tv.setText(predList);
}
}
Recipe: Drawing 3D Images
Android supports the Open Graphics Library for Embedded Systems (OpenGL ES). This recipe, based on an Android API demo, shows how to create a three-dimensional pyramid shape using this library and have it bounce around the screen and spin as it is deflected off the edges. The main activity requires two separate support classes: one to define the shape shown in Listing 6.20 and one to render the shape shown in Listing 6.21.
Listing 6.20. src/com/cookbook/open_gl/Pyramid.java
package com.cookbook.open_gl;
import java.nio.ByteBuffer;
import java.nio.ByteOrder;
import java.nio.IntBuffer;
import javax.microedition.khronos.opengles.GL10;
class Pyramid {
public Pyramid() {
int one = 0x10000;
/* square base and point top to make a pyramid */
int vertices[] = {
-one, -one, -one,
-one, one, -one,
one, one, -one,
one, -one, -one,
0, 0, one
};
/* purple fading to white at the top */
int colors[] = {
one, 0, one, one,
one, 0, one, one,
one, 0, one, one,
one, 0, one, one,
one, one, one, one
};
/* triangles of the vertices above to build the shape */
byte indices[] = {
0, 1, 2, 0, 2, 3, //square base
0, 3, 4, // side 1
0, 4, 1, // side 2
1, 4, 2, // side 3
2, 4, 3 // side 4
};
// buffers to be passed to gl*Pointer() functions
ByteBuffer vbb = ByteBuffer.allocateDirect(vertices.length*4);
vbb.order(ByteOrder.nativeOrder());
mVertexBuffer = vbb.asIntBuffer();
mVertexBuffer.put(vertices);
mVertexBuffer.position(0);
ByteBuffer cbb = ByteBuffer.allocateDirect(colors.length*4);
cbb.order(ByteOrder.nativeOrder());
mColorBuffer = cbb.asIntBuffer();
mColorBuffer.put(colors);
mColorBuffer.position(0);
mIndexBuffer = ByteBuffer.allocateDirect(indices.length);
mIndexBuffer.put(indices);
mIndexBuffer.position(0);
}
public void draw(GL10 gl) {
gl.glFrontFace(GL10.GL_CW);
gl.glVertexPointer(3, GL10.GL_FIXED, 0, mVertexBuffer);
gl.glColorPointer(4, GL10.GL_FIXED, 0, mColorBuffer);
gl.glDrawElements(GL10.GL_TRIANGLES, 18, GL10.GL_UNSIGNED_BYTE,
mIndexBuffer);
}
private IntBuffer mVertexBuffer;
private IntBuffer mColorBuffer;
private ByteBuffer mIndexBuffer;
}
Note that the pyramid has five vertices: four in a square base and one as the raised pointy top. It is important that the vertices be in an order that can be traversed by a line across the figure (not just randomly listed). The center of the shape is at the origin (0, 0, 0).
The five colors in RGBA form correspond to the vertices; the base vertices are defined as purple and the top vertex as white. The library gradates the colors to fill in the shape. Different colors or shading help provide a three-dimensional look.
The main draw() method is defined for triangle elements. The square base can be made of two triangles, and each upper side is a triangle, which leads to six total triangles or 18 indices. The pyramid is shown in two different perspectives as it bounces around in Figure 6.9.
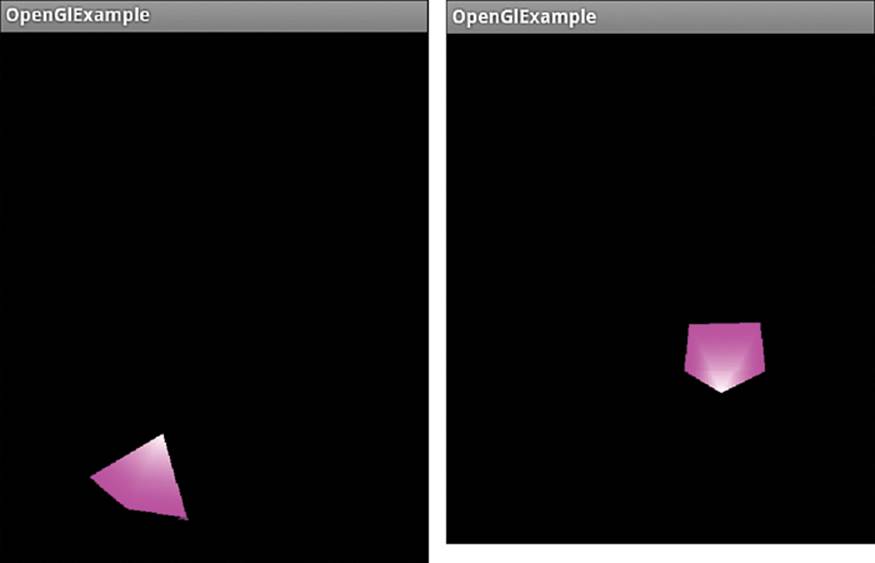
Figure 6.9 The rotating, bouncing pyramid created with OpenGL ES
Then, a separate class can be created to extend GLSurfaceView.Renderer to render this pyramid using the OpenGL ES library, as shown in Listing 6.21. Three methods need to be implemented:
![]() onSurfaceCreated()—One-time initialization of the OpenGL framework
onSurfaceCreated()—One-time initialization of the OpenGL framework
![]() onSurfaceChanged()—Sets the projection at start-up or when the viewport is resized
onSurfaceChanged()—Sets the projection at start-up or when the viewport is resized
![]() onDrawFrame()—Draws the graphic image every frame
onDrawFrame()—Draws the graphic image every frame
Listing 6.21. src/com/cookbook/open_gl/PyramidRenderer.java
package com.cookbook.open_gl;
import javax.microedition.khronos.egl.EGLConfig;import javax.microedition.khronos.opengles.GL10;
import android.opengl.GLSurfaceView;
/**
* Render a tumbling pyramid
*/
class PyramidRenderer implements GLSurfaceView.Renderer {
public PyramidRenderer(boolean useTranslucentBackground) {
mTranslucentBackground = useTranslucentBackground;
mPyramid = new Pyramid();
}
public void onDrawFrame(GL10 gl) {
/* Clear the screen */
gl.glClear(GL10.GL_COLOR_BUFFER_BIT | GL10.GL_DEPTH_BUFFER_BIT);
/* Draw a pyramid rotating */
gl.glMatrixMode(GL10.GL_MODELVIEW);
gl.glLoadIdentity();
gl.glTranslatef(mCenter[0], mCenter[1], mCenter[2]);
gl.glRotatef(mAngle, 0, 1, 0);
gl.glRotatef(mAngle*0.25f, 1, 0, 0);
gl.glEnableClientState(GL10.GL_VERTEX_ARRAY);
gl.glEnableClientState(GL10.GL_COLOR_ARRAY);
mPyramid.draw(gl);
mAngle += mAngleDelta;
/* Draw it bouncing off the walls */
mCenter[0] += mVel[0];
mCenter[1] += mVel[1];
if(Math.abs(mCenter[0])>4.0f) {
mVel[0] = -mVel[0];
mAngleDelta=(float) (5*(0.5-Math.random()));
}
if(Math.abs(mCenter[1])>6.0f) {
mVel[1] = -mVel[1];
mAngleDelta=(float) (5*(0.5-Math.random()));
}
}
public void onSurfaceChanged(GL10 gl, int width, int height) {
gl.glViewport(0, 0, width, height);
/* Set a new projection when the viewport is resized */
float ratio = (float) width / height;
gl.glMatrixMode(GL10.GL_PROJECTION);
gl.glLoadIdentity();
gl.glFrustumf(-ratio, ratio, -1, 1, 1, 20);
}
public void onSurfaceCreated(GL10 gl, EGLConfig config) {
gl.glDisable(GL10.GL_DITHER);
/* one-time OpenGL initialization */
gl.glHint(GL10.GL_PERSPECTIVE_CORRECTION_HINT,
GL10.GL_FASTEST);
if (mTranslucentBackground) {
gl.glClearColor(0,0,0,0);
} else {
gl.glClearColor(1,1,1,1);
}
gl.glEnable(GL10.GL_CULL_FACE);
gl.glShadeModel(GL10.GL_SMOOTH);
gl.glEnable(GL10.GL_DEPTH_TEST);
}
private boolean mTranslucentBackground;
private Pyramid mPyramid;
private float mAngle, mAngleDelta=0;
private float mCenter[]={0,0,-10};
private float mVel[]={0.025f, 0.03535227f, 0f};
}
The dynamics of the bouncing pyramid are captured in the onDrawFrame() method. The screen is cleared for the new image, and then the pyramid center is set to mCenter[]. The screen is defined as the origin, so the starting point of (0, 0, -10) sets the shape back from right up against the screen. At each update, the shape is rotated by mAngleDelta and translated by mVel[]. The mVels in the x and y directions are set differently enough to provide a nice diversity of bouncing around the walls. When the shape reaches the edge of the screen, the velocity sign is switched to have it bounce back.
Finally, the main activity must set the content view to the OpenGL ES object, as shown in Listing 6.22. The shape movement can be paused and resumed along with the activity.
Listing 6.22. src/com/cookbook/open_gl/OpenGlExample.java
package com.cookbook.open_gl;
import android.app.Activity;
import android.opengl.GLSurfaceView;
import android.os.Bundle;
/* wrapper activity demonstrating the use of GLSurfaceView, a view
* that uses OpenGL drawing into a dedicated surface */
public class OpenGlExample extends Activity {
@Override
protected void onCreate(Bundle savedInstanceState) {
super.onCreate(savedInstanceState);
// Set our Preview view as the activity content
mGLSurfaceView = new GLSurfaceView(this);
mGLSurfaceView.setRenderer(new PyramidRenderer(true));
setContentView(mGLSurfaceView);
}
@Override
protected void onResume() {
super.onResume();
mGLSurfaceView.onResume();
}
@Override
protected void onPause() {
super.onPause();
mGLSurfaceView.onPause();
}
private GLSurfaceView mGLSurfaceView;
}
All materials on the site are licensed Creative Commons Attribution-Sharealike 3.0 Unported CC BY-SA 3.0 & GNU Free Documentation License (GFDL)
If you are the copyright holder of any material contained on our site and intend to remove it, please contact our site administrator for approval.
© 2016-2025 All site design rights belong to S.Y.A.