Google Drive and Docs in 30 Minutes (2nd Edition) – The unofficial guide to the new Google Drive, Docs, Sheets & Slides (2015)
Chapter 4. Google Slides
Afew chapters ago, I described Google Docs as being an adequate substitute for Microsoft Word. And while Google Sheets isn’t nearly as slick as Excel, it covers the basics as well as advanced features such as Web Forms.
Now we come to Slides, the Google equivalent of Microsoft PowerPoint or Apple’s Keynote program. Slides is definitely the runt of the litter. Yes, it handles all of the things you would expect in a standard slideshow application, from animations to themes. But the presentations don’t look sophisticated—a potential negative for business users.
In business presentations, positive impressions can help make a sale or win over an audience. PowerPoint and Keynote, when used properly, can be extremely effective business communication tools. But Slides, with its flat designs and simple templates, looks amateurish. It may be enough for a student project or a presentation to a local community group, but for serious business, Slides’ primitive designs can actually be a distraction for people who are used to slick PowerPoint decks.
Nevertheless, Slides does have a few saving graces:
●Its relative lack of features makes it very easy to use.
●Collaboration is easier.
●Slides can be instantly ported to the Web.
●It’s possible to create, edit, and present Slides offline.
●It’s possible to create a draft Slides file to take advantage of Google’s collaboration features, and then export the file to PowerPoint for more sophisticated animations and formatting.
Google has also done a lot to improve Google Slides on mobile devices. When I wrote the first edition of this guide, Slides was basically limited to laptop and desktop computers. Now, the Google Slides app for phones and tablets is a superb tool for making quick edits while on the go, or even giving impromptu presentations without having to break out the laptop and projector. You can actually use the Google Slides app to give a 30-second elevator pitch in an elevator, using nothing more than your Android or iOS phone!
Over the next few pages, I’ll introduce the basic features of Slides.
Creating and launching presentations
To create a new presentation in Google Slides, use one of the following methods:
●Google Drive: New > Google Slides
●Google Slides (browser, Chromebook, or app): Press the “+” symbol to create a new file.
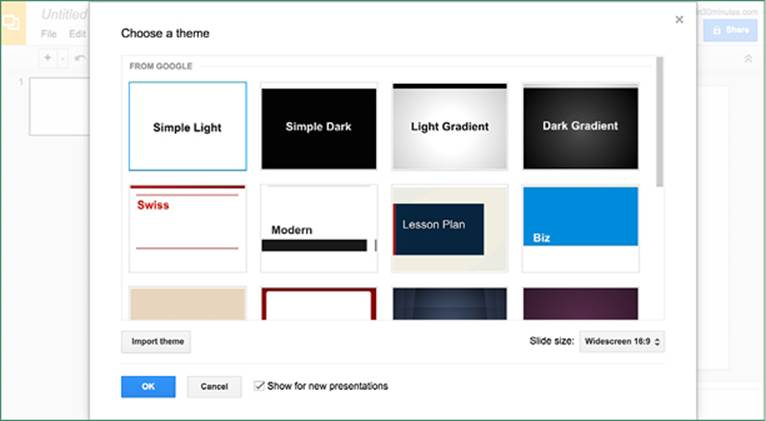
If you are creating a new presentation using the browser or Chromebook versions of Google Slides, you will be prompted to choose a theme:
The Google Slides app for phones and tablets does not have the ability to change themes. When the app creates a new presentation, it shows the title slide and options for basic edits.
The browser and Chromebook versions of Google Slides save automatically as you add text, formatting, and other elements. The Google Slides mobile app may require tapping the checkmark icon to save certain changes.
A presentation can be launched using the following methods:
●Browser/Chromebook: Press the Present button in the upper-right corner of the toolbar area.
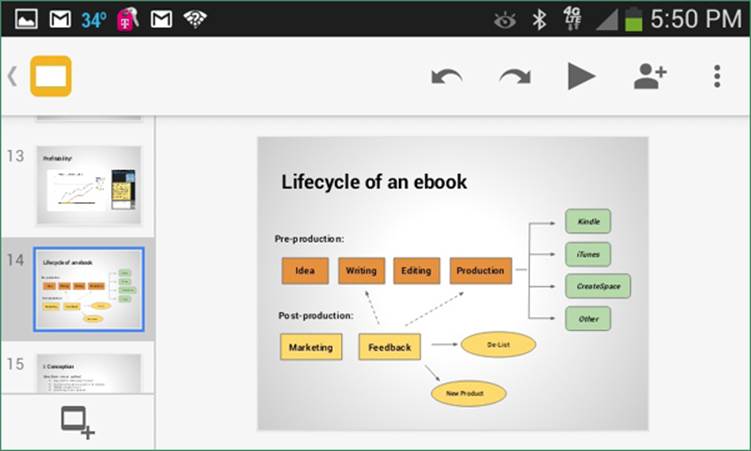
●Mobile app: Tap the triangular icon at the top of the screen (see screenshot, below).
While Microsoft PowerPoint files can be launched within Google Slides, note that the original formatting and animations may not be reflected in the presentation that plays on the screen. For this reason, I advise launching .ppt and .pptx files using PowerPoint, which is part of Microsoft Office.
How to import and convert PowerPoint files
While Google Slides can import and export PowerPoint files (.ppt and .pptx), formatting does not translate well. This is a particularly serious issue for users who attempt to convert a beautiful PowerPoint presentation. Colors, fonts, shadows, and other elements may appear drastically different in Slides. PowerPoint animations may not work at all.
Fortunately, Google Slides has enabled limited editing of PowerPoint slides (see Direct editing of Microsoft Office formats in Chapter 1). This makes it possible to make simple text and formatting changes in an imported PowerPoint file without having to convert it to Google Slides.
To import a .ppt or .pptx file using the browser and Chromebook versions of Google Slides, follow these steps:
1.Open Google Drive, click New and select Upload files.
2.Find the PowerPoint files (.ppt or .pptx) that you want to use in Slides.
3.A box will appear on the screen, notifying you that the upload is taking place.
4.Once completed, the PowerPoint files can be identified by the “P” icon in the list of files on Google Drive or in Google Slides.
If you can’t find the PowerPoint file, it may have been automatically converted to Slides. To prevent Drive from automatically converting PowerPoint files, click the gear icon to access settings and deselect the conversion option for Microsoft imports.
To convert an imported PowerPoint file to Slides format for editing, open the file select File > Open with Google Slides.
How to export a presentation
To export or convert a Google Slides presentation, use File > Download As in the browser or Chromebook versions of Google Slides. Presentations can be converted to the following formats:
●PowerPoint (.pptx). Note that formatting may not be preserved in the exported .pptx file.
●PDF.
●Image formats. Individual slides can be exported as .jpg, .png or .svg files.
●Text. Exported files will contain the text of the original spreadsheet, but no other elements.
If you are using an Android or Apple phone or tablet, export options are limited to PowerPoint files. To access this feature, tap the More icon (which looks like three vertical dots) and select Share & export > Save as PowerPoint (.pptx).
How to add slides to a presentation
To create a new slide, follow these steps:
Browser/Chromebook
1.Click the button with a plus symbol in the upper left corner of the toolbar.
2.The drop-down menu next to the “+” button lets you choose various formats (“blank”, “title with body”, “content with caption”, etc.)
The keyboard shortcut Ctrl-M also creates a new slide.
If you have created a complicated slide or formatting that you want to reproduce on another slide, use Insert > Duplicate and the delete the text and elements you no longer need.
Android/iOS
1.Tap the New Slide icon, which features a plus symbol.
2.Choose a blank slide or one of the preformatted slide options.
Editing features of Google Slides
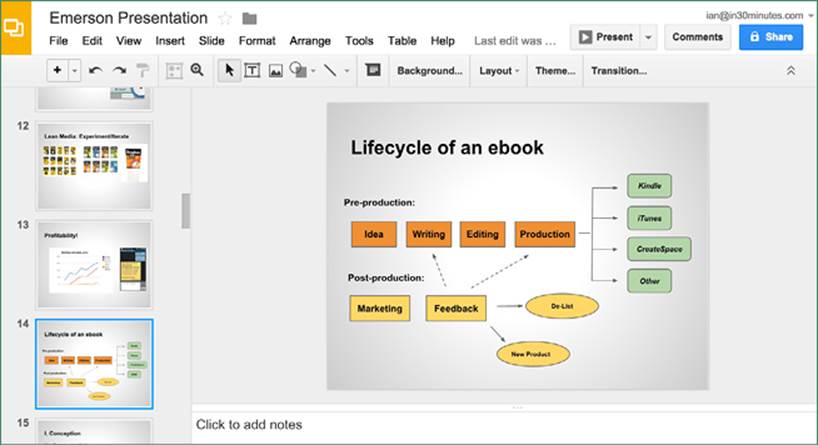
When editing a presentation in the browser or Chromebook versions of Google Slides, a toolbar runs across the top and thumbnails of the slides appear on the left side of the screen. The selected slide will occupy the center of the screen:
For the mobile app, thumbnails run across the bottom of the screen. There is no toolbar, but a few icons at the top of the screen show basic editing and sharing options.
As noted earlier, the appearance of the presentations in Google Slides don’t hold a candle to a well-designed PowerPoint deck.
On the other hand, the learning curve for Slides is gentle—Google has made it very easy to create, edit, and format presentations.
How to change a theme
When you create a new presentation, you can work with a blank template or select a pre-made theme.
Slides themes are very basic. For instance, the Modern theme is literally a white background with a black bar for the subtitle.
To change the theme in the browser or Chromebook versions of Google Slides, click the Theme button on the default toolbar.
When using the Slides app on your phone or tablet, themes can’t be changed after a presentation has been created.
How to format elements in Slides
I recommend using the browser or Chromebook versions of Google Slides to perform formatting changes. The mobile app simply doesn’t have much flexibility when it comes to formatting text and other presentation elements, and on small-screen devices manipulating individual elements can be extremely frustrating.
The Slides toolbar has two configurations. When you open an existing presentation, or create a new one, it will look like this:
![]()
The buttons can create new text boxes, lines, and shapes, and can also bring up the settings for backgrounds, themes, transitions and animations.
However, once text or some other item on the slide is selected with the mouse or trackpad, the formatting toolbar appears:

The text formatting options (bold, italics, font size, etc.) should be familiar. (For a refresher, please refer to How to format a document in Chapter 2). Unlike PowerPoint, Google Slides does not have options for adding text shadows or other sophisticated effects.
Additional buttons include:
●Fill color (paint bucket icon). Pressing this button shows a color palette. Selecting a color will change the background color of the selected box or graphic element.
●Line color (crayon button). This changes the color of drawn lines and arrows, text boxes, and edges of shapes such as squares and ovals.
●Line weight. Changes the thickness of a line, arrow, or shape edge.
●Line dash. Turns a line, arrow or edge of an element from a solid line to a dashed line.
How to add new lines, boxes, and other elements
The Google Slides toolbar has buttons for creating the following elements:
●Text boxes
●Images
●Lines and arrows (includes curves, polylines, and scribbles).
●Shapes (boxes, cylinders, callout bubbles, large symbols, etc.).
The method for creating each of these elements is basically the same:
1.Press the button for the box/element you want to draw.
2.Crosshairs will appear on the slide area.
3.Hold down the mouse button and drag to draw the element.
4.When the element is the desired size, let go.
5.You may need to click outside the line or shape to complete it.
How to manipulate slide elements
To manually change the position of text, image, graphics boxes, or any other graphic element, follow these steps:
1.Make sure the Select tool (the toolbar button that looks like an arrow) is active.
2.Click on the box or element you want to move.
3.Move the square dots that appear along the corners and edges to expand/reduce/change the shape.
4.To move the element, hover the mouse over the edge of the element until a hand appears, then “grab” it to move it.
5.Elements that are partially moved off the slide’s surface will be cut off when the presentation is launched.
To move multiple shapes at once, make sure Select is active, and draw a rectangle that touches all of the items you want to move. The items will all be highlighted at the same time. Use your mouse to move the connected objects around the screen.
Text boxes and other shapes can be rotated by grabbing the dot above a selected shape and moving the mouse. When it looks good, release the dot.
Transitions and animations
Slides has animation options that can control the appearance and exit of elements on the page, as well as the transitions between slides. These cannot be edited using the mobile app, so the following instructions apply to the browser and Chromebook versions of Google Slides.
How to create transitions
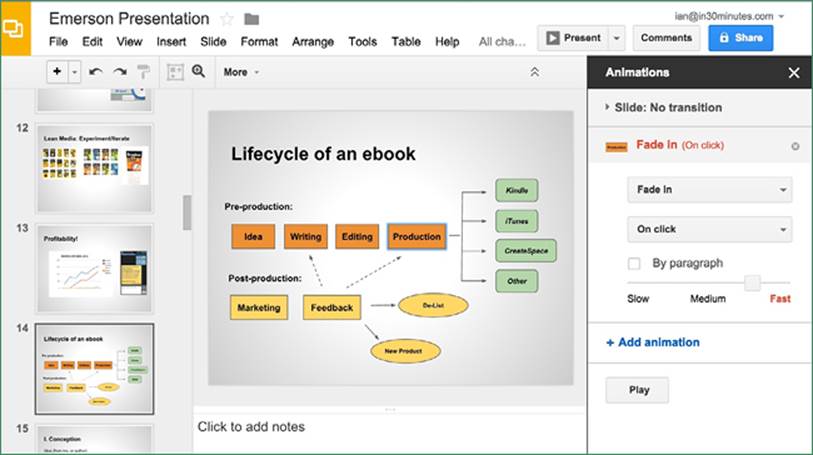
To get started, open a presentation in Slides and navigate to the slide you want to animate. Press the Transitions button in the toolbar (if you don’t see the Transitions button, select the slide thumbnail on the left side of the screen). The Animations pane will appear on the right side of the screen:
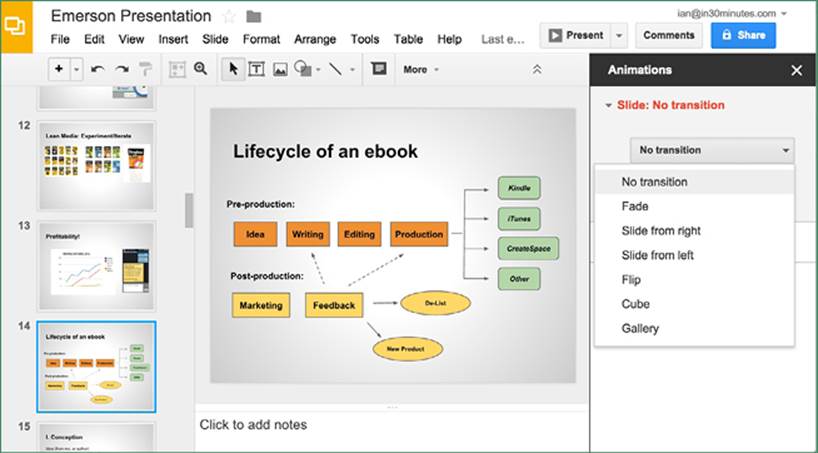
At the top of the pane below the Slide selector are transitions, which determine how the next slide will appear when the presentation is launched. A standard presentation might fade between slides, but if you’re feeling wacky you can select Flip or Cube. Press theApply to all slides button to have the chosen effect work with all of your slides (as opposed to the one being edited).
How to create animations
Below the transitions options are Animations for individual elements within a slide. Select an item on the page to get started, and then click Add animation (if the Animations pane is not visible, select Insert > Animation). Options include:
●Fade in/Fade out
●Fly in/Fly out
●Zoom in/Zoom out
●Spin
The On click drop-down menu controls how the animation will be activated.
●On click means an animation will start when the presenter clicks the mouse.
●With previous means the animation will follow the animation for another element on the screen. This is useful if you want several items to simultaneously appear or leave the screen.
The speed of each animation also can be adjusted, using the slider.
How to set up transitions
1.At the top of the Animation pop-up window is an option to expand slide transitions.
2.No transition is the default, but there are other options including rotating cubes, the next slide rolling in from the right or left, etc.
3.Transitions can apply to individual slides, or press the Apply to all slides button.
Online options
Besides collaboration (explained in Chapter 6), one of the most powerful options for Slides is the ability to publish on the Web. Google handles the hosting. You can easily email or share the link with others, or even embed the presentation on a company website or blog.
This is a very easy way to do a live presentation over the phone, or have a non-collaborator remotely review a presentation. You can also use this option as a demonstration tool, creating a slideshow that will automatically rotate through the slides and then start over from the beginning.
How to publish a presentation on the Web
To place a Slides presentation online so other people can see it, open the presentation and then select File > Publish to the Web. A pop-up window will appear (see screenshot, below).
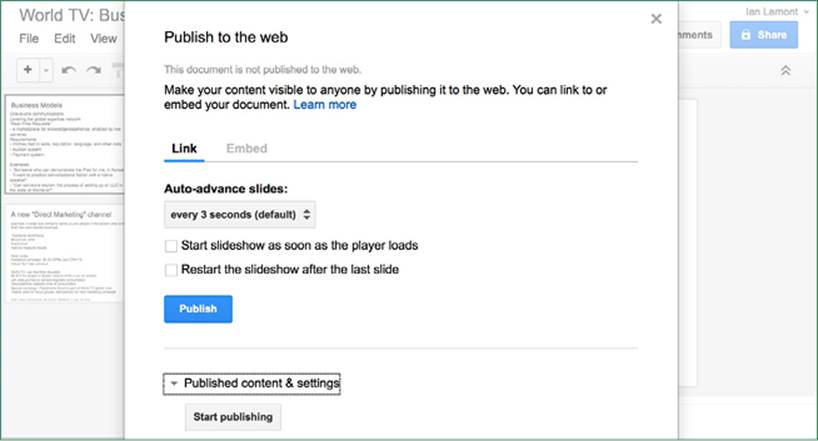
Under Link is a Publish button. Pressing it makes the presentation available online, using the highlighted link. There are options for auto-advancing the presentation when it is opened in a browser. Select Embed if you want to copy the code to place the presentation on a webpage or blog.
Under Published content & settings is another button to start or stop the online availability of the presentation. If you are using a Google Apps domain, you may also see options to restrict the presentation to users of your domain. However, if you are using a standard Google Account, the link can be viewed by any person who has the link. This means that the link can be shared and forwarded, but it won’t show up in search results.