Google Drive and Docs in 30 Minutes (2nd Edition) – The unofficial guide to the new Google Drive, Docs, Sheets & Slides (2015)
Chapter 6. Collaboration
As a grad student, I often worked on group projects. “Collaboration” usually involved emailing Word and Excel attachments, or passing USB drives containing files to classmates. It was clumsy and difficult to manage. It was also prone to error and wasted effort if people independently opened and worked on copies of the same file.
Then someone showed me how to collaborate using the Share feature in Docs. I don’t recall what the report was about. But I vividly remember going to Google Docs, opening a document at the same time other students were working on it, and seeing their differently colored cursors moving around the screen, typing new words and making edits in real time. It was an epiphany.
Sharing is not limited to Docs. This chapter will explain how to enable online collaboration in Sheets and Slides as well as Docs.
What to expect when collaborating in Google Drive
One of the great benefits of collaboration in Docs, Sheets, and Slides is that everyone works with the same copy of the file. It’s possible for two or more people to simultaneously work on the same data, and for each to see what others are adding, changing or deleting right on the screen.
This greatly reduces the chances of a document being forked—that is, being split into separate versions, with different editing histories. Forked documents can cause huge problems and lead to loads of wasted time when it’s time to reconcile the different versions of the file.
Different modes of collaboration
When working with other people on shared files in the browser and Chromebook versions of Google Docs, Sheets, and Slides, there are generally two modes of collaboration:
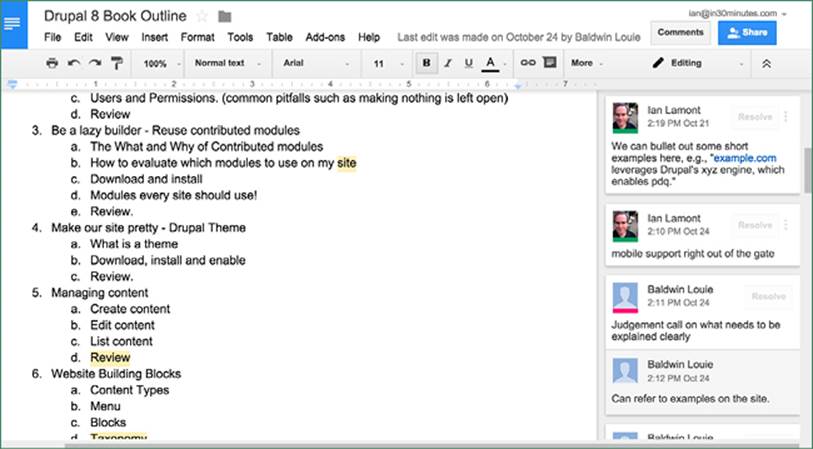
●Simultaneous: Users work at the same time on a shared document. Differently colored cursors and nametags identify different users. It’s also possible to start chats with other logged-in users, by clicking the chat icon in the upper right corner of the window.
●Asynchronous: Users work at different times on the same document. Communication about the document generally takes place using comments (see example, below) which can be inserted from the toolbar or Insert > Comment command, as well as the Email collaborators command (see Contacting collaborators, later in this chapter).
Simultaneous collaboration (also known as live collaboration) will seem strange at first. The cursors move around the screen without you controlling them. They may select, add, or delete text. Once you get the hang of it, live collaboration will become easy and efficient. Older ways of collaborating, such as emailing attachments back and forth, will seem primitive by comparison.
People don’t have to collaborate simultaneously, though. If collaborators are working on the file at different times during the day (typical for teams with people in different time zones or countries), the changes will be saved as each user works on the document for the next user to see.
Setting up collaboration
Google has made it very easy to invite collaborators to work on a file or folder using email. Those who already have Google Accounts can begin to work on the shared file or folder right away. People who don’t have Google Accounts will quickly be taken through the registration process. Non-collaborators will not be able to see the files.
It’s also possible to grant access to people who don’t have Google Accounts or don’t use email to share a document on the Web for anyone to see or edit.
While any file stored in Google Drive can be shared with other people, those people won’t be able to make edits unless it’s one of the following Google formats:
●Docs
●Sheets
●Slides
●Drawings
Microsoft Office documents, when opened in Docs, Sheets, and Slides, also show a Share button. But true collaboration is not possible—pressing the button merely shows a prompt to convert the documents to the corresponding Google format for editing.
How to invite collaborators
To get started with collaboration using the Google Chrome browser or a Chromebook, confirm you are logged into your Google Account and have an active Internet connection. Then follow these steps:
1.Open the Docs, Sheets, Slides, or Drawings file.
2.Click the Share button or go to File > Share.
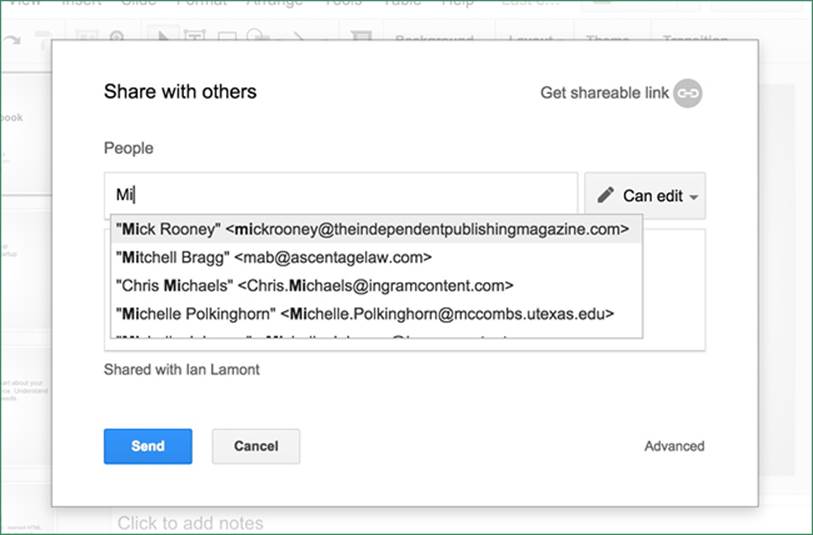
3.The Share with others pop-up window will appear (see below).
4.Enter the email addresses of collaborators in the People field.
5.Use the drop-down menu to the right of the field to control their access. This will determine if they can edit a document, add comments, or only view the contents.
6.To add a personal message to the notification email they receive, start typing in the Add a note field.
7.Press the Done button.
Here’s what the Share with others pop-up looks like:
If the email address of an invited collaborator is already associated with a Google account, then only that person will be able to access the document.
However, if the email address is not associated with a Google account, then anyone with a Google account will be able to access it.
Sharing on a phone or tablet
If you are using the Android or iOS app and want to enable sharing, simply follow these steps:
1.Open the file in question and tap the Add people icon, which looks like the silhouette of a person.
2.Type the name or email address of the collaborator. Potential matches from your device’s address book may be shown below the field—simply tap to select.
3.Select the permission level (Can edit, Can comment, Can view)
4.Add an optional note.
5.Tap the Add button to send the invitation.
How to enable public editing
In most collaboration scenarios, only a select group of people are supposed to contribute to the document. Enabling public editing is less common, but it can be helpful for community projects, public education, or situations in which anonymous input is desired.
Here’s how to enable public editing. Note that this can only be enabled from a browser or Chromebook:
1.While logged in, open the file in question, and click the Share button or choose File > Share.
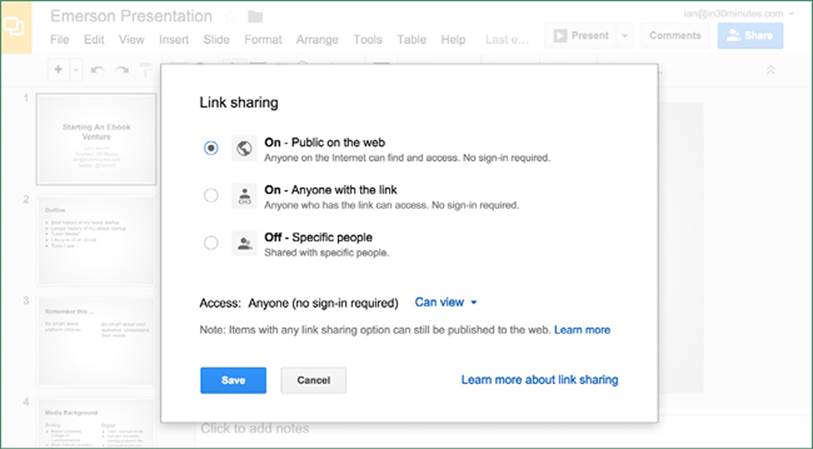
2.Click Advanced.
3.Next to Who has access, click Change.
4.Choose Public on the Web to let anyone on the Web find and access the shared file, or Anyone with the link to let people you manually notify access the file. No sign-in is required for either option.
5.The default permission is Can view. Use the drop-down to allow editing or commenting by others.
6.Press Save. The link to share the document will be highlighted.
7.Press Done to return to editing the document.
How to share a Google Drive folder
If you have a lot of documents that you need to share with colleagues, classmates, or others, you’ll want to use Google Drive’s sharing features. Put all the relevant files into a single folder in Drive, and then share that folder. It’s much easier than sharing one file at a time.
Sharing folders is something that can be done using the browser or Chromebook versions of Google Drive. First, create a folder, and place files in it:
1.Go to drive.google.com, and press New > Folder. Name the folder. You can also use New > Folder upload to upload an existing folder on your hard drive. Note that this may take some time if there is a lot of data in the folder.
2.Add additional files by using New > File upload or dragging and dropping them into the folder to be shared.
Once the folder is ready, select it in Google Drive’s home screen and click the Share icon (which looks like a silhouette) or right-click and select Share. Follow the same directions used for sharing a file with collaborators, described in How to invite collaborators earlier in this chapter.
How to restrict other editors from sharing a file or folder
The owner of a file or folder is the person who created it. Only he or she can permanently delete a file or folder, or transfer ownership to another account via the Share button or icon.
By default, editors are allowed to invite collaborators to a file or folder, or can enable public access. To prevent editors from inviting others:
1.You must be the owner of the file or folder.
2.Select the folder or file, and press the Share button or icon.
3.At the bottom of the Share with others window, click Advanced.
4.In the Sharing settings pop-up, a list of editors will be shown. At the bottom of the list, look for “Editors will be allowed to add people and change the permissions” (see screenshot earlier in this section) and click the Change link.
5.Select Only the owner can change permissions.
How to remove collaborators from a file or folder
There’s a personnel crisis at work. Francis in accounting is suspected of being a corporate spy! You need to lock down access to a shared spreadsheet, pronto!
It’s easy to do using a browser or Chromebook:
1.Open the spreadsheet in Google Sheets, and click the Share button.
2.In the Share with others pop-up, click Advanced.
3.In the Sharing settings pop-up, click the “X” next to Francis’ name.
4.To prevent public access, make sure Link sharing is turned off. If it is not, click the Change link next to the permissions row, and select Shared with specific people.
Sharing settings for existing users currently cannot be accessed from the Android and iOS apps.
Tracking edits in shared files
To see a rough summary of who edited what in a specific file, open the file and click File > See revision history. A panel will appear, showing who contributed to specific versions of a document. Press the Show more detailed revisions button at the bottom of the panel to see a more precise timeline. Click Restore this revision to bring an older version back.
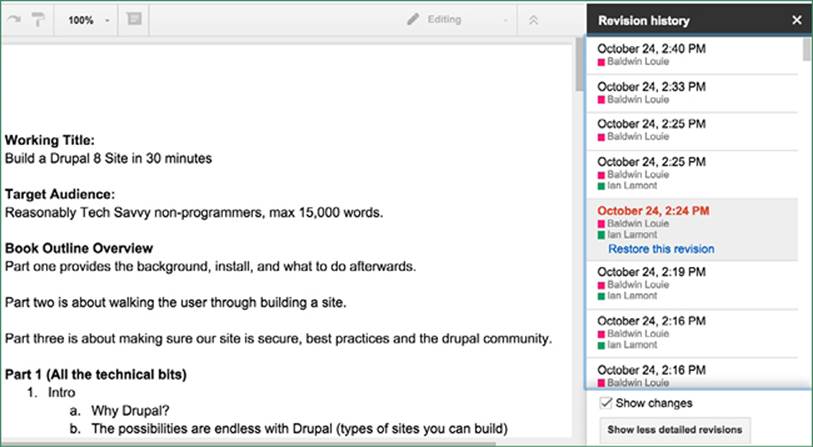
While the creators of elements such as text boxes may be shown in the revision history, specific text edits are not shown. In this sense, the revision history in Google Docs, Sheets, and Slides doesn’t come close to the details shown in the Track changes feature of Microsoft Office.
Contacting collaborators
Consider these common scenarios associated with collaborating on a shared file or folder:
●You want to make sure everyone has reviewed a document, spreadsheet, or presentation before printing it.
●Someone says he or she can’t find a shared document.
●You’re the owner of a shared file that you want to delete or unshare.
The easy way to handle these scenarios is to notify collaborators via email from within the document. This works best using the browser or Chromebook versions of Docs, Sheets, and Slides:
1.Open the file.
2.Go to File > Email collaborators.
3.The Send message pop-up will appear.
4.Select the people you want to notify using the checkboxes on the right.
5.Add a message.
6.Hit the Send button.
This function is not currently supported in the mobile apps for Android and iOS.