Designing and Developing for Google Glass (2015)
Part III. Develop
Chapter 8. Security and OAuth
Before we get into the details of how we handle events, the moments that are generated by the Mirror API and expressed as cards, whether on the right of the home screen (events that have already taken place) or to its left (events that are upcoming), we need to take a moment to focus on security. Since Glass is such a personal and intimate device, as we’ve discussed, Google takes the notion of security very seriously. As we’ve seen, when you set up Glass you tie it to a Google account, and you’re not expected (or allowed!) to share your Glass with someone else. Google expects you, as a Glassware developer, to take security at least as seriously.
DON’T PANIC.
The Mirror API has security tightly integrated into it, so you almost can’t avoid doing the right thing for your users. We’ll start here and see how security is handled within events. Additionally, it is built on top of OAuth2, and many of the libraries you’ll be using take care of the OAuth2 details for you.
The major fact you need to know about Glassware and authorization is that any Glassware built on top of the Mirror API has to authorize the wearer’s Google account for the Glassware to receive updates or be able to share resources like messages and multimedia with it. GDK Glassware, on the other hand, being installed applications that run locally on the device, only need to use authorization if access to certain APIs requires it.
There are some things you will need to know, but the basics aren’t that difficult, and we’ll cover all this later in this chapter.
Event Security: Google the Bouncer
The security model for events in Google Glass is pretty simple, straightforward, and important—every card is permitted to exactly one person and exactly one piece of Glassware that they’ve approved to run on their behalf. So the picture you’ve taken on Glass is “owned” by the Photos Glassware representing you. The message you’ve received is owned by the SMS or email Glassware and represents you. Rogue Glassware can’t suddenly tap into this and get access to your messages or pictures. Unless, of course, you explicitly share it with that Glassware.
But when you share a card, Glass can’t just permit your Glassware to own that card. Remember the rule—one card, one program (representing one person).
What Glass does, instead, is create a whole new card with a copy of the same thing. If you’re paying attention to your timeline, you’ll even see the card being duplicated. Once the new Glassware is told about this card, it can do anything it wants with it. Rewrite it…delete it…anything at all. But the original card remains untouched.
What about messages that need to be sent to more than one person? Each person needs to get their own card about it. So if you’re chatting or emailing two other friends, and you send a message, a total of three cards are generated—one for you and one for each of your friends. They may all have the same data on them, but they’re different because each person can treat it differently—we may delete the message, while you keep it (or share it with someone else, generating a few more events and cards).
This may seem trivial and unimportant, but it will save you a lot of frustration as you’re trying to write Glassware that deals with events shared with you or that you expect the user to share with others. So always keep it in mind—if your Glassware didn’t create it, or the user didn’t explicitly share it with you, it doesn’t exist.
But this raises a very good question. How does Google know that your Glassware is… well… your Glassware? For that matter, how does it know that one user is a particular user when your Glassware is acting on their behalf? This is the job of OAuth, application credentials, and the Google authentication system.
OAuth: IDs and Secrets
Some of this sounds a little theoretical, but understanding it will help when we actually implement OAuth in our projects. Bear with us a little—we’ll get to details in a little bit, and understanding some of the basics will pay off when you’re trying to diagnose authorization problems.
OAuth started as a standard way for network clients to request permission to use a resource on behalf of a user, and for those resources to indicate the client is authorized to take the requested actions. It has since grown (some would say overgrown) from those modest beginnings, but still has authorization at its core. Google uses this later version, known as OAuth2 (also expressed as “OAuth 2.0”), for most of its web services including the Google Mirror API, and this is what we’ll be talking about when we use the term OAuth. Other providers use different versions; most notably Twitter uses OAuth 1.0a, and we won’t be discussing the differences here.
OAuth2 is more a framework than a specific protocol, so you’ll see some variations between different OAuth providers—we’re going to be focusing on Google’s implementation, but the concept should be familiar if you’ve used OAuth from other companies.
The general idea behind OAuth is that services, such as Google’s Mirror API servers, can’t fundamentally trust client programs to behave. If left unchecked, an unscrupulous programmer could create an app that claims to represent a user and then do all sorts of mischief that the user never expected. OAuth acts as a check on one part of this—applications must request permission to do certain activities, known as scopes, which users must explicitly approve.
But how is the user going to give this approval? OAuth can’t tell the application itself since the server isn’t going to trust the application. Instead, OAuth specifies how the application sends the user over to a site controlled by the server where the server can get permission directly from the user. Once the user has granted that permission, OAuth specifies how that approval has been sent back to the application so it knows it has the permissions it has asked for.
There are a number of different ways to do this depending on your needs. Apps that run on a mobile device, for example, have different needs and requirements than those that are running on a web page where the user stays on the page. And these are different needs than servers that will have to act on behalf of the user when the user isn’t at the keyboard. We’ll be focusing on this last one, but you can get full details about all of them at the OAuth2 documentation.
All of this may seem a little abstract, but with a base understanding of the background, it is time to start getting into some of the details. The good news is that the details aren’t that bad. The even better news is that the programming languages that Google supports all come with OAuth libraries to make some of this more straightforward. So let’s go through the dance moves OAuth requires.
Will You Come and Join the Dance?
Let’s assume, for the moment, that a user has spotted your Glassware on the MyGlass website or mobile app. Since we’re talking about Glassware, this is a pretty good place to start. They’ll turn the switch ON in MyGlass for a service or application by selecting its card and then clicking the toggle switch…and this opens a new window that starts an elaborate dance in their web browser between you and Google’s systems.
Step 1: Redirect to Google for authorization
MyGlass opens this window and redirects it to a URL on your website to handle user authorization. The first thing you’ll do is redirect the user to the OAuth URL, providing some information as part of the parameters to the URL. The base URL at Google for this ishttps://accounts.google.com/o/oauth2/auth and we’ll add the parameters as query string parameters. Make sure you use HTTPS—regular HTTP connections are rejected.
There are a number of different parameters controlling some specifics, but for your services, you’ll be focused on just five:
response_type
This needs to be set to the string value code.
access_type
This should be set to the string value offline. This will enable you to get a refresh token (a what? we’ll explain shortly) so the user doesn’t need to be at the keyboard and authenticating your Glassware every hour.
scope
These are the permissions you are requesting. You can request more than one, and they should be separated by a space. For access to most Mirror API services, you’ll need to request the specific timeline scope: https://www.googleapis.com/auth/glass.timeline. We’ll talk about scopes a little more in a moment.
client_id
Each application requires its own unique identifier, and the client_id is how we tell Google what our identifier is. Remember in the last chapter we set up an application using the Developers Console? In a little bit, we’ll be using it again to find out what our ID is.
redirect_uri
Once the user is done on Google’s site (which we’ll cover in a moment), Google will redirect back to us. But we need to tell it where to redirect to, and this is how. We also need to give the Developers Console a list of valid URIs to redirect to, for security purposes. You guessed it…we’ll talk about this shortly.
So, five parameters. Two of which you don’t need to change, and three we’ll be covering later. Clear as mud, right? Trust us, it will make sense soon.
So for some hypothetical Glassware that we’ve written, we might redirect our guest to something like the following. We’ve broken it up into multiple lines to make it easier to read, but note that it should be all one line and should be URL encoded (which we’ve also done):
https://accounts.google.com/o/oauth2/auth?
response_type=code&
access_type=offline&
scope=https%3A%2F%2Fwww.googleapis.com%2Fauth%2Fglass.timeline&
client_id=1234567890&
redirect_uri=http%3A%2F%2Fexample.com%2Fauthinfo
So, we’ve sent our users back to Google. What happens there?
Step 2: Authorization (and maybe authentication)
In most cases the users will have logged in and authenticated themselves already. After all, you need to log in to MyGlass in the first place. In a couple of scenarios, users may be prompted for their login info (or at least account) again. But most of the time they’ll proceed to the authorization step.
This will be a screen prompting them with information about the various scopes you’ve requested, but in a format that is a little more straightforward to understand. Figure 8-1 conveys this screen. Figure 8-2 shows you the details about each permission if you click the information icon (the circle with the “I” in the middle). It will also show them information about your app so they can try to get a sense if they can trust you.
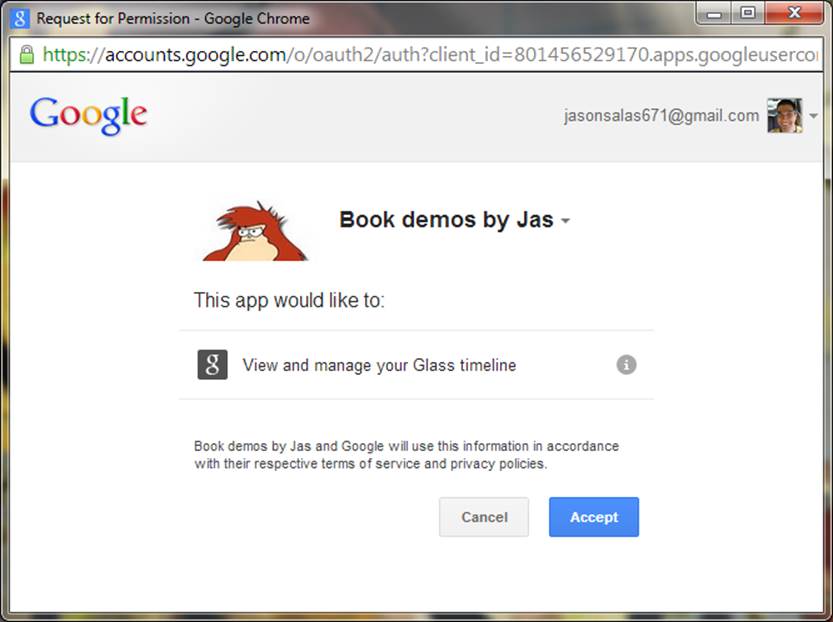
Figure 8-1. Google’s OAuth provider screen for Glassware
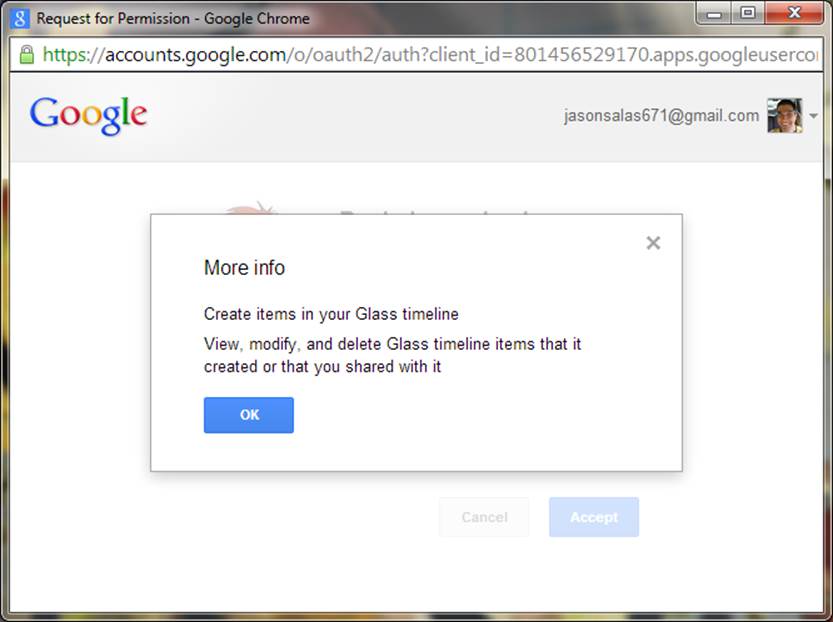
Figure 8-2. Permission information
Once they approve the scopes, Google will redirect them back to your website, at the URI you requested with some additional information. This takes us to:
Step 3: Process authorization code (or error)
Let’s handle the bad news first. If the user doesn’t trust you, or if something else went wrong, you’ll get an “error” parameter with some (but not much) information about the rejection. Sorry, maybe it will work out better next time.
In most cases, however, you’ll get back a query parameter with a code, sometimes called the authorization code. You don’t need to save this code, and it wouldn’t do you much good if you did—typically it is only good for a few dozen seconds, at the most. Instead, we’re going to exchange it for a more long-lived access token and an even longer-lived refresh token.
WHY THIS MIDDLE STEP?
It isn’t immediately obvious why OAuth2 goes through this particular dance step. Why can’t it just return to you the access token and refresh token directly through this redirect? Why is it giving you this intermediate code instead? The answer lies in who is doing the work, how much you can trust them now, how much you can trust them in the future, and how secure your communication channels are.
Up to this point, we’ve been using the user’s browser as a go-between for us to communicate with Google’s servers. We need to do this because we need the users to approve the permissions, and they need to do it directly with Google. The code being sent to us contains proof that they have, so it is pretty valuable! And yet, the code is being handed back to the user to hand to us. While the way we’re doing it is pretty secure, it isn’t perfect, and there is a chance that the browser might store this URL for a long time. So we limit the window where this code is good. If someone gets it outside of that window, they can’t do anything with it.
From here out, however, we don’t need to go through the user’s browser anymore. We’re going to talk to Google’s servers directly ourselves. So we can use a token that will live for a little bit longer—an hour by default.
We will do this exchange directly, opening an HTTPS connection to a Google URL and doing a POST operation to the same URL (https://accounts.google.com/o/oauth2/auth) with the code and some additional parameters to help prove who we are. What parameters this time? Well, most of them will look pretty familiar:
grant_type
The string value authorization_code.
code
The code that was just sent to us.
client_id
The same client ID we specified before. Really, we’ll explain it shortly.
redirect_uri
This is the same redirect URL as before, too. This is just used to help prove that we know where this code came from—it won’t try to redirect here or anything this round.
client_secret
This is a secret that we get from the Developers Console when we set things up. We’ll cover it when we cover the client ID. Any day now.
What we’ll get back in the HTTPS reply is a JSON object with our access token and some other information. Most of the OAuth libraries treat the object returned as a single creature—you shouldn’t try to break it up or store different parts of it separately. If you’re going to store it (and you probably will), we suggest you store it as a single unit, as well.
The object contains several fields:
token_type
This should be the string value Bearer.
access_token
This is the important bit. We’ll be providing this token along with all our calls to Google’s API.
refresh_token
A token that can be used in the future to get new access tokens. This token never expires (although it may be revoked), so guard it carefully!
expires_in
The number of seconds that access_token is valid for. This is generally about an hour, but you shouldn’t count on it. The token may actually become invalid before this time, particularly if it was revoked. We’ll talk about this a bit more… you guessed it…shortly.
There may be other fields that are returned, so you shouldn’t rely on just these four and no others.
Step 4: Use (and refresh) the access token
We now have completed the major steps to our dance and we have an access token! Time to celebrate!
At this point, we can probably start doing things with the user’s Glass—like sending a welcome message, listening to updates from Glass, registering contacts, and sending out updates if we want. Users should be able to configure your service, and this would be the time to do that. When all that is done, you can close the window, thus completing the initial login phase.
The access token that we have is our key to doing all of this. We need to include it as part of the HTTPS Authorization header, which might look something like this:
Authorization: Bearer 1234567890
You won’t see us include this in further documentation, however, for two good reasons. The first is that we’ll assume you actually read and remembered this paragraph. The second is that you’ll be issuing most commands through a library, and the library will take care of adding the authorization information for you.
After an hour, our access token won’t be good anymore. Trying to use it will generate an “Unauthorized” error. In order to get a new access token and keep working, we’ll need to do another POST to the same URL (https://accounts.google.com/o/oauth2/auth just so we remember) with slightly different parameters again:
grant_type
The string value refresh_token.
client_id
The same client ID we’ve specified every time so far.
client_secret
The same client secret as before.
refresh_token
The refresh token we saved earlier. Clever, yes?
We’ll get back a JSON object that contains the new access token and most of the same things as last time. We won’t get a new refresh token, however—the one we just used will continue to be good.
Rather than trying to time the expiration of the access token exactly, a common scheme that the libraries tend to use is to execute a call with the access token. If it fails due to authorization problems, they get a new access token with the refresh token and try again. If it still fails… well…you’re just out of luck. We suggest you make use of the libraries when you can, and use this same trick when you can’t.
You may notice that in everything that we’ve sent, and everything we’ve received, there is one thing that is quite conspicuously missing. We have absolutely no idea who it is that we’re talking to.
Who Are You? I Am the New Number Two
It may seem strange that OAuth doesn’t provide us with any identifying information about the user, but this is somewhat deliberate. When it comes to OAuth, we need to specifically get permission from the user to be able to do anything, and that includes getting information about who they are.
So how do we get a user’s identity? It depends on what we need, exactly. In many cases, we just need a unique identifier from them—some way to know what user configuration we should be using when the user returns to set up or change their settings.
In other cases, however, we may want to personalize the users’ experience on our site a little more, and be able to send them nice personalized messages on Glass as well. We may want their name. It may be a good UX to present them with their profile photo to make sure they are using the right account. You may want to give them the opportunity to invite friends or share things with them. We may want access to their email addresses to send them notifications.
As we suggested earlier, and as you might have guessed, each of these options is controlled by a different scope.
What Do You Want? Information
You can think of a “scope” as corresponding to a set of permissions. We’re already familiar with the glass.timeline scope (which is expressed as a full URI), which we use to get permission to write to and read from the user’s Glass device. We’ve also gotten hints that we will need permissions to access some user information. All of Google’s services are governed by scopes of authority, and we need to consult the API documentation to find out what authorization scopes will be required for each operation.
SCOPING OUT THE ENTIRE WORLD
You’re also able to bundle multiple scopes into the same project from different authorization servers. We mentioned earlier in Chapter 6 about the expected surge in mashup Glassware, which will be based on wearable programs existing just to leverage the functionality of other APIs, using them as the backbone for their features. This is essentially what made Twitter such a worldwide hit.Winkfeed, for example, does this by authenticating a Glass user with its own permissions and then also using Pocket as a reading queue.
This isn’t necessarily as easy as it sounds, however. Often when writing Mirror API Glassware, you’ll need access to the timeline, location, and profile permissions, meaning you’ll need multiple scopes. So, Google requires your application to pass a string of three space-delimited URLs. Not all providers handle scope in exactly the same fashion in their authorization servers.
While the OAuth spec recommends multiple scopes to be case-sensitive and space-delimited, Facebook requires that multiple scope URLs be separated by commas. Instagram uses plus signs to delimit two or more scopes passed to its authorization servers. And LinkedIn’s implementation goes a different route—prefacing scopes with “r” for read access or “w” for write access, then an underscore, and then the scope URL, with all scopes separated by a space.
This knowledge may come in handy if your Glassware uses other web APIs, so when accessing a remote system, don’t assume they all behave the same, and consult their documentation.
Given this, it sounds awfully tempting to just request permission for everything we might possibly need. This is a bad idea for two reasons:
1. Users are increasingly aware and savvy of what permissions they’re granting you. Unless you give them a good reason why you’re asking for some, or so many, rights, they may just reject your service as being overly intrusive.
2. You can request the bare minimum now and request additional permissions later as you may need them.
The second point is important—we may start out by requesting just basic permission to Glass to get user information, and if we later add a feature that lets users send information to Google+, we can prompt them to turn this on in their settings and request permission at that time. This is known as Incremental Authorization and is a more advanced feature in Google’s OAuth implementation.
So what, exactly, is the bare minimum right now? We’ve talked about the glass.timeline scope. There is another Glass scope that we’ll be talking about later that requests location information, and if you’re going to use it, asking for it up front is best. Finally, as noted previously, we should probably get some information about the user’s identity. And here we run into a small pile of options:
profile
This is the most basic identity scope you can request. It gives you access to the UserID and some other profile information through the Google+ API.
https://www.googleapis.com/auth/plus.me
Similar to the profile scope, the biggest difference is that some profile information (such as the user’s name) won’t be available if they haven’t upgraded their account to Google+.
https://www.googleapis.com/auth/plus.login
A much more advanced scope, this gives you the same read access as profile, but also lets you see some social information (if users have permitted it to you explicitly), manage app activities through Google+ (an interesting subject, but way out of the “scope” for this book, so to speak), and shows your Glassware on the Google+ app list. Unlike the plus.me scope, if your user hasn’t upgraded her account to Google+, she’ll be unable to continue unless she does so.
An additional scope that you’ll likely request along with one of the previous scopes, this provides you with the email address for this account. Be careful about requesting or using this scope—not every user will want you to know their email address, and this is not necessarily a good address to send them email.
https://www.googleapis.com/auth/plus.profile.emails.read
Similar to the email scope, this is one that you will request with another profile scope. In addition to the email address provided by the email scope, however, it also lets you access all the other public and verified email addresses attached to this profile.
https://www.googleapis.com/auth/userinfo.profile
You may see documentation referencing this scope as a good way to get user information, but Google has deprecated this scope and stopped supporting it in September 2014. This provided access to the same information as profile, but using a different API (the UserInfo API instead of the Google+ API). Use profile and the Google+ API instead of this scope.
https://www.googleapis.com/auth/userinfo.email
Similar to userinfo.profile, this is an older scope that provides the same information as email through a different API. It has also been deprecated and was removed in September 2014.
So once we request the right scope, we’re just given all this information, right? Well, no…not exactly. All requesting the scope does is give us permission to get the user’s info. We still have to actually request that information. For all the recommended scopes, you should be using the Google+ API to do so. The nitty-gritty of the API is outside of the scope of this book, but for a primer on how to use it, we suggest our good friend Jenny Murphy’s excellent work on the subject, Developing with Google+, as well as Google’s full documentation online athttps://developers.google.com/+/api/.
Since this really is an important bit to have, however, we’re going to take a quick look at getting the info by checking out the people.get method. Consider it a warmup for working with Glass.
The gist of using the plus.people.get API is that we’re going to send a GET request via HTTPS, and the JSON object that is returned will contain the information we need. This particular URL is in the form https://www.googleapis.com/plus/v1/people/userid where userid is the user ID of the person we want to get information about. “But wait!” we hear you calling, “We don’t know their user ID! That’s the whole problem!” Fear not. The special user ID of “me” can be used to get the information (including the user ID) of the person we’re acting on behalf of. And since we have their auth token, that’s exactly what we’re doing.
So if we have requested the correct scopes and make a call to https://www.googleapis.com/plus/v1/people/me we’ll get back a JSON object containing a representation of a person. This includes fields for their user ID, name, possibly a profile photo, and other information. We need to be careful with this information, however—users may choose to change or delete it, so we can’t assume it is correct indefinitely.
Google’s Terms of Service control how long we can retain the information, so we might want to go back and refresh the info periodically. We might be shocked, however, to discover that we’re no longer permitted access to it. What happened? The user might have cut us off and revoked our permission.
Disabling (and Reacquiring) Permissions
How dare they! How can they do that? Removing permissions…don’t they realize we’re doing this for their own good? They may, but the sad fact is that we have to remember that not all Glassware works for everyone. That’s OK.
Most users will use the MyGlass app or page to disable our access. The same switch that was used to turn on our Glassware can be used to turn it off. When this happens, two major things happen:
1. The access and refresh tokens are revoked. Any attempt to use them will get an “Unauthorized” error.
2. The subscriptions and contacts that we’ve registered on their Glass (covered in Chapter 10) will be removed.
One thing that doesn’t happen, however, is any sort of notification to our Glassware. We have no opportunity to send a final farewell message and clean the place up after they’ve gone. All we will know is that when we try to do something in the future, it will fail. We’ll talk about some ways to handle this issue later in Chapter 9.
Never lose hope, however. Just as quickly as they turned off your Glassware, they may turn it back on!
Who Is Number One? You Are Number Six
Speaking of never losing hope. We bet you forgot all about that client_id and client_secret, haven’t you? Well, we didn’t! And now is finally the time to discuss it.
OAuth relies on being able to trust every transaction it makes and being able to clearly associate it to both a user and an application. It tracks that application through the client_id (you’re a client to the OAuth server) and verifies you’re the client you say you are through theclient_secret (the equivalent of a password). We’ll get those through the Developers Console, which we first learned about in Chapter 7.
Let’s return to the project we began setting up: Glass Playground. We’ll open up the Google Developers Console and scroll down the project list until we see it. We’ll then open up the APIs & auth tab on the left and then the Credentials item underneath it. We’ll see a section for OAuth credentials, and may already have Compute Engine and App Engine credentials created for us. We can’t use these, so we’ll create a new one by clicking the Create New Client ID button.
A dialog box comes up, prompting us for some information. Most of the time, we will want an Application Type of Web application—users will be accessing us initially through a web page, even if we’re going to be using offline mode for most of what they do. The next two sections can be changed later, but we’ll set them to some initial values for our use now…after we explain them a little bit.
The Authorized JavaScript origins field, as noted in Figure 8-3, contains a list of protocols and hostnames where we might be redirecting from. So the hostname that they land on is back a few pages at Step 1. We need that protocol and hostname here. We can list more than one, but we have to be careful—the exact protocol (HTTP or HTTPS) should be listed, and the exact hostname should also be listed. So if people might be hitting either https://www.example.com and https://example.com, we need to list both here. We don’t, however, need to list the rest of the URL—no paths are necessary.
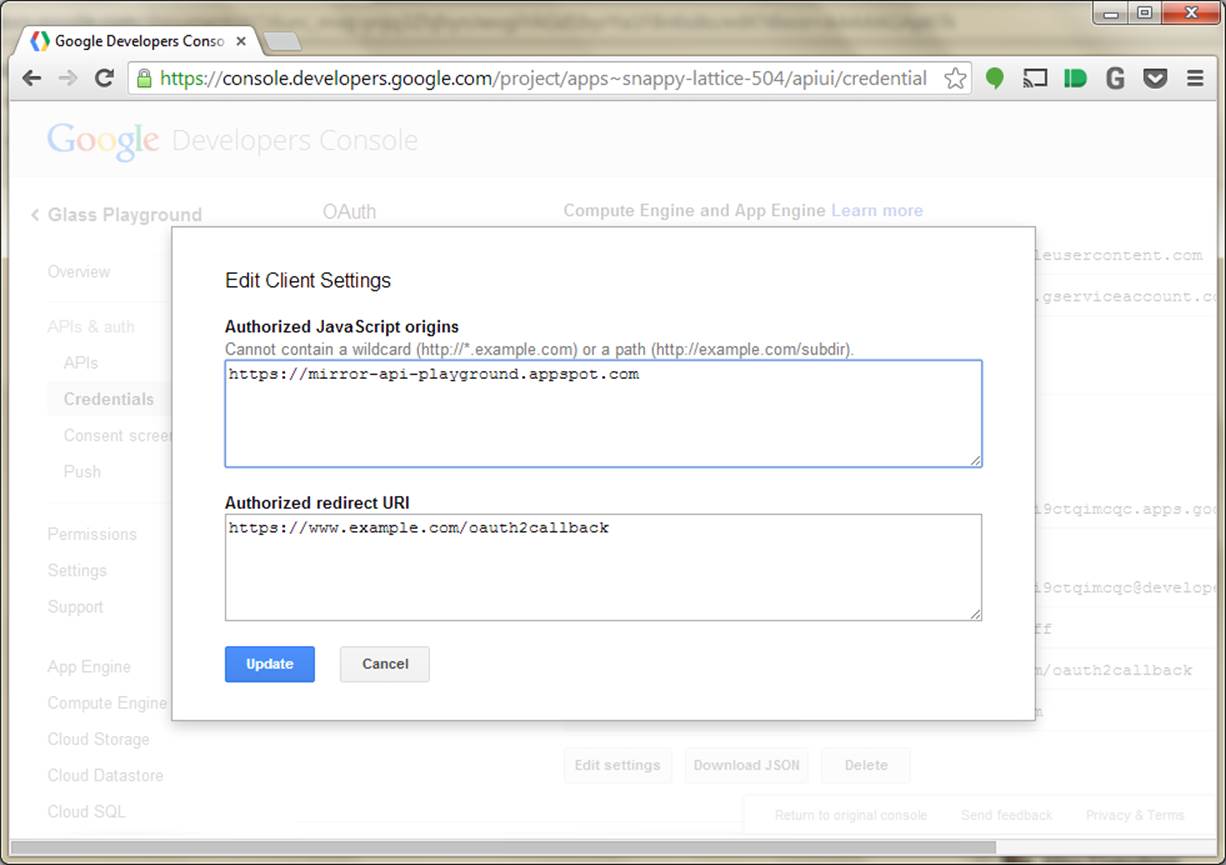
Figure 8-3. Assigning JavaScript origins and redirect URIs
For this playground, you should set this to https://mirror-api-playground.appspot.com (you’ll find out why in the next chapter, we promise!) and delete the example.
Similarly, the Authorized Redirect URI field contains the pages on our site where we might have Google redirect the user to at the end of Step 2. We need to include one of these as the redirect_uri parameter in Step 1, and all of them must be valid HTTPS URLs. By default, it will pick a URL that corresponds to the origins in the previous field, although we can edit this if our URL paths are different. Go ahead and accept the default it provides.
Once we have all this set, we can click the Create Client ID button like Figure 8-4 demonstrates. It will spin for a few moments, and you’ll see a new section titled Client ID for web application. In the future, if you need to edit the Origin or Redirect fields, you can click the Edit settings button. Most important to us now are the Client ID and Client Secret fields. Why are they important to us? That would be telling. (We’ll spill all soon.)
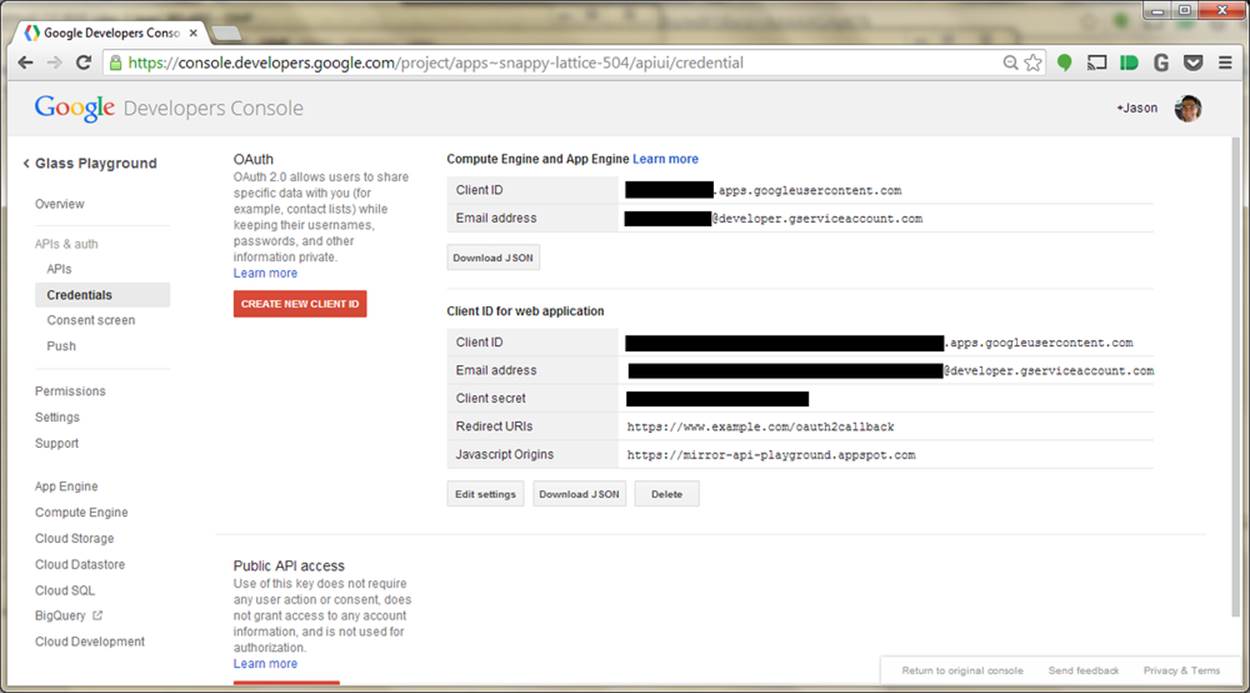
Figure 8-4. Obtaining Client ID information from Developers Console
WAKE UP!!!
We know the previous steps and configuration activities seemed long and boring, but it really was some essential groundwork before we can begin actually working with Glass. You need this critical information to allow your Glassware to communicate with Google, because again, your server will never directly talk to users, and your users will never talk directly to your server. As Jason likes to say, paraphrasing a fairly popular bumper sticker: Know OAuth, know Glassware. No OAuth, no Glassware.
But now that we understand card security, we have credentials for our playground, and we know what happens when we log in…we are (finally!) ready to do just that and start sending some data to Glass.