Designing and Developing for Google Glass (2015)
Part III. Develop
Chapter 10. Card Actions and Subscriptions
A number of people have asked recently what the big deal about wearables is. After all, they reason, they’re just new notification delivery platforms, right? If that’s all Glass was, we might agree. Let’s face it—the programs you build admittedly wouldn’t be very interesting if they couldn’t receive input from users and properly respond to it. Interactivity is where it’s at, even with wearable computing, check that—_especially_ with wearable computing—and this isn’t a facet the Glass team neglected to build into the platform. While some services will be just fine existing as static read-only mediums, you’ve got the choice of being able to easily integrate a stout feedback loop into your projects if they demand such functionality.
This chapter primes you on what you’ll need to know about using the default actions included with cards, how to create your own menu items unique to your Glassware, and how to programmatically manage subscriptions to tie it all together. We discuss how your service needs to define what actions are available within cards, how to accept those actions, and how to verify the authenticity of responses.
Simple Event Actions
We’ve already learned about a couple of menu items, and learned how to add one to an event. Let’s recap what that looked like:
{
"text": "Hello Glass",
"notification": {
"level": "DEFAULT"
},
"speakableText": "hello there Glass",
"menuItems": [
{ "action": "READ_ALOUD" }
]
}
As you may have noticed, menuItems is an array, and you could have more than one menu item available to your users. The READ_ALOUD menu item is a simple event—Glass can take care of it completely on its own and your Glassware doesn’t get a notification when the user triggers it. (Some of the other menu items do let you know what is going on—we’ll be covering those in a bit.)
Two other menu actions that behave this way are OPEN_URI and PLAY_VIDEO. Each of these uses an additional payload attribute on the menu item. The payload is a string indicating what the action applies to—in the case of OPEN_URI, it is a URI that Glass should load, while PLAY_VIDEOuses the payload as the URL of a video clip to stream.
Here is a (slightly contrived) example of all three built-in menu items on a single card:
{
"text": "Hello Glass",
"notification": {
"level": "DEFAULT"
},
"speakableText": "hello there Glass",
"menuItems": [
{
"action": "READ_ALOUD"
},{
"action": "PLAY_VIDEO",
"payload": "https://db.tt/JVepRwr6"
},{
"action": "OPEN_URI",
"payload": "http://thinkforglass.com"
}
]
}
You’ll see that we left the READ_ALOUD as the first card, since it was the most likely one that people would want to select. As we go through some of the other menu items, you should keep in mind which actions will be the most used and prioritize those to be ordered first, and keep these toward the front, but also note which ones are more dangerous, such as deleting, and place these later in the menu list. This is a design tactic we mentioned earlier as a means of reducing the interaction with the system by minimizing swipes, which promotes microinteractions.
A slightly different menu item is found with the NAVIGATE action. Instead of using the payload attached to this menu item, this action will start navigating to the value set as part of the location property of the timeline item and not of the menu item. The location property is a Location object, and is described in more detail on its own resource page. At the most basic, however, we need to specify the latitude (positive values indicating degrees north of the equator, negative indicating south) and longitude (positive values indicating degrees east of the Prime Meridian, negative values indicating degrees west) of the point we wish to navigate to:
{
"text": "Hello Glass",
"notification": {
"level": "DEFAULT"
},
"speakableText": "hello there Glass",
"menuItems": [
{ "action": "READ_ALOUD" },
{ "action": "NAVIGATE" }
],
"location": {
"latitude": 37.422,
"longitude": -122.084
}
}
You may have noticed that the menu items are pretty generic. The menu item to launch video playback just says “Play,” with no indication what video it may be showing. Navigation doesn’t tell you where you’re going. It makes sense to assume that the card is providing this information (either in the text or footer or something similar), but this may not always be practical. And if you include multiple menu items of the same action, but with different payloads (for example, two possible movies), it may get confusing.
Glass lets us set the values that are shown for each menu item, overriding the default menu item display. We can update our earlier example to be more specific about what we’ll be watching or what website we’ll be visiting:
{
"text": "Hello Glass",
"notification": {
"level": "DEFAULT"
},
"speakableText": "hello there Glass",
"menuItems": [
{
"action": "READ_ALOUD"
},{
"action": "PLAY_VIDEO",
"values": [
{
"displayName": "Jason - on-air blooper"
}
],
"payload": "https://db.tt/JVepRwr6"
},{
"action": "PLAY_VIDEO",
"values": [
{
"displayName": "Allen - Glasstalk"
}
],
"payload": "https://db.tt/VILcUoqU"
},{
"action": "OPEN_URI",
"values": [
{
"displayName": "Think for Glass"
}
],
"payload": "http://thinkforglass.com"
}
]
}
The particularly observant of you will have noticed that the values property takes an array of objects. We’ll go into why it is an array and what other properties can be set on this object in Custom Menu Items.
READING MORE
You may have noticed that we haven’t mentioned the other menu item, Read More, here. The reason is fairly simple—we don’t control this menu item directly. Glass will add it itself when it is necessary, and not include it where it isn’t.
You’ll also have noticed that all of these are relatively simple menu items. Glass can handle them without having to get or provide anything further to your service. We’ll discuss menu items that generate callbacks in a bit, but first we need to look at how you register the callback.
Listen Up!
The Mirror API refers to these callbacks as Subscriptions, and they provide information to Google about how you want to be notified when a user takes menu actions on a card, issues a voice command, shares a timeline item with a sharing contact, or changes location. We’ll discuss the first one in the next section, and the other three in the next two chapters.
Subscriptions are managed on a per-user basis—it is normal for you to have at least one subscription for each user of your service. Best practice dictates that you should insert an entry into the Subscriptions collection every time a user visits your site. Existing subscriptions may have been deleted if they disabled your Glassware, but they’ll always be revisiting your site if they turn you back on.
Fortunately, adding a subscription is very easy. The Subscriptions.insert method takes several parameters, and while some of them are listed as optional, we recommend that you use all of these:
collection
We’re working with the timeline, so this should be the string "timeline".
userToken
A string that Glass will send to you when this user triggers an event to indicate which user has done so. Glass doesn’t care what this value is—it will just send it back to you, so you should make it something useful, such as the user ID or some other key that lets you look the person up in your user database.
verifyToken
Another opaque string that Glass will just send back with the event. Think of this as a secondary key you can use to verify this call isn’t forged.
callbackUrl
A URL that the web service responds to. It must be an HTTPS URL with a trusted (aka, not self-signed) certificate that is resolvable and accessible from the public Internet.
BE SECURE
Some people have reported that during testing a self-signed certificate may work, despite Google’s recommendations. That might be true (we’re not brave enough to try), but it makes your subscription susceptible to breaking at any time without warning as the framework continues to grow. The hard-and-fast rule is to use an SSL certificate from a certificate authority, or host your Glassware server on a platform that provides one for you, such as Google App Engine.
During development of your Glassware you can use the subscription proxy Google provides as a tool. This lets you use an unsecure URL on your server and routes subscription pings to a dedicated HTTPS endpoint: https://mirrornotifications.appspot.com/forward?url=<your_callback_url>. You will still, however, need to use a publicly accessible machine.
Let’s look at each of these in a little more detail. Some of this may seem like we’re putting the cart before the horse, since you don’t know what you’re going to be seeing for the various events, but we have a chicken and egg problem here (to horribly mix both metaphors and cliches), so we need to explain a bit about how to handle the event before you even know what an event looks like. All will be made clear in the next section.
collection
We can subscribe to either timeline events or location events. If we wanted to subscribe to both, we need to set up two callbacks, although both can refer to the same URL. Location events will be covered in Chapter 12, so don’t worry about them for now; we’re just going to focus on timeline events.
userToken
The user and verify tokens are for your use only. Glass doesn’t care what you provide here—it is just going to send them back with each event notification. Remember back in Chapter 8 as we discussed OAuth we mentioned that although it associates all the transactions with a user, it doesn’t give you any information about who that user is. That is the problem that the user token addresses as well—Glass doesn’t know (or care) who the user is, but you do.
You remember back in Chapter 8 we discussed getting the user’s ID? No? Well, go back and read all of Chapter 8 then, because it is important and you probably forgot. But to refresh you memory, we said:
So how do we get a user’s identity? It depends on what we need, exactly. In many cases, we just need a unique identifier from them—some way to know what user configuration we should be using when the user returns to set up or change their settings.
This unique identifier also will work well as the user token, so when a callback comes in for this user, we can pull up their record and know who performed the action. Most importantly, we’ll need to pull up their access token so we can act on the timeline item being reported on. If you think in database terms, this user token works well as a unique key against your user database.
Waitaminute…we’ll get a callback telling us something has happened, but we don’t know what? We’ll clarify in a minute, but in short, the callback tells us a timeline item that is being acted on, but we need the user’s permission to get that item. We have that permission in the form of the access token.
verifyToken
But what then is the purpose of the verify token? The callback URL we’re providing needs to be available publicly on the Internet. While we’re intending it for Google’s use only, we have no good way to restrict who might be calling it. So if someone finds out the URL, they may also be able to guess what you’re using as the primary key, and then generate false events for you to process. Depending on what these events are, this could be very bad! The verify token should be a random string you generate for each user, stored as part of their user records, and provided only to Glass when you create the subscription. When an event comes in, you can confirm the notification comes from Glass because they’re the only one that can provide a valid verify token.
THE SOURCE (ADDRESS) OF THE PROBLEM
You might wonder why you can’t verify that the request is coming from Google by checking it against a known list of IP addresses and blocking any that come from outside those addresses. While this works for other Google services (most notably Google’s spider bot), it is too early to be able to do this for Glass. Glass is still scaling up to be able to handle a massive number of callbacks, and it isn’t reasonable to know the exact addresses of all the machines when they are frequently changing.
callbackUrl
The final parameter is probably the one that is most significant to you—the URL endpoint itself. As we’ve noted, it needs to be publicly available from Google’s servers with a valid HTTPS certificate. While it may be obvious, it also bears making plain that it also must be a URL that your app server will reply to! So you will need to write the code and configure the framework or environment that you have to call your code when this URL is hit.
Glass will access the URL via a POST operation, and the body of the POST will be a JSON object. You’ll need to convert this JSON object into something you can work with natively (see the Mirror API documentation on subscriptions for code samples in a couple of languages) and then access the parameters to get the timeline item ID, the user token, validation token, and some other information about what triggered the event. We’ll start going into details of all these fields in the next section.
Responding to Subscription Pings
As with all calls to your server via HTTPS, you’ll need to return a response code. A response code of 200 (“OK”) indicates that everything is in working order, while other error codes would indicate there is a problem processing the data. You have about 10 seconds to return an “OK” response code—if you return an error or take longer, Google may try to resend the request at a later time. One common problem is getting multiple callbacks on the same event because you didn’t send the response code back fast enough.
A good solution to this problem is to accept the event notification, add it to a job queue to handle in another thread or process, and then immediately tell Google that it has been accepted by returning the 200 status code. You don’t need to do any actual processing on this event immediately, so you’re handling it very quickly. This reduces the chance of double–notifications, plus it sets you up to handle the load you may get as your service becomes wildly popular. As the load grows, you can handle responses from Google with one server or process, and then distribute the task processing on one or more other machines that do the actual work involved.
And just what needs to be done when the process pulls the task off the job queue? It depends on exactly what action the user performed, but many things will be similar. Let’s start taking a look.
Simple Callbacks and How to Handle Them
We’re finally getting to the second half of our chicken-and-egg problem by setting up some other menu items that we can get responses about. The two simplest that we can use at this point are "TOGGLE_PINNED" and "DELETE":
{
"text": "Pin me! Delete me!",
"notification": {
"level": "DEFAULT"
},
"menuItems": [
{ "action": "TOGGLE_PINNED" },
{ "action": "DELETE" }
]
}
You may want to try these out to just see what they do. After some experiments, you’ll have discovered that deleting a card does just that—removes it from your timeline. Pinning and unpinning a card moves it between the “history” timeline to the right of the home card and the “now” portion of the timeline to the left of the home card.
Pinned cards serve a special purpose with Glass. They are meant to provide quick access to some information the wearer is interested in either seeing frequently or manually checking for updates. But remember, the data needs to stay timely—if your Glassware doesn’t keep it updated, it will vanish in seven days as Glass purges old items. As we’ve also discussed, pinned cards shouldn’t be used to launch applications, and part of the way this is discouraged is by preventing you from pinning a card—that must explicitly be a user action.
Both deleting and pinning, however, do much more than meets the eye.
If you have a subscription registered (and if you were actually following along, we hope you do), you’ll have gotten a callback on your URL that contains a JSON body something like:
{
"collection": "timeline",
"itemId": "3219c55c-3d26-4c79-a8b5-5ccc0732da88",
"operation": "UPDATE",
"userToken": "12345678901234567890",
"verifyToken": "shibboleet",
"userActions": [
{ "type": "PIN" }
]
}
The properties for the callback body are pretty straightforward:
collection
This matches the collection string we set for the subscription. Again, it will be “timeline” for now.
userToken and verifyToken
These are also the values we set for the subscription.
itemId
This is the item ID for the card the menu items were attached to. Remember that Glass assigns this ID—we have no control over it. We know what it is for a card after we create the card by examining the results, or we can do a query for the card to refresh our memory. We’ll look at the latter shortly.
operation
This will be either INSERT, UPDATE, or DELETE. As we will see in the next chapter, if a new card is permitted to us, we’ll get an INSERT operation. UPDATE operations are sent to us for most menu items except for Delete, which will generate a…anyone? Anyone? That’s right…a DELETE operation.
userActions.type
Something else for the UPDATE operation, this tells us exactly which menu option was called. (It also does for INSERT or DELETE, but those are a little more straightforward.) Each menu item generates a different user action—we’ll cover them as we go. Pinning a card generates the PINaction, while unpinning the card gets us UNPIN.
Given what we know so far, we might consider the following flow when processing a job off the callback queue:
1. Get the user record from the database based on the userToken.
2. Compare the verifyToken from the database with the verifyToken sent in the request.
3. Do something based on the operation and userAction.
That third step is, of course, the kicker. What sorts of things would you do? First, realize what you don’t need to do—Glass has already taken care of deleting or changing the pin status of the card, so you don’t need to do it on Glass.
You might, however, wish to do it if you have your own copy of the card. Consider, for example, a simple text chat system that you’re developing a Glass interface for. If a user pins a message or thread, you might want to mark the message as important in your master copy of the message so he can see it on the desktop as well. Similarly, if he marks the message as deleted on Glass, you should also remove it from your own data store.
Having the master copy of a card in our database works really well if we can also store the ID that Glass uses in our database. This isn’t always feasible, however, and even if it is, sometimes it might not be a good idea. Fortunately, Glass is willing to be a little flexible on this point. It still will always maintain its own unique ID for a card, but it also provides a secondary field it indexes that you can use for your own identifier. This property of a timeline item is the sourceItemId. Glass will store this value as part of a card, but does not care what the value itself is.
So we can update our previous example with the following:
{
"text": "Pin me! Delete me!",
"sourceItemId": "message-24601",
"notification": {
"level": "DEFAULT"
},
"menuItems": [
{ "action": "TOGGLE_PINNED" },
{ "action": "DELETE" }
]
}
Now when we process the event notification, we see that the callback body contains, well, exactly the same thing it contained before. The sourceItemId doesn’t show up in the callback. So how does this help us again?
We do have the itemId, which we can use to fetch the timeline item using the Timeline.get method. This will give us a complete Timeline item object, including the sourceItemId. With this sourceItemId value now in hand, we can now fetch the object from our own database and take whatever action is appropriate.
The timeline item we fetch has some other attributes that may be of use to us if we’re processing the delete commands or one of the pin actions. In particular, we have Boolean object attributes such as isPinned and isDeleted which report on, you guessed it, if the item is pinned or not, or if the item is deleted. If the item is deleted, we may be in for a bit of a shock—many other attributes will have been removed, including the text or html attributes. We call these object fragments “tombstone” objects, since all they do is to mark that there used to be an item here.
Given this, it becomes extremely common for our processing flow with a job in our job queue to work more like this:
1. Get the user record from the database based on the userToken.
2. Compare the verifyToken from the database with the verifyToken sent in the request: if they do not match, bail out.
3. Fetch the timeline item from Google’s server.
4. Do something based on the operation, userAction, and the current state of the item itself.
This concept of Glass mirroring what is available on other platforms is a powerful and important one, and one that we hope you picked up from our earlier chapters as well (though it bears repeating). But the two options we’ve seen to do that mirroring so far are somewhat limiting. While deleting is a common operation, many times users may want to just dismiss a card from Glass without removing it from every platform. Additionally, pinning does not always translate to commands that may exist elsewhere and has the downside that you can’t control it from outside Glass, which limits its use as a multiplatform control.
Besides, chances are good that you’ve created your own command terminology, and you want your Glassware to reflect the same terminology. We need a way to create our own menu items.
Custom Menu Items
Now that we know how to set up a subscription and respond to pings from Google, let’s see how to create some more menu items for when users interact with our Glassware, and how to handle them (remember from Chapter 7 how the architecture of the Mirror API mandates that your server never communicates directly with the user, or vice versa). Although Glass provides some common menu items, there is no way it can have all the possible choices you may want for a card. To accommodate your needs, you can create custom menu items that contain your choice of text and icon, and will report their activity to the server. We first need to see how to create the menu items and everything associated with them, and then what it will look like on the server.
The "CUSTOM" menuItem action indicates that we have a, you guessed it, custom menu item! Really quite intuitive. What a wearer sees for this menu item is determined by an array of values, which we touched on earlier to modify how a default menu item was listed, and which should include a 50 x 50 pixel icon in the PNG format. Glass distinguishes multiple custom items through the menuItem ID, which we designate and which Glass ignores except to send back to us when the menu is selected. So we might set up a color changing card with JSON like this:
{
"html": "<article><section><p class='white'>A cavalcade of color
</p></section></article>",
"menuItems": [
{
"id": "white",
"action": "CUSTOM",
"values": [
{
"state": "DEFAULT",
"displayName": "Watch White",
"iconUrl": "https://db.tt/0VgPaGii"
}
]
},
{
"id": "red",
"action": "CUSTOM",
"values": [
{
"state": "DEFAULT",
"displayName": "Ahead Red",
"iconUrl": "https://db.tt/0VgPaGii"
}
]
},
{
"id": "blue",
"action": "CUSTOM",
"values": [
{
"state": "DEFAULT",
"displayName": "Go Blue",
"iconUrl": "https://db.tt/0VgPaGii"
}
]
}
],
"notification": {
"level": "DEFAULT"
}
}
Entering this JSON into the Google Mirror API Playground produces the snapshot of your card shown in Figure 10-1.
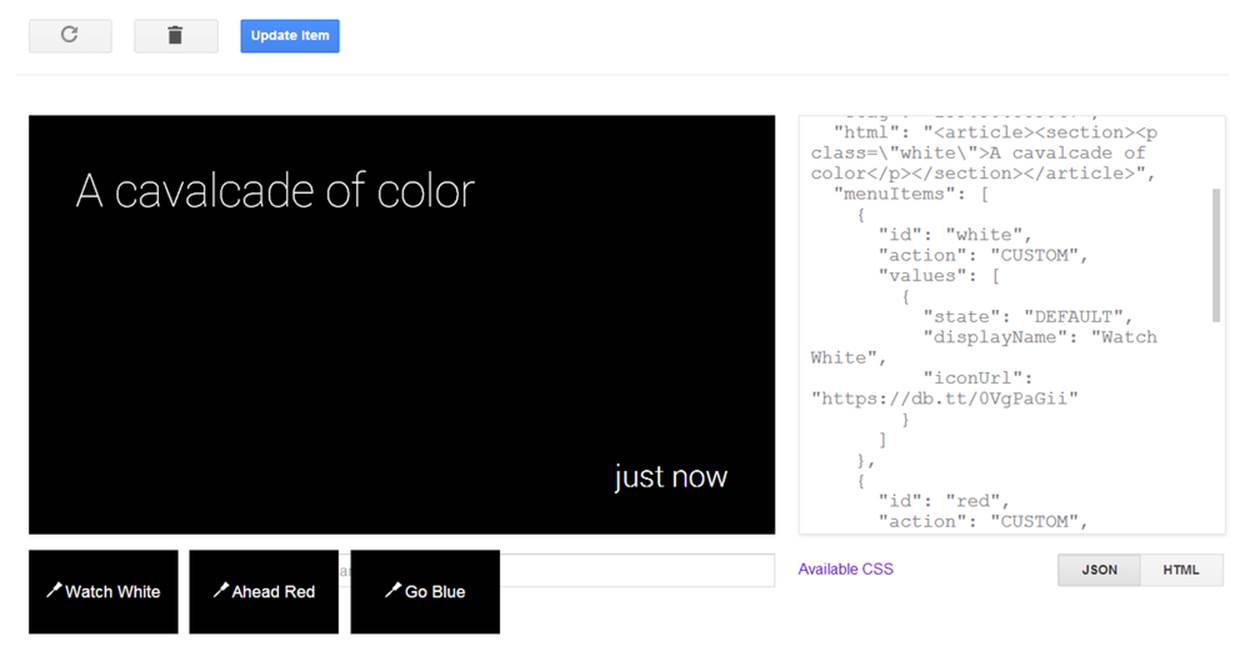
Figure 10-1. Previewing prototypes of menu items
Do note that after you’ve clicked Insert Item to send the card to Glass, the Playground will auto-generate thumbnails of the custom menu items you’ve laid out, as Figure 10-1 indicates. This feature only visualizes custom menu items, not the built-in options.
The JSON may look complicated, but let’s break down the menuItems property into some detail. We’ve seen that this will be an array of objects before, but the objects contain a few more details this round.
Each object contains an ID, in this case containing the color we want to switch the text to, and the CUSTOM action. Each object also contains a values property, which is an array. Right now, that array contains just one item. That item has the state of DEFAULT, an icon representing that we’re setting a color, and the text to display—the name of the color to switch to.
Viewed as live items on a timeline, the cards and their flow render like Figure 10-2.
FREE TOOLS FOR THE GRAPHICALLY CHALLENGED
If you’re like the both of us, you probably royally suck when it comes to graphics. Thank goodness for the Glass Asset Studio, an amazing tool by our friend Justin Ribeiro that creates white icons out of images in the dimensions Glass expects. It’s an indispensable utility to have as you’re putting together your Glassware.
Additionally, the icons we note in this chapter were used freely from Openclipart.org. Yay, public domain resources!
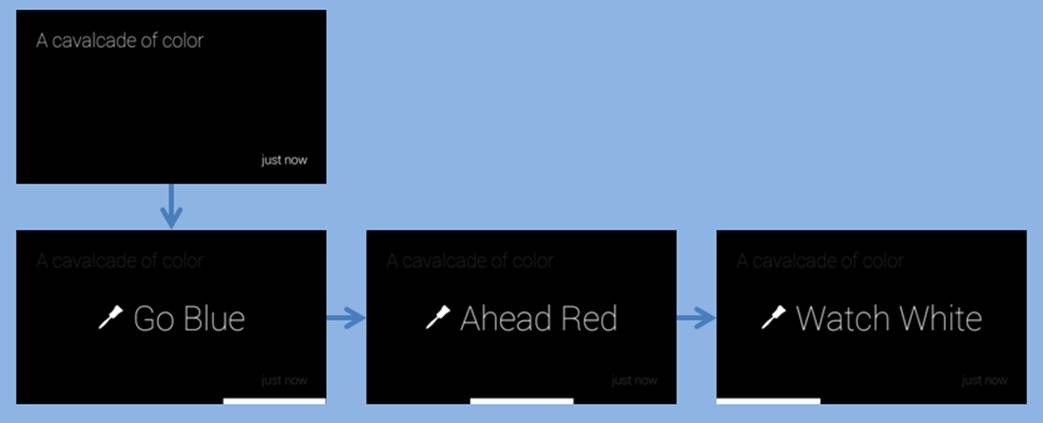
Figure 10-2. Flow for a card with accompanying menu items
If we take a look at this card, we get the text and the three menu items. If we have a subscription set up, selecting one of the menu items will send something like this to the server:
{
"collection": "timeline",
"itemId": "7e84302a-1da7-46f2-ac72-2c008fce2b4b",
"operation": "UPDATE",
"userToken": "12345678901234567890",
"verifyToken": "shibboleet",
"userActions": [
{
type: "CUSTOM",
payload: "blue"
}
]
}
Most of these should be familiar, but some have new values:
operation
Will be set to UPDATE.
userActions.type
Contains the string "CUSTOM" to indicate this is a custom menu item. Big surprise.
userActions.payload
This is a new field and will correspond to the ID of the menuItem that was selected.
We can use the same process flow we outlined earlier to determine which menu item was selected, but what should we do for each menu item once we get it to actually change the color of the card? In this case, we can call Timeline.patch for the itemId mentioned in the payload and just specify the html parameter with the HTML specifying the new color class. What if we wanted to be fancier and use a different icon for the color that has been selected? We could send Timeline.update with a complete copy of the timeline item configuration and just the relevant menu item changed (or perhaps not even present, so they can’t foolishly select the menu item twice). How you alter the card and menu items is completely up to you.
We have mentioned a few times now that you should be deliberate in how you differentiate the menu items for "Delete" and "Dismiss". The former (built in, and covered earlier) will delete the card from Glass and you are expected to delete it from your system as well. The latter is not built in—you’re expected to implement it if you want your users to be able to remove cards from the timeline.
We can take care of this easily with a CUSTOM menu item, as illustrated here:
{
"text": "Dismiss or Delete me",
"menuItems": [
{
"id": "dismiss",
"action": "CUSTOM",
"values": [
{
"state": "DEFAULT",
"displayName": "Dismiss",
"iconUrl": "https://db.tt/dRHLFhxG"
}
]
},
{ "action": "DELETE" }
],
"notification": {
"level": "DEFAULT"
}
}
On the server, we will get the CUSTOM action with the "dismiss" payload and call the Timeline.delete command for the itemId. We need to do this explicitly—Glass won’t do it for us. At the same time, however, we should not delete our internal copy of the item.
DISMISS IS DIY
You might have taken note about how seemingly backward the ability to dismiss a timeline operation is. Dismiss, you would think, should be a built-in function of the Mirror API, and delete should be custom. But that’s not the way it currently works out. This does give you a bit of leeway as to implementation and lets you gather stats about how often people do each operation.
If you add this card and play with it a little, you’ll realize that there is a difference in how the "Dismiss" menu item and the "Delete" menu item behave. When we delete, it gives us a brief period where it says it is "Deleting" and we have a moment to cancel things before it tells us that it has been "Deleted". We don’t get that at all with "Dismiss". These two other screens are other value states that we have omitted—the DEFAULT value state is required for us to show anything, but the PENDING and CONFIRMED states make for a better experience. We can add these as two additional objects to the "values" attribute thusly:
{
"text": "Dismiss or Delete me",
"menuItems": [
{
"id": "dismiss",
"action": "CUSTOM",
"values": [
{
"state": "DEFAULT",
"displayName": "Dismiss",
"iconUrl": "https://db.tt/dRHLFhxG"
},
{
"state": "PENDING",
"displayName": "Dismissing",
"iconUrl": "https://db.tt/dRHLFhxG"
},
{
"state": "CONFIRMED",
"displayName": "Dismissed!",
"iconUrl": "https://db.tt/dRHLFhxG"
}
]
},
{ "action": "DELETE" }
],
"notification": {
"level": "DEFAULT"
}
}
Let’s test this JSON code in the Playground to see the layout of the custom menu item with our icon in Figure 10-3 (again, only Dismiss will be thumbnailed, but not Delete since it’s a built-in).
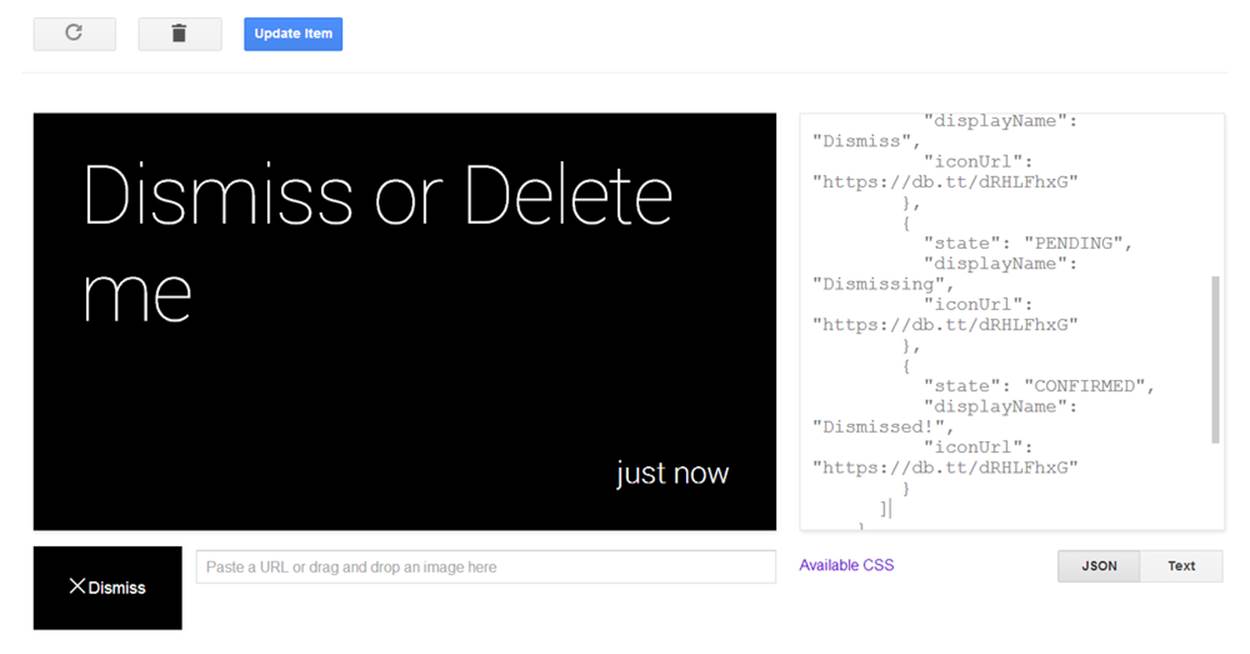
Figure 10-3. Testing a Dismiss action
Looking at the cards live on Glass produces Figure 10-4’s expected layout.
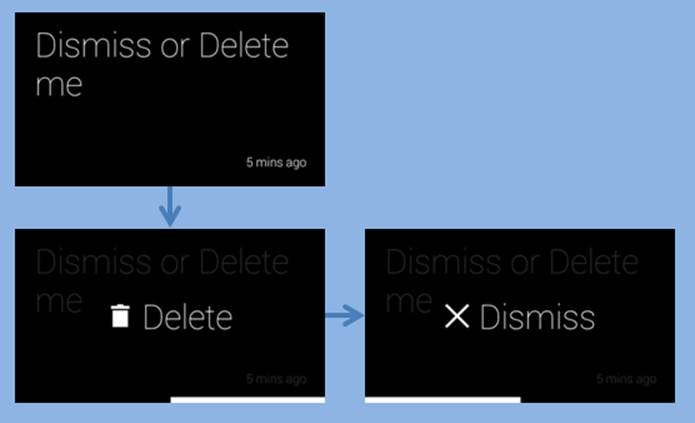
Figure 10-4. Flow for the custom Dismiss action with the default Delete menu item
Glass encourages us to add these additional states, and we strongly suggest that you add them for all your menus. Your users will be expecting them and they are natural parts of the Glass UX.
Keeping in Contact
Earlier we saw the specialized NAVIGATE menu item that would work with a Location object that was part of a timeline item. We have another object that also provides some additional commands when it is part of a card—the Contact object.
The most simple way to use a Contact is as part of the creator attribute on a timeline item. If we have assigned a telephone number to this creator, we can add a VOICE_CALL menu item to allow the wearers to directly call a phone number, in much the same way they could access a URL:
{
"text": "O'Reilly Media",
"notification": {
"level": "DEFAULT"
},
"creator":{
"displayName": "O’Reilly Media, Inc.",
"phoneNumber": "(707) 827-7019"
},
"menuItems":[
{ "action": "VOICE_CALL" }
]
}
This is a pretty simplistic use of the creator attribute, however, and it almost seems easier to embed the telephone number as part of a URL and use that method instead. But fear not—there are bigger and better uses for Contact objects.
Returning to our hypothetical example of a simple text messaging application, we can use the Contacts collection to indicate the participants in a discussion. Glass will even (sometimes) format the message using information we can provide as part of the creator property as well as a list of recipients specified through the Timeline.recipients property, but we strongly suggest you use HTML to control the exact layout you want. We’re going to ignore our own suggestion for this example, however:
{
"creator": {
"displayName": "George",
"id": "user-prez1",
"imageUrls": [
"https://mirror-api-playground.appspot.com/links/washington.jpg"
]
},
"recipients": [
{
"displayName": "Abe",
"id": "user-prez16",
"imageUrls": [
"https://mirror-api-playground.appspot.com/links/lincoln.png"
]
}
],
"text": "Welcome Abe",
"bundleId": "thread-cicchat-1812",
"sourceItemId": "cicchat-1812-1",
"menuItems": [
{"action": "REPLY"}
],
"notification": {
"level": "DEFAULT"
}
}
Here we have a creator and a (rather small) list of recipients of this message. When we view it in the Playground, we see one of the imageUrls belonging to Washington. When we send it to Glass, however, we see a somewhat different format—Washington is on top, in the usual position where we expect the sender to be, and Lincoln is shown on the bottom as (the only) one of the recipients. This serves as a reminder of three things: the Playground isn’t always perfect, you need to test things with Glass itself, and you should control the formatting if you want it to look correct.
We’ve also included a bundleId and a sourceItemId here. We’ll explain why we included them, and why their values are not an arbitrary pick, in a few paragraphs. Let’s look at this rendered in the Playground in Figure 10-5.
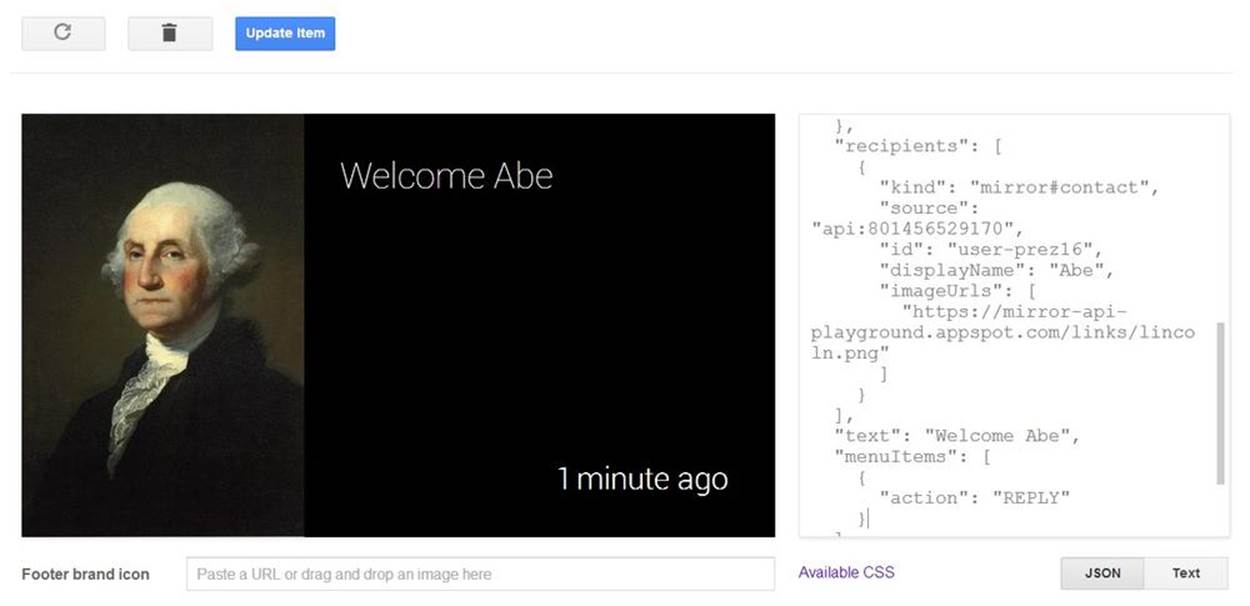
Figure 10-5. Make sure you test your card prototypes on Glass!
And so now for purposes of consistency, let’s look at Figure 10-6, which is produced after clicking Update Item and sending the item to Glass.
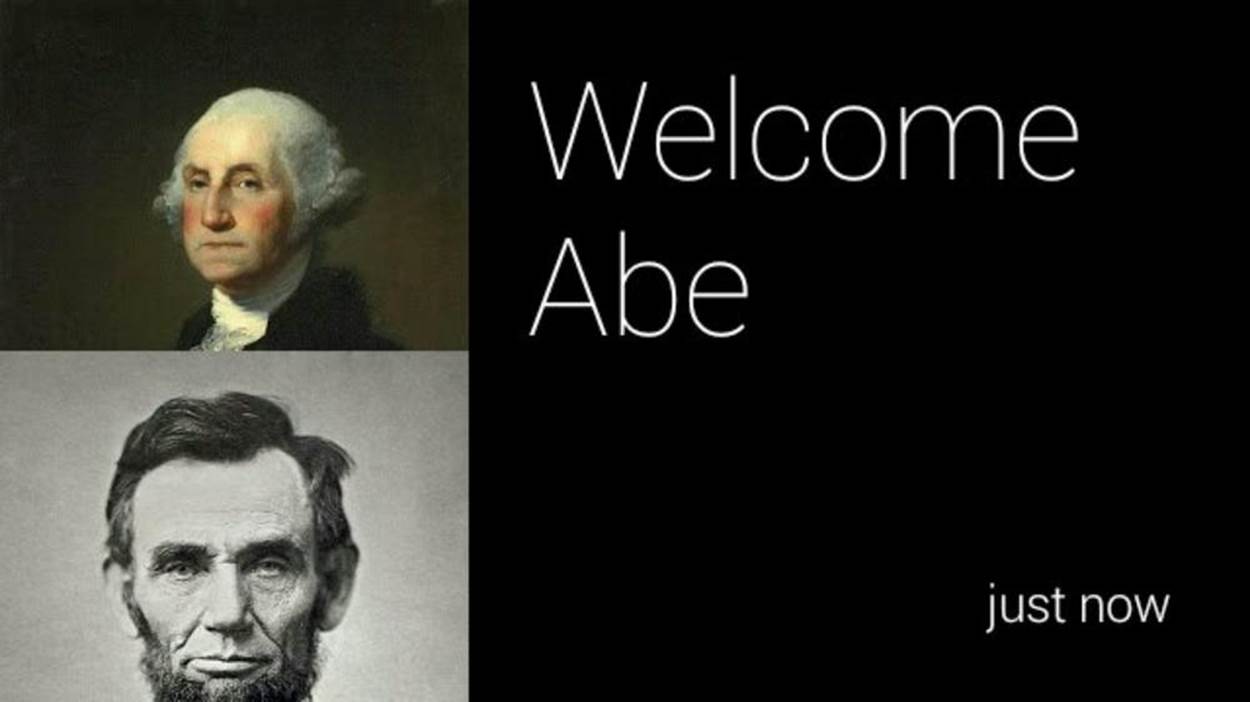
Figure 10-6. Testing image placement
It’s decidedly different, including both presidents!
We also see a new menu item action here, REPLY. Go ahead and try it out—when you select the REPLY menu item, you’ll be able to dictate text to Glass that is sent back to the Glassware. This works differently than any other menu item we’ve seen before since it will generate a response with an INSERT operation. As you may surmise, this suggests that a whole new card has been created to mark this event and we’re getting alerted that this new card exists:
{
"collection": "timeline",
"itemId": "4bf0669e-bdcc-4641-8da6-5725a84fcffa",
"operation": "INSERT",
"userToken": "user-prez16",
"verifyToken": "fourscore",
"userActions": [
{
"type": "REPLY"
}
]
}
When we process this callback on our job queue, we’ll go through our usual steps. When we get a message with the ID 4bf0669e-bdcc-4641-8da6-5725a84fcffa, we might get something like this:
{
"kind": "mirror#timelineItem",
"id": "4bf0669e-bdcc-4641-8da6-5725a84fcffa",
"inReplyTo": "470e1114-e06f-433b-94ff-67830e7d0107",
"created": "1861-03-04T12:19:36.713Z",
"updated": "1861-03-04T12:19:36.713Z",
"etag": "1396181976713",
"recipients": [
{
"kind": "mirror#contact",
"source": "api:243969892606",
"displayName": "George",
"id": "user-prez1",
"imageUrls": [
"https://mirror-api-playground.appspot.com/links/washington.jpg"
]
}
],
"text": "Glad to be here, George",
"notification": {
"level": "DEFAULT"
}
}
We see that the creator of the message we replied to is now included as the recipient (if we used the REPLY_ALL menu control, all the previous recipients would also be included here). There is no creator set—Glass doesn’t know who sent the message (or at least doesn’t know the contact info for them). It also hasn’t associated it with the bundle or the original source ID. We do, however, have a new field, inReplyTo, letting us know the original message that was sent, and we can get both the bundleId and the sourceItemId by using Timeline.get and getting that message as well.
Why do we care about the bundleId and sourceItemId, however? Well, we want this to maintain consistency with our own database, so we need to make sure this reply gets attached to the right message thread and we know which message we’re replying to (since we do nested messaging when we view it on the Web). The bundleId corresponds to the thread, and we can now look it up in our database and add it to the thread. It doesn’t necessarily need to be the exact value of the thread ID—in this case, we have prefixed it with a string so we know this is a thread on our message board and not a private message, but however the value gets encoded in the string, we need to know how to decode it.
After we insert this new message into the thread, we should now have a new message identifier—what corresponds to the sourceItemId. We might want users to reply to their own message, too, so we should do a Timeline.update or Timeline.patch to update the message that was just inserted to give it the new sourceItemId, the bundleId that corresponds to the thread, and the menu items that all the other posts have. If we’re formatting the message differently (perhaps to give it a title or to format a long message as we’ve previously discussed), this would be a good opportunity as well.
This brings up an interesting point, however. What happens if the original message in our datastore is updated or we need to find out which messages in a thread are still on the timeline? We know how to get things by the ID that Glass knows them by, but how do we get them if we only know our ID? We can use the Timeline.list method and specify either the bundleId parameter or the sourceItemId parameter. This returns a (possibly large) list of matching results. If the results are particularly large, we may need to make multiple calls to page through them all. (You don’t need to specify either of these parameters—if you don’t, you’ll get all the timeline items that your Glassware has inserted that haven’t yet expired.)
The ability for REPLY and REPLY_ALL to take voice-entered text is a very tempting feature. It is easy to think of pinning a card, giving it a REPLY menu item, and using this as a way to send voice commands to our Glassware. This is a bad idea for three reasons:
1. Pinning is an ineffective tool to set up a launcher, as we have discussed a few times already.
2. Using the free-form text entry to issue commands can cause all sorts of problems with trying to parse what the user actually said. It may be good in some rare cases, but generally is best avoided.
3. We have a better way to set up Contacts as specialized voice commands and sharing endpoints, which we go into detail about in the next chapter.
All materials on the site are licensed Creative Commons Attribution-Sharealike 3.0 Unported CC BY-SA 3.0 & GNU Free Documentation License (GFDL)
If you are the copyright holder of any material contained on our site and intend to remove it, please contact our site administrator for approval.
© 2016-2026 All site design rights belong to S.Y.A.