Android Development Patterns: Best Practices for Professional Developers (2016)
Chapter 2. Testing and Debugging
Testing and debugging are two important parts of developing for Android. These procedures revolve around making sure that your application is trustworthy, dependable, and maintainable. By using various methods of testing, you can make sure that you are working with code that does what you believe it should. By debugging your application, you can determine problems that may exist in your code, as well as get a glimpse into what is happening on the device while your application is running.
In this chapter, you learn about unit testing, integration testing, and using the debugging tools that are available with Android Studio. This will give you an understanding of why testing is important and how you can use it with your own applications.
Unit Testing
To some developers, unit testing is not just a suggestion; it is a vital part of the development process. Without testing your code and knowing exactly what it will do and is capable of, you are not be able to trust it.
Generally, unit tests are written for specific modules of your code. Modules may include entire classes or they may be as simple as testing a single function. You will be the one writing the actual unit tests against your code, so you will probably want to adopt some of the creeds of test-driven design. The following list of questions helps you get the most out of your unit testing:
![]() What is the purpose of this module?
What is the purpose of this module?
![]() What types of input will the module support?
What types of input will the module support?
![]() What happens when invalid data is sent to the module?
What happens when invalid data is sent to the module?
![]() Does this module return any data or objects?
Does this module return any data or objects?
![]() Does the returned data or object require validation?
Does the returned data or object require validation?
![]() How can the result be reached in the simplest manner?
How can the result be reached in the simplest manner?
Unit testing goes further than just making sure that your code does what you believe it should. It is a useful tool in validating your code when collaborating and working with others.
When working on team projects, you may have a module that you know works but every time you submit a pull request, synchronize, or otherwise check your code into your code repository, you are informed from another team member that your module is broken and that you need to fix it before it will be added to the master or main branch of your code repository.
Even if you are absolutely sure that your module is fine, without running tests to prove that your module works correctly, you may find yourself in an endless argument with other members of your team that will waste your time and cause your project to be delayed while the problem is resolved. By providing a test with your code, you can let other developers see exactly how you have tested your module, and allow them an opportunity to provide a test of their own that will help explain what they are expecting your module to be able to handle.
To begin writing tests in your project, you need to make a few modifications to your project. If your project does not already contain testing folders, you will need to create them in the following path: app/src/test/java. This folder contains your test code, whereas the code you want to perform the testing on should reside in the app/src/main/java folder.
Having confirmed or created the folder structure, you can then modify the gradle.build file of your app module to add support for JUnit. This can be done as follows:
dependencies {
// other dependencies
testCompile 'junit:junit:4.12'
}
With the folder structure and dependencies taken care of, you can now write your test classes. Test classes use annotations to declare test methods as well as to perform special processing. The following shows a sample class with imports for JUnit as well as a method that uses the@Test annotation to designate the method as a testing method:
import org.junit.Test;
import java.util.regex.Pattern;
import static org.junit.Assert.assertFalse;
import static org.junit.Assert.assertTrue;
public class EmailValidatorTest {
// use @Test to specify a testing method
@Test
public void emailValidator_CorrectEmail_ReturnsTrue() {
// using assertThat() to perform validation of email address
assertThat(EmailValidator.isValidEmail("myemail@address.com"), is(true));
}
// other testing methods and logic would continue here
}
Other annotations that you may be interested in using for testing are shown in Table 2.1.
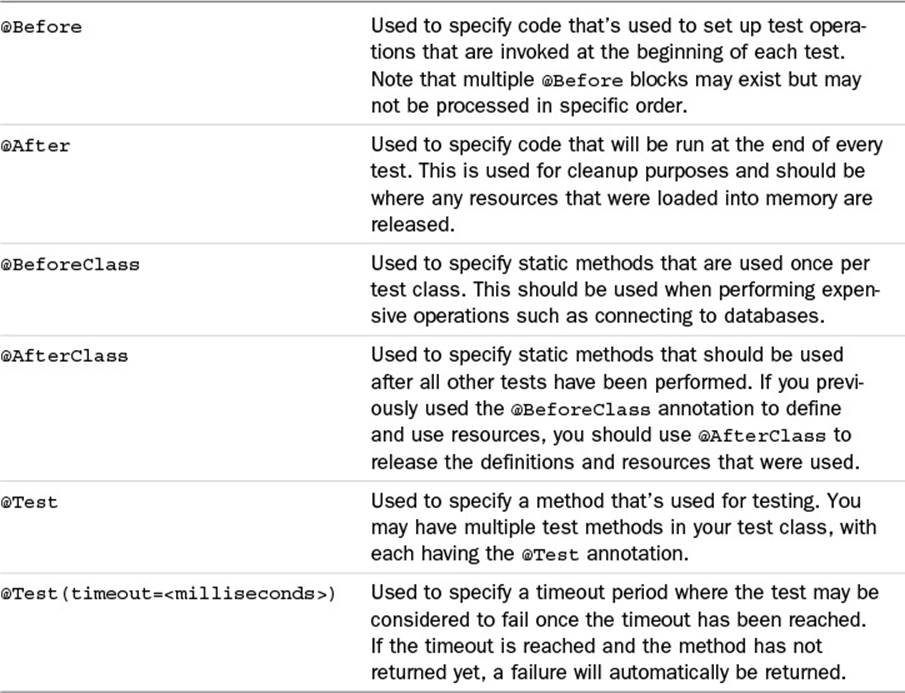
Table 2.1 JUnit Annotations
After you create your test classes and methods, you can run them from Android Studio by opening the Build Variants window. This can be done by using the quick access menu on the left side of the screen, or by using the Build, Select Build Variant... menu. Once the window is displayed, make sure that Test Artifact has the Unit Tests option selected. Your tests will then be listed and can be executed by right-clicking the class or method you would like to run and then selecting Run.
When the test has completed running, the results will be displayed in the Run window. If you require a full project that demonstrates how to integrate and use automated testing, you can visit the official testing sample from Google via GitHub athttps://github.com/googlesamples/android-testing.
There are still other options for testing that can be leveraged to round out and complete your testing strategy. The Robotium automation framework (https://code.google.com/p/robotium/) is a well-tested and trusted framework that can be leveraged as a stand-alone component or as an addition to your testing suite.
Another option that you want to consider is Appium (http://appium.io/). Appium is a cross-platform product that is closer to a set of automation libraries that can be used for native, hybrid, and web applications. Appium is based on Selenium WebDriver and allows you to use the language you are comfortable with to create and run tests, including Ruby, .NET, Java, Python, JavaScript, Swift, Objective C, and more. If you are already comfortable with how Selenium WebDriver works, this is definitely an option you will want to check out.
Integration Testing
After unit testing has been completed, integration testing takes things further by testing an entire sequence of events, testing the user interface (UI) components, and potentially working with various service providers for end-to-end testing.
One of the ways you can perform integration testing is with monkeyrunner. The monkey-runner app is a tool that executes Python scripts that can open or install an application on an Android device through an ADB connection and then send keyboard and touch events as well as take screenshots of the mayhem it creates while running. This can be a valuable tool in creating an application that can stand programmatic stress testing and that will self-document results through imagery. Listing 2.1 shows a sample Python script that you can create that opens an application and sends button presses to it.
Listing 2.1 Python Script That Can Be Used with monkeyrunner
from com.android.monkeyrunner import MonkeyRunner, MonkeyDevice
import commands
import sys
import os
print "** MonkeyRunner Start"
# Determine if screenshot directory exists, make if not
# Note, this is made where this script is executed from
if not os.path.exists("screenshots"):
print "creating the screenshots directory"
os.makedirs("screenshots")
# Connect MonkeyRunner to the device
device = MonkeyRunner.waitForConnection()
# What app are we testing, install if not found
apk_path = device.shell('pm path com.dutsonpa.debugexample')
if apk_path.startswith('package:'):
print "App Found."
else:
print "Installing App"
device.installPackage('com.dutsonpa.debugexample.apk')
print "Starting MainActivity"
device.startActivity(component='com.dutsonpa.debugexample/com.dutsonpa.debugexample.MainActivity')
# Take a Screenshot
MonkeyRunner.sleep(1)
result = device.takeSnapshot()
result.writeToFile('./screenshots/monkeyrunner_ss.png','png')
print "Screenshot Taken"
#sending an event which simulate a click on the menu button
device.press('KEYCODE_MENU', MonkeyDevice.DOWN_AND_UP)
print "** MonkeyRunner Finish"
Note
You must have Python installed on your system and have it in your system path so that the script can be executed. You should also have the Android SDK in your system path so that monkeyrunner can be executed from your command line or terminal.
Another testing tool you may find useful is the UI/Application Exerciser Monkey (Monkey). Monkey runs similarly to monkeyrunner, but instead of being a Python script it is a command-line application that you can configure and run on either an emulator or on a device.
Monkey can simulate touch, click, gesture, directional, trackball, and similar device events. When the application crashes, performs a permission error, or runs into an Application Not Responding (ANR) notice, Monkey will stop sending events to the device or emulator. If you really want to drive your device or emulator to the limit, you can override these default settings and Monkey will continue to throw random events.
Using Monkey can be as simple as the following line:
adb shell monkey -p com.dutsonpa.debugexample -v 300
Here, I have an emulator launched and accessible via adb. This means that adb is processed first. The shell command is then passed to open a remote shell on the target device. Next comes the call for monkey as well as an argument option of -p. The -p argument acts as a constraint that will force Monkey to only work in the package that is specified immediately after it. The com.dutsonpa.debugexample is the package name that Monkey will be constrained in. The argument of -v is used to show verbose logging to the terminal. You can omit the argument, but very little information will be shown when it is omitted. The 300 at the end of the line is used as the number of events that should be used. In this case, 300 random events will be sent to the emulator. The output of running a command with 100 events from the terminal is shown in Figure 2.1.
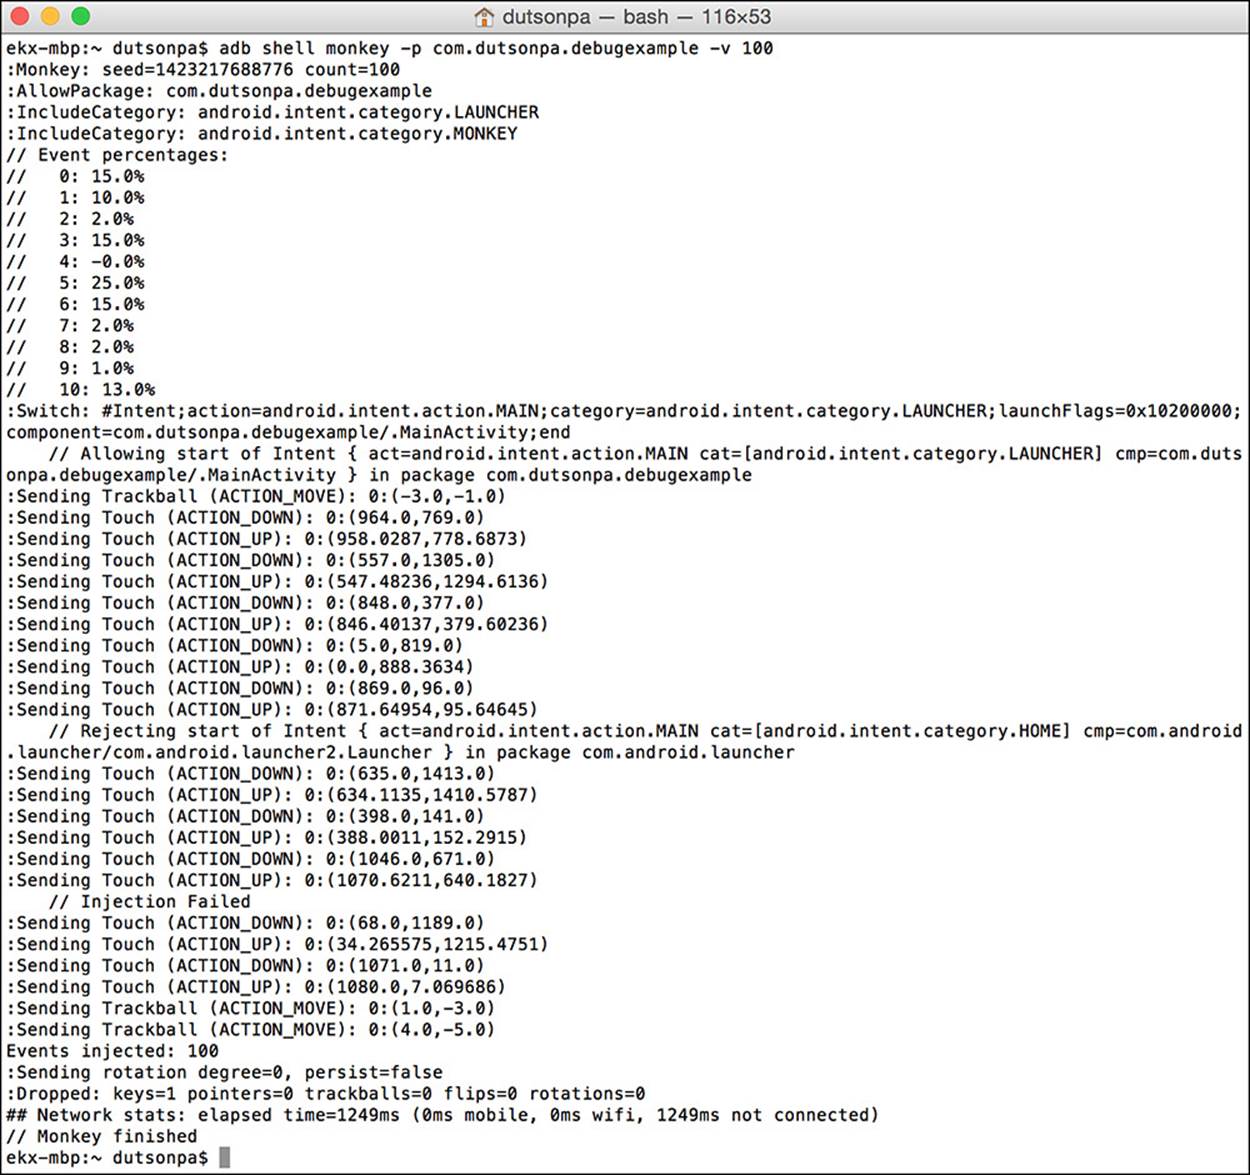
Figure 2.1 With the verbose argument passed, the terminal displays information about the events sent to the emulator.
Monkey can also be somewhat tuned to act in a more controlled manner. By using different arguments, you can control how fast the input events are triggered as well as how many of them will be touch, motion, trackball, gesture, and other input events. Another wonderful feature is that when an error does occur with the test, a full stack trace is printed to your terminal, including application memory usage, the packages that were running at the time of the crash, the type of crash, the exact point during the testing when the application crashed, and thread traces.
Using Monkey is a great way to get a quick evaluation on your application. It may seem like sending random events is overkill, but in reality it gives you a way to evaluate the responsiveness of your application under heavy stress. When working with applications that need to do rapid screen updates or even handle many input events at the same time (such as a game), Monkey can generate random and mass input. Monkey also has the benefit of doing things that may interrupt your application. By pulling down the status bar and pressing the back, home, and menu keys, Monkey gives your application a chance to work on the OnPause(), OnResume(), and other methods.
Monkey may not always be the solution that solves all of your problems, but it should be part of your testing strategy because it is easy to run, comes with the Android SDK, and gives instant feedback on how your device will handle your application.
Another tool that you should consider using during your integration testing is user interface (UI) testing. This can be done with another tool that is bundled with the Android SDK. The UI Automator Viewer is run from the command line or terminal window from the Tools directory of your SDK installation.
Note
If you installed Android Studio and do not know where the Android SDK has been installed on your system, you can find out by opening Android Studio and then clicking the SDK Manager icon, or by using the menu to select Tools, Android, SDK Manager. This will launch the SDK Manager, which will list the path on your system to the SDK in a text field at the top of the window.
To start using the UI Automator Viewer, open your command shell and navigate to the tools directory of your Android SDK installation location. Note that if the tools directory is in your system path, you do not need to navigate to the directory; instead, you may simply run the command to start using the UI Automator Viewer. Once you have located the proper path, run the following:
./uiautomatorviewer
Note that Windows users should not need the ./ and can just type in uiautomatorviewer to start the application. When the application starts, you will be greeted with a fairly sparse interface that is ready to be used.
Before you go any further, make sure that you have connected an actual Android device to your computer and that you have USB debugging enabled.
Tip
You can make sure that you have a device connected and ready to go either by checking the Android DDMS window of Android Studio and looking for your device to be listed or by using the adb command to list devices attached to your computer. Typing adb devicesinto your command line should return a list of devices that are connected and ready to be debugged. If nothing is returned, check your connections and make sure that you have USB debugging turned on for your device.
Once you have your device connected and the application that you want to test open, you can click the Device Screenshot icon near the top of the UI Automator Viewer window. This starts a process of taking a UI XML snapshot. This grabs the current screen and displays it on the leftside of the window. Here, you can drag your mouse over various elements and inspect them. As you mouse over various elements, a window on the right side will move through the layout and show you where it belongs in the view hierarchy.
When you click an element, layout, or widget, a red border appears and the details of that item are displayed, including class, package, and property information. Figure 2.2 shows a button selected with the property information being displayed inside of the UI Automator Viewer.
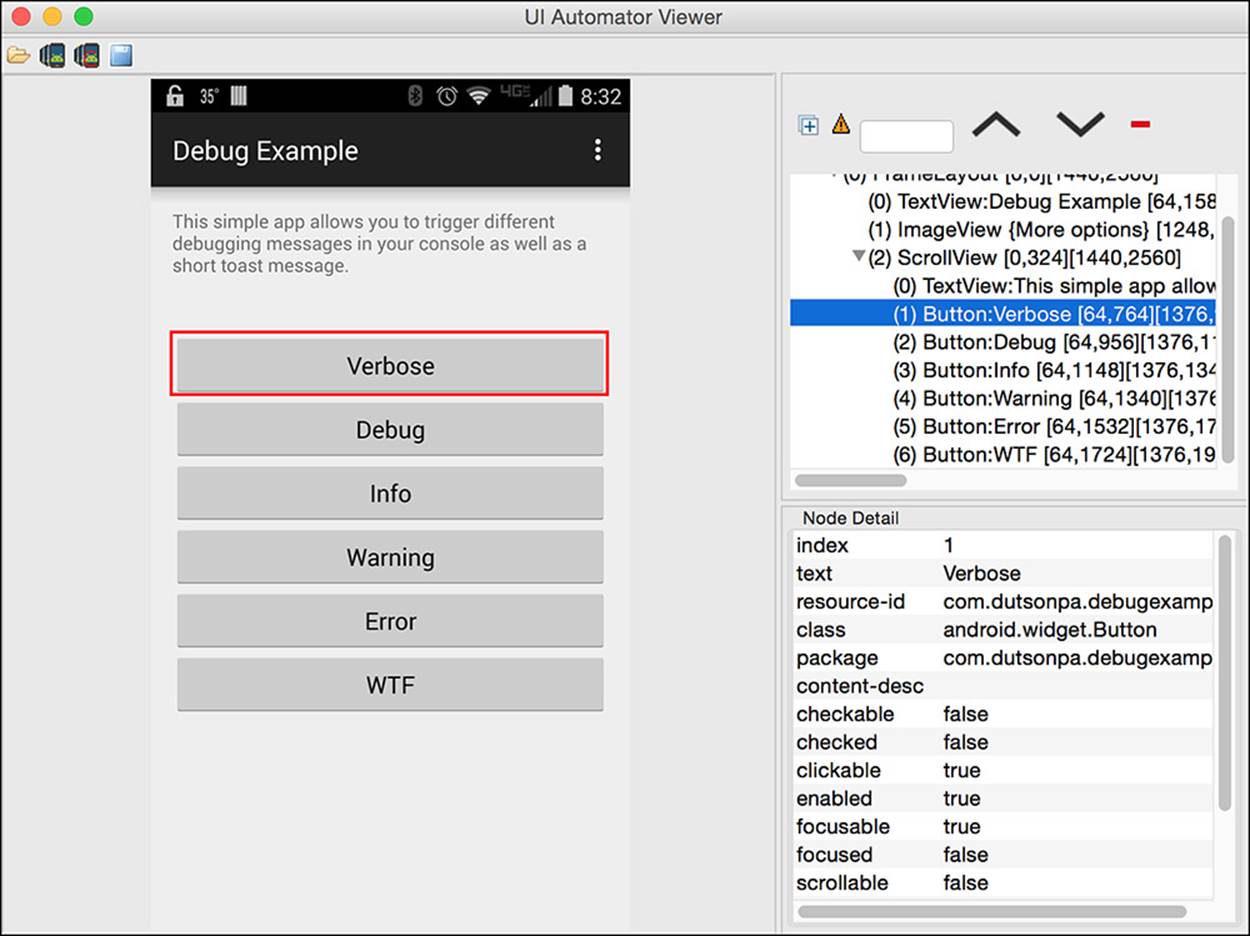
Figure 2.2 On the left, the button being inspected has a border applied while various properties of the button are displayed on the right.
You may find that some items are not displayed on the screen but are present in your application. For these items you can browse through the hierarchy and select the item. A dashed border is applied to the item and the item properties are still listed below. Using this information, you can determine if the item is where it should be, or it will give you a clue as to where the item went when the application was loaded.
Note
One of the best features of the UI Automator Viewer is that you can see what will be shown, displayed, or read to a user when the accessibility mode of the device has been enabled. If you notice that “content-desc” has no value, you should address this immediately by adding a proper value. Keep in mind, though, that not everything needs a value—for example, you wouldn’t want the device to announce “scroll view” or “frame layout” to a user using your app. You would, however, want buttons and navigation options announced.
Using the UI Automator Viewer can help you spot potential layout problems, find “missing” components, widgets, and elements, and help you get a great view of how the layout is put together when rendered on an Android device.
Debugging
Many developers devote a good portion of their time to writing unit tests and testing scripts in order to ship applications that are stable, working, and run with near 100% certainty. At times, especially with Android development, a test works on some devices but will behave differently on others. In this case, the best way to find the problem and fix it is with debugging. Debugging on Android can be broken down into profiling, tracing, and messaging.
Profiling
When working with an application, it is good to know how much memory is available and how much your application is using. Due to the flexibility that Android brings to the table, many manufacturers have modified the general UI of Android, giving it special effects, new applications, and extended functionality. However, this customization comes with a cost attached. As manufacturers add on special features and “built-in” functionality, they change the amount of system memory available and add or extend many of the built-in functions of the device.
More than just being aware of system memory, you should also be looking at the amount of CPU that your application is using and how much is available. Something that many developers overlook is how many CPU cycles are being used by their application. This may not seem like something to worry about, but using the device CPU is not free. Every task you perform and process that you start uses power. The more power-hungry your application, the greater chance your user has of not using and eventually uninstalling your application.
To get started profiling your application, you need to either start your emulator or connect an Android device to your computer with USB Debugging enabled.
Tip
To enable “Developer mode” on your Android device, open Settings, then find About Device or About Phone, then tap Build Number until a toast (notification) appears telling you that you are a developer. Note that some devices or phones may have a Software Information menu option that contains the Build Number option. This will unlock the Developer Options, and you can enable USB Debugging and many other options that will help you develop and debug your applications.
Once your device is connected, you are ready to start the Android Device Monitor. This can be launched either from a command line or from Android Studio. To launch from a command line, you need to navigate to the Tools directory of your Android SDK installation, or have thatfolder added to your system path. You then need to find and run monitor. Note that Linux and similar systems will need to run ./monitor in order to start the application.
If you want to start the Android Device Monitor from Android Studio, you can do so by clicking the Tools menu and then Android and Android Device Manager. Regardless of how you start it, a splash screen will appear and then the Android Device Monitor window will appear.Figure 2.3 shows what the Android Device Monitor window looks like.
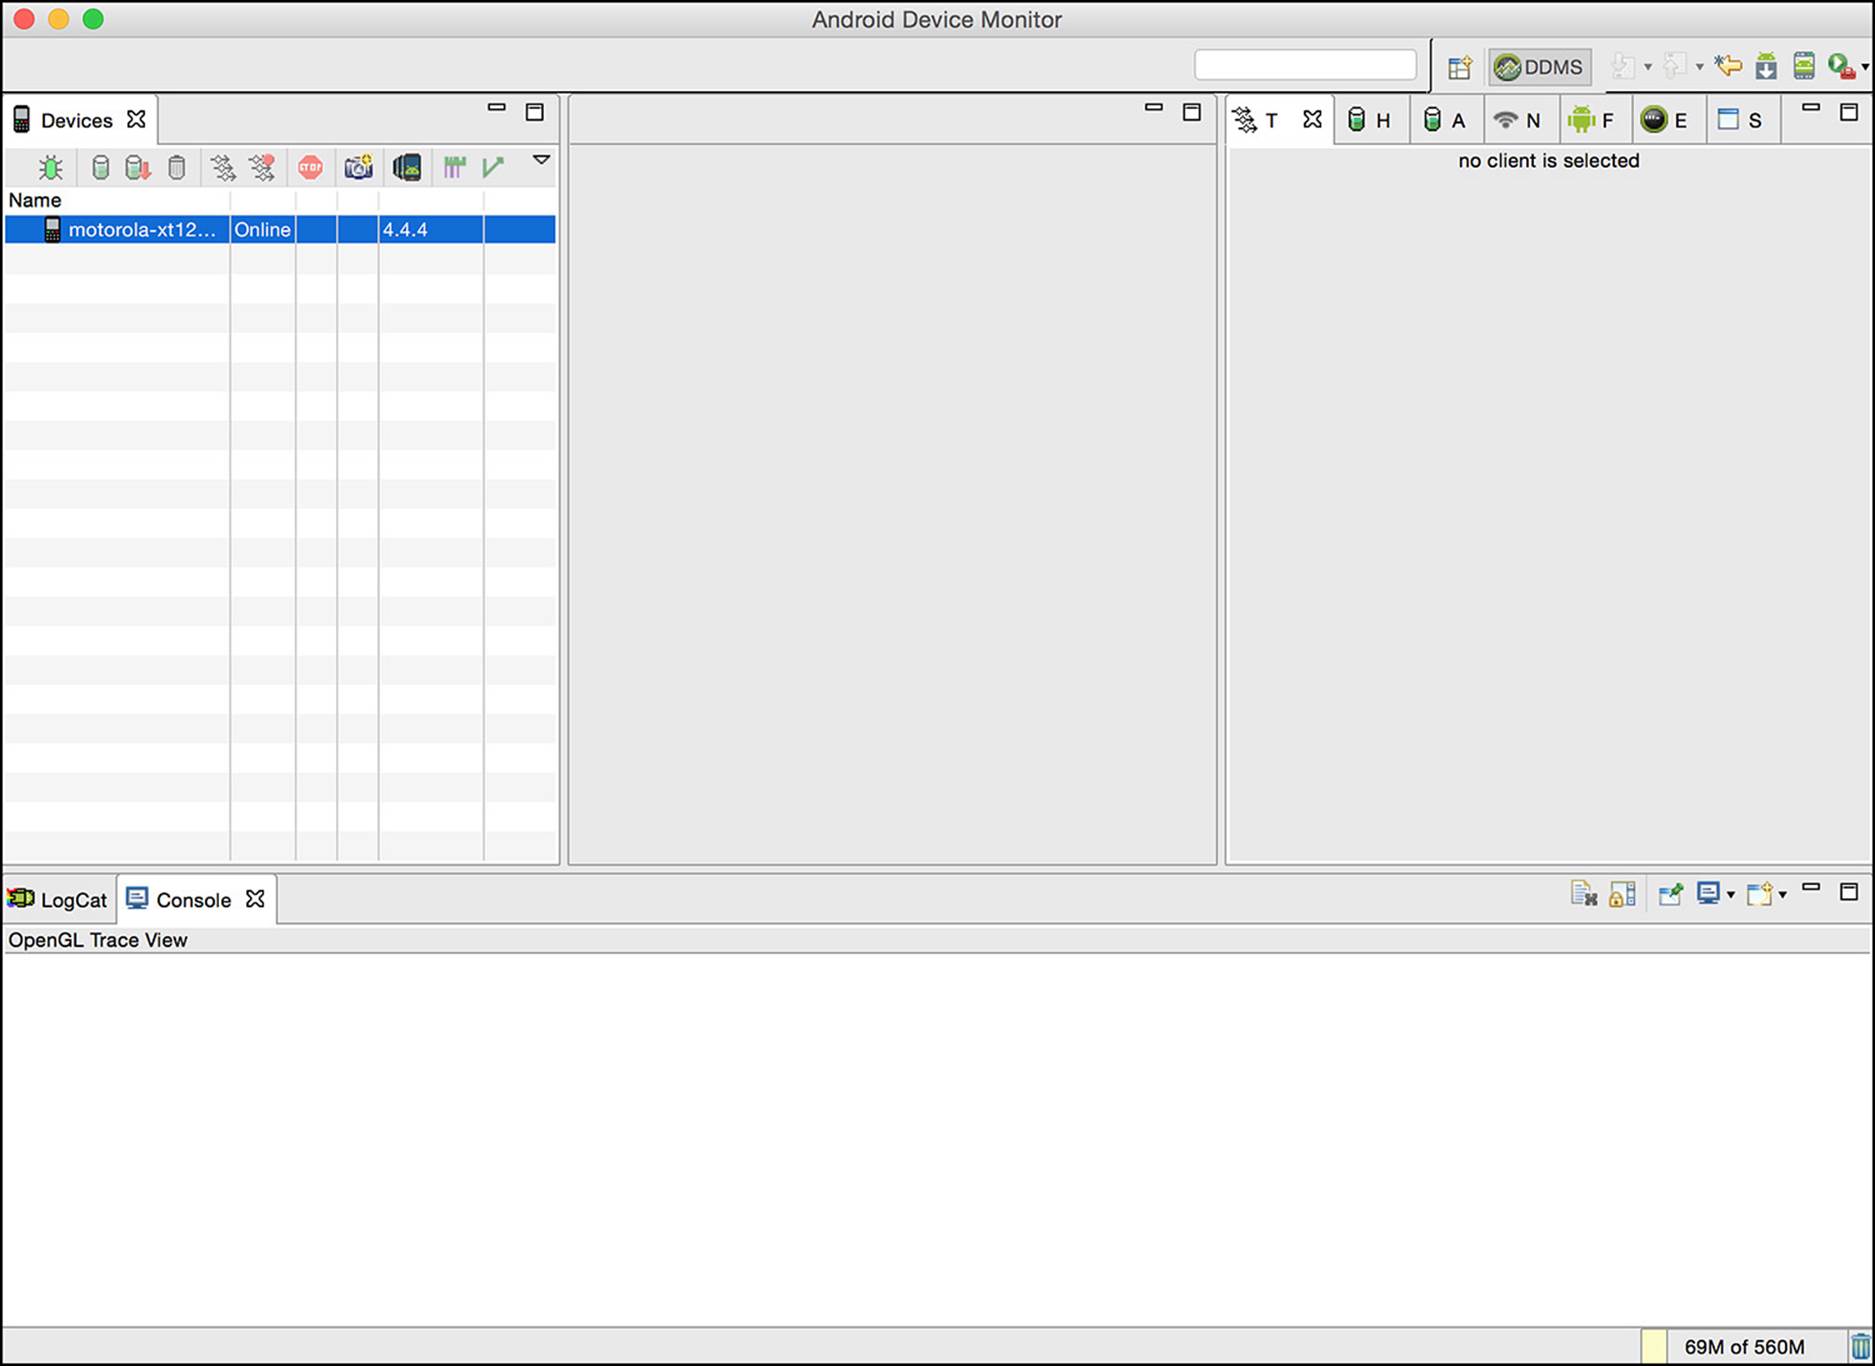
Figure 2.3 The Android Device Monitor may look plain when getting started, but will show you a wealth of information.
Your device should be listed in the Android Device Monitor. Listed beneath it are any running packages that can be profiled. By clicking one of these packages, you can start profiling the package by clicking Update Heap; the icon should look like a cylinder that is partially colored green. Before any information is shown, you will also need to click the trashcan icon for garbage collection to run. You can then click the Head tab that is located on the right side of the Android Device Monitor to view collected information. Figure 2.4 shows data that has been collected from one of the packages running on my phone.
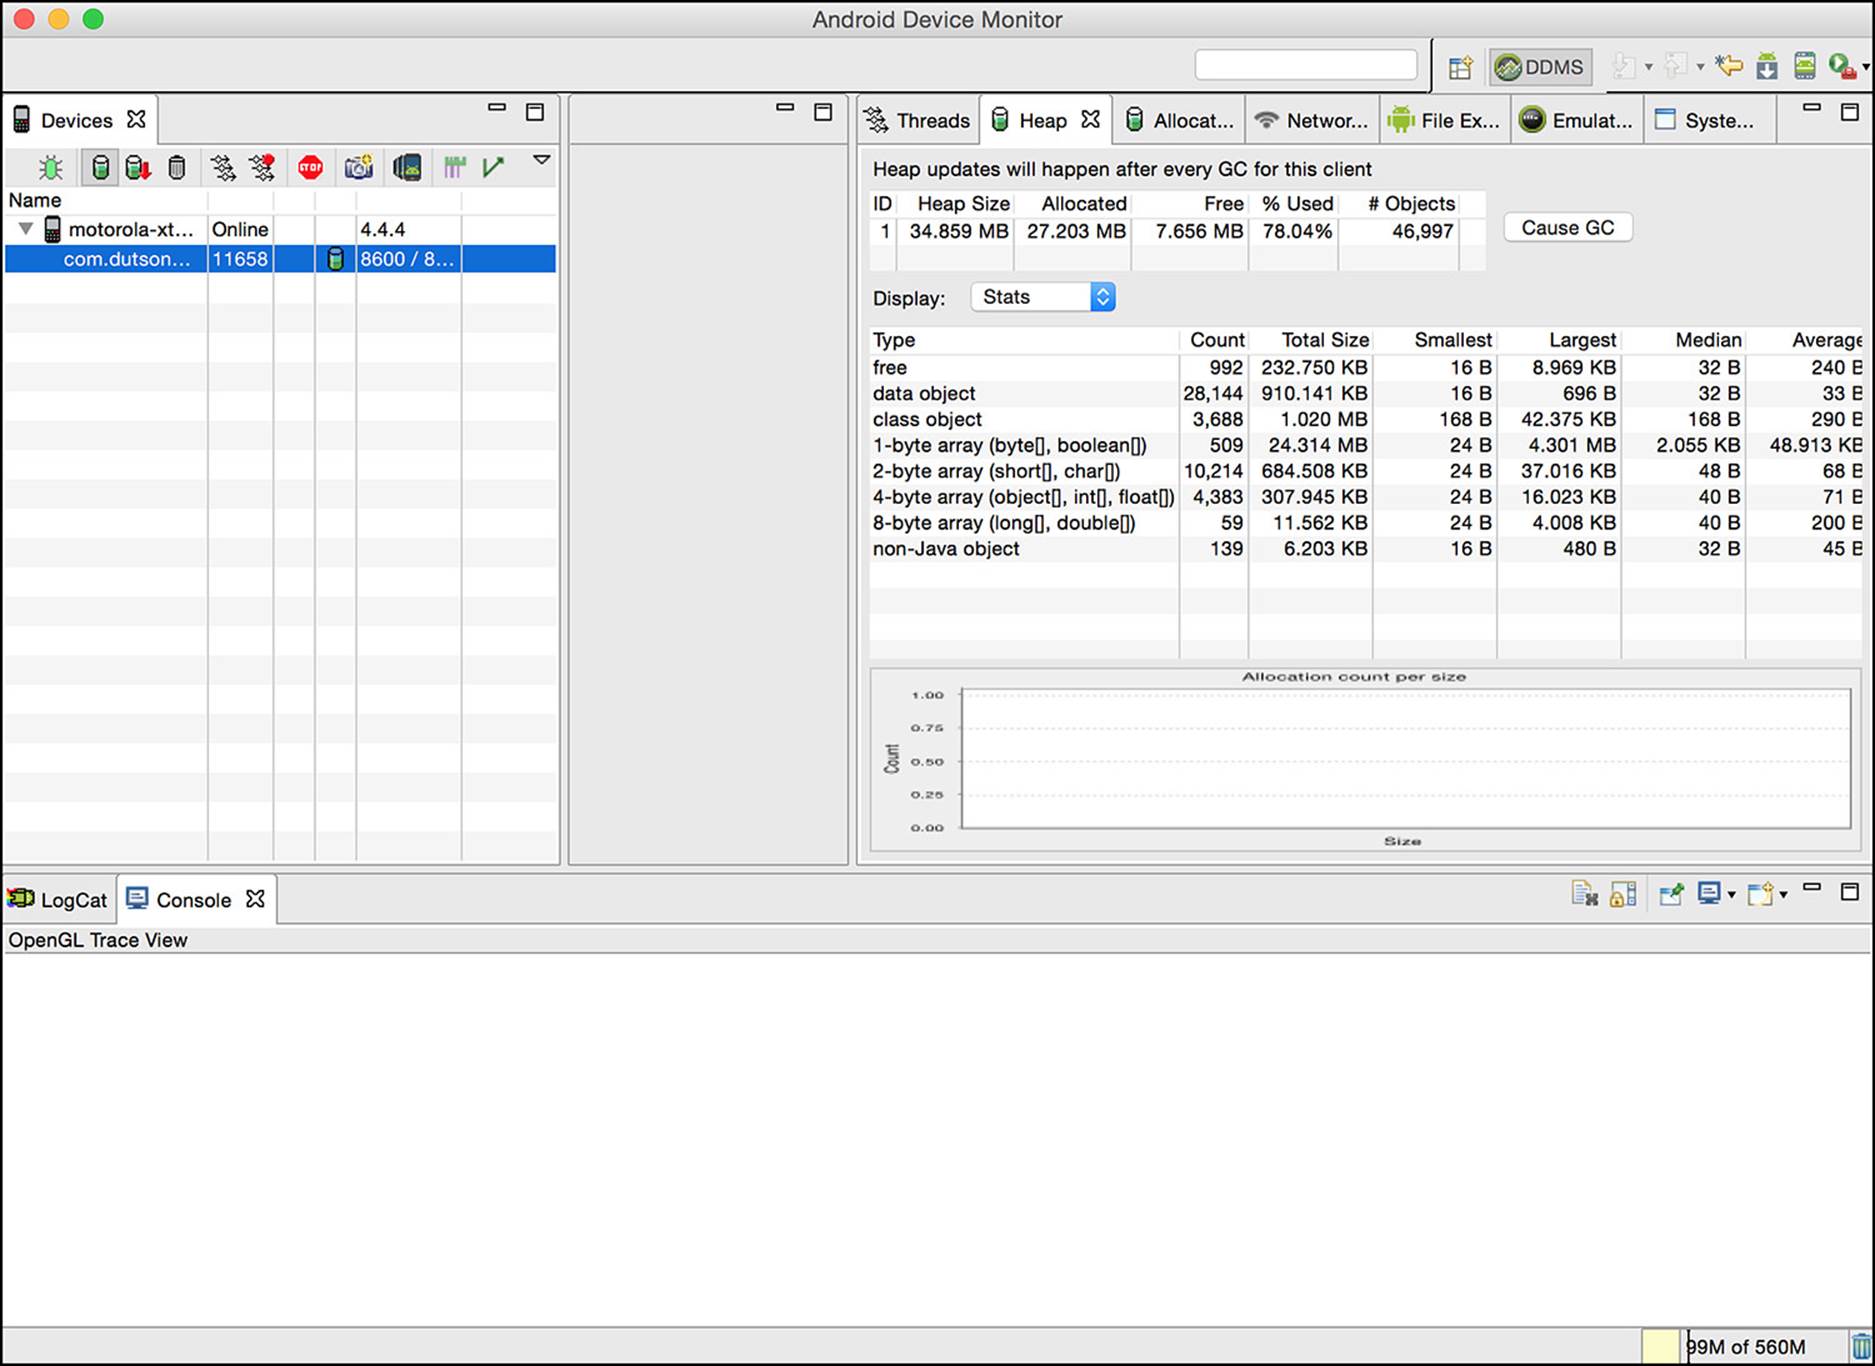
Figure 2.4 Many areas of the Android Device Monitor can be resized, which allows you to view information easier.
By capturing a heap dump, I was able to see that my application was allocated a heap size of just under 35MB and that I was using 27MB of it, leaving 7% free. As Figure 2.4 shows, all the objects created by my application are listed and how much memory they take. This allows me to quickly see what is using the most memory, and can give me a clue into what I should be looking at to trim back any objects that may be inefficiently created.
It should be noted that depending on your application, the version of Android you are targeting, and the device you are using, you will see different results. This is one of the reasons why it is best to test your applications on as many physical devices as possible so that you can see real results.
Another helpful stat is at the bottom of the Android Device Monitor window. It shows me the amount of memory available on my device and where the current usage is. This can be helpful in establishing a baseline of memory available on a device, and can be right-clicked to toggle options for showing the max heap level.
Another portion of the Android Device Monitor that you may find helpful while profiling is the System Information tab. This window shows you the current CPU load, memory usage, and frame render time of your device. Keep in mind that when polling the CPU and memory, it will poll your entire device, not just a particular package.
Now that you know how to get some basic profiling information, it is time to learn how to add tracing to your code to help you analyze and optimize your code.
Tracing
For tracing what your code is doing, you can use a system-wide tracing utility called Systrace that polls your device for running applications, memory usage, and more. When Systrace completes, it generates an HTML report that can be viewed in a web browser. To launch Systrace, open the Android Device Monitor and click the icon that looks like green and red bars. Figure 2.5 shows the icon highlighted in the Android Device Monitor as well as the option window that appears when it is clicked.
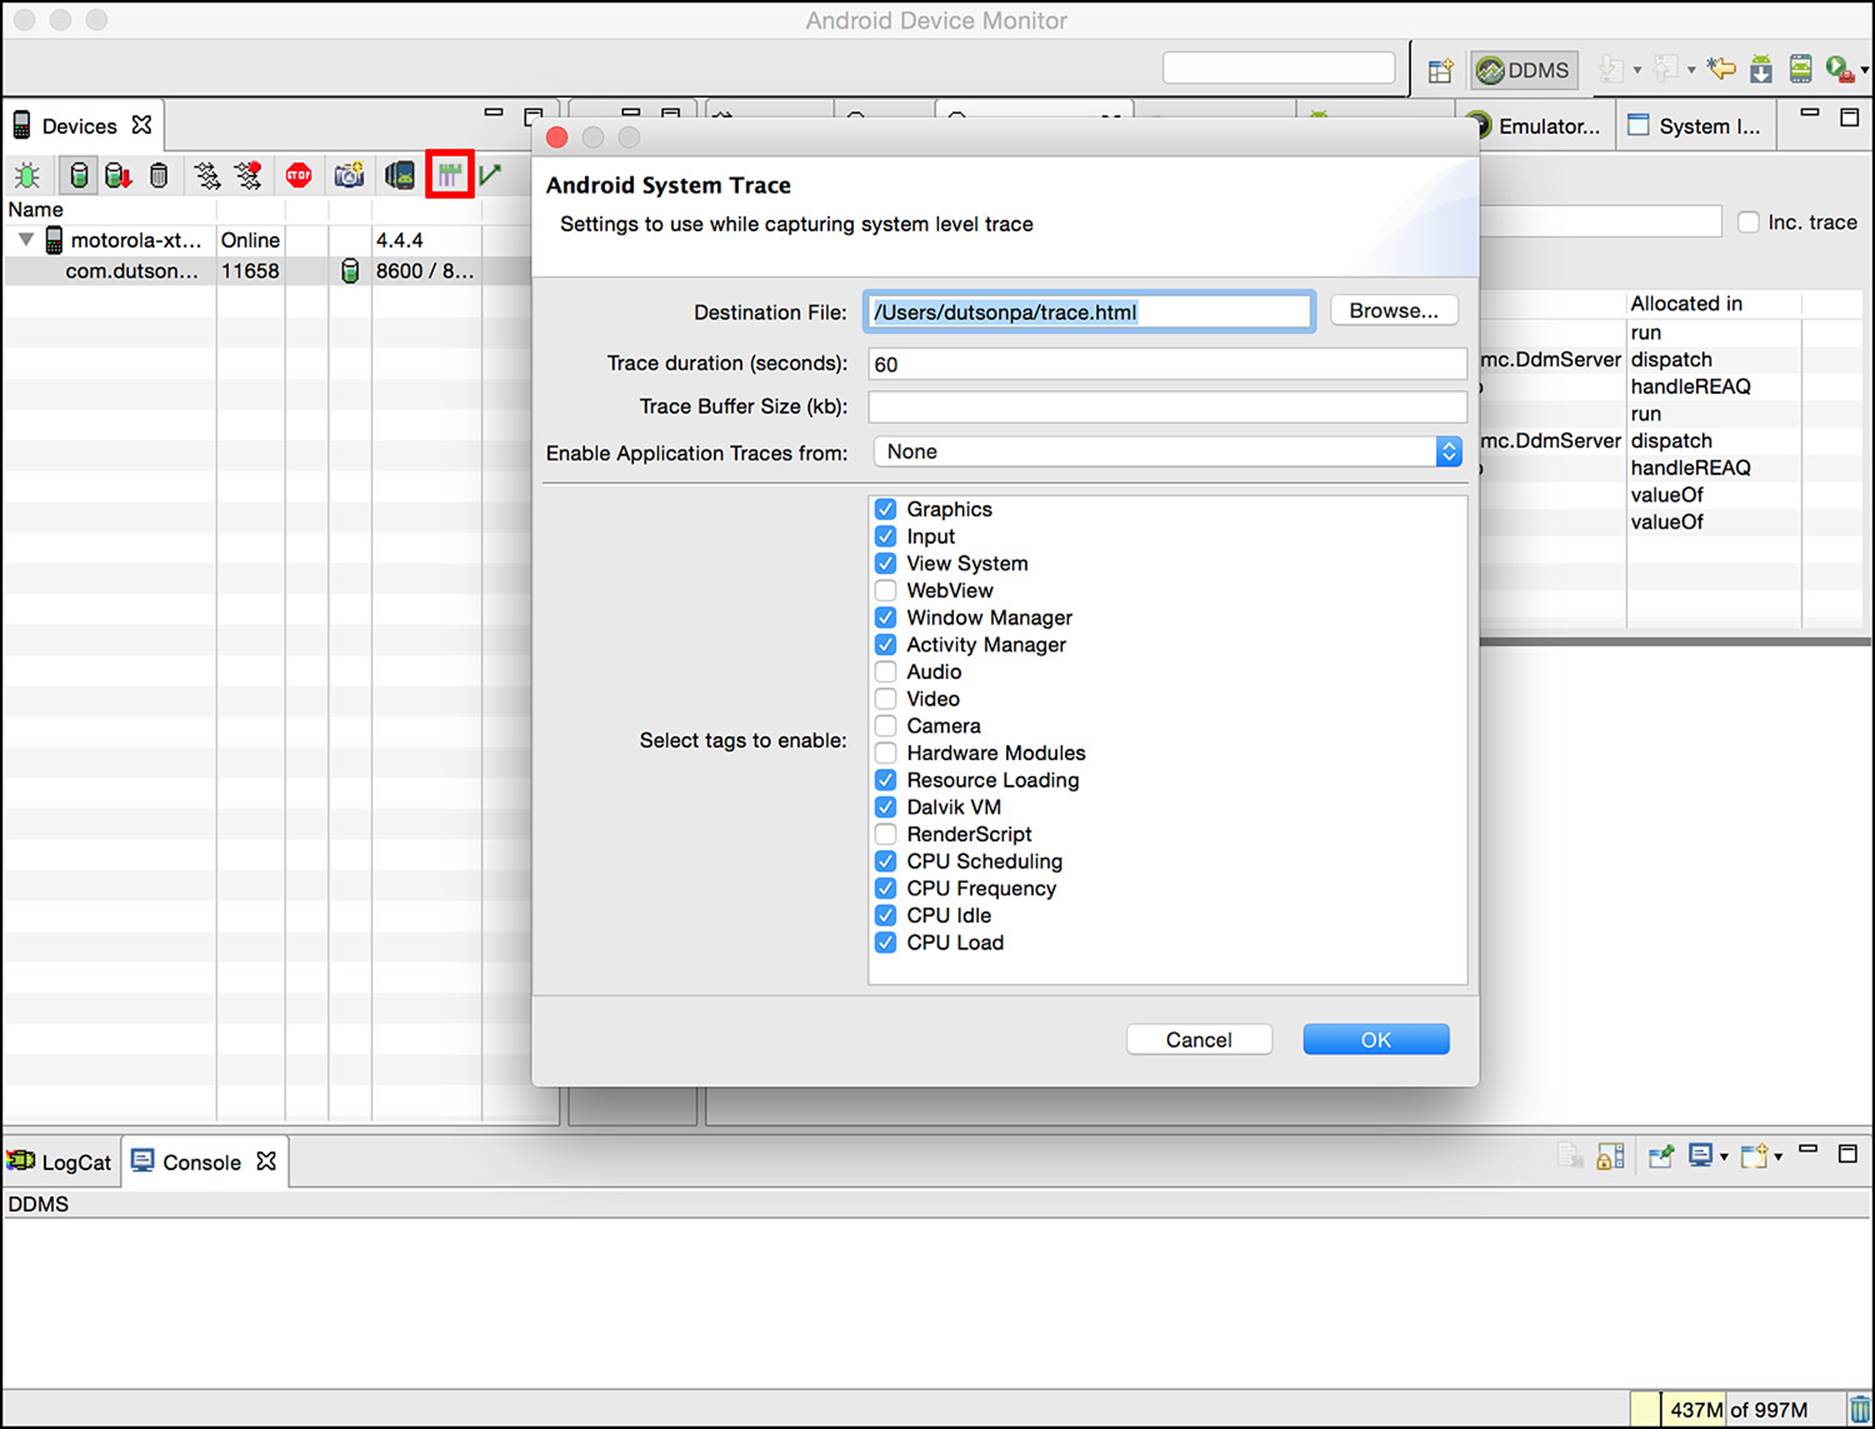
Figure 2.5 When the Systrace icon is clicked, a window appears, allowing you to set your desired tracing options.
The window that appears allows you to choose the following options:
![]() Where to save the report
Where to save the report
![]() How long to run the trace
How long to run the trace
![]() Size limit of the trace (in KB)
Size limit of the trace (in KB)
![]() What application to trace (select “None” for all applications)
What application to trace (select “None” for all applications)
![]() Specific tags to collect data on
Specific tags to collect data on
The Systrace tool is powerful, and reviewing the report it generates will give you a great insight into what your application and device are doing. If you generate a report and find it difficult to read, try turning on only the specific tags you need data for.
Another method of debugging your code involves putting messages into a debug output when the application is running.
Messaging
It seems that every language has a way to print values to the console or into a debug log that can be viewed as a program runs. For web developers, this used to mean using the alert() method, and recently the console.log() method. For Java developers, this was occasionally the System.out.println() method when not using a system of breakpoints and stepping through with a debugger.
In Android, you have access to the Log class, which in turn allows you to leave yourself messages that can be viewed by LogCat. To use LogCat from the command line, you should first connect a device or emulator and have it visible to adb. You can then type adb logcat, and information should start flowing into your console window. You can also pass some options to the command-line call to control the output. Table 2.2 lists the options and what they do.
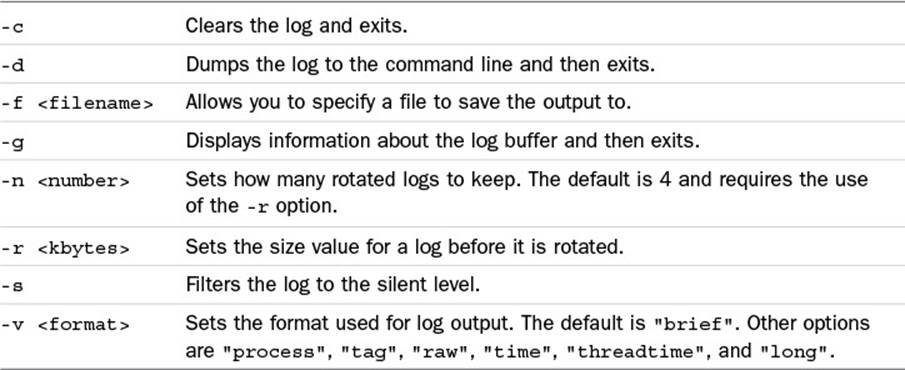
Table 2.2 The adb logcat Options
LogCat is also integrated into Android Studio as part of the Dalvik Debug Monitor Server (DDMS). It is visible through the Android tool window. If that window is not currently visible inside of Android Studio, you can open it by clicking View, then Tool Windows, and then Android.
The LogCat window consists of an output area, a log level select box, a search input, and a filter select box. Figure 2.6 shows an image of these areas.
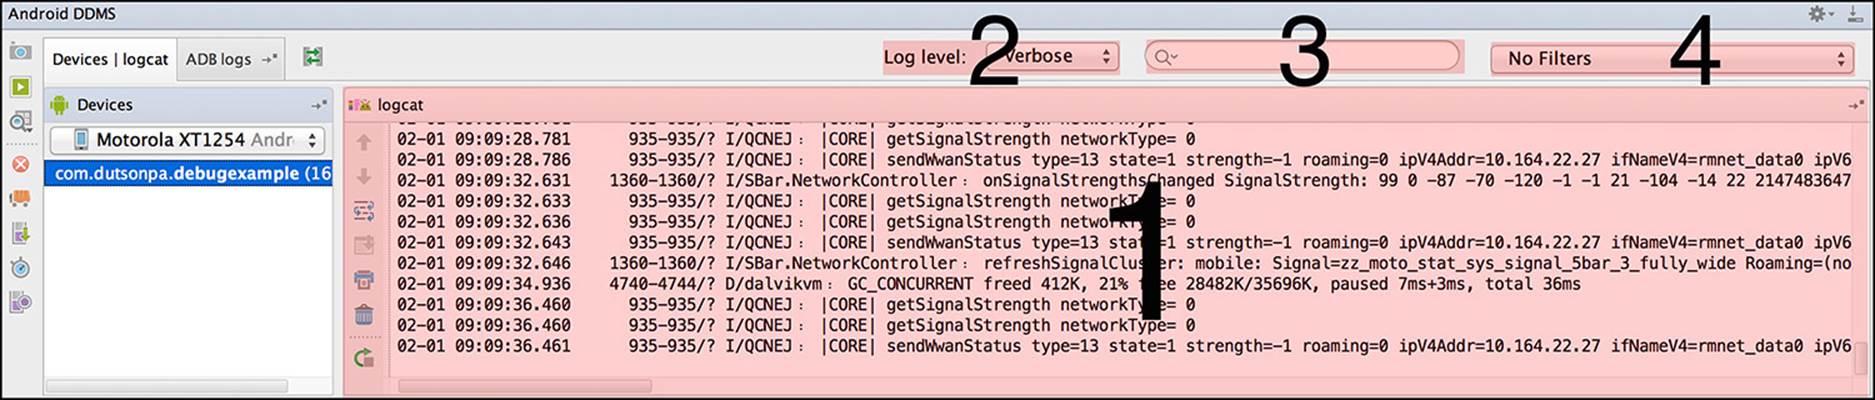
Figure 2.6 The output area (1) shows the log; the log level selector (2) allows fine tuning of the log shown; the search area (3) allows you to filter based on a query; the Filters selector (4) allows you to switch between viewing the global, custom, and application-specific logs.
Because LogCat shows the system log, it can display lots of system information. This is good because it allows you to see what is going on your device, but it can also make it difficult to find a specific log message. This is what the search, filter, and log-level options are for.
By typing a query into the search field, you can filter by package or application name and only messages that refer to that search query will be shown. By adjusting the log level, you can restrict what is shown to only messages that are logged at that particular level. By using a filter, you can view messages that are generated by the system, your application, or by a custom filter that you can create.
You can mix and match these options to help you narrow down and find the messages you want quickly and efficiently. As mentioned before, you can use log levels to view only some messages. These can be set in your application by using the Log class.
To set log levels in your application, you need to import the Log class. This is done by including import android.util.Log; in the import section of your class file. You can then start logging messages in your code by using the following:
Log.v("MainActivity", "This is a verbose log message.");
Note that two arguments are passed to the Log.v() method. The first is a string that you should set to the class you are currently in. This will help you identify where this particular message was triggered from. If you do not wish to pass a string in this manner, you can declare a variable in your class and use the variable instead. Doing so would look like the following:
private static final String TAG = "MainActivity";
Log.v(TAG, "This is a verbose log message.");
There are several levels of logging. Table 2.3 shows the levels available that you can use in your code.
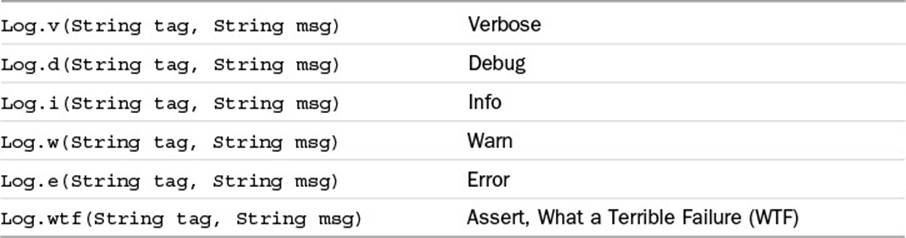
Table 2.3 Available Methods for Logging
Each of these levels is called in the same manner, with the differences being on when each message appears when filtered in the logs. As an example, I have an application that has buttons tied to trigger a log message when clicked. When I am filtering my LogCat console with the Verbose level, the following is displayed:
02-01 09:42:01.168 16414-16414/com.dutsonpa.debugexample V/MainActivity :
Verbose button has been clicked.
02-01 09:42:01.856 16414-16414/com.dutsonpa.debugexample D/MainActivity :
Debug button has been clicked.
02-01 09:42:02.665 16414-16414/com.dutsonpa.debugexample I/MainActivity :
Info button has been clicked.
02-01 09:42:03.471 16414-16414/com.dutsonpa.debugexample W/MainActivity :
Warning button has been clicked.
02-01 09:42:04.277 16414-16414/com.dutsonpa.debugexample E/MainActivity :
Error button has been clicked.
02-01 09:42:05.151 16414-16414/com.dutsonpa.debugexample A/MainActivity :
WTF button has been clicked.
The messages generated by the log contain a timestamp, the application that the message was generated from, the level of log used (V, D, I, W, E, or A), with the tag that was used, and then the message that was passed to be shown.
Note that when using LogCat inside of DDMS, if I change my level to Warn, the LogCat console only displays the following:
02-01 09:42:03.471 16414-16414/com.dutsonpa.debugexample W/MainActivity :
Warning button has been clicked.
02-01 09:42:04.277 16414-16414/com.dutsonpa.debugexample E/MainActivity :
Error button has been clicked.
02-01 09:42:05.151 16414-16414/com.dutsonpa.debugexample A/MainActivity :
WTF button has been clicked.
This is because of the order of severity of these messages. Verbose will show all Verbose and above log messages. Because Verbose is the bottom level of severity, all log messages will be shown. When I changed the log level to Warn, only the Warn, Error, and WTF log messages were shown.
Note
The WTF tag is reserved for errors or sections of code that should never fail. It is also listed as being an Assert, which is the highest level of logging. Code logged at the Assert level will always be visible in LogCat because it has been signified as being of extreme or dire importance.
Logging files does not replace the benefits or merits of profiling, tracing, or even using breakpoints. It does, however, give you, the developer, a way to see values and variables as they change in real time without pausing threads and rummaging through a stack.
Note that although they are very helpful while developing your app, they are not something you will want to leave in the final build of your application. Leaving them in will cause more memory usage, overhead, and potentially more file space to be used if any external logging libraries are packed into your APK.
Summary
In this chapter, you learned about various methods and ways you can test and debug your Android applications. You learned writing tests for your applications is important, and that when collaborating with others, tests help you confirm that your code does what you believe it will.
You learned about the importance of automated testing tools to help you identify, control, fix problems with rapid user input and layout problems. You also know that you have tools that are built into the Android SDK that you can use from the command line to help you achieve testing success.
You learned how to monitor your Android device or emulator for memory and CPU usage, and how to create reports to understand what is using your system resources so that you can optimize your code. You also learned that not every manufacturer ships the same Android experience, which gives you the opportunity to either extend new functionality or to be aware that it is there when you are writing your own application.
Lastly, you learned about the logging process and how you can log messages to the console and view them either with the command-line logcat tool or by using the Android tool window in Android Studio and adjusting the LogCat output filters.
All materials on the site are licensed Creative Commons Attribution-Sharealike 3.0 Unported CC BY-SA 3.0 & GNU Free Documentation License (GFDL)
If you are the copyright holder of any material contained on our site and intend to remove it, please contact our site administrator for approval.
© 2016-2025 All site design rights belong to S.Y.A.