Android Programming: The Big Nerd Ranch Guide (2015)
Chapter 11. Using ViewPager
In this chapter, you will create a new activity to host CrimeFragment. This activity’s layout will consist of an instance of ViewPager. Adding a ViewPager to your UI lets users navigate between list items by swiping across the screen to “page” forward or backward through the crimes (Figure 11.1).
Figure 11.1 Swiping to page through crimes
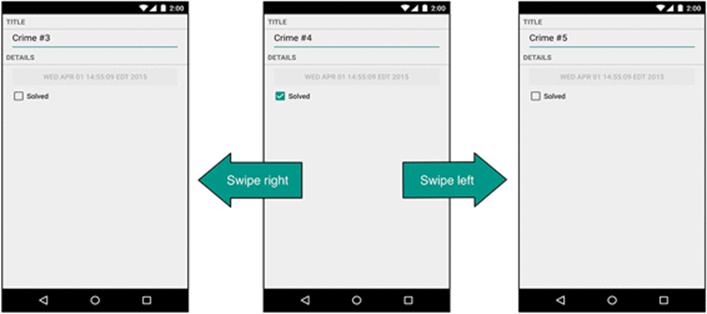
Figure 11.2 shows an updated diagram for CriminalIntent. The new activity will be named CrimePagerActivity and will take the place of CrimeActivity. Its layout will consist of a ViewPager.
Figure 11.2 Object diagram for CrimePagerActivity
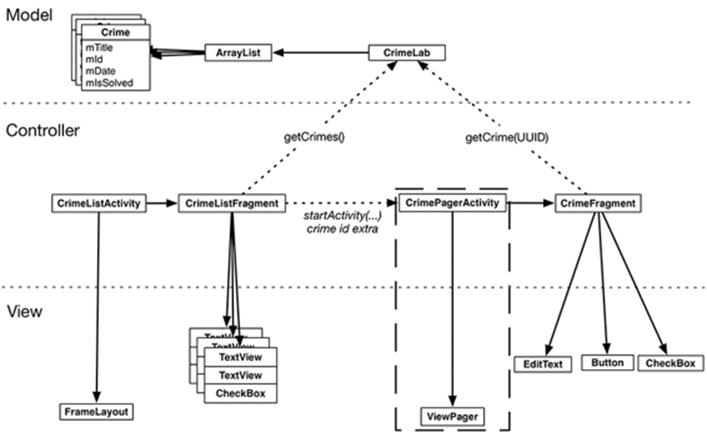
The only new objects you need to create are within the dashed rectangle in the diagram above. Nothing else in CriminalIntent needs to change to implement paging between detail views. In particular, you will not have to touch the CrimeFragment class thanks to the work you did in Chapter 10to ensure CrimeFragment’s independence.
Here are the tasks ahead in this chapter:
· create the CrimePagerActivity class
· define a view hierarchy that consists of a ViewPager
· wire up the ViewPager and its adapter in CrimePagerActivity
· modify CrimeHolder.onClick(…) to start CrimePagerActivity instead of CrimeActivity
Creating CrimePagerActivity
CrimePagerActivity will be a subclass of FragmentActivity. It will create and manage the ViewPager.
Create a new class named CrimePagerActivity. Make its superclass FragmentActivity and set up the view for the activity.
Listing 11.1 Set up ViewPager (CrimePagerActivity.java)
public class CrimePagerActivity extends FragmentActivity {
@Override
protected void onCreate(Bundle savedInstanceState) {
super.onCreate(savedInstanceState);
setContentView(R.layout.activity_crime_pager);
}
}
The layout file does not yet exist. Create a new layout file in res/layout/ and name it activity_crime_pager. Make its root view a ViewPager and give it the attributes shown in Figure 11.3. Notice that you must use ViewPager's full package name (android.support.v4.view.ViewPager).
Figure 11.3 CrimePagerActivity’s ViewPager (activity_crime_pager.xml)

You use ViewPager's full package name when adding it to the layout file because the ViewPager class is from the support library. Unlike Fragment, ViewPager is only available in the support library; there is not a “standard” ViewPager class in a later SDK.
ViewPager and PagerAdapter
A ViewPager is like a RecyclerView in some ways. A RecyclerView requires an Adapter to provide views. A ViewPager requires a PagerAdapter.
However, the conversation between ViewPager and PagerAdapter is much more involved than the conversation between RecyclerView and Adapter. Luckily, you can use FragmentStatePagerAdapter, a subclass of PagerAdapter, to take care of many of the details.
FragmentStatePagerAdapter will boil down the conversation to two simple methods: getCount() and getItem(int). When your getItem(int) method is called for a position in your array of crimes, it will return a CrimeFragment configured to display the crime at that position.
In CrimePagerActivity, set the ViewPager’s pager adapter and implement its getCount() and getItem(int) methods.
Listing 11.2 Setting up pager adapter (CrimePagerActivity.java)
public class CrimePagerActivity extends FragmentActivity {
private ViewPager mViewPager;
private List<Crime> mCrimes;
@Override
protected void onCreate(Bundle savedInstanceState) {
super.onCreate(savedInstanceState);
setContentView(R.layout.activity_crime_pager);
mViewPager = (ViewPager) findViewById(R.id.activity_crime_pager_view_pager);
mCrimes = CrimeLab.get(this).getCrimes();
FragmentManager fragmentManager = getSupportFragmentManager();
mViewPager.setAdapter(new FragmentStatePagerAdapter(fragmentManager) {
@Override
public Fragment getItem(int position) {
Crime crime = mCrimes.get(position);
return CrimeFragment.newInstance(crime.getId());
}
@Override
public int getCount() {
return mCrimes.size();
}
});
}
}
Let’s go through this code. After finding the ViewPager in the activity’s view, you get your data set from CrimeLab – the List of crimes. Next, you get the activity’s instance of FragmentManager.
Then you set the adapter to be an unnamed instance of FragmentStatePagerAdapter. Creating the FragmentStatePagerAdapter requires the FragmentManager. Remember that FragmentStatePagerAdapter is your agent managing the conversation with ViewPager. For your agent to do its job with the fragments that getItem(int) returns, it needs to be able to add them to your activity. That is why it needs your FragmentManager.
(What exactly is your agent doing? The short story is that it is adding the fragments you return to your activity and helping ViewPager identify the fragments’ views so that they can be placed correctly. More details are in the For the More Curious section at the end of the chapter.)
The pager adapter’s two methods are straightforward. The getCount() method returns the number of items in the array list. The getItem(int) method is where the magic happens. It fetches the Crime instance for the given position in the dataset. It then uses that Crime’s ID to create and return a properly configured CrimeFragment.
Integrating CrimePagerActivity
Now you can begin the process of decommissioning CrimeActivity and putting CrimePagerActivity in its place.
First add a newIntent method to CrimePagerActivity along with an extra for the crime ID.
Listing 11.3 Creating newIntent (CrimePagerActivity.java)
public class CrimePagerActivity extends FragmentActivity {
private static final String EXTRA_CRIME_ID =
"com.bignerdranch.android.criminalintent.crime_id";
private ViewPager mViewPager;
private List<Crime> mCrimes;
public static Intent newIntent(Context packageContext, UUID crimeId) {
Intent intent = new Intent(packageContext, CrimePagerActivity.class);
intent.putExtra(EXTRA_CRIME_ID, crimeId);
return intent;
}
@Override
protected void onCreate(Bundle savedInstanceState) {
super.onCreate(savedInstanceState);
setContentView(R.layout.activity_crime_pager);
UUID crimeId = (UUID) getIntent()
.getSerializableExtra(EXTRA_CRIME_ID);
...
}
}
Now, you want pressing a list item in CrimeListFragment to start an instance of CrimePagerActivity instead of CrimeActivity.
Return to CrimeListFragment.java and modify CrimeHolder.onClick(…) to start a CrimePagerActivity.
Listing 11.4 Firing it up (CrimeListFragment.java)
private class CrimeHolder extends RecyclerView.ViewHolder
implements View.OnClickListener {
...
@Override
public void onClick(View v) {
Intent intent = CrimeActivity.newIntent(getActivity(), mCrime.getId());
Intent intent = CrimePagerActivity.newIntent(getActivity(), mCrime.getId());
startActivity(intent);
}
}
You also need to add CrimePagerActivity to the manifest so that the OS can start it. While you are in the manifest, remove CrimeActivity’s declaration. To accomplish this, you can just rename the CrimeActivity to CrimePagerActivity in the manifest.
Listing 11.5 Adding CrimePagerActivity to manifest (AndroidManifest.xml)
<?xml version="1.0" encoding="utf-8"?>
<manifest ...>
...
<application ...>
...
<activity
android:name=".CrimeActivity"
android:name=".CrimePagerActivity"
android:label="@string/app_name" >
</activity>
...
</application>
</manifest>
Finally, to keep your project tidy, delete CrimeActivity.java from the project tool window.
Run CriminalIntent. Press Crime #0 to view its details. Then swipe left and right to browse more crimes. Notice that the paging is smooth and there is no delay in loading. By default, ViewPager loads the item currently on screen plus one neighboring page in each direction so that the response to a swipe is immediate. You can tweak how many neighboring pages are loaded by calling setOffscreenPageLimit(int).
But all is not yet perfect with your ViewPager. Press Back to return to the list of crimes and press a different item. You will see the first crime displayed again instead of the crime that you asked for.
By default, the ViewPager shows the first item in its PagerAdapter. You can have it show the crime that was selected by setting the ViewPager’s current item to the index of the selected crime.
At the end of CrimePagerActivity.onCreate(…), find the index of the crime to display by looping through and checking each crime’s ID. When you find the Crime instance whose mId matches the crimeId in the intent extra, set the current item to the index of that Crime.
Listing 11.6 Setting initial pager item (CrimePagerActivity.java)
public class CrimePagerActivity extends FragmentActivity {
@Override
public void onCreate(Bundle savedInstanceState) {
...
FragmentManager fragmentManager = getSupportFragmentManager();
mViewPager.setAdapter(new FragmentStatePagerAdapter(fragmentManager) {
...
});
for (int i = 0; i < mCrimes.size(); i++) {
if (mCrimes.get(i).getId().equals(crimeId)) {
mViewPager.setCurrentItem(i);
break;
}
}
}
}
Run CriminalIntent. Selecting any list item should display the details of the correct Crime. And that is it. Your ViewPager is now fully armed and operational.
FragmentStatePagerAdapter vs. FragmentPagerAdapter
There is another PagerAdapter type that you can use called FragmentPagerAdapter. FragmentPagerAdapter is used exactly like FragmentStatePagerAdapter. It only differs in how it unloads your fragments when they are no longer needed (Figure 11.4).
Figure 11.4 FragmentStatePagerAdapter’s fragment management
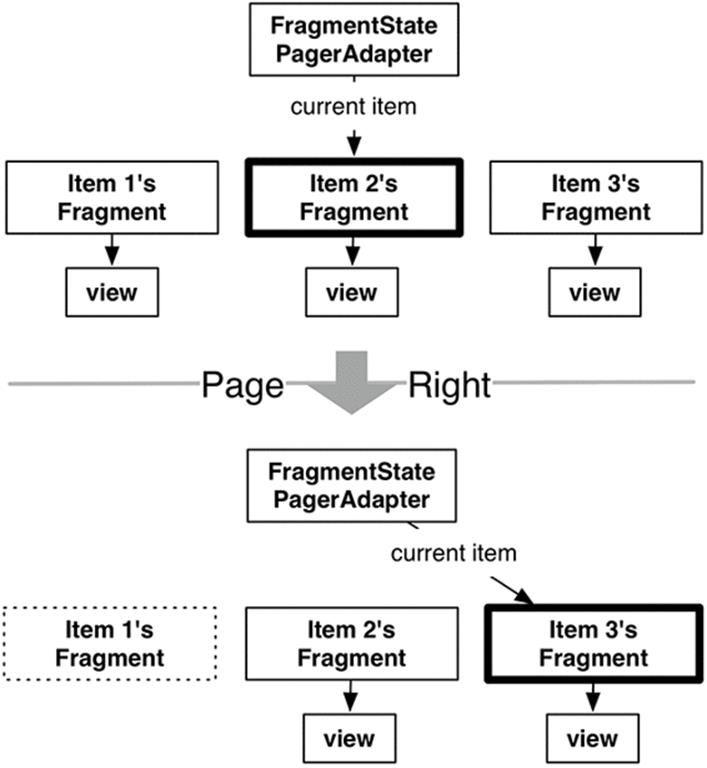
With FragmentStatePagerAdapter, your unneeded fragment is destroyed. A transaction is committed to completely remove the fragment from your activity’s FragmentManager. The “state” in FragmentStatePagerAdapter comes from the fact that it will save out your fragment’s Bundle fromonSaveInstanceState(Bundle) when it is destroyed. When the user navigates back, the new fragment will be restored using that instance state.
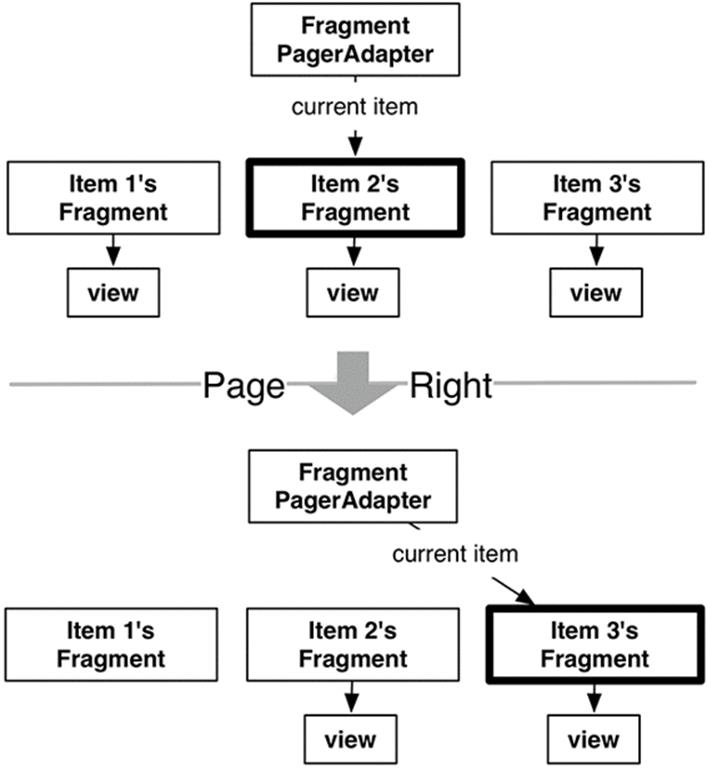
FragmentPagerAdapter handles things differently. When your fragment is no longer needed, FragmentPagerAdapter calls detach(Fragment) on the transaction, instead of remove(Fragment). This destroys the fragment’s view, but leaves the fragment instance alive in the FragmentManager. So the fragments created by FragmentPagerAdapter are never destroyed (Figure 11.5).
Figure 11.5 FragmentPagerAdapter’s fragment management
Which kind of adapter you want to use depends on your application. In general, FragmentStatePagerAdapter is more frugal with memory. CriminalIntent is displaying what could be a long list of crimes, each of which will eventually include a photo. You do not want to keep all that information in memory, so you use FragmentStatePagerAdapter.
On the other hand, if your interface has a small, fixed number of fragments, FragmentPagerAdapter is safe and appropriate. The most common example of this scenario is a tabbed interface. Some detail views have enough details to require two screens, so the details are split across multiple tabs. Adding a swipeable ViewPager to this interface makes the app tactile. Keeping these fragments in memory can make your controller code easier to manage, and because this style of interface usually has only two or three fragments per activity there is little danger of running low on memory.
For the More Curious: How ViewPager Really Works
The ViewPager and PagerAdapter classes handle many things for you behind the scenes. This section will supply more details about what is going on back there.
A caveat before we get into this discussion: you do not need to understand the nitty-gritty details in most cases.
But if you need to implement the PagerAdapter interface yourself, you will need to know how the ViewPager-PagerAdapter relationship differs from an ordinary RecyclerView-Adapter relationship.
When would you need to implement the PagerAdapter interface yourself? When you want ViewPager to host something other than Fragments. If you want to host normal View objects in a ViewPager, like a few images, you implement the raw PagerAdapter interface.
So why is ViewPager not a RecyclerView?
Using a RecyclerView in this case would be a lot of work because you could not use your existing Fragment. An Adapter expects you to provide a View instantly. However, your FragmentManager determines when your fragment’s view is created, not you. So when RecyclerView comes knocking at your Adapter’s door for your fragment’s view, you will not be able to create the fragment and provide its view immediately.
This is the reason ViewPager exists. Instead of an Adapter, it uses a class called PagerAdapter. PagerAdapter is more complicated than Adapter because it does more of the work of managing views than Adapter does. Here are the basics.
Instead of an onBindViewHolder(…) method that returns a view holder and its corresponding view, PagerAdapter has the following methods:
public Object instantiateItem(ViewGroup container, int position)
public void destroyItem(ViewGroup container, int position, Object object)
public abstract boolean isViewFromObject(View view, Object object)
PagerAdapter.instantiateItem(ViewGroup, int) tells the pager adapter to create an item view for a given position and add it to a container ViewGroup, and destroyItem(ViewGroup, int, Object) tells it to destroy that item. Note that instantiateItem(ViewGroup, int) does not say to create the viewright now. The PagerAdapter could create the view at any time after that.
Once the view has been created, ViewPager will notice it at some point. To figure out which item’s view it is, it calls isViewFromObject(View, Object). The Object parameter is an object received from a call to instantiateItem(ViewGroup, int). So if ViewPager calls instantiateItem(ViewGroup, 5) and receives object A, isViewFromObject(View, A) should return true if the View passed in is for item 5, and false otherwise.
This is a complicated process for the ViewPager, but it is less complicated for the PagerAdapter, which only needs to be able to create views, destroy views, and identify which object a view comes from. This loose requirement gives a PagerAdapter implementation enough wiggle room to create and add a new fragment inside instantiateItem(ViewGroup, int) and return the fragment as the Object to keep track of. Then isViewFromObject(View, Object) looks like this:
@Override
public boolean isViewFromObject(View view, Object object) {
return ((Fragment)object).getView() == view;
}
Implementing all those PagerAdapter overrides would be a pain to do every time you needed to use ViewPager. Thank goodness for FragmentPagerAdapter and FragmentStatePagerAdapter.
For the More Curious: Laying Out Views in Code
Throughout the book, you have been creating your views in layout files. It is also possible to create your views in code.
In fact, you could have defined your ViewPager in code without a layout file at all.
@Override
protected void onCreate(Bundle savedInstanceState) {
super.onCreate(savedInstanceState);
ViewPager viewPager = new ViewPager(this);
setContentView(viewPager);
...
}
No magic is necessary to create a view: just call its constructor, passing in a Context as the parameter. You can programmatically create an entire view hierarchy instead of using layout files.
However, creating views in code should be avoided, because layout files provide a few benefits.
One benefit of layout files is that they help to provide a clear separation between your controller and view objects in your app. The view exists in XML and the controller exists in Java code. This separation makes your code easier to maintain by limiting the amount of changes in your controller when you change your view and vice versa.
Another benefit to views defined in XML is that you can use Android’s resource qualification system to automatically choose the appropriate version of that XML file based on the properties of the device.
As you saw in Chapter 3, this system makes it easy to change your layout file depending on the orientation of the device (as well as other configurations).
So what are the downsides to using layout files? Well, you do have to go to the trouble of creating an XML file and inflating it. If you are creating a single view, sometimes you may not want to go to the trouble.
Otherwise, though, there are no downsides worth speaking of – the Android team has never recommended constructing view hierarchies programmatically, even back in the old days when developers had to be even more conscious of performance than they are now. Even if you need something as small as an ID on your view (which is often necessary, even with a programmatically created view), it is simpler to have a layout file.
All materials on the site are licensed Creative Commons Attribution-Sharealike 3.0 Unported CC BY-SA 3.0 & GNU Free Documentation License (GFDL)
If you are the copyright holder of any material contained on our site and intend to remove it, please contact our site administrator for approval.
© 2016-2026 All site design rights belong to S.Y.A.