Android Programming: The Big Nerd Ranch Guide (2015)
Chapter 17. Two-Pane Master-Detail Interfaces
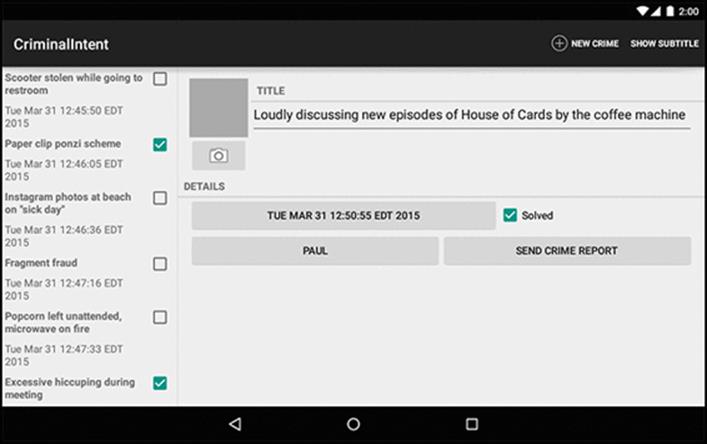
In this chapter, you will create a tablet interface for CriminalIntent that allows users to see and interact with the list of crimes and the details of an individual crime at the same time. Figure 17.1 shows this list-detail interface, which is also commonly referred to as a master-detail interface.
Figure 17.1 Master and detail sharing the spotlight
You will need a tablet device or AVD for testing in this chapter. To create a tablet AVD, select Tools → Android → Android Virtual Device Manager. Click Create Virtual Device... and select the Tablet category on the left. Select your favorite hardware profile, click Next, and choose an API level of at least 21 (Figure 17.2).
Figure 17.2 Device selections for a tablet AVD

Adding Layout Flexibility
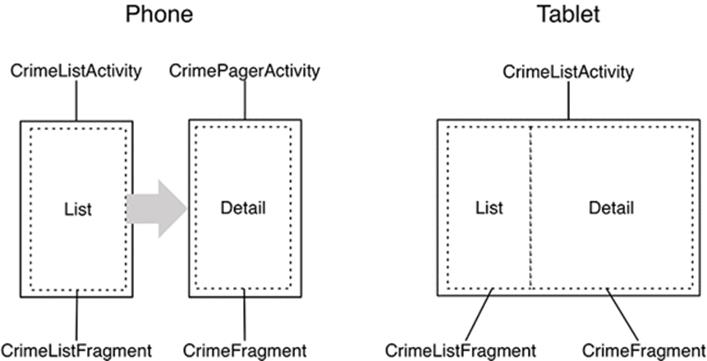
On a phone, you want CrimeListActivity to inflate a single-pane layout, as it currently does. On a tablet, you want it to inflate a two-pane layout that is capable of displaying the master and detail views at the same time.
In the two-pane layout, CrimeListActivity will host both a CrimeListFragment and a CrimeFragment, as shown in Figure 17.3.
Figure 17.3 Different types of layouts
To make this happen, you are going to:
· modify SingleFragmentActivity so that the layout that gets inflated is not hardcoded
· create a new layout that consists of two fragment containers
· modify CrimeListActivity so that it will inflate a single-container layout on phones and a two-container layout on tablets
Modifying SingleFragmentActivity
CrimeListActivity is a subclass of SingleFragmentActivity. Currently, SingleFragmentActivity is set up to always inflate activity_fragment.xml. To make SingleFragmentActivity more flexible, you are going to enable a subclass to provide its own resource ID for the layout instead.
In SingleFragmentActivity.java, add a protected method that returns the ID of the layout that the activity will inflate.
Listing 17.1 Making SingleFragmentActivity flexible (SingleFragmentActivity.java)
public abstract class SingleFragmentActivity extends AppCompatActivity {
protected abstract Fragment createFragment();
@LayoutRes
protected int getLayoutResId() {
return R.layout.activity_fragment;
}
@Override
public void onCreate(Bundle savedInstanceState) {
super.onCreate(savedInstanceState);
setContentView(R.layout.activity_fragment);
setContentView(getLayoutResId());
FragmentManager fm = getSupportFragmentManager();
Fragment fragment = fm.findFragmentById(R.id.fragment_container);
if (fragment == null) {
fragment = createFragment();
fm.beginTransaction()
.add(R.id.fragment_container, fragment)
.commit();
}
}
}
The default implementation of SingleFragmentActivity will work the same as before, but now its subclasses can choose to override getLayoutResId() to return a layout other than activity_fragment.xml. You annotate getLayoutResId() with @LayoutRes to tell Android Studio that any implementation of this method should return a valid layout resource ID.
Creating a layout with two fragment containers
In the Project tool window, right-click res/layout/ and create a new Android XML file. Ensure that the resource type is Layout, name the file activity_twopane.xml, and give it a LinearLayout root element.
Use Figure 17.4 to write the XML for the two-pane layout.
Figure 17.4 A layout with two fragment containers (layout/activity_twopane.xml)
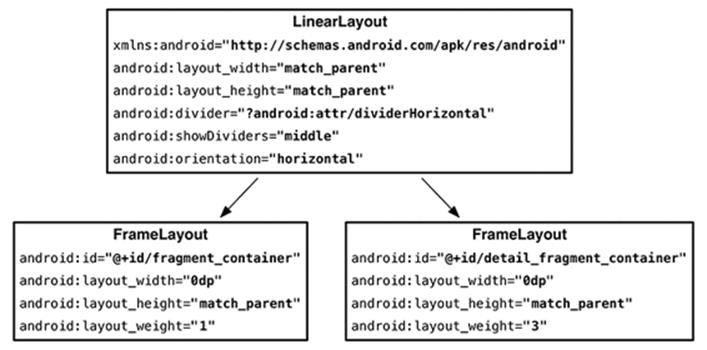
Note that the first FrameLayout has a fragment_container layout ID, so the code in SingleFragmentActivity.onCreate(…) can work as before. When the activity is created, the fragment that is returned in createFragment() will appear in the lefthand pane.
Test this layout in CrimeListActivity by overriding getLayoutResId() to return R.layout.activity_twopane.
Listing 17.2 Changing to two-pane layout file (CrimeListActivity.java)
public class CrimeListActivity extends SingleFragmentActivity {
@Override
protected Fragment createFragment() {
return new CrimeListFragment();
}
@Override
protected int getLayoutResId() {
return R.layout.activity_twopane;
}
}
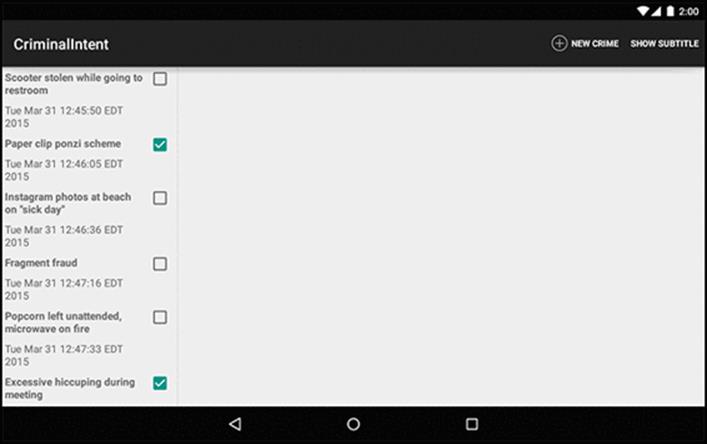
Run CriminalIntent on a tablet device and confirm that you have two panes (Figure 17.5). Note that the larger detail pane is empty and that pressing a list item will not display the crime’s details. You will hook up the detail container later in the chapter.
Figure 17.5 Two-pane layout on a tablet
As currently written, CrimeListActivity will also inflate the two-pane interface when running on a phone. In the next section, you will fix that using an alias resource.
Using an alias resource
An alias resource is a resource that points to another resource. Alias resources live in res/values/ and, by convention, are defined in a refs.xml file.
Your next job will be to have CrimeListActivity show a different layout file depending on whether it is on a tablet or a phone. You do this the same way you show a different layout for landscape and portrait: by using a resource qualifier.
Doing that with files in res/layout works, but has some drawbacks. Each layout file has to contain a complete copy of the layout you want to show. This can result in a lot of redundancy. If you wanted an activity_masterdetail.xml layout file, you would have to copy all ofactivity_fragment.xml into res/layout/activity_masterdetail.xml and all of activity_twopane.xml into res/layout-sw600dp/activity_masterdetail.xml. (You will see what sw600dp does in a moment.)
Instead of doing that, you will use an alias resource. In this section, you will create an alias resource that points to the activity_fragment.xml layout on phones and the activity_twopane.xml layout on tablets.
In the Project tool window, right-click the res/values directory and create a new values resource file. Name the file refs.xml and the directory values. It should have no qualifiers. Click Finish. Then add the item shown in Listing 17.3.
Listing 17.3 Creating a default alias resource value (res/values/refs.xml)
<resources>
<item name="activity_masterdetail" type="layout">@layout/activity_fragment</item>
</resources>
This resource’s value is a reference to the single-pane layout. It also has a resource ID: R.layout.activity_masterdetail. Note that the alias’s type attribute is what determines the inner class of the ID. Even though the alias itself is in res/values/, its ID is in R.layout.
You can now use this resource ID in place of R.layout.activity_fragment. Make that change in CrimeListActivity.
Listing 17.4 Switching layout again (CrimeListActivity.java)
@Override
protected int getLayoutResId() {
return R.layout.activity_twopane;
return R.layout.activity_masterdetail;
}
Run CriminalIntent to confirm that your alias is working properly. CrimeListActivity should inflate the single-pane layout again.
Creating tablet alternatives
Because your alias is in res/values/, it is the default alias. So, by default, CrimeListActivity inflates the single-pane layout.
Now you are going to create an alternative resource so that the activity_masterdetail alias will point to activity_twopane.xml on larger devices.
In the Project tool window, right-click res/values/ and create a new values resource file. Name it refs.xml and name its directory values again. But this time, select Smallest Screen Width under Available qualifiers and click the >> button to move it over to the right (Figure 17.6).
Figure 17.6 Adding a qualifier
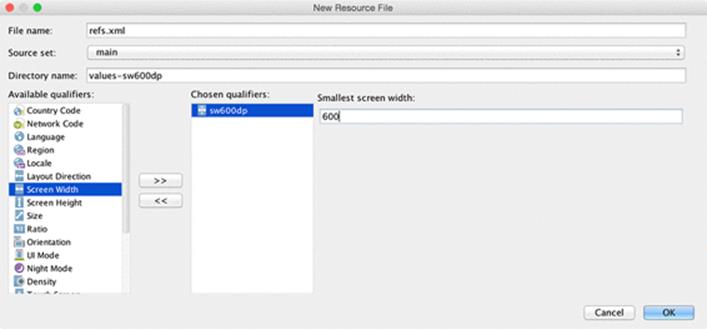
This qualifier is a bit different. It asks you to specify a value for the smallest screen width. Type in 600 here, and click OK. Once it opens your new resource file, add the activity_masterdetail alias to this file, too, pointing at a different layout file.
Listing 17.5 Alternative alias for larger devices (res/values-sw600dp/refs.xml)
<resources>
<item name="activity_masterdetail" type="layout">@layout/activity_twopane</item>
</resources>
Let’s explain what you are doing here. Your goal is to have logic that works like this:
· For devices that are under a specified size, use activity_fragment.xml.
· For devices that are over a specified size, use activity_twopane.xml.
Android does not provide a way to use a resource only when a device is under a particular size, but it does provide the next best thing. The -sw600dp configuration qualifier lets you provide resources only when a device is above a certain size. The sw stands for “smallest width,” but refers to the screen’s smallest dimension, and thus is independent of the device’s current orientation.
With a -sw600dp qualifier, you are saying, “Use this resource on any device whose smallest dimension is 600dp or greater.” This is a good rule of thumb for specifying a tablet-sized screen.
What about the other part, where you want to use activity_fragment.xml on smaller devices? Smaller devices will not match your -sw600dp resource, so the default will be used: activity_fragment.xml.
Run CriminalIntent on a phone and on a tablet. Confirm that the single- and two-pane layouts appear where you expect them.
Activity: Fragment Boss
Now that your layouts are behaving properly, you can turn to adding a CrimeFragment to the detail fragment container when CrimeListActivity is sporting a two-pane layout.
You might think to simply write an alternative implementation of CrimeHolder.onClick(View) for tablets. Instead of starting a new CrimePagerActivity, onClick(View) would get CrimeListActivity’s FragmentManager and commit a fragment transaction that adds a CrimeFragment to the detail fragment container.
The code in your CrimeListFragment.CrimeHolder would look like this:
public void onClick(View v) {
// Stick a new CrimeFragment in the activity's layout
Fragment fragment = CrimeFragment.newInstance(mCrime.getId());
FragmentManager fm = getActivity().getSupportFragmentManager();
fm.beginTransaction()
.add(R.id.detail_fragment_container, fragment)
.commit();
}
This works, but it is not how stylish Android programmers do things. Fragments are intended to be standalone, composable units. If you write a fragment that adds fragments to the activity’s FragmentManager, then that fragment is making assumptions about how the hosting activity works, and your fragment is no longer a standalone, composable unit.
For example, in the code above CrimeListFragment adds a CrimeFragment to CrimeListActivity and assumes that CrimeListActivity has a detail_fragment_container in its layout. This is business that should be handled by CrimeListFragment’s hosting activity instead of CrimeListFragment.
To maintain the independence of your fragments, you will delegate work back to the hosting activity by defining callback interfaces in your fragments. The hosting activities will implement these interfaces to perform fragment-bossing duties and layout-dependent behavior.
Fragment callback interfaces
To delegate functionality back to the hosting activity, a fragment typically defines a callback interface named Callbacks. This interface defines work that the fragment needs done by its boss, the hosting activity. Any activity that will host the fragment must implement this interface.
With a callback interface, a fragment is able to call methods on its hosting activity without having to know anything about which activity is hosting it.
Implementing CrimeListFragment.Callbacks
To implement a Callbacks interface, you first define a member variable that holds an object that implements Callbacks. Then you cast the hosting activity to Callbacks and assign it to that variable.
You assign the activity in the Fragment lifecycle method:
public void onAttach(Activity activity)
This method is called when a fragment is attached to an activity, whether it was retained or not.
Similarly, you will set the variable to null in the corresponding waning lifecycle method:
public void onDetach()
You set the variable to null here because afterward you cannot access the activity or count on the activity continuing to exist.
In CrimeListFragment.java, add a Callbacks interface to CrimeListFragment. Also add an mCallbacks variable and override onAttach(Activity) and onDetach() to set and unset it.
Listing 17.6 Adding callback interface (CrimeListFragment.java)
public class CrimeListFragment extends Fragment {
...
private boolean mSubtitleVisible;
private Callbacks mCallbacks;
/**
* Required interface for hosting activities.
*/
public interface Callbacks {
void onCrimeSelected(Crime crime);
}
@Override
public void onAttach(Activity activity) {
super.onAttach(activity);
mCallbacks = (Callbacks) activity;
}
@Override
public void onCreate(Bundle savedInstanceState) {
super.onCreate(savedInstanceState);
setHasOptionsMenu(true);
}
...
@Override
public void onSaveInstanceState(Bundle outState) {
super.onSaveInstanceState(outState);
outState.putBoolean(SAVED_SUBTITLE_VISIBLE, mSubtitleVisible);
}
@Override
public void onDetach() {
super.onDetach();
mCallbacks = null;
}
Now CrimeListFragment has a way to call methods on its hosting activity. It does not matter which activity is doing the hosting. As long as the activity implements CrimeListFragment.Callbacks, everything in CrimeListFragment can work the same.
Note that CrimeListFragment performs an unchecked cast of its activity to CrimeListFragment.Callbacks. This means that the hosting activity must implement CrimeListFragment.Callbacks. That is not a bad dependency to have, but it is important to document it.
Next, in CrimeListActivity, implement CrimeListFragment.Callbacks. Leave onCrimeSelected(Crime) empty for now.
Listing 17.7 Implementing callbacks (CrimeListActivity.java)
public class CrimeListActivity extends SingleFragmentActivity
implements CrimeListFragment.Callbacks {
@Override
protected Fragment createFragment() {
return new CrimeListFragment();
}
@Override
protected int getLayoutResId() {
return R.layout.activity_masterdetail;
}
@Override
public void onCrimeSelected(Crime crime) {
}
}
Eventually, CrimeListFragment will call this method in CrimeHolder.onClick(…) and also when the user chooses to create a new crime. First, let’s figure out CrimeListActivity.onCrimeSelected(Crime)’s implementation.
When onCrimeSelected(Crime) is called, CrimeListActivity needs to do one of two things:
· if using the phone interface, start a new CrimePagerActivity
· if using the tablet interface, put a CrimeFragment in detail_fragment_container
To determine which interface was inflated, you could check for a certain layout ID. But it is better to check whether the layout has a detail_fragment_container. Checking a layout’s capabilities is a more precise test of what you need. Filenames can change, and you do not really care what file the layout was inflated from; you just need to know whether it has a detail_fragment_container to put your CrimeFragment in.
If the layout does have a detail_fragment_container, then you are going to create a fragment transaction that removes the existing CrimeFragment from detail_fragment_container (if there is one in there) and adds the CrimeFragment that you want to see.
In CrimeListActivity.java, implement onCrimeSelected(Crime) to handle the selection of a crime in either interface.
Listing 17.8 Conditional CrimeFragment startup (CrimeListActivity.java)
@Override
public void onCrimeSelected(Crime crime) {
if (findViewById(R.id.detail_fragment_container) == null) {
Intent intent = CrimePagerActivity.newIntent(this, crime.getId());
startActivity(intent);
} else {
Fragment newDetail = CrimeFragment.newInstance(crime.getId());
getSupportFragmentManager().beginTransaction()
.replace(R.id.detail_fragment_container, newDetail)
.commit();
}
}
Finally, in CrimeListFragment, you are going to call onCrimeSelected(Crime) in the places where you currently start a new CrimePagerActivity.
In CrimeListFragment.java, modify CrimeHolder.onClick(View) and onOptionsItemSelected(MenuItem) to call Callbacks.onCrimeSelected(Crime).
Listing 17.9 Calling all callbacks! (CrimeListFragment.java)
@Override
public boolean onOptionsItemSelected(MenuItem item) {
switch (item.getItemId()) {
case R.id.menu_item_new_crime:
Crime crime = new Crime();
CrimeLab.get(getActivity()).addCrime(crime);
Intent intent = CrimePagerActivity
.newIntent(getActivity(), crime.getId());
startActivity(intent);
updateUI();
mCallbacks.onCrimeSelected(crime);
return true;
case R.id.menu_item_show_subtitle:
mSubtitleVisible = !mSubtitleVisible;
getActivity().invalidateOptionsMenu();
updateSubtitle();
return true;
default:
return super.onOptionsItemSelected(item);
}
}
...
private class CrimeHolder extends RecyclerView.ViewHolder
implements View.OnClickListener {
...
@Override
public void onClick(View v) {
Intent intent = CrimePagerActivity.newIntent(getActivity(), mCrime.getId());
startActivity(intent);
mCallbacks.onCrimeSelected(mCrime);
}
}
When you call back in onOptionsItemSelected(…), you also reload the list immediately upon adding a new crime. This is necessary because, on tablets, the list will remain visible after adding a new crime. Before, you were guaranteed that the detail screen would appear in front of it.
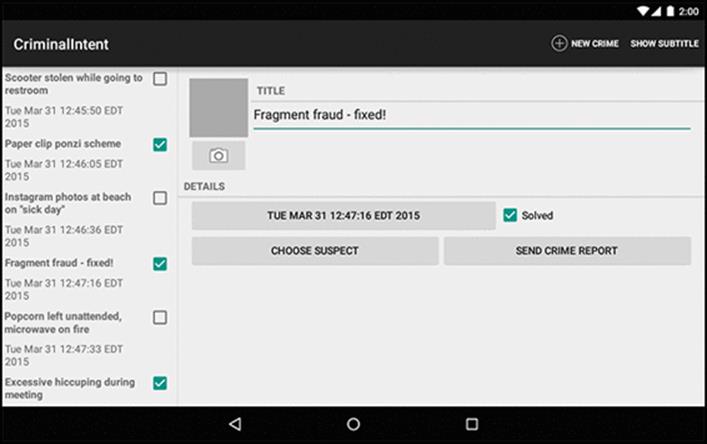
Run CriminalIntent on a tablet. Create a new crime, and a CrimeFragment will be added and shown in the detail_fragment_container. Then view an old crime to see the CrimeFragment being swapped out for a new one (Figure 17.7).
Figure 17.7 Master and detail now wired up
Looks great! One small problem, though: If you make changes to a crime, the list will not update to reflect them. Right now, you only reload the list immediately after adding a crime and in CrimeListFragment.onResume(). But on a tablet, CrimeListFragment stays visible alongside theCrimeFragment. The CrimeListFragment is not paused when the CrimeFragment appears, so it is never resumed. Thus, the list is not reloaded.
You can fix this problem with another callback interface – this one in CrimeFragment.
Implementing CrimeFragment.Callbacks
CrimeFragment will define the following interface:
public interface Callbacks {
void onCrimeUpdated(Crime crime);
}
For CrimeFragment to push updates to a peer Fragment, it will need to do two things. First, since CriminalIntent’s single source of truth is its SQLite database, it will need to save its Crime to CrimeLab. Then CrimeFragment will call onCrimeUpdated(Crime) on its hosting activity. CrimeListActivity will implement onCrimeUpdated(Crime) to reload CrimeListFragment’s list, which will pull the latest data from the database and display it.
Before you start with CrimeFragment’s interface, change the visibility of CrimeListFragment.updateUI() so that it can be called from CrimeListActivity.
Listing 17.10 Changing updateUI()’s visibility (CrimeListFragment.java)
private public void updateUI() {
...
}
Then, in CrimeFragment.java, add the callback interface along with an mCallbacks variable and implementations of onAttach(…) and onDetach().
Listing 17.11 Adding CrimeFragment callbacks (CrimeFragment.java)
...
private ImageButton mPhotoButton;
private ImageView mPhotoView;
private Callbacks mCallbacks;
/**
* Required interface for hosting activities.
*/
public interface Callbacks {
void onCrimeUpdated(Crime crime);
}
public static CrimeFragment newInstance(UUID crimeId) {
...
}
@Override
public void onAttach(Activity activity) {
super.onAttach(activity);
mCallbacks = (Callbacks)activity;
}
@Override
public void onCreate(Bundle savedInstanceState) {
...
}
@Override
public void onPause() {
...
}
@Override
public void onDetach() {
super.onDetach();
mCallbacks = null;
}
Now implement CrimeFragment.Callbacks in CrimeListActivity to reload the list in onCrimeUpdated(Crime).
Listing 17.12 Refreshing crime list (CrimeListActivity.java)
public class CrimeListActivity extends SingleFragmentActivity
implements CrimeListFragment.Callbacks, CrimeFragment.Callbacks {
...
public void onCrimeUpdated(Crime crime) {
CrimeListFragment listFragment = (CrimeListFragment)
getSupportFragmentManager()
.findFragmentById(R.id.fragment_container);
listFragment.updateUI();
}
}
CrimeFragment.Callbacks must be implemented in all activities that host CrimeFragment. So provide an empty implementation in CrimePagerActivity, too.
Listing 17.13 Providing empty callbacks implementation (CrimePagerActivity.java)
public class CrimePagerActivity extends AppCompatActivity
implements CrimeFragment.Callbacks {
...
@Override
public void onCrimeUpdated(Crime crime) {
}
}
CrimeFragment will be doing a Time Warp two-step a lot internally: Jump to the left, save mCrime to CrimeLab. Step to the right, call mCallbacks.onCrimeUpdated(Crime). Add a method to make it more convenient to do this jig.
Listing 17.14 Adding updateCrime() method (CrimeFragment.java)
...
@Override
public void onActivityResult(int requestCode, int resultCode, Intent data) {
...
}
private void updateCrime() {
CrimeLab.get(getActivity()).updateCrime(mCrime);
mCallbacks.onCrimeUpdated(mCrime);
}
private void updateDate() {
mDateButton.setText(mCrime.getDate().toString());
}
...
Then add calls in CrimeFragment.java to updateCrime() when a Crime’s title or solved status has changed.
Listing 17.15 Calling onCrimeUpdated(Crime) (CrimeFragment.java)
@Override
public View onCreateView(LayoutInflater inflater, ViewGroup container,
Bundle savedInstanceState) {
...
mTitleField.addTextChangedListener(new TextWatcher() {
...
@Override
public void onTextChanged(CharSequence s, int start, int before, int count) {
mCrime.setTitle(s.toString());
updateCrime();
}
...
});
...
mSolvedCheckbox.setOnCheckedChangeListener(new OnCheckedChangeListener() {
@Override
public void onCheckedChanged(CompoundButton buttonView, boolean isChecked) {
mCrime.setSolved(isChecked);
updateCrime();
}
});
...
}
You also need to call onCrimeUpdated(Crime) in onActivityResult(…), where the Crime’s date, photo, and suspect can be changed. Currently, the photo and suspect do not appear in the list item’s view, but CrimeFragment should still be neighborly and report those updates.
Listing 17.16 Calling onCrimeUpdated(Crime) again (CrimeFragment.java)
@Override
public void onActivityResult(int requestCode, int resultCode, Intent data) {
...
if (requestCode == REQUEST_DATE) {
Date date = (Date) data
.getSerializableExtra(DatePickerFragment.EXTRA_DATE);
mCrime.setDate(date);
updateCrime();
updateDate();
} else if (requestCode == REQUEST_CONTACT && data != null) {
...
try {
...
String suspect = c.getString(0);
mCrime.setSuspect(suspect);
updateCrime();
mSuspectButton.setText(suspect);
} finally {
c.close();
}
} else if (requestCode == REQUEST_PHOTO) {
updateCrime();
updatePhotoView();
}
}
Run CriminalIntent on a tablet and confirm that your RecyclerView updates when changes are made in CrimeFragment (Figure 17.8). Then run it on a phone to confirm that the app works as before.
Figure 17.8 List reflects changes made in detail
You have reached the end of your time with CriminalIntent. In 11 chapters, you created a complex application that uses fragments, talks to other apps, takes pictures, and stores data. Why not celebrate with a piece of cake?
Just be sure to clean up after yourself. You never know who might be watching.
For the More Curious: More on Determining Device Size
Before Android 3.2, the screen size qualifier was used to provide alternative resources based the size of a device. Screen size is a qualifier that groups different devices into four broad categories – small, normal, large, and xlarge.
Table 17.1 shows the minimum screen sizes for each qualifier:
Table 17.1 Screen size qualifiers
|
Name |
Minimum screen size |
|
small |
320x426dp |
|
normal |
320x470dp |
|
large |
480x640dp |
|
xlarge |
720x960dp |
Screen size qualifiers were deprecated in Android 3.2 in favor of qualifiers that allow you to test for the dimensions of the device. Table 17.2 shows these new qualifiers.
Table 17.2 Discrete screen dimension qualifiers
|
Qualifier format |
description |
|
wXXXdp |
Available width: width is greater than or equal to XXX dp |
|
hXXXdp |
Available height: height greater than or equal to XXX dp |
|
swXXXdp |
Smallest width: width or height (whichever is smaller) greater than or equal to XXX dp |
Let’s say that you wanted to specify a layout that would only be used if the display were at least 300dp wide. In that case, you could use an available width qualifier and put your layout file in res/layout-w300dp (the “w” is for “width”). You can do the same thing for height by using an “h” (for“height”).
However, the height and width may swap depending on the orientation of the device. To detect a particular size of screen, you can use sw, which stands for smallest width. This specifies the smallest dimension of your screen. Depending on the device’s orientation, this can be either width or height. If the screen is 1024x800, then sw is 800. If the screen is 800x1024, sw is still 800.
All materials on the site are licensed Creative Commons Attribution-Sharealike 3.0 Unported CC BY-SA 3.0 & GNU Free Documentation License (GFDL)
If you are the copyright holder of any material contained on our site and intend to remove it, please contact our site administrator for approval.
© 2016-2026 All site design rights belong to S.Y.A.