Android Programming: The Big Nerd Ranch Guide (2015)
Chapter 23. HTTP & Background Tasks
The apps that dominate the brains of users are networked apps. Those people fiddling with their phones instead of talking to each other at dinner? They are maniacally checking their newsfeeds, responding to text messages, or playing networked games.
To get started with networking in Android, you are going to create a new app called PhotoGallery. PhotoGallery is a client for the photo-sharing site Flickr. It will fetch and display the most recent public photos uploaded to Flickr. Figure 23.1 gives you an idea of what the app will look like.
Figure 23.1 Complete PhotoGallery
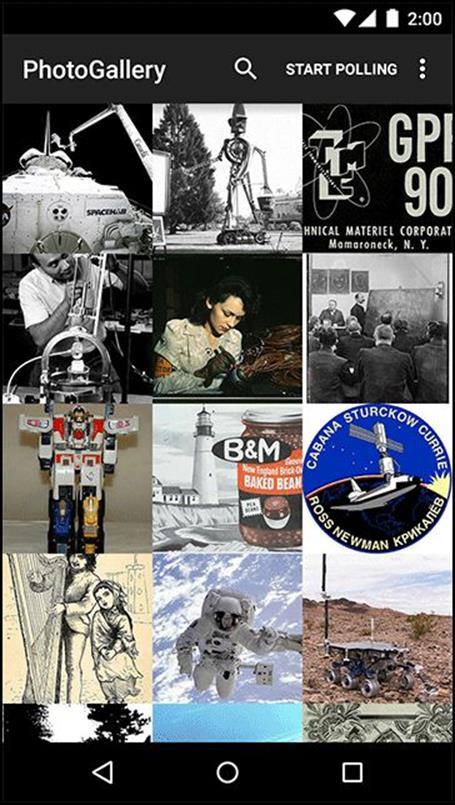
(We added a filter to our PhotoGallery implementation to show only photos listed on Flickr as having “no known copyright restrictions.” Visit https://www.flickr.com/commons/usage/ to learn more about unrestricted images. All other photos on Flickr are the property of the person who posted them and are subject to usage restrictions depending on the license specified by the owner. To read more about permissions for using third-party content that you retrieve from Flickr, visit https://www.flickr.com/creativecommons/.)
You will spend six chapters with PhotoGallery. It will take two chapters for you to get the basics of downloading and parsing JSON and displaying images up and running. Once that is done, in subsequent chapters you will add features that explore search, services, notifications, broadcast receivers, and web views.
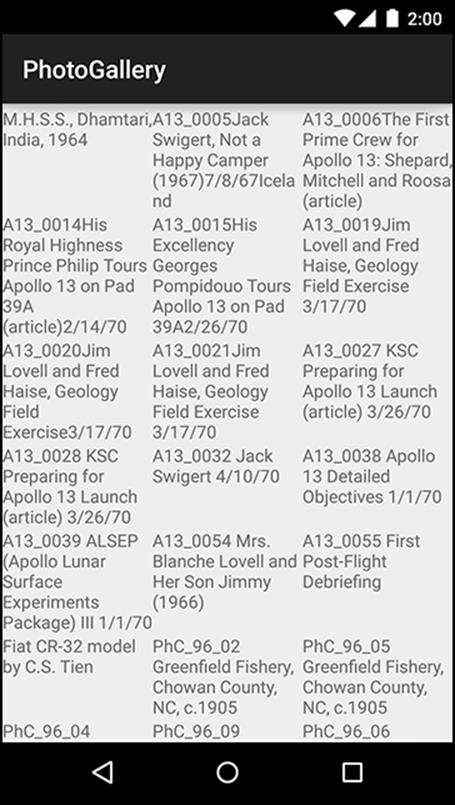
In this chapter, you will learn how to use Android’s high-level HTTP networking. Almost all day-to-day programming of web services these days is based on the HTTP networking protocol. By the end of the chapter, you will be fetching, parsing, and displaying photo captions from Flickr (Figure 23.2). (Retrieving and displaying photos will happen in Chapter 24.)
Figure 23.2 PhotoGallery at the end of the chapter
Creating PhotoGallery
Create a new Android application project. Configure the app as shown in Figure 23.3.
Figure 23.3 Creating PhotoGallery
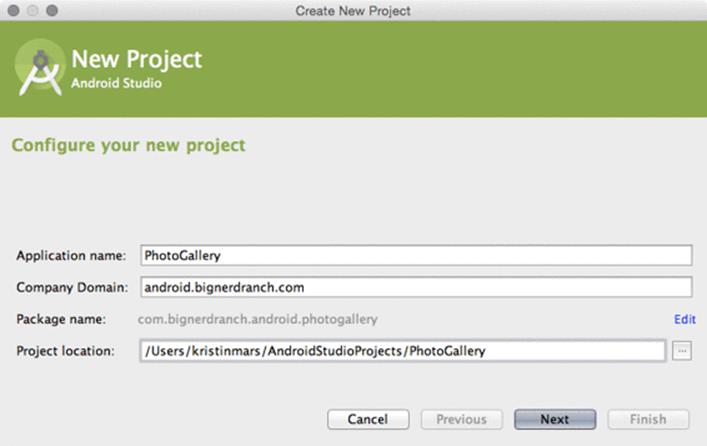
Click Next. When prompted, check Phone and Tablet as the target form factor and choose API 16: Android 4.1 (Jelly Bean) from the Minimum SDK dropdown.
Then have the wizard create a blank activity named PhotoGalleryActivity.
PhotoGallery will follow the same architecture you have been using so far. PhotoGalleryActivity will be a SingleFragmentActivity subclass and its view will be the container view defined in activity_fragment.xml. This activity will host a fragment – in particular, an instance ofPhotoGalleryFragment, which you will create shortly.
Copy SingleFragmentActivity.java and activity_fragment.xml into your project from a previous project.
In PhotoGalleryActivity.java, set up PhotoGalleryActivity as a SingleFragmentActivity by deleting the code that the template generated and replacing it with an implementation of createFragment(). Have createFragment() return an instance of PhotoGalleryFragment. (Bear with the error that this code will cause for the moment. It will go away after you create the PhotoGalleryFragment class.)
Listing 23.1 Activity setup (PhotoGalleryActivity.java)
public class PhotoGalleryActivity extends Activity SingleFragmentActivity {
@Override
protected void onCreate(Bundle savedInstanceState) {
/* Auto-generated template code... */
}
@Override
public boolean onCreateOptionsMenu(Menu menu) {
/* Auto-generated template code... */
}
@Override
public boolean onOptionsItemSelected(MenuItem item) {
/* Auto-generated template code... */
}
@Override
public Fragment createFragment() {
return PhotoGalleryFragment.newInstance();
}
}
PhotoGallery will display its results in a RecyclerView, using the built-in GridLayoutManager to arrange the items in a grid.
First, add the RecyclerView library as a dependency, as you did in Chapter 9. Open the Project Structure window and select the app module on the left. Select the Dependencies tab and click the + button. Select Library dependency from the drop-down menu that appears. Find and select the recyclerview-v7library and click OK.
Rename layout/activity_photo_gallery.xml to layout/fragment_photo_gallery.xml to create a layout for the fragment. Then replace its contents with the RecyclerView shown in Figure 23.4.
Figure 23.4 A RecyclerView (layout/fragment_photo_gallery.xml)

Finally, create the PhotoGalleryFragment class. Retain the fragment, inflate the layout you just created, and initialize a member variable referencing the RecyclerView (Listing 23.2).
Listing 23.2 Some skeleton code (PhotoGalleryFragment.java)
public class PhotoGalleryFragment extends Fragment {
private RecyclerView mPhotoRecyclerView;
public static PhotoGalleryFragment newInstance() {
return new PhotoGalleryFragment();
}
@Override
public void onCreate(Bundle savedInstanceState) {
super.onCreate(savedInstanceState);
setRetainInstance(true);
}
@Override
public View onCreateView(LayoutInflater inflater, ViewGroup container,
Bundle savedInstanceState) {
View v = inflater.inflate(R.layout.fragment_photo_gallery, container, false);
mPhotoRecyclerView = (RecyclerView) v
.findViewById(R.id.fragment_photo_gallery_recycler_view);
mPhotoRecyclerView.setLayoutManager(new GridLayoutManager(getActivity(), 3));
return v;
}
}
(Wondering why you are retaining the fragment? Hold that thought – we will explain later in the chapter. See the section called “Cleaning Up AsyncTasks”.)
Fire up PhotoGallery to make sure everything is wired up correctly before moving on. If all is well, you will be the proud owner of a blank screen.
Networking Basics
You are going to have one class handle the networking in PhotoGallery. Create a new Java class and, since you will be connecting to Flickr, name this class FlickrFetchr.
FlickrFetchr will start off small with only two methods: getUrlBytes(String) and getUrlString(String). The getUrlBytes(String) method fetches raw data from a URL and returns it as an array of bytes. The getUrlString(String) method converts the result from getUrlBytes(String) to a String.
In FlickrFetchr.java, add implementations for getUrlBytes(String) and getUrlString(String) (Listing 23.3).
Listing 23.3 Basic networking code (FlickrFetchr.java)
public class FlickrFetchr {
public byte[] getUrlBytes(String urlSpec) throws IOException {
URL url = new URL(urlSpec);
HttpURLConnection connection = (HttpURLConnection)url.openConnection();
try {
ByteArrayOutputStream out = new ByteArrayOutputStream();
InputStream in = connection.getInputStream();
if (connection.getResponseCode() != HttpURLConnection.HTTP_OK) {
throw new IOException(connection.getResponseMessage() +
": with " +
urlSpec);
}
int bytesRead = 0;
byte[] buffer = new byte[1024];
while ((bytesRead = in.read(buffer)) > 0) {
out.write(buffer, 0, bytesRead);
}
out.close();
return out.toByteArray();
} finally {
connection.disconnect();
}
}
public String getUrlString(String urlSpec) throws IOException {
return new String(getUrlBytes(urlSpec));
}
}
This code creates a URL object from a string – like, say, https://www.bignerdranch.com. Then it calls openConnection() to create a connection object pointed at the URL. URL.openConnection() returns a URLConnection, but because you are connecting to an http URL, you can cast it to HttpURLConnection. This gives you HTTP-specific interfaces for working with request methods, response codes, streaming methods, and more.
HttpURLConnection represents a connection, but it will not actually connect to your endpoint until you call getInputStream() (or getOutputStream() for POST calls). Until then, you cannot get a valid response code.
Once you create your URL and open a connection, you call read() repeatedly until your connection runs out of data. The InputStream will yield bytes as they are available. When you are done, you close it and spit out your ByteArrayOutputStream’s byte array.
While getUrlBytes(String) does the heavy lifting, getUrlString(String) is what you will actually use in this chapter. It converts the bytes fetched by getUrlBytes(String) into a String. Right now, it may seem strange to split this work into two methods. However, having two methods will be useful in the next chapter when you start downloading image data.
Asking permission to network
One other thing is required to get networking up and running: you have to ask permission. Just as users would not want you secretly taking their pictures, they also do not want you to secretly download ASCII pictures of farm animals.
To ask permission to network, add the following permission to your AndroidManifest.xml.
Listing 23.4 Adding networking permission to manifest (AndroidManifest.xml)
<manifest
xmlns:android="http://schemas.android.com/apk/res/android"
package="com.bignerdranch.android.photogallery" >
<uses-permission android:name="android.permission.INTERNET" />
<application
...
</application>
</manifest>
When a user tries to download your app, a dialog showing these permissions is displayed. The user can then accept or deny installation.
This is not a great system. Your app may have a legitimate but not immediately obvious reason for requesting a permission. And if users do not like any particular permission request, their only option is to remove the entire app.
The upcoming Android M release has a fix for these problems. In M, you can ask permission at the time you first need it, not just when the app is installed. Also, users can revoke individual permissions at any time.
For permissions you cannot do without (like internet access in PhotoGallery), the old behavior is still best: prompt the user at app install. But for less obvious or less critical permissions, the newer style of request is much kinder.
Using AsyncTask to Run on a Background Thread
The next step is to call and test the networking code you just added. However, you cannot simply call FlickrFetchr.getUrlString(String) directly in PhotoGalleryFragment. Instead, you need to create a background thread and run your code there.
The easiest way to work with a background thread is with a utility class called AsyncTask. AsyncTask creates a background thread for you and runs the code in the doInBackground(…) method on that thread.
In PhotoGalleryFragment.java, add a new inner class called FetchItemsTask at the bottom of PhotoGalleryFragment. Override AsyncTask.doInBackground(…) to get data from a website and log it.
Listing 23.5 Writing an AsyncTask, part I (PhotoGalleryFragment.java)
public class PhotoGalleryFragment extends Fragment {
private static final String TAG = "PhotoGalleryFragment";
private RecyclerView mPhotoRecyclerView;
...
private class FetchItemsTask extends AsyncTask<Void,Void,Void> {
@Override
protected Void doInBackground(Void... params) {
try {
String result = new FlickrFetchr()
.getUrlString("https://www.bignerdranch.com");
Log.i(TAG, "Fetched contents of URL: " + result);
} catch (IOException ioe) {
Log.e(TAG, "Failed to fetch URL: ", ioe);
}
return null;
}
}
}
Now, in PhotoGalleryFragment.onCreate(…), call execute() on a new instance of FetchItemsTask.
Listing 23.6 Writing an AsyncTask, part II (PhotoGalleryFragment.java)
public class PhotoGalleryFragment extends Fragment {
private static final String TAG = "PhotoGalleryFragment";
private RecyclerView mPhotoRecyclerView;
@Override
public void onCreate(Bundle savedInstanceState) {
super.onCreate(savedInstanceState);
setRetainInstance(true);
new FetchItemsTask().execute();
}
...
}
The call to execute() will start your AsyncTask, which will then fire up its background thread and call doInBackground(…). Run your code and you should see the amazing Big Nerd Ranch home page HTML pop up in LogCat, as shown in Figure 23.5.
Figure 23.5 Big Nerd Ranch HTML in LogCat
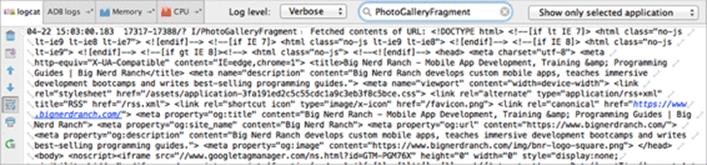
Finding your log statements within the LogCat window can be tricky. It helps to search for something specific. In this case, enter “PhotoGalleryFragment” into the LogCat search box, as shown.
Now that you have created a background thread and run some networking code on it, let’s take a closer look at threads in Android.
You and Your Main Thread
Networking does not happen immediately. A web server may take as long as a second or two to respond, and a file download can take even longer than that. Because networking can take so long, Android disallows all networking on the main thread. If you try to do it, Android will throw aNetworkOnMainThreadException.
Why? To understand that, you need to understand what a thread is, what the main thread is, and what the main thread does.
A thread is a single sequence of execution. Code running within a single thread will execute one step after another. Every Android app starts life with a main thread. The main thread, however, is not a preordained list of steps. Instead, it sits in an infinite loop and waits for events initiated by the user or the system. Then it executes code in response to those events as they occur (Figure 23.6).
Figure 23.6 Regular threads vs. the main thread
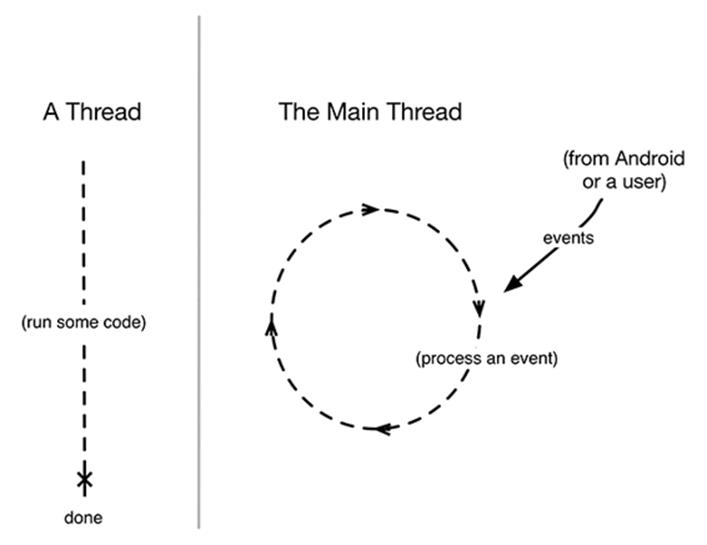
Imagine that your app is an enormous shoe store, and that you only have one employee – The Flash. (Who hasn’t dreamed of that?) There are a lot of things to do in a store to keep the customers happy: arranging the merchandise, fetching shoes for customers, wielding the Brannock device. With The Flash as your salesperson, everyone is taken care of in a timely fashion, even though there is only one guy doing all the work.
For this situation to work, The Flash cannot spend too much time doing any one thing. What if a shipment of shoes goes missing? Someone will have to spend a lot of time on the phone straightening it out. Your customers will get mighty impatient waiting for shoes while The Flash is on hold.
The Flash is like the main thread in your application. It runs all the code that updates the UI. This includes the code executed in response to different UI-related events – activity startup, button presses, and so on. (Because the events are all related to the user interface in some way, the main thread is sometimes called the UI thread.)
The event loop keeps the UI code in sequence. It makes sure that none of these operations step on each other while still ensuring that the code is executed in a timely fashion. So far, all of the code you have written (except for the code you just wrote with AsyncTask) has been executed on the main thread.
Beyond the main thread
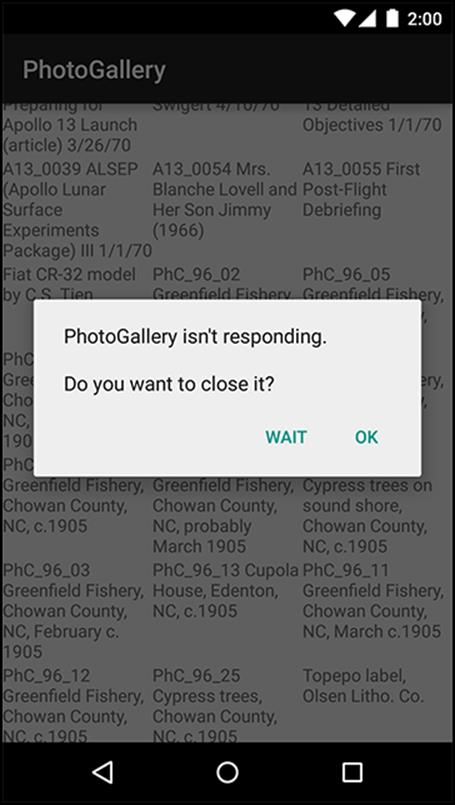
Networking is a lot like a phone call to your shoe distributor: it takes a long time compared to other tasks. During that time, the user interface will be completely unresponsive, which might result in an application not responding, or ANR.
An ANR occurs when Android’s watchdog determines that the main thread has failed to respond to an important event, like pressing the Back button. To the user, it looks like Figure 23.7.
Figure 23.7 Application not responding
In your store, you would solve the problem by (naturally) hiring a second Flash to call the shoe distributor. In Android, you do something similar – you create a background thread and access the network from there.
And what is the easiest way to work with a background thread? Why, AsyncTask.
You will get to see other things AsyncTask can do later this chapter. Before you do that, you will want to do some real work with your networking code.
Fetching JSON from Flickr
JSON stands for JavaScript Object Notation, a format that has become popular in recent years, particularly for web services. Android includes the standard org.json package, which has classes that provide simple access to creating and parsing JSON text. The Android developer documentation has information about org.json, and you can get more information about JSON as a format at http://json.org.
Flickr offers a fine JSON API. All the details you need are available in the documentation at http://www.flickr.com/services/api/. Pull it up in your favorite web browser and find the list of Request Formats. You will be using the simplest – REST. This tells you that the API endpoint ishttps://api.flickr.com/services/rest/. You can invoke the methods Flickr provides on this endpoint.
Back on the main page of the API documentation, find the list of API Methods. Scroll down to the photos section, then locate and click on flickr.photos.getRecent. The documentation will report that this method “Returns a list of the latest public photos uploaded to flickr.” That is exactly what you need for PhotoGallery.
The only required parameter for the getRecent method is an API key. To get an API key, return to http://www.flickr.com/services/api/ and follow the link for API keys. You will need a Yahoo ID to log in. Once you are logged in, request a new, noncommercial API key. This usually only takes a moment. Your API key will look something like 4f721bgafa75bf6d2cb9af54f937bb70. (You do not need the “Secret,” which is only used when an app will access user-specific information or images.)
Once you have a key, you have all you need to make a request to the Flickr web service. Your GET request URL will look something like this:
https://api.flickr.com/services/rest/?method=flickr.photos.getRecent&api_key=xxx&format=json&nojsoncallback=1.
The Flickr response is in XML format by default. In order to get a valid JSON response you need to specify values for both the format and nojsoncallback parameters. Setting nojsoncallback to 1 tells Flickr to exclude the enclosing method name and parentheses from the response it sends back. This is necessary so that your Java code can more easily parse the response.
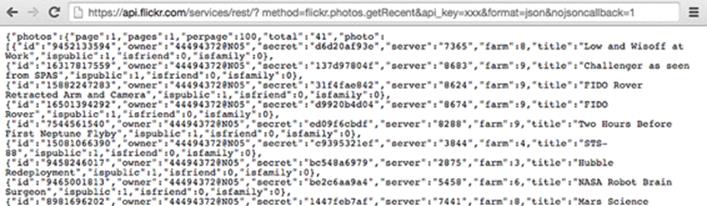
Copy the example URL into your browser, replacing the “xxx” value provided for the api_key with your actual API key. This will allow you to see an example of what the response data will look like, as shown in Figure 23.8.
Figure 23.8 Example JSON output
Time to start coding. First, add some constants to FlickrFetchr.
Listing 23.7 Adding constants (FlickrFetchr.java)
public class FlickrFetchr {
private static final String TAG = "FlickrFetchr";
private static final String API_KEY = "yourApiKeyHere";
...
}
Make sure to replace yourApiKeyHere with the API key you generated earlier.
Now use the constants to write a method that builds an appropriate request URL and fetches its contents.
Listing 23.8 Adding fetchItems() method (FlickrFetchr.java)
public class FlickrFetchr {
...
String getUrlString(String urlSpec) throws IOException {
return new String(getUrlBytes(urlSpec));
}
public void fetchItems() {
try {
String url = Uri.parse("https://api.flickr.com/services/rest/")
.buildUpon()
.appendQueryParameter("method", "flickr.photos.getRecent")
.appendQueryParameter("api_key", API_KEY)
.appendQueryParameter("format", "json")
.appendQueryParameter("nojsoncallback", "1")
.appendQueryParameter("extras", "url_s")
.build().toString();
String jsonString = getUrlString(url);
Log.i(TAG, "Received JSON: " + jsonString);
} catch (IOException ioe) {
Log.e(TAG, "Failed to fetch items", ioe);
}
}
}
Here you use a Uri.Builder to build the complete URL for your Flickr API request. Uri.Builder is a convenience class for creating properly escaped parameterized URLs. Uri.Builder.appendQueryParameter(String, String) will automatically escape query strings for you.
Notice you added values for the method, api_key, format, and nojsoncallback parameters. You also specified one extra parameter called extras, with a value of url_s. Specifying the url_s extra tells Flickr to include the URL for the small version of the picture if it is available.
Finally, modify the AsyncTask in PhotoGalleryFragment to call the new fetchItems() method.
Listing 23.9 Calling fetchItems() (PhotoGalleryFragment.java)
public class PhotoGalleryFragment extends Fragment {
...
private class FetchItemsTask extends AsyncTask<Void,Void,Void> {
@Override
protected Void doInBackground(Void... params) {
try {
String result = new FlickrFetchr()
.getUrlString("https://www.bignerdranch.com");
Log.i(TAG, "Fetched contents of URL: " + result);
} catch (IOException ioe) {
Log.e(TAG, "Failed to fetch URL: ", ioe);
}
new FlickrFetchr().fetchItems();
return null;
}
}
}
Run PhotoGallery and you should see rich, fertile Flickr JSON in LogCat, like Figure 23.9. (It will help to search for “FlickrFetchr” in the LogCat search box.)
Figure 23.9 Flickr JSON in LogCat

Unfortunately the Android Studio LogCat window does not wrap the output nicely as of this writing. Scroll to the right to see more of the extremely long JSON response string. (LogCat can be finicky. Do not panic if you do not get results like ours. Sometimes the connection to the emulator is not quite right and the log messages do not get printed out. Usually it clears up over time, but sometimes you have to rerun your application or even restart your emulator.)
Now that you have such fine JSON from Flickr, what should you do with it? You do what you do with all data – put it in one or more model objects. The model class you are going to create for PhotoGallery is called GalleryItem. Figure 23.10 shows an object diagram of PhotoGallery.
Figure 23.10 Object diagram of PhotoGallery
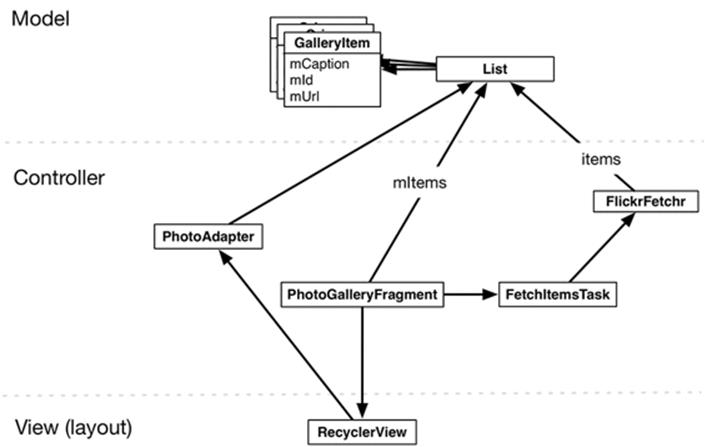
Note that Figure 23.10 does not show the hosting activity so that it can focus on the fragment and the networking code.
Create the GalleryItem class and add the following code:
Listing 23.10 Creating model object class (GalleryItem.java)
public class GalleryItem {
private String mCaption;
private String mId;
private String mUrl;
@Override
public String toString() {
return mCaption;
}
}
Have Android Studio generate getters and setters for mCaption, mId, and mUrl.
Now that you have made model objects, it is time to fill them with data from the JSON you got from Flickr.
Parsing JSON text
The JSON response displayed in your browser and LogCat window is hard to read. If you pretty print (format with white space) the response, it looks something like Figure 23.11.
Figure 23.11 JSON hierarchy
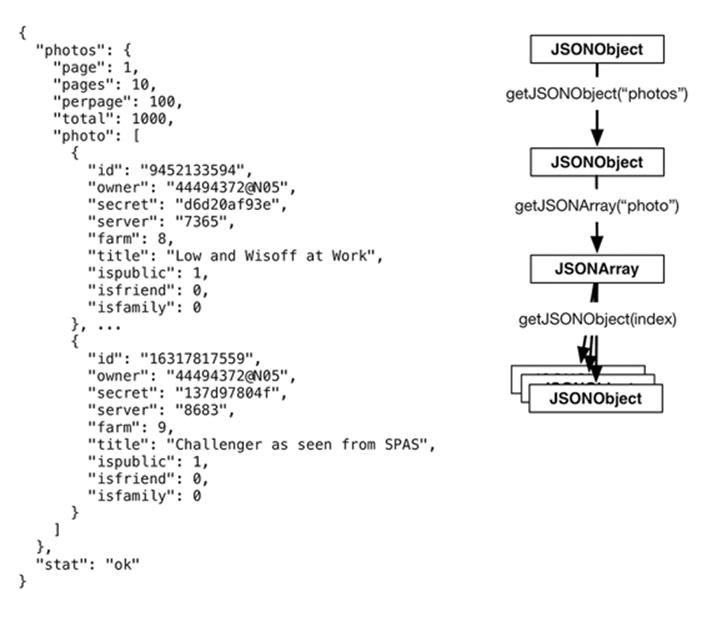
A JSON object is a set of name-value pairs enclosed between curly braces, { }. A JSON array is a comma-separated list of JSON objects enclosed in square brackets, [ ]. You can have objects nested within each other, resulting in a hierarchy.
The json.org API provides Java objects corresponding to JSON text, such as JSONObject and JSONArray. You can easily parse JSON text into corresponding Java objects using the JSONObject(String) constructor. Update fetchItems() to do just that.
Listing 23.11 Reading JSON string into JSONObject (FlickrFetchr.java)
public class FlickrFetchr {
private static final String TAG = "FlickrFetchr";
...
public void fetchItems() {
try {
...
Log.i(TAG, "Received JSON: " + jsonString);
JSONObject jsonBody = new JSONObject(jsonString);
} catch (JSONException je){
Log.e(TAG, "Failed to parse JSON", je);
} catch (IOException ioe) {
Log.e(TAG, "Failed to fetch items", ioe);
}
}
}
The JSONObject constructor parses the JSON string you passed it, resulting in an object hierarchy that maps to the original JSON text. The object hierarchy for the JSON returned from Flickr is shown in Figure 23.11.
Here you have a top-level JSONObject that maps to the outermost curly braces in the original JSON text. This top-level object contains a nested JSONObject named photos. Within this nested JSONObject is a JSONArray named photo. This array contains a collection of JSONObjects, each representing metadata for a single photo.
Write a method that pulls out information for each photo. Make a GalleryItem for each photo and add it to a List.
Listing 23.12 Parsing Flickr photos (FlickrFetchr.java)
public class FlickrFetchr {
private static final String TAG = "FlickrFetchr";
...
public void fetchItems() {
...
}
private void parseItems(List<GalleryItem> items, JSONObject jsonBody)
throws IOException, JSONException {
JSONObject photosJsonObject = jsonBody.getJSONObject("photos");
JSONArray photoJsonArray = photosJsonObject.getJSONArray("photo");
for (int i = 0; i < photoJsonArray.length(); i++) {
JSONObject photoJsonObject = photoJsonArray.getJSONObject(i);
GalleryItem item = new GalleryItem();
item.setId(photoJsonObject.getString("id"));
item.setCaption(photoJsonObject.getString("title"));
if (!photoJsonObject.has("url_s")) {
continue;
}
item.setUrl(photoJsonObject.getString("url_s"));
items.add(item);
}
}
}
This code uses convenience methods such as getJSONObject(String name) and getJSONArray(String name) to navigate the JSONObject hierarchy. (These methods are also annotated on Figure 23.11.)
Flickr does not always return a url_s component for each image. You add a check here to ignore images that do not have an image url.
The parseItems(…) method needs a List and JSONObject. Update fetchItems() to call parseItems(…) and return a List of GalleryItems.
Listing 23.13 Calling parseItems(…) (FlickrFetchr.java)
public void List<GalleryItem> fetchItems() {
List<GalleryItem> items = new ArrayList<>();
try {
String url = ...;
String jsonString = getUrlString(url);
Log.i(TAG, "Received JSON: " + jsonString);
JSONObject jsonBody = new JSONObject(jsonString);
parseItems(items, jsonBody);
} catch (JSONException je) {
Log.e(TAG, "Failed to parse JSON", je);
} catch (IOException ioe) {
Log.e(TAG, "Failed to fetch items", ioe);
}
return items;
}
Run PhotoGallery to test your JSON parsing code. PhotoGallery has no way of reporting the contents of your List right now, so you will need to set a breakpoint and use the debugger if you want to make sure everything worked correctly.
From AsyncTask Back to the Main Thread
To finish off, let’s switch to the view layer and get PhotoGalleryFragment’s RecyclerView to display some captions.
First define a ViewHolder as an inner class.
Listing 23.14 Adding a ViewHolder implementation (PhotoGalleryFragment.java)
public class PhotoGalleryFragment extends Fragment {
private static final String TAG = "PhotoGalleryFragment";
...
private class PhotoHolder extends RecyclerView.ViewHolder {
private TextView mTitleTextView;
public PhotoHolder(View itemView) {
super(itemView);
mTitleTextView = (TextView) itemView;
}
public void bindGalleryItem(GalleryItem item) {
mTitleTextView.setText(item.toString());
}
}
private class FetchItemsTask extends AsyncTask<Void,Void,Void> {
...
}
}
Next, add a RecyclerView.Adapter to provide PhotoHolders as needed based on a list of GalleryItems.
Listing 23.15 Adding a RecyclerView.Adapter implementation (PhotoGalleryFragment.java)
public class PhotoGalleryFragment extends Fragment {
private static final String TAG = "PhotoGalleryFragment";
...
private class PhotoHolder extends RecyclerView.ViewHolder {
...
}
private class PhotoAdapter extends RecyclerView.Adapter<PhotoHolder> {
private List<GalleryItem> mGalleryItems;
public PhotoAdapter(List<GalleryItem> galleryItems) {
mGalleryItems = galleryItems;
}
@Override
public PhotoHolder onCreateViewHolder(ViewGroup viewGroup, int viewType) {
TextView textView = new TextView(getActivity());
return new PhotoHolder(textView);
}
@Override
public void onBindViewHolder(PhotoHolder photoHolder, int position) {
GalleryItem galleryItem = mGalleryItems.get(position);
photoHolder.bindGalleryItem(galleryItem);
}
@Override
public int getItemCount() {
return mGalleryItems.size();
}
}
...
}
Now that you have the appropriate nuts and bolts in place for RecyclerView, add code to set up and attach an adapter when appropriate.
Listing 23.16 Implementing setupAdapter() (PhotoGalleryFragment.java)
public class PhotoGalleryFragment extends Fragment {
private static final String TAG = "PhotoGalleryFragment";
private RecyclerView mPhotoRecyclerView;
private List<GalleryItem> mItems = new ArrayList<>();
...
@Override
public View onCreateView(LayoutInflater inflater, ViewGroup container,
Bundle savedInstanceState) {
View v = inflater.inflate(R.layout.fragment_photo_gallery, container, false);
mPhotoRecyclerView = (RecyclerView) v
.findViewById(R.id.fragment_photo_gallery_recycler_view);
mPhotoRecyclerView.setLayoutManager(new GridLayoutManager(getActivity(), 3));
setupAdapter();
return v;
}
private void setupAdapter() {
if (isAdded()) {
mPhotoRecyclerView.setAdapter(new PhotoAdapter(mItems));
}
}
...
}
The setupAdapter() method you just added looks at the current model state, namely the List of GalleryItems, and configures the adapter appropriately on your RecyclerView. You call setupAdapter() in onCreateView(…) so that every time a new RecyclerView is created, it is reconfigured with an appropriate adapter. You also want to call it every time your set of model objects changes.
Notice that you check to see whether isAdded() is true before setting the adapter. This confirms that the fragment has been attached to an activity, and in turn that getActivity() will not be null.
Remember that fragments can exist unattached to any activity. Before now, this possibility has not come up because your method calls have been driven by callbacks from the framework. In this scenario, if a fragment is receiving callbacks, then it definitely is attached to an activity. No activity, no callbacks.
However, now that you are using an AsyncTask you are triggering some callbacks from a background thread. Thus you cannot assume that the fragment is attached to an activity. You must check to make sure that your fragment is still attached. If it is not, then operations that rely on that activity (like creating your PhotoAdapter, which in turn creates a TextView using the hosting activity as the context) will fail. This is why, in your code above, you check that isAdded() is true before setting the adapter.
Now you need to call setupAdapter() after data has been fetched from Flickr. Your first instinct might be to call setupAdapter() at the end of FetchItemsTask’s doInBackground(…). This is not a good idea. Remember that you have two Flashes in the store now – one helping multiple customers, and one on the phone with Flickr. What will happen if the second Flash tries to help customers after hanging up the phone? Odds are good that the two Flashes will step on each other’s toes.
On a computer, this toe-stepping-on results in objects in memory becoming corrupted. Because of this, you are not allowed to update the UI from a background thread, nor is it safe or advisable to do so.
What to do? AsyncTask has another method you can override called onPostExecute(…). onPostExecute(…) is run after doInBackground(…) completes. More importantly, onPostExecute(…) is run on the main thread, not the background thread, so it is safe to update the UI within it.
Modify FetchItemsTask to update mItems and call setupAdapter() after fetching your photos to update the RecyclerView’s data source.
Listing 23.17 Adding adapter update code (PhotoGalleryFragment.java)
private class FetchItemsTask extends AsyncTask<Void,Void,Void List<GalleryItem>> {
@Override
protected Void List<GalleryItem> doInBackground(Void... params) {
return new FlickrFetchr().fetchItems();
return null;
}
@Override
protected void onPostExecute(List<GalleryItem> items) {
mItems = items;
setupAdapter();
}
}
You made three changes here. First, you changed the type of the FetchItemsTask’s third generic parameter. This parameter is the type of result produced by your AsyncTask. It sets the type of value returned by doInBackground(…) as well as the type of onPostExecute(…)’s input parameter.
Second, you modified doInBackground(…) to return your list of GalleryItems. By doing this you fix your code so that it compiles properly. You also pass your list of items off so that it may be used from within onPostExecute(…).
Finally, you added an implementation of onPostExecute(…). This method accepts as input the list you fetched and returned inside doInBackground(…), puts it in mItems, and updates your RecyclerView’s adapter.
With that, your work for this chapter is complete. Run, and you should see text displayed for each GalleryItem you downloaded (similar to Figure 23.2).
Cleaning Up AsyncTasks
In this chapter, your AsyncTask and other code was carefully structured so that you would not have to keep track of the AsyncTask instance. For example, you retained the fragment (called setRetainInstance(true)) so that rotation does not repeatedly fire off new AsyncTasks to fetch the JSON data. However, in other situations you will need to keep a handle on your AsyncTasks, even canceling and rerunning them at times.
For these more complicated uses, you will want to assign your AsyncTask to an instance variable. Once you have a handle on it, you can call AsyncTask.cancel(boolean). This method allows you to cancel an ongoing AsyncTask.
AsyncTask.cancel(boolean) can work in a more rude or less rude fashion. If you call cancel(false), it will be polite and simply set isCancelled() to true. The AsyncTask can then check isCancelled() inside of doInBackground(…) and elect to finish prematurely.
If you call cancel(true), however, it will be impolite and interrupt the thread doInBackground(…) is on, if it is currently running. AsyncTask.cancel(true) is a more severe way of stopping the AsyncTask. If you can avoid it, you should.
When and where should you cancel your AsyncTask? It depends. First ask yourself, should the work the AsyncTask is doing stop if the fragment or activity is destroyed or goes out of view? If so, you should cancel the AsyncTask instance in either onStop(…) (to cancel the task when the view is no longer visible) or onDestroy(…) (to cancel the task when the fragment/activity instance is destroyed).
What if you want the work the AsyncTask is doing to survive the life of the fragment/activity and its view? You could just let the AsyncTask run to completion, without canceling. However, this has potential for memory leaks (e.g., the Activity instance being kept alive past when it should have been destroyed) or problems related to updating or accessing the UI when it is in an invalid state. If you have important work that must be completed regardless of what the user is doing, it is better to consider alternative options, such as launching a Service (you will learn more about this inChapter 26).
For the More Curious: More on AsyncTask
In this chapter you saw how to use the last type parameter on AsyncTask, which specifies the return type. What about the other two?
The first type parameter allows you to specify the type of input parameters you will pass to the execute(), which in turn dictates the type of input parameters doInBackground(…) will receive. You would use it in the following way:
AsyncTask<String,Void,Void> task = new AsyncTask<String,Void,Void>() {
public Void doInBackground(String... params) {
for (String parameter : params) {
Log.i(TAG, "Received parameter: " + parameter);
}
return null;
}
};
Input parameters are passed in to the execute(…) method, which takes in a variable number of arguments:
task.execute("First parameter", "Second parameter", "Etc.");
Those variable arguments are then passed on to doInBackground(…).
The second type parameter allows you to specify the type for sending progress updates. Here is what the code pieces look like:
final ProgressBar gestationProgressBar = /* A determinate progress bar */;
gestationProgressBar.setMax(42); /* max allowed gestation period */
AsyncTask<Void,Integer,Void> haveABaby = new AsyncTask<Void,Integer,Void>() {
public Void doInBackground(Void... params) {
while (!babyIsBorn()) {
Integer weeksPassed = getNumberOfWeeksPassed();
publishProgress(weeksPassed);
patientlyWaitForBaby();
}
}
public void onProgressUpdate(Integer... params) {
int progress = params[0];
gestationProgressBar.setProgress(progress);
}
};
/* call when you want to execute the AsyncTask */
haveABaby.execute();
Progress updates usually happen in the middle of an ongoing background process. The problem is that you cannot make the necessary UI updates inside that background process. So AsyncTask provides publishProgress(…) and onProgressUpdate(…).
Here is how it works: you call publishProgress(…) from doInBackground(…) in the background thread. This will make onProgressUpdate(…) be called on the UI thread. So you can do your UI updates in onProgressUpdate(…), but control them from doInBackground(…) with publishProgress(…).
For the More Curious: Alternatives to AsyncTask
If you use an AsyncTask to load data, you are responsible for managing its lifecycle during configuration changes, such as rotation, and stashing its data somewhere that lives through them. Often, this is simplified by using setRetainInstance(true) on a Fragment and storing the data there, but there are still situations where you have to intervene and code you have to write in order to ensure that everything happens correctly. Such situations include the user pressing the Back button while the AsyncTask is running, or the fragment that launched the AsyncTask getting destroyed during execution by the OS due to a low-memory situation.
Using a Loader is an alternative solution that takes some (but not all) of this responsibility off your hands. A loader is designed to load some kind of data (an object) from some source. The source could be a disk, a database, a ContentProvider, the network, or another process.
AsyncTaskLoader is an abstract Loader that uses an AsyncTask to move the work of loading data to another thread. Almost all useful loader classes you create will be a subclass of AsyncTaskLoader. The AsyncTaskLoader will do the job of fetching the data without blocking the main thread and delivering the results to whomever is interested.
Why would you use a loader instead of, say, an AsyncTask directly? Well, the most compelling reason is that the LoaderManager will keep your component’s loaders alive, along with their data, between configuration changes like rotation. LoaderManager is responsible for starting, stopping, and maintaining the lifecycle of any Loaders associated with your component.
If, after a configuration change, you initialize a loader that has already finished loading its data, it can deliver that data immediately rather than trying to fetch it again. This works whether your fragment is retained or not, which can make your life easier because you do not have to consider the lifecycle complications that retained fragments can introduce.
Challenge: Gson
Deserializing JSON in Java objects, as you did in Listing 23.12, is a common task in app development regardless of the platform. Lots of smart people have created libraries to simplify the process of converting JSON text to Java objects and back again.
One such library is Gson (https://github.com/google/gson). Gson maps JSON data to Java objects for you automatically. This means you do not need to write any parsing code. For this reason, Gson is currently our favorite JSON parsing library.
For this challenge, simplify your JSON parsing code in FlickrFetchr by incorporating the Gson library into your app.
Challenge: Paging
By default, getRecent returns one page of 100 results. There is an additional parameter you can use called page that will let you return page two, three, and so on.
For this challenge, implement a RecyclerView.OnScrollListener that detects when you are at the end of your results and replaces the current page with the next page of results. For a slightly harder challenge, append subsequent pages to your results.
Challenge: Dynamically Adjusting the Number of Columns
Currently the number of columns displayed in the grid is fixed at three. Update your code to provide a dynamic number of columns so more columns appear in landscape and on larger devices.
A simple approach could involve providing an integer resource qualified for different orientations and/or screen sizes. This is similar to how you provided different layouts for different screen sizes in Chapter 17. Integer resources should be placed in the res/values folder(s). Check out the Android developer documentation for more details.
Providing qualified resources does not offer much in the way of granularity. For a more difficult challenge (and more flexible implementation), calculate and set the number of columns each time the fragment’s view is created. Calculate the number of columns based on the current width of the RecyclerView and some predetermined constant column width.
There is only one catch: you cannot calculate the number of columns in onCreateView() because the RecyclerView will not be sized yet. Instead, implement a ViewTreeObserver.OnGlobalLayoutListener and put your column calculation code in onGlobalLayout(). Add the listener to your RecyclerViewusing addOnGlobalLayoutListener().
All materials on the site are licensed Creative Commons Attribution-Sharealike 3.0 Unported CC BY-SA 3.0 & GNU Free Documentation License (GFDL)
If you are the copyright holder of any material contained on our site and intend to remove it, please contact our site administrator for approval.
© 2016-2026 All site design rights belong to S.Y.A.