Android Programming: The Big Nerd Ranch Guide (2015)
Chapter 22. More About Intents and Tasks
In this chapter, you will use implicit intents to create a launcher app to replace Android’s default launcher app. Figure 22.1 shows what this app, NerdLauncher, will look like.
Figure 22.1 NerdLauncher final product
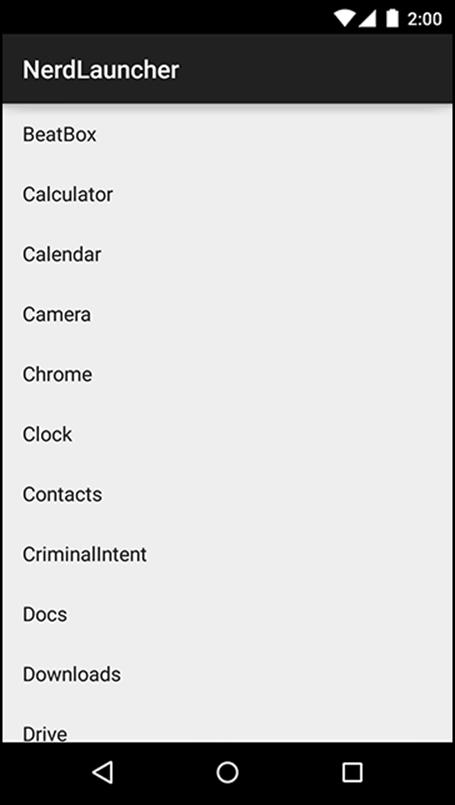
NerdLauncher will display a list of apps on the device. The user will press a list item to launch the app.
To get it working correctly, you will deepen your understanding of intents, intent filters, and how applications interact in the Android environment.
Setting Up NerdLauncher
Create a new Android application project named NerdLauncher. Select Phone and Tablet as the form factor and API 16: Android 4.1 (Jelly Bean) as the minimum SDK. Create a blank activity named NerdLauncherActivity.
NerdLauncherActivity will host a single fragment and in turn should be a subclass of SingleFragmentActivity. Copy SingleFragmentActivity.java and activity_fragment.xml into your NerdLauncher from the CriminalIntent project.
Open NerdLauncherActivity.java and change NerdLauncherActivity’s superclass to SingleFragmentActivity. Remove the template’s code and override createFragment() to return a NerdLauncherFragment. (Bear with the error caused by the return line in createFragment(). This will be fixed in a moment when you create the NerdLauncherFragment class.)
Listing 22.1 Another SingleFragmentActivity (NerdLauncherActivity.java)
public class NerdLauncherActivity extends SingleFragmentActivityAppCompatActivity {
@Override
protected Fragment createFragment() {
return NerdLauncherFragment.newInstance();
}
@Override
protected void onCreate(Bundle savedInstanceState) {
/* Auto-generated template code... */
}
@Override
public boolean onCreateOptionsMenu(Menu menu) {
/* Auto-generated template code... */
}
@Override
public boolean onOptionsItemSelected(MenuItem item) {
/* Auto-generated template code... */
}
}
NerdLauncherFragment will display a list of application names in a RecyclerView. Add the RecyclerView library as a dependency, as you did in Chapter 9.
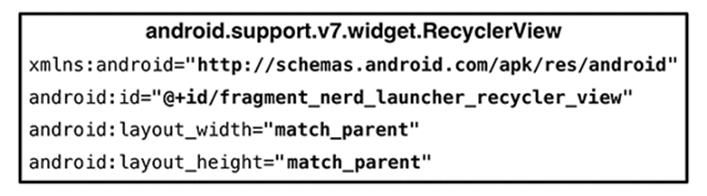
Rename layout/activity_nerd_launcher.xml to layout/fragment_nerd_launcher.xml to create a layout for the fragment. Replace its contents with the RecyclerView shown in Figure 22.2.
Figure 22.2 Create NerdLauncherFragment layout (layout/fragment_nerd_launcher.xml)
Finally, add a new class named NerdLauncherFragment that extends from android.support.v4.app.Fragment. Add a newInstance() method and override onCreateView(…) to stash a reference to the RecyclerView object in a member variable. (You will hook data up to the RecyclerView in just a bit.)
Listing 22.2 Basic NerdLauncherFragment implementation (NerdLauncherFragment.java)
public class NerdLauncherFragment extends Fragment {
private RecyclerView mRecyclerView;
public static NerdLauncherFragment newInstance() {
return new NerdLauncherFragment();
}
@Override
public View onCreateView(LayoutInflater inflater, ViewGroup container,
Bundle savedInstanceState) {
View v = inflater.inflate(R.layout.fragment_nerd_launcher, container, false);
mRecyclerView = (RecyclerView) v
.findViewById(R.id.fragment_nerd_launcher_recycler_view);
mRecyclerView.setLayoutManager(new LinearLayoutManager(getActivity()));
return v;
}
}
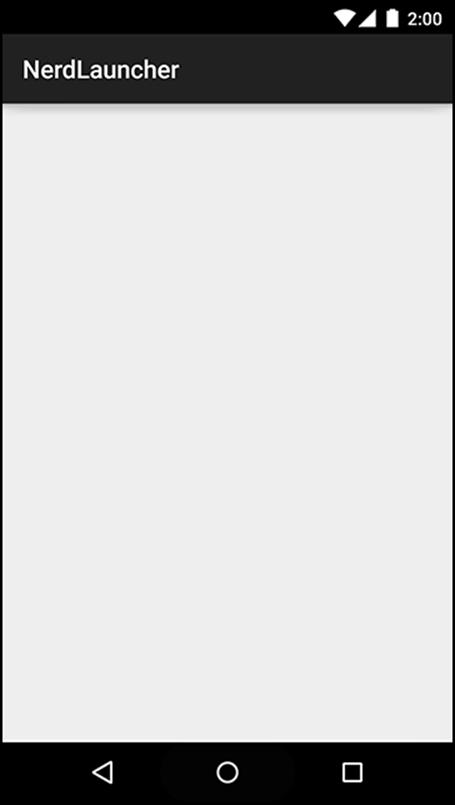
Run your app to make sure everything is hooked up correctly to this point. If so, you will be the proud owner of an app titled NerdLauncher, displaying an empty RecyclerView (Figure 22.3).
Figure 22.3 NerdLauncher beginnings
Resolving an Implicit Intent
NerdLauncher will show the user a list of launchable apps on the device. (A launchable app is an app the user can open by clicking an icon on the Home or launcher screen.) To do so, it will query the system (using the PackageManager) for launchable main activities. Launchable main activities are simply activities with intent filters that include a MAIN action and a LAUNCHER category. You have seen this intent filter in the AndroidManifest.xml file in your projects:
<intent-filter>
<action android:name="android.intent.action.MAIN" />
<category android:name="android.intent.category.LAUNCHER" />
</intent-filter>
In NerdLauncherFragment.java, add a method named setupAdapter() and call that method from onCreateView(…). (Ultimately this method will create a RecyclerView.Adapter instance and set it on your RecyclerView object. For now, it will just generate a list of application data.) Also, create an implicit intent and get a list of activities that match the intent from the PackageManager. Log the number of activities that the PackageManager returns.
Listing 22.3 Querying the PackageManager (NerdLauncherFragment.java)
public class NerdLauncherFragment extends Fragment {
private static final String TAG = "NerdLauncherFragment";
private RecyclerView mRecyclerView;
public static NerdLauncherFragment newInstance() {
return new NerdLauncherFragment();
}
@Override
public View onCreateView(LayoutInflater inflater, ViewGroup container,
Bundle savedInstanceState) {
...
setupAdapter();
return v;
}
private void setupAdapter() {
Intent startupIntent = new Intent(Intent.ACTION_MAIN);
startupIntent.addCategory(Intent.CATEGORY_LAUNCHER);
PackageManager pm = getActivity().getPackageManager();
List<ResolveInfo> activities = pm.queryIntentActivities(startupIntent, 0);
Log.i(TAG, "Found " + activities.size() + " activities.");
}
}
Run NerdLauncher and check LogCat to see how many apps the PackageManager returned. (We got 42 the first time we tried it.)
In CriminalIntent, you used an implicit intent to send a crime report. You presented an activity chooser by creating an implicit intent, wrapping it in a chooser intent, and sending it to the OS with startActivity(Intent):
Intent i = new Intent(Intent.ACTION_SEND);
... // Create and put intent extras
i = Intent.createChooser(i, getString(R.string.send_report));
startActivity(i);
You may be wondering why you are not using that approach here. The short explanation is that the MAIN/LAUNCHER intent filter may or may not match a MAIN/LAUNCHER implicit intent that is sent via startActivity(…).
It turns out that startActivity(Intent) does not mean “Start an activity matching this implicit intent.” It means “Start the default activity matching this implicit intent.” When you send an implicit intent via startActivity(…) (or startActivityForResult(…)), the OS secretly adds theIntent.CATEGORY_DEFAULT category to the intent.
Thus, if you want an intent filter to match implicit intents sent via startActivity(…), you must include the DEFAULT category in that intent filter.
An activity that has the MAIN/LAUNCHER intent filter is the main entry point for the app that it belongs to. It only wants the job of main entry point for that application. It typically does not care about being the “default” main entry point, so it does not have to include the CATEGORY_DEFAULTcategory.
Because MAIN/LAUNCHER intent filters may not include CATEGORY_DEFAULT, you cannot reliably match them to an implicit intent sent via startActivity(…). So, instead you use the intent to query the PackageManager directly for activities with the MAIN/LAUNCHER intent filter.
The next step is to display the labels of these activities in NerdLauncherFragment’s RecyclerView. An activity’s label is its display name – something the user should recognize. Given that these activities are launcher activities, the label is most likely the application name.
You can find the labels for the activities, along with other metadata, in the ResolveInfo objects that the PackageManager returned.
First, sort the ResolveInfo objects returned from the PackageManager alphabetically by label using the ResolveInfo.loadLabel(…) method.
Listing 22.4 Sorting alphabetically (NerdLauncherFragment.java)
public class NerdLauncherFragment extends Fragment {
...
private void setupAdapter() {
...
List<ResolveInfo> activities = pm.queryIntentActivities(startupIntent, 0);
Collections.sort(activities, new Comparator<ResolveInfo>() {
public int compare(ResolveInfo a, ResolveInfo b) {
PackageManager pm = getActivity().getPackageManager();
return String.CASE_INSENSITIVE_ORDER.compare(
a.loadLabel(pm).toString(),
b.loadLabel(pm).toString());
}
});
Log.i(TAG, "Found " + activities.size() + " activities.");
}
}
Now define a ViewHolder that displays an activity’s label. Store the activity’s ResolveInfo in a member variable (you will use it more than once later on).
Listing 22.5 ViewHolder implementation (NerdLauncherFragment.java)
public class NerdLauncherFragment extends Fragment {
...
private void setupAdapter() {
...
}
private class ActivityHolder extends RecyclerView.ViewHolder {
private ResolveInfo mResolveInfo;
private TextView mNameTextView;
public ActivityHolder(View itemView) {
super(itemView);
mNameTextView = (TextView) itemView;
}
public void bindActivity(ResolveInfo resolveInfo) {
mResolveInfo = resolveInfo;
PackageManager pm = getActivity().getPackageManager();
String appName = mResolveInfo.loadLabel(pm).toString();
mNameTextView.setText(appName);
}
}
}
Next add a RecyclerView.Adapter implementation.
Listing 22.6 RecyclerView.Adapter implementation (NerdLauncherFragment.java)
public class NerdLauncherFragment extends Fragment {
...
private class ActivityHolder extends RecyclerView.ViewHolder {
...
}
private class ActivityAdapter extends RecyclerView.Adapter<ActivityHolder> {
private final List<ResolveInfo> mActivities;
public ActivityAdapter(List<ResolveInfo> activities) {
mActivities = activities;
}
@Override
public ActivityHolder onCreateViewHolder(ViewGroup parent, int viewType) {
LayoutInflater layoutInflater = LayoutInflater.from(getActivity());
View view = layoutInflater
.inflate(android.R.layout.simple_list_item_1, parent, false);
return new ActivityHolder(view);
}
@Override
public void onBindViewHolder(ActivityHolder activityHolder, int position) {
ResolveInfo resolveInfo = mActivities.get(position);
activityHolder.bindActivity(resolveInfo);
}
@Override
public int getItemCount() {
return mActivities.size();
}
}
}
Last but not least, update setupAdapter() to create an instance of ActivityAdapter and set it as the RecyclerView’s adapter.
Listing 22.7 Set RecyclerView’s adapter (NerdLauncherFragment.java)
public class NerdLauncherFragment extends Fragment {
...
private void setupAdapter() {
...
Log.i(TAG, "Found " + activities.size() + " activities.");
mRecyclerView.setAdapter(new ActivityAdapter(activities));
}
...
}
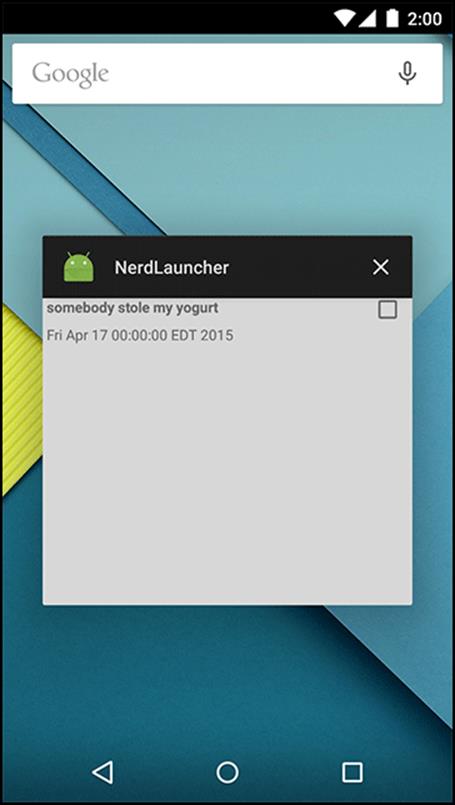
Run NerdLauncher, and you will see a RecyclerView populated with activity labels (Figure 22.4).
Figure 22.4 All your activities are belong to us
Creating Explicit Intents at Runtime
You used an implicit intent to gather the desired activities and present them in a list. The next step is to start the selected activity when the user presses its list item. You will start the activity using an explicit intent.
To create the explicit intent, you need to get the activity’s package name and class name from the ResolveInfo. You can get this data from a part of the ResolveInfo called ActivityInfo. (You can learn what data is available in different parts of ResolveInfo from its reference page:http://developer.android.com/reference/android/content/pm/ResolveInfo.html.)
Update ActivityHolder to implement a click listener. When an activity in the list is pressed, use the ActivityInfo for that activity to create an explicit intent. Then use that explicit intent to launch the selected activity.
Listing 22.8 Launching pressed activity (NerdLauncherFragment.java)
...
private class ActivityHolder extends RecyclerView.ViewHolder
implements View.OnClickListener {
private ResolveInfo mResolveInfo;
private TextView mNameTextView;
public ActivityHolder(View itemView) {
super(itemView);
mNameTextView = (TextView) itemView;
mNameTextView.setOnClickListener(this);
}
public void bindActivity(ResolveInfo resolveInfo) {
...
}
@Override
public void onClick(View v) {
ActivityInfo activityInfo = mResolveInfo.activityInfo;
Intent i = new Intent(Intent.ACTION_MAIN)
.setClassName(activityInfo.applicationInfo.packageName,
activityInfo.name);
startActivity(i);
}
}
Notice that in this intent you are sending an action as part of an explicit intent. Most apps will behave the same whether you include the action or not. However, some may change their behavior. The same activity can display different interfaces depending on how it is started. As a programmer, it is best to declare your intentions clearly and let the activities you start do what they will.
In Listing 22.8, you get the package name and class name from the metadata and use them to create an explicit intent using the Intent method:
public Intent setClassName(String packageName, String className)
This is different from how you have created explicit intents in the past. Before, you have used an Intent constructor that accepts a Context and a Class object:
public Intent(Context packageContext, Class<?> cls)
This constructor uses its parameters to get what the Intent really needs – a ComponentName. A ComponentName is a package name and a class name stuck together. When you pass in an Activity and a Class to create an Intent, the constructor determines the fully qualified package name from theActivity.
You could also create a ComponentName yourself from the package and class names and use the following Intent method to create an explicit intent:
public Intent setComponent(ComponentName component)
However, it is less code to use setClassName(…), which creates the component name behind the scenes.
Run NerdLauncher and launch some apps.
Tasks and the Back Stack
Android uses tasks to keep track of the user’s state within each running application. Each application opened from Android’s default launcher app gets its own task. This is the desired behavior but, unfortunately for your NerdLauncher, it is not the default behavior. Before you foray into forcing applications to launch into their own tasks, let’s discuss what tasks are and how they work.
A task is a stack of activities that the user is concerned with. The activity at the bottom of the stack is called the base activity, and whatever activity is on top is the activity that the user sees. When you press the Back button, you are popping the top activity off of this stack. If you are looking at the base activity and hit the Back button, it will send you to the Home screen.
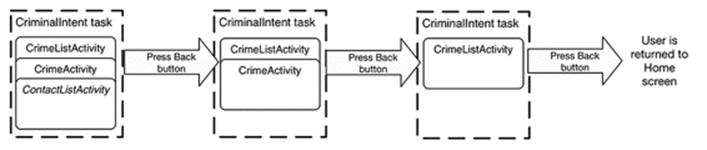
By default, new activities are started in the current task. In CriminalIntent, whenever you started a new activity that activity was added to the current task (as shown in Figure 22.5). This was true even if the activity was not part of the CriminalIntent application, like when you started an activity to select a crime suspect.
Figure 22.5 CriminalIntent task

The benefit of adding an activity to the current task is that the user can navigate back through the task instead of the application hierarchy (as shown in Figure 22.6).
Figure 22.6 Pressing the Back button in CriminalIntent
Switching between tasks
Using the overview screen, you can switch between tasks without affecting each task’s state. For instance, if you start entering a new contact and switch to checking your Twitter feed, you will have two tasks started. If you switch back to editing contacts, your place in both tasks will be saved.
(The overview screen has many other names. You may hear it called the task manager, recents screen, recent apps screen, or recent tasks list.)
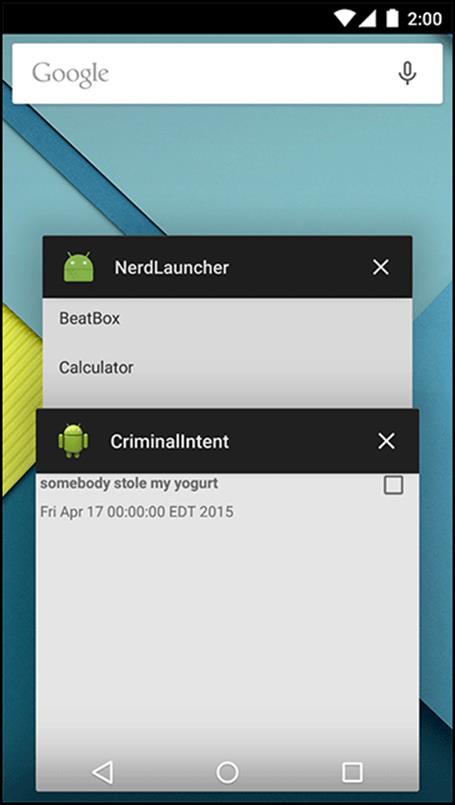
Try out the overview screen on your device or emulator. First, launch CriminalIntent from the Home screen or from your app launcher. (If your device or emulator no longer has CriminalIntent installed, open your CriminalIntent project in Android Studio and run it from there.) Select a crime from the crime list. Then push the Home button to return to the Home screen. Next, launch BeatBox from the Home screen or from your app launcher (or, if necessary, from Android Studio).
Open the overview screen. The method for doing so will vary depending on your device. Press the Recents button if the device has one. (The Recents button usually looks like a square or two overlapping rectangles and appears at the far right side of the navigation bar. You can see two examples of the Recents button in Figure 22.7.) Otherwise, try long-pressing the Home button. If that does not work, double-tap the Home button.
Figure 22.7 Overview screen versions
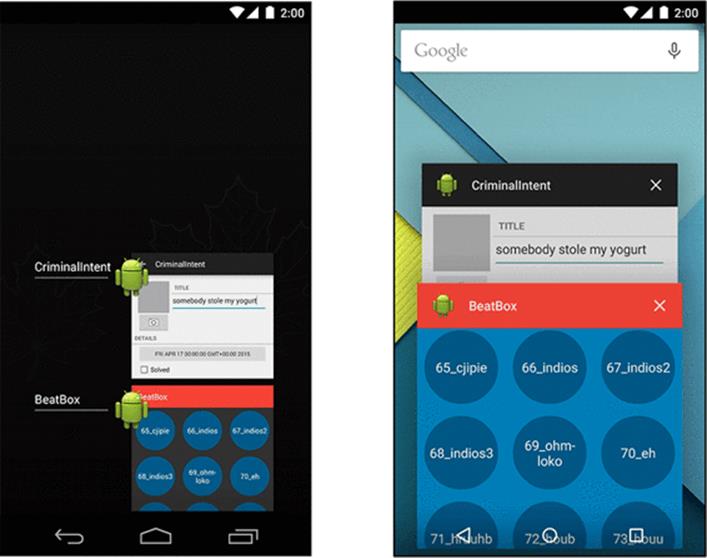
The overview screen displayed on the left in Figure 22.7 is what users will see if they are running KitKat. The overview screen displayed on the right is what users running Lollipop will see. In both cases, the entry displayed for each app (known as a card in Lollipop) represents the task for each app. A screenshot of the activity at the top of each task’s back stack is displayed. Users can press on the BeatBox or CriminalIntent entry to return to the app (and to whatever activity they were interacting with in that app).
Users can clear an app’s task by removing the card from the task list. Do this by swiping on the card entry. Clearing the task removes all activities from the application’s back stack.
Try clearing CriminalIntent’s task, then relaunch the app. You will see the list of crimes instead of the crime you were editing before you cleared the task.
Starting a new task
Sometimes, when you start an activity, you want the activity added to the current task. Other times, you want it started in a new task that is independent of the activity that started it.
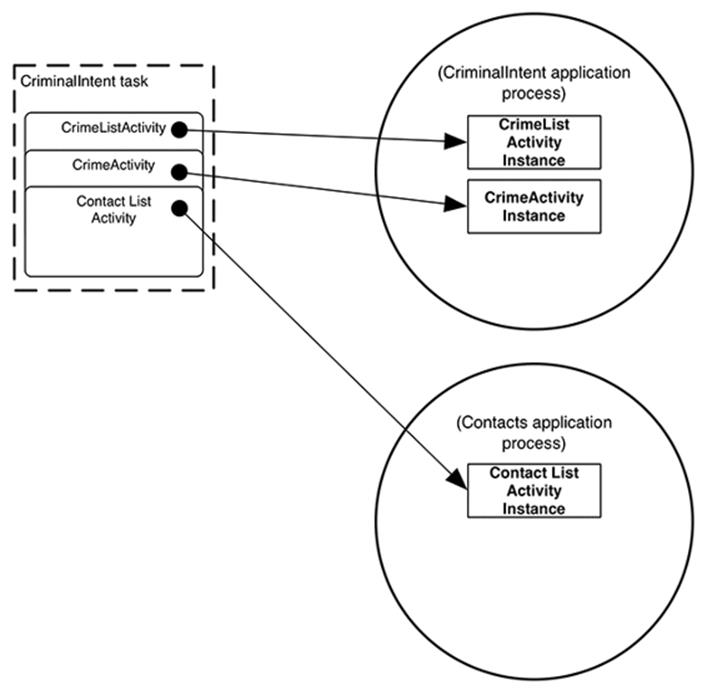
Right now, any activity started from NerdLauncher is added to NerdLauncher’s task, as depicted in Figure 22.8.
Figure 22.8 NerdLauncher’s task contains CriminalIntent
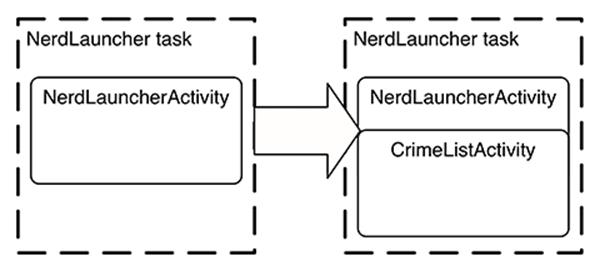
You can confirm this by clearing all the tasks displayed in the overview screen. Then start NerdLauncher and click on the CriminalIntent entry to launch the CriminalIntent app. Open the overview screen again. You will not see CriminalIntent listed anywhere. When CrimeListActivity was started, it was added to NerdLauncher’s task (Figure 22.9). If you press the NerdLauncher task, you will be returned to whatever CriminalIntent screen you were looking at before starting the overview screen.
Figure 22.9 CriminalIntent not in its own task
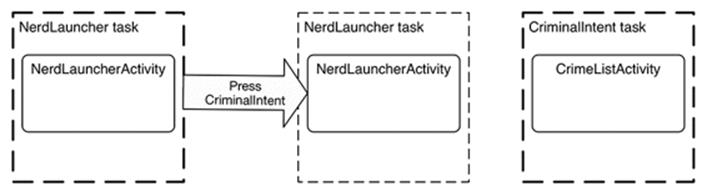
Instead, you want NerdLauncher to start activities in new tasks (Figure 22.10). This way each application opened by pressing an item in the NerdLauncher list gets its own task, which will allow users to switch between running applications as they like (via the overview screen, NerdLauncher, or the Home screen).
Figure 22.10 Launching CriminalIntent into its own task
To start a new task when you start a new activity, add a flag to the intent in NerdLauncherFragment.java.
Listing 22.9 Adding new task flag to intent (NerdLauncherFragment.java)
public class NerdLauncherFragment extends Fragment {
...
private class ActivityHolder extends RecyclerView.ViewHolder
implements View.OnClickListener {
...
@Override
public void onClick(View v) {
...
Intent i = new Intent(Intent.ACTION_MAIN)
.setClassName(activityInfo.applicationInfo.packageName,
activityInfo.name)
.addFlags(Intent.FLAG_ACTIVITY_NEW_TASK);
startActivity(i);
}
}
...
}
Clear the tasks listed in your overview screen. Run NerdLauncher and start CriminalIntent. This time, when you pull up the overview screen you will see a separate task for CriminalIntent (Figure 22.11).
Figure 22.11 CriminalIntent now in its own task
If you start CriminalIntent from NerdLauncher again, you will not create a second CriminalIntent task. The FLAG_ACTIVITY_NEW_TASK flag by itself creates one task per activity. CrimeListActivity already has a task running, so Android will switch to that task instead of starting a new one.
Try this out. Open the detail screen for one of the crimes in CriminalIntent. Use the overview screen to switch to NerdLauncher. Press on CriminalIntent in the list. You will notice you are right back where you were in the CriminalIntent app, viewing details for a single crime.
Using NerdLauncher as a Home Screen
Who wants to start an app to start other apps? It would make more sense to offer NerdLauncher as a replacement for the device’s Home screen. Open NerdLauncher’s AndroidManifest.xml and add to its main intent filter.
Listing 22.10 Changing NerdLauncherActivity’s categories (AndroidManifest.xml)
<intent-filter>
<action android:name="android.intent.action.MAIN" />
<category android:name="android.intent.category.LAUNCHER" />
<category android:name="android.intent.category.HOME" />
<category android:name="android.intent.category.DEFAULT" />
</intent-filter>
By adding the HOME and DEFAULT categories, NerdLauncherActivity is asking to be offered as an option for the Home screen. Press the Home button, and NerdLauncher will be offered as an option (Figure 22.12).
Figure 22.12 Select Home app

(If you make NerdLauncher the Home screen you can easily change it back later. Launch the Settings app from NerdLauncher. If you are running Lollipop, go to Settings → Apps. Select NerdLauncher from the app list. If you are running a pre-Lollipop version of Android, go to Settings → Applications→ Manage Applications. Select All to find NerdLauncher. Once you have selected NerdLauncher, you should be on the App Info screen. Scroll down to Launch by default and press the CLEAR DEFAULTS button. The next time you press the Home button, you will be able to select another default.)
Challenge: Icons
You used ResolveInfo.loadLabel(…) in this chapter to present useful names in your launcher. ResolveInfo provides a similar method called loadIcon() that retrieves an icon to display for each application. For a small challenge, add an icon for each application to NerdLauncher.
For the More Curious: Processes vs. Tasks
All objects need memory and a virtual machine to live in. A process is a place created by the OS for your application’s objects to live and for your application to run.
Processes may own resources managed by the OS, like memory, network sockets, and open files. Processes also have at least one, possibly many, threads of execution. On Android, your process will also always have exactly one virtual machine running.
While there are some obscure exceptions, in general every application component in Android is associated with exactly one process. Your application is created with its own process, and this is the default process for all components in your application.
(You can assign individual components to different processes, but we recommend sticking to the default process. If you think you need something running in a different process, you can usually achieve the same ends with multi-threading, which is more straightforward to program in Android than using multiple processes.)
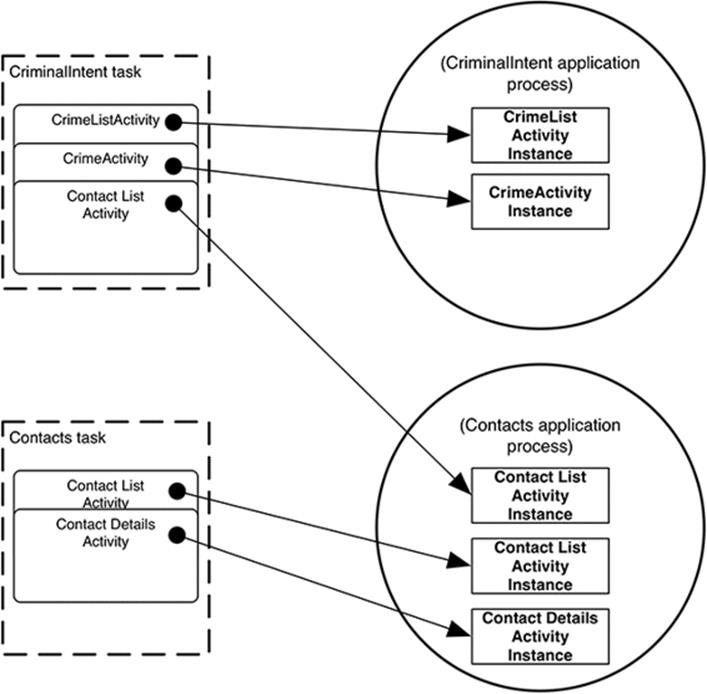
Every activity instance lives in exactly one process and is referenced by exactly one task. But that is where the similarities between processes and tasks end. Tasks contain only activities and often consist of activities living in different application processes. Processes, on the other hand, contain all running code and objects for a single application.
It can be easy to confuse processes and tasks because there is some overlap between the two ideas and both are often referred to by an application name. For instance, when you launched CriminalIntent from NerdLauncher, the OS created a CriminalIntent process and a new task for whichCrimeListActivity was the base activity. In the overview screen, this task was labeled CriminalIntent.
The task that an activity is referenced by can be different from the process it lives in. For example, consider the CriminalIntent and contact applications and walk through the following scenario.
Open CriminalIntent, select a crime from the list (or add a new crime), and then press CHOOSE SUSPECT. This launches the contacts application to choose a contact. The contact list activity is added to the CriminalIntent task. This means that when your user presses the Back button to navigate between different activities, he or she may be unknowingly switching between processes, which is nifty.
However, the contact list activity instance is actually created in the contacts app’s process’s memory space, and it runs on the virtual machine living in the contacts application’s process. (The state of the activity instances and task references of this scenario are depicted in Figure 22.13.)
Figure 22.13 Tasks and processes
To explore the idea of processes vs. tasks further, leave CriminalIntent up and running on the contact list screen. (Make sure the contacts app itself is not listed on the overview screen. If so, clear the contacts app task.) Press the Home button. Launch the contacts app from the Home screen. Select a contact from the list of contacts (or select to add a new contact).
In doing this, new contact list activity and contact details instances will be created in the contact application’s process. A new task will be created for the contacts application, and that task will reference the new contact list and contact details activity instances (as shown in Figure 22.14).
Figure 22.14 Tasks and processes
In this chapter, you created tasks and switched between them. What about replacing Android’s default overview screen, as you are able to do with the Home screen? Unfortunately, Android does not provide a way to do this. Also, you should know that apps advertised on the Google Play store as “task killers” are, in fact, process killers. Such apps kill a particular process, which means you may be killing activities referenced by other applications’ tasks.
For the More Curious: Concurrent Documents
If you are running your apps on a Lollipop device, you may have noticed some interesting behavior with respect to CriminalIntent and the overview screen. When you opt to send a crime report from CriminalIntent, the activity for the app you select from the chooser is added to its own separate task rather than to CriminalIntent’s task (Figure 22.15).
Figure 22.15 Gmail launched into separate task
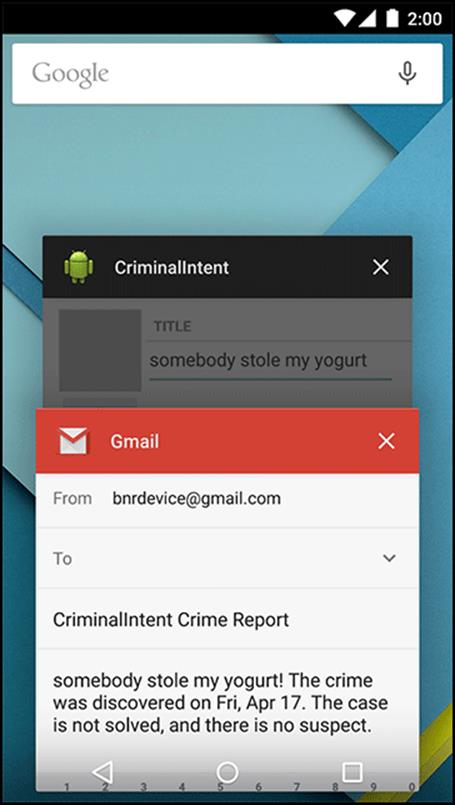
On Lollipop, the implicit intent chooser creates a new, separate task for activities launched with the android.intent.action.SEND or action.intent.action.SEND_MULTIPLE actions. (On older versions of Android, this does not happen, so Gmail’s compose activity would have been added directly to CriminalIntent’s task.)
This behavior uses a new notion in Lollipop called concurrent documents. Concurrent documents allow any number of tasks to be dynamically created for an app at runtime. Prior to Lollipop, apps could only have a predefined set of tasks, each of which had to be named in the manifest.
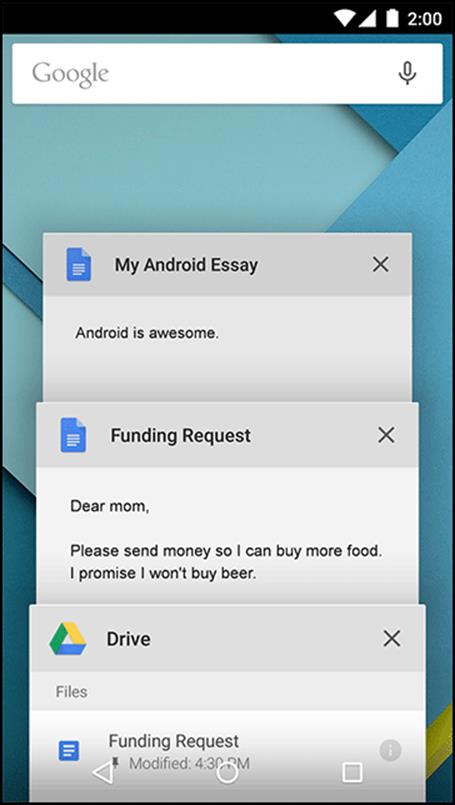
A prime example of concurrent documents in practice is the Google Drive app. You can open and edit multiple documents, each of which gets its own separate task in the Lollipop overview screen (Figure 22.16). If you were to take the same actions in Google Drive on a pre-Lollipop device, you would only see one task in the overview screen. This is because of the requirement on pre-Lollipop devices to define an app’s tasks ahead of time in the manifest. It was not possible pre-Lollipop to generate a dynamic number of tasks for a single app.
Figure 22.16 Multiple Google Drive tasks on Lollipop
You can start multiple “documents” (tasks) from your own app running on a Lollipop device by either adding the Intent.FLAG_ACTIVITY_NEW_DOCUMENT flag to an intent before calling startActivity(…) or by setting the documentLaunchMode on the activity in the manifest like so:
<activity
android:name=".CrimePagerActivity"
android:label="@string/app_name"
android:parentActivityName=".CrimeListActivity"
android:documentLaunchMode="intoExisting" />
Using this approach, only one task per document will be created (so if you issue an intent with the same data as an already existing task, no new task is created). You can enforce a new task to always be created, even if one already exists for a given document, by either adding theIntent.FLAG_ACTIVITY_MULTIPLE_TASK flag along with the Intent.FLAG_ACTIVITY_NEW_DOCUMENT flag before issuing the intent, or by using always as the value for documentLaunchMode in your manifest.
To learn more about the overview screen and changes that were made to it with the Lollipop release, check out https://developer.android.com/guide/components/recents.html.