Android Programming: The Big Nerd Ranch Guide (2015)
Chapter 28. Browsing the Web and WebView
Each photo you get from Flickr has a page associated with it. In this chapter, you are going to update PhotoGallery so that users can press a photo to see its Flickr page. You will learn two different ways to integrate web content into your apps, shown in Figure 28.1. The first works with the device’s browser app (left), and the second uses a WebView to display web content within PhotoGallery (right).
Figure 28.1 Web content: two different approaches

One Last Bit of Flickr Data
For both ways, you need to get the URL for a photo’s Flickr page. If you look at the JSON you are currently receiving for each photo, you can see that the photo page is not part of those results.
{
"photos": {
...,
"photo": [
{
"id": "9452133594",
"owner": "44494372@N05",
"secret": "d6d20af93e",
"server": "7365",
"farm": 8,
"title": "Low and Wisoff at Work",
"ispublic": 1,
"isfriend": 0,
"isfamily": 0,
"url_s":"https://farm8.staticflickr.com/7365/9452133594_d6d20af93e_m.jpg"
}, ...
]
},
"stat": "ok"
}
You might think that you are in for some more JSON request writing. Fortunately, that is not the case. If you look at the “Web Page URLs” section of Flickr’s documentation at http://www.flickr.com/services/api/misc.urls.html, you will see that you can create the URL for an individual photo’s page like so:
http://www.flickr.com/photos/user-id/photo-id
The photo-id seen here is the same as the value of the id attribute from your JSON. You are already stashing that in mId in GalleryItem. What about user-id? If you poke around the documentation, you will find that the owner attribute in your JSON is a user ID. So if you pull out the ownerattribute, you should be able to build the URL from your photo JSON:
http://www.flickr.com/photos/owner/id
Update GalleryItem to put this plan into action.
Listing 28.1 Adding code for photo page (GalleryItem.java)
public class GalleryItem {
private String mCaption;
private String mId;
private String mUrl;
private String mOwner;
...
public void setUrl(String url) {
mUrl = url;
}
public String getOwner() {
return mOwner;
}
public void setOwner(String owner) {
mOwner = owner;
}
public Uri getPhotoPageUri() {
return Uri.parse("http://www.flickr.com/photos/")
.buildUpon()
.appendPath(mOwner)
.appendPath(mId)
.build();
}
@Override
public String toString() {
return mCaption;
}
}
Here, you create a new mOwner property here and add a short method called getPhotoPageUri() to generate photo page URLs as discussed above.
Now change parseItems(…) to read in the owner attribute.
Listing 28.2 Reading in owner attribute (FlickrFetchr.java)
public class FlickrFetchr {
...
private void parseItems(List<GalleryItem> items, JSONObject jsonBody)
throws IOException, JSONException {
JSONObject photosJsonObject = jsonBody.getJSONObject("photos");
JSONArray photoJsonArray = photosJsonObject.getJSONArray("photo");
for (int i = 0; i < photoJsonArray.length(); i++) {
JSONObject photoJsonObject = photoJsonArray.getJSONObject(i);
GalleryItem item = new GalleryItem();
item.setId(photoJsonObject.getString("id"));
item.setCaption(photoJsonObject.getString("title"));
if (!photoJsonObject.has("url_s")) {
continue;
}
item.setUrl(photoJsonObject.getString("url_s"));
item.setOwner(photoJsonObject.getString("owner"));
items.add(item);
}
}
}
Easy peasy. Now to have fun with your new photo page URL.
The Easy Way: Implicit Intents
You will browse to this URL first by using your old friend the implicit intent. This intent will start up the browser with your photo URL.
The first step is to make your app listen to presses on an item in the RecyclerView. Update PhotoGalleryFragment’s PhotoHolder to implement a click listener that will fire an implicit intent.
Listing 28.3 Firing implicit intent when item is pressed (PhotoGalleryFragment.java)
public class PhotoGalleryFragment extends VisibleFragment {
...
private class PhotoHolder extends RecyclerView.ViewHolder
implements View.OnClickListener {
private ImageView mItemImageView;
private GalleryItem mGalleryItem;
public PhotoHolder(View itemView) {
super(itemView);
mItemImageView = (ImageView) itemView
.findViewById(R.id.fragment_photo_gallery_image_view);
itemView.setOnClickListener(this);
}
public void bindDrawable(Drawable drawable) {
mItemImageView.setImageDrawable(drawable);
}
public void bindGalleryItem(GalleryItem galleryItem) {
mGalleryItem = galleryItem;
}
@Override
public void onClick(View v) {
Intent i = new Intent(Intent.ACTION_VIEW, mGalleryItem.getPhotoPageUri());
startActivity(i);
}
}
...
}
Next, bind the PhotoHolder to a GalleryItem in PhotoAdapter.onBindViewHolder(…).
Listing 28.4 Binding GalleryItem (PhotoGalleryFragment.java)
...
private class PhotoAdapter extends RecyclerView.Adapter<PhotoHolder> {
...
@Override
public void onBindViewHolder(PhotoHolder photoHolder, int position) {
GalleryItem galleryItem = mGalleryItems.get(position);
photoHolder.bindGalleryItem(galleryItem);
Drawable placeholder = getResources().getDrawable(R.drawable.bill_up_close);
photoHolder.bindDrawable(placeholder);
mThumbnailDownloader.queueThumbnail(photoHolder, galleryItem.getUrl());
}
...
}
...
That is it. Start up PhotoGallery and press on a photo. Your browser app should pop up and load the photo page for the item you pressed (similar to the image on the left in Figure 28.1).
The Harder Way: WebView
Using an implicit intent to display the photo page is easy and effective. But what if you do not want your app to open the browser?
Often, you want to display web content within your own activities instead of heading off to the browser. You may want to display HTML that you generate yourself, or you may want to lock down the browser somehow. For apps that include help documentation, it is common to implement it as a web page so that it is easy to update. Opening a web browser to a help web page does not look professional, and it prevents you from customizing behavior or integrating that web page into your own user interface.
When you want to present web content within your own user interface, you use the WebView class. We are calling this the “harder” way here, but it is pretty darned easy. (Anything is hard compared to using implicit intents.)
The first step is to create a new activity and fragment to display the WebView. Start, as usual, by defining a layout file, using Figure 28.2.
Figure 28.2 Initial layout (res/layout/fragment_photo_page.xml)
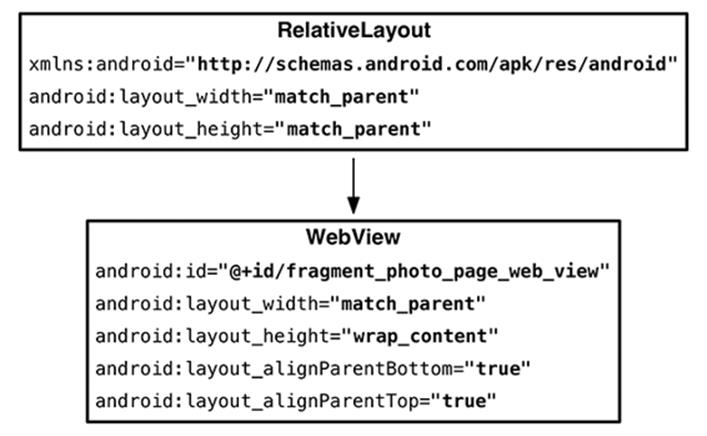
You may be thinking, “That RelativeLayout is pretty useless.” True enough – for the moment. You will fill it out later in the chapter with additional “chrome.”
Next, get the rudiments of your fragment set up. Create PhotoPageFragment as a subclass of the VisibleFragment class you created in the last chapter. You will need to inflate your layout file, extract your WebView from it, and forward along the URL to display as a fragment argument.
Listing 28.5 Setting up your web browser fragment (PhotoPageFragment.java)
public class PhotoPageFragment extends VisibleFragment {
private static final String ARG_URI = "photo_page_url";
private Uri mUri;
private WebView mWebView;
public static PhotoPageFragment newInstance(Uri uri) {
Bundle args = new Bundle();
args.putParcelable(ARG_URI, uri);
PhotoPageFragment fragment = new PhotoPageFragment();
fragment.setArguments(args);
return fragment;
}
@Override
public void onCreate(Bundle savedInstanceState) {
super.onCreate(savedInstanceState);
mUri = getArguments().getParcelable(ARG_URI);
}
@Override
public View onCreateView(LayoutInflater inflater, ViewGroup container,
Bundle savedInstanceState) {
View v = inflater.inflate(R.layout.fragment_photo_page, container, false);
mWebView = (WebView) v.findViewById(R.id.fragment_photo_page_web_view);
return v;
}
}
For now, this is just a skeleton. You will fill it out a bit more in a moment. But first, create the containing PhotoPageActivity class using good old SingleFragmentActivity.
Listing 28.6 Creating web activity (PhotoPageActivity.java)
public class PhotoPageActivity extends SingleFragmentActivity {
public static Intent newIntent(Context context, Uri photoPageUri) {
Intent i = new Intent(context, PhotoPageActivity.class);
i.setData(photoPageUri);
return i;
}
@Override
protected Fragment createFragment() {
return PhotoPageFragment.newInstance(getIntent().getData());
}
}
Switch up your code in PhotoGalleryFragment to launch your new activity instead of the implicit intent.
Listing 28.7 Switching to launch your activity (PhotoGalleryFragment.java)
public class PhotoGalleryFragment extends VisibleFragment {
...
private class PhotoHolder extends RecyclerView.ViewHolder
implements View.OnClickListener{
...
@Override
public void onClick(View v) {
Intent i = new Intent(Intent.ACTION_VIEW, mGalleryItem.getPhotoPageUri());
Intent i = PhotoPageActivity
.newIntent(getActivity(), mGalleryItem.getPhotoPageUri());
startActivity(i);
}
}
...
}
And, finally, add your new activity to the manifest.
Listing 28.8 Adding activity to manifest (AndroidManifest.xml)
<manifest ... >
...
<application
...>
<activity
android:name=".PhotoGalleryActivity"
android:label="@string/app_name" >
...
</activity>
<activity android:name=".PhotoPageActivity" />
<service android:name=".PollService" />
...
</application>
</manifest>
Run PhotoGallery and press on a picture. You should see a new empty activity pop up.
OK, now to get to the meat and actually make your fragment do something. You need to do three things to make your WebView successfully display a Flickr photo page. The first one is straightforward – you need to tell it what URL to load.
The second thing you need to do is enable JavaScript. By default, JavaScript is off. You do not always need to have it on, but for Flickr, you do. (If you run Android Lint, it gives you a warning for doing this. It is worried about cross-site scripting attacks. You can suppress this Lint warning here by annotating onCreateView(…) with @SuppressLint("SetJavaScriptEnabled").)
Finally, you need to override one method on a class called WebViewClient, shouldOverrideUrlLoading(WebView, String), and return false. We will discuss this class a bit more after you enter the code.
Listing 28.9 Loading URL into WebView (PhotoPageFragment.java)
public class PhotoPageFragment extends VisibleFragment {
...
@Override
public View onCreateView(LayoutInflater inflater, ViewGroup container,
Bundle savedInstanceState) {
View v = inflater.inflate(R.layout.fragment_photo_page, container, false);
mWebView = (WebView) v.findViewById(R.id.fragment_photo_page_web_view);
mWebView.getSettings().setJavaScriptEnabled(true);
mWebView.setWebViewClient(new WebViewClient() {
public boolean shouldOverrideUrlLoading(WebView view, String url) {
return false;
}
});
mWebView.loadUrl(mUri.toString());
return v;
}
}
Loading the URL has to be done after configuring the WebView, so you do that last. Before that, you turn JavaScript on by calling getSettings() to get an instance of WebSettings and calling WebSettings.setJavaScriptEnabled(true). WebSettings is the first of the three ways you can modify yourWebView. It has various properties you can set, like the user agent string and text size.
After that, you configure your WebViewClient. WebViewClient is an event interface. By providing your own implementation of WebViewClient, you can respond to rendering events. For example, you could detect when the renderer starts loading an image from a particular URL or decide whether to resubmit a POST request to the server.
WebViewClient has many methods you can override, most of which you will not deal with. However, you do need to replace the default WebViewClient’s implementation of shouldOverrideUrlLoading(WebView, String). This method determines what will happen when a new URL is loaded in theWebView, like by pressing a link. If you return true, you are saying, “Do not handle this URL, I am handling it myself.” If you return false, you are saying, “Go ahead and load this URL, WebView, I’m not doing anything with it.”
The default implementation fires an implicit intent with the URL, just like you did earlier. Now, though, this would be a severe problem. The first thing Flickr does is redirect you to the mobile version of the website. With the default WebViewClient, that means that you are immediately sent to the user’s default web browser. This is just what you are trying to avoid.
The fix is simple – just override the default implementation and return false.
Run PhotoGallery, press an item, and you should see the item’s photo page displayed in the WebView (just like the image on the right in Figure 28.1).
Using WebChromeClient to spruce things up
Since you are taking the time to create your own WebView, let’s spruce it up a bit by adding a progress bar and updating the toolbar’s subtitle with the title of the loaded page. Crack open fragment_photo_page.xml and get started on these changes.
Listing 28.10 Adding title and progress (fragment_photo_page.xml)
<RelativeLayout ...>
<ProgressBar
android:id="@+id/fragment_photo_page_progress_bar"
android:layout_width="match_parent"
android:layout_height="wrap_content"
android:layout_alignParentTop="true"
android:visibility="gone"
style="?android:attr/progressBarStyleHorizontal"
android:background="?attr/colorPrimary"/>
<WebView
android:id="@+id/fragment_photo_page_web_view"
android:layout_width="match_parent"
android:layout_height="wrap_content"
android:layout_height="match_parent"
android:layout_alignParentTop="true" />
android:layout_alignParentBottom="true"
android:layout_below="@id/fragment_photo_page_progress_bar" />
</RelativeLayout>
To hook up the ProgressBar, you will use the second callback on WebView: WebChromeClient. WebViewClient is an interface for responding to rendering events; WebChromeClient is an event interface for reacting to events that should change elements of chrome around the browser. This includes JavaScript alerts, favicons, and of course updates for loading progress and the title of the current page.
Hook it up in onCreateView(…).
Listing 28.11 Using WebChromeClient (PhotoPageFragment.java)
public class PhotoPageFragment extends VisibleFragment {
...
private WebView mWebView;
private ProgressBar mProgressBar;
...
@Override
public View onCreateView(LayoutInflater inflater, ViewGroup container,
Bundle savedInstanceState) {
View v = inflater.inflate(R.layout.fragment_photo_page, container, false);
mProgressBar =
(ProgressBar)v.findViewById(R.id.fragment_photo_page_progress_bar);
mProgressBar.setMax(100); // WebChromeClient reports in range 0-100
mWebView = (WebView) v.findViewById(R.id.fragment_photo_page_web_view);
mWebView.getSettings().setJavaScriptEnabled(true);
mWebView.setWebChromeClient(new WebChromeClient() {
public void onProgressChanged(WebView webView, int newProgress) {
if (newProgress == 100) {
mProgressBar.setVisibility(View.GONE);
} else {
mProgressBar.setVisibility(View.VISIBLE);
mProgressBar.setProgress(newProgress);
}
}
public void onReceivedTitle(WebView webView, String title) {
AppCompatActivity activity = (AppCompatActivity) getActivity();
activity.getSupportActionBar().setSubtitle(title);
}
});
mWebView.setWebViewClient(new WebViewClient() {
...
});
mWebView.loadUrl(mUri.toString());
return v;
}
}
Progress updates and title updates each have their own callback method, onProgressChanged(WebView, int) and onReceivedTitle(WebView, String). The progress you receive from onProgressChanged(WebView, int) is an integer from 0 to 100. If it is 100, you know that the page is done loading, so you hide the ProgressBar by setting its visibility to View.GONE.
Run PhotoGallery to test your changes. It should look like Figure 28.3.
Figure 28.3 Fancy WebView
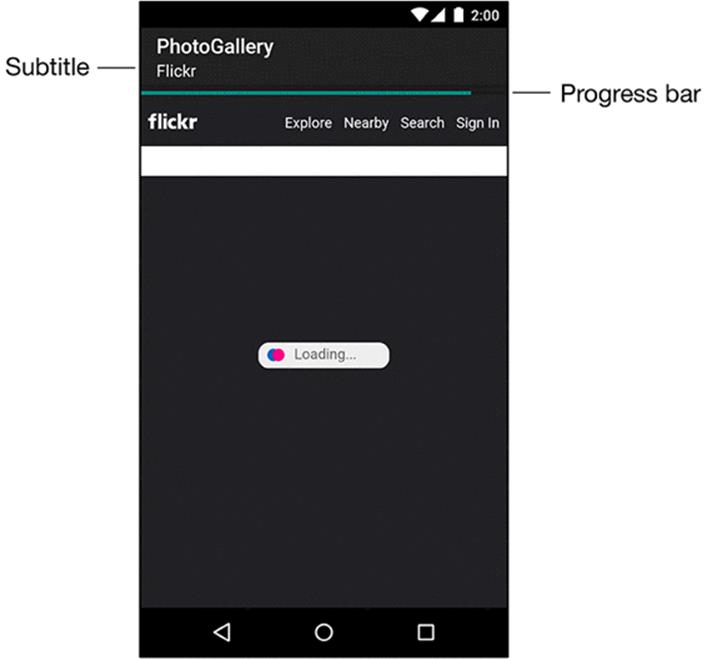
When you press on a photo, PhotoPageActivity pops up. A progress bar displays as the page loads and a subtitle reflecting the subtitle received in onReceivedTitle(…) appears in the toolbar. Once the page is loaded, the progress bar disappears.
Proper Rotation with WebView
Try rotating your screen. While it does work correctly, you will notice that the WebView has to completely reload the web page. This is because WebView has too much data to save it all out inside onSaveInstanceState(…). It has to start from scratch each time it is re-created on rotation.
You may think the easiest way to resolve this problem would be to retain PhotoPageFragment. However, this would not work, because WebView is part of the view hierarchy and is thus still destroyed and re-created on rotation.
For some classes like this (VideoView is another one), the Android documentation recommends that you allow the activity to handle the configuration change itself. This means that instead of the activity being destroyed on rotation, it simply moves its views around to fit the new screen size. As a result, WebView does not have to reload all of its data.
To tell PhotoPageActivity to handle its own darned configuration changes, make the following tweak to AndroidManifest.xml.
Listing 28.12 Handling configuration changes yourself (AndroidManifest.xml)
<manifest ... >
...
<activity
android:name=".PhotoPageActivity"
android:configChanges="keyboardHidden|orientation|screenSize" />
...
</manifest>
This attribute says that if the configuration changes because the keyboard was opened or closed, due to an orientation change, or due to the screen size changing (which also happens when switching between portrait and landscape after Android 3.2), then the activity should handle the change itself.
And that is it. Try rotating again, and admire how smoothly the change is handled.
Dangers of handling configuration changes
That is so easy and works so well that you are probably wondering why you do not do this all the time. It seems like it would make life so much easier. However, handling configuration changes on your own is a dangerous habit.
First, resource qualifiers no longer work automatically. You instead have to manually reload your view. This can be more complicated than it sounds.
Second, and more important, allowing the activity to handle configuration changes will likely cause you to not bother with overriding Activity.onSavedInstanceState(…) to stash transient UI states. Doing so is still necessary, even if the activity is handling configuration changes on its own, because you still have to worry about death and re-creation in low-memory situations. (Remember, the activity can be destroyed and stashed by the system at any time if it is not in the running state, as shown in Figure 3.13 .)
For the More Curious: Injecting JavaScript Objects
In this chapter, you have seen how to use WebViewClient and WebChromeClient to respond to specific events that happen in your WebView. However, it is possible to do even more than that by injecting arbitrary JavaScript objects into the document contained in the WebView itself. Check out the documentation at http://developer.android.com/reference/android/webkit/WebView.html and scroll down to the addJavascriptInterface(Object, String) method. Using this, you can inject an arbitrary object into the document with a name you specify.
mWebView.addJavascriptInterface(new Object() {
@JavascriptInterface
public void send(String message) {
Log.i(TAG, "Received message: " + message);
}
}, "androidObject");
And then invoke it like so:
<input type="button" value="In WebView!"
onClick="sendToAndroid('In Android land')" />
<script type="text/javascript">
function sendToAndroid(message) {
androidObject.send(message);
}
</script>
Starting with API 17 (Jelly Bean 4.2) and up, only public methods annotated @JavascriptInterface are exported to JavaScript. Prior to that, all public methods in the object hierarchy were accessible.
Either way, this could be dangerous. You are letting some potentially strange web page fiddle with your program. So to be safe, it is a good idea to make sure you own the HTML in question – either that, or be extremely conservative with the interface you expose.
For the More Curious: KitKat’s WebView Overhaul
WebView underwent a serious overhaul with the release of KitKat (Android 4.4, API 19). The new WebView is based on the Chromium open source project. It now shares the same rendering engine used by the Chrome for Android app, meaning pages should look and behave more consistently across the two. (However, WebView does not have all the features Chrome for Android does. You can see a good table comparing the two at https://developer.chrome.com/multidevice/webview/overview.)
The move to Chromium meant some really exciting improvements for WebView, like support for new web standards like HTML5 and CSS3, an updated JavaScript engine, and improved performance. From a development perspective, one of the most exciting new features is the added support for remote debugging of WebView using Chrome DevTools (which can be enabled by calling WebView.setWebContentsDebuggingEnabled()).
But what if your app supports pre-KitKat devices? It is important to note that some things behave very differently now. For example, interaction with content providers is no longer allowed from nonlocal web content (pages hosted on a server rather than your device), and custom URL schemes are handled in a more restrictive fashion.
If you set your target SDK to a value less than API 19, WebView will try to avoid the behavior changes introduced in API 19 while still attempting to provide the benefits of improved performance and web standards support. (This is called “quirks mode.”) However, in some cases this is still not enough. For example, default zoom levels are not supported at all on API 19 and higher devices.
To make a long story short, if you are supporting pre-KitKat devices and rely on WebView, you will want to learn more about the differences between the pre- and post-KitKat versions. There is a great guide on migrating to the new WebView on the developer sitehttp://developer.android.com/guide/webapps/migrating.html. Be prepared to test your WebView on both pre- and post-KitKat devices, and also know that some changes may have to happen to the web content itself.
Challenge: Using the Back Button for Browser History
You may have noticed that you can follow other links within the WebView once you launch PhotoPageActivity. However, no matter how many links you follow, the Back button always brings you immediately back to PhotoGalleryActivity. What if you instead want the Back button to bring users their browsing history within the WebView?
Implement this behavior by overriding the Back button method Activity.onBackPressed(). Within that method you can use a combination of WebView’s browsing history methods (WebView.canGoBack() and WebView.goBack()) to do the right thing. If there are items in the WebView’s browsing history, go back to the previous item. Otherwise, allow the Back button to behave as normal by calling through to super.onBackPressed().
Challenge: Supporting Non-HTTP Links
If you poke around within PhotoPageFragment’s WebView, you may stumble upon non-HTTP links. For example, as of this writing, the photo detail page Flickr provides displays an Open in App button. Pressing this button is supposed to launch the Flickr app if it is installed. If it is not installed, the Google Play store should launch and offer the option to install the Flickr app.
However, if you press Open in App, the WebView instead displays error text, as shown in Figure 28.4.
Figure 28.4 Open in app error
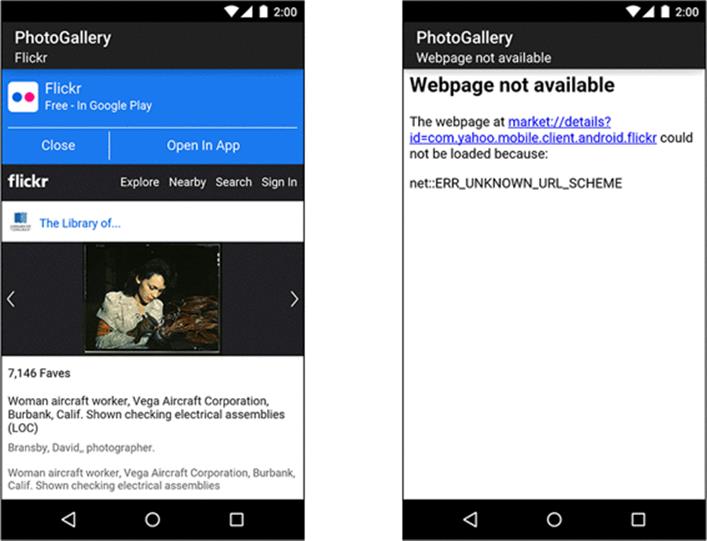
This is because you overrode WebViewClient.shouldOverrideUrlLoading(…) to always return false. In turn, the WebView always tries to load the URI into itself, even if the URI scheme is not supported by WebView.
To fix this, you want non-HTTP URIs to be handled by the application that is the best fit for that URI. Before a URI is loaded, check the scheme. If the scheme is not HTTP or HTTPS, issue an Intent.ACTION_VIEW for the URI.