Android Programming: The Big Nerd Ranch Guide (2015)
Chapter 29. Custom Views and Touch Events
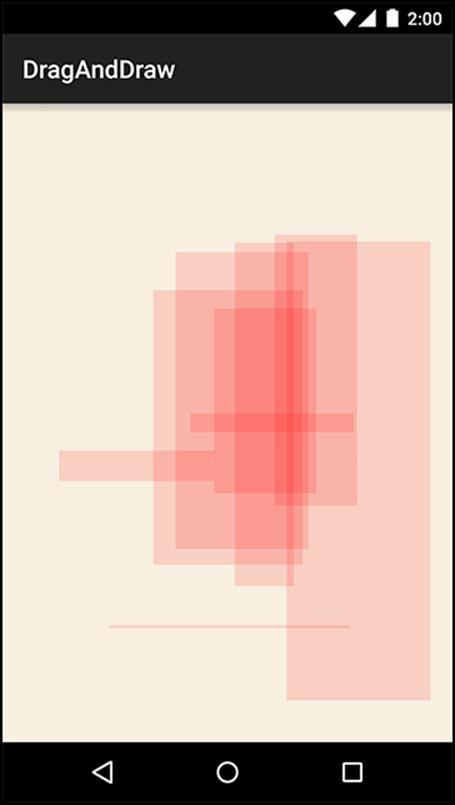
In this chapter, you will learn how to handle touch events by writing a custom subclass of View named BoxDrawingView. The BoxDrawingView class will be the star of a new project named DragAndDraw and will draw boxes in response to the user touching the screen and dragging. The finished product will look like Figure 29.1.
Figure 29.1 Boxes drawn in many shapes and sizes
Setting Up the DragAndDraw Project
Create a new project named “DragAndDraw”. Select API 16 as the minimum SDK and create a blank activity. Name the activity DragAndDrawActivity.
Setting up DragAndDrawActivity
DragAndDrawActivity will be a subclass of SingleFragmentActivity that inflates the usual single-fragment-containing layout. Copy SingleFragmentActivity.java and its activity_fragment.xml layout file into the DragAndDraw project.
In DragAndDrawActivity.java, make DragAndDrawActivity a SingleFragmentActivity that creates a DragAndDrawFragment (a class that you will create next).
Listing 29.1 Modifying the activity (DragAndDrawActivity.java)
public class DragAndDrawActivity extends AppCompatActivity SingleFragmentActivity {
@Override
protected void onCreate(Bundle savedInstanceState) {
...
}
@Override
public boolean onCreateOptionsMenu(Menu menu) {
...
}
@Override
public boolean onOptionsItemSelected(MenuItem item) {
...
}
@Override
public Fragment createFragment() {
return DragAndDrawFragment.newInstance();
}
}
Setting up DragAndDrawFragment
To prepare a layout for DragAndDrawFragment, rename the activity_drag_and_draw.xml layout file to fragment_drag_and_draw.xml.
DragAndDrawFragment’s layout will eventually consist of a BoxDrawingView, the custom view that you are going to write. All of the drawing and touch-event handling will be implemented in BoxDrawingView.
Create a new class named DragAndDrawFragment and make its superclass android.support.v4.app.Fragment. Override onCreateView(…) to inflate fragment_drag_and_draw.xml.
Listing 29.2 Creating the fragment (DragAndDrawFragment.java)
public class DragAndDrawFragment extends Fragment {
public static DragAndDrawFragment newInstance() {
return new DragAndDrawFragment();
}
@Override
public View onCreateView(LayoutInflater inflater, ViewGroup container,
Bundle savedInstanceState) {
View v = inflater.inflate(R.layout.fragment_drag_and_draw, container, false);
return v;
}
}
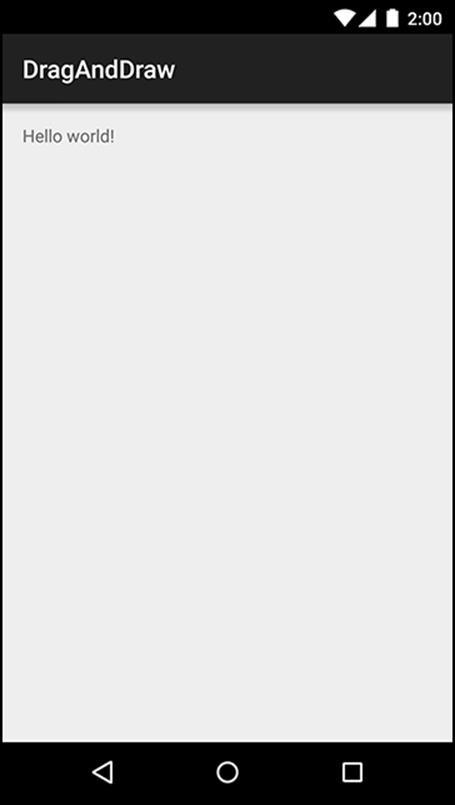
You can run DragAndDraw to confirm that your app is set up properly. It should look like Figure 29.2.
Figure 29.2 DragAndDraw with default layout
Creating a Custom View
Android provides many excellent standard views and widgets, but sometimes you need a custom view that presents visuals that are unique to your app.
While there are all kinds of custom views, you can shoehorn them into two broad categories:
|
simple |
A simple view may be complicated inside; what makes it “simple” is that it has no child views. A simple view will almost always perform custom rendering. |
|
composite |
Composite views are composed of other view objects. Composite views typically manage child views but do not perform custom rendering. Instead, rendering is delegated to each child view. |
There are three steps to follow when creating a custom view:
1. Pick a superclass. For a simple custom view, View is a blank canvas, so it is the most common choice. For a composite custom view, choose an appropriate layout class, such as FrameLayout.
2. Subclass this class and override the constructors from the superclass.
3. Override other key methods to customize behavior.
Creating BoxDrawingView
BoxDrawingView will be a simple view and a direct subclass of View.
Create a new class named BoxDrawingView and make View its superclass. In BoxDrawingView.java, add two constructors.
Listing 29.3 Initial implementation for BoxDrawingView (BoxDrawingView.java)
public class BoxDrawingView extends View {
// Used when creating the view in code
public BoxDrawingView(Context context) {
this(context, null);
}
// Used when inflating the view from XML
public BoxDrawingView(Context context, AttributeSet attrs) {
super(context, attrs);
}
}
You write two constructors because your view could be instantiated in code or from a layout file. Views instantiated from a layout file receive an instance of AttributeSet containing the XML attributes that were specified in XML. Even if you do not plan on using both constructors, it is good practice to include them.
Next, update your fragment_drag_and_draw.xml layout file to use your new view.
Listing 29.4 Adding BoxDrawingView to layout (fragment_drag_and_draw.xml)
<RelativeLayout xmlns:android="http://schemas.android.com/apk/res/android"
xmlns:tools="http://schemas.android.com/tools"
android:layout_width="match_parent"
android:layout_height="match_parent"
>
<TextView
android:layout_width="wrap_content"
android:layout_height="wrap_content"
android:layout_centerHorizontal="true"
android:layout_centerVertical="true"
android:text="@string/hello_world" />
</RelativeLayout>
<com.bignerdranch.android.draganddraw.BoxDrawingView
xmlns:android="http://schemas.android.com/apk/res/android"
android:layout_width="match_parent"
android:layout_height="match_parent"
/>
You must use BoxDrawingView’s fully qualified class name so that the layout inflater can find it. The inflater works through a layout file creating View instances. If the element name is an unqualified class name, then the inflater looks for a class with that name in the android.view andandroid.widget packages. If the class lives somewhere else, then the layout inflater will not find it, and your app will crash.
So, for custom classes and other classes that live outside of android.view and android.widget, you must always specify the fully qualified class name.
Run DragAndDraw to confirm that all the connections are correct. All you will see is an empty view (Figure 29.3).
Figure 29.3 BoxDrawingView with no boxes
The next step is to get BoxDrawingView listening for touch events and using the information from them to draw boxes on the screen.
Handling Touch Events
One way to listen for touch events is to set a touch event listener using the following View method:
public void setOnTouchListener(View.OnTouchListener l)
This method works the same way as setOnClickListener(View.OnClickListener). You provide an implementation of View.OnTouchListener, and your listener will be called every time a touch event happens.
However, because you are subclassing View, you can take a shortcut and override this View method:
public boolean onTouchEvent(MotionEvent event)
This method receives an instance of MotionEvent, a class that describes the touch event, including its location and its action. The action describes the stage of the event:
|
action constants |
description |
|
ACTION_DOWN |
user’s finger touches the screen |
|
ACTION_MOVE |
user moves finger on the screen |
|
ACTION_UP |
user lifts finger off the screen |
|
ACTION_CANCEL |
a parent view has intercepted the touch event |
In your implementation of onTouchEvent(…), you can check the value of the action by calling the MotionEvent method:
public final int getAction()
Let’s get to it. In BoxDrawingView.java, add a log tag and then an implementation of onTouchEvent(…) that logs a message for each of the four different actions.
Listing 29.5 Implementing BoxDrawingView (BoxDrawingView.java)
public class BoxDrawingView extends View {
private static final String TAG = "BoxDrawingView";
...
@Override
public boolean onTouchEvent(MotionEvent event) {
PointF current = new PointF(event.getX(), event.getY());
String action = "";
switch (event.getAction()) {
case MotionEvent.ACTION_DOWN:
action = "ACTION_DOWN";
break;
case MotionEvent.ACTION_MOVE:
action = "ACTION_MOVE";
break;
case MotionEvent.ACTION_UP:
action = "ACTION_UP";
break;
case MotionEvent.ACTION_CANCEL:
action = "ACTION_CANCEL";
break;
}
Log.i(TAG, action + " at x=" + current.x +
", y=" + current.y);
return true;
}
}
Notice that you package your X and Y coordinates in a PointF object. You want to pass these two values together as you go through the rest of the chapter. PointF is a container class provided by Android that does this for you.
Run DragAndDraw and pull up LogCat. Touch the screen and drag your finger. You should see a report of the X and Y coordinate of every touch action that BoxDrawingView receives.
Tracking across motion events
BoxDrawingView is intended to draw boxes on the screen, not just log coordinates. There are a few problems to solve to get there.
First, to define a box, you need two points: the origin point (where the finger was initially placed) and the current point (where the finger currently is).
To define a box, then, requires keeping track of data from more than one MotionEvent. You will store this data in a Box object.
Create a class named Box to represent the data that defines a single box.
Listing 29.6 Adding Box (Box.java)
public class Box {
private PointF mOrigin;
private PointF mCurrent;
public Box(PointF origin) {
mOrigin = origin;
mCurrent = origin;
}
public PointF getCurrent() {
return mCurrent;
}
public void setCurrent(PointF current) {
mCurrent = current;
}
public PointF getOrigin() {
return mOrigin;
}
}
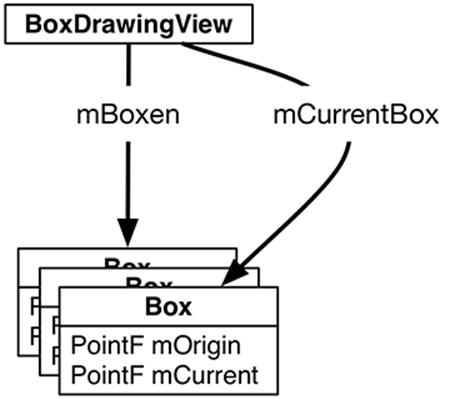
When the user touches BoxDrawingView, a new Box will be created and added to a list of existing boxes (Figure 29.4).
Figure 29.4 Objects in DragAndDraw
Back in BoxDrawingView, use your new Box object to track your drawing state.
Listing 29.7 Adding drag lifecycle methods (BoxDrawingView.java)
public class BoxDrawingView extends View {
public static final String TAG = "BoxDrawingView";
private Box mCurrentBox;
private List<Box> mBoxen = new ArrayList<>();
...
@Override
public boolean onTouchEvent(MotionEvent event) {
PointF current = new PointF(event.getX(), event.getY());
String action = "";
switch (event.getAction()) {
case MotionEvent.ACTION_DOWN:
action = "ACTION_DOWN";
// Reset drawing state
mCurrentBox = new Box(current);
mBoxen.add(mCurrentBox);
break;
case MotionEvent.ACTION_MOVE:
action = "ACTION_MOVE";
if (mCurrentBox != null) {
mCurrentBox.setCurrent(current);
invalidate();
}
break;
case MotionEvent.ACTION_UP:
action = "ACTION_UP";
mCurrentBox = null;
break;
case MotionEvent.ACTION_CANCEL:
action = "ACTION_CANCEL";
mCurrentBox = null;
break;
}
Log.i(TAG, action + " at x=" + current.x +
", y=" + current.y);
return true;
}
}
Any time an ACTION_DOWN motion event is received, you set mCurrentBox to be a new Box with its origin as the event’s location. This new Box is added to the list of boxes. (In the next section, when you implement custom drawing, BoxDrawingView will draw every Box within this list to the screen.)
As the user’s finger moves around the screen, you update mCurrentBox.mCurrent. Then, when the touch is canceled or when the user’s finger leaves the screen, you null out mCurrentBox to end your draw motion. The Box is complete; it is stored safely in the list but will no longer be updated about motion events.
Notice the call to invalidate() in the case of ACTION_MOVE. This forces BoxDrawingView to redraw itself so that the user can see the box while dragging across the screen. Which brings you to the next step: drawing the boxes to the screen.
Rendering Inside onDraw(…)
When your application is launched, all of its views are invalid. This means that they have not drawn anything to the screen. To fix this situation, Android calls the top-level View’s draw() method. This causes that view to draw itself, which causes its children to draw themselves. Those children’s children then draw themselves, and so on down the hierarchy. When all the views in the hierarchy have drawn themselves, the top-level View is no longer invalid.
To hook into this drawing, you override the following View method:
protected void onDraw(Canvas canvas)
The call to invalidate() that you make in response to ACTION_MOVE in onTouchEvent(…) makes the BoxDrawingView invalid again. This causes it to redraw itself and will cause onDraw(…) to be called again.
Now let’s consider the Canvas parameter. Canvas and Paint are the two main drawing classes in Android:
· The Canvas class has all the drawing operations you perform. The methods you call on Canvas determine where and what you draw – a line, a circle, a word, or a rectangle.
· The Paint class determines how these operations are done. The methods you call on Paint specify characteristics – whether shapes are filled, which font text is drawn in, and what color lines are.
In BoxDrawingView.java, create two Paint objects in BoxDrawingView’s XML constructor.
Listing 29.8 Creating your paint (BoxDrawingView.java)
public class BoxDrawingView extends View {
private static final String TAG = "BoxDrawingView";
private Box mCurrentBox;
private List<Box> mBoxen = new ArrayList<>();
private Paint mBoxPaint;
private Paint mBackgroundPaint;
...
// Used when inflating the view from XML
public BoxDrawingView(Context context, AttributeSet attrs) {
super(context, attrs);
// Paint the boxes a nice semitransparent red (ARGB)
mBoxPaint = new Paint();
mBoxPaint.setColor(0x22ff0000);
// Paint the background off-white
mBackgroundPaint = new Paint();
mBackgroundPaint.setColor(0xfff8efe0);
}
}
Armed with paint, you can now draw your boxes to the screen.
Listing 29.9 Overriding onDraw(Canvas) (BoxDrawingView.java)
public BoxDrawingView(Context context, AttributeSet attrs) {
...
}
@Override
protected void onDraw(Canvas canvas) {
// Fill the background
canvas.drawPaint(mBackgroundPaint);
for (Box box : mBoxen) {
float left = Math.min(box.getOrigin().x, box.getCurrent().x);
float right = Math.max(box.getOrigin().x, box.getCurrent().x);
float top = Math.min(box.getOrigin().y, box.getCurrent().y);
float bottom = Math.max(box.getOrigin().y, box.getCurrent().y);
canvas.drawRect(left, top, right, bottom, mBoxPaint);
}
}
The first part of this code is straightforward: using your off-white background paint, you fill the canvas with a backdrop for your boxes.
Then, for each box in your list of boxes, you determine what the left, right, top, and bottom of the box should be by looking at the two points for the box. The left and top values will be the minimum values, and the bottom and right will be the maximum values.
After calculating these values, you call Canvas.drawRect(…) to draw a red rectangle onto the screen.
Run DragAndDraw and draw some red rectangles (Figure 29.5).
Figure 29.5 An expression of programmerly emotion
And that is it. You have now created a view that captures its own touch events and performs its own drawing.
Challenge: Saving State
Figure out how to persist your boxes across orientation changes from within your View. This can be done with the following View methods:
protected Parcelable onSaveInstanceState()
protected void onRestoreInstanceState(Parcelable state)
These methods do not work like Activity and Fragment’s onSaveInstanceState(Bundle). First, they will only be called if your View has an ID. Second, instead of taking in a Bundle, they return and process an object that implements the Parcelable interface. We recommend using a Bundle as theParcelable instead of implementing a Parcelable class yourself. (Implementing the Parcelable interface is complicated. It is better to avoid doing so when possible.)
Finally, you must also maintain the saved state of BoxDrawingView’s parent, the View class. Save the result of super.onSaveInstanceState() in your new Bundle and send that same result to the super class when calling super.onRestoreInstanceState(Parcelable).
Challenge: Rotating Boxes
For a harder challenge, make it so that you can use a second finger to rotate your rectangles. To do this, you will need to handle multiple pointers in your MotionEvent handling code. You will also need to rotate your canvas.
When dealing with multiple touches, you need these extra ideas:
|
pointer index |
tells you which pointer in the current set of pointers the event is for |
|
pointer ID |
gives you a unique ID for a specific finger in a gesture |
The pointer index may change, but the pointer ID will not.
For more details, check out the documentation for the following MotionEvent methods:
public final int getActionMasked()
public final int getActionIndex()
public final int getPointerId(int pointerIndex)
public final float getX(int pointerIndex)
public final float getY(int pointerIndex)
Also look at the documentation for the ACTION_POINTER_UP and ACTION_POINTER_DOWN constants.