Android Programming: The Big Nerd Ranch Guide (2015)
Chapter 2. Android and Model-View-Controller
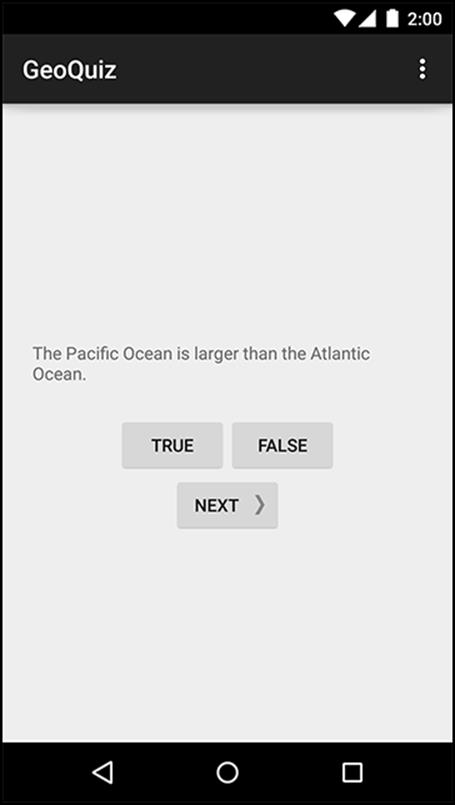
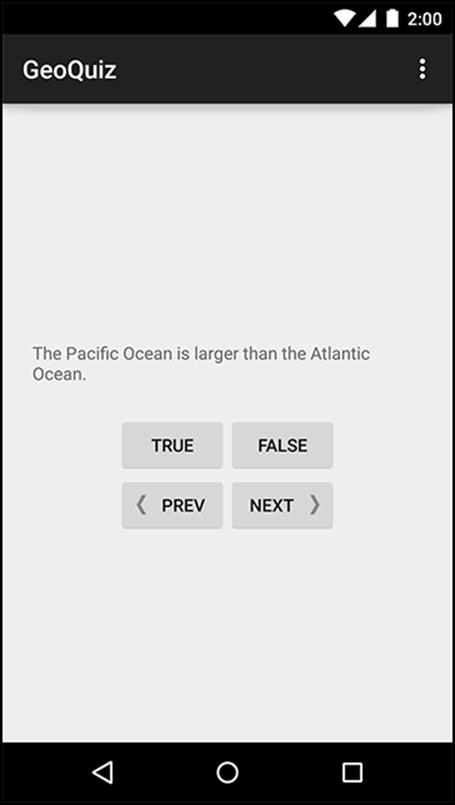
In this chapter, you are going to upgrade GeoQuiz to present more than one question, as shown in Figure 2.1.
Figure 2.1 More questions!
To make this happen, you are going to add a class named Question to the GeoQuiz project. An instance of this class will encapsulate a single true-false question.
Then, you will create an array of Question objects for QuizActivity to manage.
Creating a New Class
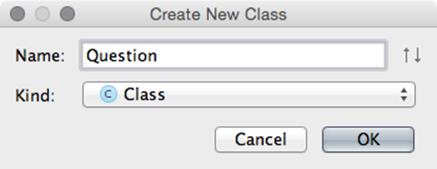
In the Project tool window, right-click the com.bignerdranch.android.geoquiz package and select New → Java Class. Name the class Question and click OK (Figure 2.2).
Figure 2.2 Creating the Question class
In Question.java, add two member variables and a constructor.
Listing 2.1 Adding to Question class (Question.java)
public class Question {
private int mTextResId;
private boolean mAnswerTrue;
public Question(int textResId, boolean answerTrue) {
mTextResId = textResId;
mAnswerTrue = answerTrue;
}
}
The Question class holds two pieces of data: the question text and the question answer (true or false).
Why is mTextResId an int and not a String? The mTextResId variable will hold the resource ID (always an int) of a string resource for the question. You will create the question string resources in a later section.
These variables need getter and setter methods. Rather than typing them in yourself, you can have Android Studio generate the implementations for you.
Generating getters and setters
The first step is to configure Android Studio to recognize the m prefix for member variables.
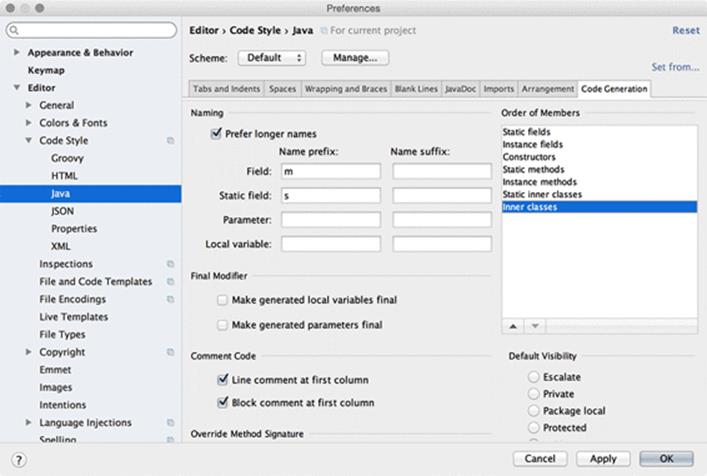
Open Android Studio’s preferences (from the Android Studio menu on Mac and from File → Settings on Windows). Expand Editor and then expand Code Style. Select Java, then choose the Code Generation tab.
In the Naming table, select the Field row (Figure 2.3) and add m as the Name prefix for fields. Then add s as the Name prefix for static fields. (You will not be using the s prefix in the GeoQuiz project, but it will be useful in later projects.)
Figure 2.3 Setting Java code style preferences
Click OK.
What is the point of setting these prefixes? Now, when you ask Android Studio to generate a getter for mTextResId, it will create getTextResId() rather than getMTextResId() and isAnswerTrue() rather than isMAnswerTrue().
Back in Question.java, right-click after the constructor and select Generate... and then Getter and Setter. Select mTextResId and mAnswerTrue and click OK to create a getter and setter for each variable.
Listing 2.2 Generated getters and setters (Question.java)
public class Question {
private int mTextResId;
private boolean mAnswerTrue;
...
public int getTextResId() {
return mTextResId;
}
public void setTextResId(int textResId) {
mTextResId = textResId;
}
public boolean isAnswerTrue() {
return mAnswerTrue;
}
public void setAnswerTrue(boolean answerTrue) {
mAnswerTrue = answerTrue;
}
}
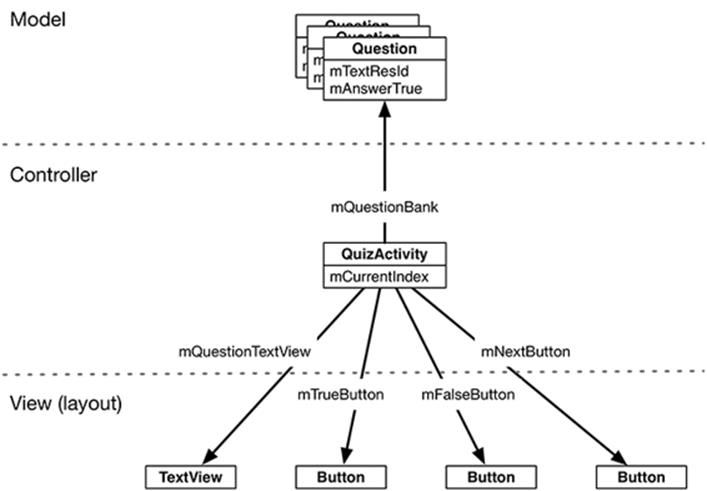
Your Question class is now complete. In a moment, you will modify QuizActivity to work with Question. First, let’s take a look at how the pieces of GeoQuiz will work together. You are going to have QuizActivity create an array of Question objects. It will then interact with the TextView and the three Buttons to display questions and provide feedback. Figure 2.4 diagrams these relationships.
Figure 2.4 Object diagram for GeoQuiz
Model-View-Controller and Android
Notice that the objects in Figure 2.4 are separated into three sections labeled Model, Controller, and View. Android applications are designed around an architecture called Model-View-Controller, or MVC for short. In MVC, all objects in your application must be a model object, a view object, or a controller object.
· A model object holds the application’s data and “business logic.” Model classes are typically designed to model the things your app is concerned with, such as a user, a product in a store, a photo on a server, or a television show. Or a true-false question. Model objects have no knowledge of the user interface; their sole purpose is holding and managing data.
In Android applications, model classes are generally custom classes you create. All of the model objects in your application compose its model layer.
GeoQuiz’s model layer consists of the Question class.
· View objects know how to draw themselves on the screen and how to respond to user input, like touches. A simple rule of thumb is that if you can see it on screen, then it is a view.
Android provides a wealth of configurable view classes. You can also create custom view classes. An application’s view objects make up its view layer.
GeoQuiz’s view layer consists of the widgets that are inflated from activity_quiz.xml.
· Controller objects tie the view and model objects together. They contain “application logic.” Controllers are designed to respond to various events triggered by view objects and to manage the flow of data to and from model objects and the view layer.
In Android, a controller is typically a subclass of Activity, Fragment, or Service. (You will learn about fragments in Chapter 7 and services in Chapter 26.)
GeoQuiz’s controller layer, at present, consists solely of QuizActivity.
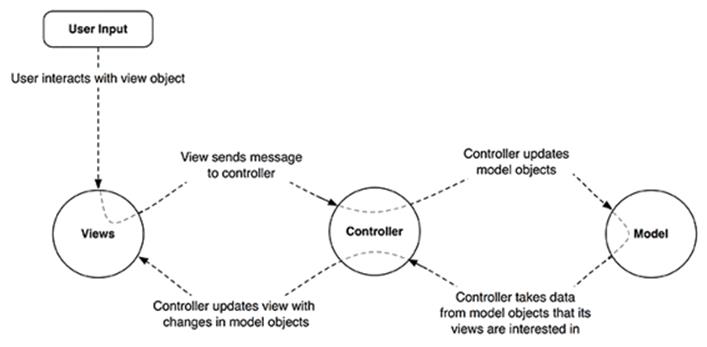
Figure 2.5 shows the flow of control between objects in response to a user event, like a press of a button. Notice that model and view objects do not talk to each other directly; controllers sit squarely in the middle of everything, receiving messages from some objects and dispatching instructions to others.
Figure 2.5 MVC flow with user input
Benefits of MVC
An application can accumulate features until it is too complicated to understand. Separating code into classes helps you design and understand the application as a whole; you can think in terms of classes instead of individual variables and methods.
Similarly, separating classes into model, view, and controller layers helps you design and understand an application; you can think in terms of layers instead of individual classes.
Although GeoQuiz is not a complicated app, you can still see the benefits of keeping layers separate. In a moment, you are going to update GeoQuiz’s view layer to include a Next button. When you do that, you will not need to remember a single thing about the Question class you just created.
MVC also makes classes easier to reuse. A class with restricted responsibilities is more reusable than one with its fingers in every pie.
For instance, your model class, Question, knows nothing about the widgets used to display a true-false question. This makes it easy to use Question throughout your app for different purposes. For example, if you wanted to display a list of all the questions at once, you could use the same object that you use here to display just one question at a time.
Updating the View Layer
Now that you have been introduced to MVC, you are going to update GeoQuiz’s view layer to include a Next button.
In Android, objects in the view layer are typically inflated from XML within a layout file. The sole layout in GeoQuiz is defined in activity_quiz.xml. This layout needs to be updated as shown in Figure 2.6. (Note that to save space we are not showing the attributes of unchanged widgets.)
Figure 2.6 New button!
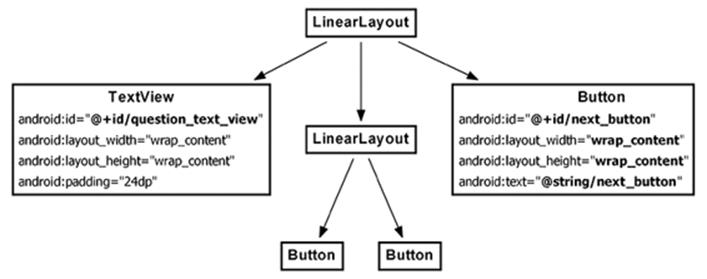
So the changes you need to make to the view layer are:
· Remove the android:text attribute from the TextView. You no longer want a hard-coded question to be part of its definition.
· Give the TextView an android:id attribute. This widget will need a resource ID so that you can set its text in QuizActivity’s code.
· Add the new Button widget as a child of the root LinearLayout.
Return to activity_quiz.xml and make it happen.
Listing 2.3 New button... and changes to the text view (activity_quiz.xml)
<LinearLayout
... >
<TextView
android:id="@+id/question_text_view"
android:layout_width="wrap_content"
android:layout_height="wrap_content"
android:padding="24dp"
android:text="@string/question_text"
/>
<LinearLayout
... >
...
</LinearLayout>
<Button
android:id="@+id/next_button"
android:layout_width="wrap_content"
android:layout_height="wrap_content"
android:text="@string/next_button" />
</LinearLayout>
Save activity_quiz.xml, and you may see a familiar error pop up to alert you about a missing string resource.
Return to res/values/strings.xml. Remove the question string and add a string for the new button.
Listing 2.4 Updating strings (strings.xml)
...
<string name="app_name">GeoQuiz</string>
<string name="question_text">Constantinople is the largest city in Turkey.</string>
<string name="true_button">True</string>
<string name="false_button">False</string>
<string name="next_button">Next</string>
<string name="correct_toast">Correct!</string>
...
While you have strings.xml open, go ahead and add the strings for the set of geography questions that will be shown to the user.
Listing 2.5 Adding question strings in advance (strings.xml)
...
<string name="incorrect_toast">Incorrect!</string>
<string name="action_settings">Settings</string>
<string name="question_oceans">The Pacific Ocean is larger than
the Atlantic Ocean.</string>
<string name="question_mideast">The Suez Canal connects the Red Sea
and the Indian Ocean.</string>
<string name="question_africa">The source of the Nile River is in Egypt.</string>
<string name="question_americas">The Amazon River is the longest river
in the Americas.</string>
<string name="question_asia">Lake Baikal is the world\'s oldest and deepest
freshwater lake.</string>
...
Notice that you use the escape sequence \' in the last value to get an apostrophe in your string. You can use all the usual escape sequences in your string resources, such as \n for a new line.
Save your files. Then return to activity_quiz.xml and preview your layout changes in the graphical layout tool.
That is all for now for GeoQuiz’s view layer. Time to wire everything up in your controller class, QuizActivity.
Updating the Controller Layer
In the previous chapter, there was not much happening in GeoQuiz’s one controller, QuizActivity. It displayed the layout defined in activity_quiz.xml. It set listeners on two buttons and wired them to make toasts.
Now that you have multiple questions to retrieve and display, QuizActivity will have to work harder to tie GeoQuiz’s model and view layers together.
Open QuizActivity.java. Add variables for the TextView and the new Button. Also, create an array of Question objects and an index for the array.
Listing 2.6 Adding variables and a Question array (QuizActivity.java)
public class QuizActivity extends AppCompatActivity {
private Button mTrueButton;
private Button mFalseButton;
private Button mNextButton;
private TextView mQuestionTextView;
private Question[] mQuestionBank = new Question[] {
new Question(R.string.question_oceans, true),
new Question(R.string.question_mideast, false),
new Question(R.string.question_africa, false),
new Question(R.string.question_americas, true),
new Question(R.string.question_asia, true),
};
private int mCurrentIndex = 0;
...
Here you call the Question constructor several times and create an array of Question objects.
(In a more complex project, this array would be created and stored elsewhere. In later apps, you will see better options for storing model data. For now, we are keeping it simple and just creating the array within your controller.)
You are going to use mQuestionBank, mCurrentIndex, and the accessor methods in Question to get a parade of questions on screen.
First, get a reference for the TextView and set its text to the question at the current index.
Listing 2.7 Wiring up the TextView (QuizActivity.java)
public class QuizActivity extends AppCompatActivity {
...
@Override
protected void onCreate(Bundle savedInstanceState) {
super.onCreate(savedInstanceState);
setContentView(R.layout.activity_quiz);
mQuestionTextView = (TextView) findViewById(R.id.question_text_view);
int question = mQuestionBank[mCurrentIndex].getTextResId();
mQuestionTextView.setText(question);
mTrueButton = (Button) findViewById(R.id.true_button);
...
}
}
Save your files and check for any errors. Then run GeoQuiz. You should see the first question in the array appear in the TextView.
Now let’s see about the Next button. First, get a reference to the button. Then set a View.OnClickListener on it. This listener will increment the index and update the TextView’s text.
Listing 2.8 Wiring up the new button (QuizActivity.java)
public class QuizActivity extends AppCompatActivity {
...
@Override
protected void onCreate(Bundle savedInstanceState) {
super.onCreate(savedInstanceState);
setContentView(R.layout.activity_quiz);
mQuestionTextView = (TextView) findViewById(R.id.question_text_view);
int question = mQuestionBank[mCurrentIndex].getTextResId();
mQuestionTextView.setText(question);
...
mFalseButton.setOnClickListener(new View.OnClickListener() {
@Override
public void onClick(View v) {
Toast.makeText(QuizActivity.this,
R.string.correct_toast,
Toast.LENGTH_SHORT).show();
}
});
mNextButton = (Button) findViewById(R.id.next_button);
mNextButton.setOnClickListener(new View.OnClickListener() {
@Override
public void onClick(View v) {
mCurrentIndex = (mCurrentIndex + 1) % mQuestionBank.length;
int question = mQuestionBank[mCurrentIndex].getTextResId();
mQuestionTextView.setText(question);
}
});
...
}
}
You now have code in two separate places that updates the mQuestionTextView variable. Take a moment to put this code into a private method instead, as shown in Listing 2.9. Then call that method in the mNextButton’s listener and at the end of onCreate(Bundle) to initially set the text in the activity’s view.
Listing 2.9 Encapsulating with updateQuestion() (QuizActivity.java)
public class QuizActivity extends AppCompatActivity {
...
private void updateQuestion() {
int question = mQuestionBank[mCurrentIndex].getTextResId();
mQuestionTextView.setText(question);
}
@Override
protected void onCreate(Bundle savedInstanceState) {
...
mQuestionTextView = (TextView) findViewById(R.id.question_text_view);
int question = mQuestionBank[mCurrentIndex].getTextResId();
mQuestionTextView.setText(question);
...
mNextButton.setOnClickListener(new View.OnClickListener() {
@Override
public void onClick(View v) {
mCurrentIndex = (mCurrentIndex + 1) % mQuestionBank.length;
int question = mQuestionBank[mCurrentIndex].getTextResId();
mQuestionTextView.setText(question);
updateQuestion();
}
});
updateQuestion();
...
}
}
Run GeoQuiz and test your new Next button.
Now that you have the questions behaving appropriately, it is time to turn to the answers. At the moment, GeoQuiz thinks that the answer to every question is “False.” Let’s rectify that. Here again, you will implement a private method to encapsulate code rather than writing similar code in two places.
The method that you are going to add to QuizActivity is:
private void checkAnswer(boolean userPressedTrue)
This method will accept a boolean variable that identifies whether the user pressed True or False. Then, it will check the user’s answer against the answer in the current Question object. Finally, after determining whether the user answered correctly, it will make a Toast that displays the appropriate message to the user.
In QuizActivity.java, add the implementation of checkAnswer(boolean) shown in Listing 2.10.
Listing 2.10 Adding checkAnswer(boolean) (QuizActivity.java)
public class QuizActivity extends AppCompatActivity {
...
private void updateQuestion() {
int question = mQuestionBank[mCurrentIndex].getTextResId();
mQuestionTextView.setText(question);
}
private void checkAnswer(boolean userPressedTrue) {
boolean answerIsTrue = mQuestionBank[mCurrentIndex].isAnswerTrue();
int messageResId = 0;
if (userPressedTrue == answerIsTrue) {
messageResId = R.string.correct_toast;
} else {
messageResId = R.string.incorrect_toast;
}
Toast.makeText(this, messageResId, Toast.LENGTH_SHORT)
.show();
}
@Override
protected void onCreate(Bundle savedInstanceState) {
...
}
}
Within the button’s listeners, call checkAnswer(boolean), as shown in Listing 2.11.
Listing 2.11 Calling checkAnswer(boolean) (QuizActivity.java)
public class QuizActivity extends AppCompatActivity {
...
@Override
protected void onCreate(Bundle savedInstanceState) {
...
mTrueButton = (Button) findViewById(R.id.true_button);
mTrueButton.setOnClickListener(new View.OnClickListener() {
@Override
public void onClick(View v) {
Toast.makeText(QuizActivity.this,
R.string.incorrect_toast,
Toast.LENGTH_SHORT).show();
checkAnswer(true);
}
});
mFalseButton = (Button) findViewById(R.id.false_button);
mFalseButton.setOnClickListener(new View.OnClickListener() {
@Override
public void onClick(View v) {
Toast.makeText(QuizActivity.this,
R.string.correct_toast,
Toast.LENGTH_SHORT).show();
checkAnswer(false);
}
});
mNextButton = (Button) findViewById(R.id.next_button);
...
}
}
GeoQuiz is ready to run again. Let’s get it running on a real device.
Running on a Device
In this section, you will set up your system, device, and application to get GeoQuiz running on your hardware device.
Connecting your device
First, plug the device into your system. If you are developing on a Mac, your system should recognize the device right away. On Windows, you may need to install the adb (Android Debug Bridge) driver. If Windows cannot find the adb driver, then download one from the device manufacturer’s website.
Configuring your device for development
To test apps on your device, you need to enable USB debugging on the device.
· On devices running Android 4.2 or later, Developer options is not visible by default. To enable it, go to Settings → About Tablet/Phone and press Build Number 7 times. Then you can return to Settings, see Developer options, and enable USB debugging.
· On devices running Android 4.0 or 4.1, go to Settings → Developer options instead.
· On devices running versions of Android earlier than 4.0, go to Settings → Applications → Development and find the option to enable USB debugging.
As you can see, the options vary considerably across devices. If you are having problems enabling your device, visit http://developer.android.com/tools/device.html for more help.
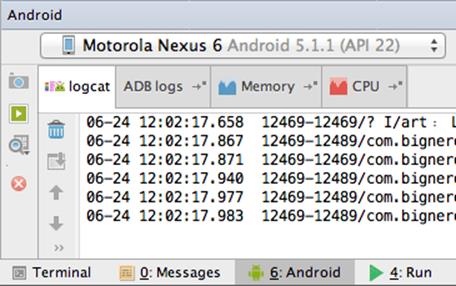
You can confirm that your device is recognized by opening the Devices view. The quickest way to the Devices view is to select the Android tool window near the bottom of Android Studio. Inside of this window, you will see a drop-down list of connected devices (Figure 2.7). You should see your AVD and your hardware device listed.
Figure 2.7 Viewing connected devices
If you are having trouble getting your device recognized, verify that your device is turned on and the developer options are enabled.
If you are still unable to see your device in the Devices view, you can find more help on the Android developers’ site. Start at http://developer.android.com/tools/device.html. Or visit this book’s forum at forums.bignerdranch.com for more troubleshooting help.
Run GeoQuiz as before. Android Studio will offer a choice between running on the virtual device or the hardware device plugged into your system. Select the hardware device and continue. GeoQuiz will launch on your device.
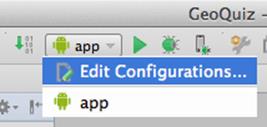
If Android Studio defaults to your emulator without offering a choice of device to run the app on, recheck the steps above and make sure your device is plugged in. Next, ensure that your run configuration is correct. To modify the run configuration, select the app drop-down list near the top of the window, as shown in Figure 2.8.
Figure 2.8 Run configurations
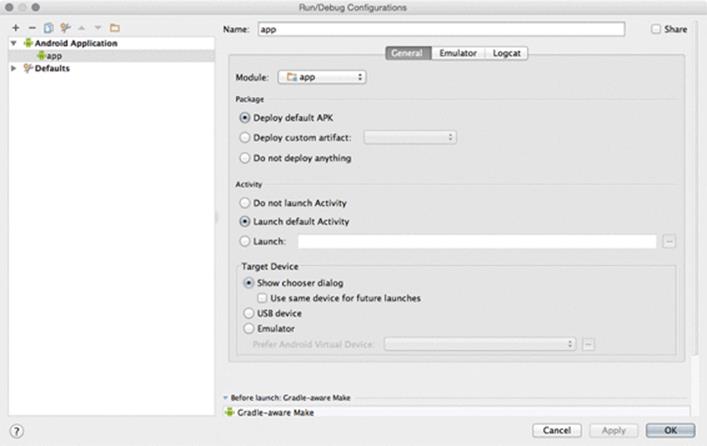
Choose Edit Configurations and you will be presented with a new window with details about your run configuration (Figure 2.9). Select app in the left pane and verify that your Target Device is set to Show chooser dialog. Select OK and re-run the app. You will now be presented with a choice of device to launch the app on.
Figure 2.9 Run configuration properties
Adding an Icon
GeoQuiz is now up and running, but the user interface would be spiffier if the Next button also displayed a right-pointing arrow icon.
You can find such an arrow in the solutions file for this book. The solutions file is a collection of Android Studio projects for each chapter of this book. The solutions are hosted here:
https://www.bignerdranch.com/solutions/AndroidProgramming2e.zip
Download this file and open the 02_MVC/GeoQuiz/app/src/main/res directory. Within this directory, locate the drawable-hdpi, res/drawable-mdpi, drawable-xhdpi, and drawable-xxhdpi directories.
The suffixes on these directory names refer to the screen pixel density of a device:
|
mdpi |
medium-density screens (~160dpi) |
|
hdpi |
high-density screens (~240dpi) |
|
xhdpi |
extra-high-density screens (~320dpi) |
|
xxhdpi |
extra-extra-high-density screens (~480dpi) |
(There are a few other density categories that are omitted from the solutions, including ldpi and xxxhdpi.)
Within each directory, you will find two image files – arrow_right.png and arrow_left.png. These files have been customized for the screen pixel density specified in the directory’s name.
You are going to include all the image files from the solutions in GeoQuiz. When it runs, the OS will choose the best image file for the specific device running the app. Note that by duplicating the images multiple times, you increase the size of your application. In this case, this is not a problem because GeoQuiz is a simple app.
If an app runs on a device that has a screen density not included in any of the application’s screen density qualifiers, Android will automatically scale the available image to the appropriate size for the device. Thanks to this feature, it is not necessary to provide images for all of the pixel density buckets. To reduce the size of your application, you can focus on one or a few of the higher resolution buckets and selectively optimize for lower resolutions when Android’s automatic scaling provides an image with artifacts on those lower resolution devices.
(For alternatives to duplicating images at different densities and an explanation of your mipmap directory, see Chapter 21.)
Adding resources to a project
The next step is to add the image files to GeoQuiz’s resources.
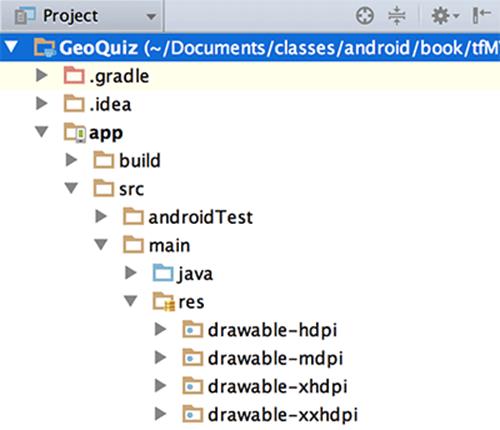
First, confirm that you have the necessary drawable folders. Make sure the project tools window is displaying the Project view (select Project from the dropdown at the top of the project tools window, as shown in Figure 1.13 in Chapter 1). Expand the contents of GeoQuiz/app/src/main/res. You should see folders named drawable-hdpi, drawable-mdpi, drawable-xhdpi, and drawable-xxhdpi, as shown in Figure 2.10. (You will likely see other folders as well. Ignore those for now.)
Figure 2.10 Verifying existence of drawable directories
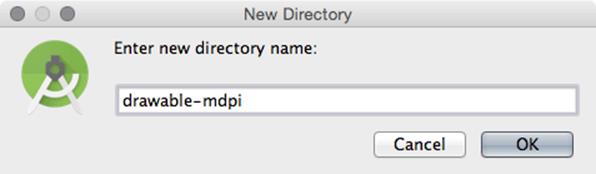
If you are missing any of the drawable folders listed above, you will need to add them before you can add the image resources. Right-click on your res directory and select New → Directory. Give your directory the name of whichever directory is missing, such as drawable-mdpi and click OK(Figure 2.11).
Figure 2.11 Creating a drawable directory
After creating the drawable-mdpi directory, you should see it appear in the Project view in the project tools window. (If you do not see the new directory, you are probably still using the Android view. Switch to the Project view, as suggested earlier.)
Repeat the process to create the drawable-hdpi, drawable-xhdpi, and drawable-xxhdpi directories.
Once you have all of the drawable directories, for each of the drawable directories in the solutions file, copy the arrow_left.png and arrow_right.png files and paste them into your project’s corresponding drawable directory.
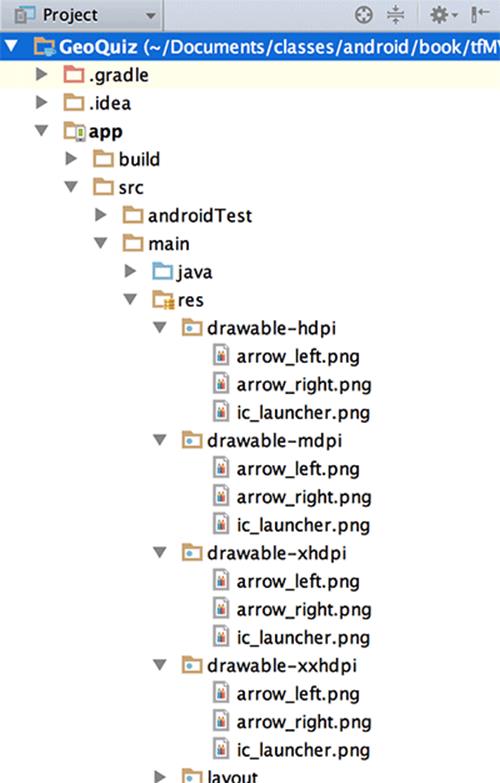
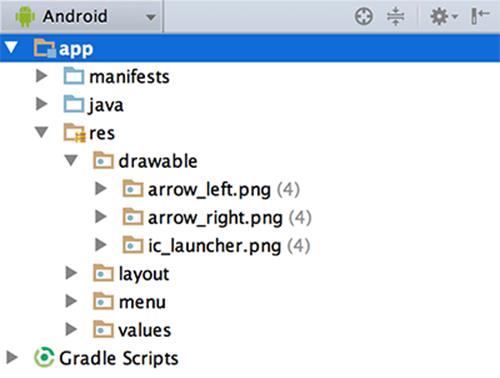
After copying all of the images, you will see the new arrow_left.png and arrow_right.png files in the project tool window (as shown in Figure 2.12).
Figure 2.12 Arrow icons in GeoQuiz drawable directories
If you switch the project tools window back to the Android view, you will see the newly added drawable files summarized (as shown in Figure 2.13).
Figure 2.13 Summary of arrow icons in GeoQuiz drawable directories
Including images in your app is as simple as that. Any .png, .jpg, or .gif file you add to a res/drawable folder will be automatically assigned a resource ID. (Note that filenames must be lowercase and not have any spaces.)
These resource IDs are not qualified by screen density. So you do not need to determine the device’s screen density at runtime. All you have to do is use this resource ID in your code. When the app is run, the OS will determine the appropriate image to display on that particular device.
You will learn more about how the Android resource system works starting in Chapter 3. For now, let’s put that right arrow to work.
Referencing resources in XML
You use resource IDs to reference resources in code. But you want to configure the Next button to display the arrow in the layout definition. How do you reference a resource from XML?
With a slightly different syntax. Open activity_quiz.xml and add two attributes to the Button widget definition.
Listing 2.12 Adding an icon to the Next button (activity_quiz.xml)
<LinearLayout
... >
...
<LinearLayout
... >
...
</LinearLayout>
<Button
android:id="@+id/next_button"
android:layout_width="wrap_content"
android:layout_height="wrap_content"
android:text="@string/next_button"
android:drawableRight="@drawable/arrow_right"
android:drawablePadding="4dp"
/>
</LinearLayout>
In an XML resource, you refer to another resource by its resource type and name. A reference to a string resource begins with @string/. A reference to a drawable resource begins with @drawable/.
You will learn more about naming resources and working in the res directory structure starting in Chapter 3.
Save and run GeoQuiz. Admire your button’s new appearance. Then test it to make sure it still works as before.
GeoQuiz does, however, have a bug. While GeoQuiz is running, press the Next button to show another question. Then rotate the device. (If you are running on the emulator, press Fn+Control+F12/Ctrl+F12 to rotate.)
After you rotate, you will be looking at the first question again. How did this happen, and how can you fix it?
The answers to those questions have to do with the activity lifecycle, which is the topic of Chapter 3.
Challenges
Challenges are exercises at the end of the chapter for you to do on your own. Some are easy and provide practice doing the same thing you have done in the chapter. Other challenges are harder and require more problem solving.
We cannot encourage you enough to take on these challenges. Tackling them cements what you have learned, builds confidence in your skills, and bridges the gap between us teaching you Android programming and you being able to do Android programming on your own.
If you get stuck while working on a challenge, take a break and come back and try again fresh. If that does not help, check out the forum for this book at forums.bignerdranch.com. In the forum, you can review questions and solutions that other readers have posted as well as ask questions and post solutions of your own.
To protect the integrity of your current project, we recommend you make a copy and work on challenges in the new copy.
In your computer’s file explorer, navigate to the root directory of your project. Copy the GeoQuiz folder and Paste a new copy next to the original (on OS X, use the Duplicate feature). Rename the new folder GeoQuiz Challenge. Back in Android Studio, select File → Import Project.... Inside the import window, navigate to GeoQuiz Challenge and select OK. The copied project will then appear in a new window ready for work.
Challenge: Add a Listener to the TextView
Your Next button is nice, but you could also make it so that a user could press the TextView itself to see the next question.
Hint: You can use the View.OnClickListener listener for the TextView that you have used with the Buttons, because TextView also inherits from View.
Challenge: Add a Previous Button
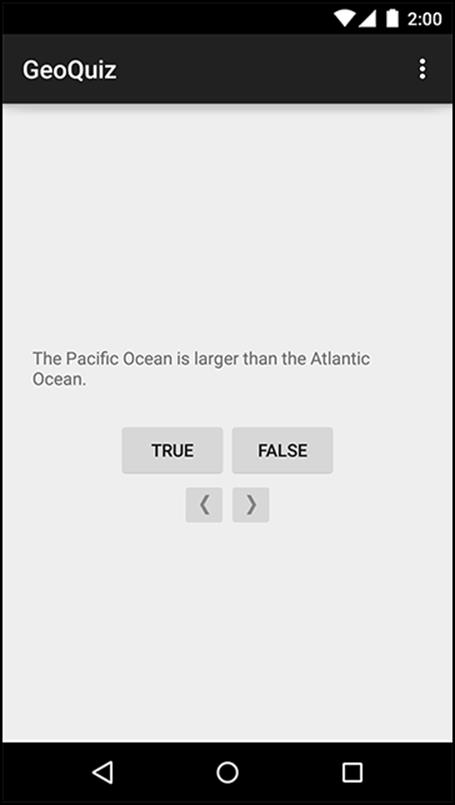
Add a button that the user can press to go back one question. The UI should look something like Figure 2.14.
Figure 2.14 Now with a previous button!
This is a great challenge. It requires you to retrace many of the steps in these two chapters.
Challenge: From Button to ImageButton
Perhaps the user interface would look even better if the next and previous buttons showed only icons, as in Figure 2.15.
Figure 2.15 Icon-only buttons
To accomplish this challenge, these two widgets must become ImageButtons instead of regular Buttons.
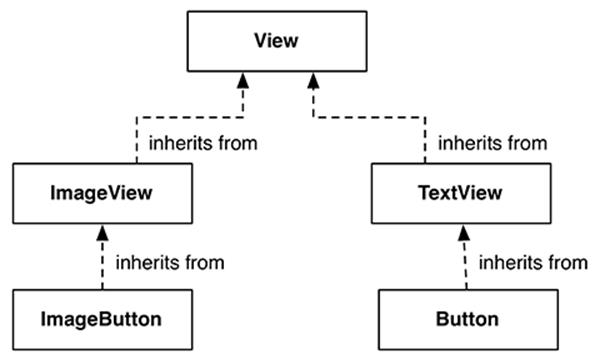
ImageButton is a widget that inherits from ImageView. Button, on the other hand, inherits from TextView. Figure 2.16 shows their different inheritance hierarchies.
Figure 2.16 Inheritance diagram for ImageButton and Button
You can replace the text and drawable attributes on the Next button with a single ImageView attribute:
<Button ImageButton
android:id="@+id/next_button"
android:layout_width="wrap_content"
android:layout_height="wrap_content"
android:text="@string/next_button"
android:drawableRight="@drawable/arrow_right"
android:drawablePadding="4dp"
android:src="@drawable/arrow_right"
/>
Of course, you will need to modify QuizActivity to work with ImageButton.
After you have changed these buttons to ImageButtons, Android Studio will warn you about a missing android:contentDescription attribute. This attribute supports accessibility for low-vision readers. You set the value to a string, and then that string is read aloud when users have the appropriate settings applied.
Finally, add an android:contentDescription attribute to each ImageButton.
All materials on the site are licensed Creative Commons Attribution-Sharealike 3.0 Unported CC BY-SA 3.0 & GNU Free Documentation License (GFDL)
If you are the copyright holder of any material contained on our site and intend to remove it, please contact our site administrator for approval.
© 2016-2026 All site design rights belong to S.Y.A.