Android Programming: The Big Nerd Ranch Guide (2015)
Chapter 3. The Activity Lifecycle
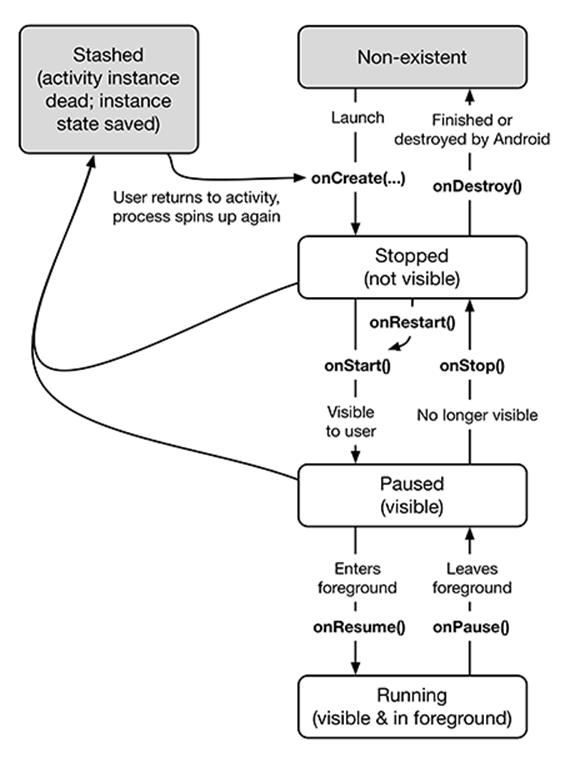
Every instance of Activity has a lifecycle. During this lifecycle, an activity transitions between three states: running, paused, and stopped. For each transition, there is an Activity method that notifies the activity of the change in its state. Figure 3.1 shows the activity lifecycle, states, and methods.
Figure 3.1 Activity state diagram
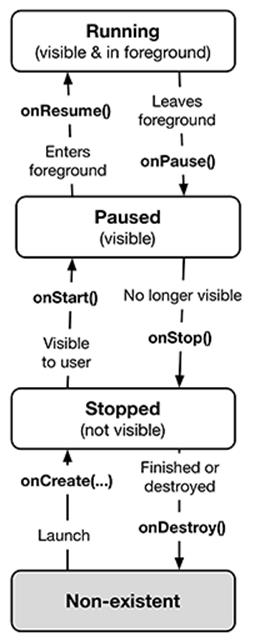
Subclasses of Activity can take advantage of the methods named in Figure 3.1 to get work done at critical transitions in the activity’s lifecycle.
You are already acquainted with one of these methods – onCreate(Bundle). The OS calls this method after the activity instance is created but before it is put on screen.
Typically, an activity overrides onCreate(…) to prepare the specifics of its user interface:
· inflating widgets and putting them on screen (in the call to (setContentView(int))
· getting references to inflated widgets
· setting listeners on widgets to handle user interaction
· connecting to external model data
It is important to understand that you never call onCreate(…) or any of the other Activity lifecycle methods yourself. You override them in your activity subclasses, and Android calls them at the appropriate time.
Logging the Activity Lifecycle
In this section, you are going to override lifecycle methods to eavesdrop on QuizActivity’s lifecycle. Each implementation will simply log a message informing you that the method has been called.
Making log messages
In Android, the android.util.Log class sends log messages to a shared system-level log. Log has several methods for logging messages. Here is the one that you will use most often in this book:
public static int d(String tag, String msg)
The d stands for “debug” and refers to the level of the log message. (There is more about the Log levels in the final section of this chapter.) The first parameter identifies the source of the message, and the second is the contents of the message.
The first string is typically a TAG constant with the class name as its value. This makes it easy to determine the source of a particular message.
In QuizActivity.java, add a TAG constant to QuizActivity:
Listing 3.1 Adding TAG constant (QuizActivity.java)
public class QuizActivity extends AppCompatActivity {
private static final String TAG = "QuizActivity";
...
}
Next, in onCreate(…), call Log.d(…) to log a message.
Listing 3.2 Adding log statement to onCreate(…) (QuizActivity.java)
public class QuizActivity extends AppCompatActivity {
...
@Override
protected void onCreate(Bundle savedInstanceState) {
super.onCreate(savedInstanceState);
Log.d(TAG, "onCreate(Bundle) called");
setContentView(R.layout.activity_quiz);
...
}
}
Now override five more methods in QuizActivity by adding the following after onCreate(Bundle) and before onCreateOptionsMenu(Menu):
Listing 3.3 Overriding more lifecycle methods (QuizActivity.java)
@Override
public void onStart() {
super.onStart();
Log.d(TAG, "onStart() called");
}
@Override
public void onPause() {
super.onPause();
Log.d(TAG, "onPause() called");
}
@Override
public void onResume() {
super.onResume();
Log.d(TAG, "onResume() called");
}
@Override
public void onStop() {
super.onStop();
Log.d(TAG, "onStop() called");
}
@Override
public void onDestroy() {
super.onDestroy();
Log.d(TAG, "onDestroy() called");
}
...
}
Notice that you call the superclass implementations before you log your messages. These superclass calls are required. Calling the superclass implementation before you do anything else is critical in onCreate(…); the order is less important in the other methods.
You may have been wondering about the @Override annotation. This asks the compiler to ensure that the class actually has the method that you are attempting to override. For example, the compiler would be able to alert you to the following misspelled method name:
public class QuizActivity extends AppCompatActivity {
@Override
public void onCreat(Bundle savedInstanceState) {
super.onCreate(savedInstanceState);
setContentView(R.layout.activity_quiz);
}
...
The Activity class does not have an onCreat(Bundle) method, so the compiler will complain. Then you can fix the typo rather than accidentally implementing QuizActivity.onCreat(Bundle).
Using LogCat
To access the log while the application is running, you can use LogCat, a log viewer included in the Android SDK tools.
When you run GeoQuiz, you should see LogCat appear at the bottom of Android Studio, as shown in Figure 3.2. If LogCat is not visible, select the Android tool window near the bottom of the screen and ensure that the Devices | logcat tab is selected.
Figure 3.2 Android Studio with LogCat
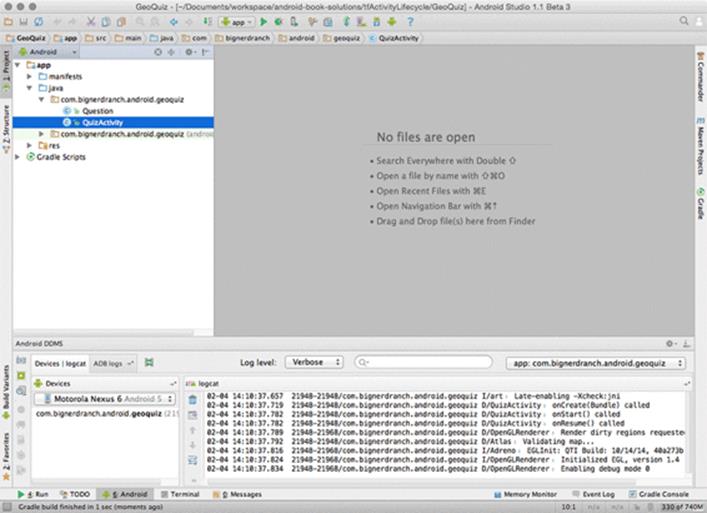
Run GeoQuiz and messages will start materializing in LogCat. By default, log statements that are generated with your app’s package name are shown. You will see your own messages along with some system output.
To make your messages easier to find, you can filter the output using the TAG constant. In LogCat, click the filter drop-down box in the top right of the LogCat pane. Notice the existing filter, which is set up to show messages from only your app. Selecting No Filters will show log messages generated from all over the system.
In the filter dropdown, select Edit Filter Configuration. Use the + button to create a brand-new filter. Name the filter QuizActivity and enter QuizActivity in the by Log Tag: field (Figure 3.3).
Figure 3.3 Creating a filter in LogCat
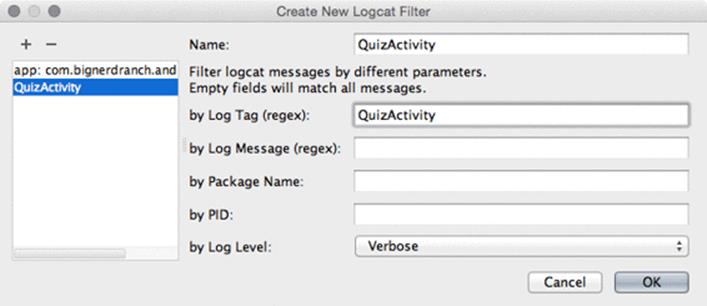
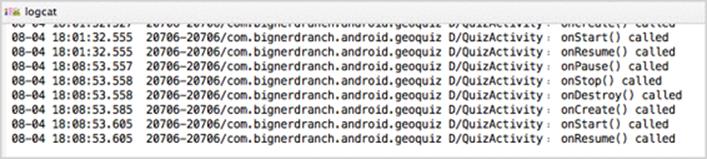
Click OK, and only messages tagged QuizActivity will be visible (Figure 3.4).
Three lifecycle methods were called after GeoQuiz was launched and the initial instance of QuizActivity was created.
Figure 3.4 Launching GeoQuiz creates, starts, and resumes an activity

(If you are not seeing the filtered list, select the QuizActivity filter from LogCat’s filter dropdown.)
Now let’s have some fun. Press the Back button on the device and then check LogCat. Your activity received calls to onPause(), onStop(), and onDestroy() (Figure 3.5).
Figure 3.5 Pressing the Back button destroys the activity

When you pressed the Back button, you told Android, “I’m done with this activity, and I won’t need it anymore.” Android then destroyed your activity. This is Android’s way of being frugal with your device’s limited resources.
Relaunch GeoQuiz. Press the Home button and then check LogCat. Your activity received calls to onPause() and onStop(), but not onDestroy() (Figure 3.6).
Figure 3.6 Pressing the Home button stops the activity

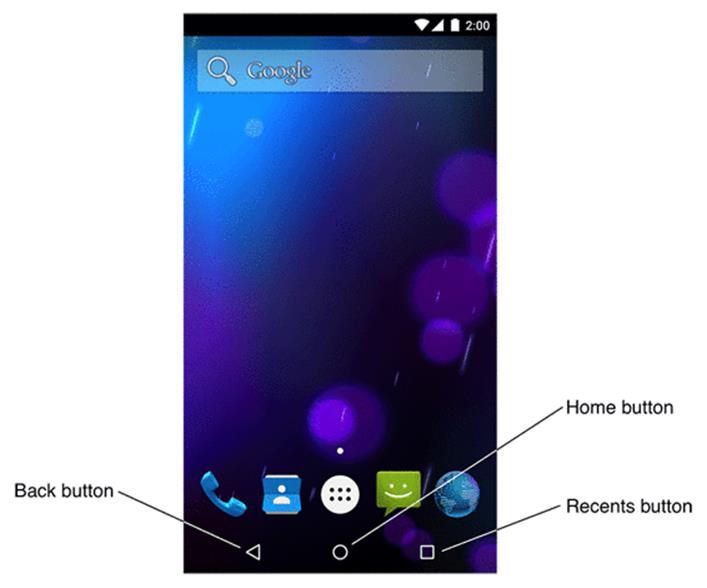
On the device, pull up the task manager: On newer devices, press the Recents button next to the Home button (Figure 3.7). On devices without a Recents button, long-press the Home button.
Figure 3.7 Home, Back, and Recents buttons
In the task manager, press GeoQuiz and then check LogCat. The activity was started and resumed, but it did not need to be created.
Pressing the Home button tells Android, “I’m going to go look at something else, but I might come back.” Android pauses and stops your activity but tries not to destroy it in case you come back.
However, a stopped activity’s survival is not guaranteed. When the system needs to reclaim memory, it will destroy stopped activities.
Another situation that pauses an activity is when it is obscured from the user, such as by a pop-up window. Even if the window only partially covers the activity, the activity is paused and cannot be interacted with. The activity resumes when the pop-up window is dismissed.
As you continue through the book, you will override the different activity lifecycle methods to do real things for your application. When you do, you will learn more about the uses of each method.
Rotation and the Activity Lifecycle
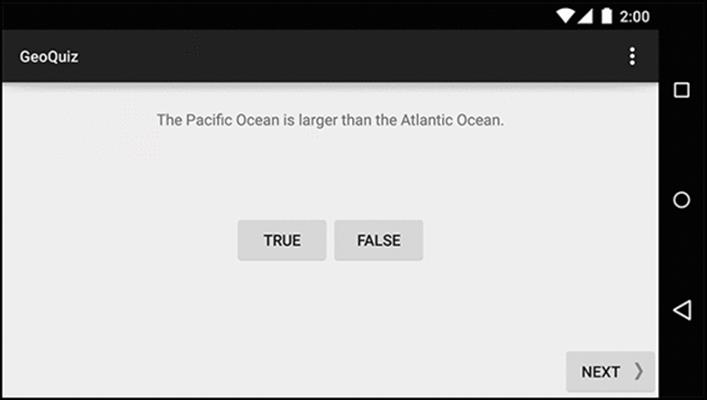
Let’s get back to the bug you found at the end of Chapter 2. Run GeoQuiz, press the Next button to reveal the second question, and then rotate the device. (On the emulator, press Fn+Control+F12/Ctrl+F12 to rotate.)
After rotating, GeoQuiz will display the first question again. Check LogCat to see what has happened. Your output should look like Figure 3.8.
Figure 3.8 QuizActivity is dead. Long live QuizActivity!
When you rotated the device, the instance of QuizActivity that you were looking at was destroyed, and a new one was created. Rotate the device again to witness another round of destruction and rebirth.
This is the source of your bug. Each time a new QuizActivity is created, mCurrentIndex is initialized to 0, and the user starts over at the first question. You will fix this bug in a moment. First, let’s take a closer look at why this happens.
Device configurations and alternative resources
Rotating the device changes the device configuration. The device configuration is a set of characteristics that describe the current state of an individual device. The characteristics that make up the configuration include screen orientation, screen density, screen size, keyboard type, dock mode, language, and more.
Typically, applications provide alternative resources to match different device configurations. You saw an example of this when you added multiple arrow icons to your project for different screen densities.
Screen density is a fixed component of the device configuration; it cannot change at runtime. On the other hand, some components, like screen orientation, can change at runtime.
When a runtime configuration change occurs, there may be resources that are a better match for the new configuration. To see this in action, let’s create an alternative resource for Android to find and use when the device’s screen orientation changes to landscape.
Creating a landscape layout
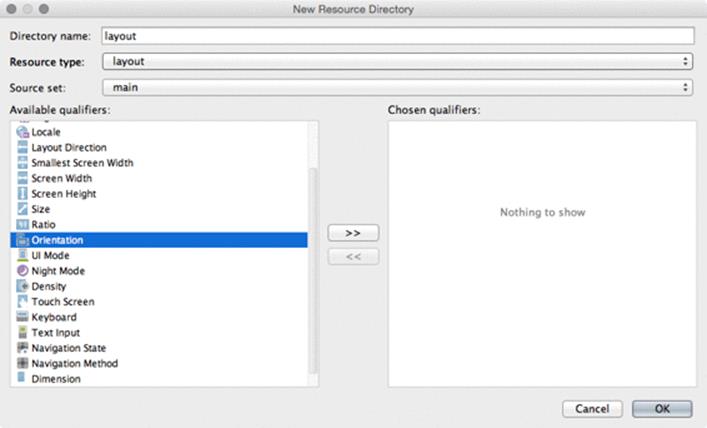
In the Project tool window, right-click the res directory and select New → Android resource directory. You should see a window similar to Figure 3.9 that lists the resource types and qualifiers for those types. Select layout in the Resource type drop-down box. Leave the Source set option set to main. Next, you will choose how the layout resources will be qualified. Select Orientation in the Available qualifiers list and click the >> button to move Orientation to the Chosen qualifiers section.
Figure 3.9 Creating a new resource directory
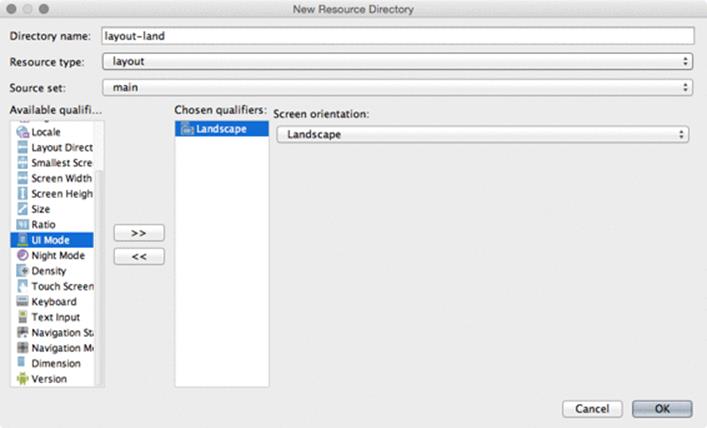
Finally, ensure that Landscape is selected in the Screen Orientation dropdown, as shown in Figure 3.10. Verify that the Directory name now indicates that your directory is called layout-land. While this window looks fancy, its purpose is just to set the name of your directory. Click OK and Android Studio will create the res/layout-land/ folder.
Figure 3.10 Creating res/layout-land
The -land suffix is another example of a configuration qualifier. Configuration qualifiers on res subdirectories are how Android identifies which resources best match the current device configuration. You can find the list of configuration qualifiers that Android recognizes and the pieces of the device configuration that they refer to at http://developer.android.com/guide/topics/resources/providing-resources.html.
When the device is in landscape orientation, Android will find and use resources in the res/layout-land directory. Otherwise, it will stick with the default in res/layout/. However, at the moment there are no resources in the res/layout-land directory. Let’s fix that.
Copy the activity_quiz.xml file from res/layout/ to res/layout-land/. You now have a landscape layout and a default layout. Keep the filename the same. The two layout files must have the same filename so that they can be referenced with the same resource ID.
Now make some changes to the landscape layout so that it is different from the default. Figure 3.11 shows the changes that you are going to make.
Figure 3.11 An alternative landscape layout
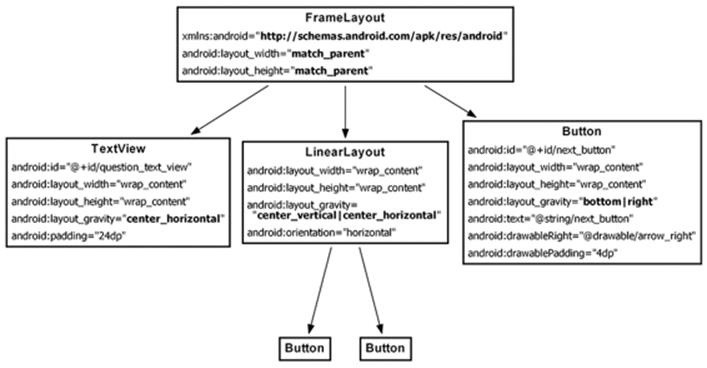
The FrameLayout will replace the LinearLayout. FrameLayout is the simplest ViewGroup and does not arrange its children in any particular manner. In this layout, child views will be arranged according to their android:layout_gravity attributes.
The TextView, LinearLayout, and Button children of the FrameLayout need android:layout_gravity attributes. The Button children of the LinearLayout will stay exactly the same.
Open layout-land/activity_quiz.xml and make the necessary changes using Figure 3.11. You can use Listing 3.4 to check your work.
Listing 3.4 Tweaking the landscape layout (layout-land/activity_quiz.xml)
<LinearLayout xmlns:android="http://schemas.android.com/apk/res/android"
android:layout_width="match_parent"
android:layout_height="match_parent"
android:gravity="center"
android:orientation="vertical" >
<FrameLayout xmlns:android="http://schemas.android.com/apk/res/android"
android:layout_width="match_parent"
android:layout_height="match_parent" >
<TextView
android:id="@+id/question_text_view"
android:layout_width="wrap_content"
android:layout_height="wrap_content"
android:layout_gravity="center_horizontal"
android:padding="24dp" />
<LinearLayout
android:layout_width="wrap_content"
android:layout_height="wrap_content"
android:layout_gravity="center_vertical|center_horizontal"
android:orientation="horizontal" >
...
</LinearLayout>
<Button
android:id="@+id/next_button"
android:layout_width="wrap_content"
android:layout_height="wrap_content"
android:layout_gravity="bottom|right"
android:text="@string/next_button"
android:drawableRight="@drawable/arrow_right"
android:drawablePadding="4dp"
/>
</LinearLayout>
</FrameLayout>
Run GeoQuiz again. Rotate the device to landscape to see the new layout (Figure 3.12). Of course, this is not just a new layout – it is a new QuizActivity as well.
Figure 3.12 QuizActivity in landscape orientation
Rotate back to portrait to see the default layout and yet another new QuizActivity.
Android does the work of determining the best resource for you, but it has to create a new activity from scratch to do it. For a QuizActivity to display a different layout, setContentView(R.layout.activity_quiz) must be called again. And this will not happen unless QuizActivity.onCreate(…) is called again. Thus, Android destroys the current QuizActivity on rotation and starts fresh to ensure that it has the resources that best match the new configuration.
Note that Android destroys the current activity and creates a new one whenever any runtime configuration change occurs. A change in keyboard availability or language could also occur at runtime, but a change in screen orientation is the runtime change that occurs most frequently.
Saving Data Across Rotation
Android does a great job of providing alternative resources at the right time. However, destroying and re-creating activities on rotation can cause headaches, too, like GeoQuiz’s bug of reverting back to the first question when the device is rotated.
To fix this bug, the post-rotation QuizActivity needs to know the old value of mCurrentIndex. You need a way to save this data across a runtime configuration change, like rotation. One way to do this is to override the Activity method:
protected void onSaveInstanceState(Bundle outState)
This method is normally called by the system before onPause(), onStop(), and onDestroy().
The default implementation of onSaveInstanceState(…) directs all of the activity’s views to save their state as data in the Bundle object. A Bundle is a structure that maps string keys to values of certain limited types.
You have seen this Bundle before. It is passed into onCreate(Bundle):
@Override
public void onCreate(Bundle savedInstanceState) {
super.onCreate(savedInstanceState);
...
}
When you override onCreate(…), you call onCreate(…) on the activity’s superclass and pass in the bundle you just received. In the superclass implementation, the saved state of the views is retrieved and used to re-create the activity’s view hierarchy.
Overriding onSaveInstanceState(Bundle)
You can override onSaveInstanceState(…) to save additional data to the bundle and then read that data back in onCreate(…). This is how you are going to save the value of mCurrentIndex across rotation.
First, in QuizActivity.java, add a constant that will be the key for the key-value pair that will be stored in the bundle.
Listing 3.5 Adding a key for the value (QuizActivity.java)
public class QuizActivity extends AppCompatActivity {
private static final String TAG = "QuizActivity";
private static final String KEY_INDEX = "index";
private Button mTrueButton;
...
Next, override onSaveInstanceState(…) to write the value of mCurrentIndex to the bundle with the constant as its key.
Listing 3.6 Overriding onSaveInstanceState(…) (QuizActivity.java)
mNextButton.setOnClickListener(new View.OnClickListener() {
@Override
public void onClick(View v) {
mCurrentIndex = (mCurrentIndex + 1) % mQuestionBank.length;
updateQuestion();
}
});
updateQuestion();
}
@Override
public void onSaveInstanceState(Bundle savedInstanceState) {
super.onSaveInstanceState(savedInstanceState);
Log.i(TAG, "onSaveInstanceState");
savedInstanceState.putInt(KEY_INDEX, mCurrentIndex);
}
Finally, in onCreate(…), check for this value. If it exists, assign it to mCurrentIndex.
Listing 3.7 Checking bundle in onCreate(…) (QuizActivity.java)
...
if (savedInstanceState != null) {
mCurrentIndex = savedInstanceState.getInt(KEY_INDEX, 0);
}
updateQuestion();
}
Run GeoQuiz and press Next. No matter how many device rotations you perform, the newly minted QuizActivity will “remember” what question you were on.
Note that the types that you can save to and restore from a Bundle are primitive types and classes that implement the Serializable or Parcelable interfaces. It is usually a bad practice to put objects of custom types into a Bundle, however, because the data might be stale when you get it back out. It is a better choice to use some other kind of storage for the data and put a primitive identifier into the Bundle instead.
Testing the implementation of onSaveInstanceState(…) is a good idea – especially if you are saving and restoring objects. Rotation is easy to test; testing low-memory situations is harder. There is information at the end of this chapter about how to simulate your activity being destroyed by Android to reclaim memory.
The Activity Lifecycle, Revisited
Overriding onSaveInstanceState(Bundle) is not just for handling rotation. An activity can also be destroyed if the user navigates away for a while and Android needs to reclaim memory.
Android will never destroy a running activity to reclaim memory – the activity must be in the paused or stopped state to be destroyed. If an activity is paused or stopped, then its onSaveInstanceState(…) method has been called.
When onSaveInstanceState(…) is called, the data is saved to the Bundle object. That Bundle object is then stuffed into your activity’s activity record by the OS.
To understand the activity record, let’s add a stashed state to the activity lifecycle (Figure 3.13).
Figure 3.13 The complete activity lifecycle
When your activity is stashed, an Activity object does not exist, but the activity record object lives on in the OS. The OS can reanimate the activity using the activity record when it needs to.
Note that your activity can pass into the stashed state without onDestroy() being called. However, you can always rely on onPause() and onSaveInstanceState(…) to be called. Typically, you override onSaveInstanceState(…) to stash small, transient states that belong to the current activity in yourBundle and onPause() for anything else that needs to be done.
Under some situations, Android will not only kill your activity but also completely shut down your application’s process. This will only happen if the user is not currently looking at your application, but it can (and does) happen. Even in this case, the activity record will live on and enable a quick restart of your activity if the user returns.
So when does the activity record get snuffed? When the user presses the Back button, your activity really gets destroyed, once and for all. At that point, your activity record is discarded. Activity records are also typically discarded on reboot and may also be discarded if they are not used for a long time.
For the More Curious: Testing onSaveInstanceState(Bundle)
If you are overriding onSaveInstanceState(Bundle), you should test that your state is being saved and restored as expected. This is easy to do on the emulator.
Start up a virtual device. Within the list of applications on the device, find the Settings app (Figure 3.14). This app is included with most system images used on the emulator.
Figure 3.14 Finding the Settings app
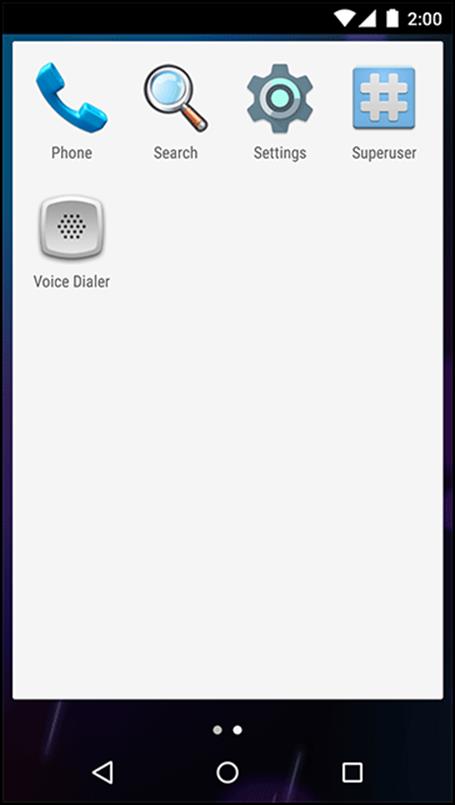
Launch Settings and select Developer options. Here you will see many possible settings. Turn on the setting labeled Don’t keep activities, as shown in Figure 3.15.
Figure 3.15 Don’t keep activities selected
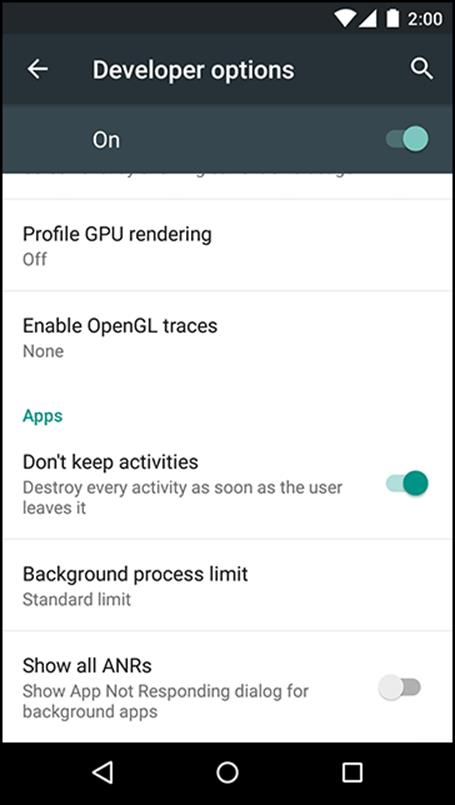
Now run your app and press the Home button. Pressing Home causes the activity to be paused and stopped. Then the stopped activity will be destroyed just as if the Android OS had reclaimed it for its memory. Then you can restore the app to see if your state was saved as you expected. Be sure to turn this setting off when you are done testing, as it will cause a performance decrease and some apps will perform poorly.
Pressing the Back button instead of the Home button will always destroy the activity, regardless of whether you have this development setting on. Pressing the Back button tells the OS that the user is done with the activity.
To run the same test on a hardware device, you must install Dev Tools on the device. For more information, visit http://developer.android.com/tools/debugging/debugging-devtools.html.
For the More Curious: Logging Levels and Methods
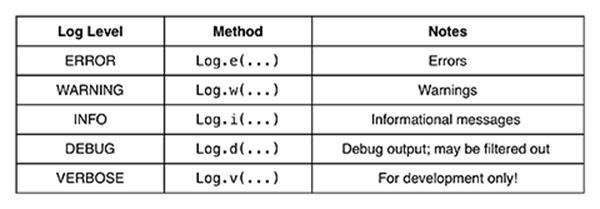
When you use the android.util.Log class to send log messages, you control not only the content of a message, but also a level that specifies how important the message is. Android supports five log levels, shown in Figure 3.16. Each level has a corresponding method in the Log class. Sending output to the log is as simple as calling the corresponding Log method.
Figure 3.16 Log levels and methods
In addition, each of the logging methods has two signatures: one which takes a tag string and a message string and a second that takes those two arguments plus an instance of Throwable, which makes it easy to log information about a particular exception that your application might throw.Listing 3.8 shows some sample log method signatures. Use regular Java string concatenation to assemble your message string, or String.format if you have fancier needs.
Listing 3.8 Different ways of logging in Android
// Log a message at "debug" log level
Log.d(TAG, "Current question index: " + mCurrentIndex);
Question question;
try {
question = mQuestionBank[mCurrentIndex];
} catch (ArrayIndexOutOfBoundsException ex) {
// Log a message at "error" log level, along with an exception stack trace
Log.e(TAG, "Index was out of bounds", ex);
}