Programming Android (2011)
Part IV. Advanced Topics
Chapter 15. Location and Mapping
Ever since mobile phones started to incorporate standalone GPS receivers, developers have foreseen a new era of location-based applications. Location awareness enables a new generation of mobile applications. If your application is looking up restaurants, it’s clearly advantageous if you can restrict your search to the area around you. It’s even better if you can see a map of the restaurants’ locations, and perhaps be able to look up driving or walking directions. If you’re looking for a temporary job, as in the MJAndroid application highlighted in Using the Database API: MJAndroid, it’s definitely a benefit to be able to graphically view job opportunities on a map.
Navigation is really just the first generation of location-based services (LBS). Applications that enable users either to opt in to allow sharing of their location with friends, such as Google Latitude, or to attach importance to geographic sites, such as Foursquare, have begun to arrive in a big way. The world of LBS is really taking off, and as we’ll see, Google’s Android provides powerful features that greatly simplify development of this type of application.
In economic terms, location-based applications are a major factor in mobile telephony, making up a significant portion of the revenue from mobile applications, and growing fast. Because they are based on the ability of the mobile network to locate devices and the relationship of mobility and location, location-based applications are as fundamental to mobile telephony as communication.
Applications often combine location awareness with search: Where are my contacts? Where are services or products I’m looking for? Where are people with common interests?
In this chapter, we’ll explore how the MJAndroid application uses Android to address some of these questions.
Location-Based Services
Mobile phones use several related methods, alone and in combination, to determine where they are:
Cell ID
Whether you’re actually talking on the phone or not, as long as it’s powered up, your mobile phone carries on a constant conversation with nearby cell towers. It has to do this to be able to respond when someone calls you, so every few seconds it “pings” the cell tower it was using last to tell it that it’s still in range and to note network parameters such as the current time, the current signal strength (uplink and downlink), and so on.
If you happen to be moving, your phone may initiate a handover to another cell tower, all in the background and without you having to intervene. Each cell tower worldwide has a unique identifier called, appropriately enough, its Cell ID, and each tower knows its latitude and longitude, so it’s easy enough for a mobile phone to know approximately where you are located by noting the current Cell ID’s geographic location. Cell network sizes vary depending on the expected traffic in an area, but in the United States their radius ranges from a half mile (cities) to five miles or more (wide-open spaces).
Triangulation
Most of the time your mobile phone is in range of more than one cell tower. In 2G and later mobile technologies, the cell tower has the ability to tell what direction your signal is coming from. If there are two or three towers that can see your phone, together they can triangulate on your phone’s location. With some operators, your phone then has the ability to query the network to find out where it’s been located. This sounds a little backward, but it can be very accurate, and it doesn’t depend on any extra hardware on the mobile phone.
GPS
The satellite-based Global Positioning System is ubiquitous these days, found in car navigation units, handheld navigators, and mobile phones. The good news is that, using GPS, your mobile phone can determine its location very accurately, including its altitude if that’s important for some particular application. There are several downsides to GPS, but it is gaining popularity nonetheless. The downsides are:
Increased cost
GPS radios and processors are fairly inexpensive, but still, an increase of even $10 in the bill-of-materials cost of a mobile phone is considerable.
Reduced battery life
There have been great strides in reducing the power required by GPS radios and processors, but they still suck battery power. Most phones that include GPS also have a feature that lets the user turn it on and off. If your application depends on GPS accuracy, it’s good to remember that your application might have to check to see whether the GPS device is turned on, and notify the user if it isn’t.
Unreliable availability
Nothing “always works,” but GPS in particular depends on your mobile device being able to see the satellites currently overhead. If you’re in the basement of a high-rise building, surrounded by steel-reinforced concrete, you probably aren’t going to be able to use GPS.
It’s reasonable to expect that all Android phones will include one or all of these location finding methods. Most recent Android phones, in particular, can use them all. So now we’ll proceed to techniques for using the location capabilities.
Mapping
Google is most famous for its search engine, but not far behind that comes the acclaim of Google Maps. When creating Android, the folks at Google could easily see the potential in LBS and how well that fit with their mapping expertise. Most LBS applications end up displaying a map. Meanwhile, Google already had the technology to display and update interactive maps, and the business processes in place to allow others to use those maps and add features for their own websites. It still required a significant leap to make that mapping technology available to application developers for mobile phones, but Google has certainly answered the challenge in Android.
The Google Maps Activity
One of the applications that comes with Android is the Google Maps application itself. If it’s appropriate, you can start Google Maps from your application the same way you start any other Activity:
1. Create an Intent (new Intent(String action, Uri uri)) that says you need to display a map. The parameters are:
o An action, for which you must specify ACTION_VIEW.
o A Uri, for which you should specify one of the following URI schemes, substituting your data:
§ geo:latitude, longitude
§ geo: latitude , longitude ?z= zoom
§ geo:0,0?q my_street_address
§ geo:0,0?q business_near_city
2. Call startActivity(Intent intent), using the intent you just created.
An example that creates a map is:
Intent intent = new Intent(ACTION_VIEW, "geo:37.422006,-122.084095");
startActivity(intent);
This is certainly easy, and it gets you all the power of Google Maps, but you can’t really integrate the map into your application this way. Google Maps is an application unto itself, and there’s no way for you to change anything about the user interface or add overlay graphics to the map to point out whatever is of interest to your users. Android provides more flexible packages to add that power.
The MapView and MapActivity
Chapter 10’s MJAndroid sample application needs to add overlays that show the locations for jobs in the area. So, instead of using the Google Maps application, we will use a MapView, which we can overlay with graphics as needed. You can have only one MapView per Activity, and that activity has to extend MapActivity. As you’ll see, that’s a small price to pay for the powerful geographic functions that MapView adds to your application.
There are a couple of unique prerequisites for using MapViews, and we touched on both of them when we looked at the initialization of MJAndroid in Chapter 10:
Include the MapViews library
The MapView is not included in the default Android libraries. Instead, you need to specify in AndroidManifest.xml that you are using this additional library:
<application android:icon="@drawable/icon2">
<uses-library android:name="com.google.android.maps" />
You can’t put the uses-library line just anywhere in AndroidManifest.xml; it needs to be within the <application> tag and outside the <activity> tag definitions.
Sign your application and obtain a Maps API key from Google
When you use a MapView in your application, you are using actual Google Maps data to draw the map. For legal reasons, Google needs to track who is using its map data. Google doesn’t care what your application does with the data, but you need to register with Google for an API key and agree to appropriate Terms of Service. This tells Google your application is using mapping data, and whether you are also using the routing data that is available from Google Maps. Application Signing covered the processes of signing your application and getting an API key.
NOTE
Remember that programs using a MapView must be signed. To make it easy for you to try out the MJAndroid example from this book, we’ve included an .apk file as described in Application Signing. If you change the code or do any coding of your own, get your own key, which is also described in Application Signing.
Working with MapViews
The MapView encapsulates a lot of very complex mapping software and is available for you to use in your Android applications—for free. Here are some of the things you can do with a MapView, with only a little programming on your part:
§ Show a street map of any area in the world, with up-to-date mapping information courtesy of Google.
§ Change the map view to show:
Street view
Photographs taken at street level for many areas in North America.
Satellite view
An aerial, photographic view of the area.
Traffic view
Real-time traffic information superimposed on the map or satellite views.
§ Move the map under program control.
§ Plot your own graphics in overlays on top of the map.
§ Respond to user touch events on the map.
MapView and MyLocationOverlay Initialization
The map in MicroJobs has two modes:
§ At startup, and when we select Current Location from the Spinner, we want to display a map of our current location, and we want that map to track us as we move around. For this map, we will use the MyLocationOverlay class.
§ When we select a specific location from the Spinner, we want to display a map of that location, turn off location updates, and not track movement.
Let’s look at the code in MicroJobs.java that initializes the MapView and the MyLocationOverlay that tracks our current location:
@Override
public void onCreate(Bundle savedInstanceState) {
...
mvMap = (MapView) findViewById(R.id.mapmain);![]()
// get the map controller
final MapController mc = mvMap.getController();![]()
mMyLocationOverlay = new MyLocationOverlay(this, mvMap);![]()
mMyLocationOverlay.runOnFirstFix(![]()
new Runnable() {
public void run() {
mc.animateTo(mMyLocationOverlay.getMyLocation());![]()
mc.setZoom(16);
}
});
Drawable marker = getResources().getDrawable(R.drawable.android_tiny_image);![]()
marker.setBounds(0, 0, marker.getIntrinsicWidth(), marker.getIntrinsicHeight());
mvMap.getOverlays().add(new MJJobsOverlay(marker));
mvMap.setClickable(true);![]()
mvMap.setEnabled(true);
mvMap.setSatellite(false);
mvMap.setTraffic(false);
mvMap.setStreetView(false);
// start out with a general zoom
mc.setZoom(16);![]()
...
/**
* Required method to indicate whether we display routes
*/
@Override
protected boolean isRouteDisplayed() { return false; }![]()
Here are some of the highlights of the code:
![]()
We first find the MapView in the main.xml layout file the same way we find any other view, and assign it to the variable mvMap, of type MapView, so that we can refer to it when we need to.
![]()
We also get a handle on the MapController associated with MapView. We’ll use that to pan (animate) the map, zoom in, zoom out, change views, and so on.
![]()
To use MyLocationOverlay, we create a new instance, giving it the highly creative name mMyLocationOverlay.
![]()
The first thing we do with mMyLocationOverlay is define a method that Android will call when we receive our first location fix from the location provider.
![]()
This runOnFirstFix method moves the map to the current location (given by mMyLocationOverlay.getMyLocation()), and zooms to a reasonable level for us to see nearby job prospects.
![]()
Next we identify a marker that we’ve decided to use on mMyLocationOverlay to mark available jobs. We use an image that’s stored in our res/drawable directory, called android_tiny_image. It’s a picture of a little Android robot. We define the bounds of the Drawable, and add the marker overlay to the list of overlays for the MapView mvMap.
![]()
Now we’d like to set some initial attributes for mvMap, described later in this section. We’ll allow the user to change most of these through menu buttons.
![]()
Then, following a belt-and-suspenders philosophy, just in case there isn’t a location provider to trigger runOnFirstFix, we’ll set the zoom level again here.
![]()
Finally, MapView requires us to override the isRouteDisplayed() method to indicate whether we are displaying route information on our map. We are not, so we return false.
MyLocationOverlay encapsulates a wealth of location and mapping code. In our single call to the constructor we:
§ Ask Android to figure out what location providers are available in our environment (GPS, Cell ID, triangulation).
§ Connect to the “best” of those location providers.
§ Ask the location provider to provide us with periodic location updates as our handset moves.
§ Link to routines that will automatically move our map as needed to track any changes in location.
MyLocationOverlay also allows us to place a compass rose on the MapView and have that updated as well, but we won’t be using that in MJAndroid.
The map attributes set by the code are:
setClickable
We want users to be able to tap on a job to cause MJAndroid to display more detail about that job, so we set this to true.
setEnabled
This method is actually inherited from android.view.View. Google doesn’t tell us exactly what this means in the case of a MapView, but presumably it enables the standard map functions—zooming, panning, and so on.
setSatellite
Setting this flag adds a satellite view from the composite map, whereas clearing the flag removes the view. To start with, we don’t want the satellite information on the map.
setTraffic
Similarly, setting or clearing this flag adds or removes current traffic information from the map, respectively. Again, we don’t want to start with traffic information on the map.
setStreetView
We don’t want street views right now either, although we’ll let the user enable them later.
ZOOMING IN ANDROID MAPS
Android maps come equipped with support for zooming in and out. The “i” key zooms in on the map, whereas the “o” key zooms out. Maps can also zoom in and out under program control, through the MapController.
Several methods are defined for zooming, all using the MapController. Android defines 21 zoom levels for maps. At zoom level 1, the equator of the Earth is 256 pixels long. Every step up in zoom level multiplies that by 2. Google warns that the higher-resolution maps are not available worldwide. All the zoom methods clamp the zoom level to the range 1 through 21 if you ask it to go beyond those limits.
The methods that control zoom, along with their parameters, are:
zoomIn
Zooms in one level.
zoomOut
Zooms out one level.
setZoom(int zoomlevel)
Zooms to the given level, restricting it to the range 1 to 21.
zoomInFixing(int xpixel, int ypixel), zoomOutFixing(int xpixel, int ypixel)
Zoom in one level, but keep the given point fixed on the screen. Normally when you zoom in and out, the center of the screen is the only point that stays fixed. These routines let you pick any point on the map to be the fixed point.
zoomToSpan(int latSpanE6, int longSpanE6)
Attempts to zoom so that the given span is displayed on the map. What it actually does is select the zoom level that is the closest match for the span requested. The latitude and longitude span parameters are expressed as integers with a value 106 times the actual value in degrees. For instance, a latitude/longitude span of 2.5 degrees by 1.0 degrees would be expressed aszoomToSpan(2500000, 1000000).
Pausing and Resuming a MapActivity
For a minute, let’s focus on map activities and note a way we can help save battery power. The good news is that Android makes this pretty easy.
In a mobile environment, battery life is everything, and if we’re not the application that is currently being displayed, we want to do everything we can to minimize the power we consume. Recall from the discussion of the Android life cycle (Visualizing Life Cycles) that when an Activity(such as MicroJobs) starts another Activity (such as MicroJobsList), the new Activity takes over the screen, and the calling Activity gets pushed onto a stack of activities that are waiting to run. At that time, Android calls the onPause routine in the calling Activity so that it can prepare itself to go into hibernation. At this point, in MicroJobs.java (or just about any MapActivity that uses location updates), we want to turn off location updates. Doing so will at least save the cycles devoted to doing the update, and may allow the handset to save even more power by putting the location provider in a quiescent state that uses less power.
When the called Activity (in our case, MicroJobsList) exits and the calling Activity is popped off the stack and takes control of the screen, the framework calls the onResume method in the calling Activity. In a MapActivity, we want to turn on location updates again when this method is invoked.
In MicroJobs, the onPause and onResume methods are straightforward:
/**
* @see com.google.android.maps.MapActivity#onPause()
*/
@Override
public void onPause() {
super.onPause();
mMyLocationOverlay.disableMyLocation();
}
/**
* @see com.google.android.maps.MapActivity#onResume()
*/
@Override
public void onResume() {
super.onResume();
mMyLocationOverlay.enableMyLocation();
}
Note that if we’d had a compass rose as part of our MyLocationOverlay, we would have to disable and enable it as well. Otherwise, the system would be wasting cycles and battery updating the direction of the compass rose, even though it wasn’t visible on-screen.
Controlling the Map with Menu Buttons
We want to give the user the ability to turn on satellite, traffic, and street views of the map. In addition, we’ll throw in a few menu buttons to enable zooming and another way to get to the Jobs list.
Android has a sophisticated set of menu capabilities that includes three types of menus (options, context, and submenus), each with its own capabilities, icon menu buttons, and other advanced features. We just use text-based menu buttons. We need to do two things:
1. Create the menu of buttons that will be displayed.
2. Catch the menu events and invoke appropriate actions.
The following code creates the menu in MicroJobs.java:
/**
* Set up menus for this page
*
* @see android.app.Activity#onCreateOptionsMenu(android.view.Menu)
*/
@Override
public boolean onCreateOptionsMenu(Menu menu) {
boolean supRetVal = super.onCreateOptionsMenu(menu);
menu.add(Menu.NONE, 0, Menu.NONE, getString(R.string.map_menu_zoom_in));
menu.add(Menu.NONE, 1, Menu.NONE, getString(R.string.map_menu_zoom_out));
menu.add(Menu.NONE, 2, Menu.NONE, getString(R.string.map_menu_set_satellite));
menu.add(Menu.NONE, 3, Menu.NONE, getString(R.string.map_menu_set_map));
menu.add(Menu.NONE, 4, Menu.NONE, getString(R.string.map_menu_set_traffic));
menu.add(Menu.NONE, 5, Menu.NONE, getString(R.string.map_menu_show_list));
return supRetVal;
}
We create menu buttons by overriding the onCreateOptionsMenu method, where we are passed a menu parameter for the Activity’s menu. After dutifully allowing the superclass a chance to do what it needs to do, we simply add items (buttons) to the menu using menu.add. The version of menu.addthat we’ve chosen takes four parameters:
int groupid
Android allows you to group menu items so that you can quickly change the whole menu at once. We don’t have a need for that in MicroJobs, so Menu.NONE says we don’t need it.
int itemid
We need a unique identifier for this menu item so that we can tell later whether it was picked.
int order
The itemid we defined in the second parameter does not imply order. If we cared about the order in which the items were presented, we’d do that with this parameter. Since we don’t care, we use Menu.NONE again.
int titleRes
This is the ID of the string resource we want to use for the button title. Note that this is an Integer, not a String, so the menu strings need to be predefined in string.xml, under the res directory. Recall that Android takes care of compiling the strings in res/strings.xml into a .java file (R.java) that assigns an integer to each string. The getString method retrieves that integer for you (despite the name, the method returns an integer and not a string).
To catch the menu events, we override the onOptionsItemSelected method:
/**
* @see android.app.Activity#onOptionsItemSelected(android.view.MenuItem)
*/
@Override
public boolean onOptionsItemSelected(MenuItem item) {
switch (item.getItemId()) {
case 0:
// Zoom in
zoomIn();
return true;
case 1:
// Zoom out
zoomOut();
return true;
case 2:
// Toggle satellite views
mvMap.setSatellite(!mvMap.isSatellite());
return true;
case 3:
// Toggle street views
mvMap.setStreetView(!mvMap.isStreetView());
return true;
case 4:
// Toggle traffic views
mvMap.setTraffic(!mvMap.isTraffic());
return true;
case 5:
// Show the job list activity
startActivity(new Intent(MicroJobs.this, MicroJobsList.class));
return true;
}
return false;
}
We use the MenuItem parameter, and the switch has a case for each button that we defined for the menu. We’ve already seen code similar to that contained in each case.
Controlling the Map with the Keypad
Some users might prefer to control the map through the keypad (generally one “click,” versus two “clicks” to cause a menu event). Enabling this behavior also demonstrates how to respond to KeyPad events in general, so we’ve added some code to zoom in, zoom out, and back out of the current activity:
/**
* @see android.app.Activity#onKeyDown(int, android.view.KeyEvent)
*/
@Override
public boolean onKeyDown(int keyCode, KeyEvent event) {
switch (keyCode) {
case KeyEvent.KEYCODE_DPAD_UP: // zoom in
zoomIn();
return true;
case KeyEvent.KEYCODE_DPAD_DOWN: // zoom out
zoomOut();
return true;
case KeyEvent.KEYCODE_BACK: // go back (meaning exit the app)
finish();
return true;
default:
return false;
}
}
To catch key-down events, we simply override onKeyDown and provide a switch for the different keys that are of interest. In addition to the keycodes you would expect (KEYCODE_A, ...KEYCODE_Z; and things like KEYCODE_SPACE, KEYCODE_SHIFT_LEFT, and KEYCODE_SHIFT_RIGHT), Android includes keycodes that may or may not appear on any particular device (KEYCODE_CAMERA and KEYCODE_VOLUME_UP). A complete set of keycodes can be found at http://code.google.com/android/reference/android/view/KeyEvent.html.
Location Without Maps
What if your activity needs to access location information, but it doesn’t include a MapView? When you use a MapView, Android makes everything very easy with MyLocationOverlay, but if you don’t need a map it still isn’t that hard to get location information. The code in this section is not part of MJAndroid, but it shows how you obtain location information independent of MapView.
Let’s look at a very simple, one-activity application that displays the current location in a TextView.
The Manifest and Layout Files
An appropriate AndroidManifest.xml file follows. We created this file using the Android SDK and the Android Manifest Editor that comes as part of it. The only change we needed to make with the editor was to add the uses-permission tag for android.permission.ACCESS_FINE_LOCATION (in the next-to-last line of the file). We always need this permission in order to get location information from a GPS location provider:
<?xml version="1.0" encoding="utf-8"?>
<manifest xmlns:android="http://schemas.android.com/apk/res/android"
package="com.microjobsinc.dloc"
android:versionCode="1"
android:versionName="1.0.0">
<application android:icon="@drawable/icon" android:label="@string/app_name">
<activity android:name=".Main"
android:label="@string/app_name">
<intent-filter>
<action android:name="android.intent.action.MAIN" />
<category android:name="android.intent.category.LAUNCHER" />
</intent-filter>
</activity>
</application>
<uses-permission android:name="android.permission.ACCESS_FINE_LOCATION">
</uses-permission>
</manifest>
We’ll use a very simple layout file with four TextViews: one label and one text box each for latitude and longitude:
<?xml version="1.0" encoding="utf-8"?>
<LinearLayout xmlns:android="http://schemas.android.com/apk/res/android"
android:orientation="vertical"
android:layout_width="fill_parent"
android:layout_height="fill_parent"
>
<TextView
android:id="@+id/lblLatitude"
android:layout_width="fill_parent"
android:layout_height="wrap_content"
android:text="Latitude:"
/>
<TextView
android:id="@+id/tvLatitude"
android:layout_width="fill_parent"
android:layout_height="wrap_content"
/>
<TextView
android:id="@+id/lblLongitude"
android:layout_width="fill_parent"
android:layout_height="wrap_content"
android:text="Longitude:"
/>
<TextView
android:id="@+id/tvLongitude"
android:layout_width="fill_parent"
android:layout_height="wrap_content"
/>
</LinearLayout>
Connecting to a Location Provider and Getting Location Updates
Let’s start with an activity that just connects with the GPS LocationProvider and gets and displays our current location (no updates):
package com.oreilly.demo.pa.microJobs;
import android.app.Activity;
import android.content.Context;
import android.location.Location;
import android.location.LocationManager;
import android.os.Bundle;
import android.widget.TextView;
public class Main extends Activity {
/** Called when the activity is first created. */
@Override
public void onCreate(Bundle savedInstanceState) {
super.onCreate(savedInstanceState);
setContentView(R.layout.main);
// find the TextViews
TextView tvLatitude = (TextView)findViewById(R.id.tvLatitude);
TextView tvLongitude = (TextView)findViewById(R.id.tvLongitude);
// get handle for LocationManager
LocationManager lm = (LocationManager)
getSystemService(Context.LOCATION_SERVICE);![]()
// connect to the GPS location service
Location loc = lm.getLastKnownLocation("gps");![]()
// fill in the TextViews
tvLatitude.setText(Double.toString(loc.getLatitude()));![]()
tvLongitude.setText(Double.toString(loc.getLongitude()));
}
}
The procedure is pretty straightforward. Here are some of the highlights of the code:
![]()
Connects to the LocationManager using getSystemService(Context.LOCATION_SERVICE).
![]()
Asks the LocationManager where we are using getLastKnownLocation("provider").
![]()
Gets the latitude and longitude from the Location returned and uses it as needed.
But we also want to get periodic location updates from the LocationManager so that we can track our location as we move about. For that we need to add a listener routine and ask the LocationManager to call it when it has an update.
Location updates from the LocationManager are accessible to an application through a DispLocListener class, so we will create an instance of this class in the onCreate method of our main activity. We are required to override a number of methods in DispLocListener to meet the LocationListenerinterface definition, but we don’t need them for this application, so we’ll leave the definitions empty. The full implementation follows:
package com.oreilly.demo.pa.MicroJobs;
import android.app.Activity;
import android.content.Context;
import android.location.Location;
import android.location.LocationListener;
import android.location.LocationManager;
import android.os.Bundle;
import android.widget.TextView;
public class Main extends Activity {
private LocationManager lm;
private LocationListener locListenD;
public TextView tvLatitude;
public TextView tvLongitude;
/** Called when the activity is first created. */
@Override
public void onCreate(Bundle savedInstanceState) {
super.onCreate(savedInstanceState);
setContentView(R.layout.main);
// find the TextViews
tvLatitude = (TextView)findViewById(R.id.tvLatitude);
tvLongitude = (TextView)findViewById(R.id.tvLongitude);
// get handle for LocationManager
LocationManager lm =
(LocationManager) getSystemService(Context.LOCATION_SERVICE);
// connect to the GPS location service
Location loc = lm.getLastKnownLocation("gps");
// fill in the TextViews
tvLatitude.setText(Double.toString(loc.getLatitude()));
tvLongitude.setText(Double.toString(loc.getLongitude()));
// ask the Location Manager to send us location updates
locListenD = new DispLocListener();
lm.requestLocationUpdates("gps", 30000L, 10.0f, locListenD);
}
private class DispLocListener implements LocationListener {
@Override
public void onLocationChanged(Location location) {
// update TextViews
tvLatitude.setText(Double.toString(location.getLatitude()));
tvLongitude.setText(Double.toString(location.getLongitude()));
}
@Override
public void onProviderDisabled(String provider) {
}
@Override
public void onProviderEnabled(String provider) {
}
@Override
public void onStatusChanged(String provider, int status, Bundle extras) {
}
}
}
Our onCreate method creates an instance of DispLocListener and requests that the LocationManager update it as needed using requestLocationUpdates. This method takes four parameters:
String provider
Which location provider to use. We assume GPS is available in this case.
long minTime
Minimum update time, in milliseconds. The LocationManager will wait at least this long between updates. Here’s an opportunity to tune your application for battery life: more frequent updates mean more battery usage.
float minDistance
Minimum distance, in meters, required to trigger an update. The LocationManager will update us only if we’ve moved at least this far since the last update.
LocationListener listener
The name of the listener method to call when there is an update. This is the DispLocListener instance we just created.
Finally, we want to add the onPause and onResume code to turn location updates off when we’re not actually displaying on the user’s screen, and turn them back on when we are:
/**
* Turn off location updates if we're paused
*/
@Override
public void onPause() {
super.onPause();
lm.removeUpdates(locListenD);
}
/**
* Resume location updates when we're resumed
*/
@Override
public void onResume() {
super.onResume();
lm.requestLocationUpdates("gps", 30000L, 10.0f, locListenD);
}
Updating the Emulated Location
While developing and debugging an application like the one shown in the preceding section, you’re normally running on the emulator. It would be nice (maybe even essential) to be able to update the current location that the emulator uses as it’s running your code. Such a mock location provider can get very fancy, but Android provides some built-in ways of updating the emulated location:
§ The geo program built into the Android shell
§ One-time updates via DDMS
§ Tracks that are sequentially updated via DDMS
We’ll look at each of these.
Using geo to update location
The geo utility is built into the Android image that runs on the emulator. It has a number of capabilities, two of which are useful here:
geo fix
You can use the geo fix command to send a location to Android by telneting to the console of the emulated Android. The LocationProvider will then use this as the current location:
telnet localhost 5554
Android Console: type 'help' for a list of commands
OK
geo fix -122.842232 38.411908 0
OK
geo fix takes three parameters:
longitude
Specified in decimal
latitude
Also specified in decimal
altitude
Specified in meters
Using DDMS to update location
In Chapter 1, we discussed the Dalvik Debug Monitor Service (DDMS). Here we will discuss two features of this tool related to location updates. The Emulator Control pane of the DDMS screen provides several ways of controlling the running emulator. After switching to the DDMS perspective (click on DDMS in the upper right of the Eclipse window) you should see the Emulator Control pane in the middle left of the DDMS window (Figure 15-1). You will probably have to scroll down in that pane to see the controls related to Location Controls.
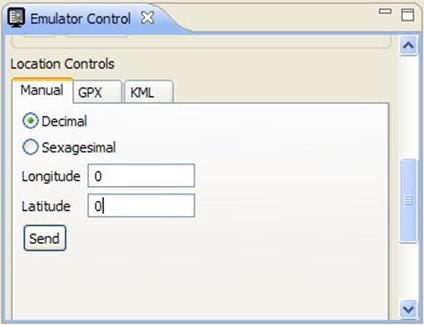
Figure 15-1. DDMS Emulator Control pane
To send a one-time update of a location to the emulator, just enter the longitude and latitude in the appropriate boxes and click Send.
If you click on either the GPX or KML tab, you will be able to load a GPX or KML file that describes a path, as shown in Figure 15-2. Here we’ve already loaded the file OR.kml, which is included on the website for this book. It traces a path near O’Reilly headquarters in Sebastopol, California.
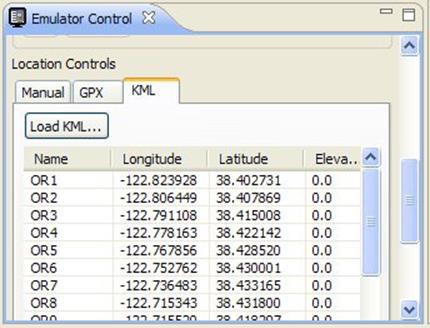
Figure 15-2. DDMS emulator with KML location updates
You can create GPX tracks with many GPS navigation software tools, and KML tracks with Google Earth or many other navigation programs. The OR.kml file was generated by plotting a series of Google Earth placemarks and concatenating them together into a single file. Here’s an excerpt of OR.kml:
<?xml version="1.0" encoding="UTF-8"?>
<kml xmlns="http://earth.google.com/kml/2.2">
<Document>
<name>OR1.kml</name>
<StyleMap id="msn_ylw-pushpin">
<Pair>
<key>normal</key>
<styleUrl>#sn_ylw-pushpin</styleUrl>
</Pair>
<Pair>
<key>highlight</key>
<styleUrl>#sh_ylw-pushpin</styleUrl>
</Pair>
</StyleMap>
<Style id="sh_ylw-pushpin">
<IconStyle>
<scale>1.3</scale>
<Icon>
<href>http://maps.google.com/mapfiles/kml/pushpin/ylw-pushpin.png</href>
</Icon>
<hotSpot x="20" y="2" xunits="pixels" yunits="pixels"/>
</IconStyle>
<ListStyle>
</ListStyle>
</Style>
<Style id="sn_ylw-pushpin">
<IconStyle>
<scale>1.1</scale>
<Icon>
<href>http://maps.google.com/mapfiles/kml/pushpin/ylw-pushpin.png</href>
</Icon>
<hotSpot x="20" y="2" xunits="pixels" yunits="pixels"/>
</IconStyle>
<ListStyle>
</ListStyle>
</Style>
<Placemark>
<name>OR1</name>
<LookAt>
<longitude>-122.7583711698369</longitude>
<latitude>38.38922415809942</latitude>
<altitude>0</altitude>
<range>14591.7166300043</range>
<tilt>0</tilt>
<heading>0.04087372005871314</heading>
<altitudeMode>relativeToGround</altitudeMode>
</LookAt>
<styleUrl>#msn_ylw-pushpin</styleUrl>
<Point>
<coordinates>-122.8239277647483,38.40273084940345,0</coordinates>
</Point>
</Placemark>
<Placemark>
<name>OR2</name>
<LookAt>
<longitude>-122.7677364592949</longitude>
<latitude>38.3819544049429</latitude>
<altitude>0</altitude>
<range>11881.3330990845</range>
<tilt>0</tilt>
<heading>-8.006283077460853e-010</heading>
<altitudeMode>relativeToGround</altitudeMode>
</LookAt>
<styleUrl>#msn_ylw-pushpin</styleUrl>
<Point>
<coordinates>-122.8064486052584,38.40786910573772,0</coordinates>
</Point>
</Placemark>
<Placemark>
<name>OR3</name>
<LookAt>
<longitude>-122.7677364592949</longitude>
<latitude>38.3819544049429</latitude>
<altitude>0</altitude>
<range>11881.3330990845</range>
<tilt>0</tilt>
<heading>-8.006283077460853e-010</heading>
<altitudeMode>relativeToGround</altitudeMode>
</LookAt>
<styleUrl>#msn_ylw-pushpin</styleUrl>
<Point>
<coordinates>-122.7911077944045,38.41500788727795,0</coordinates>
</Point>
</Placemark>
...
All materials on the site are licensed Creative Commons Attribution-Sharealike 3.0 Unported CC BY-SA 3.0 & GNU Free Documentation License (GFDL)
If you are the copyright holder of any material contained on our site and intend to remove it, please contact our site administrator for approval.
© 2016-2025 All site design rights belong to S.Y.A.