Programming Android (2011)
Part I. Tools and Basics
Chapter 5. Eclipse for Android Software Development
Eclipse is a controversial topic. It is a great open source success story, it is the most widely used Java Integrated Development Environment (IDE), it is powerful, and it is the center of the largest ecosystem of add-ons and derivative products available for software development. These are the reasons Eclipse was chosen as the development target for plug-ins that customize it for Android software development. But Eclipse has been criticized for being unfriendly and difficult to learn.
Eclipse isn’t like most GUI software that takes pains to protect the user from invoking operations that cannot succeed. Eclipse’s developers favor modularity and power over smoothing the sharp edges. For example, one of the first things you may have noticed in running an example program is that Eclipse offers to do things with your Android program that don’t make much sense, like running it on a server, or as an applet, as shown in Figure 5-1.
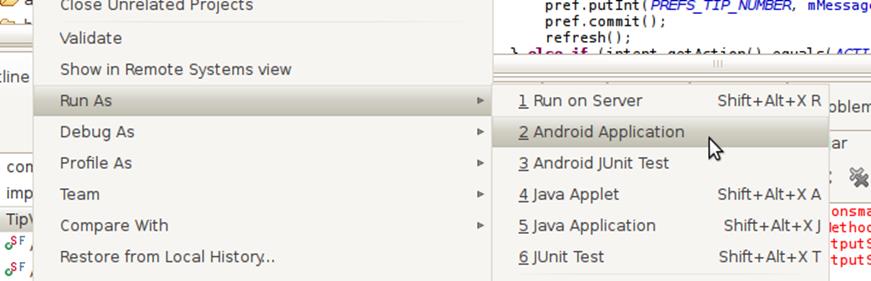
Figure 5-1. Running Eclipse as an applet, a task that is bound to fail
We are not here to criticize Eclipse, nor rationalize on its behalf. But we will explain why Eclipse does things like this. We will explain how Eclipse components fit together and work together. We will familiarize you with what you are looking at when you launch Eclipse and start coding. With this knowledge you will be better equipped to make effective use of Eclipse and less likely to find it frustrating.
Documentation for Eclipse is available at http://www.eclipse.org/documentation.
Eclipse Concepts and Terminology
Eclipse has its own nomenclature, behind which are the concepts that are key to understanding it. These concepts developed over a very long product life span, originating with VisualAge—a software development tool written in the SmallTalk language in the mid-1980s. The current implementation of Eclipse is written in the Java language, based on a framework called Equinox, which implements a specification for modular Java software systems called OSGi. OSGi is a way of specifying, in a manifest, the life cycle and dependencies of dynamically loaded modules, called bundles. That is, Eclipse is a collection of modules in a framework. When modules are added or removed, if they have dependencies on other modules, those dependencies will be satisfied automatically, if possible.
Further information on the Equinox OSGi implementation, including a detailed explanation of what happens when Eclipse starts up, is available at http://eclipse.org/equinox/documents/quickstart.php.
Plug-ins
When you set up your Android software development tools, you added plug-ins to Eclipse: the Android Development Tools (ADT) plug-ins. Plug-ins are OSGi bundles.
The Android SDK adds two plug-ins to Eclipse. You can find them by showing the Plug-ins view, by selecting Window→Show View→Other... and expanding the “Plug-in development” item. Then select Plug-ins from the list of views. You will see the list shown in Figure 5-2.
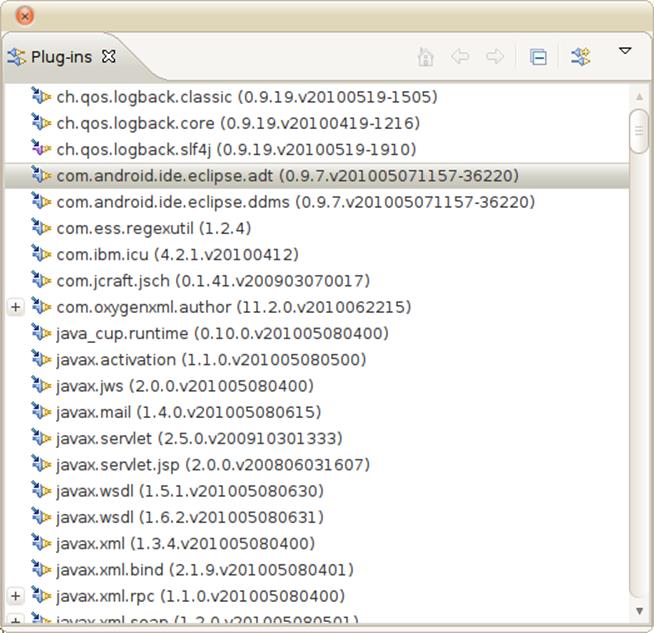
Figure 5-2. A list of all the plug-ins in an Eclipse environment
TIP
Note that in this chapter and in other places in this book, Eclipse view screenshots are shown in “detached” mode—in a separate window—so that we do not need to trim the surrounding views and toolbars out of screenshots. The way a view appears on your screen depends on the Eclipse perspective you are using and the other views in that perspective. Right-clicking on a view title pops up a menu with options for how to display the view, including the Detached option.
Plug-ins are listed alphabetically, so, near the top of the list you will see the two plug-ins required for working with the Android SDK: com.android.ide.eclipse.adt and com.android.ide.eclipse.ddms. Keep the Plug-ins view open. Later in this chapter we will look at some information about those plug-ins to see how they modify the Eclipse environment. You can also look at this list of plug-ins and see that Eclipse is, in fact, made of plug-ins, all the way down to the Equinox OSGi implementation.
Workspaces
Eclipse keeps a lot of state, and workspaces are where it is kept. When you first run Eclipse, it will ask if you want to create a workspace. Thereafter, when you start Eclipse, it picks up right where you left off, with all the projects, files, and views as you left them, by reading its previous state from a workspace. Eclipse implements workspaces using directories.
Every project belongs to a workspace. By default, new projects are directories created inside the workspace directory. Even if you create a project from source that is not in the workspace directory, most of the meta information about that project is kept in the workspace.
Workspaces are independent. Settings that you set up in one workspace stay in that workspace. You can use multiple workspaces to separate projects that target different platforms, and that may use markedly different environments—for example, Rails projects and Android projects. You can use multiple workspaces to run more than one instance of Eclipse. Suppose you have Eclipse-based tools for some web application framework that are not compatible with the version of Eclipse you are using for Android development. By using a separate workspace for Android development, you can maintain separate state and even run both Eclipse versions at the same time.
Java Environments
Three distinct Java environments are used in Java software development in Eclipse.
Eclipse’s Java Runtime Environment
The first environment is that in which Eclipse itself is running. In The Eclipse Integrated Development Environment (IDE) we covered installing Java development tools and runtime environments, if your system does not already have one installed. If you need to use a different Java runtime for Eclipse, you can configure this choice in your eclipse.ini file in the folder where Eclipse is installed. If Eclipse is running out of memory, for instance, this is the environment you will want to adjust.
The Java compiler
The second environment is used to compile your code. Eclipse comes with its own incremental Java compiler. In addition to producing the compiled Java .class files, it creates the error messages displayed in the Java editor and produces the typing information Eclipse uses for suggestions, autocompletion, and so on. This environment is configured using the Java→Compiler node in the Preferences pane, but you can override the defaults for a specific project from the project’s preferences.
In addition, this environment contains a description of the libraries against which the application is compiled. If you look at the Preferences→Build Path for an Android application, you will find that there is no Java runtime included in the list of libraries on which the project depends. Instead, an Android project depends on a version of the Android libraries. Because the Android tools are bolted onto Eclipse, though, you can’t directly change the Android library version from the Build Path pane. If you need to do that, you’ll have to open the Android preferences pane.
The application runtime
The third environment is the one in which your application runs—in this case, one of the Android emulators. In setting up your development environment—either when you installed the SDK or when you set up the ADT plug-in—you set up one or more Android Virtual Devices (AVDs). When you create a new Android project you associate it with one of the AVDs. The plug-in uses the appropriate profile to set up both the compilation environment and the emulator used for running the application, reducing the chance for a mismatch between the runtime environment: an application compiled against the Android 2.2 libraries may not run on a 1.5 platform.
Projects
For software developers, Eclipse projects correspond to programs they are developing. For Android software developers, they correspond to Android applications. Within Eclipse, projects are how Eclipse plug-ins know which software to operate on: when you create an Android project, the project data includes information that Eclipse uses to select code from various plug-ins to perform various operations. The ADT plug-ins are invoked to help create a project with the right set of files and directory structure for an Android application. When you work on the files in an Android project, the right editors are used when you open XML files such as layouts and the manifest. When you modify files in a project, the right builders are called to build the application.
Builders and Artifacts
The Eclipse framework defines the concept of a “builder,” used to generate project artifacts from their sources. Artifacts are files built from source files. The Android Eclipse plug-in defines several new builders that create .dex files from .class files, create Java constants that identify resources specified in XML, create .apk files, and perform other Android-specific operations that are part of turning code into an installable package. Eclipse will regenerate the installable application whenever you make changes. You should always be able to run it or debug it.
The transformation of .class files, which are the output of the Java compiler, to .dex files, which are bytecode interpreted by the Dalvik virtual machine (VM), is a neat trick: it enables you to program in Java, using the very highly developed editing and refactoring tools, as well as numerous other tools created to enhance the productivity and reliability of Java coding.
Extensions
Extensions are all the places where a plug-in extends Eclipse functionality. You won’t manipulate or change extensions as an Android software developer, but while we have that Plug-ins view open, let’s take a brief look at some of the extensions the Android plug-ins add. This will give you a more concrete idea of the relationship of the ADT plug-ins and the rest of the Eclipse system. In the Plug-ins view, as shown in Figure 5-2, double-click on the plug-in named com.android.ide.eclipse.adt and you will see an Extensions view, listing the extensions in the plug-in, as shown inFigure 5-3.
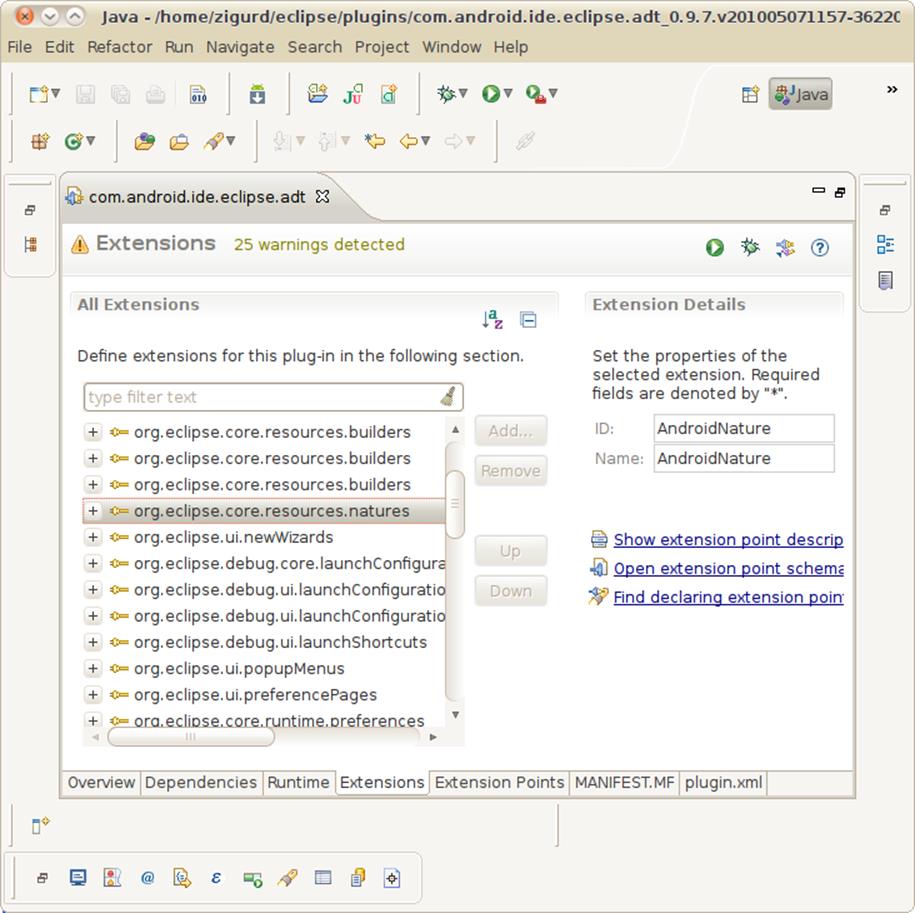
Figure 5-3. A list of extensions in the ADT plug-in
For example, you can select each extension named org.eclipse.core.resources.builders and, on the right side of the Extensions view, it will show you the extension names: Android Resource Manager, Android Pre Compiler, and Android Package Builder. These are the extensions needed to process Android resources; precompile AIDL (Android Interface Definition Language), which is described in Chapter 6, into Java code; and turn .class files, which are created using the Java builder, into .dex files as well as build the .apk file, which can be deployed to an Android device or AVD.
If you expand the org.eclipse.ui.editors item, you will see a list of the editors the ADT plug-in adds to the Eclipse system: the Android Manifest Editor, Android Resource Editor, Android Layout Editor, Android Menu Editor, and Android XML Resources Editor. There are many other extensions in this list, and this should give you an idea of the amount of code that is required to turn Eclipse into a tool for Android software development. The ones we’ve explored here are enough to reveal some of the most important aspects: how Android programs get built, and what is added to the Eclipse environment to help you edit Android-specific files—including the XML files that comprise the manifest, layouts, and other resources.
If you explore the other ADT plug-in similarly, you will see how Dalvik Debug Monitor Service (DDMS) features are added to Eclipse.
Associations
Associations are how files within a project are associated with, among other things, the editors that operate on them. For example, Java files within an Android project are edited with the Java editor, the same as any Java project, but XML files are edited with an Android-specific XML editor, which could be the Android Manifest Editor or the Android Resource Editor. These editors know how to edit specific structures in these files, but they fall short in other areas, such as general-purpose structure editing with the Outline view. If you wanted to open an Android XML file with an XML editor other than the one the association for the file calls for, you can override associations with the Open With command in the context menu for a source file, which pops up when you right-click on the file in the Package Explorer view.
The Open With command shows you a choice of editors that are likely to work on the file you selected. If you select the Other... option, you will see a list of all editors in your Eclipse configuration and be offered the option of opening the selected file with an external program.
Eclipse Views and Perspectives
In addition to understanding the way the ADT plug-ins modify Eclipse, some familiarity with Eclipse’s system of views and perspectives will help you recognize what you are looking at when you use Eclipse in Android software development. An Eclipse view is a part of the Eclipse window that displays information of a certain type, or in a certain way: a list of projects and project files, a list of errors in code, a hierarchical view of entities in a class, and so on. A perspective is an arrangement of views designed for a particular purpose, such as editing Java, or debugging.
If your Eclipse environment does not result in the same set of views shown in the examples here or listed among the main views, don’t be alarmed. Different sets of plug-ins can result in different behavior, including the set of default views in some perspectives. The most important perspectives for Java coding are the Package Explorer, Editor, and Outline views, and those should be present in your Eclipse environment.
When you first start Eclipse (after you get past the Welcome screen) but before you have created any projects, you should see something similar to Figure 5-4.
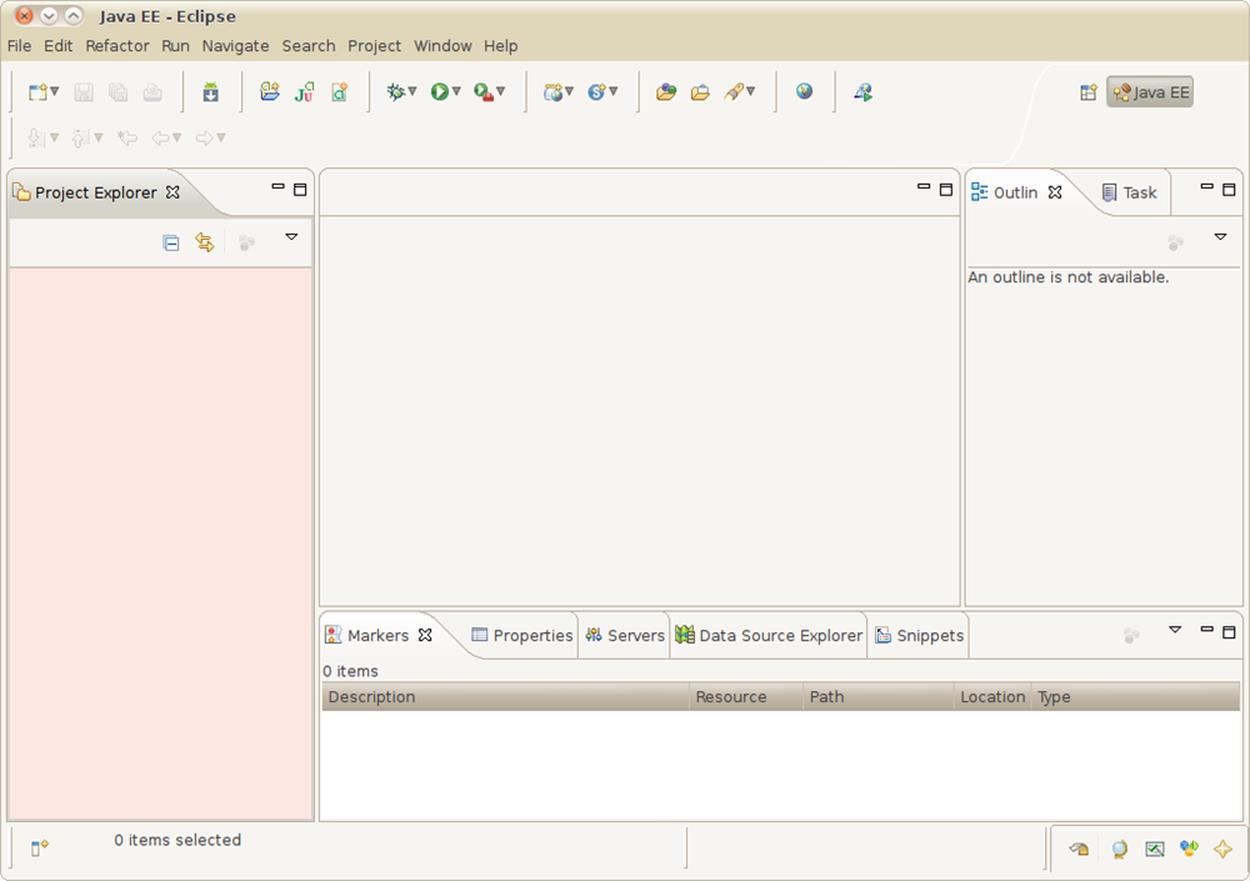
Figure 5-4. An empty workspace, with the ADT plug-in configured
The workspace pictured here is a little more cramped than what you will probably experience. Most coders use larger screens in order to see the information in the views surrounding the editor that goes in the middle of an Eclipse perspective, and leave enough room to see an adequate amount of code. We left these perspectives at the default minimum size in order to fit the screenshots on the page.
A typical Java editing perspective in Eclipse looks like the one in Figure 5-5, with views for exploring the contents of projects, a list of tasks, the output of builders and other operations, and so on. You can see that some changes from the default set of views were made in creating an Android project and editing a Java source file in an Android project. Let’s take a look at the views that are displayed by default here.
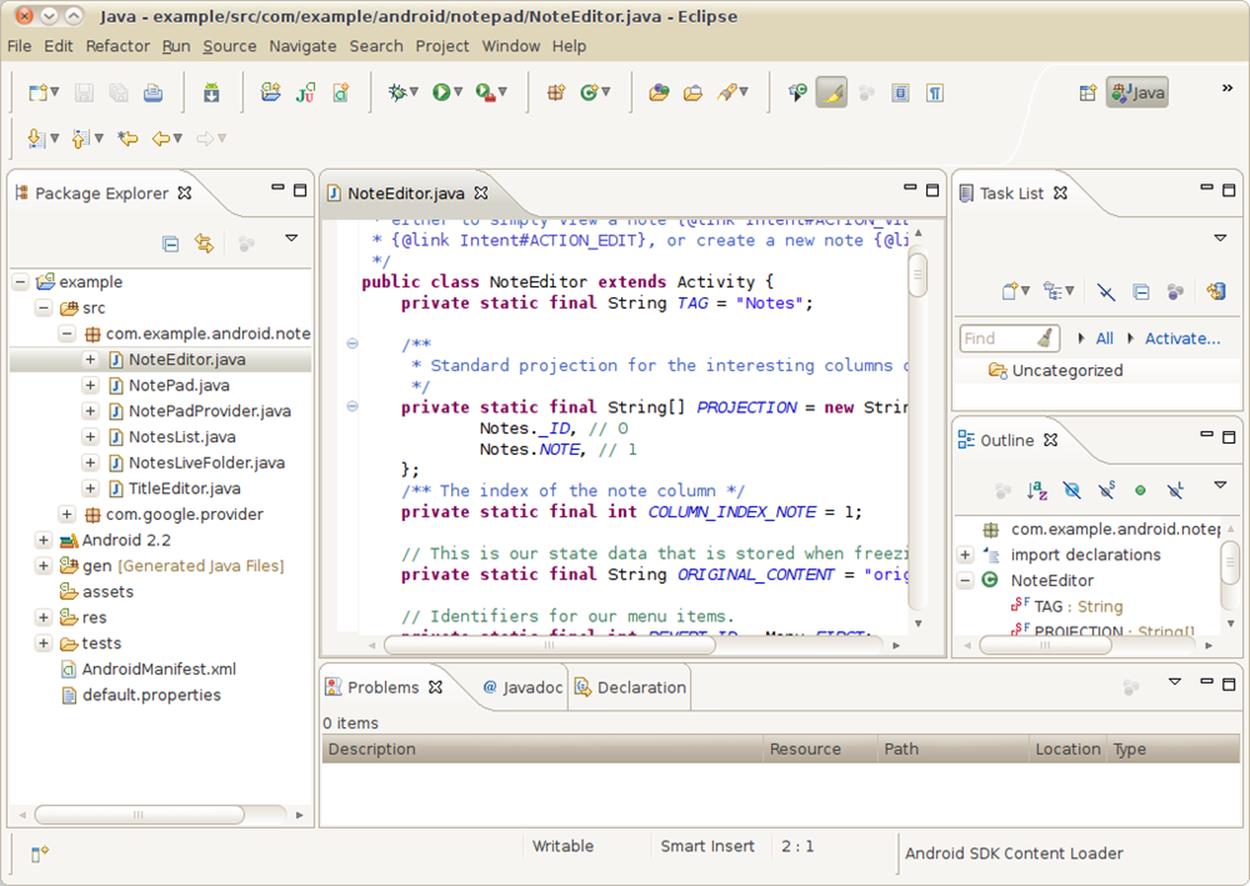
Figure 5-5. The Java editing perspective with an Android project, and an Android source file in the Java editor
The Package Explorer View
Eclipse is more than just an editor with a lot of chrome around the editing window. Most of the views displayed around the editor in an Eclipse perspective have the goal of speeding navigation in the project and in the project’s files. The Package Explorer view will often be your starting point when editing source files and running and debugging your projects.
The Task List View
The Task List view lists tasks that you may have created using the New Task command in the view’s toolbar, or by turning an item in the Problems view into a task. You can link the task list with a source code repository or bug tracker in order to share it with other people working on a project with you. Curiously, the Task List view does not list the TODO items many coders use to insert task reminders into code. These are parsed by the Java editor and are marked with icons in the left margin. There may be something about the implementation of the plug-ins that implement these features that makes it difficult to present all tasks in one place.
The Outline View
A program is both its source code—which is usually ordinary text—and the structure into which it is parsed, which consists, in the case of Java, of fields and methods. The Outline view shows the structure of a Java class, and enables you to operate on that structure with many of the same commands you would apply to the selection in an Editor view. The Java editor relies on knowing the underlying structure, too. But the Outline view enables you to see that structure explicitly laid out in a hierarchy, with icons that indicate type and scope information to the left of the name of each item in this structured view. More information on the Outline view is available at http://help.eclipse.org/helios/topic/org.eclipse.jdt.doc.user/reference/views/ref-view-outline.htm.
The Problems View
The Eclipse concept of “builders” generalizes the idea of compiling source files into objects or, more generally in Eclipse parlance, artifacts. Problems are what prevent this from happening smoothly. Problems can be compiler errors, or any other error from a builder. Sometimes problems prevent a builder from completing an artifact, and sometimes they are warnings that do not prevent an artifact from being generated. The Problems view displays problems and enables fast navigation to them. Right-click on a problem to see the context menu: if you want to fix the problem right away, the Go To command opens the file and navigates to the line associated with the problem. If it is a warning that should eventually be fixed, you can track the problem by using the New Task From Marker… command. Double-clicking on a problem also navigates to the source of the problem.
Java Coding in Eclipse
If you are new to Java and Eclipse, your first concern will be getting things right. But soon enough, your primary concern will be making coding fast and easy. Of all programming languages, Java has likely had the most effort applied to boosting programmer productivity through tools like Eclipse. For this reason, the story of Java coding in Eclipse is a story driven by the desire for the highest possible level of productivity. Productivity has three key aspects: creating new code efficiently, finding code you need to read or modify, and making changes to code that affect more than just the line of code you are editing.
Editing Java Code and Code Completion
The central productivity feature for editing Java code in any Java-oriented IDE is code completion or, in Eclipse parlance, “content assist.” Nearly anywhere in a Java source file you can press the keyboard shortcut Ctrl-space bar to display a pop up that “proposes” to complete what you are currently doing. For example, if you know there is a method to find something, but you forgot exactly how that goes, type fi and press Ctrl-space bar. You will then see something similar to Figure 5-6.
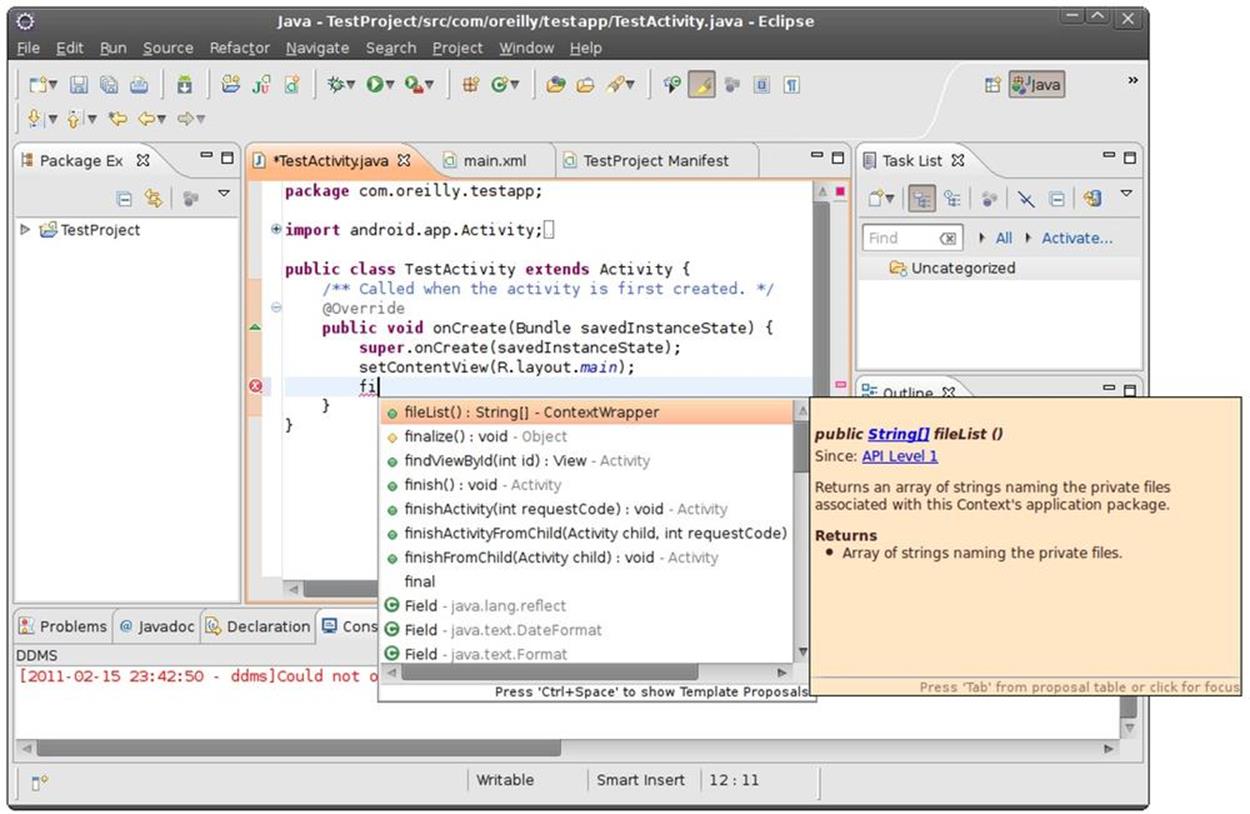
Figure 5-6. Offering a completion in the content assist pop up
In this case, content assist is offering to insert the signature of a method, with a parameter list for you to fill in. You can see that the method findViewById is listed, and you can select this choice in order to avoid having to type the whole method name and argument list.
Had you pressed Ctrl-space bar before having typed anything, all the constants and methods of the class would have been offered as possible completions by content assist.
Refactoring
Java is statically typed, which requires every object and every reference to be explicitly declared before it is used. This can make Java look bureaucratic and inelegant, and make it seem as though coding in Java is needlessly wordy. IDEs like Eclipse compensate for the verbosity of Java syntax by providing code completion and other speed-ups for coders. There is one aspect of coding productivity that works far better in statically typed languages: refactoring.
Refactoring means making changes that preserve program behavior. That is, refactoring does not change what the program does. It changes how the program is organized. Ensuring that behavior does not change while code is reorganized enables powerful transformations: even renaming a reference or type name can be perilous if you have to do it with text substitution. But with refactoring, you are assured that all and only the right names are modified.
Two factors greatly improve the kinds of refactorings that can be performed: the language should be statically typed, and the IDE should have a compiled model of the program. By “model of the program,” we mean a data structure that represents compiled code, such that all the types and references in the program can be found within their scope. By knowing exact types, and the exact scope of a type or reference, the IDE can locate every use of that type or reference without any ambiguity.
Refactoring is the prime example of how languages can no longer be compared only by syntax, aesthetics, and expressive power. Conservatively designed languages like Java can be both as safe as possible and highly productive in the context of the typical set of tools a coder has at herfingertips.
Eclipse and Android
The ADT plug-in adds several Android-specific tools to the Eclipse workbench. Most of these tools can be found in the Android perspective (Window→Open Perspective→Other..., select DDMS). Each tool is a separate Eclipse view (Window→Show View→Other..., select DDMS), though, and can be added to any other perspective, as convenience and screen real estate dictate. Here are a few of the most useful:
LogCat
Displays the device logs in a scrolling pane. You can adjust filtering so that only the logs you are interested in are visible, or so that you can see everything down to the garbage collections and library loading.
File Explorer
Displays the file explorer.
Heap
Displays the heap.
Threads
Displays threads.
Pixel Perfect
Displays the Pixel Perfect view.
Layout View
Displays the layout view.
avdmgr
Displays the Android SDK and AVD Manager.
Preventing Bugs and Keeping Your Code Clean
You can think of Eclipse as a specialized operating system: it is made up of thousands of files, has its own filesystem, and runs a web server. Eclipse is open and very extensible. Plug-ins—the Eclipse analog of an operating system’s applications—are relatively easy to write, and the Eclipse ecosystem has many more extensions than any one Eclipse user could ever install and use. Because Android code is written in Java, you can apply all kinds of plug-ins to Android software development.
Here we will explore an often very valuable category of Eclipse extensions: static analyzers, or source code analyzers.
Static Analyzers
An informal definition of static analysis is that it picks up where compiler warnings leave off. In Eclipse, compiler warnings are, in general, very good. While a good compiler can provide you with warning messages that are helpful in catching potential runtime problems, it isn’t a compiler’s job to go hunting for hidden problems. Static analyzers cover that territory.
Static analyzers are called “static” because the analysis is performed on code that isn’t running. While the compiler performs some functions that might come under the heading of static analysis—and the Java compiler in Eclipse does a very good job of cleaning up after the detritus of programming, such as variables and methods that are not used—static analyzers are more ambitious. Static analyzers attempt to find bugs, rather than just loose ends.
The three static analysis tools covered here are the three most widely used in Java software development, and they include a range of applicability and approaches to the problem of static analysis. All three of these tools are also open source projects, and all three are examples of the kinds of Eclipse plug-ins you might seek out and add to your Eclipse environment to enhance productivity in creating Android applications. You may not stick with using all three, but installing all three is a good place to start exploring static analysis.
FindBugs
We will start exploring static analyzers by installing and using FindBugs. You can find documentation, as well as the source code for FindBugs, at http://findbugs.sourceforge.net. We will go into the installation process in some detail because it is similar to the installation process for most kinds of Eclipse plug-ins. To install FindBugs, you must first add the FindBugs repository to Eclipse’s list of sites from which to install packages. You do this by using the Help→Install New Software Menu command, and clicking the Add… button in the Install dialog. This opens the Add Repository dialog that allows you to add the FindBugs repository located at http://findbugs.cs.umd.edu/eclipse, as shown in Figure 5-7.
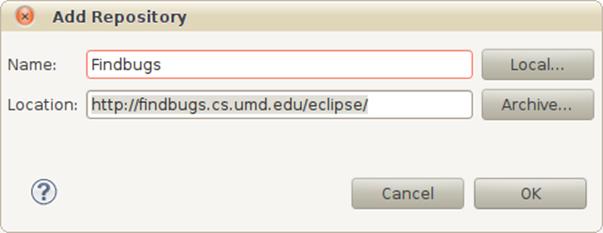
Figure 5-7. Adding a repository for the purpose of adding a plug-in to your Eclipse environment
The next step in installing FindBugs is to select the package from the repository, as shown in Figure 5-8. In this case, there is only one package to select.
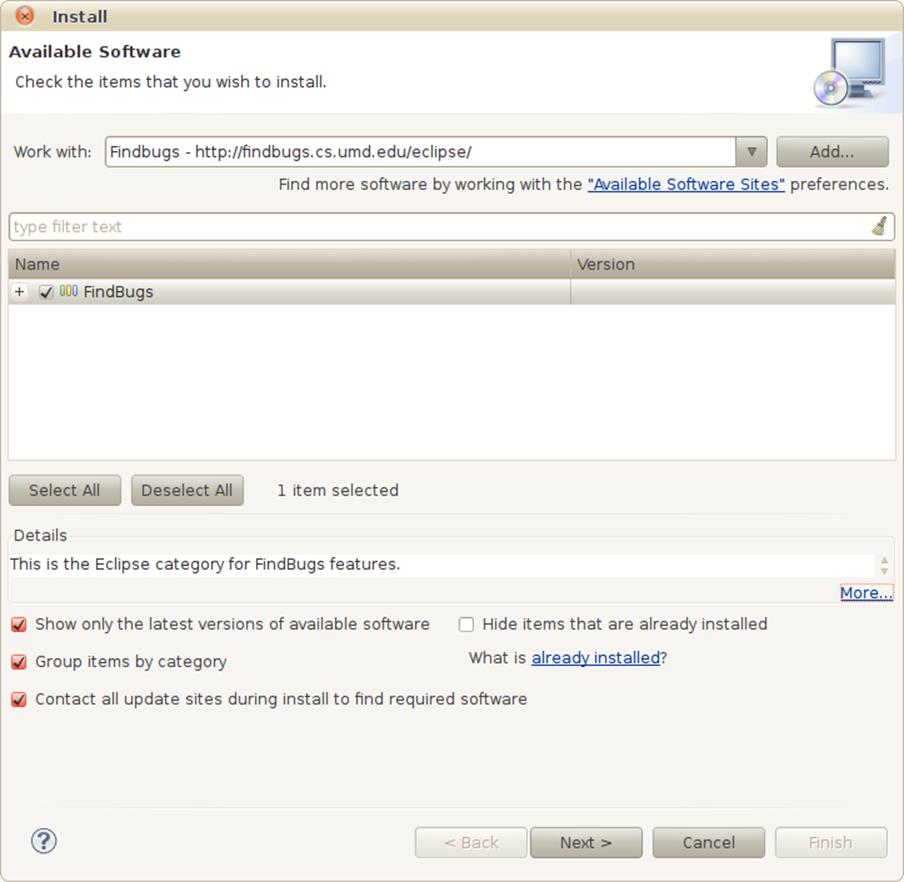
Figure 5-8. Selecting the only available package in the FindBugs repository
Once the package has been selected, you can advance to the next dialog, which shows the list of packages to be installed. In this case, there’s only one, as shown in Figure 5-9.
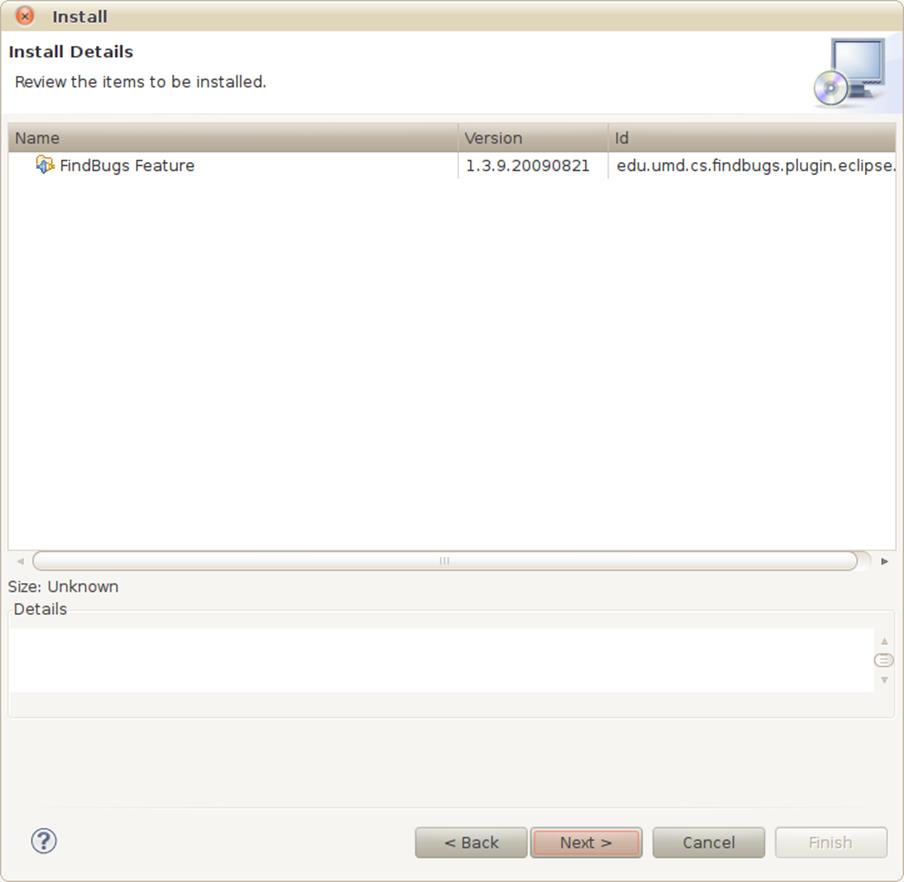
Figure 5-9. Reviewing that you have selected the only available package in the FindBugs repository
And there’s more: the next dialog in the installation sequence enables you to read and accept, or not accept, the license agreement that accompanies this package, as shown in Figure 5-10.

Figure 5-10. Accepting the FindBugs license agreement
There may be one more hurdle to cross in installing this Eclipse plug-in. Since the package is not signed, you get a security warning, as shown in Figure 5-11.
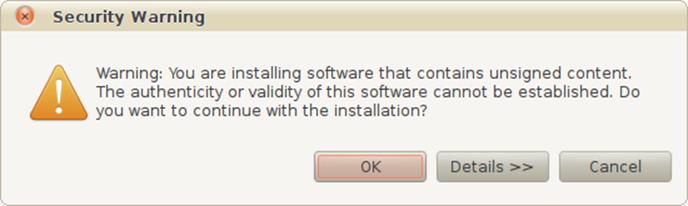
Figure 5-11. The security warning displayed when installing unsigned packages
And finally, you are prompted to restart Eclipse, as show in Figure 5-12.
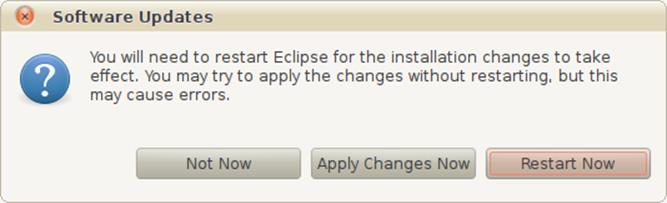
Figure 5-12. Restarting Eclipse after installing FindBugs
Applying Static Analysis to Android Code
FindBugs has a menu command, a perspective, and some views you will find useful in finding bugs. To start FindBugs, use the menu command in the context menu of a project, as shown in Figure 5-13.
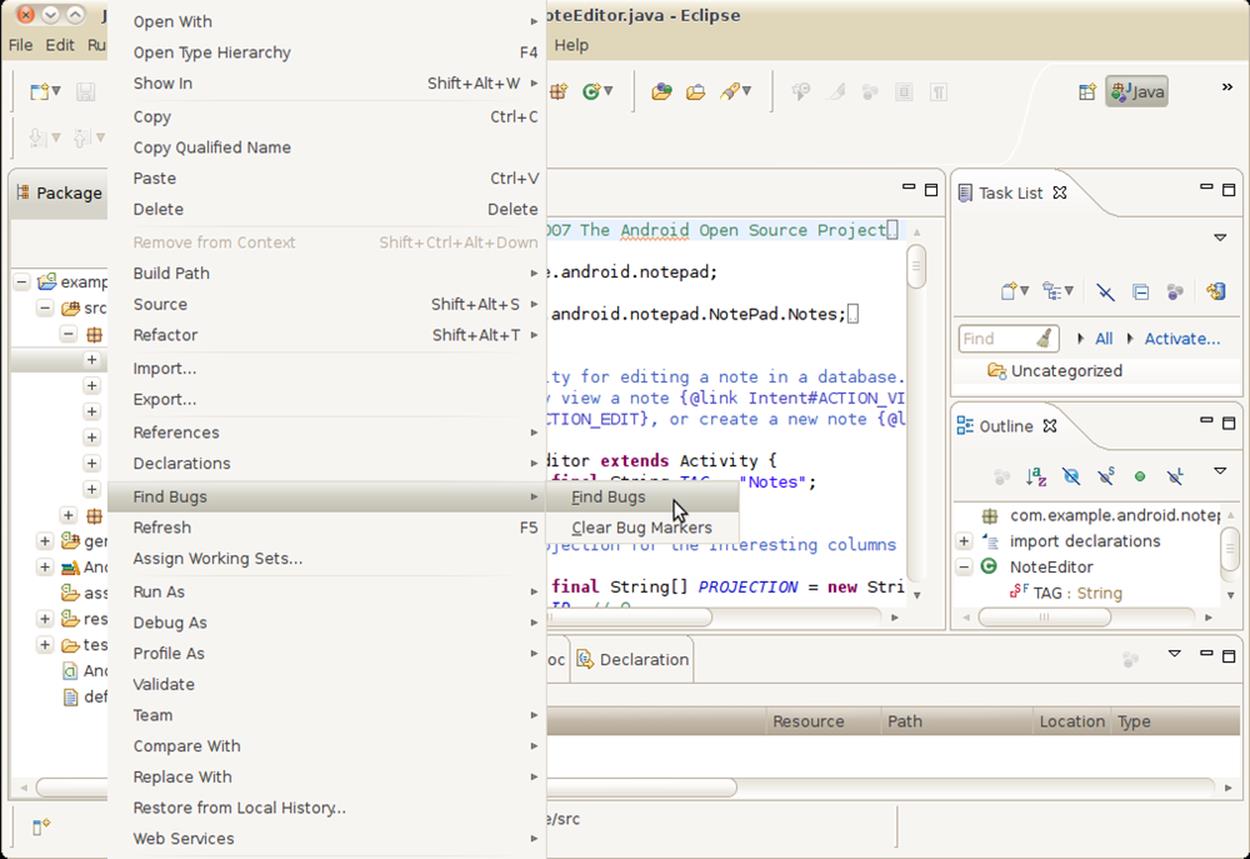
Figure 5-13. Invoking FindBugs
Once you have run FindBugs, you can change to the FindBugs perspective, as shown in Figure 5-14. The FindBugs perspective includes views that display a hierarchical list of potential problems FindBugs has found, organized by type of problem; an Editor view that includes markers for the problems; and, if you open the properties for a problem, a detailed explanation of the problem, including an explanation of why FindBugs can raise “false positives.”
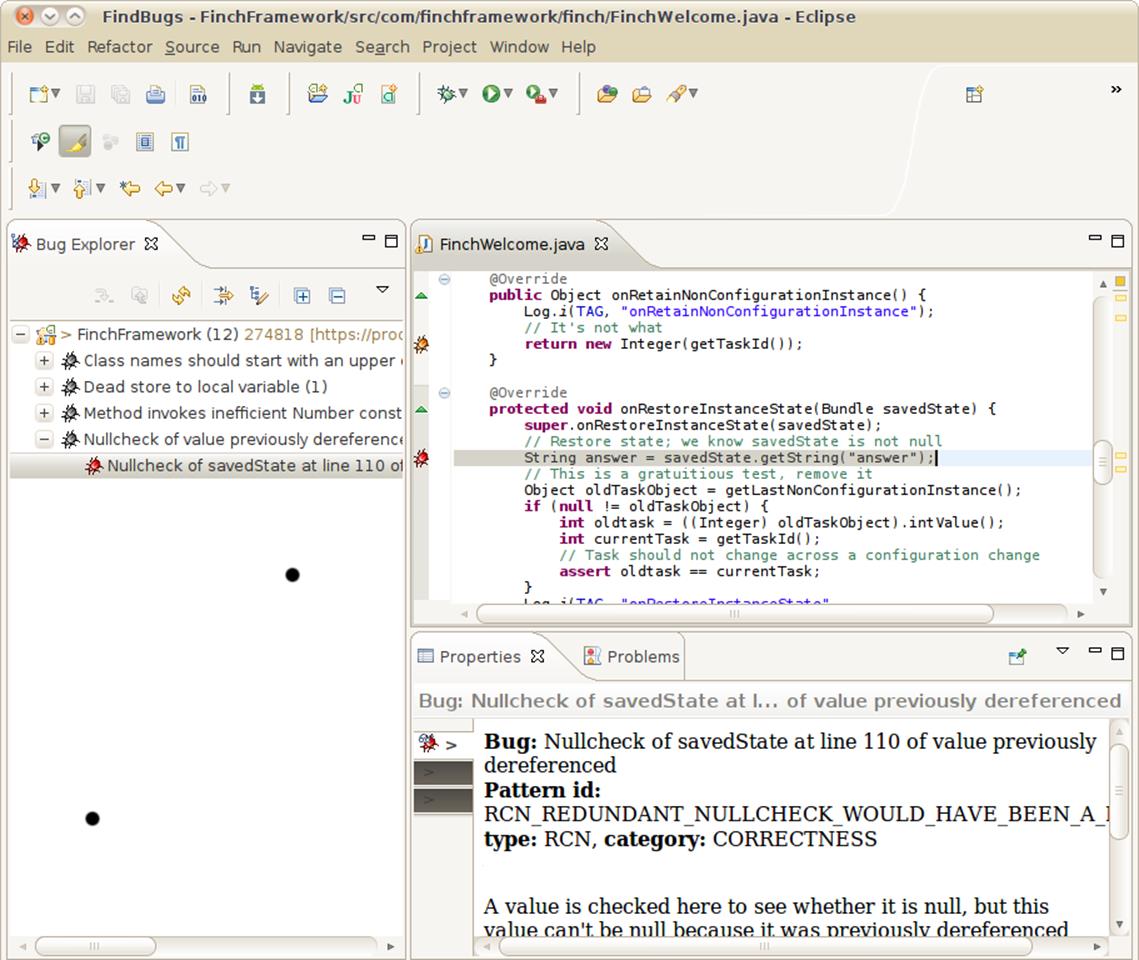
Figure 5-14. The FindBugs perspective
In this case, we will take a look at the “Null check of a value previously dereferenced” problem, as shown in the Bug Explorer view in Figure 5-15.
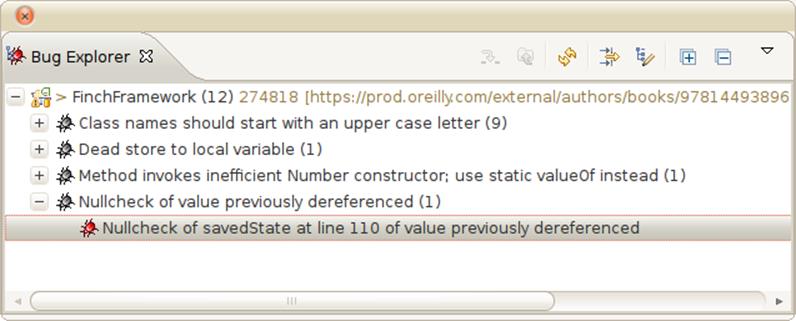
Figure 5-15. The FindBugs Bug Explorer
Verifying that a field has a non-null value field after already having dereferenced isn’t syntactically incorrect Java, but it is almost certainly either useless or an outright error. In the following code, you can see that the field savedState is used with the assumption that it is never null, but a null check occurs in the logging call:
protected void onRestoreInstanceState(Bundle savedState) {
super.onRestoreInstanceState(savedState);
// Restore state; we know savedState is not null
String answer = savedState.getString("answer");
// This is a gratuitous test, remove it
Object oldTaskObject = getLastNonConfigurationInstance();
if (null != oldTaskObject) {
int oldtask = ((Integer) oldTaskObject).intValue();
int currentTask = getTaskId();
// Task should not change across a configuration change
assert oldtask == currentTask;
}
Log.i(TAG, "onRestoreInstanceState"
+ (null == savedState ? "" : RESTORE) + " " + answer);
}
In fact, savedState should be null-checked before it is used, because the value of savedState is not specified to be non-null. We will change the assignment that did not null-test savedState to the following:
String answer = null != savedState ? savedState.getString("answer") : "";
Running FindBugs again confirms that this change eliminates the possible problem.
This is a good example of the kind of bug static analysis can find. It is outside the realm of compiler warnings because there are cases where this is exactly what the programmer intended, but a simple inference enables a static analyzer to suggest that this might be a bug, and it very often is abug.
Limitations of Static Analysis
Static analyzers suffer from detecting false positives, because of the approaches they take to finding weaknesses in code. This is one thing that differentiates static analysis from compiler warnings. It would be considered a bug if a compiler error message indicated a problem that wasn’t really a problem.
One of the weaker aspects of static analyzers is in finding code where coding conventions have not been observed. For example, the “Class names should start with an upper case letter” warning, shown in Figure 5-15, was provoked by autogenerated code, which coders should not have to inspect unless they suspect bugs in the code generator.
Highly experienced coders often question the usefulness of static analyzers, since their code contains relatively few problems that static analyzers can catch, and therefore the results have a higher proportion of false positives. It is an accepted fact that static analysis of code written by highly experienced coders finds only a fraction of the bugs in that code, and that it is no substitute for module tests and good debugging skills. However, if you are a relative newcomer to Java as well as to Android, you may find static analyzers are a very useful adjunct to compiler warnings.
Eclipse Idiosyncrasies and Alternatives
Now that you know that the Android SDK has many capabilities built on Eclipse, and how the Eclipse plug-in and extension architecture enables Android tools to “hook” so many aspects of an IDE’s functionality, you may be wondering why it offers to run your Android application on a server, or as an applet. It is particularly troubling to have a tool that is supposed to enhance your productivity lay a red herring across your path in this way, since Eclipse expects you to find the right commands in a set of exceptionally lengthy menus.
Go ahead, see what happens: pick any Android project in your Eclipse workspace, right-click on the project name, and select Run As→Java Applet. You will see the dialog shown in Figure 5-16.
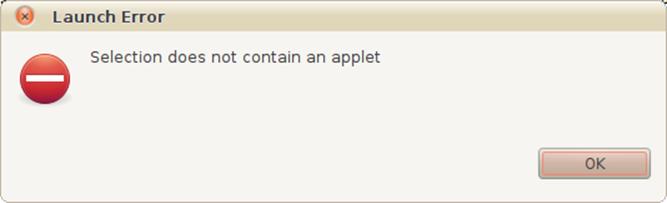
Figure 5-16. Dialog shown when the selection does not contain an applet
No harm done, but it is appalling: Eclipse, plus whatever plug-ins are in play at that moment, should know not to offer you an action that fails, guaranteed, 100% of the time. Eclipse is a bad example: don’t treat the users of your Android programs this way! If the selection does not contain an applet, don’t offer the user a command to run the selection as an applet. This is a fundamental precept of graphical user interfaces and foundational to the idea of generic operations on a selection: once the user has selected something, the program should know all the valid operations on that selection and present only valid operations. A good interface—especially a big, complex interface—should encourage safe exploration,
Why does Eclipse fail to be a good GUI application in such seemingly trivial ways? Such failure is baffling in light of the impressive power and ease of use of Eclipse refactoring and other features. There is no one fault to point to. Our conjecture is that the fine-grained modularity of Eclipse, which results in an explosion of extension interfaces, causes this combination of powerful features and niggling annoyances. At best, plug-in authors are faced with too many interfaces to hook in order to accomplish a highly polished user experience. At worst, Eclipse’s architecture may make it practically impossible to do the right thing in some cases. This is why some people seek alternatives.
All materials on the site are licensed Creative Commons Attribution-Sharealike 3.0 Unported CC BY-SA 3.0 & GNU Free Documentation License (GFDL)
If you are the copyright holder of any material contained on our site and intend to remove it, please contact our site administrator for approval.
© 2016-2026 All site design rights belong to S.Y.A.