Getting Started with Windows Remote Arduino (2015)
2. Windows Remote Arduino for Windows 10
This chapter explains how to work with Arduino and Windows 10 for getting started.
2.1 Setting Up Arduino on Windows 10
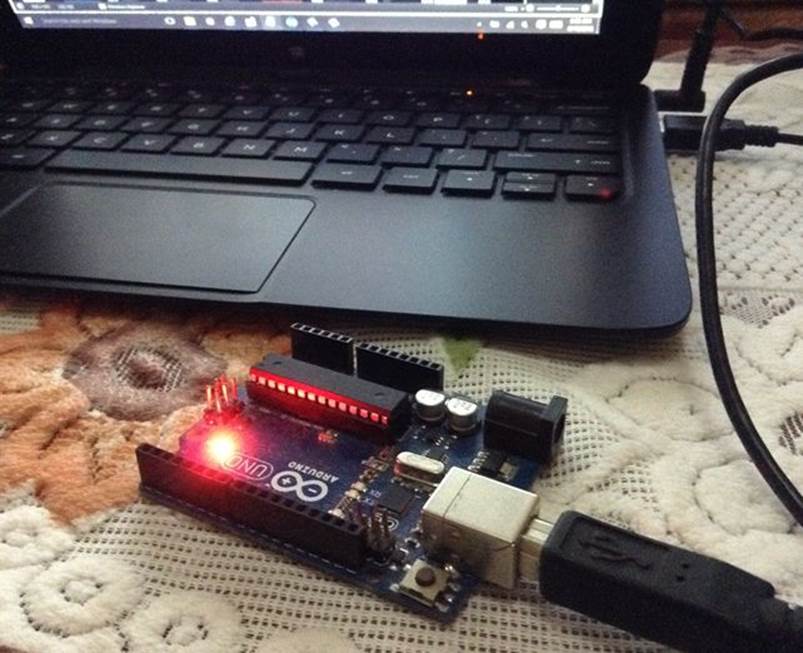
After you installed Arduino software, you can plugin Arduino board into computer via USB.
Then you run Arduino software. In general it will detect Arduino hardware include Arduino type and model.
2.1.1 Arduino Hardware Driver on Windows 10
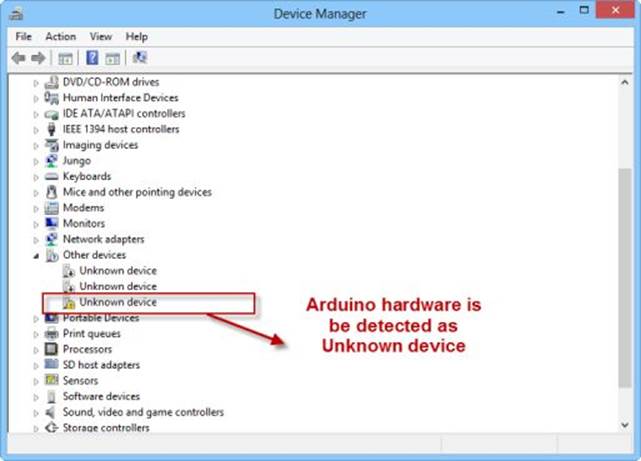
If you open Device Manager, you should see Arduino detected on Ports (COM & LPT).

However, if you get a problem about Arduino hardware driver, you update that driver.
You can update this device driver by navigating hardware driver on the driver folder of Arduino software installation folder.
2.1.2 Simple Testing
Now you're ready to get started. For illustration, I use the sample code from Arduino, Blink. You can visit on http://arduino.cc/en/Tutorial/Blink for configuration.
For this scenario, we use attached LED which is connected on Digital 13. Open Arduino IDE.

On Arduino software, Click File -> Examples -> 01.Basics -> Blink.
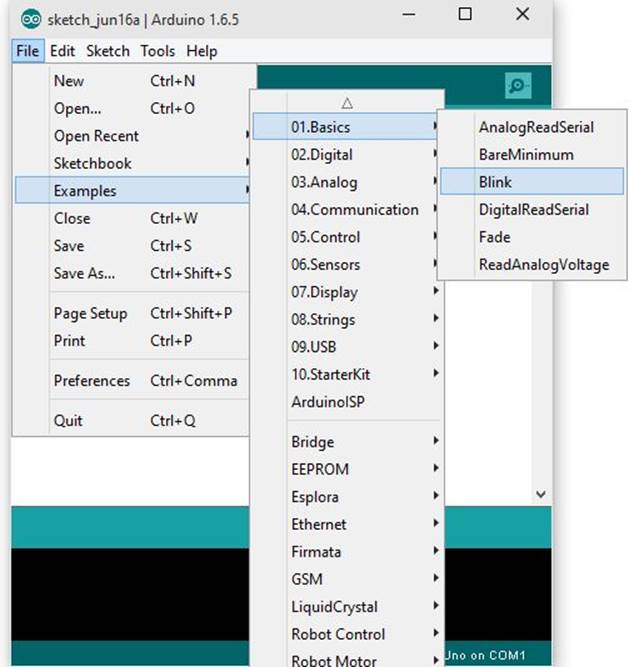
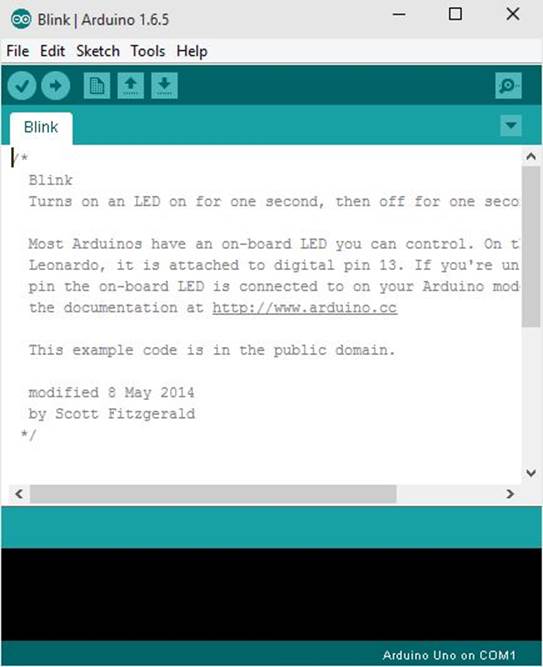
Then you will get a sample code of Blink app.
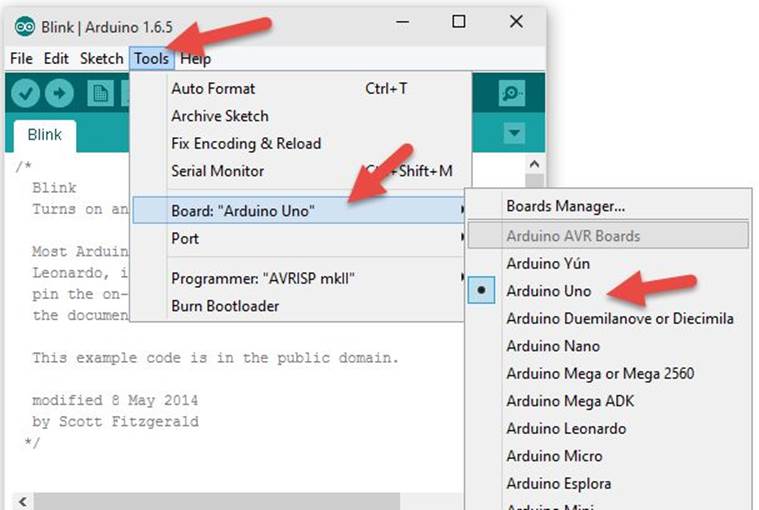
Now try to connect your Arduino into computer. Select Arduino Uno for board target. You can select it by clicking menu Tools -> Board : Arduino Uno.
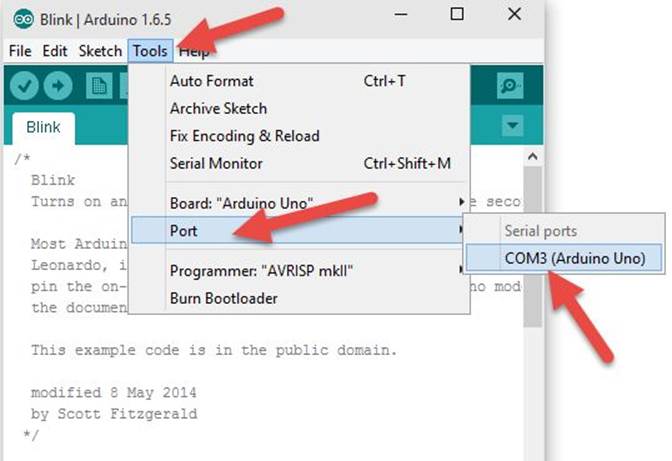
Furthermore, you must select Arduino port. Select menu Tools -> Port -> (your Arduino port which already connected).
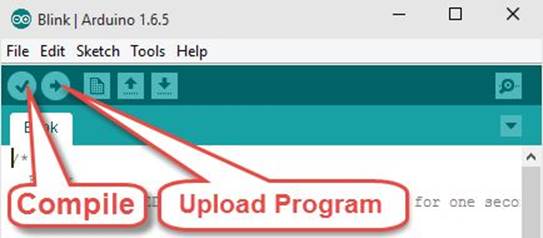
Now you can compile and upload this program into Arduino board.
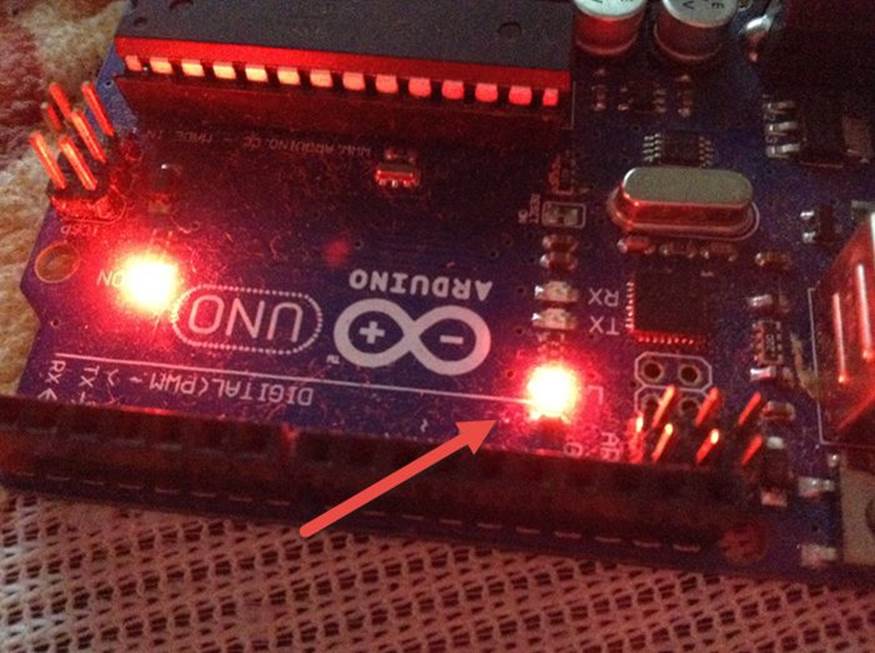
If success, you should see blinking LED on Arduino board.
2.2 Arduino and Windows Remote Arduino (WRA)
To communicate between Arduino and computer/tablet/embedded board based Windows 10, we can use Windows Remote Arduino. There are two types of connectivity for Windows Remote Arduino:
· Serial port (USB)
· Bluetooth
I will explain them on the next section. Now we must configure Arduino board and computer to establish a connection.
2.2.1 Configuring Arduino Board
To work with Windows Remote Arduino, we must configure Arduino board to be deployed Firmata library. Firmata is a protocol for communicating with microcontrollers from software on a computer (or smartphone/tablet, etc). The protocol can be implemented in firmware on any microcontroller architecture as well as software on any computer software package. Further information about Firmata, you can read it on https://github.com/firmata/protocol .
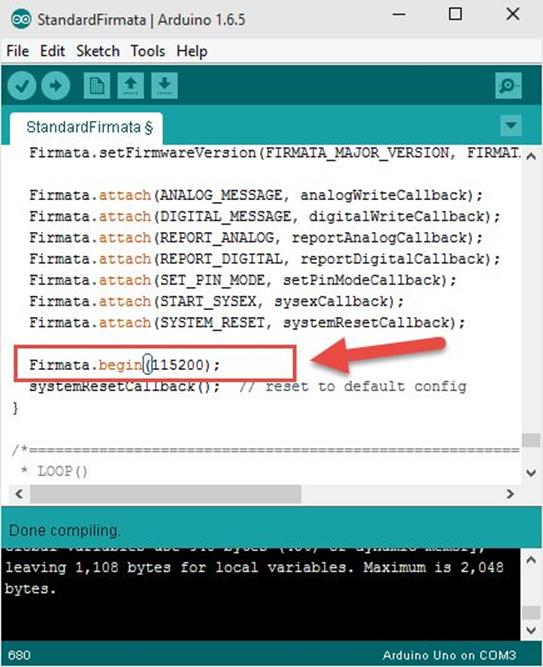
To deploy Firmata into Arduino board, you do it opening Arduino IDE. Select menu File -> Examples -> Firmata -> StandardFirmata.
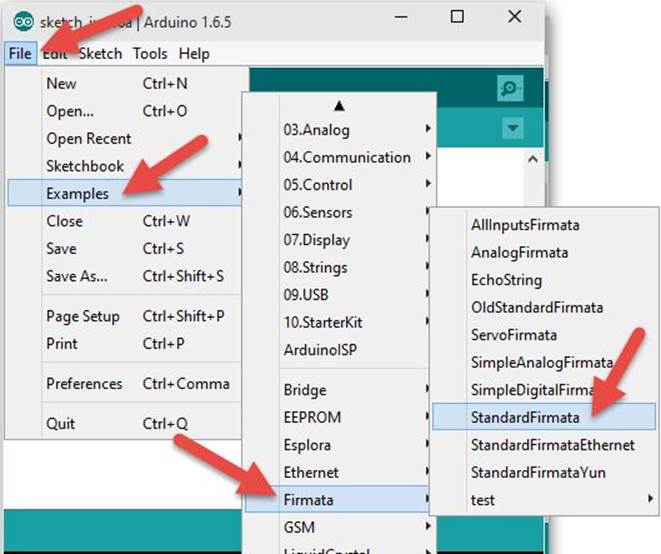
Then, you will get Firmata code on Arduino IDE.
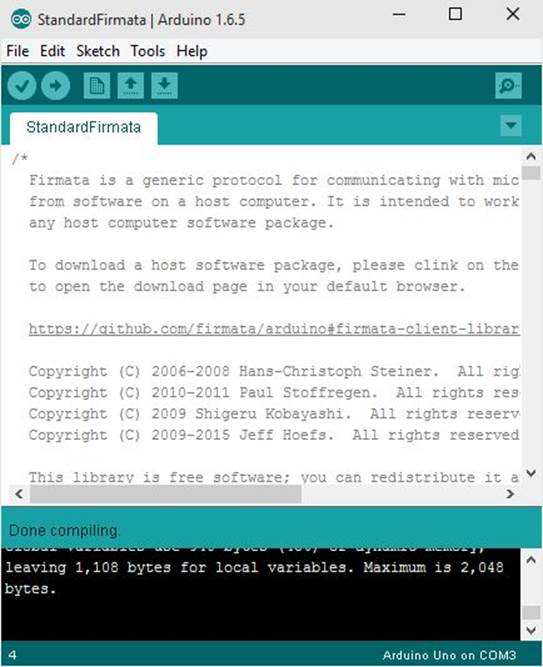
By default, Firmata on Arduino uses a baud rate 57600. You can change it according to your serial port (USB) or Bluetooth, for instance, 115200. After that, please compile and upload this program into Arduino board.

Finally, Arduino board is ready for running with Firmata protocol.
2.2.2 Compiling Windows Remote Arduino
The next step is to compile Windows Remote Arduino library. You can download it on https://github.com/ms-iot/remote-wiring/. It provides library for Windows 10 and Windows 8.1. Open for Solution file (*.sln) for Windows 10 using Visual Studio 2015.
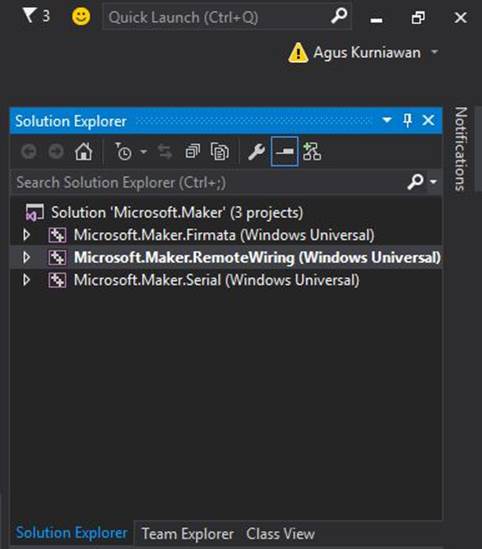
Compile these libraries for ARM, x86, and x64 targets.
If finished, you should see the compiled files. Compiled ARM, x64, and x86 targets will generate ARM, x64 and Debug folders.

2.3 Windows Remote Arduino with USB
In this section, we build a blinking LED program via USB using Windows Universal app. The USB usage is applied as a bridge to remote Arduino board.
Our scenario needs the following items:
· Three LEDs
· USB cable
· Jumper cables
To build the program, you can do the following steps:
· Wiring
· Creating a project
· Adding reference files for Windows Remote Arduino
· Configuring Windows Remote Arduino on project
· Writing program
· Testing
Let's start!
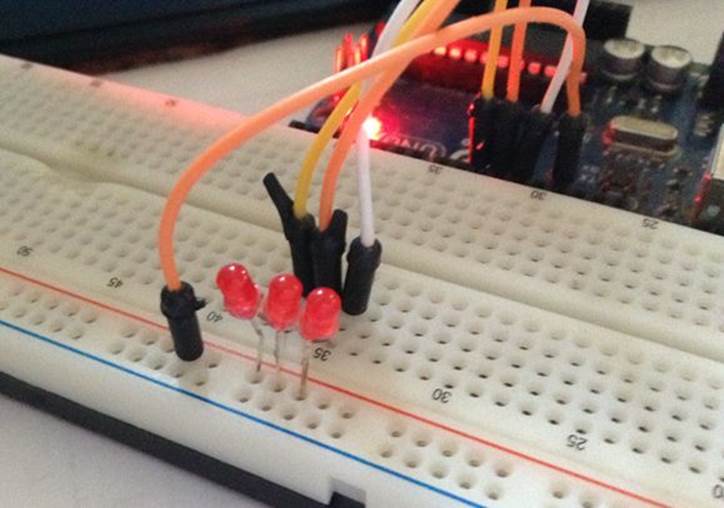
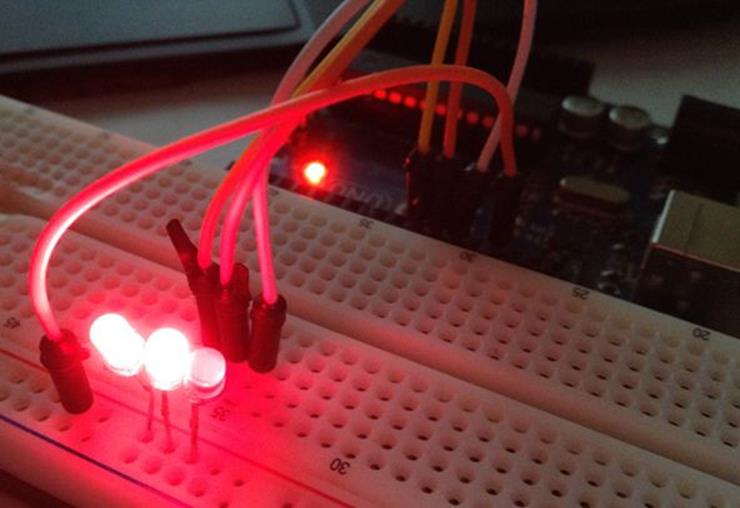
2.3.1 Wiring
Connect three LEDs on Digital 12, 11, 10. Other LED pins are be connected to GND. Now you connect Arduino board to Computer via USB cable.
2.3.2 Creating A Project
Open Visual Studio 2015. Create a new project with template Blank App (Windows Universal). It's located on Visual C# -> Windows -> Windows Universal.
Fill the project name, called BlinkingLed.
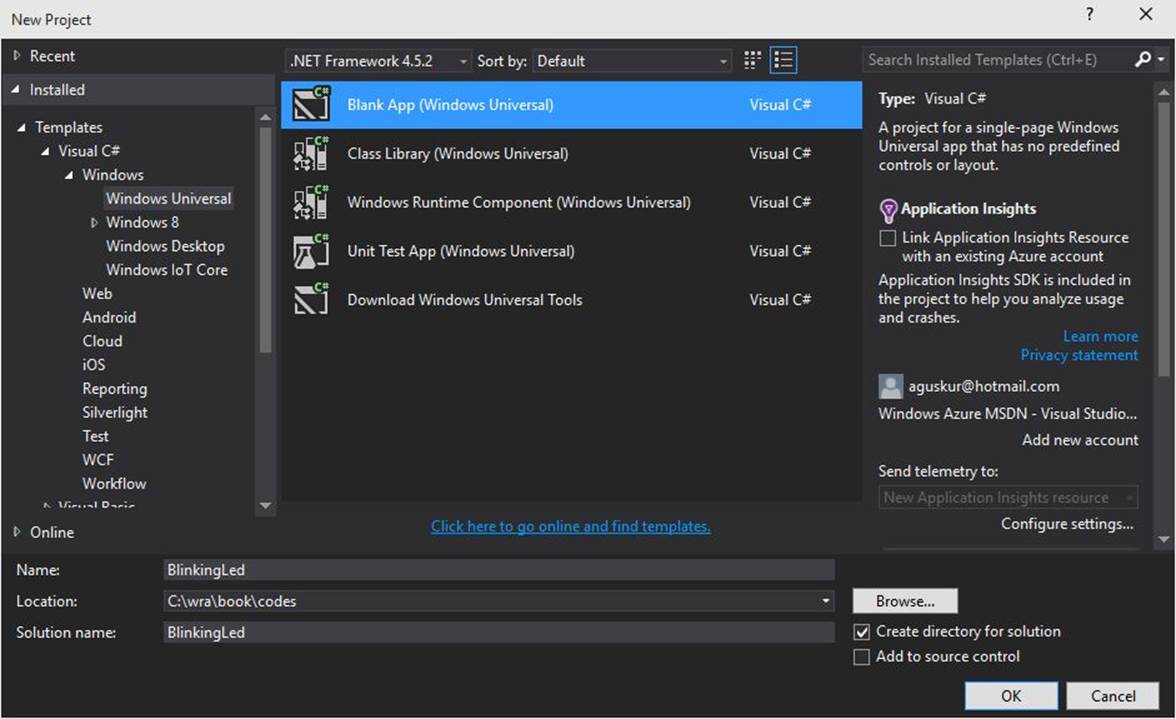
If done, click OK button.
2.3.3 Adding Reference Files for Windows Remote Arduino
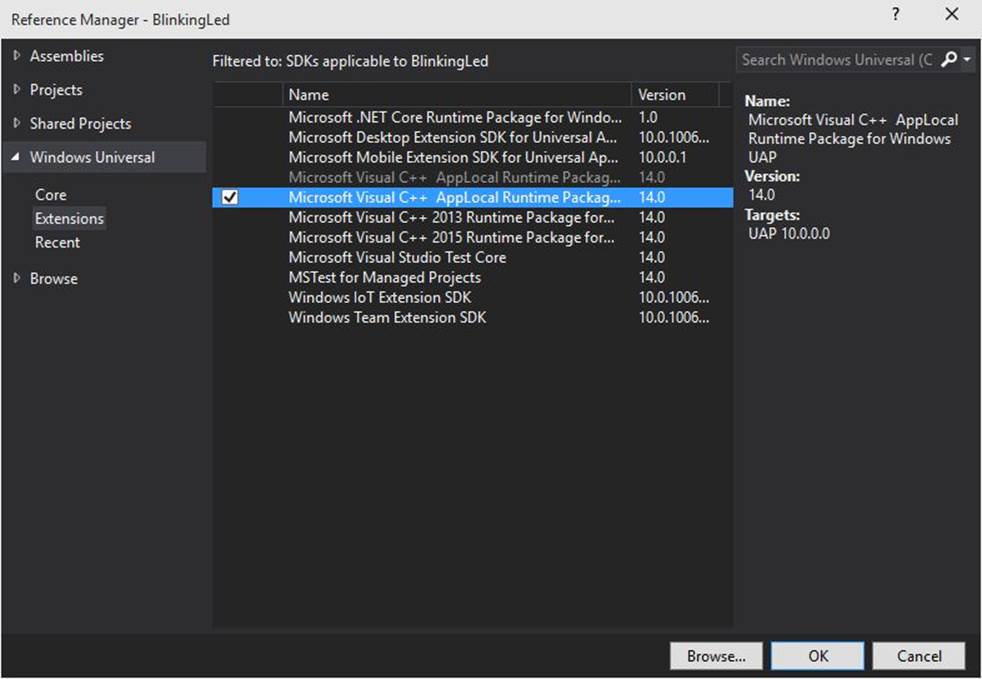
The next step is to add Windows Remote Arduino into our project. Firstly, add Microsoft Visual C++ AppLocal Runtime from Windows Universal -> Extensions.
Then, we add our compiled files from Windows Remote Arduino (read section 2.2.2).
Add the following files (depend on your target: ARM, x64, x86):
· Microsoft.Maker.RemoteWiring.winmd
· Microsoft.Maker.Firmata.winmd
· Microsoft.Maker.Serial.winmd
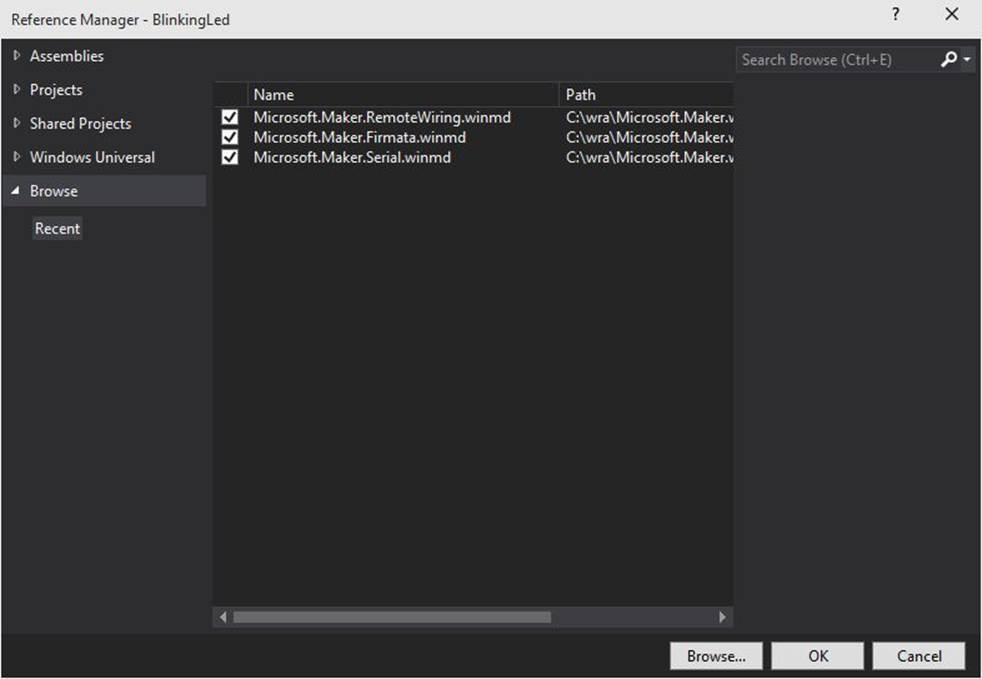
Click OK button if finished.
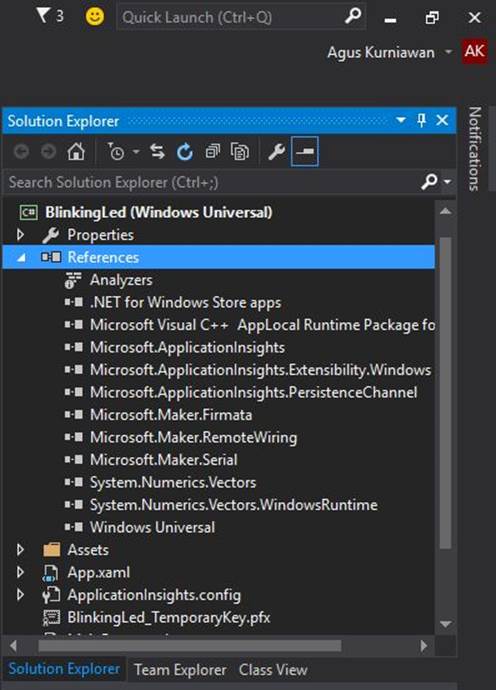
Finally, you should see our referenced files on our project.
2.3.4 Configuring Windows Remote Arduino (WRA) on Project
After added WRA Reference files, we must configure project config file and activate USB capability on app.
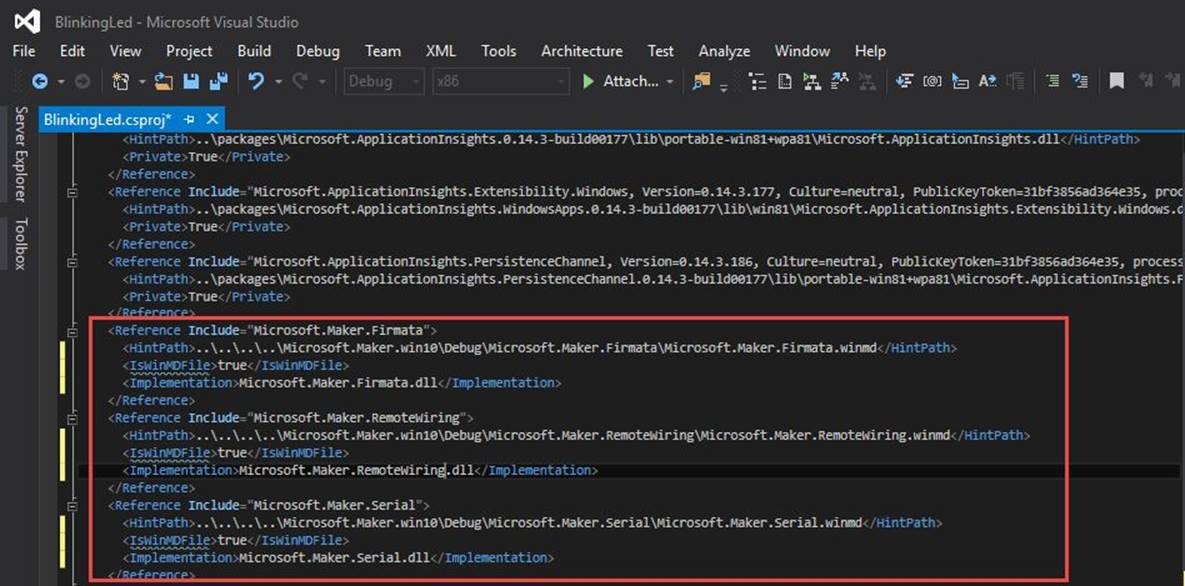
To configure project config file (*.csproj) , you just unload the project (not solution). Or you edit project file (*.csproj) directly.
Add this script into <Reference Include "Microsoft.Maker.Firmata"></Reference> tag
<IsWinMDFile>true</IsWinMDFile>
<Implementation>Microsoft.Maker.Firmata.dll</Implementation>
Add this script into<Reference Include="Microsoft.Maker.RemoteWiring"></Reference> tag
<IsWinMDFile>true</IsWinMDFile>
<Implementation>Microsoft.Maker.RemoteWiring.dll</Implementation>
Add this script into<Reference Include="Microsoft.Maker.Serial"></Reference> tag
<IsWinMDFile>true</IsWinMDFile>
<Implementation>Microsoft.Maker.Serial.dll</Implementation>
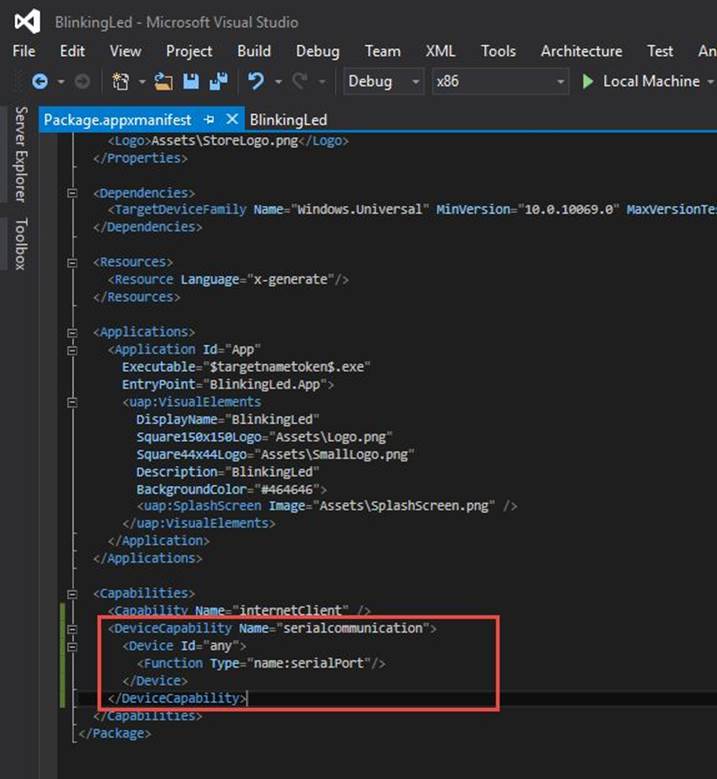
You also need to configure Package.appxmanifest file to enable Serial port capability. Open Package.appxmanifest file and add the following script on <Capabilities></Capabilities> tag.
<DeviceCapability Name="serialcommunication">
<Device Id="any">
<Function Type="name:serialPort"/>
</Device>
</DeviceCapability>
2.3.5 Writing Program
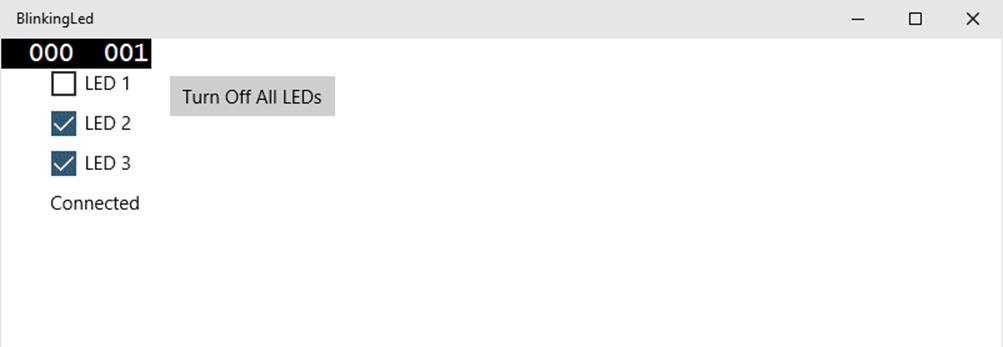
Now we develop UI on XAML. We modify MainPage.xaml file and build the following UI.
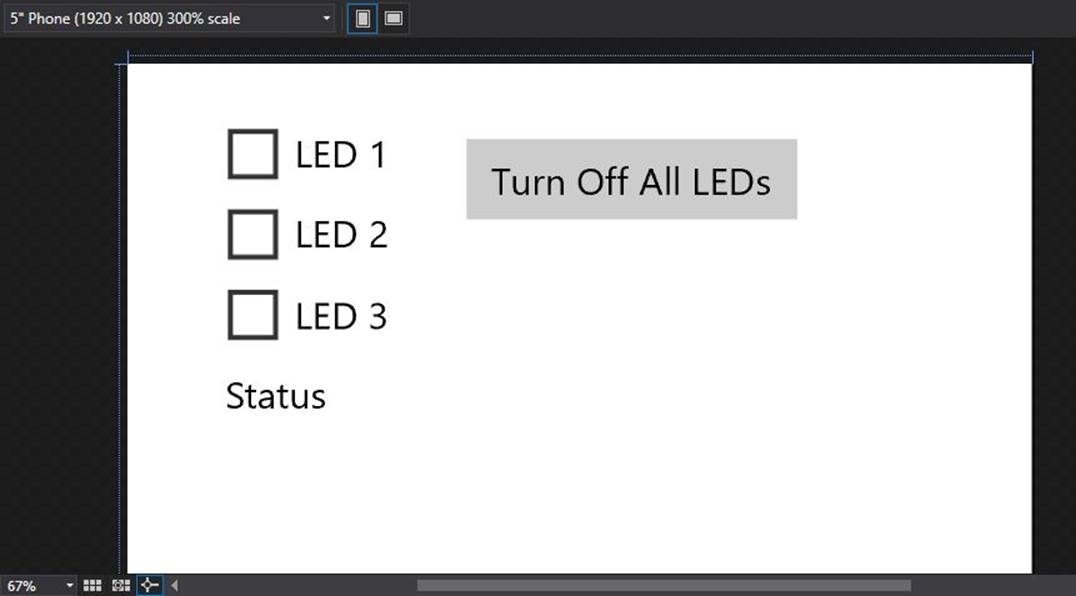
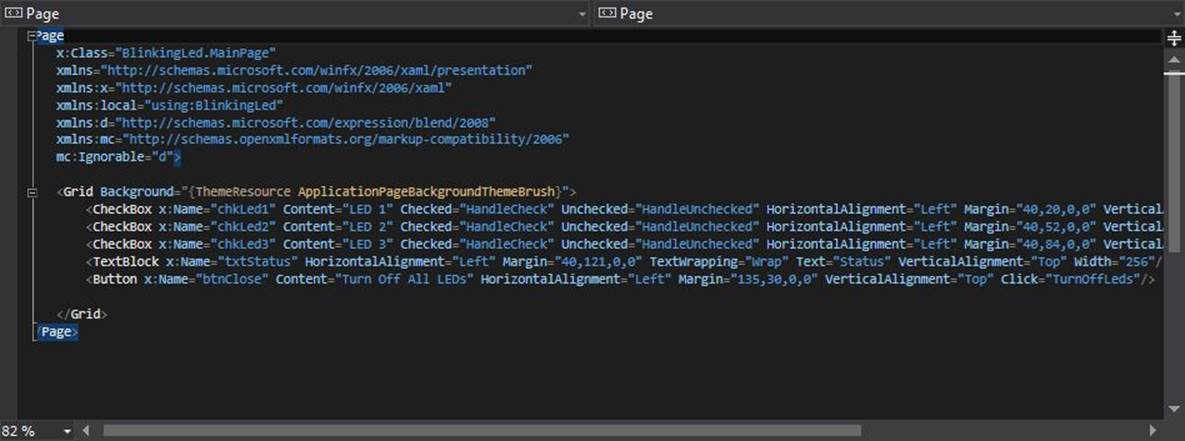
We need three CheckBox, a TextBlock and a Button. The following is a script of MainPage.xam.
<Page
x:Class="BlinkingLed.MainPage"
xmlns="http://schemas.microsoft.com/winfx/2006/xaml/presentation"
xmlns:x="http://schemas.microsoft.com/winfx/2006/xaml"
xmlns:local="using:BlinkingLed"
xmlns:d="http://schemas.microsoft.com/expression/blend/2008"
xmlns:mc="http://schemas.openxmlformats.org/markup-compatibility/2006"
mc:Ignorable="d">
<Grid Background="{ThemeResource ApplicationPageBackgroundThemeBrush}">
<CheckBox x:Name="chkLed1" Content="LED 1" Checked="HandleCheck" Unchecked="HandleUnchecked" HorizontalAlignment="Left" Margin="40,20,0,0" VerticalAlignment="Top" Width="85"/>
<CheckBox x:Name="chkLed2" Content="LED 2" Checked="HandleCheck" Unchecked="HandleUnchecked" HorizontalAlignment="Left" Margin="40,52,0,0" VerticalAlignment="Top" Width="85"/>
<CheckBox x:Name="chkLed3" Content="LED 3" Checked="HandleCheck" Unchecked="HandleUnchecked" HorizontalAlignment="Left" Margin="40,84,0,0" VerticalAlignment="Top" Width="85"/>
<TextBlock x:Name="txtStatus" HorizontalAlignment="Left" Margin="40,121,0,0" TextWrapping="Wrap" Text="Status" VerticalAlignment="Top" Width="256"/>
<Button x:Name="btnClose" Content="Turn Off All LEDs" HorizontalAlignment="Left" Margin="135,30,0,0" VerticalAlignment="Top" Click="TurnOffLeds"/>
</Grid>
</Page>
On MainPage.xaml.cs, we modify this code. Firstly, we add our namespace.
using Microsoft.Maker.Serial;
using Microsoft.Maker.RemoteWiring;
Then, we declare some variables.
private UsbSerial connection;
private RemoteDevice arduino;
private const byte LED1 = 12;
private const byte LED2 = 11;
private const byte LED3 = 10;
LED 1, 2, 3 are connected to Digital 12, 11, and 10 on Arduino.
We define InitWRA() method and subscribe ConnectionEstablished event. We set pin mode using pinMode() method.
private void InitWRA()
{
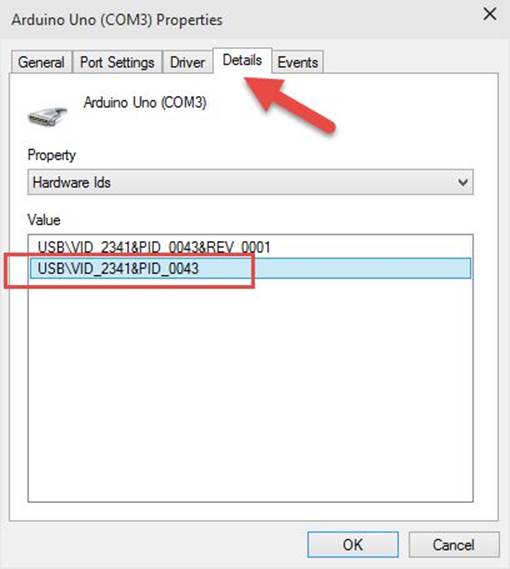
connection = new UsbSerial("VID_2341", "PID_0043");
arduino = new RemoteDevice(connection);
connection.ConnectionEstablished += Connection_ConnectionEstablished;
connection.begin(57600, SerialConfig.SERIAL_8N1);
}
private void Connection_ConnectionEstablished()
{
arduino.pinMode(LED1, PinMode.OUTPUT);
arduino.pinMode(LED2, PinMode.OUTPUT);
arduino.pinMode(LED3, PinMode.OUTPUT);
txtStatus.Text = "Connected";
}
You can see parameters on UsbSerial(). These values can be obtained from SerialPort (USB) property which Arduino board is connected. For instance, My Arduino is connected to COM3. You can open COM property from Device Manager.
We handle CheckBox checked or unchecked in HandleCheck() and HandleUnchecked() methods. If it checked, we turn on LED. Otherwise, we turn off LED.
private void HandleCheck(object sender, RoutedEventArgs e)
{
CheckBox cb = sender as CheckBox;
if(cb.Name== "chkLed1")
{
arduino.digitalWrite(LED1, PinState.HIGH);
}
if (cb.Name == "chkLed2")
{
arduino.digitalWrite(LED2, PinState.HIGH);
}
if (cb.Name == "chkLed3")
{
arduino.digitalWrite(LED3, PinState.HIGH);
}
}
private void HandleUnchecked(object sender, RoutedEventArgs e)
{
CheckBox cb = sender as CheckBox;
if (cb.Name == "chkLed1")
{
arduino.digitalWrite(LED1, PinState.LOW);
}
if (cb.Name == "chkLed2")
{
arduino.digitalWrite(LED2, PinState.LOW);
}
if (cb.Name == "chkLed3")
{
arduino.digitalWrite(LED3, PinState.LOW);
}
}
We also declare TurnOffLeds() to turn off LEDs. This is connected to button clicked event.
private void TurnOffLeds(object sender, RoutedEventArgs e)
{
chkLed1.IsChecked = false;
chkLed2.IsChecked = false;
chkLed3.IsChecked = false;
}
Finally, on class constructor, we call InitWRA() method.
public MainPage()
{
this.InitializeComponent();
this.Unloaded += MainPage_Unloaded;
InitWRA();
}
private void MainPage_Unloaded(object sender, RoutedEventArgs e)
{
arduino.Dispose();
}
2.3.6 Testing
Run this program. If success, you can see our program UI. Try to do checked on CheckBoxs. Then, you should see lighting LED.
2.4 Windows Remote Arduino with Bluetooth
WRA also support using Bluetooth to remote Arduino. You can use Bluetooth module from SparkFun Bluetooth Mate Silver, https://www.sparkfun.com/products/12576 .
Don't forget to modify Firmata code on Arduino about baud rate.
Just connect your Bluetooth module on Tx and Rx from Arduino. Then, pair Bluetooth module on Arduino to Bluetooth PC. Add Bluetooth capability on Package.appxmanifest file.
<DeviceCapability Name="bluetooth.rfcomm">
<Device Id="any">
<Function Type="name:serialPort"/>
</Device>
</DeviceCapability>
On our program, we change UsbSerial to BluetoothSerial object.
private UsbSerial connection;
private RemoteDevice arduino;
...
private BluetoothSerial connection;
private RemoteDevice arduino;
On instantiate stage, you just construct connection object with BluetoothSerial() with passing Bluetooth name.
connection = new BluetoothSerial("MyBluetooth");
connection.ConnectionFailed += Connection_ConnectionFailed;
arduino = new RemoteDevice(connection);
connection.ConnectionEstablished += Connection_ConnectionEstablished;
connection.begin(115200, 0);
Just it!
Now you can program as usual with RemoteDevice object.
All materials on the site are licensed Creative Commons Attribution-Sharealike 3.0 Unported CC BY-SA 3.0 & GNU Free Documentation License (GFDL)
If you are the copyright holder of any material contained on our site and intend to remove it, please contact our site administrator for approval.
© 2016-2026 All site design rights belong to S.Y.A.