Practical Electronics: Components and Techniques (2015)
Chapter 16. Packaging
Packaging is a key aspect of electronics design, and some people make a lifelong career of it. For a consumer product, creating the package might involve the skills of an industrial designer or graphic artist, someone well versed in thermal analysis, an RF engineer to check for radio-frequency emissions, and a production engineer to make sure that the package can actually be built in a cost-effective manner. When a package is being designed for applications such as aerospace or marine applications, a whole new set of requirements comes into play. Physical volume, weight, electrical connections, mounting constraints, and even the type of paint used are just some examples. It can get quite involved.
However, for the most part, packaging for small- to medium-sized projects, particularly those that are prototypes or one-off devices, just involves applying a lot of common sense and asking some key questions. This chapter addresses those key questions and also examines issues such as plastic versus metal, sources for chassis components, and the potential of unconventional packages.
The Importance of Packaging
Every circuit or device that isn’t going to spend its life on a workbench needs an enclosure of some sort to protect it. Even if it does end up living out its days in the back corner of a workbench, a package will prevent things falling into it or someone accidentally touching it while it’s active.
Packaging can range from the simple to the complex. It all depends on where the device will reside and the type of environmental conditions it can be expected to encounter. If something will sit on a bench or a shelf, it might not need much more than an enclosure to keep out dust, stray bits of metal, and the occasional curious finger. If it’s going to be outside, it will need to withstand the extremes of the local climate. A device that is intended to be wearable must contend with things like lint, dust, dirt, and sweat.
Types of Packaging
The material used for packaging generally falls into two basic categories: plastic and metal. Although wood is sometimes used for things like high-end designer PC enclosures, it’s not really a good material when it comes to long-term durability and electrical shielding. The same goes for material like cardboard or foamcore. Not really a good idea.
Plastic
Plastic can be easily formed into just about any shape you might care to imagine, and once the final shape is fixed and set in a mold, you can make as many of the packages as you like, as quickly as the injection molding machine can push them out. Plastic is also easy to work with using a drill press and a rotary tool, and the harder types can even be machined with a lathe or vertical mill.
Early plastic enclosures used a material called Bakelite, invented in 1907 and named after Leo Baekeland. If you’ve even seen (or used) a vintage rotary-dial telephone, you’ve seen Bakelite. It was commonly used for everything from electrical insulators to radio and phonograph enclosures, and even in jewelry and children’s toys. Today, Bakelite has largely been replaced by plastics such as ABS (acrylonitrile butadiene styrene), polystyrene, or PVC. Although modern plastics are easier to mold and less brittle, Bakelite is still used in applications where its unique properties are required.
Plastic does have some drawbacks when compared to metal enclosures. For one thing, many plastics don’t tolerate UV very well, so it might not be a good idea to leave a plastic enclosure in a location where it gets direct sunlight. Plastic does not provide any shielding against unwanted electromagnetic radiation, so it needs to be coated on the inside with special conductive paint. Strength might also be a consideration, as a plastic part simply does not have the strength of a metal part of the same size and shape.
The mass production of a plastic part requires a mold, which is where most of the up-front expense lies. Creating a mold is a painstaking process, in both the design and the fabrication. When designing a mold form, the engineer must take into account things like unfillable gaps or corners, any volume change of the plastic as the temperature changes, and the design of any removable secondary mold parts to create complex internal shapes. Once the design is complete, a machinist creates the mold sections from metal. Only after the mold has been cleaned, polished, and checked for accuracy does it go out for production use. The mold design and fabrication process can cost many thousands of dollars, so it’s not something to be taken lightly. If there is an error, the whole process might have to start over again.
Stock items such as plastic tubes, extrusions, and molded cases are also options for packaging with plastic. The advantage here is that the final package might not need much in the way of modifications to be immediately useful. Perhaps a few holes for indicators and connectors, and perhaps some internal parts like PCB card guides and a battery holder mounting arrangement (if a battery is used).
Metal
For creating electronics enclosures, metal can be cast into a mold, extruded into a tubular or rectangular shape, and formed into sheets, and a complex shape can be machined from a solid block of metal. Metal is extremely versatile, strong, and sometimes even lighter than an equivalent plastic enclosure, but it is not always very easy to work with.
Metal casting uses a mold created in damp sand into which hot molten metal is poured. As with a plastic mold, it is essential to get the mold right at the outset. Metal casting is typically used for heavy-duty enclosures intended for harsh environments. It doesn’t show up much in consumer electronics, although it can be used for small items produced in large quantities. Some early portable MP3 players used cast metal cases, for example.
Extrusions are typically aluminum and come in a variety of shapes. The most common enclosure for elecronics is a rectangular extrusion with PCB guides formed into the inside of the extrusion. Extrusions can also be formed into a variety of shapes that can be used to create parts that will mount onto or inside something else, such as PCB card guides, brackets, or wiring channels.
Extrusions are available in various lengths with slots for holding panels and special adapters for connecting to other extrusions at 45- and 90-degree angles. Using these parts, you can build an enclosure using extrusions, some sheet metal, and the appropriate screws, nuts, and bolts to hold it all together.
Sheet metal fabrication has been used to create everything from the chassis in radio receivers to enclosures for computers. Almost all PC cases are made from sheet metal and fabricated using various bending, punching, and stamping techniques. Working with sheet metal requires a brake (for bending), a shear (for cutting), a drill press, a rivet tool, and perhaps a spot welder. For making large (greater than 1 inch) holes, or holes with a noncircular shape (such as D connectors), a hydraulic punch is essential.
Odds are that not many people will have all those tools lying about in their home shop. For this reason, custom sheet-metal fabrication, like mass-production plastic-injection molding, is typically used only when a large number of items need to be fabricated, or the cost and effort of building a one-off enclosure is outweighed by the need.
Machining from a solid block of metal can create a beautiful, lightweight chassis, but at the expense of machine shop time and a lot of wasted material. It is commonly used for low-volume things like parts of satellites and space probes, where the dimensions are unique to the particular application (space vehicles are largely hand-made things, and each is different). A machined enclosure might also be used as part of a prototype that will later be cast in metal or molded from plastic.
Stock Enclosures
Stock enclosures are available in a wide range of styles, size, and materials. Browsing through the available products from the enclosure and chassis manufacturers listed in Appendix D will give you some idea of the vast range of products available, and that’s just a small sample.
Plastic Enclosures
Companies such as Hammond Manufacturing make a variety of plastic enclosures for electronics, ranging from simple boxes to complete chassis with a carry handle.
Figure 16-1 shows one example, an ABS plastic box with a lid attached by two screws. It measures 1.38 inches long by 1.38 inches wide by .59 inches deep.
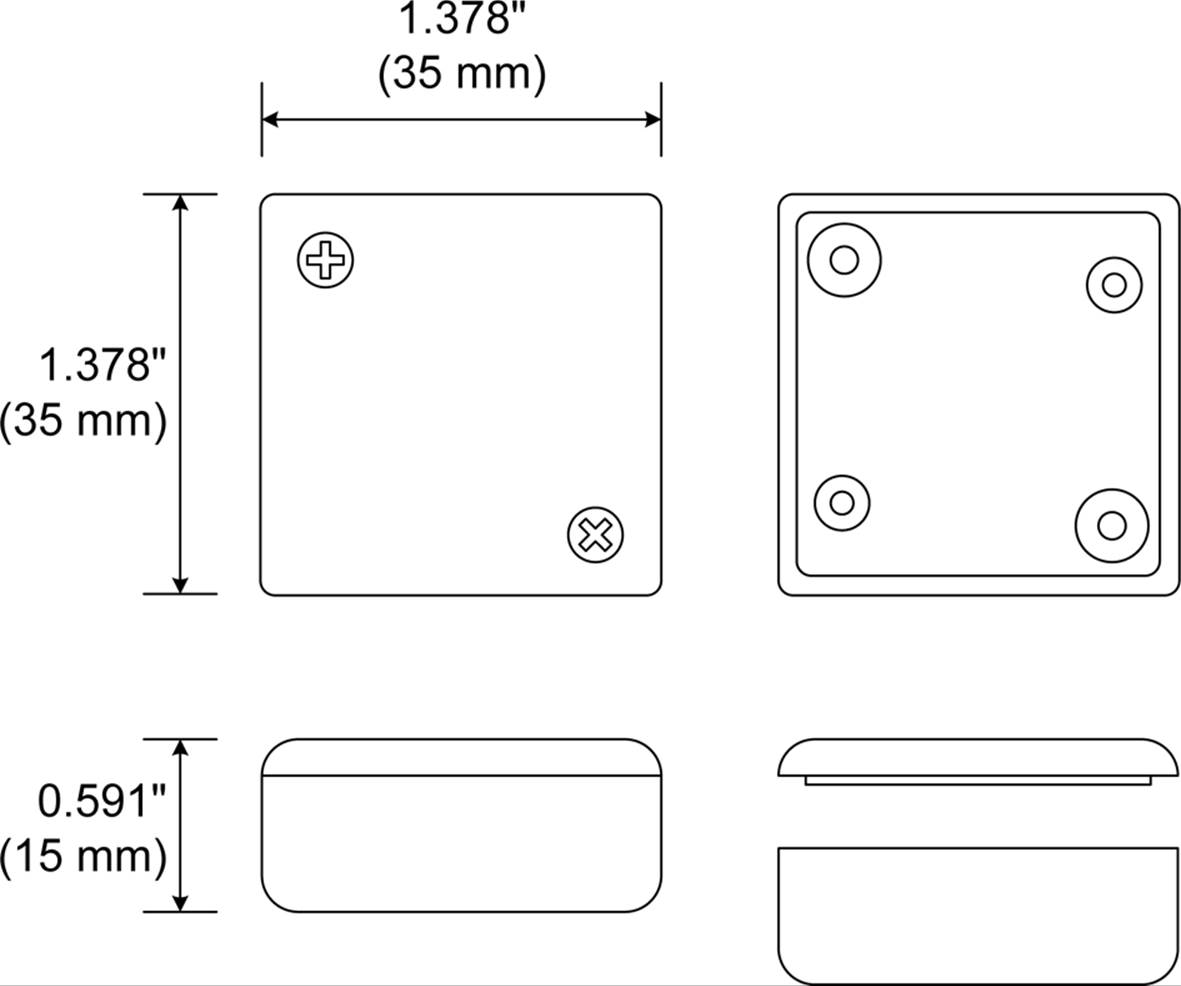
Figure 16-1. Small ABS plastic enclosure
Figure 16-2 shows what the enclosure looks like in real life (a ruler is included to provide a sense of scale).
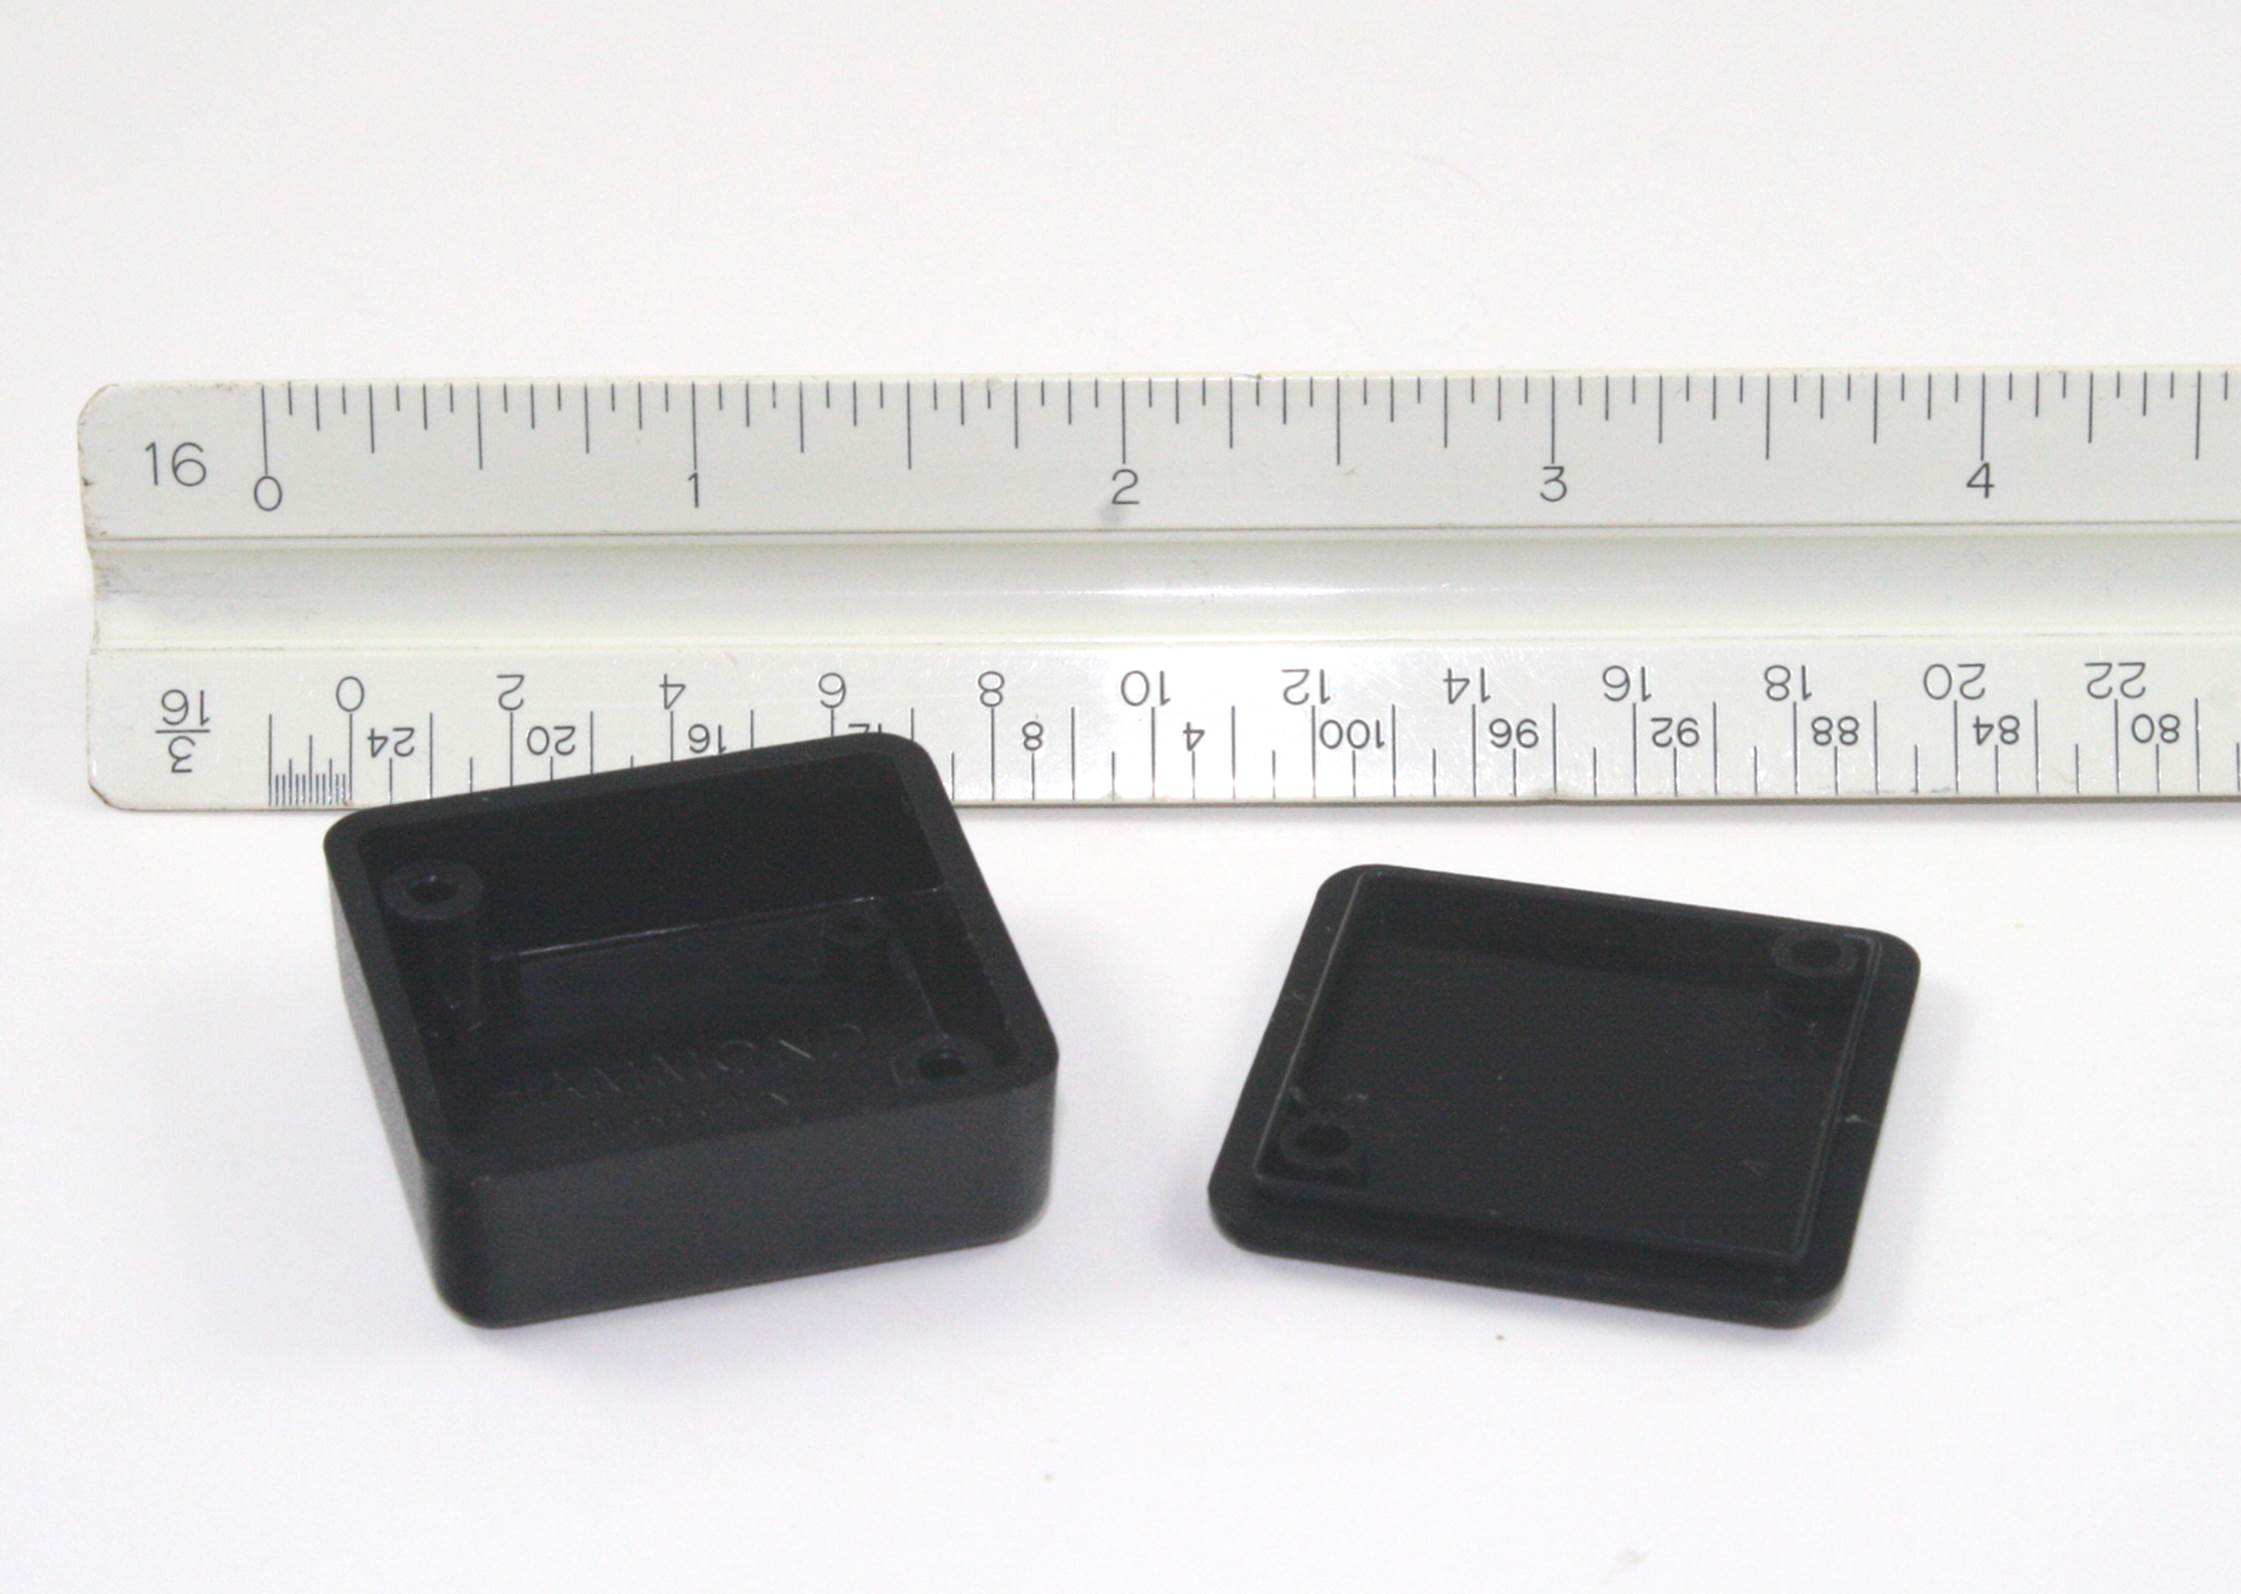
Figure 16-2. Photo of the small ABS plastic enclosure
What could possibly fit into such a tiny space? For starters, there is room inside for a PCB and even a battery. A simple display or some LEDs might be brought out through the cover (just drill or cut holes and let the display devices protrude through them). Attach a cloth or elastic loop to the back, and it could be something wearable. Glue one part of a square Velcro pad to the back and the device might be something you could put somewhere in a vehicle and take with you when you park it. A micro-USB connector could be brought out through the side of the enclosure. Here are some ideas for what could be made with a small enclosure like this:
§ One part of a driveway light beam sensor (either the sensor or the IR LED sender).
§ A really tiny CMOS camera.
§ A fall sensor for an elderly person.
§ Temperature and humidity display for use inside a vehicle.
§ A koi pond water-level detector (to shut off the valve when the water level is high enough and turn it on when it is too low).
§ Soil moisture detector (a red light might mean it’s dry, and a green light could indicate sufficient soil moisture).
§ An add-on to enhance an electronic toy (put an AVR microcontroller in the case and program it using the Arduino boot loader and software tools).
§ A data logger to collect readings from a sensor and offload them later.
And the list goes on. But sometimes it’s just not possible to cram everything into a small box, so a larger box is necessary. Figure 16-3 shows an enclosure commonly called a project box. This is an ABS box with a thin aluminum cover held in place with four self-tapping screws (seeChapter 2 for some caveats regarding self-tapping screws). It measures 1.5 inches high by 3.25 inches wide and 5.25 inches long (all measurements approximate).
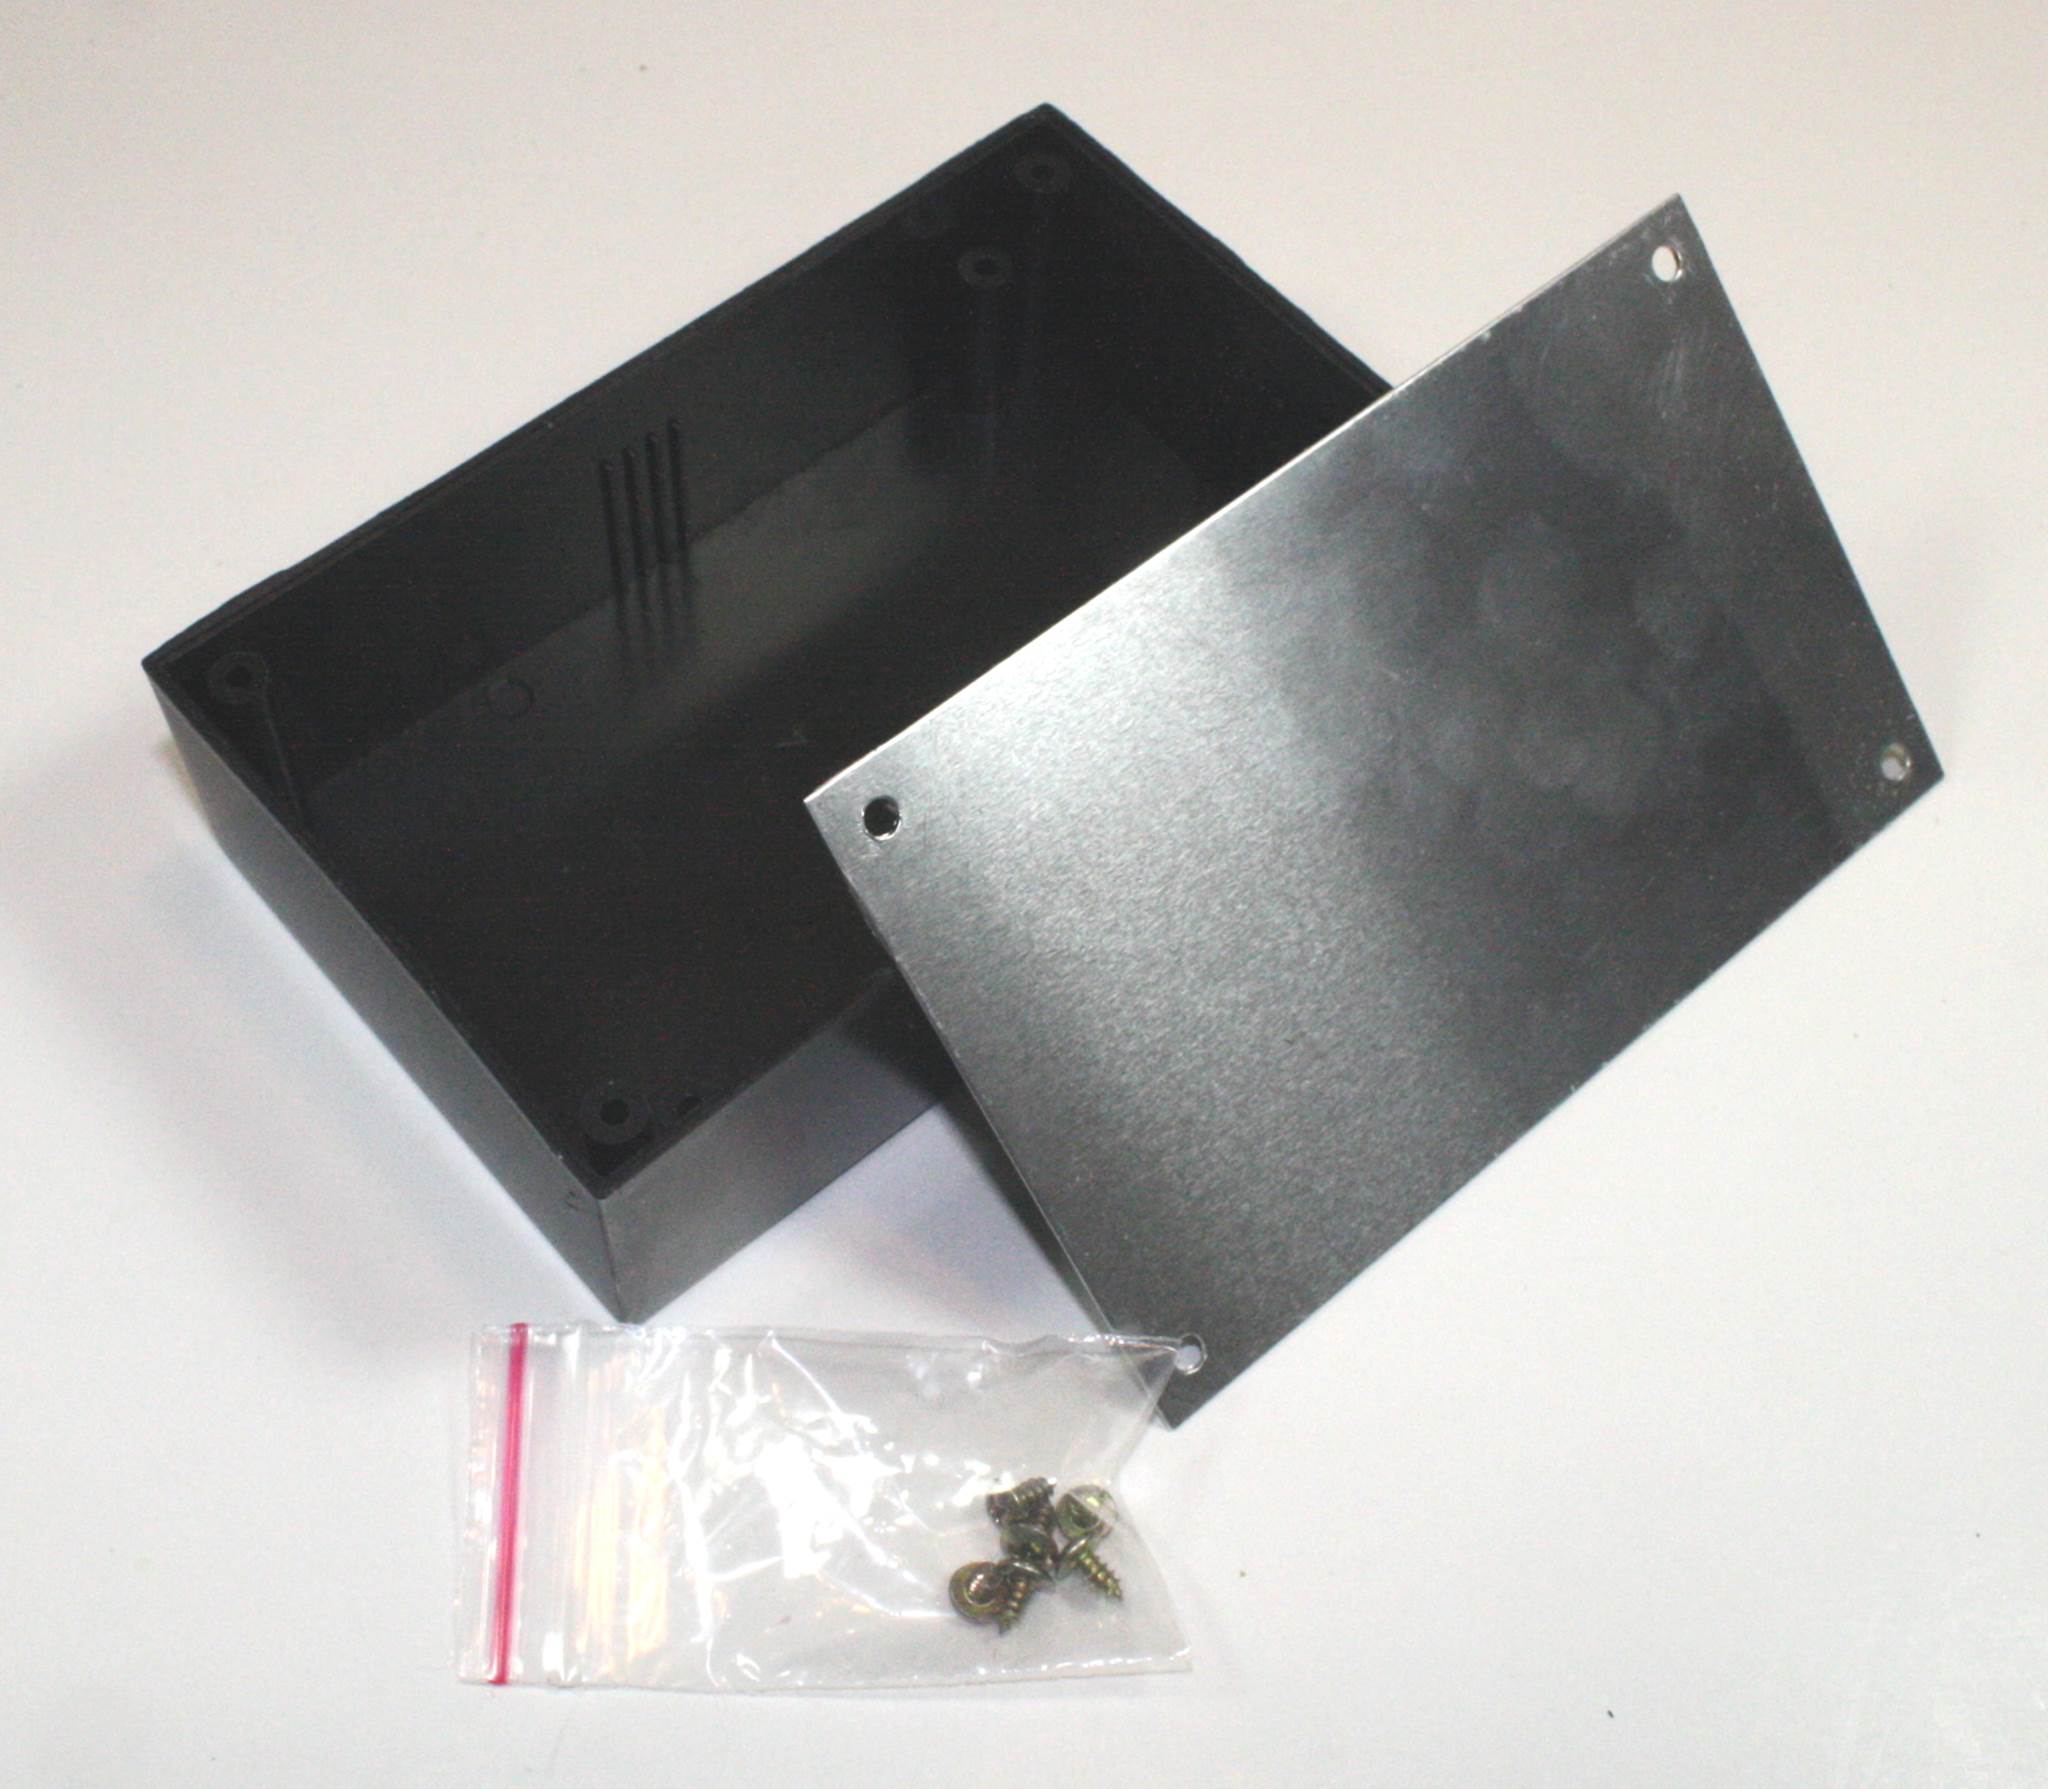
Figure 16-3. Polystyrene “project box” with metal cover
It’s common to get a cheap project box and then find out that the sides have warped inward so that the cover doesn’t fit correctly. This is not uncommon with injection molded plastic parts, but if the box has stiffener ribs molded into it, the warping will be much less noticeable. Also, because of the warped plastic and loose production tolerances, the cover usually doesn’t fit correctly to begin with. To make a cheap project box cover fit correctly and look presentable, you will probably need to trim the edges of the cover panel slightly on all sides. I use a sander like the one shown in Figure 16-4 to do this. Ideally, if the cover fits correctly, it shouldn’t bend or warp in the corners when the four screws are tightened. You will still probably need to pull out the sides of the box slightly when mounting the cover, because they will undoubtedly be warped to some degree.
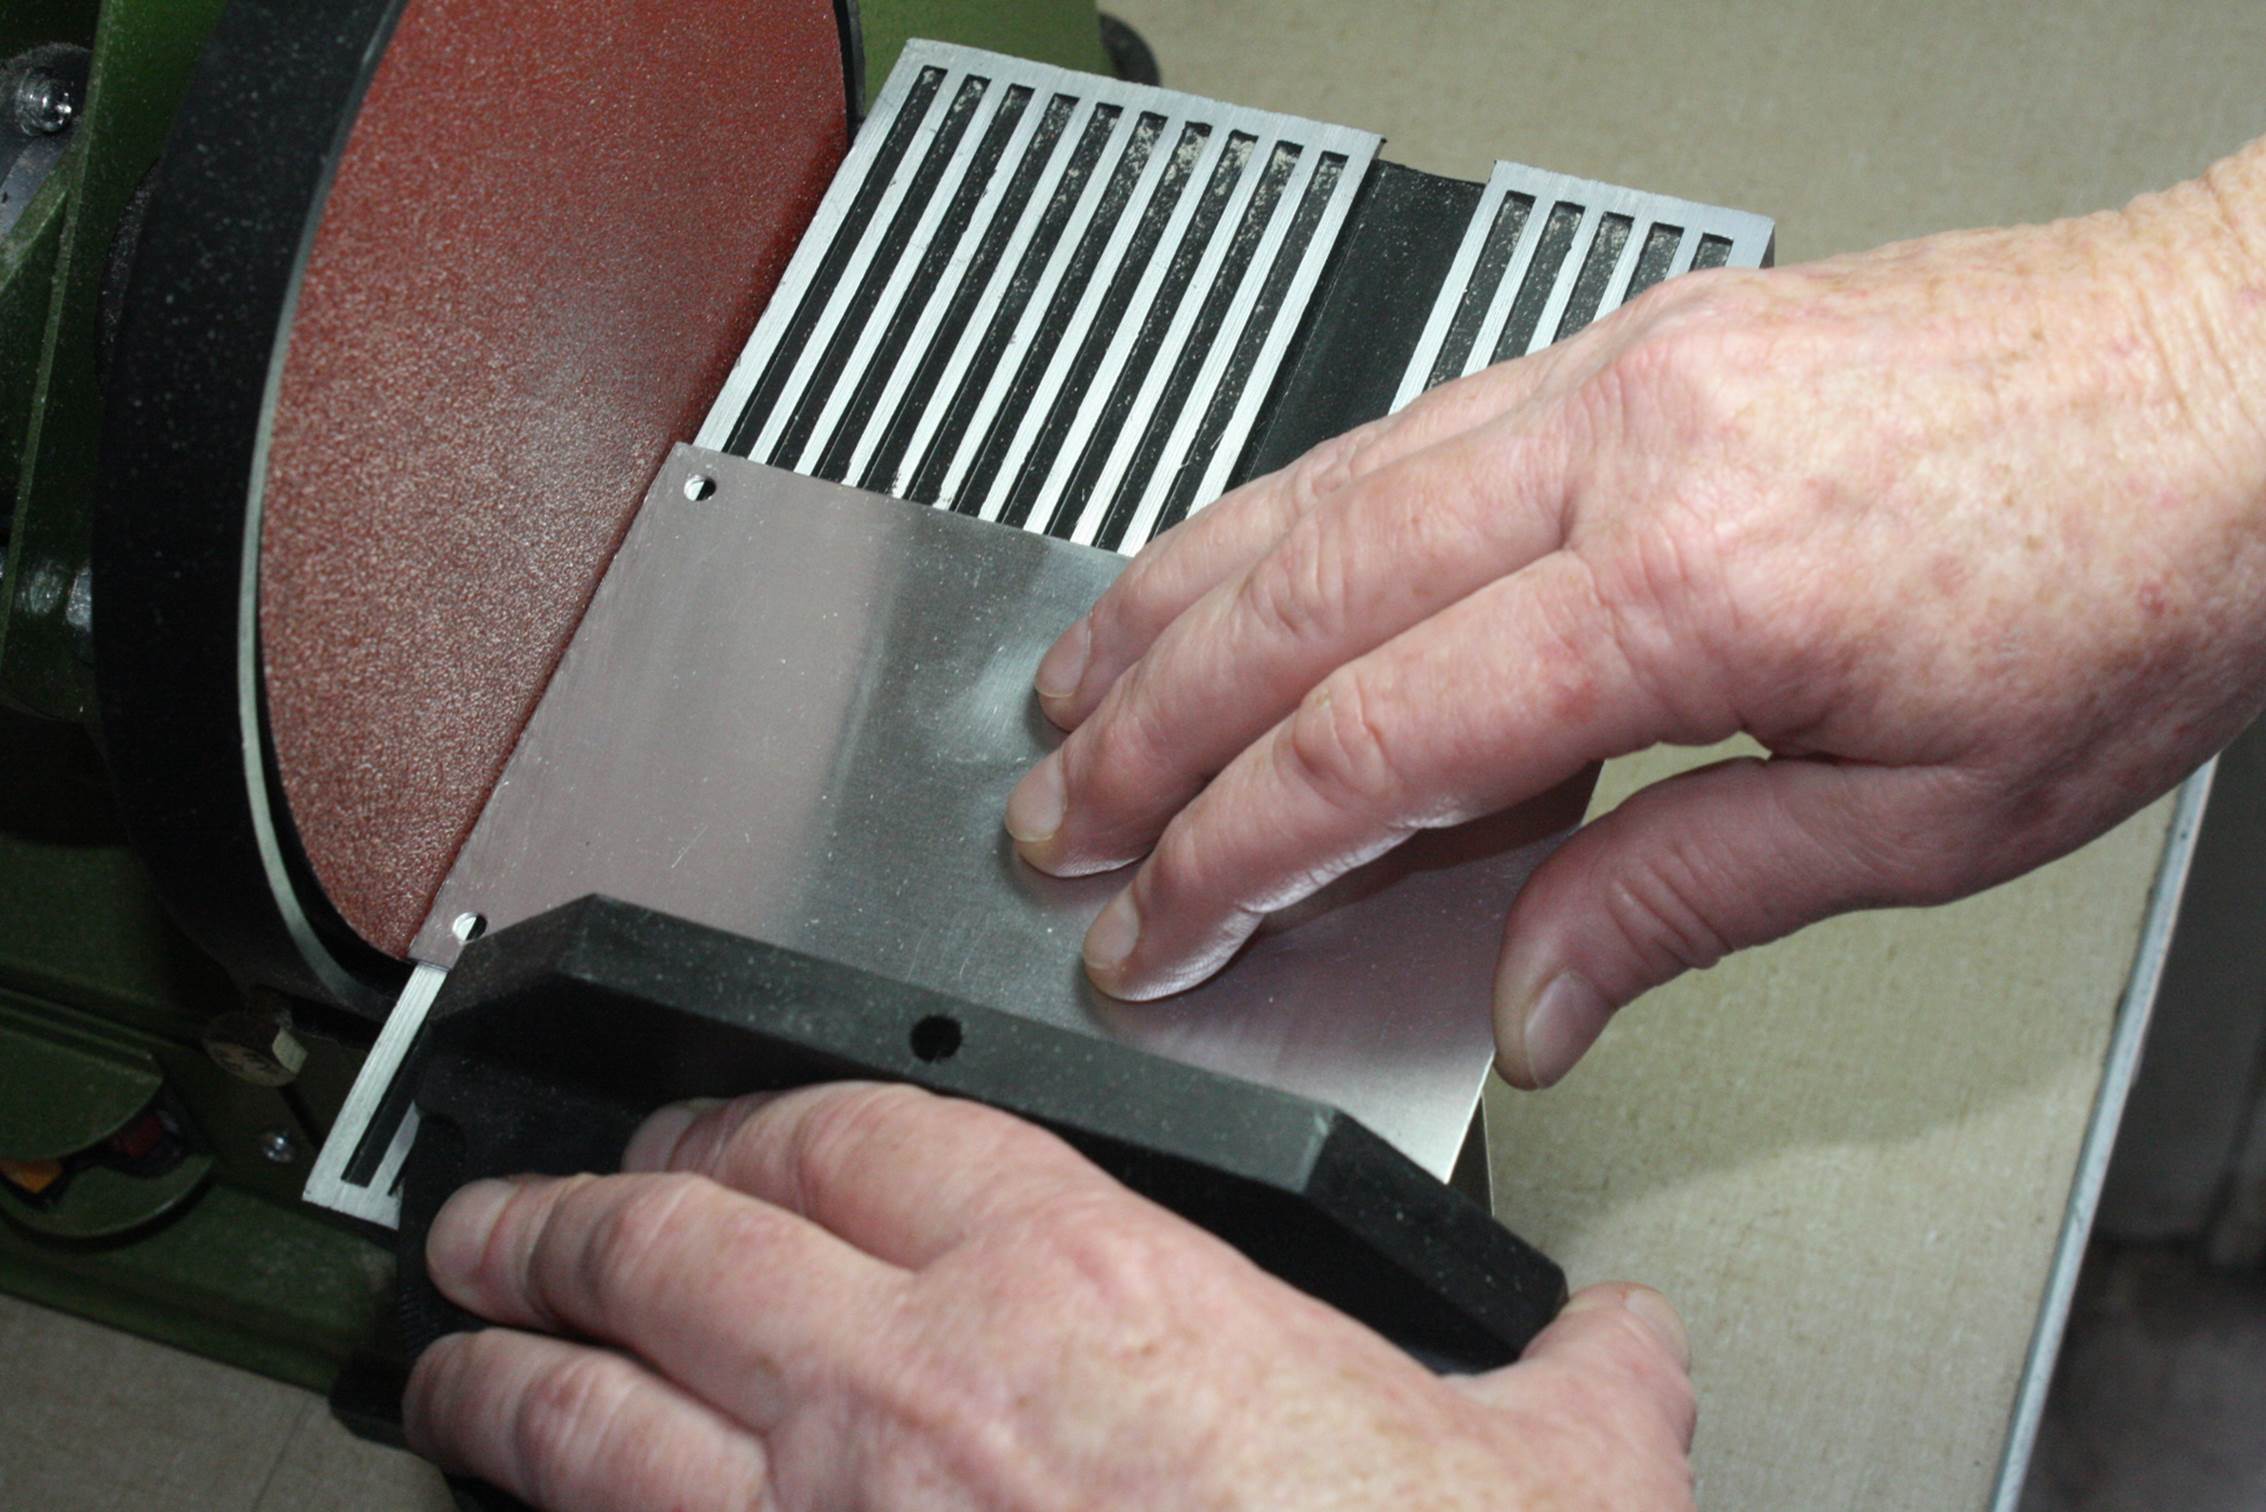
Figure 16-4. Reducing the overall size of a project box cover panel
Because of the hassles and aggravation, I don’t recommend this type of enclosure. They tend to be poorly made and don’t hold up well to rough handling. But then again, they are cheap, and sometimes it’s about the only thing available on short notice. You can purchase them at many retail electronics outlets and supply houses.
The metal cover plates sold with plastic project boxes tend to be very thin. To get the best results when drilling holes, I recommend a drill press with sacrificial backing material, as described in Chapter 4. It is easy to warp the metal plate if too much pressure is applied during drilling without any back support.
Of course, plastic enclosures come in shapes other than rectangles and squares. Figure 16-5 shows some examples of the many different shapes that are available. Other shapes, not shown here, include game controllers, control pendants, and cases with a precut opening for a touchscreen display. It’s easy to become lost for a couple of hours online looking at all of the types that are available.
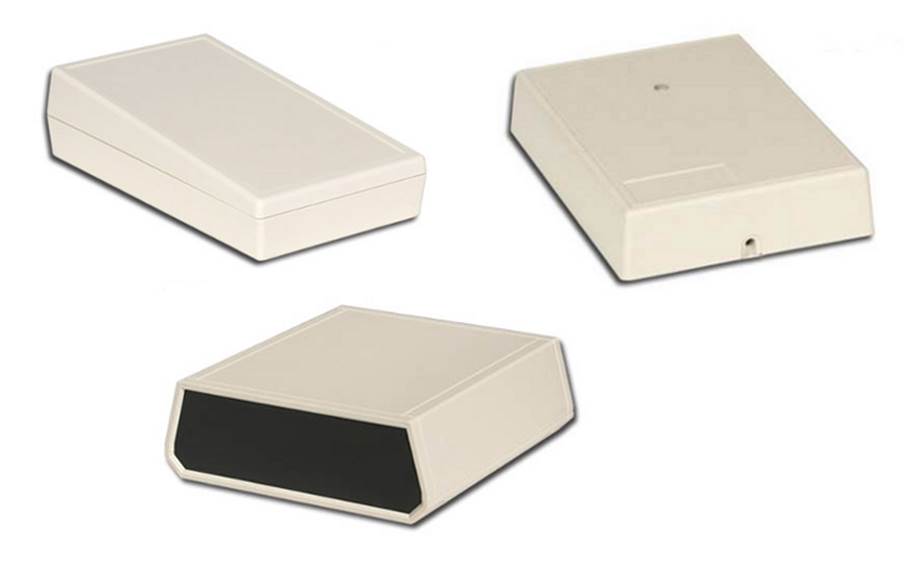
Figure 16-5. Plastic enclosures in various shapes
Cast Aluminum Enclosures
Stock enclosures are available in cast aluminum for applications where the enclosure needs to be rugged and able to withstand harsh conditions. Figure 16-6 shows a typical small cast aluminum enclosure.
Some cast enclosures are available with rubber gaskets to protect the contents from rain, snow, and dirt. If, for example, you wanted to build a device to monitor something in a forest (rainfall or soil moisture content, for example), a sealed cast enclosure would be a good choice. Connectors can be mounted through holes in the enclosure and also sealed with rubber or neoprene gaskets. Some types are available with fins on the exterior for heat dissipation.
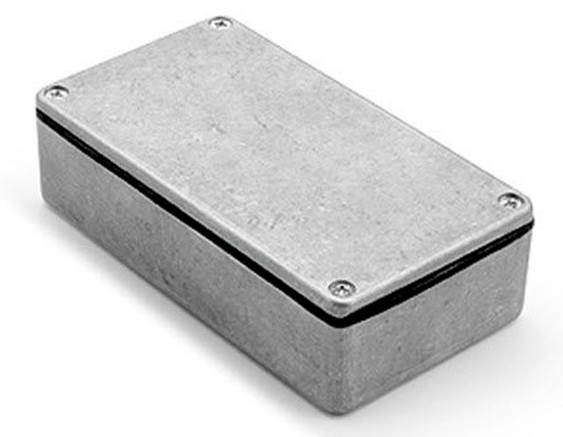
Figure 16-6. A small, stock cast aluminum enclosure with gasket
Extruded Aluminum Enclosures
Extruded aluminum is popular as an enclosure, and vendors offer various styles and sizes. Figure 16-7 shows a generic example with circuit boards that slide inside and end covers to close it all up.
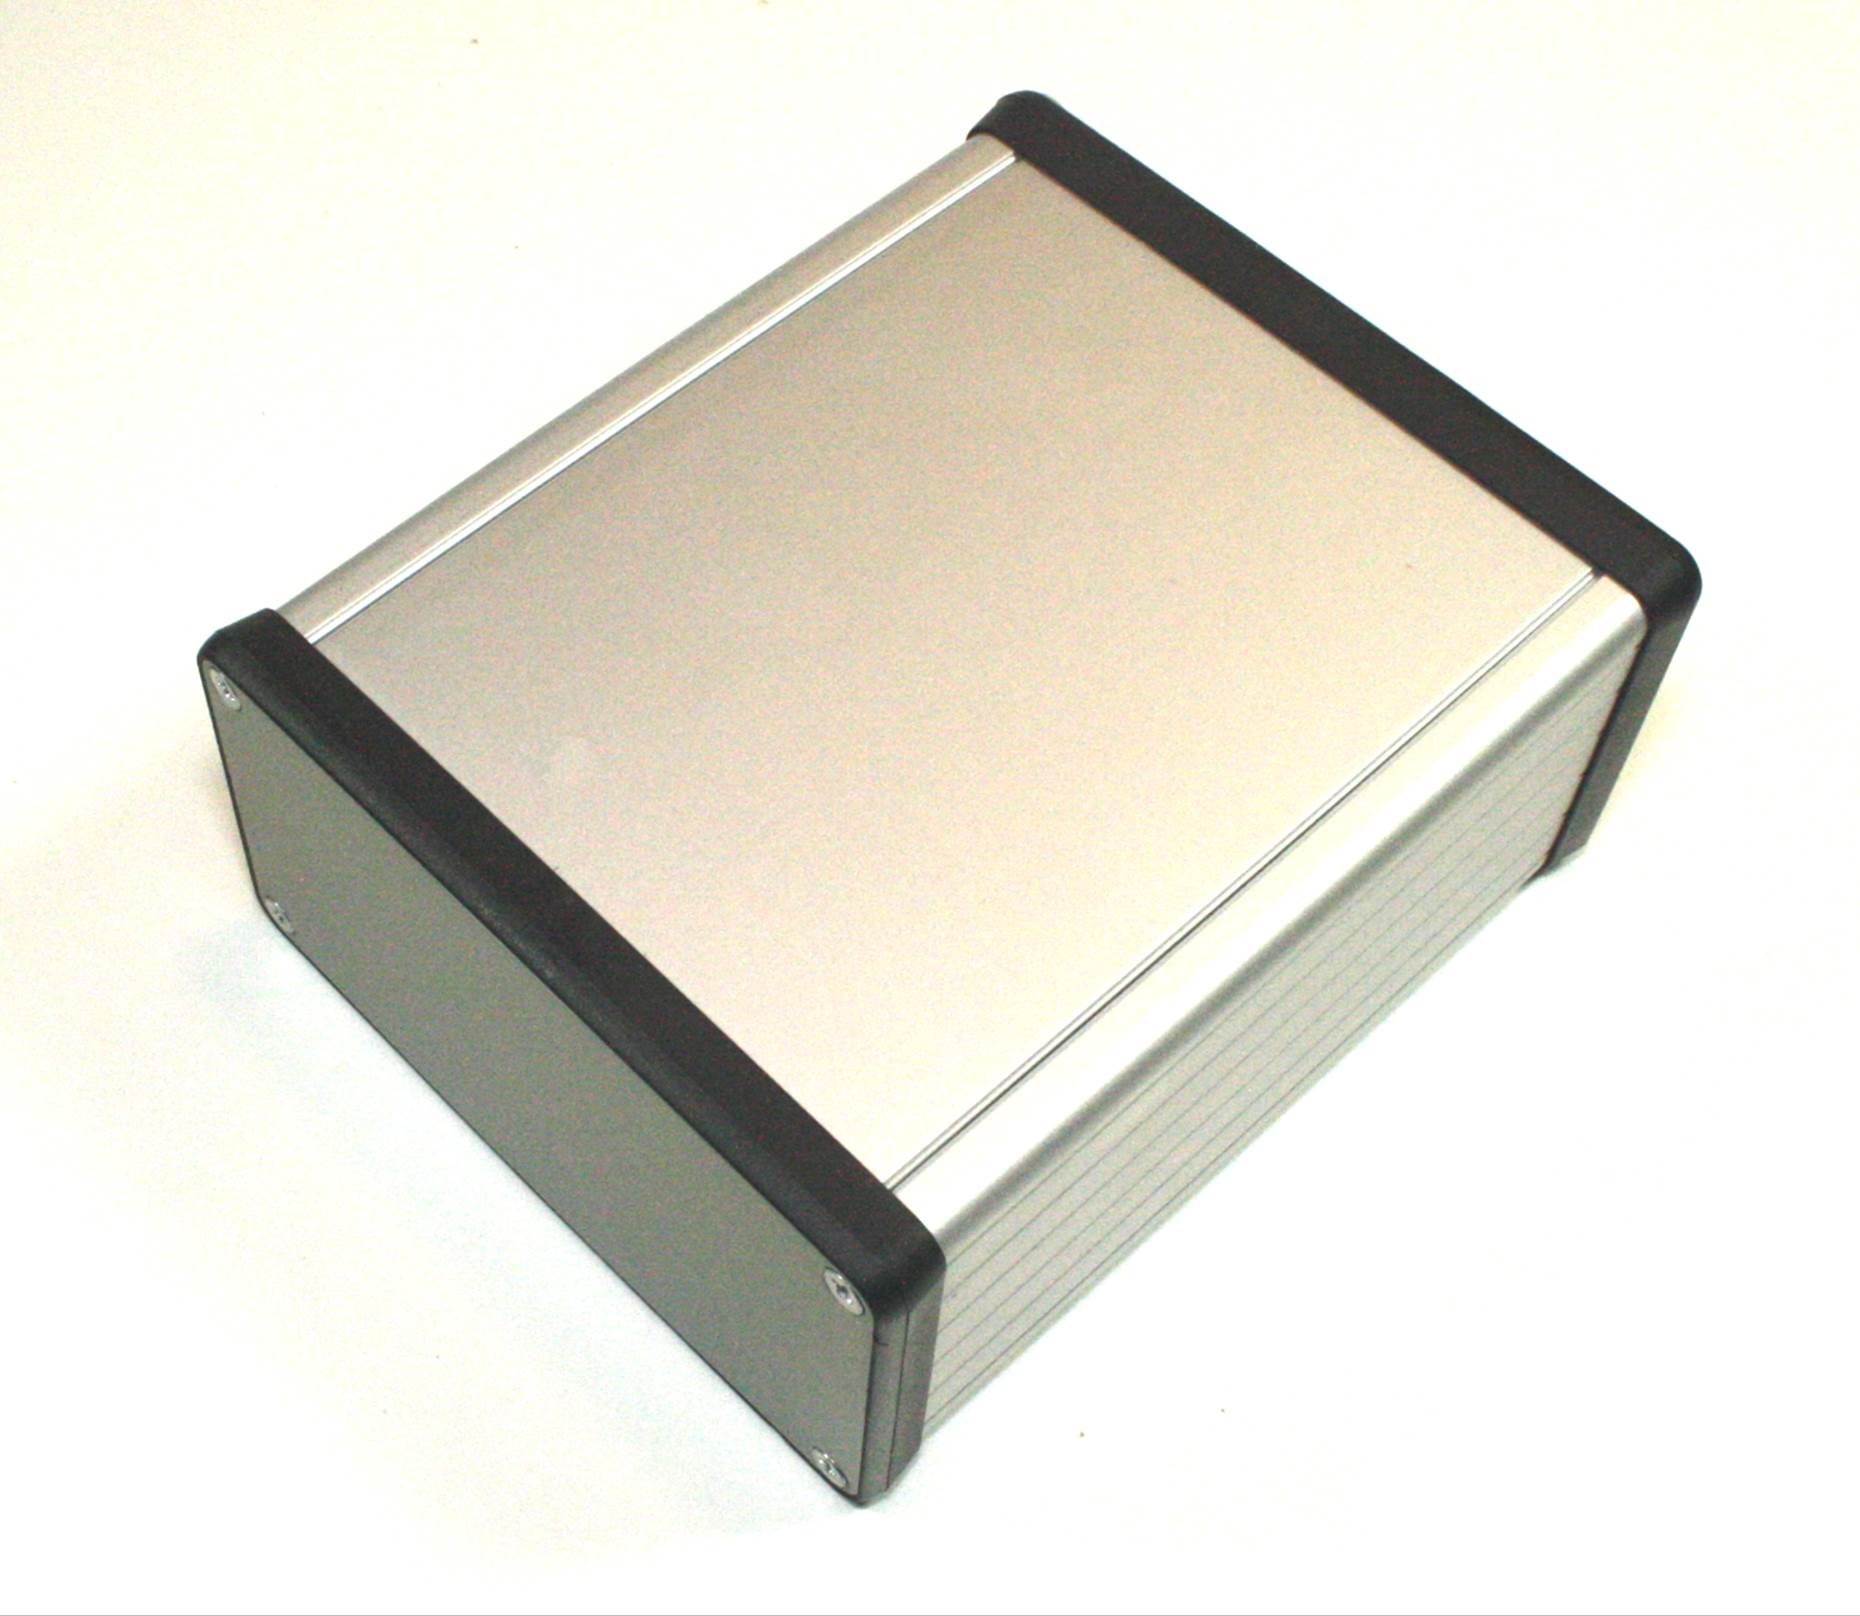
Figure 16-7. Rectangular extruded aluminum enclosure
If you are old enough to remember what a modem is and have actually used one, odds are you’ve seen a commercial product built into an extruded enclosure. These types of enclosures were once popular and were used for everything from telecommunications devices to miniature test equipment. They are excellent enclosures for homemade test instruments, audio gear, and electronic music recording or sound processing gadgets, to name just a few possible applications.
Variations on this theme use solid metal end panels rather than plastic, and these are suitable for use in automobiles or other vehicles. The metal shell can be used as a heatsink to dissipate heat from something like a voltage regulator or a power transistor. Figure 16-7 has metal end panels.
Sheet Metal Enclosures
Several enclosure manufacturers sell boxes and chassis made of formed sheet metal, either aluminum or steel, like the ones shown in Figure 16-8. One common type is the two-piece box, which is fabricated along the lines of the diagram shown on the left side of Figure 16-8. A two-piece box is made from two sheet-metal parts that have been bent or stamped to fit across each other, so that one piece forms the front, back, and bottom of the enclosure, while the other serves as the top and sides. In terms of ruggedness and quality, these can range from cheap sheet-metal stampings held together with self-tapping sheet-metal screws to products with press-in nuts in the cover mounting flanges, baked-on finishes, and ventilation slots cut into the top cover. As with just about everything else, it depends on how much you are willing to pay for it.
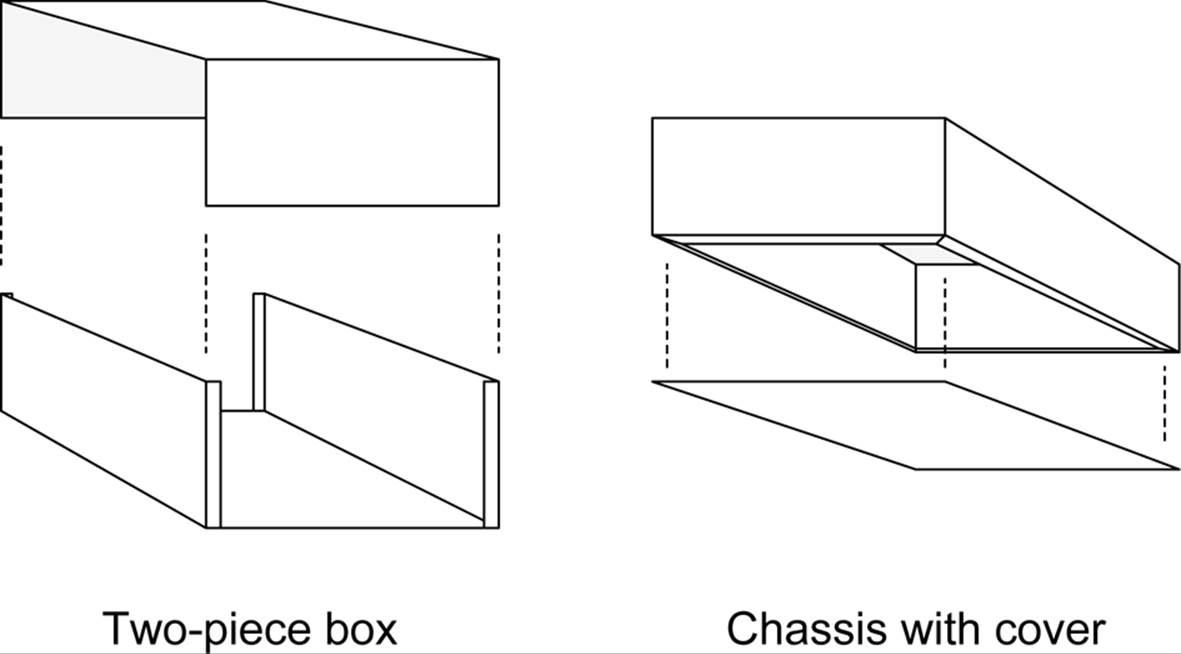
Figure 16-8. Common sheet-metal electronics chassis styles
Be sure to pay attention to the type of metal used in a sheet-metal enclosure. Steel is more durable, but it can be harder to work with than aluminum. A steel enclosure will also be heavier than an equivalent size in aluminum. Aluminum enclosures tend to be made from soft metal, and it can take some patience to get good results when you’re cutting or drilling it. The upside is that you can use something like a rotary tool (discussed in Chapter 4) to make rectangular holes in an aluminum chassis or enclosure, or even a nibbler tool (also discussed in Chapter 4), but unless a steel enclosure is made with very thin gauge metal it can be a real chore to create noncircular holes in it.
Figure 16-9 shows a real-life example of a sheet-metal enclosure. It is made from steel and it’s already painted, so all that’s needed are the electronics to go inside and some rubber feet for it to sit on.
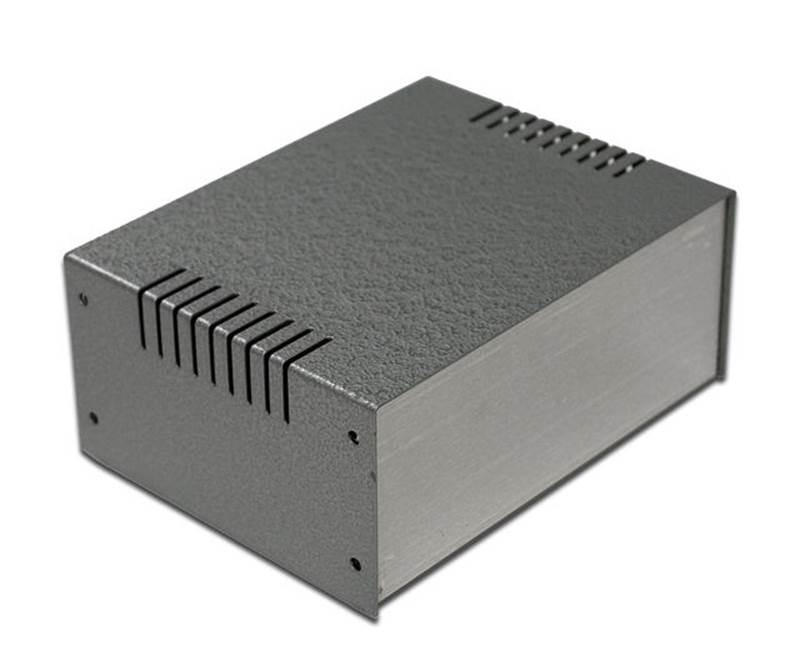
Figure 16-9. A two-part sheet-metal enclosure
The second common type of sheet-metal enclosure is shown on the right in Figure 16-8. This is essentially a box with an open side. Mounting flanges are formed along the open edges of the box, and a cover plate mounts over the open side with either self-tapping sheet-metal screws or machine screws (if press-in nuts have been used). It is commonly referred to as a chassis, rather than an enclosure, because generally people mount parts inside, perhaps with a transformer or other large items bolted to the top, and then mount the entire thing in some other, larger, assembly.
One way to use a flat chassis box like this is to bolt it to the back of a 19-inch rack panel at a 90-degree angle, as shown in Figure 16-10, and mount whatever controls, displays, and indicators are needed on the rack panel.
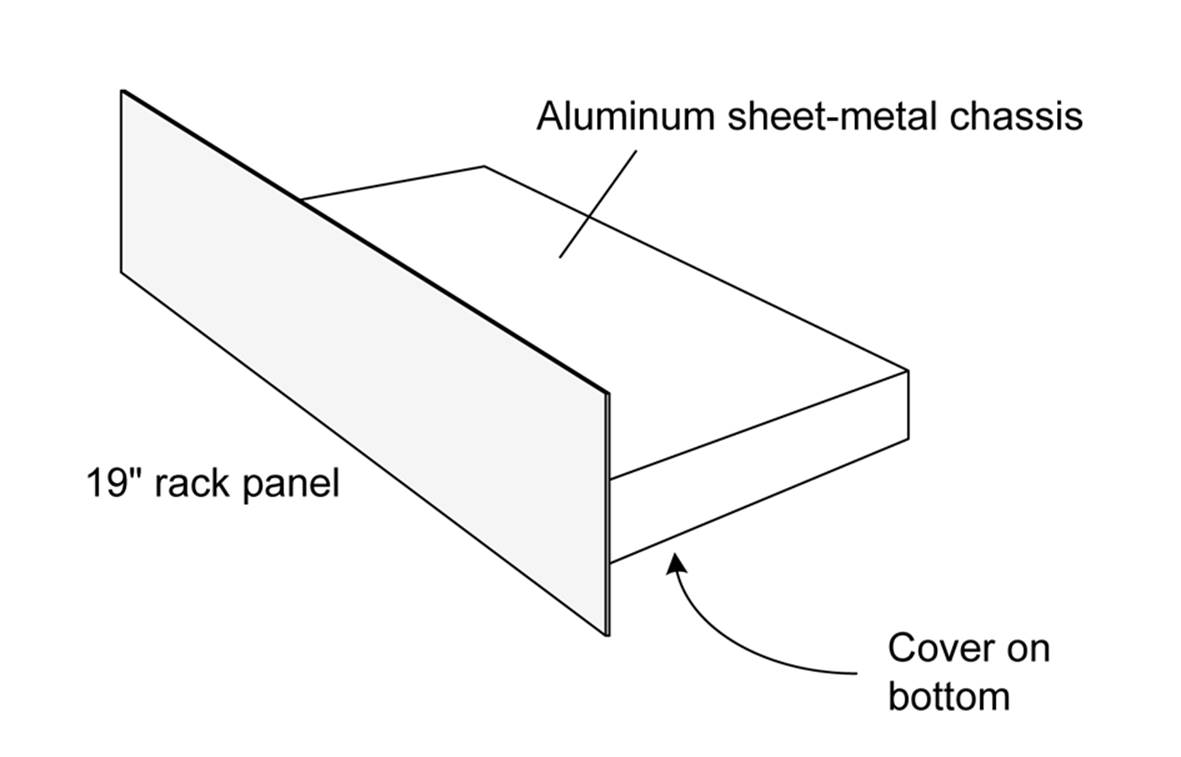
Figure 16-10. Rack mounted panel with sheet-metal chassis
If you need something a bit larger and more rugged than a sheet-metal enclosure or chassis, a variety of enclosure kits are available. These kits allow you to build devices that look like commercial products, and these types of enclosures are often used in the production of commercial electronics devices.
Kits are more expensive than a simple enclosure, but low-cost products (such as the one shown in Figure 16-11) are available that require you to do the assembly work.
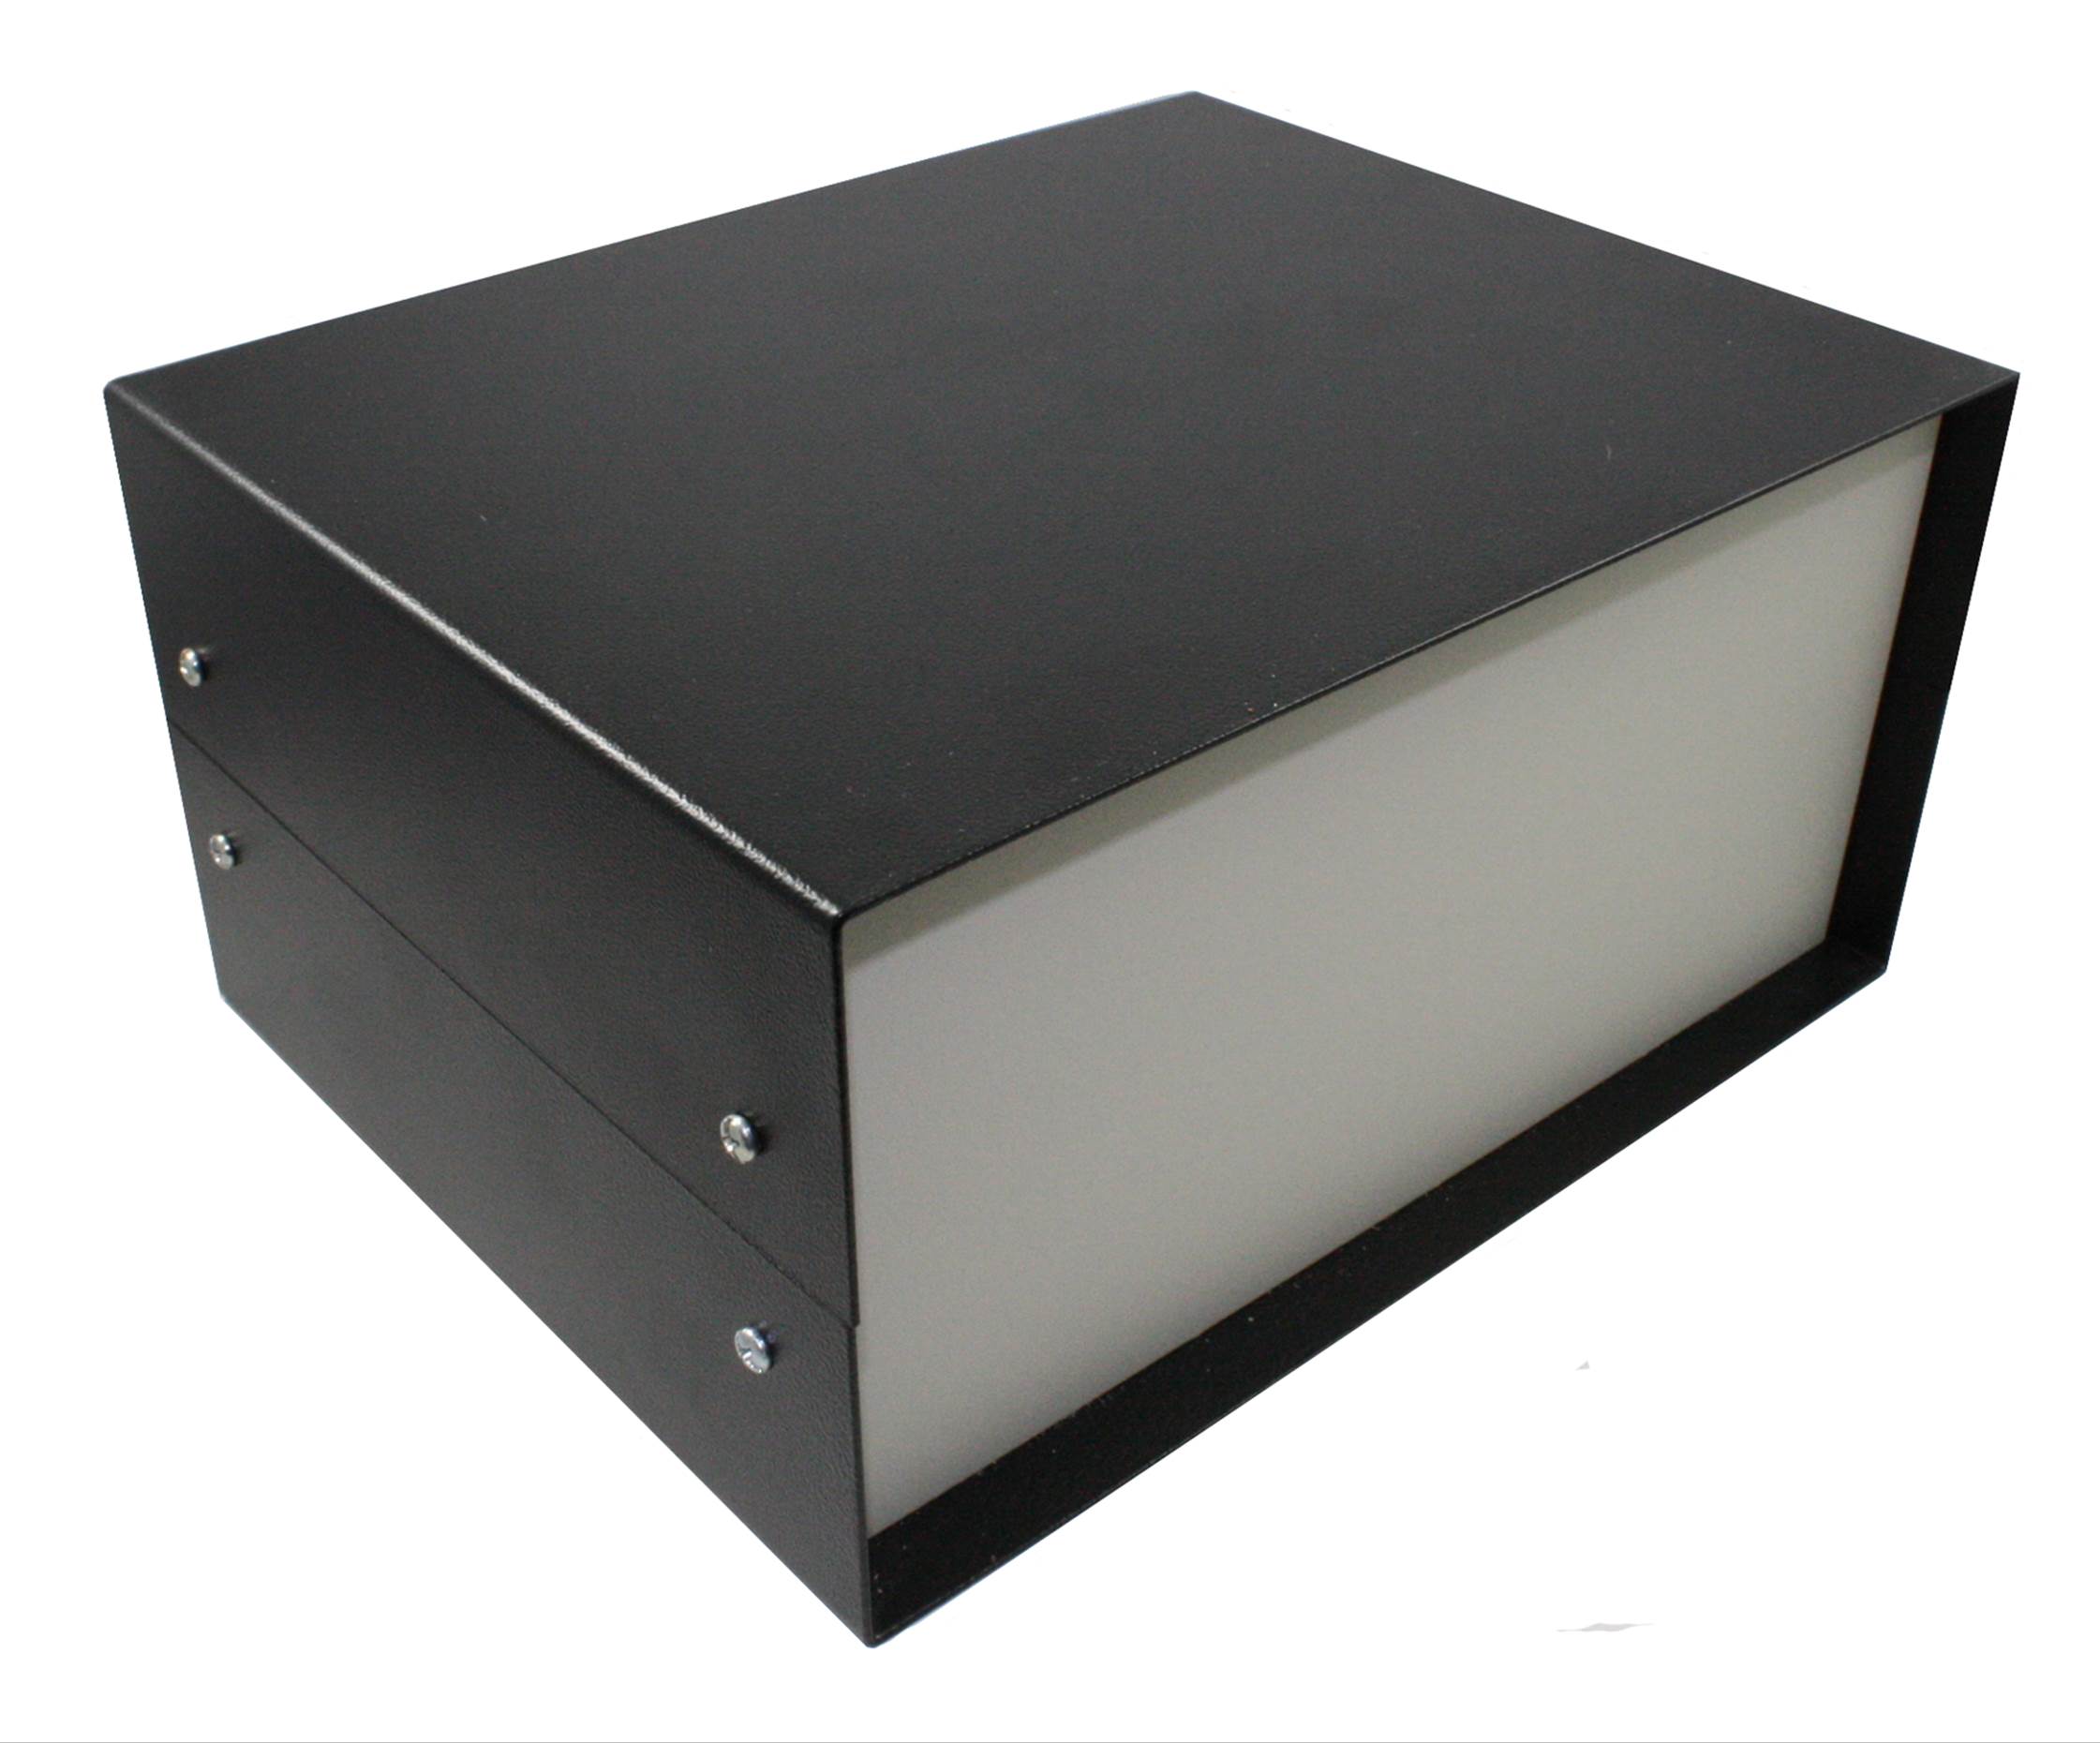
Figure 16-11. An enclosure kit for a bench or desktop electronic device
If you need a larger enclosure, you might want to consider some of the larger, heavy-duty enclosure kits that can be mounted into a 19-inch equipment rack. These types of kits aren’t cheap (around $200 to $300 is typical). If you’ve ever looked at professional audio equipment in a music store, you’ve probably seen this type of chassis. Heavy-duty chassis like these are also found in television and radio broadcast studios, and the rack-mounted servers used in data centers are similar in design.
Technically, most of these would fall under the category of sheet-metal enclosures because they are formed from cut and stamped pieces of metal, usually steel. The main difference between the examples shown in Figures 16-9 and 16-11 is that one is very simple with a minimal number of parts, while the other has threaded holes for the screws, internal mounting points, braces, and other features.
Building or Recycling Enclosures
While there are many options to choose from when it comes to buying a ready-made enclosure, sometimes it’s worthwhile (and fun) to build your own from raw materials or recycled items. Wandering through a secondhand store, browsing the electrical section in a hardware store, or even going through old toys that the kids have outgrown can help spark ideas and yield some interesting finds that you can use in your own project.
Building Plastic and Wood Enclosures
If you are comfortable with cutting sheet plastic, you can build your own enclosures. Ideally, you would want to have a drill press and a miniature table saw (such as the tools shown in Chapter 3). A rotary tool and a sander like the one shown in Figure 16-4 are also very useful. Figure 16-12shows an exploded view of such an enclosure.
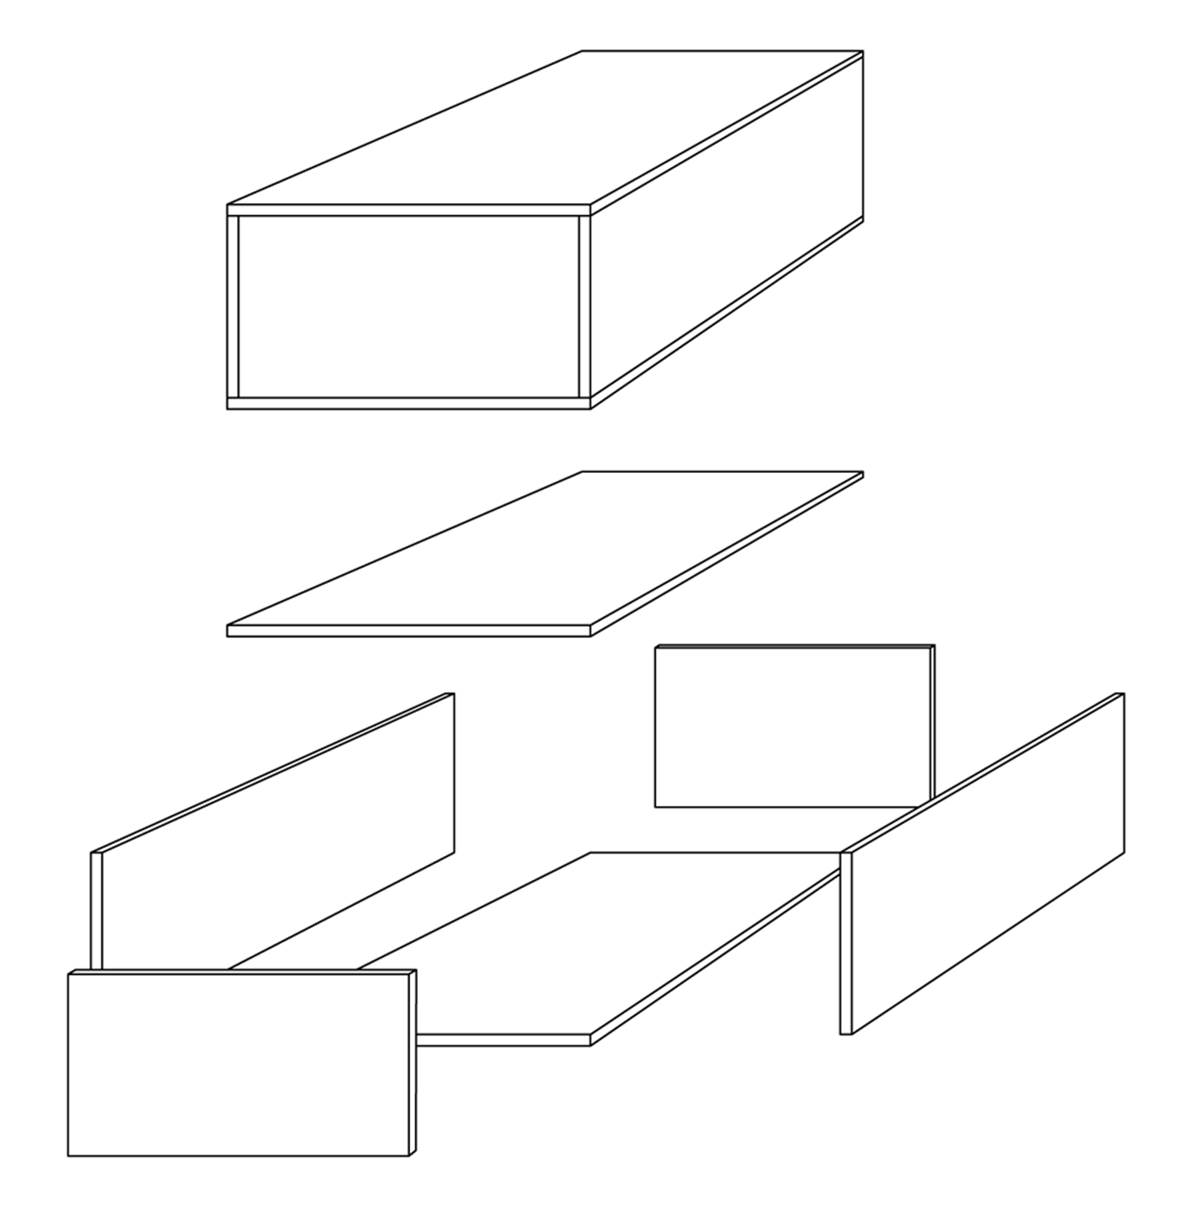
Figure 16-12. Enclosure made from plastic sheet stock
The box consists of six panels. Assuming that it is made from 1/8-inch to 1/4-inch sheet stock, you can assemble it using MEK to form plastic welds at the joints, or epoxy if the plastic isn’t compatible with MEK (see Chapter 2 for information on adhesives). If you want to give the assembly a removable lid, you can use 1/4-inch by 1/4-inch pieces of extruded square cross-section posts cut from bar stock and attached to the inside corners, as shown in Figure 16-13. This makes the whole assembly much more rigid, and if you drill and tap the posts to accept a #4 screw, they can be used to secure the lid on the enclosure.
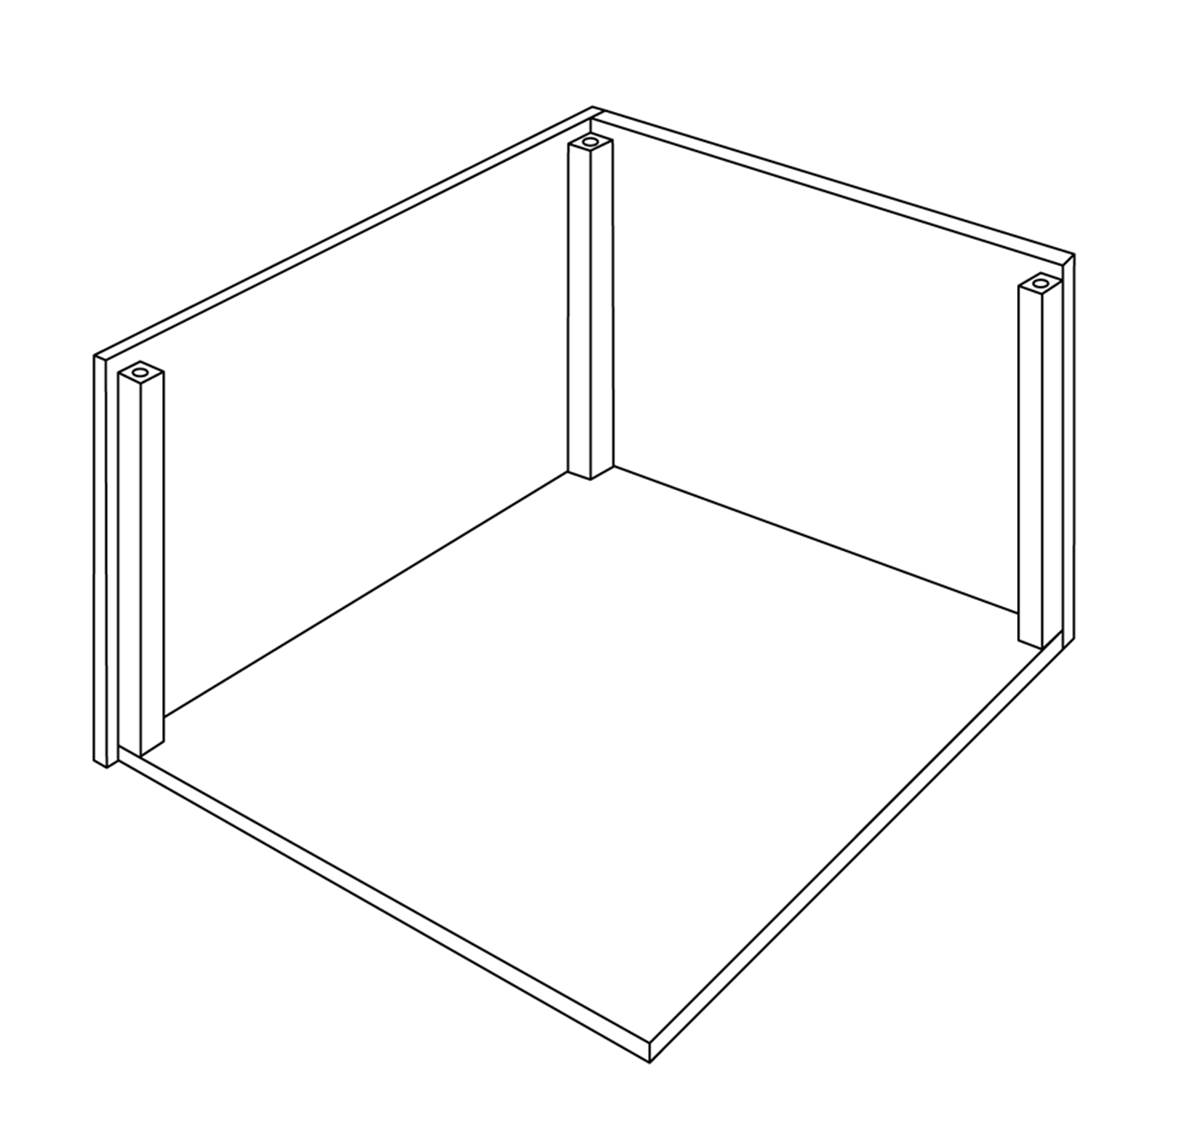
Figure 16-13. Using corner posts for reinforcement and cover attachment
Figure 16-14 shows the construction details. All dimensions are in inches unless otherwise stated.
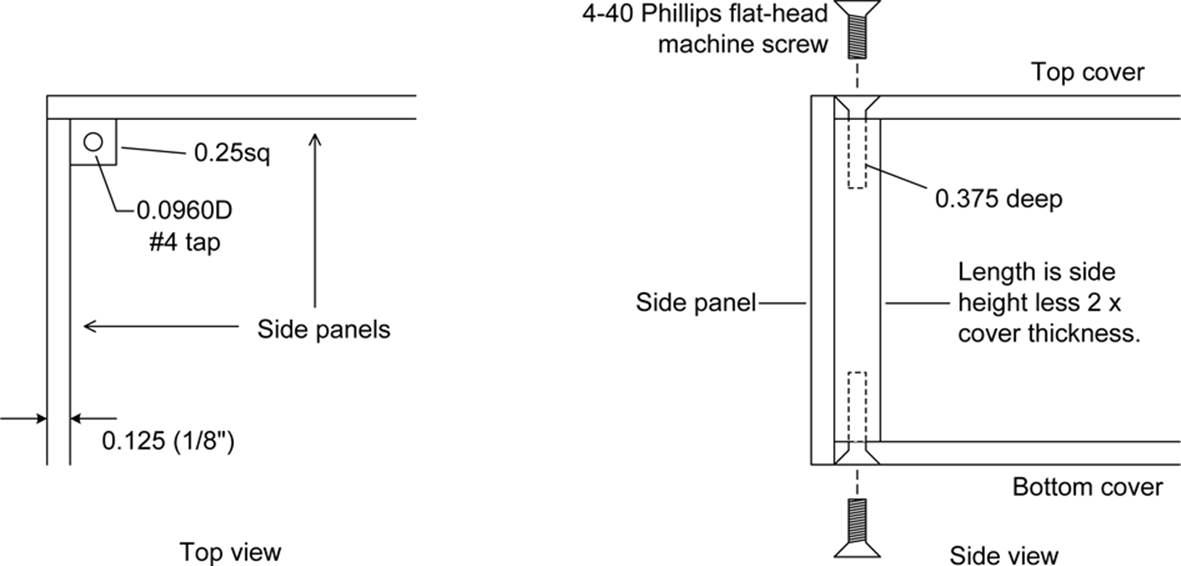
Figure 16-14. Fabrication details for corner posts in a plastic enclosure
Plastic can be worked with the same tools employed for metal. The primary differences involve the softness of the material and the tendency of plastic to melt and gum things up, so parameters like the tool speed on a mill or drill will need to be adjusted to compenstate. The lubricants used with aluminum or steel might not work well with plastic, particularly the solvent-based types. There are water-based lubricants available.
Cubes and rectangular boxes aren’t the only options. You can make an enclosure with a sloped front panel or one that has a 90-degree bend to fit around the corner of something. The possibilities are limited only by your imagination and the materials you are using. Just bear in mind that, unless you really want to go to the trouble of making beveled edges, using a milling machine to make slots for things to slide into, and know how to sand and paint plastic, enclosures built with this technique have a tendency to look like hand-made items (fine-grit sandpaper and epoxy spray paint can help a lot with the aesthetics, however). Perhaps that’s OK, depending on the application, but if you really need a polished look in a hurry, you might want to consider buying a ready-made enclosure. Consider your options before jumping into something like this, and if the trade-offs are worth the effort, you can end up with something that looks nice and will last a long time.
If you have woodworking skills, or know someone who does, and you have access to tools like a planer, jointer, and router table, then you can make enclosures from wood. Another option that is quite popular with the maker movement is to use a CNC (computer numeric control) router or a laser to cut pieces from wood panels. The wood can be thin plywood (birch is a common choice), or MDO (Medium Density Overlay) panels. A CNC router can produce clean cuts, but it’s noisy and somewhat messy (lots of sawdust to deal with), and the cutting tool needs to be really sharp to avoid tearing the wood. A laser produces clean cuts with no rips or burrs, but it does tend to burn the edges of the wood pieces, leaving a dark outline around each part. But even with just conventional tools, you can still create good-looking things, like the device shown in Figure 16-15. This is a solar intensity measurement device I helped my daughter make for a science fair project. It might have the look of something high-tech, but it’s really just some pine boards, a piece of plywood, and some paint.
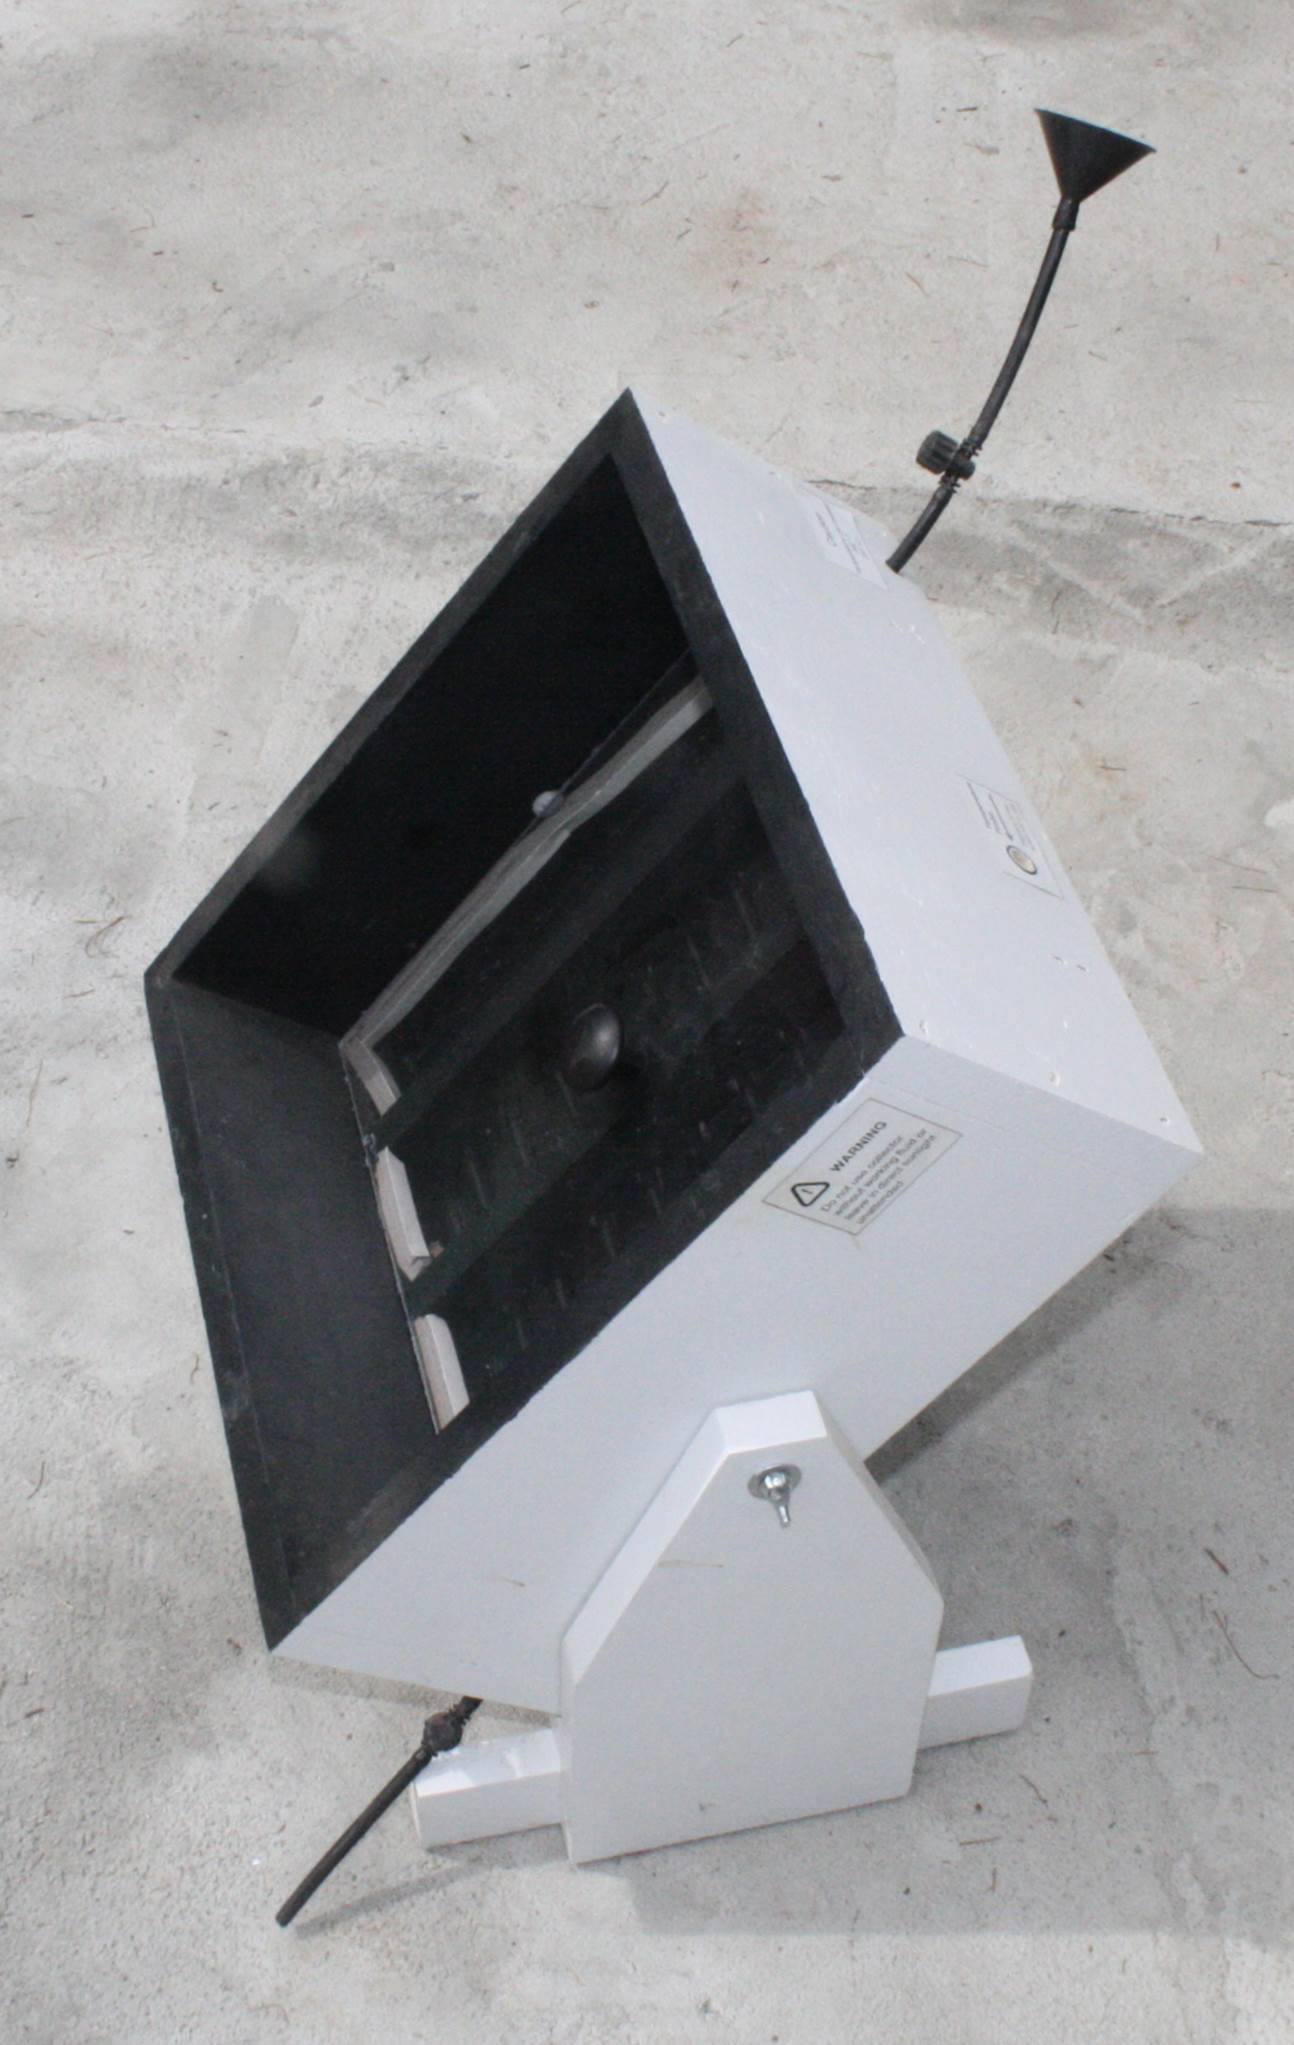
Figure 16-15. A solar intensity measurement device made from wood
Unconventional Enclosures
Just about anything that is the right size, easily sealed (more or less), and sturdy enough to take whatever physical abuse might get thrown at it has the potential to be an enclosure for electronics. An enclosure might be something that you might not think of as an enclosure for electronics, such as PVC or ABS pipe. You can get diameters ranging from 1/2 inch up to 8 inches at most hardware and home improvement stores, and a large number of attachments and adapters are available.
Figure 16-16 shows one way to use a section of PVC tubing as a sealed enclosure. This is an ideal low-cost housing for electronics used in an environment like a greenhouse, as an automated weather monitor, or as a remote sensor strapped to the side of a tree (for instance). It could also contain a level sensor (or two) and be mounted in a vehicle to determine when leveling jacks are extended to the correct height.
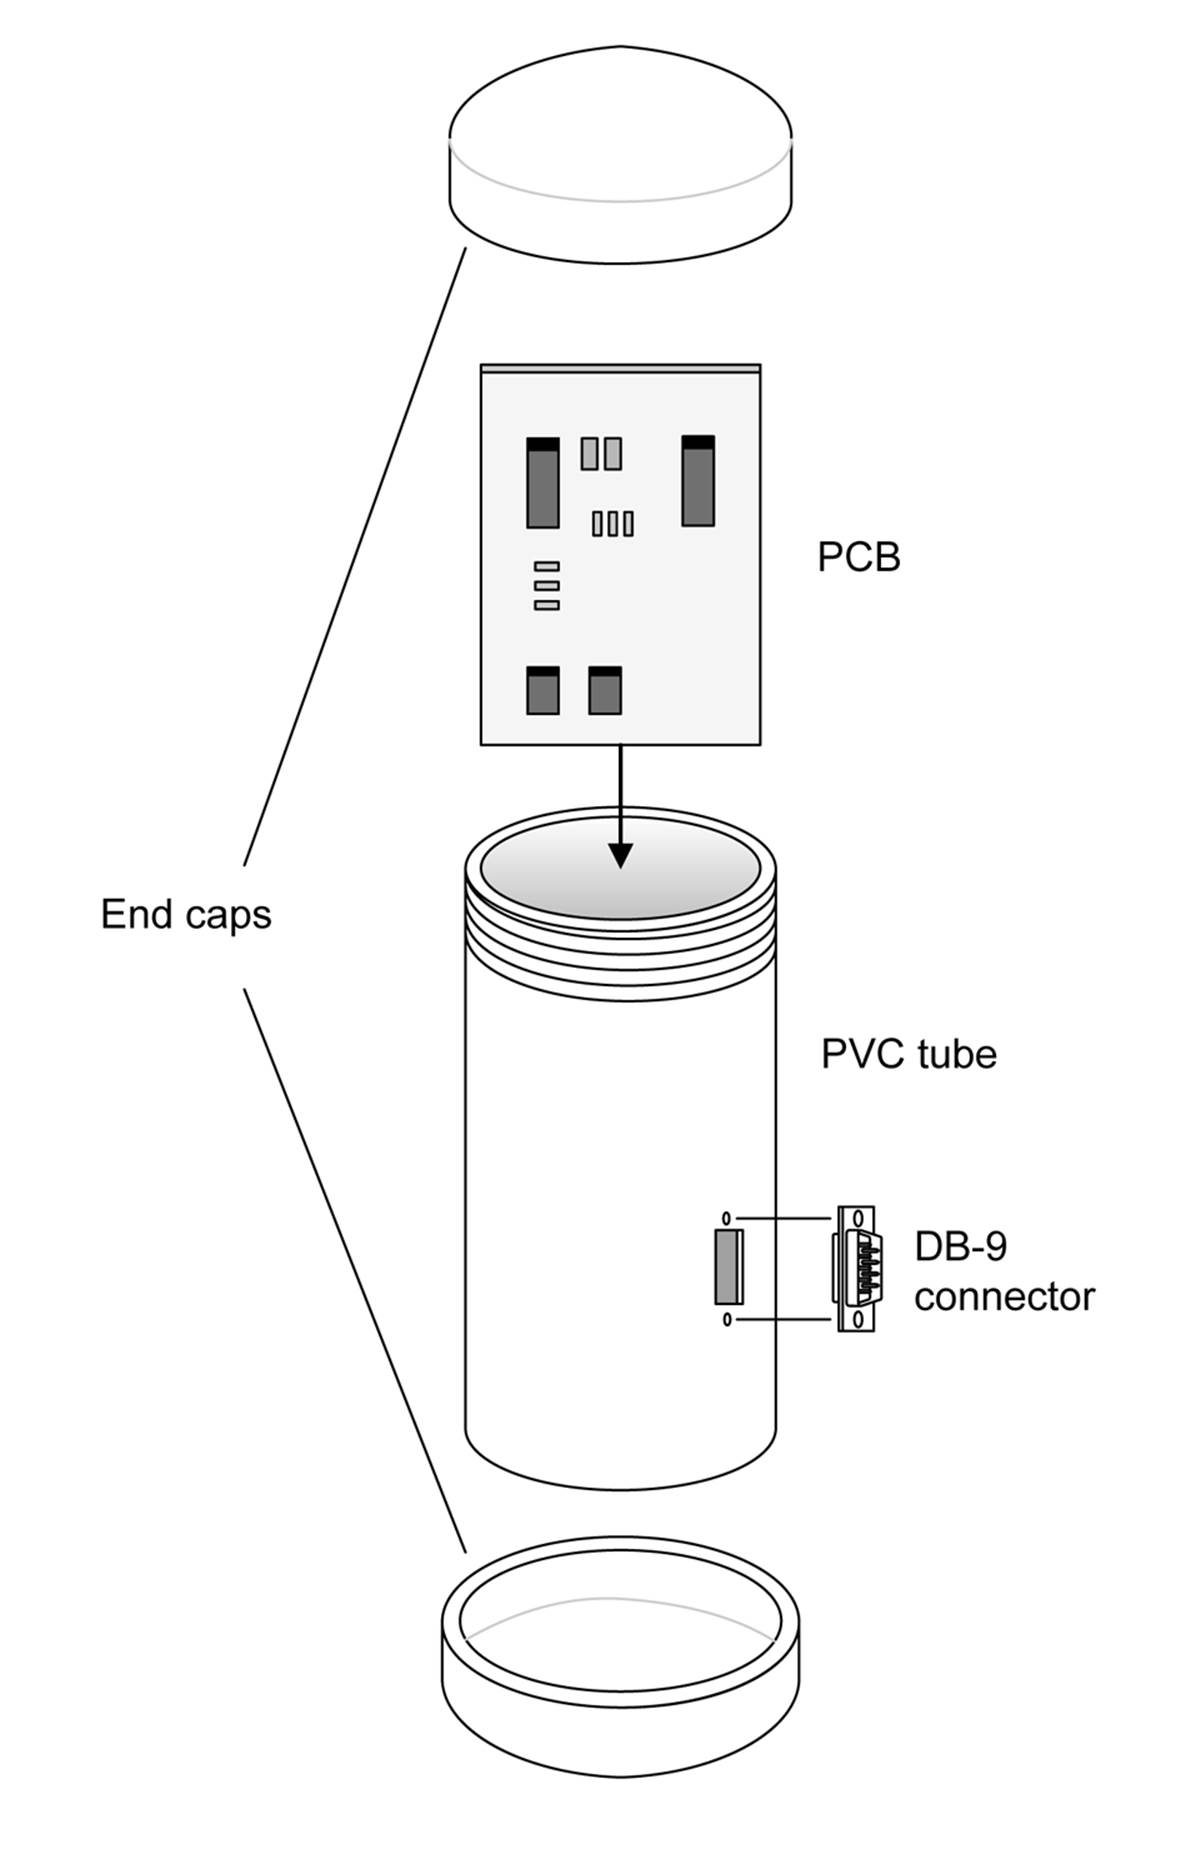
Figure 16-16. A section of PVC tubing used as an enclosure
Figure 16-16 shows a DB-9 connector, for a couple of reasons. First, DB-type connectors are available with glass-filled bodies and solid pins, which makes them suitable for applications like vacuum chambers and harsh environments. For many applications, a plastic-filled body would probably be acceptable, but the pins do need to be a solid machined type to block moisture entry into the tube. Secondly, the rectangular shape of the DB connector allows it to align vertically on the tube with a minimum amount of radius offset under the connector flange, which in turn reduces the amount of silicon rubber or epoxy resin needed to seal it to the tube. Remember that the connector can be wired to carry whatever signal and power lines are necessary, including USB, and a DB-25 could be used if more connections are needed. Once the mating connector is attached and the mounting screws are secure, the entire connector assembly can be encased in a generous application of clear silicon rubber. If it ever needs to be removed, it can be cut away with a sharp pocket knife.
Sometimes a useful little enclosure is an empty container that would otherwise be tossed in the trash or the recycle bin, like the little tins that mints come in. It turns out that the Altoids brand tins are popular for project enclosures. Searching “altoids tin projects” on Google returns around 127,000 results. Switch to images and take a look at what people have done with these ubiquitous little metal boxes. You’ll find everything from ham radio modules to effects for guitar players, from MP3 players to set-top video players. You can even buy box lots of empty tins on eBay.
Steel food, coffee, and tobacco cans are another possibility, although you will most likely need to fabricate an end cover to replace the one that was removed when the can was opened. Metal cans can be pressed into service as antennas for wireless data links, as a housing for one end of a light-beam communication link, and as a chassis for mounting various sensors. The blind rivets described in Chapter 2 can be used to quickly and easily attach a mounting bracket.
The main thing to keep in mind when using a coffee or tobacco can in a situation where it can be exposed to rain or ambient moisture is that you will need to strip the old paint, prime the bare metal, and then repaint it both inside and out to prevent rust. That can be a lot of work if you don’t happen to have a sand-blaster handy or a bench grinder with a wire brush wheel, so you might want to consider that.
Small utility boxes like the ones used for residential AC wiring can also be useful for some applications, and browsing the selection on the shelves at a hardware store or electrical supply outlet can be a good source of inspiration. Granted, most of the enclosures designed for use with electrical power wiring aren’t all that visually appealing, because they’re designed to be bolted to a flat surface or hidden behind a wall. But it’s still possible to find something that will do the job, and it doesn’t take too much effort to cut the mounting tabs off a molded box if you really don’t need them.
Repurposing Existing Enclosures
Occasionally, you might come across an intriguing enclosure with something already inside of it. Well, if you don’t need whatever was originally packaged inside, you can pull it out and put in your own circuitry. Candidates for repurposing include old test equipment, junk PC components (particularly old outboard disk drive enclosures), and broken or discarded electronic toys like a spy voice recorder or a sing-along headset microphone. Lots of possibilities there. If you like harmless pranks, an old toy with something like an Arduino, or a wireless module like one of the Bluetooth LE types described in Chapter 14, stuffed inside can be a source of significant amusement.
While expending the time and effort to disassemble something and rebuild it to serve a new purpose might be considered to be extreme hacking, it is sometimes worth the effort if you really need a particular type of packaging for your own invention and simply cannot find it anywhere else. If you are careful, take your time, and don’t mind expending the time on it, you can have a rugged, professional, and unique enclosure.
Designing Packaging for Electronics
One of the best ways to get ideas for packaging is to look and see what others have done to solve their packaging problems. For example, Figure 16-17 shows a personal pedometer built into a small plastic case. It has a flip-up cover, an LCD display and a reset button, a molded clip on the back for attaching it to your belt, and a removable fabric loop with a metal clip (not shown) for securing it to your clothing if you don’t happen to have a belt.
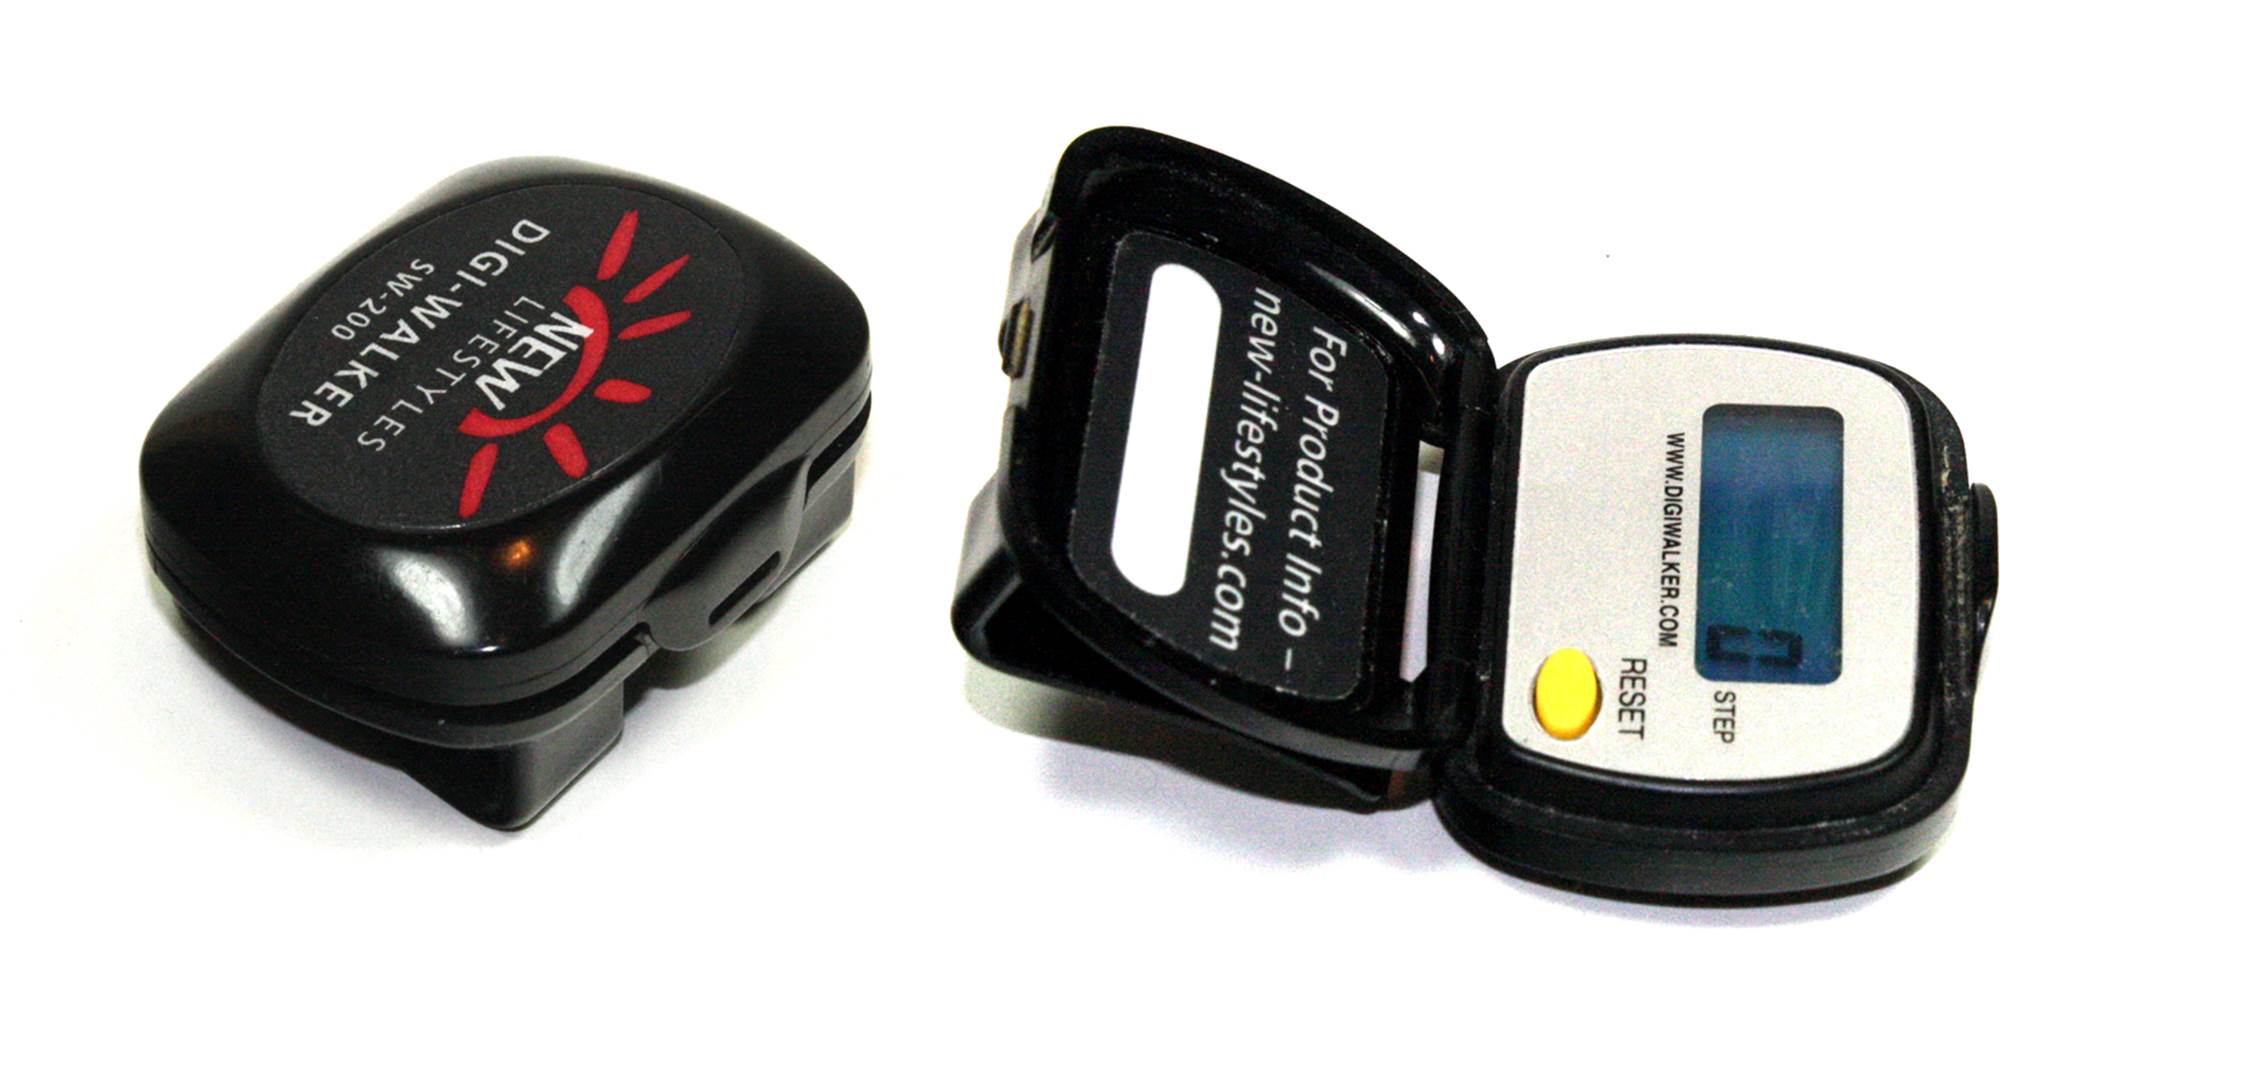
Figure 16-17. A wearable personal pedometer
This is obviously a custom injection-molded item, and it appears to have been made with at least three different parts: case backshell, front cover, and panel insert. It wasn’t disassembled because the device appears to have been glued together, and prying it apart could destroy it (not to mention irritate its owner). It uses some type of small battery (like the ones shown in Chapter 5), but the battery cannot be replaced. So when this thing dies, it’s dead forever. That might be a good time to take it apart and see what’s inside, if you’re willing to wait that long.
The enclosure shown in Figure 16-1 could easily be used for a device like this. Plastic and metal belt clips can be purchased from multiple sources, and the ones seen in a quick Google search ranged from $3 to $6.
Figure 16-18 shows another interesting example of an innovative packaging solution. This is an old Fluke 1900A event counter and frequency meter.
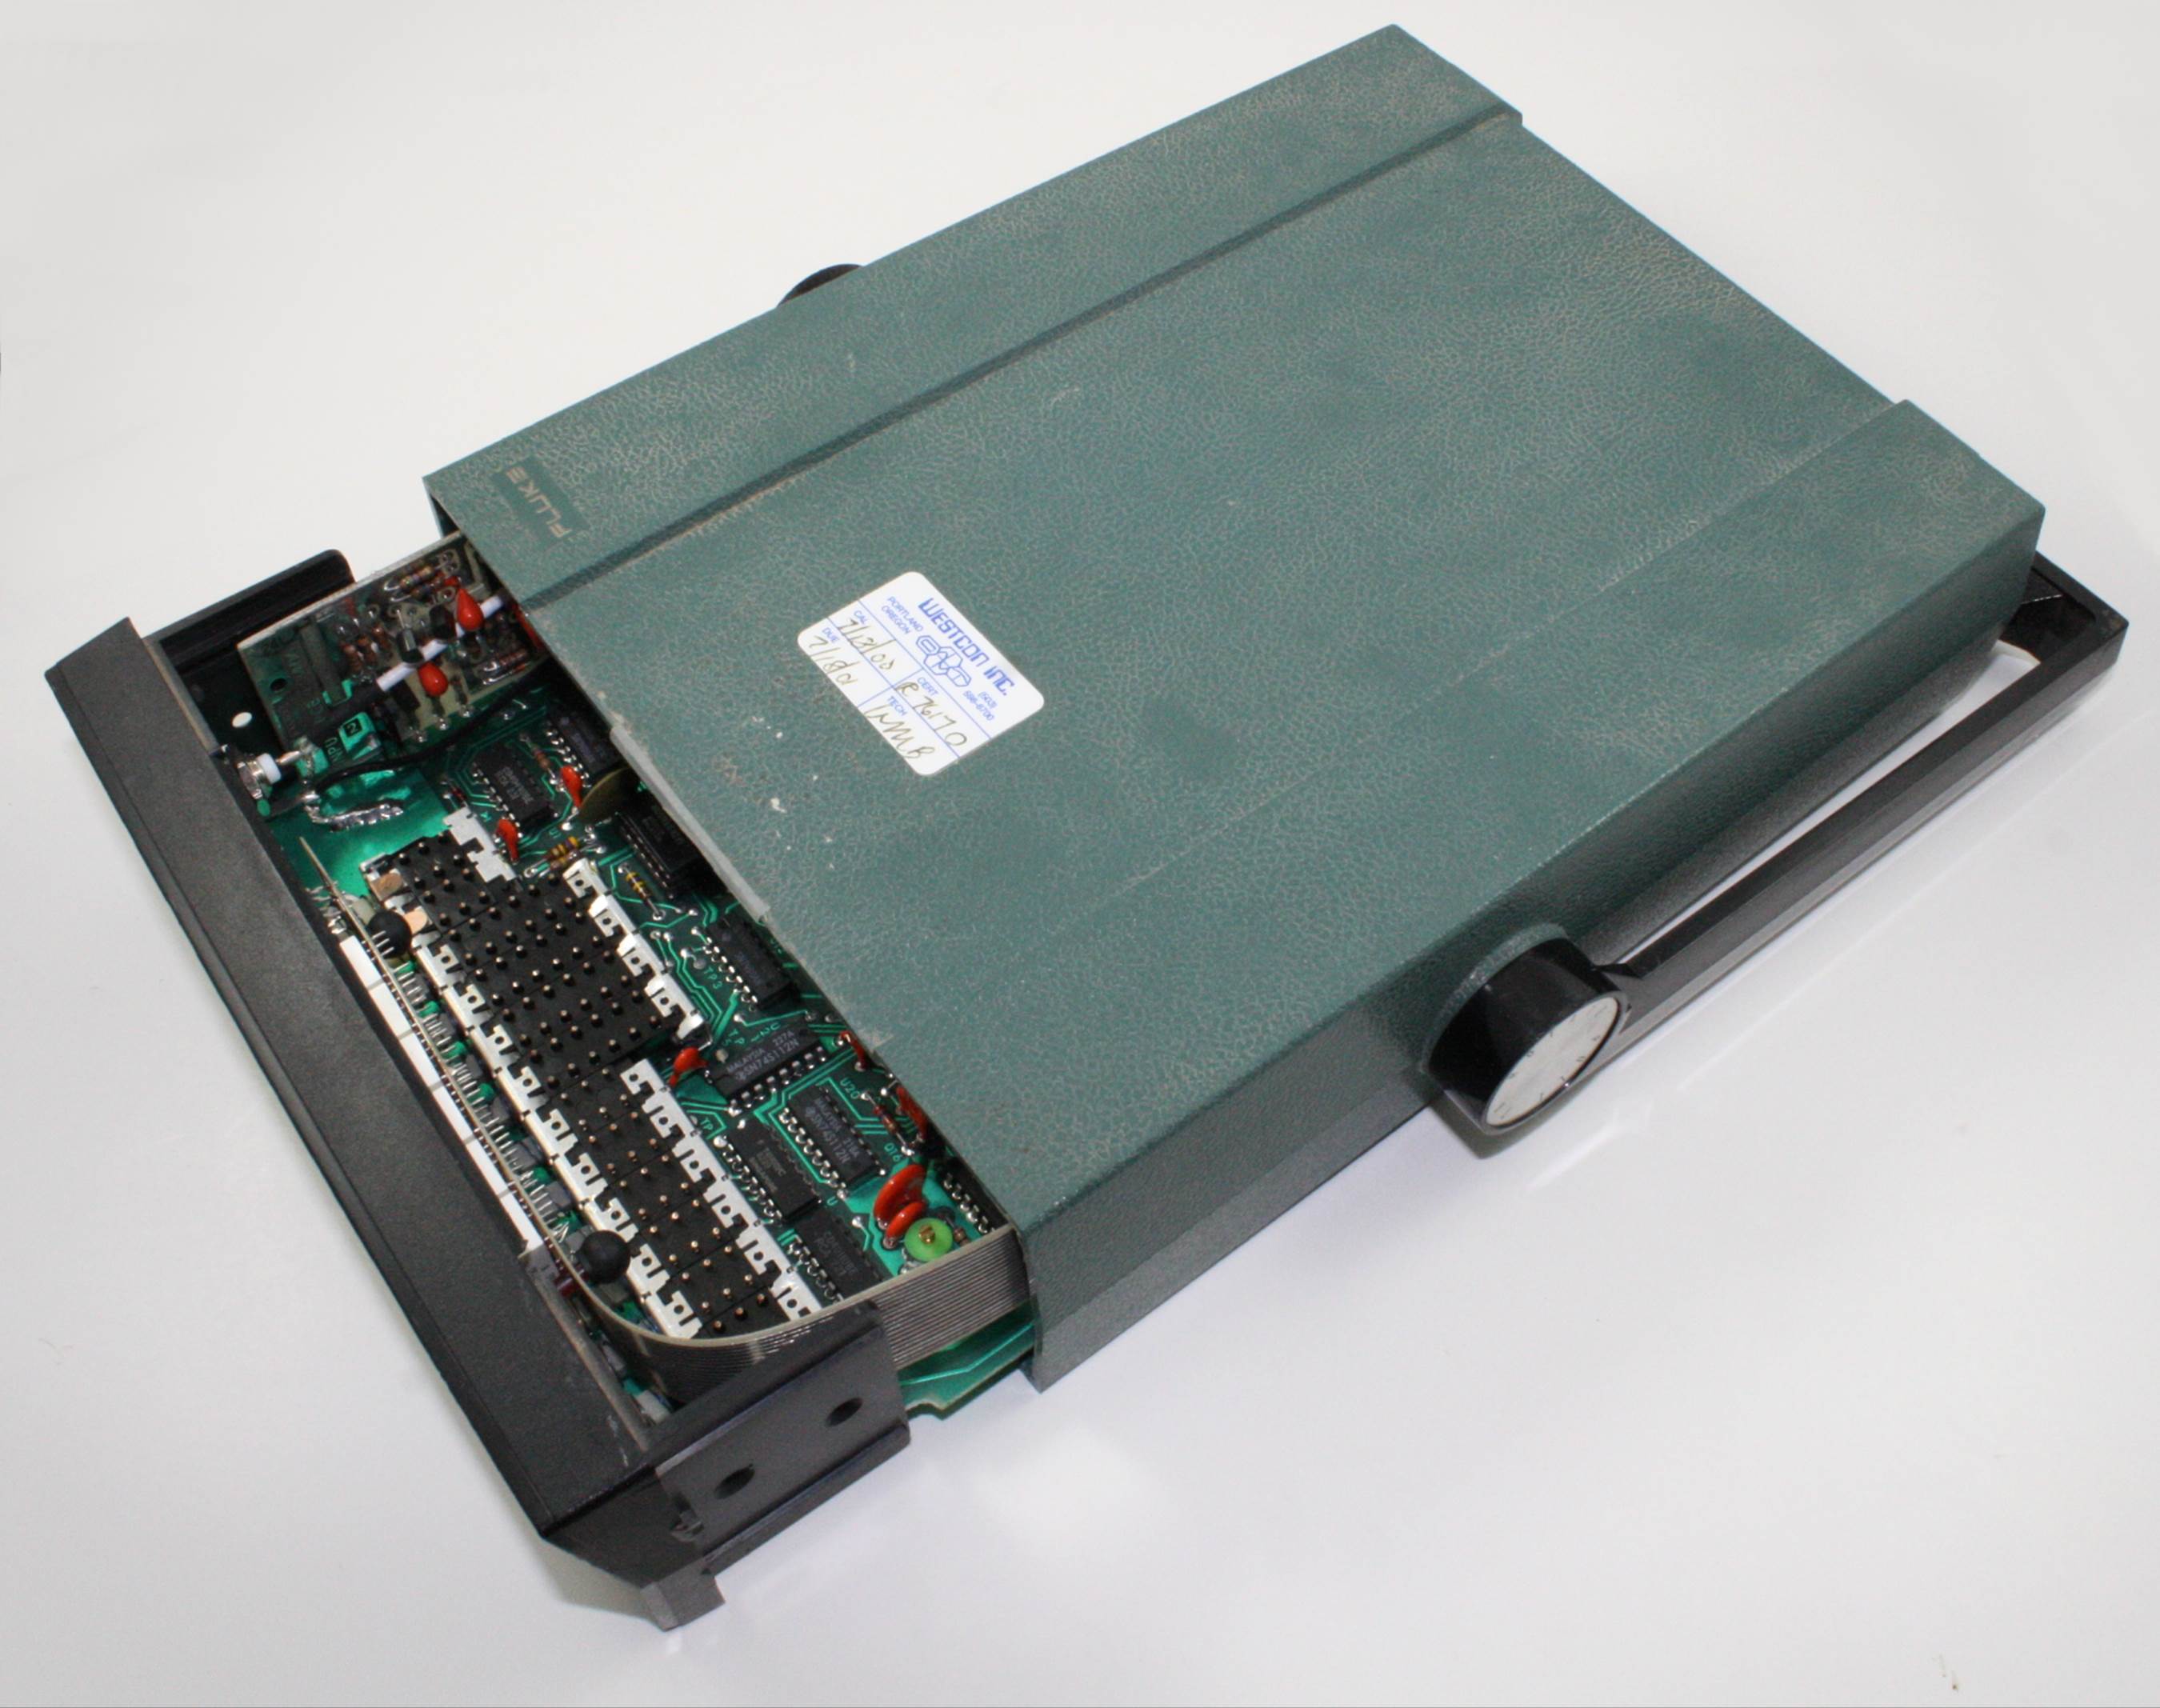
Figure 16-18. Fluke two-part plastic instrument enclosure with carry handle
The Fluke Corporation made a series of electronic test equipment devices in the 1970s and 1980s featuring this two-part packaging scheme. It’s a brilliant design in that it has only two main parts, the front panel with the attached PCB, and the shell. One screw in the rear holds it all together. The devices also included a carry handle that can be set to act as a stand or folded back out of the way, and only the front panel and internal PCB changes for each type of instrument.
Bud Industries manufactures a series of plastic enclosures that are similar to the Fluke design, including the IP-6130 and IP-6131 kits. Figure 16-19 shows an example (with nothing in it, of course). These are a bit more complicated than the Fluke package, because an enclosure kit must be capable of being adapted to a variety of applications. You can pick up an IP-6130 from an electronics distributor for around $26.

Figure 16-19. Portable electronics enclosure
Device Size and Weight
If you’re building something for your own personal use, considerations like size and weight might not be at the top of the list. However, if you think you might want to mass—produce your design, then these become major considerations.
Is the device wearable?
§ Wearable devices need to be small and lightweight. Anything over about 1.5 × 1.5 inches (or around 38 × 38 millimeters) will probably be too big for a wrist, but things worn on a belt can be larger.
§ Depending on the application, a wearable device should be light enough to be largely unnoticed. Something that has enough mass to bounce and tug with the wearer’s every movement wouldn’t be a good idea for an athletic wearable, but it might be acceptable for something used as a shop or construction worksite tool. Even then, something hanging from a belt that bounces around can be annoying.
Does the device need to be easily portable?
§ If the device is something that a user might want to pick up and carry from one place to another, it should be light enough that it doesn’t throw his back out when he lifts it.
§ A portable device might need a handle (or two) if it’s too large to conveniently pick up and carry one-handed. If handles are used, they must be sized to accommodate the weight of the device and comfortably fit a generic hand size.
Will the device reside in a static environment, like a workbench or a 19-inch rack?
§ When you are building something for a workbench, the size should be just large enough to hold all the internal parts but not so large as to crowd out other things on the workbench.
§ If the device will be mounted in a 19-inch rack, then the width is already constrained. The two other dimensions to consider are height and depth. Sometimes a small equipment rack won’t accommodate anything with a depth of more than about 15 inches or so. Other racks, like those used for servers and networking equipment, can handle things up to 28 inches or more deep.
Will the device be integrated into a vehicle of some type?
§ If your device is intended to be mounted in an automobile or a truck, then the weight isn’t as big of a consideration as the size. It will need to be small enough to mount out of the way, perhaps under a seat, under the dash, or in the trunk.
§ If your device will be used in something like a boat, it will need to be environmentally protected (see “Environmental Considerations” for more on this). As with a device for a car or truck, the weight isn’t as much a factor as the size.
Environmental Considerations
Anything that will be exposed to the elements needs to be protected, and even things that are intended to be worn by a user should be protected if they might be exposed to sweat (sweat is very corrosive to electronics).
Will the device be exposed to rain, sea spray, or other forms of moisture?
§ A plastic package with a gasket to seal the enclosure is acceptable for small items. The plastic should be thick enough to allow the cover to be tightly sealed without stripping screws or causing the enclosure to warp.
§ A cast-metal enclosure is a better choice than plastic if your device will be mounted in an exposed location on a vehicle. Many cast-metal boxes are available with a gasket to seal the cover of the enclosure, like the one shown in Figure 16-6. Applying a thin layer of silicone grease to the gasket will help to prevent it from drying and rotting, and improves the water resistance of the seal.
§ If the device will be mounted in an outside location, such as the control circuits for a remote weather station or some kind of data acquisition device, then a sealed cast-metal enclosure might be an appropriate choice. A section of PVC tubing (the so-called Schedule 80 outdoor-rated type) can also be used. Assuming that a threaded end cap is used, the end cap will need to be sealed with Teflon thread tape or silicone grease to keep dirt and moisture out.
Will the device be exposed to direct sunlight?
§ Direct exposure to sunlight can destroy a plastic enclosure over time. The UV from sunlight can break down the polymer chains in plastic, making it brittle and crumbly. Some plastics, like the PVC tubing known as Schedule 80 can withstand direct sunlight for an extended period of time (on the order of years), but even it will eventually have problems.
§ Try to shade an electronic enclosure from direct sunlight, if at all possible. Something like the white boxes used for official weather stations is one possibility. If nothing else, just putting your device inside a larger box, like an electrical utility box, can shade it from the direct glare of the sun.
Will the device be used in a dirty or dusty environment?
§ For a dirty or dusty environment, the same general concepts for water resistance also apply. While dust isn’t normally conductive, it does create thermal issues and it can get into controls like potentiometers and switches.
§ If your device has a fan, odds are it won’t be used in a moisture-prone environment, but it might be used in a dusty situation. Any fans or ventilation holes will need to be filtered to keep dust and dirt out, but still allow for air flow. Of course, this also means that someone will need to clean or change the filters occasionally.
Thermal Considerations
Heat is one of the primary enemies of electronics. Heat degrades components, including PCBs, and it can lead to failures.
Will the device have a sealed enclosure?
§ If a device is contained in a sealed enclosure, there is no way to air to circulate and remove excess heat, which means that the component parts will need to be rated to operate at the nominal internal temperate inside the enclosure.
§ If at all possible, try to incorporate a heatsink for parts that generate heat. This includes things like voltage regulators, power transistors, and motor control ICs. A heatsink might be the wall of a cast-metal enclosure, or an add-on attachment for a TO-220 package (see Chapter 9).
Will the device be mounted near, or exposed to, a heat source?
§ Try to avoid mounting your device in a location where it will be exposed to heat sources. For example, the space under the hood of a car or in the engine well of a boat can get very hot. The sun is also a major heat source, so things exposed to direct sunlight not only have to deal with direct UV, but also the IR (infrared, or heat) part of the solar spectrum. So try to mount things like a solar-panel motion controller gadget in a shady area, if possible, and run a cable out to the sensor that has to sit in the sunlight.
Sources
Table 16-1 lists the various sources for the commercially available enclosures discussed in this chapter. Although I’ve listed the manufacturer’s name and URL, you can also find many of these at major distributors and from Amazon. I’ve not listed the prices I paid, because they can vary, depending on where you purchase a particular item. Shop around and compare to get the best price.
|
Figure |
Manufacturer/source |
Part number(s) |
URL |
|
Figure 16-1 |
Hammond Manufacturing |
1551NBK |
http://www.hammfg.com |
|
Figure 16-3 |
Parts Express |
320-430 |
http://www.parts-express.com |
|
Figure 16-5 |
Serpac |
15-S, G10A, A31 |
http://iprojectbox.com |
|
Figure 16-6 |
Retex |
RI-400 series |
http://www.retex.es |
|
Figure 16-7 |
Hammond Manufacturing |
1455N1201 |
http://www.hammfg.com |
|
Figure 16-9 |
Hammond Manufacturing |
1454R |
http://www.hammfg.com |
|
Figure 16-11 |
Hammond Manufacturing |
1458G5 |
http://www.hammfg.com |
|
Figure 16-19 |
Bud Industries |
IP-6130 |
http://www.budind.com |
|
Table 16-1. Enclosure sources |
|||
The enclosures listed in Table 16-1 are just examples of what is available; there are many styles, sizes, and types to choose from. Look around, compare prices, and if possible, go to local electronics parts suppliers and ask to look at their stock of enclosures. Some will be helpful and let you see samples of what they carry, and some might even have small enclosures sitting out on a display shelf. Others will want you to have a part number already in hand and won’t let you look in the stockroom.
Summary
This chapter has covered a wide range of electronics packaging types and techniques, from plastic to metal. One thing that I hope came through is that packaging is an exercise in trade-offs.
Here are the key trade-off considerations we’ve covered:
§ Plastic is often cheaper than metal, but it doesn’t have the structural strength of metal, and it isn’t always suitable for large enclosures.
§ Metal is stronger than plastic, and a metal enclosure can also serve as a heatsink, but it’s more difficult to work with than plastic and can be more expensive.
§ Designing packaging for harsh environments can be a challenge and usually ends up as a trade-off between environmental resistance and thermal considerations.
A completely sealed plastic enclosure can’t readily dissipate heat, whereas a sealed metal enclosure can, but it will often be heavier and bulkier than the plastic equivalent.
The chapter also showed that off-the-shelf enclosures are a good choice for prototypes, and sometimes they can also be used for mass production. With mass production, there are up-front costs to be considered, mainly for mold machining and production tooling. Lastly, we took a brief look at salvaging an enclosure from an existing piece of equipment. Old test and computer equipment is a good place to look for enclosures, ranging from small to very large, and even low-cost consumer electronics can sometimes be repurposed. The major consideration here is the time and effort that will be expended versus the cost of buying something that’s already close enough to get the job done.
All materials on the site are licensed Creative Commons Attribution-Sharealike 3.0 Unported CC BY-SA 3.0 & GNU Free Documentation License (GFDL)
If you are the copyright holder of any material contained on our site and intend to remove it, please contact our site administrator for approval.
© 2016-2026 All site design rights belong to S.Y.A.