Practical Electronics: Components and Techniques (2015)
Chapter 2. Fasteners and Adhesives
Creating something new often entails attaching something to something else, and modifying something to adapt it to another purpose can entail attaching things where nothing was attached before. Then there’s the issue of making sure things will stay attached. Fasteners and fastening techniques are key to creating reliable attachments, or building a solid, reliable chassis and enclosure for a circuit or electro-mechanical device. As a prelude to the upcoming chapters on tools and their uses, this chapter presents some of the more common hardware and adhesives used to fasten two or more things together. In Chapter 16, we’ll look at enclosures and other packaging topics and see how fasteners and adhesives are used.
Fasteners come in a range of types and sizes. Some, such as screws and bolts, are familiar to just about everyone. Other types, such as rivets, are not as common but are widely used in a variety of applications. Still other types are designed for specialized applications. But regardless of the type or size, all fasteners are intended to do just what their name implies: fasten something to something else.
Although you might first think of nuts, bolts, and screws, a fastener isn’t always a metallic part. Some reusable snap-on plastic fasteners are available for use with cardboard materials and are excellent for building disposable toys and play sets for children (among other applications), and screws and bolts are available in various nonmetallic materials, such as nylon, Teflon, wood, and ceramics.
Note that the word fasteners does not exclude things like adhesives (i.e., glues, silicon rubber, and other chemical compounds), and this chapter also includes a brief discussion of the various types of adhesives available. Adhesives are a handy way to attach things, and if done correctly, the bond is as strong and reliable as those made with screws or rivets. The concept of fastening can even be extended to include brazing, welding, and soldering, but this chapter won’t cover those topics. Soldering is covered in Chapter 4 and elsewhere in this book. Brazing (a technique like a form of high-temperature soldering using an oxy-acetylene torch) and welding are art forms unto themselves, and there are numerous excellent reference and how-to books available. Also, many community colleges and vocational schools offer classes in both techniques.
Screws and Bolts
Various standards describe threaded fasteners, but there is no generally accepted definitive distinction between a screw and a bolt. Some sources define the difference on the basis of how the part is used, with bolts being mounted through something and tightened with a nut, and screws being inserted into a part with preformed threads or cutting their own threads as they are driven into position (self-tapping screws). Size also matters for naming threaded fasteners, with small parts often referred to as screws and larger pieces called bolts.
In any case, both bolts and screws use a spiral thread cut or pressed into a rod (usually metal but nylon, plastic, and wood have been used as well) to exert an axial force, which in turn is applied to hold two or more things in a fixed relationship to one another.
DISTINGUISHING BOLTS FROM SCREWS
The apparent ambiguity in the designation of a fastener as either a bolt or a screw is reflected in the official publication ICP013, “Distinguishing Bolts from Screws” from the US Customs and Border Protection division of the Department of Homeland Security. This document attempts to provide some guidance regarding how to determine whether a fastener is a bolt or a screw, but in the end, it still basically comes down to size and usage.
As the document puts it: “if it doesn’t meet the primary criteria (and of course, if it doesn’t conform to a fastener industry standard for a bolt), then it probably is a screw.” In this case, the “primary criteria” is that a bolt is big and used with a nut, whereas a screw is small and not used with a nut. Except in those cases where a screw might be used with a nut (a machine screw). Or it’s a really big bolt with a sharp tip that can cut its own threads. It gets confusing sometimes.
Figure 2-1 shows a sample of the various kinds of screws and bolts that are available. Just bear in mind that what might be a screw in one context could also be referred to as a bolt in another. This book will apply the terms screw and bolt based on the general criteria of size and usage stated previously.
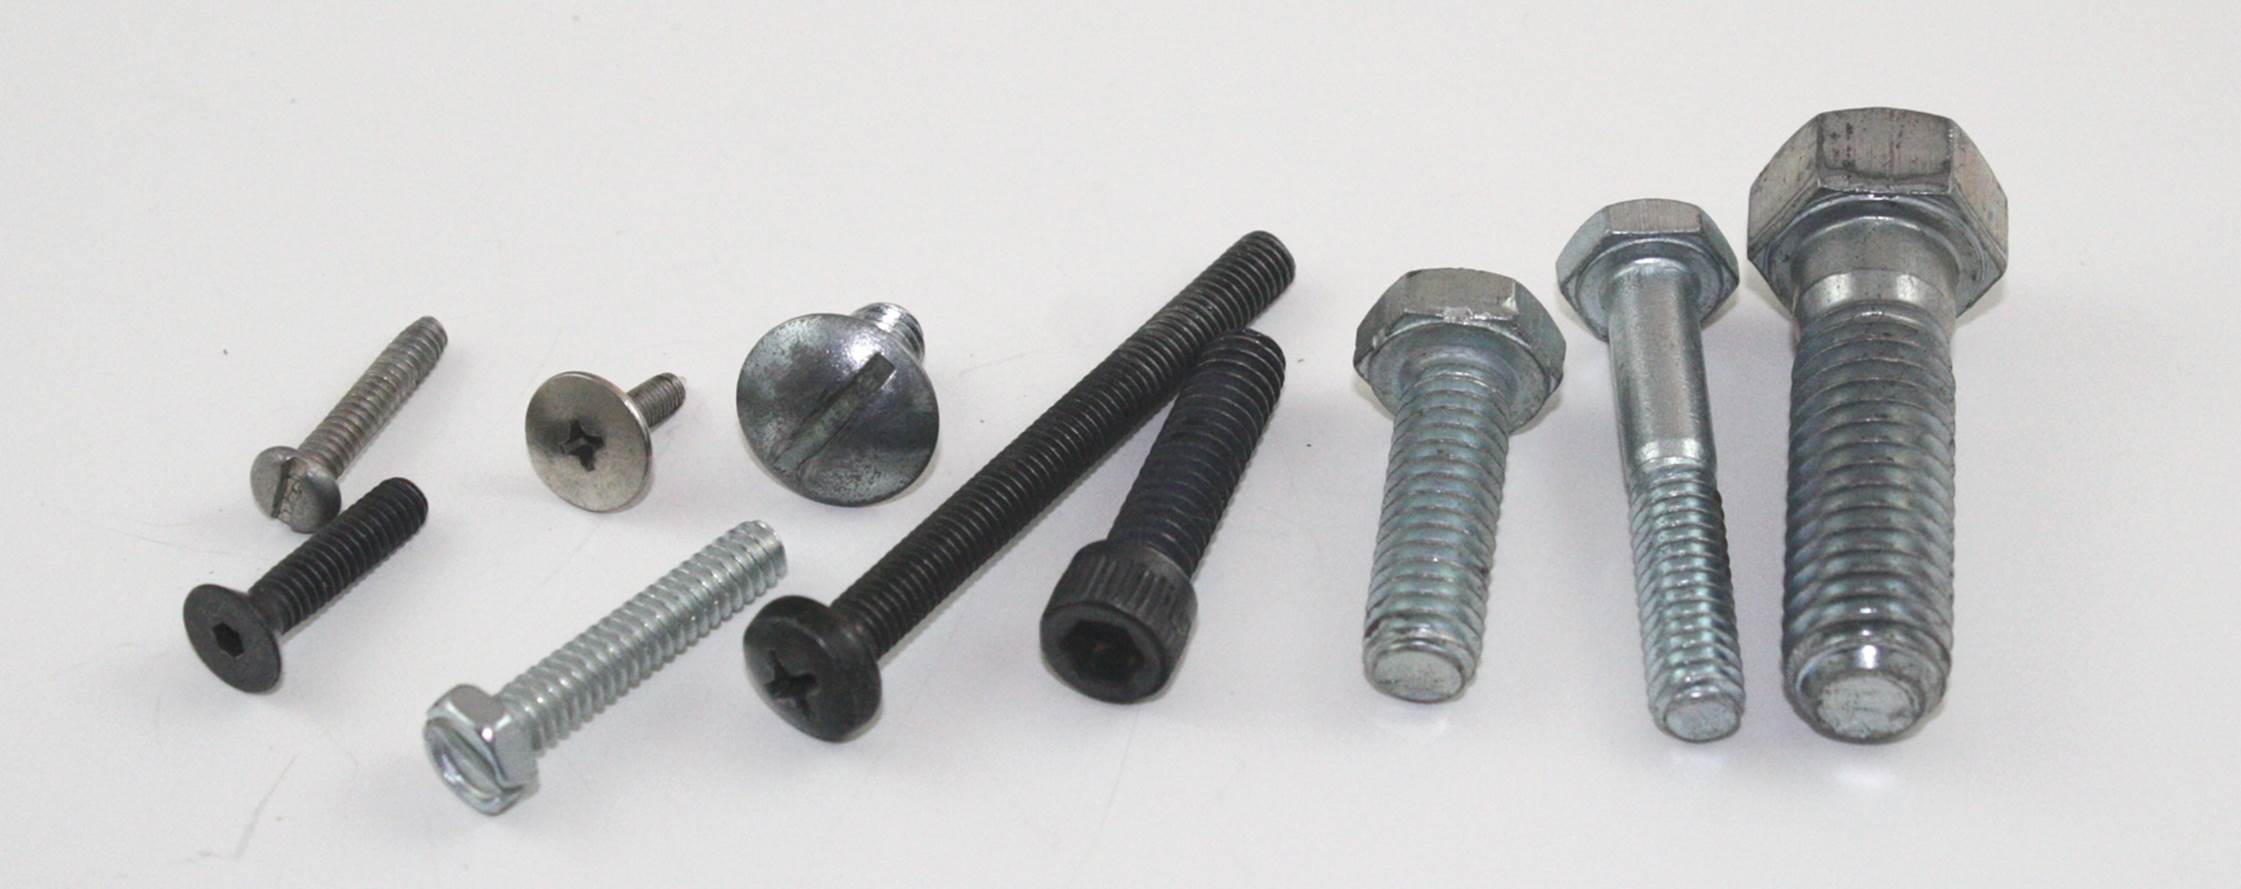
Figure 2-1. Various screws and bolts
The variety of available screw types is staggering, and Figure 2-1 shows just a small sample. Fortunately, you don’t need to be familiar with every type to make sensible choices; nor do you need to have a stockroom with stacks of containers full of fasteners to do useful work.
You can generally do most of the necessary fastener work you might encounter with a selection of machine screws in sizes 2, 4, 6, and 8, with a selection of lengths for each gauge, ranging from 1/4 inch long to 2 inches. A list of suggested sizes and types of machine screws to have on hand is shown in Table 2-1. The following section examines common gauge sizes in detail.
|
Size |
Type |
Drive |
Length |
|
4-40 |
Pan |
Phillips |
1/4” |
|
4-40 |
Cap |
Hex Socket |
1/4” |
|
4-40 |
Pan |
Phillips |
1/2” |
|
4-40 |
Cap |
Hex Socket |
1/2” |
|
6-32 |
Pan |
Phillips |
1/4” |
|
6-32 |
Cap |
Hex Socket |
1/4” |
|
6-32 |
Pan |
Phillips |
1/2” |
|
6-32 |
Cap |
Hex Socket |
1/2” |
|
6-32 |
Pan |
Phillips |
3/4” |
|
6-32 |
Pan |
Phillips |
1” |
|
8-32 |
Pan |
Phillips |
3/8” |
|
8-32 |
Pan |
Phillips |
1/2” |
|
8-32 |
Pan |
Phillips |
3/4” |
|
8-32 |
Pan |
Phillips |
1” |
|
Table 2-1. A suggested inventory of screws (and associated washers and nuts) |
|||
For definitions of the head types and drives, see “Screw and Bolt Head Styles” and “Screw and Bolt Drive Types”.
If you purchase the suggested hardware in Table 2-1 as stainless steel parts in boxes of 100 each, you’ll spend between $2.25 to $6.50 per box, and 14 small boxes don’t take up much room at all. Also be sure to get nuts, flat washers, and locking washers for each size. “Washers” discusses the various types of washers that are available. Of course, you can always just buy small quantities of what you need from a well-stocked hardware store, but you’ll pay less per piece by buying parts by the box.
One of the best ways to become familiar with what fasteners are available and how they are used is to disassemble some electronic devices and observe what was used to hold things together (and, as a bonus, you might find some interesting bits to use in your own projects). You will find everything from cap head to Phillips, UTS/ANSI and metric, self-tapping types for both plastic and metal, and even some odd-looking things with star-shaped drive holes or even three slots (Y or tri-wing types, popular with some Asian manufacturers). If you have a military or industrial surplus outlet nearby, these can be a goldmine for hardware.
Screw and Bolt Sizes
Fortunately, unless you have a specific need to use an uncommon type of screw or bolt, you can do almost everything with five or so different sizes.
The Unified Thread System (UTS) commonly used in the US defines screws in terms of both diameter and thread pitch. The UTS is controlled by ANSI, the American National Standards Institute, and throughout this book, I’ll use UTS and ANSI interchangeably when referring to bolt and screw sizes other than metric. Typical sizes encountered in electronics include diameter gauges of 2, 4, 6, 8, and 10. Common thread pitches include 40, 32, and 24. The pitch refers to the number of threads per unit of length in inches. So, a UTS screw or bolt size is defined as gauge-pitch(e.g., 4-40 or 6-32). Table 2-2 lists some common UTS screw and bolt sizes. The fractional diameter is the nearest value.
|
Gauge |
Diameter (inches) |
Decimals |
|
0 |
1/16 |
0.06 |
|
1 |
5/64 |
0.07 |
|
2 |
3/32 |
0.08 |
|
3 |
7/64 |
0.09 |
|
4 |
7/64 |
0.11 |
|
5 |
1/8 |
0.12 |
|
6 |
9/64 |
0.13 |
|
8 |
5/32 |
0.16 |
|
10 |
3/16 |
0.19 |
|
12 |
7/32 |
0.21 |
|
14 |
1/4 |
0.24 |
|
Table 2-2. UTS/ANSI machine screw diameter sizes |
||
Just because a gauge size is defined in Table 2-2, that doesn’t necessarily mean that hardware in that size can be easily purchased. Fasteners in sizes 2, 4, 6, 8, and 10 are readily available. You can find other sizes (#1, for example) if you’re willing to look hard enough, but if you need to special-order a gauge, a supplier won’t be too interested unless you are willing to commit to purchasing a large quantity of the parts. Stick to the common sizes if at all possible. It’s much easier that way.
Also be aware that with sizes of 1/4 inch or larger, the parts are often specified in diameter-pitch nomenclature, rather than gauge-pitch. In other words, while saying you want to use a 14-20 is technically correct, you may find that 1/4-20 is how the parts are stocked at the distributor or hardware store.
You should keep in mind that the gauge size numbers used with machine screws and bolts are also used with self-tapping screws, both sheet metal and wood. Be aware, however, that the actual diameter of a part can vary somewhat from the ideal value given in Table 2-2. The amount of variance depends on the tolerances applied by the manufacturer and the process used to create the threads, but it is generally no more than +/– 0.01 inches. This is important to remember when sizing holes and selecting drill bits, as discussed in Chapter 4.
In the metric-speaking world (which is almost everywhere outside of the US) a large range of metric screw and bolt types is available. These are defined in the international standard ISO 68-1, and the ISO 262 standard specifies a number of predefined sizes. Based on the standards, a metric screw with a shaft diameter of 1 mm may have a coarse thread of 0.25 mm or a fine thread of 0.2 mm. So, to specify a 1 mm screw with a coarse thread, you would use M1x0.25.
The remainder of this book will largely stick to UTS/ANSI nomenclature except when discussing things like tapping and clearance holes, but generally, everything you might say about using a UTS screw or bolt also applies to its metric equivalent.
It seems inevitable that eventually the entire world, the US included, will go to the metric system. In industry this has already begun, with many US manufacturers shifting to metric parts to accommodate a global market and the use of parts and subassemblies from foreign suppliers. If you want to employ some “future-proofing” into your designs, you might want to consider learning how to work with metric parts, and metric units of measurement in general.
Screw and Bolt Drive Types
The two most commonly encountered screw drive types are slotted and Phillips. Figure 2-2 shows the drive types you might regularly encounter, but other specialty types are also in use. These are the common names; other names are also encountered, such as cross for Phillips, and Robertson for the square drive. Browsing through the website or catalog of a supplier such as McMaster-Carr, Microfasteners, or AmazonSupply (formerly SmallParts) can be very informative.

Figure 2-2. Screw and bolt drive styles
Some types of fasteners are available with a six-sided (hex) hole for use with a hex wrench (also called a hex key or an Allen wrench). These hex socket types are usually found with button and cap head styles (see “Screw and Bolt Head Styles”) and are common in robotics and in scientific and metrology equipment such as interferometers, optical spectrometers, and telescopes. A hex socket drive allows for greater torque without tool slippage, which is a problem with both slot and Phillips drives.
Larger bolts often have a hex head suitable for use with a socket tool (i.e., the entire head of the bolt is the drive), and small sizes in this style are also available. The large sizes will be familiar to anyone who has ever worked on an automobile, and the small sizes can sometimes be found in scientific and military-grade equipment.
A small hex head part can be difficult to drive without a special socket wrench made specifically to seat flush around the head. Most common sockets sold at auto supply and home improvement centers will not work reliably, because they have a slightly rounded edge that will prevent the socket from fully seating on the sides of the head. The tool will likely slip and damage the head of the fastener. Chapter 4 discusses how to modify a socket to fit flush on a small hex head fastener.
If you elect to use a hex head screw or bolt, it is worth bearing in mind that while the part can be tightened (torqued) to a greater degree without tool slippage (or tool breakage) than a Phillips or a hex socket head part, it can be awkward to use in tight places where the socket to drive the screw or bolt won’t easily fit. In other words, consider the tool that will need to be used to deal with the fastener in its eventual location.
Drive types such as tri-wing, Y, Torx, and other security variations are intended to discourage unauthorized access. They require special tools made expressly for that drive type, and the tools usually aren’t available at the local home improvement center. Avoid them if at all possible.
You can defeat a security Torx or hex socket type drive by carefully knocking out the small pin-like column in the center of the drive hole using a pin punch and a ball-peen hammer. Alternatively, you can sometimes drill out the security pin with a good drill press if you first securely clamp down the work piece and use a drill bit not much larger than the security pin. Then again, if you expect to work with these types of fasteners on a regular basis, the tools to deal with them aren’t that expensive and you can find them on eBay.
Screw and Bolt Head Styles
Figure 2-3 shows some common head types for screws and bolts. The hex head is typically found on bolts (larger than common screws), and the button and cap head types typically have a hex socket and are used with a hex wrench. Notice that the cap head is shown with knurling, which allows for hand-tightening if the head is large enough or your fingers are small enough. The other head types can have either a slot or Phillips drive, and even a hex socket drive variation is available for the flat and oval head styles.
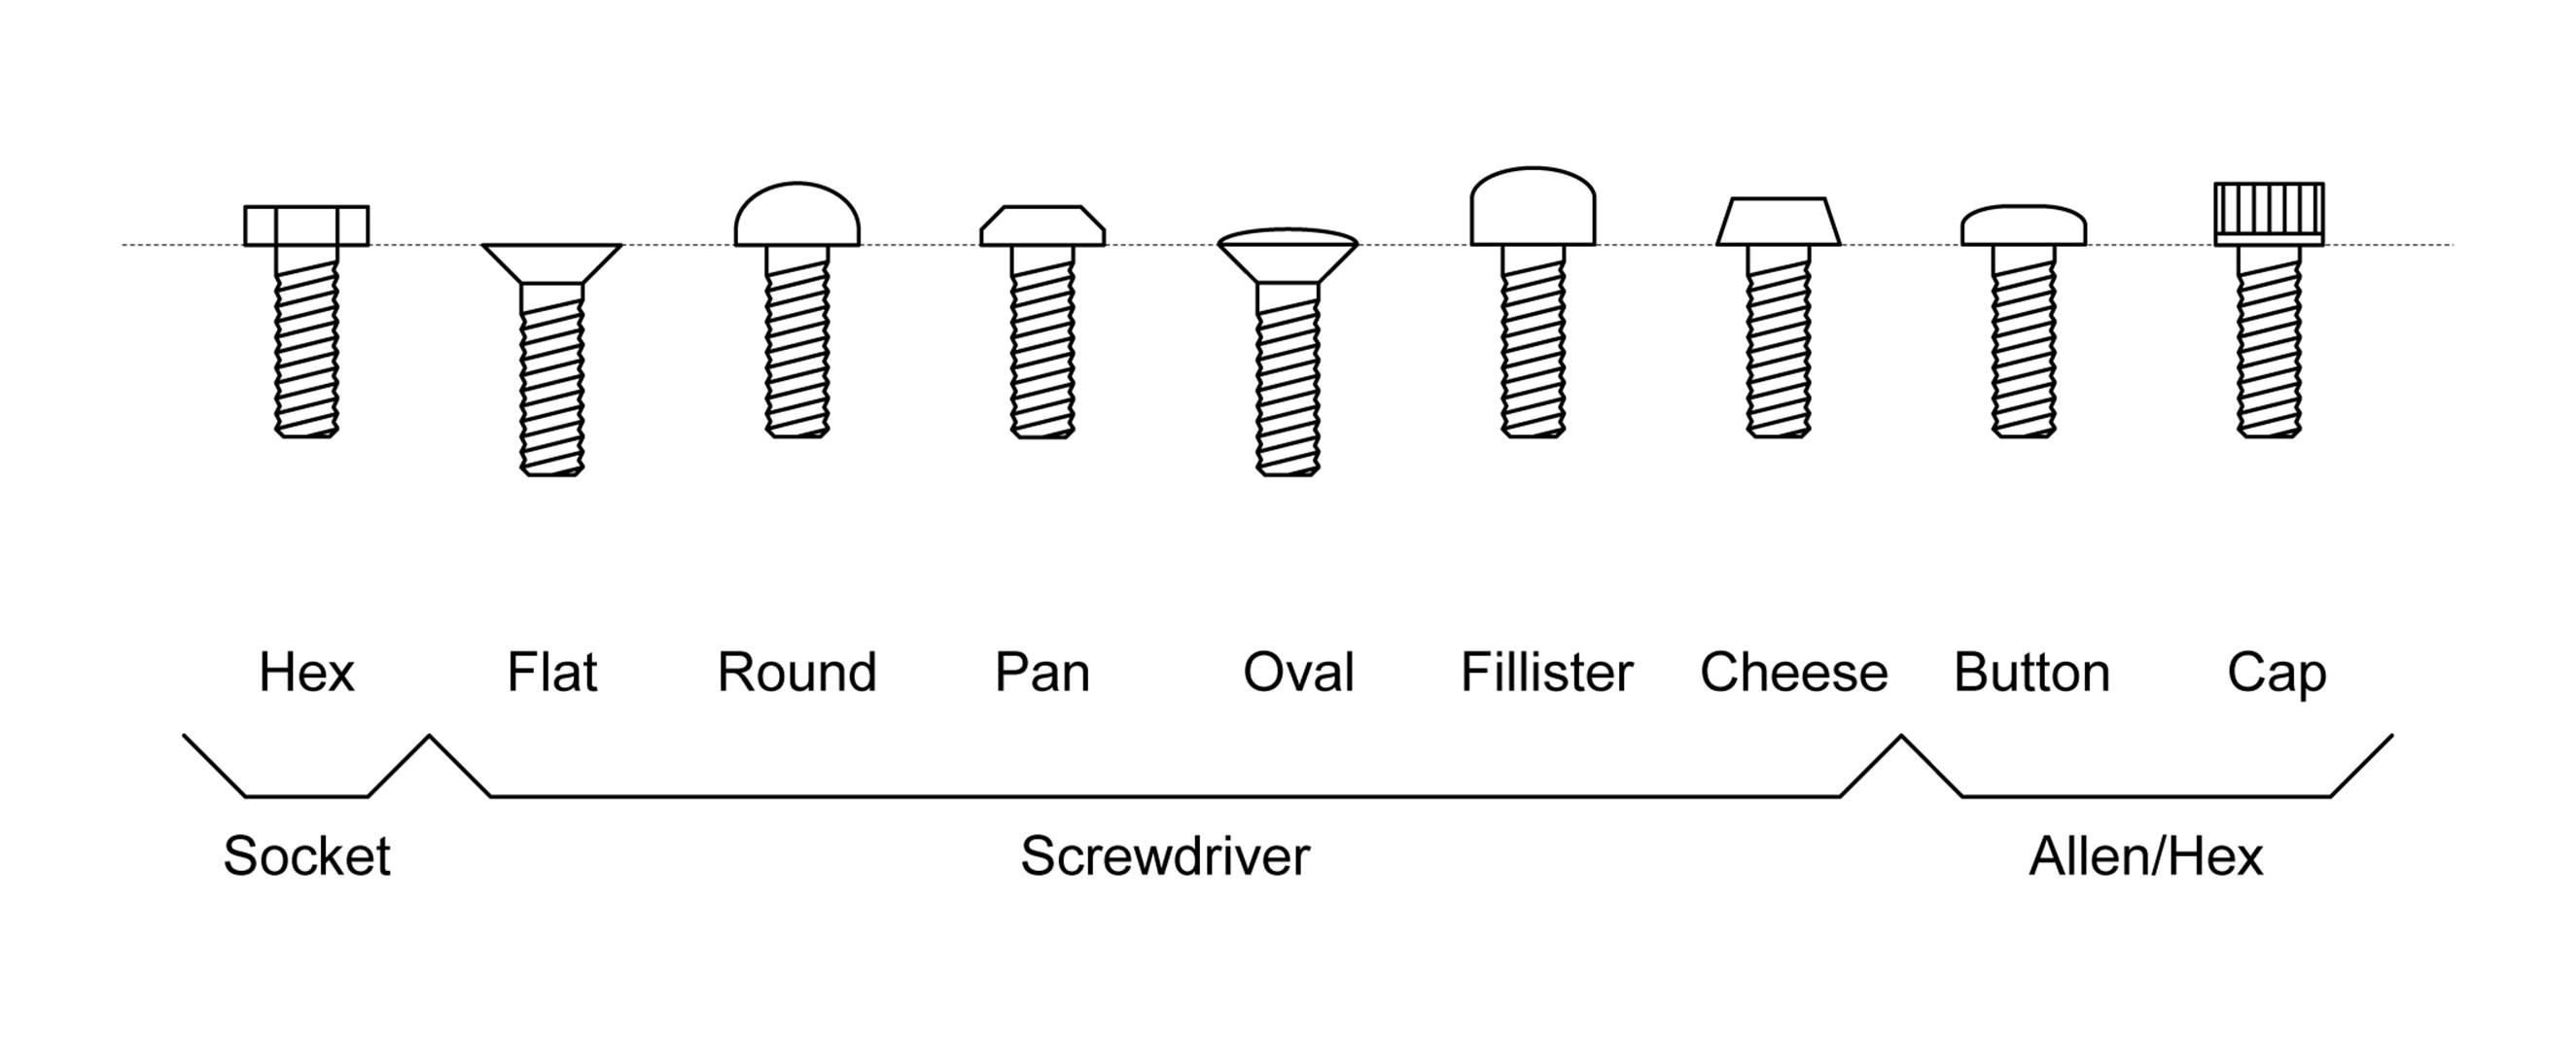
Figure 2-3. Common screw and bolt head types
The round and pan head styles are most common around the home. Woodworkers routinely employ flat-head wood screws to keep the screw head flush with the surface of the wood. Consumer electronics tend to use a lot of flat-head machine screws and self-tapping types, again to keep things smooth and flush.
Be aware that the flat and oval head types require a countersunk hole to seat correctly. These are typically used in situations that require low-profile (or flush, in the case of the flat head types) screws or bolts. Chapter 4 covers drilling a countersunk hole, but basically, it involves creating a hole in the material, larger than the hole for the shaft of the screw, for the screw head to seat into.
Selecting Screws and Bolts
Selecting the appropriate screw or bolt for a particular application involves taking into consideration several factors. If you want to fasten a plastic back onto a plastic case, a self-tapping screw would do the job. The back plate of a metal chassis box is usually fastened with self-tapping sheet metal screws. The screws used to mount things to a chassis, panel, or other surface can be 8-32, 6-32, or 4-40, depending on the size and mass of what is being mounted.
As a general rule of thumb, the larger the screw or bolt, the more load it can bear. Small screws (#2, for example) are fine for lightweight tasks, but a larger #6 or #8 screw should be considered for items or situations where the screw must resist a force (as with hinges or attaching a metal panel). Also, the use of multiple screws or bolts can increase strength and reliability, but at the cost of extra weight and expense. Without knowing the type of materials being used and the forces expected, it’s impossible for me to give specific recommendations for maximum loads, butTable 2-3 can serve as a rough guide.
|
Size |
Clamp load |
|
4-40 |
200 |
|
6-32 |
350 |
|
8-32 |
500 |
|
10-24 |
700 |
|
1/4-20 |
700 |
|
Table 2-3. Machine screw clamp loads |
|
Clamp load is the amount of load applied to a bolted joint to hold the parts together and avoid relative motion (shear slippage). In Table 2-3 this is a maximum de-rated value derived from various references, and it assumes the lowest grade of part. It does not take into account any additional stresses that may be placed on the fastener.
In general, parts with a nut tend to resist pull-out (axial failure) better than screws in a tapped hole, but the amount of the screw’s threads engaged by the nut or the inside threads of a tapped hole plays a significant role. Likewise, the material the screw or bolt is used with has a big effect on the ability of the part to resist pull-out. Consider the case of a #4 stainless steel screw in a tapped hole in a piece of soft 1/10-inch (10-gauge) aluminum. Odds are, the inside threads in the hole in the aluminum will probably fail before the screw itself does, particularly if the hole was threaded using a 50% thread instead of a 75% cut. See Chapter 4 for more on threads and how to make them.
Shear strength is another consideration. If a screw or bolt is used to attach two pieces that may have a tendency to move parallel to each another, then there’s a distinct risk that the fastener can be sheared off between the pieces. One way to compensate for this is to use the largest screw or bolt size possible. Another approach is to set hardened steel alignment pins into the pieces so that when they are mated, the pins will help take the stress if the pieces shift.
MIL-HDBK-60 from the US government contains a lot of useful information about threaded fasteners, along with definitions and formulas for various applications. You can download it for free at EverySpec. Fastenal also provides a good online fastener guide. Although it mainly addresses large bolts and nuts, the information can be easily scaled down for smaller fasteners.
The drive type is another important selection criteria. The two most common choices are Phillips and hex (i.e., Allen) drives. When selecting a Phillips drive, be careful not to get confused with a JIS cross-drive type screw head, which looks a lot like a Phillips but doesn’t behave the same way (it won’t “cam out,” for example). See Chapter 4 for more on the JIS drive type.
Hex drives are popular in aerospace sub-systems, military gear, and scientific instruments. Generally, you’ll find hex drive screws and bolts in applications where there is a need to apply a significant and specific amount of torque to a fastener. A Phillips drive part will determine how much maximum torque you can apply by virtue of its design, while a hex drive will not stop you from twisting a hex wrench into two peices if you’re not careful (or shearing the head off a bolt or screw). For this reason, hex drive fasteners are often installed with a torque wrench.
Never use a slotted-head screw or bolt if you can avoid it. Screwdrivers tend to slip out of the slot, and it doesn’t take much to damage the slot to the point where it is unusable. For this reason, the Phillips drive was invented about 80 years ago to minimize damage to fasteners by “camming out” when the screw stalled at maximum tightness. A Phillips or hex socket drive is a much better choice than a single-slot part.
Use a screw that is just long enough to do the job; self-tapping screws can cause damage if they drive too far, especially in the case of plastic self-tapping types. Holes that are sized and tapped for a particular screw, such as the mounting holes in the aluminum frame of a hard disk drive, will accept only a screw of a specific maximum length. A screw that is too long either won’t drive in completely, or it might drive through into something that it will damage (such as a circuit board in the path of the screw).
When using a nut, also try to use the shortest possible screw. A screw or bolt that protrudes out beyond the nut can interfere with other components and might get bent. A bent screw with a nut on it can be very difficult to remove gracefully without resorting to a cutting tool of some type.
Washers
Washers are essential when using fasteners to create a reliable load-bearing mounting point and help prevent the screw from working itself out and coming loose over time. A flat washer under the head of the screw or bolt helps to distribute the force applied by the screw. With metal, a washer slightly wider than the head of the screw is usually sufficient. If you are attaching to something thin or soft, such as polystyrene plastic, use a larger flat washer to help spread out the stress on the material. The same reasoning applies to soft materials like wood.
Figure 2-4 shows some of the available washer styles, and Figure 2-5 shows the typical assembly order for a screw and nut with washers.
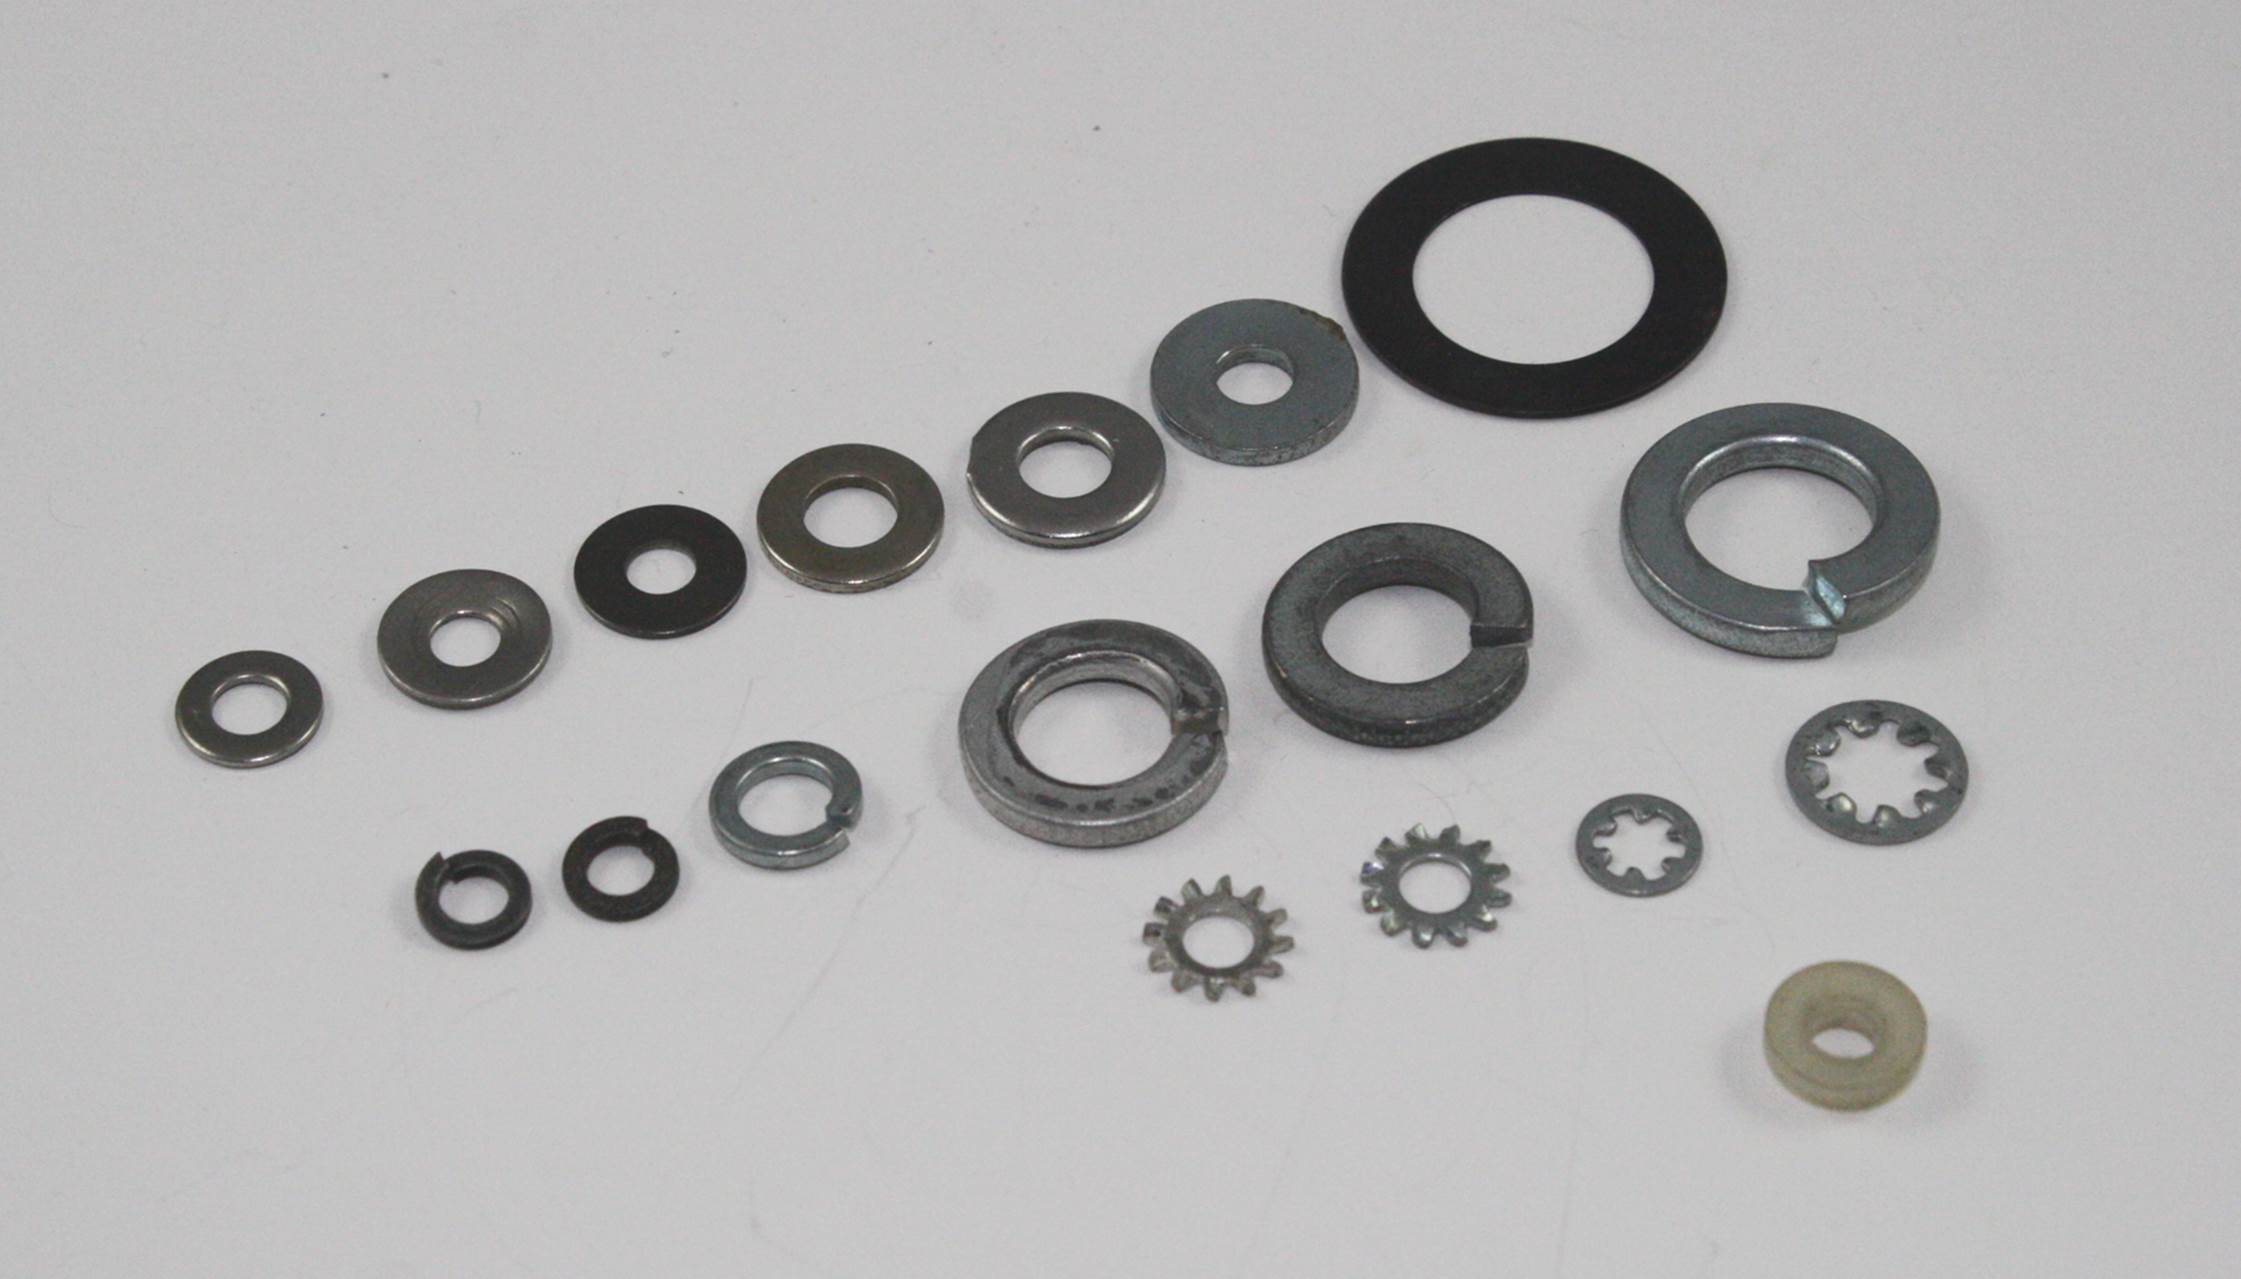
Figure 2-4. Various types of washers
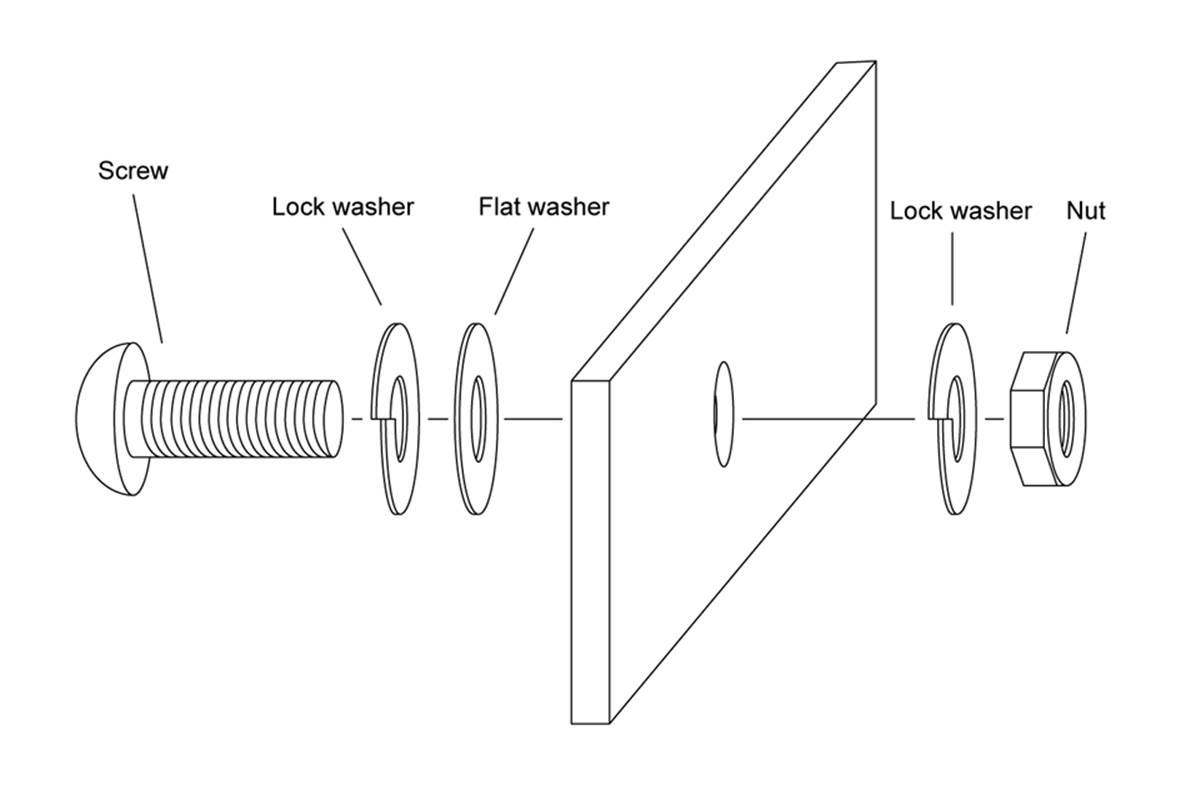
Figure 2-5. Using washers
A flat washer is also sometimes used as a spacer, although it is not a good idea to use a stack of washers to try to compensate for a screw or bolt that is too long to begin with. Occasionally an assembled bolt stack will include a flat washer under the lock washer beneath the nut. Although this does somewhat reduce the effectiveness of the lock washer, it also helps to prevent marring the underlying surface when the lock washer “bites” into the material.
A lock washer helps prevent a nut from becoming loose. These types of washers come in three basic styles: split-ring, inner-tooth, and outer-tooth. Figure 2-6 shows how a split-ring lock washer works.
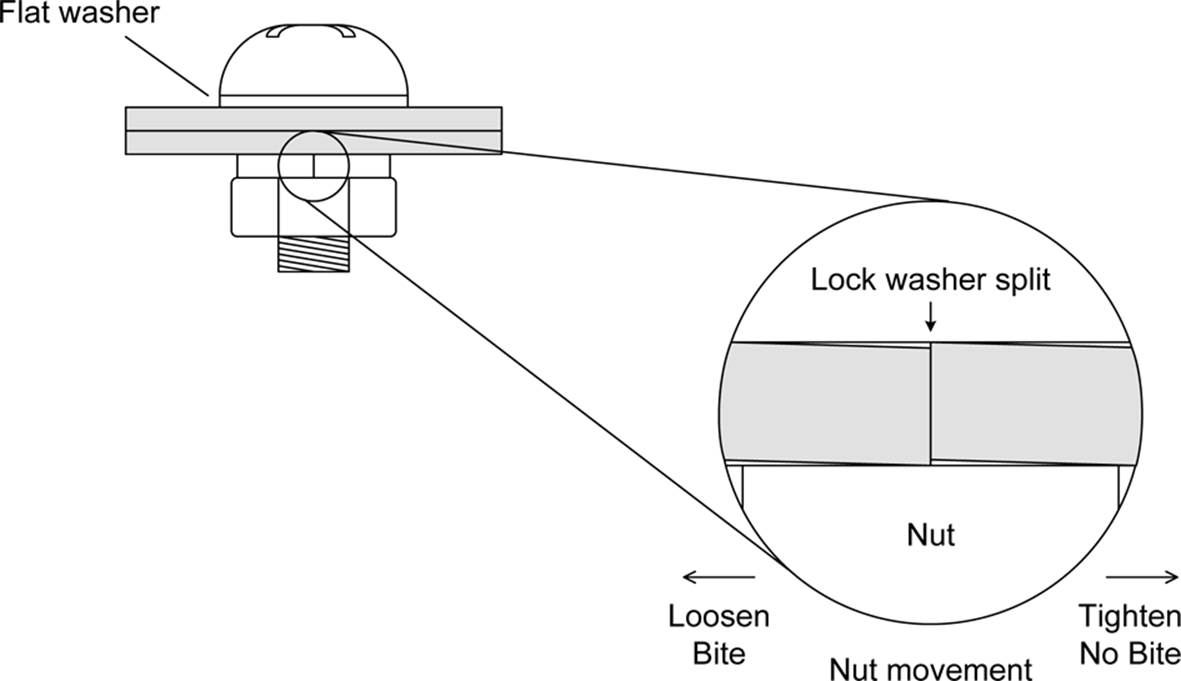
Figure 2-6. Split-ring lock washer
The edges of the split are bent slightly so that the nut will move over them smoothly when turned in the tightening direction, but the sharp edges will catch (or bite) on both the nut and the underlying surface if the nut moves in the loosening direction. This isn’t enough to prevent the removal of the nut, but it is enough friction to help keep the nut secure. Be careful not to overtighten a split-ring lock washer, as it can be pressed flat, effectively disabling the locking capability of the washer.
The inner- and outer-tooth washers work in basically the same way, except that with these types, each tooth is bent slightly to bite into the nut and surface material if it starts to loosen. Figure 2-7 shows a selection of toothed washers. Toothed washers are often used with soft materials, such as plastic or sheet aluminum. Toothed washers are also used for establishing a ground connection, as the teeth can cut through paint or an anodized finish into the underlying metal.
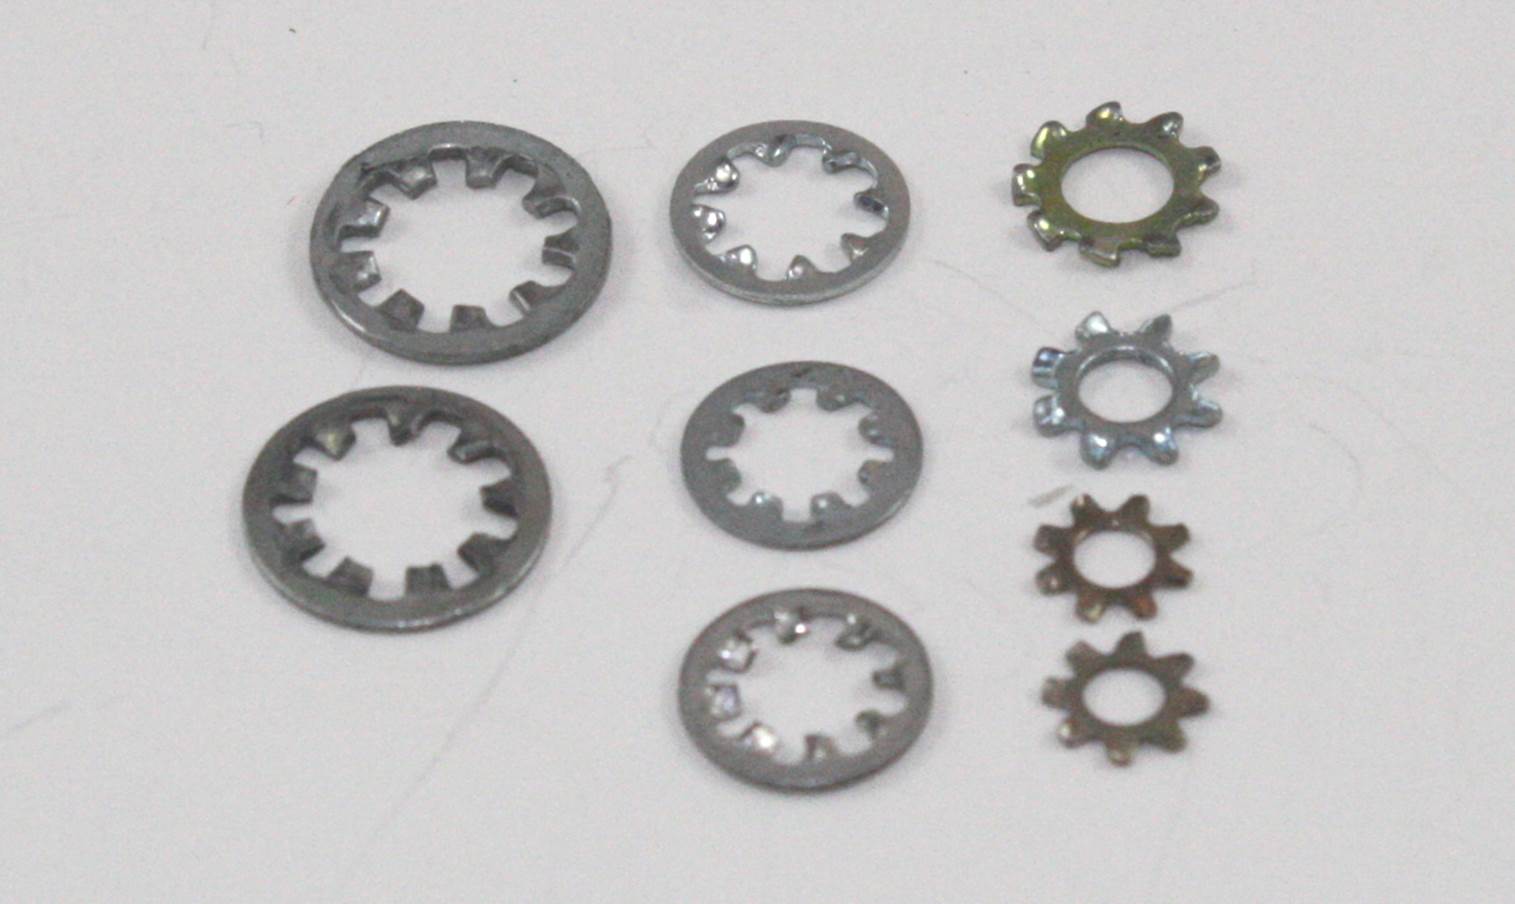
Figure 2-7. Toothed lock washers
When you are using a screw in a pre-threaded hole, there is, of course, no nut to lock, so the lock washer is placed under the head of the screw. A flat washer may also be used to protect the underlying surface, if necessary, but the smooth flat washer may reduce the effectiveness of the lock washer.
Self-Tapping Screws
Sometimes it makes sense to let a screw cut its own threads, and that is just what a self-tapping screw is designed to do. If you’ve ever worked with wood or wallboard (sheet-rock), you’ve probably encountered a self-tapping screw. A self-tapping wood screw can cut its own threads as it is driven into place in a soft material such as wood.
Figure 2-8 shows a selection of different self-tapping screws.
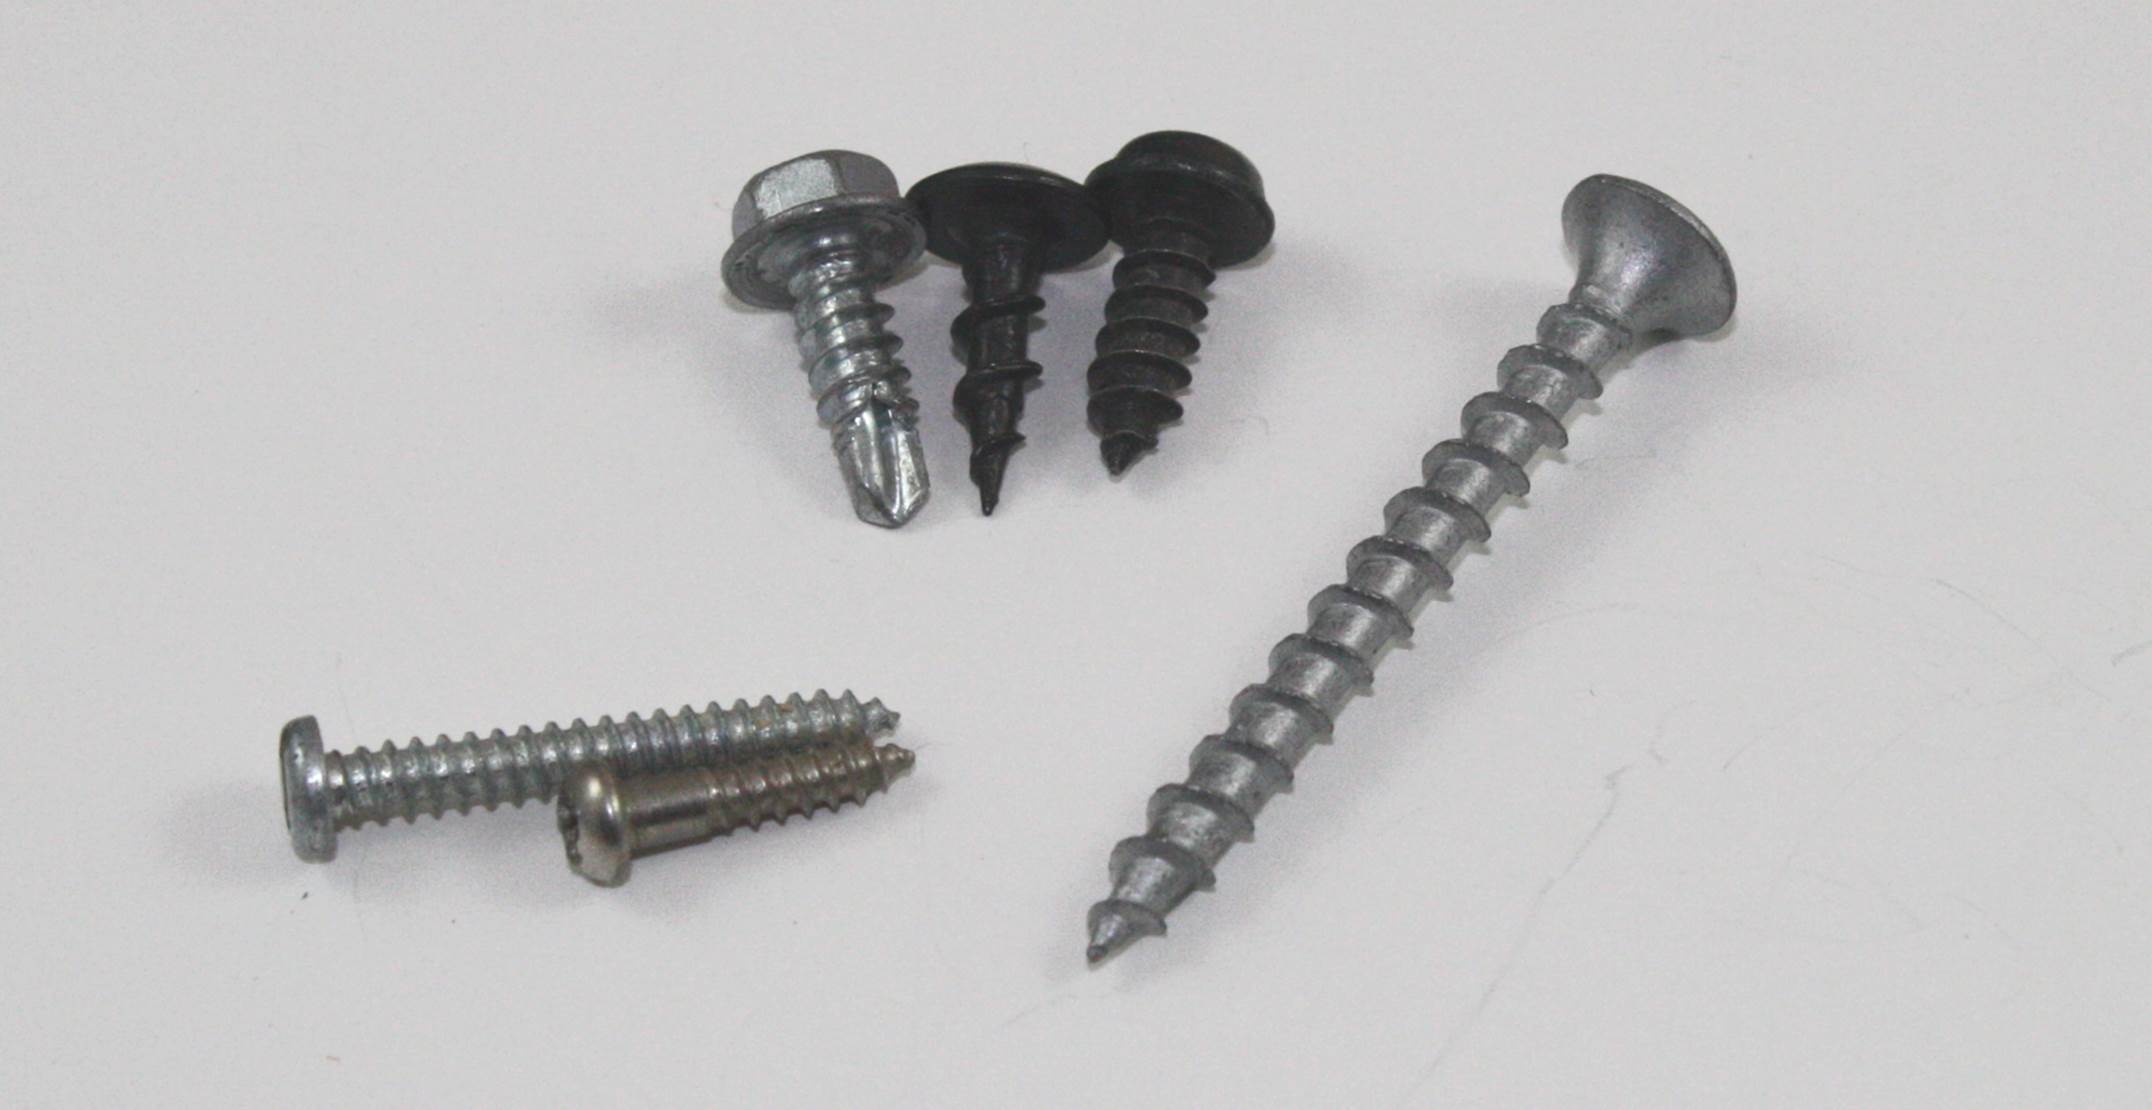
Figure 2-8. Self-tapping screws
Plastic is another material that works well with self-tapping fasteners, and they can also be used with soft or thin sheet metal. The small enclosures and electronics chassis sold by companies such as Hammond and LMB often use self-tapping sheet-metal screws to affix covers and panels to the main box or chassis.
As handy as they might appear, you should avoid self-tapping fasteners if possible. If you are working with something already built with self-tapping screws, sometimes you can’t avoid them, but once a self-tapping screw goes in and comes out, it will almost never go back in as securely as it did the first time. This is especially true of sheet metal, because the original hole in the metal will be deformed by the screw when it is first installed. Chapter 4 describes a handy trick you can use when reinstalling a self-tapping screw.
Rivets
Rivets are commonly used to fasten sheet material, such as the aluminum skin sections of aircraft, fiberglass panels on a golf cart, and aluminum canoes. With suitable washers or purpose-made rivets, rivets can also be used to attach sheet plastic to a metal framework.
It is interesting to note that at one time (about 100 years ago), rivets—in the form of large red-hot chunks of metal shaped like a threadless bolt—were used to build the frameworks of skyscrapers, bridges, and the Titanic. In fact, until the widespread acceptance of arc welding and other modern methods of attaching one piece of metal to another, rivets and large bolts were the primary fasteners for large structures.
In electronics applications, rivets come in handy for creating small metal enclosures, attaching a bracket to something like, say, a metal can for use as a 2.45 GHz antenna, or even attaching a small metal enclosure to a section of metal pipe (like a light-beam sensor or sender on a chain-link fence post).
The type of rivet most commonly used for electronics work is relatively small, about the size of a #6 screw. Figure 2-9 shows some of the sizes available. Figure 2-10 shows an example of the tool used to install rivets.
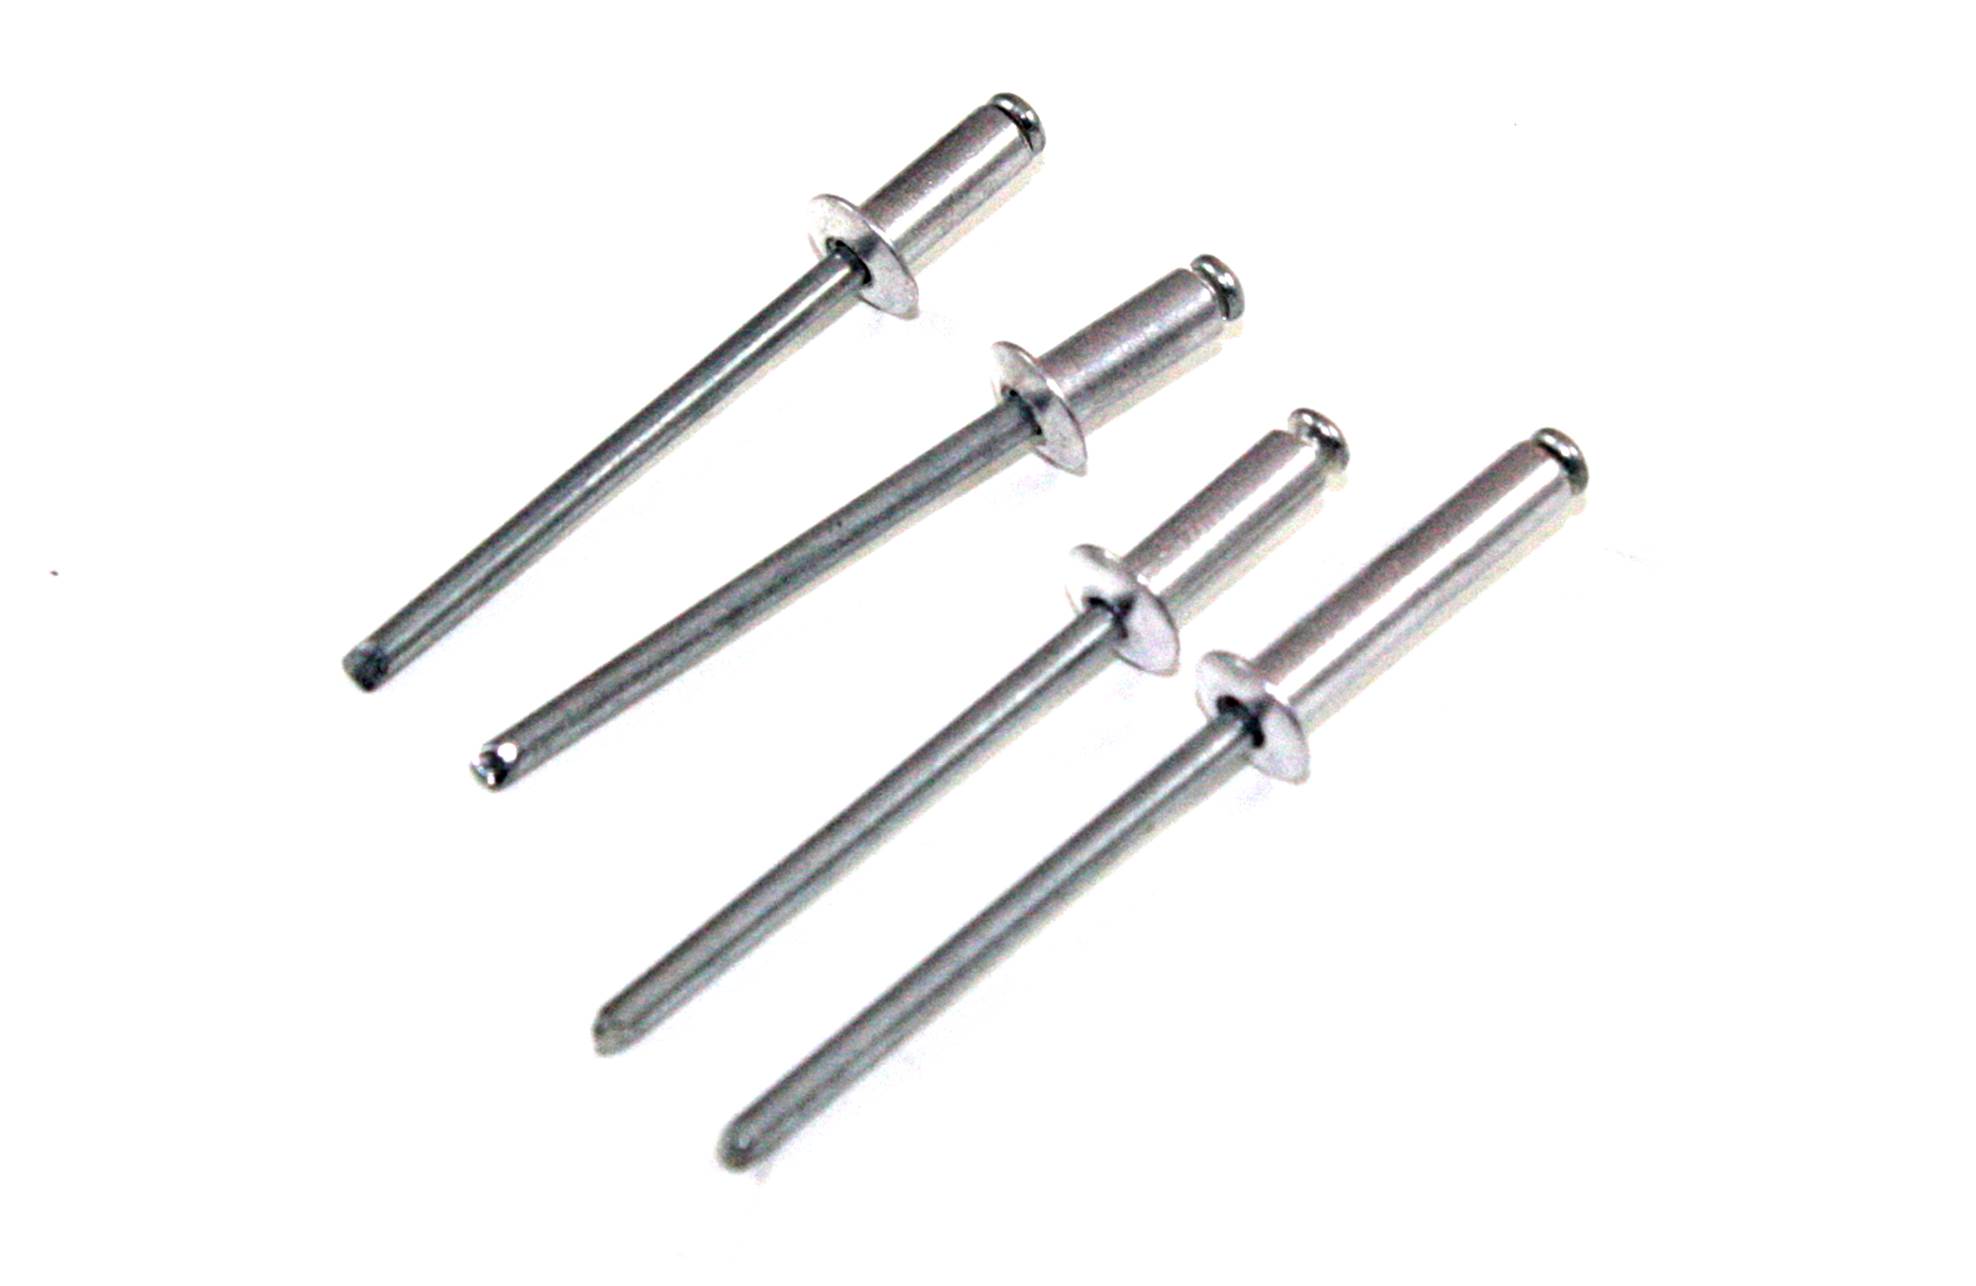
Figure 2-9. Small blind rivets
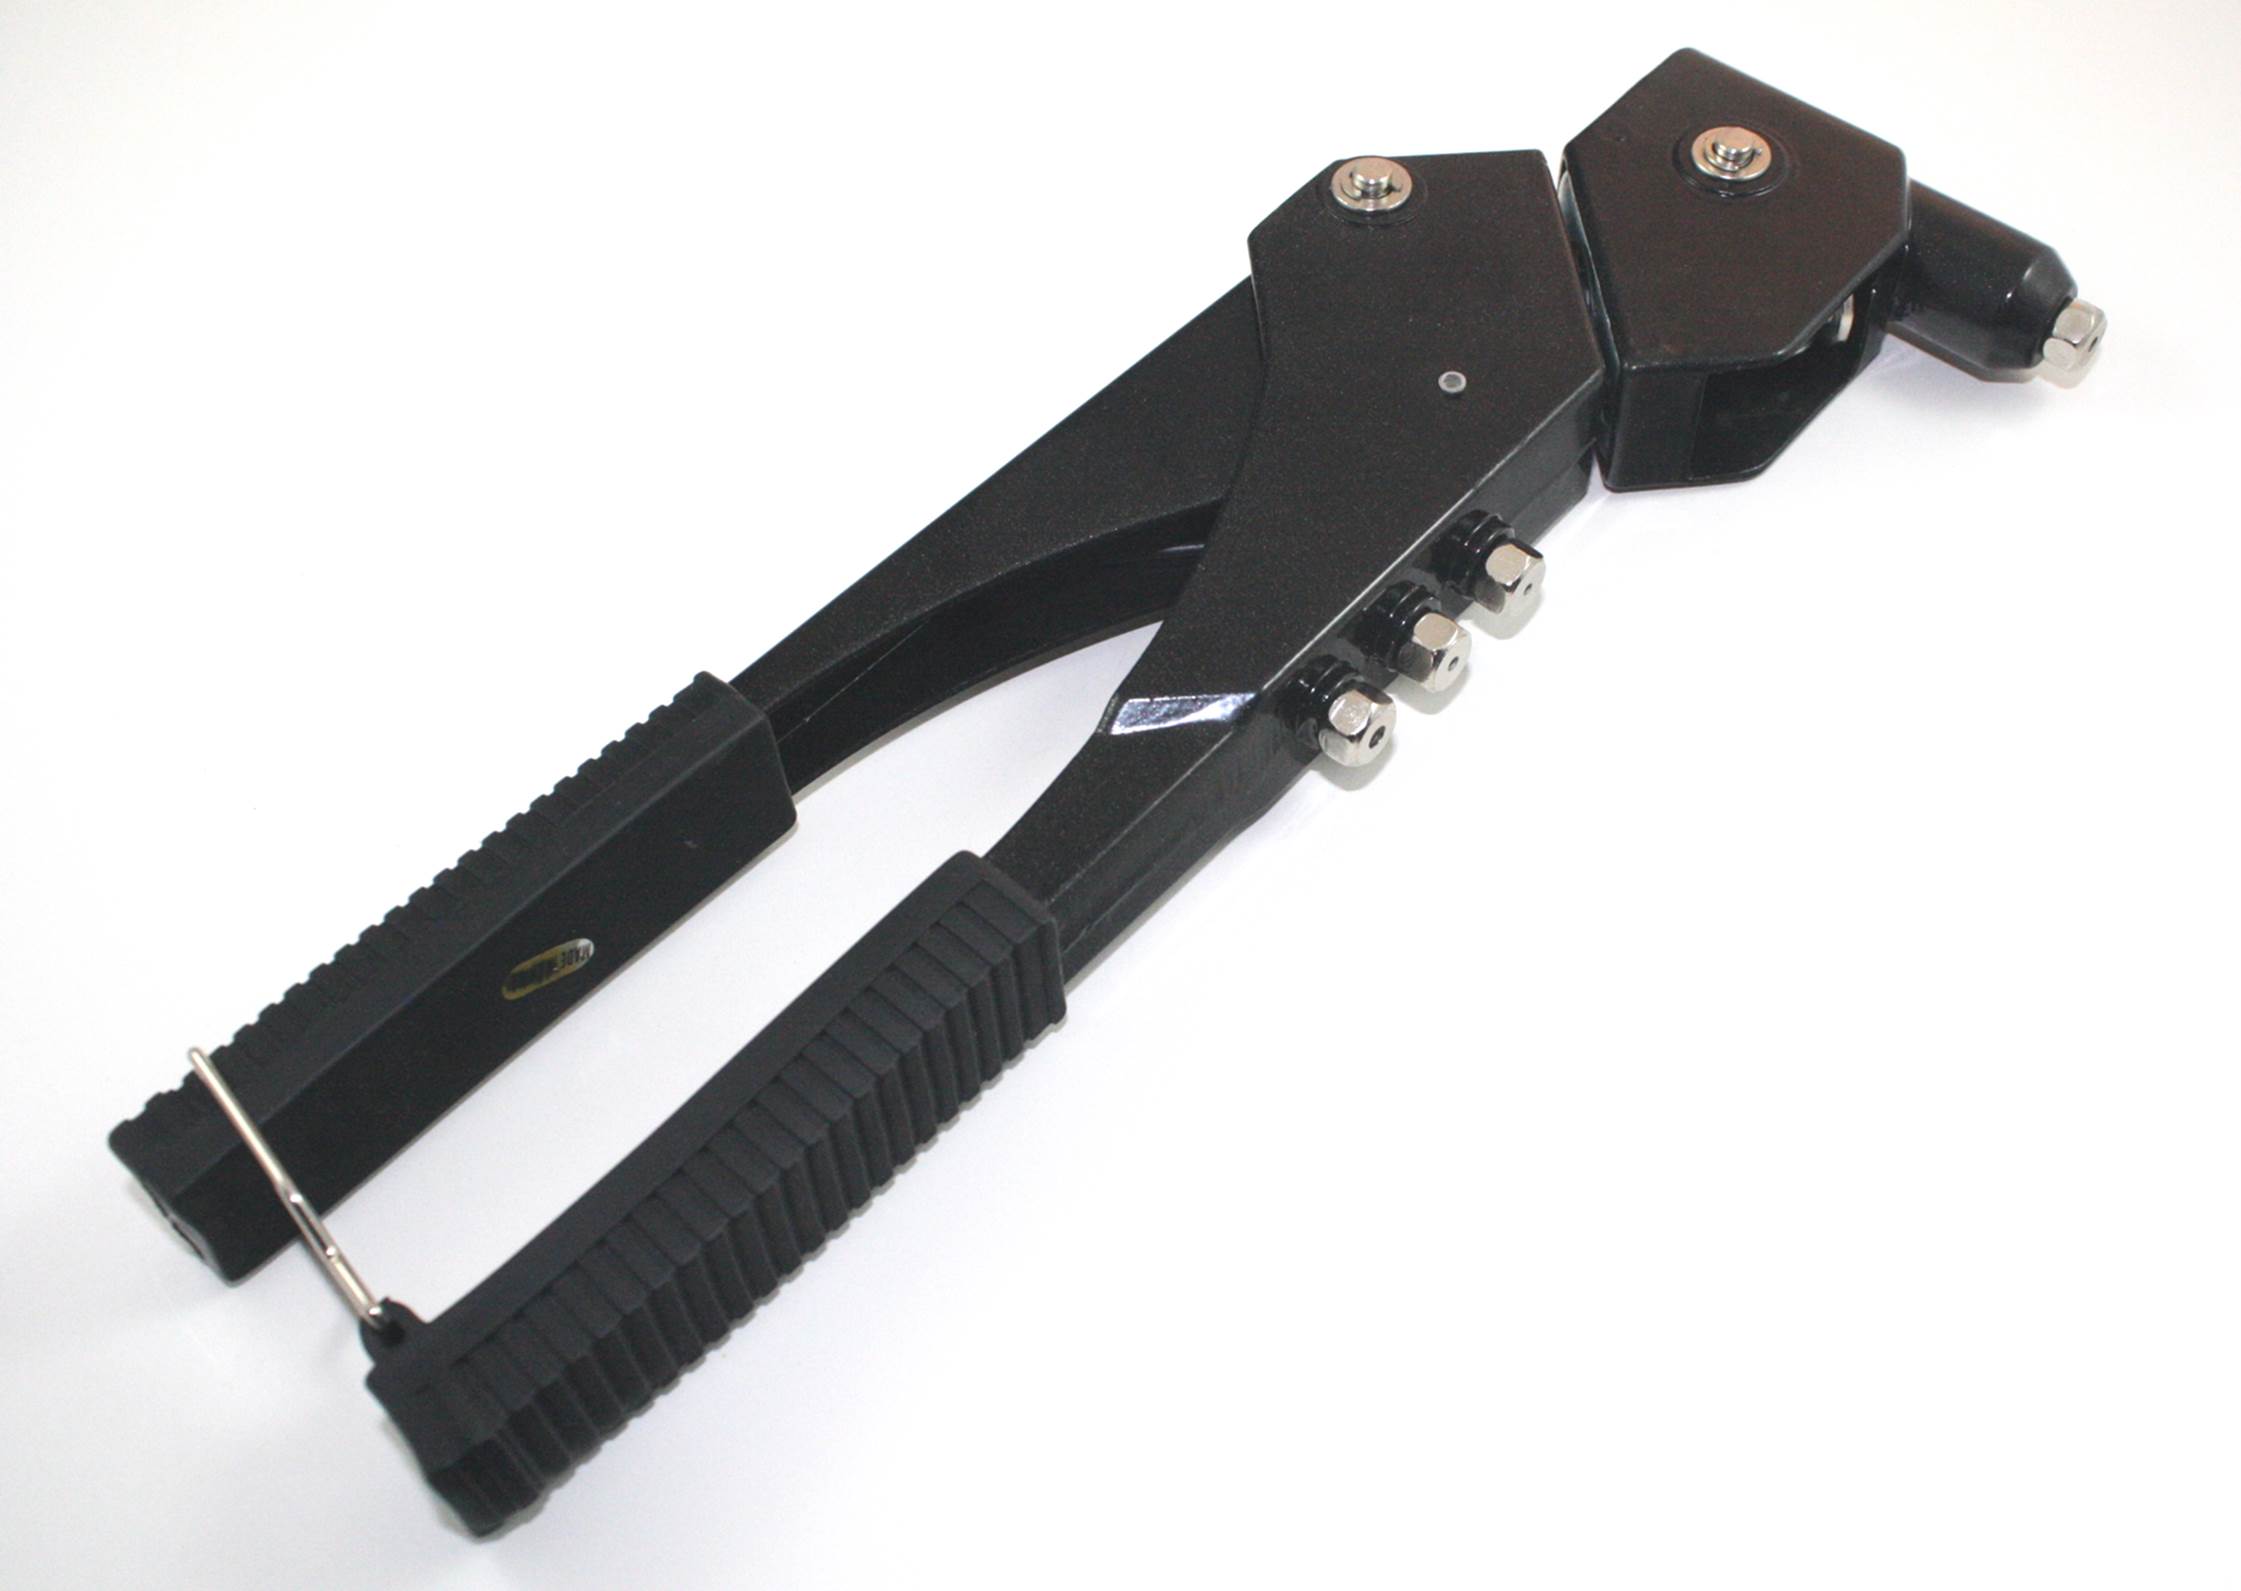
Figure 2-10. Hand-operated blind rivet installation tool
The items shown in Figure 2-9 are so-called blind rivets, which means that they are designed to be installed from one side of the work without requiring someone with another tool to apply pressure on the opposite side. They are sometimes also called pop rivets, after the brand name POP originally used for these products.
Blind rivets are available in a variety of head styles, including domed, flat, flush, and countersunk types. They also come in a range of sizes, lengths, and materials.
Blind rivets are installed with a tool that pulls a metal rod through the rivet body to cause the rivet to expand in a hole. The tool then trims off the excess length of rod flush with the exposed seat of the rivet. Chapter 4 covers riveting tools and how to use them. Chapter 16 discusses how blind rivets can be used to fabricate electronics enclosures or modify existing equipment or devices.
Adhesives and Bonding
Another way to fasten two (or more) things is with adhesives. Numerous types are available, ranging from cyanoacrylates (sometimes called “super-glue”), to single- and multi-part epoxies, to silicon rubber formulations like the adhesive used to glue the heatshield tiles onto the space shuttle. Adhesives are a science unto themselves, and some companies specialize in nothing but adhesives for special applications.
If you think you want or need to use an adhesive, it would be wise to do some research and see what is available. If nothing else, just reading the packages at the hardware store can be informative. When you are applying an adhesive, a pair of latex or nitrile gloves can save your hands (but make sure the adhesive won’t attack the gloves!), and a wooden popsicle stick or medical tongue depressor can easily be trimmed with a sharp knife to make a disposable spreading and mixing tool.
Glues, Epoxies, and Solvents
Water-based glues work by creating a rigid matrix of linked chemical bonds in the adhesive material between two parts to be attached. Generally speaking, when the glue is “wet” it is in a liquid or semiliquid form, and the molecules in the glue can move and slide around quite easily. Wet glue has very little internal cohesive strength. It also has the ability to flow into the microscopic pits, bumps, and pores of the parts it is applied to. Some examples of water-based glues are the common white glue found in school classrooms or the wood glues used by carpenters.
For a water-based adhesive to form a tight bond, it needs to interface with the parts being bonded. With materials like wood or paper, this isn’t a problem, since these are porous materials. Water-based adhesives usually don’t work well with nonporous materials such as plastic or metal.
When a glue “dries” through evaporation or chemical reaction, the molecules in the glue can no longer move, and the internal cohesive force increases. Some types of glues also shrink, thereby pulling the glued parts closer to one another, while others expand slightly. The main point, however, is that the glue forms a hard interface between two parts that both adheres to the parts and is internally cohesive so it won’t break apart under normal stress.
An epoxy is a type of adhesive that utilizes a chemical reaction (curing) to create internal cohesive bonds. Epoxy adhesives are based on an epoxy resin, which may be any of a number of compounds from what is called the epoxide functional group. The word epoxy actually refers to the cured form of epoxy resin.
An epoxy resin is a type of polymer that consists of chains of molecules. When the resin reacts with a hardener agent, either contained within the resin itself or applied as an additive, the reaction causes a chemical reaction involving cross-linking that is referred to as curing.
Epoxy adhesives come in various forms. There are one-part formulations that use light (typically UV) to start the curing action, while others work on contact with the air. A two-part epoxy consists of a resin and a hardener. These are mixed just prior to use. The shelf life of two-part epoxy is long, often on the order of years. Once the parts are mixed there is a period of time, typically between 5 and 30 minutes, when the epoxy can be worked before it starts to set and become too stiff to manipulate. Full curing can take up to 24 hours, depending on the formulation.
There is a vast range of applications for epoxy-based adhesives, and more for non-adhesive applications. Epoxies are known for excellent adhesion, good chemical and heat resistance, good-to-excellent mechanical properties, and excellent electrical insulating properties. With the appropriate formulation, epoxies can be used to bond materials such as metal, glass, wood, ceramics, plastics, and other resin-based materials (e.g., fiberglass and carbon-fiber materials). Some types of epoxies feature high thermal insulation, while other types offer thermal conductivity combined with high electrical resistance.
Unlike adhesion, plastic bonding is the process of causing two parts to partially dissolve at the point where they meet, and then allowing that joint to re-harden so that the two different parts actually become one. This applies only to plastics, and it is the plastic equivalent of welding two metal parts to one another. Bonding can be accomplished using heat generated by focused ultrasonic vibrations, applied by a heated metal tool, or chemically using a solvent. Here we will be looking at the chemical approach to plastic bonding; and if you have ever built a plastic model car or airplane or assembled PVC plumbing or conduit, then you are probably already familiar with plastic bonding. The ever-popular “clamshell” packaging is an example of ultrasonic thermal bonding, and cheap plastic toys are sometimes assembled with hot flat-tip tools that press a molded stub down into another piece and weld the two at that point.
Adhesives that utilize bonding work by attacking and literally melting the plastic to create a welded connection, and the plastic can react to the solvent very quickly. One chemical of this type is known as methyl ethyl ketone, or MEK, also referred to as butanone. It is particularly effective with polystyrene plastics. It also works with polyvinylchloride (PVC) and clear acrylic plastic. MEK can be purchased in small amounts at most hardware and home improvement stores. It is typically a thin liquid that will evaporate rapidly, and it must be used with good ventilation.
Working with Wood and Paper
You can glue wood easily using adhesives specifically formulated for that purpose, although you can also use a general-purpose epoxy and get good results if you are careful and pick the correct one. Depending on how strong you want the joint to be, and whether or not it needs to be waterproof, you can use standard white glue, general-purpose glue, or specialty carpenter’s wood glue. Even hot glue will work for some applications.
The same general caveats for wood apply to working with paper in all its various forms. A wide range of paper products is available, from heavy poster board to corrugated cardboard. These are useful for assembling a prototype enclosure or creating a scale model of something. Common white glue works well with paper (as any creative child can testify), and most wood glues will also work. Hot glue is popular with the arts-and-crafts crowd because it adheres reasonably well in the short term and is easy to apply.
Although it might tempting because of its convenience, resist the urge to use hot glue for anything except cardboard, fiberboard, and craft projects. Hot glue can be very unreliable; it’s somewhat brittle when cool, and its adhesive properties on nonporous surfaces like metal or plastics are rather poor. It’s great for making throwaway holiday decorations, but for long-term applications, not so much. Hot glue can also deliver some nasty burns if it comes into contact with bare skin while still in the molten state.
Working with Plastic
Plastics are a good place to consider using adhesives, but you need to be aware of just what type of plastic you are working with. Polyethylene, for example, is often heat-fusion-bonded to seal different pieces together, as standard adhesives and resins don’t adhere to it very well. If you are working with something like polystyrene or PVC, you have a number of adhesive choices available.
There are multiple methods for identifying plastics, ranging from burning a sample sliver to laboratory spectroscopy. Another way is to take a sliver or sample piece and apply the adhesive you want to use. If you are using MEK or a MEK-like solvent-based adhesive, then the sample will show signs of a reaction with the adhesive (sagging, melting, deformation, softness, etc.). If it does nothing, then you will need to consider a different adhesive formulation, like a two-part epoxy.
Epoxies are a good choice, provided that the epoxy is formulated for the materials to be bonded. The downside to epoxies is that they tend to take some time to properly cure, so if you are in a hurry, you might want to consider something else. Also, because plastics are nonporous, the glued joint may be prone to breaking if it is overstressed by being bent or twisted. If it does break, it will most likely be at the place where the epoxy meets the material; the epoxy itself is tough and usually stays intact.
When you’re working with polystyrene, PVC, or ABS materials, the best choice is to use a solvent-type bond (also known as solvent welding), unless there is some compelling reason not to. If you purchase MEK (described in “Glues, Epoxies, and Solvents”), you might want to consider making your own “glue” rather than try to work with the MEK in its liquid form. To make it thicker and easier to use, you can dissolve some bits of scrap polystyrene into it. The resulting goo is basically what you get from a tube of model cement from the hobby store, and it’s a whole lot cheaper, too.
Note that a solvent like MEK won’t work with some plastics. PEX, for example, seems to be unaffected by MEK, as is nylon. For these, you’ll need to select a different adhesive, or resort to bolts, nuts, and brackets.
Working with Metal
Joining metal can be challenging, because the smooth, nonporous metal surfaces don’t really offer much for the adhesive to grip. Water-based glues such as white glue and wood glue won’t work, and solvent-based bonding methods are useless with metal.
Some types of specialty epoxies will grip metal surfaces, if the surfaces are properly prepared. When using an epoxy to join metal parts, be sure to follow the manufacturer’s directions to the letter. As with plastics, an epoxy joint with metal parts is susceptible to shear forces. In other words, it might have good tensile strength, but it can break if twisted or bent.
Another method involves the silicon rubber adhesive mentioned earlier. It comes in a variety of types and colors, with some types useful for things like caulking a shower stall, and other grades suitable for use with the gaskets on automobile engines. Some high-temperature formulations are also available (such as what was used with the space shuttle). The downside is that silicon rubber works best for attaching large, flat surfaces. It doesn’t work well for something that is small or narrow, such as when you’re trying to glue one plate to another at a right angle.
In reality, the two best methods for attaching metal are to use fasteners or some kind of welding process. Epoxies come in third, but there is the issue of shear weakness. Silicon rubber works if there is a lot of surface area to work with, but otherwise it might not be a good idea.
Special-Purpose Adhesives
Be careful when working with cyanoacrylate adhesives. These glues work quickly and can create strong bonds, but they should be used with caution. Cotton or wool materials can react with cyanoacrylates in an exothermic reaction, and the heat generated can be high enough to cause a fire to break out. Cyanoacrylates also tend to have low shear strength, so while you might have trouble pulling a bond apart, applying sideways force will typically break it loose. These adhesives also tend to have a short shelf life, on the order of a year in an unopened package, and less than a month after they’ve been opened.
Summary
There are numerous ways to attach one thing to another. The best method depends on the material, the necessary strength, the desired reliability, and how much effort you want to put into it. Starting with bolts and screws, which are very strong fasteners when used correctly, we moved on to look at rivets, and finally adhesives. We did not cover gas, arc, or spot welding here.
With the information presented in this chapter, you should be able to make informed decisions about the types of fasteners that are suitable for your projects, and also be able to identify some of the less common types when modifying or re-purposing an existing device.
Although this chapter has mentioned in passing some of the tools used, and provided some warnings about selecting the right tool for a particular fastener, Chapters 3 and 4 provide further details about tools and their correct usage. Chapter 16 presents some examples of how to select and use various fastening techniques to create finished packages.
All materials on the site are licensed Creative Commons Attribution-Sharealike 3.0 Unported CC BY-SA 3.0 & GNU Free Documentation License (GFDL)
If you are the copyright holder of any material contained on our site and intend to remove it, please contact our site administrator for approval.
© 2016-2026 All site design rights belong to S.Y.A.