Raspberry Pi Projects (2014)
Part III. Hardware Projects
Chapter 10. The Twittering Toyby Dr. Andrew Robinson
In This Chapter
• Make a soft toy read out tweets and move
• Learn about text-to-speech
• Discover object-orientated programming
• Gain experience building Python modules
• Access Twitter from your program
In this chapter you’ll make use of the Twitter library to bring a soft toy to life. At the end of this chapter, you can have your very own animatronic chicken that waddles and moves its beak as it reads aloud tweets from a particular user or containing a certain hash tag.
This project illustrates that one of the joys of the Raspberry Pi is the ease of reusing existing code. Programmers strive for efficiency (some people call it laziness) and aim to never type the same thing twice. What’s even better is never having to write the code in the first place and using someone else’s!
This chapter will cover how to hack a toy to connect it to the Raspberry Pi and how to install a Python module to talk to Twitter and interact with an external program (in this case a text-to-speech engine) from Python.
Hacking the Toy
You are going to take an animated toy and “hack” it so the Raspberry Pi can control its movement. You’ll do this by wiring one of the relays on the PiFace interface to replace the toy’s on-off switch.
![]()
The word hack in regard to computing has become associated with illegal activity. In this sense, hacking is bad and not something to engage in. However, to programmers, a hack is a way to make something work, particularly when reusing something or repurposing it in a clever way.
There are many animatronic and robotic toys available online and in novelty shops. It’s easy to modify the simple toys that have just a basic on-off switch. Before hacking your toy, it’s worth considering what happens if something goes wrong – it’s best not to hack an expensive toy or one you’re particularly fond of, just in case you struggle to put it back together again. You may wish to build your own toy from components instead.
Building the Chicken
I chose to build a twittering chicken around the Head and Mouth Mechanism shown in Figure 10.1 from Rapid Electronics (www.rapidonline.com/Education/Head-and-mouth-mechanism-60675). The mechanism contains a battery case, a motor, gears and a switch. On this web page, you’ll find a free data sheet with a fabric pattern for making the chicken cover (as well as for a bird and a whale with other mechanisms).
Yellow fur for the body and red felt for the wattle and comb can be purchased from a local fabric shop, and a local craft shop or market is an ideal hunting ground for suitable materials like stick-on eyes. What’s great about building your own toy is the opportunity for customisation – feel free to experiment. It shouldn’t be too hard to modify the chicken pattern into the Linux mascot “tux the penguin”. You could share your pattern online for other people too.
Figure 10-1: A naked chicken – the mechanism that makes the toy move.

Wiring
You will connect the relay in parallel with the switch. This allows the relay to override the switch to turn the toy on.
Open the case by removing the four screws as shown in Figure 10.2, taking care not to lose any bits or move parts too far out of alignment.
![]()
An important skill of hacking is remembering how you take something apart so you can put it all back together. You could try filming it with a camera phone or similar, so you can play it back to see which part goes where.
Series and Parallel Circuits
Series and parallel are two names to classify how components in a circuit are connected. In series, as the name suggests, the electric current flows through all the components in a series, one after another. As such, if you have switches wired in series, then all of them have to be closed for the current to flow. Breaking one of them will break the circuit.
In parallel, the flow of electricity splits and so closing any switch wired in parallel will allow the current to flow. This is because electricity tends to take the path of least resistance, which in parallel circuits will be through any closed switch. For the toy, the closed PiFace Digital relay contacts will bypass the toy's open switch.
Figure 10-2: Removing the case of the movement mechanism.

Try and identify how the wires are connected to form the circuit. Find the terminals on the power switch. These may be covered with glue, but this can be carefully peeled or scraped away. In many cases, there will be only two wires going to the switch; if there are more, then the wiring is more complex, and it may be better to hack a different model if you cannot easily identify how the circuit works.
Attach another wire to each of the wires already connected to the terminals as shown in Figure 10.3. A soldering iron is the most secure way to do this, but you could also twist the wire onto the terminal and secure with tape. Briefly, touch the free ends of the wires you just joined together to check that your model moves. Find an appropriate hole to pass them through to the outside of the model, taking care that they don’t catch on any moving parts. Adding a blob of glue or tying a loose knot on the inside will relieve some of the strain on the connections.
Figure 10-3: Add wires (shown as white in the figure) in parallel to the switch and add a knot to stop it from pulling through.
It is now time to reassemble your toy and the time when you discover how much attention you were paying when you took it apart! All things being well, your toy should go back together looking no worse after its surgery, as shown in Figure 10.4, and you shouldn’t have any parts left over. Briefly touch the wires together again to make sure that your toy still comes to life.
Figure 10-4: Toy post-surgery showing no ill effects. Touch the wires together to make the toy move.

Making It Talk
You’ll use the espeak text-to-speech (TTS) program to read aloud the tweets.
How TTS Works
A TTS engine typically works by splitting the words into syllables and then synthesising the word by concatenating (combining) corresponding sounds. In most TTS engines, the computer has no understanding of the words, so the output is monotone. However, TTS is an exciting area of research in computer science, attempting to make it sound more human. Latest research efforts include modelling the human voice box to generate more realistic sounds on virtual vocal chords, and another project to try and understand what is being said to vary pitch, delivery speed and rhythm.
After you’ve followed the instructions below to install espeak, you can see more about what espeak is doing if you run it with -X. For example, from a terminal run espeak -X “hello world”.
Uses of TTS
TTS is used when a visual display isn’t appropriate. This includes assistive technology for people with visual impairments or when it is not possible to look at a screen, a satnav or automatic telephone exchanges.
If the computer is required to say just a few hundred different words, then for better quality, an actor will record the separate words, with the computer forming sentences and playing back a sequence of clips separated by short pauses. In some applications, there are too many different words to have a recording of each one, so the computer will generate them from syllables. In the case of a satnav, it’s a lot of work recording the name of every road and every place. Some words will be frequently used so they may be recorded, and a mixture of synthesized TTS and recorded may be used. You might like to try putting your own voice in the soft toy by recording a set of words and writing a program that plays them back. See the “More Ideas” section at the end of this chapter.
Install espeak by typing the following in a terminal:
sudo apt-get install espeak
Plug in some speakers and then test that TTS works by typing this in a terminal:
espeak "hello world from espeak"
![]()
If you cannot hear sound, you may need to change how audio is routed. The Raspberry Pi can output sound via the HDMI cable or the audio jack socket. It will try to automatically select the correct one, but that doesn’t always work with some displays. To switch it by hand, type sudo amixer cset numid=3 n, where n is 0 for automatic, 1 for audio jack and 2 for HDMI.
Using Espeak in Python
The next step is to call the espeak program from Python. Because you might want other programs that you write in the future to use espeak, you’ll create a module for it. It’s worth studying how the module works because it shows how you can run another program from Python, which can be very useful. Enter the following code into espeak.py:
import subprocess
def say(words):
#Speaks words via espeak text to speech engine
devnull = open("/dev/null", "w")
subprocess.call([
"espeak",
"-v", "en-rp", # english received pronunciation
words],
stderr=devnull)
Let’s take a brief tour of the code. The first line imports the subprocess module that allows other programs to be called. Put simply, a program running on a computer is called a process, so if it wants to run another program, then (similar to calling a function) it creates another subprocess with a call.
def defines the say function that is passed a string of words to say. Next, the file /dev/null is opened for writing. On Linux, /dev/null is a special file that throws away anything written to it. It’s a really good way of ignoring any output produced. In this case, it’s used to hide any error messages produced by espeak. If you replaced /dev/null with a real filename, then any error message would be saved there instead.
Finally, the subprocess.call function calls the program “espeak” with an array of arguments to pass to it. In this case, if the words argument contained hello, it would be the same as typing the following:
espeak -v en-rp hello
This shows that multiple arguments can be passed to a command. The -v en-rp is used to specify how espeak sounds. It can be fun to play around with different pronunciations, or even languages.
Testing the Espeak module
Now is a good time to check the Python module you’ve just created. Enter the following into the file try_espeak.py:
#!/usr/bin/env python
# try_espeak.py
# Show use of espeak.py
import espeak as talker
def main():
talker.say("Hello World")
if __name__ == '__main__':
main()
Run try_espeak.py and check that you hear “Hello World” from the speakers.
![]()
Try espeak with different pronunciation options, such as American or caricatures of British accents such as Northern, West Midlands or Scottish. The codes needed are described in the espeak documentation athttp://espeak.sourceforge.net/languages.html. You could add another argument to the say function in Python and pass information to set the accent. If you are really adventurous, you could try passing pitch, speed and voice arguments, and you’ll get some very silly sounding voices.
Making It Move
The next step is to turn on the motors of the toy to make the mouth move while it is speaking. To control the motors, you’ll use PiFace Digital. You should have set up PiFace Digital as specified in Chapter 9, “Test Your Reactions”. Because there are LEDs on the board, these will indicate that the outputs are active so you can test the code before connecting the chicken. Create a new file named chicken.py and enter the following:
import piface.pfio as pfio
import espeak as talker
VERBOSE_MODE = True
class Chicken():
#The wobbling/talking chicken
def __init__(self, pfio, pin):
pfio.init()
self.pfio = pfio
self.relay_pin = pin
def start_wobble(self):
#Starts wobbling the chicken
self.pfio.digital_write(self.relay_pin,1)
if VERBOSE_MODE:
print "Chicken has started wobbling."
def stop_wobble(self):
#Stops wobbling the chicken
self.pfio.digital_write(self.relay_pin,0)
if VERBOSE_MODE:
print "Chicken has stopped wobbling."
def say(self, text_to_say):
#Makes the chicken say something
if VERBOSE_MODE:
print "Chicken says: %s" % text_to_say
talker.say(text_to_say)
def test_chicken():
#create a sample Chicken object called tweetyPi
tweetyPi = Chicken(pfio,1)
tweetyPi.start_wobble()
tweetyPi.say("hello world")
tweetyPi.stop_wobble()
if __name__ == '__main__':
test_chicken()
With a speaker connected, run the preceding script and check that it works. You should hear the relay click (and see the corresponding LED illuminate) on the PiFace interface, the sound “hello world” come from the speaker and then the relay click off again.
Looking back at the code, you should notice a couple of points. The line VERBOSE_MODE = True is an example of a constant. It is set by the programmer and then never changes – in other words, it remains constant. In this case, it provides an easy way to turn on and off debugging information in one place. With it turned on, you’ll receive messages saying when the chicken should start moving and stop. Without these messages, if the chicken wasn’t moving, you wouldn’t know if the problem was with this module, or whether the problem was elsewhere.
![]()
Being able to see what is going on in a program is very important when debugging. Computer scientists describe it has having good visibility. One way to achieve this is to have print statements at key points in a program so as it executes you can follow its progress and the state of data. It’s very common for a program to not work perfectly the first time, so designing it to make it easy to debug can save time in the long run, particularly when you might add a new feature later.
Creating Classes
The file chicken.py makes uses a particular style of programming called object-orientated programming (OOP). You don’t need to worry too much if you don’t understand the code at the moment; there are more examples of OOP in other chapters in the book.
OOP is a handy way to group code and data together. Think about any object in the real world: It has characteristics, also called attributes, and it has things that can be done to it. For example, a balloon’s attributes include its colour and if it is inflated. Actions that can be done to it include blowing it up or popping it. You may have a room full of different balloons, but they can all be considered to share the same set of attributes and actions (even though the value of the attribute, like the colour, might be different). As such, they are all the same class of object.
In OOP, the programmer designs his or her own classes of objects, which have a set of attributes and functions. In chicken.py, the Chicken class of the object is defined by class Chicken():. The next indented block defines the methods (another name for functions) of the class. There are methods to start and stop the chicken from moving and one to make it speak. The __init__ method is a special method that is called when an object is created. In this case, it calls the pfio initialisation method (to initialise the PiFace interface) and sets up the object’s attributes. This can be handy, as you can use your object without worrying about what you need to do to initialise things first. So far, the program has only created a class for the chicken. It hasn’t created an actual object, merely a description of what a Chicken object will be like. It’s a bit like creating a cookie cutter – you’ve defined what shape the cookies will be, but you’ve not actually created any cookies yet.
Creating Objects
A Chicken object is created in the test_chicken function. It is outside the class definition (and therefore not part of the Chicken class) because it’s not within the indented block. The statement tweetyPi = Chicken(pfio,0) creates a new Chicken object called tweetyPi. The arguments are used to pass in the PiFace Digital interface and identify which pin the motor is connected to.
Imagine if you had multiple chickens, one connected to each of the relays on PiFace. You could create two chickens by typing the following:
tweetyPi1 = Chicken(pfio,0)
tweetyPi2 = Chicken(pfio,1)
Now, if you wanted to start them both wobbling you could type this:
tweetyPi1.start_wobble()
tweetyPi2.start_wobble()
By using objects, you can use the same function for each chicken. You don’t have to worry about which pin they are connected to after you’ve created the object because the object stores it for you. This is an example of why using OOP can be advantageous.
OOP can be tricky to understand at first, but it should become clearer as you see more examples. For now, you can ignore the details, accept that it works and hide it in the chicken module, in the same way you use other modules without knowing what is inside them. Believe it or not, professional programmers do this too – as long as the interface to a module is clear (that is, the functions it provides are clearly documented), it doesn’t matter if they don’t fully understand how it works!
Breaking Up Your Code
Chapter 2, “Introductory Software Project: The Insult Generator”, talks about splitting programs up into functions and how important it is to structure your code in computing.
In this example, separate files are used for modules to help structure the program. Classes also help by grouping related data and functions together.
As you will see, what may have sounded like a daunting task of making a Twitter-enabled soft toy move and talk becomes manageable when tackled in smaller chunks. You also tested each chunk so it’s easier to see where a problem is. Similarly, as you become more experienced, you’ll be able to take almost any big and seemingly hard problem, and split it up into little steps. Why not try it? Think of a project you want to do, and then think how you can split it up into smaller parts. Hopefully, as you complete the projects in this book, you’ll learn the skills necessary to implement each of these little parts, and you’ll be able to build almost anything!
Testing As You Go
If you wrote a huge program and tried to run it, chances are it wouldn’t work the first time. You’d then have to go through all of it trying to find where the problem was. Instead, it is better to test as you go, checking each component before moving on to the next. Python provides a good means to do this. Toward the end of the file are the following lines:
if __name__ == '__main__':
test_chicken()
This code calls the test_chicken() function if the file is being run by itself, but doesn’t call the function if it is imported as a module. As such, it’s a good way of writing code that will test the behaviour of a module. As you learn more about programming, you will understand the importance of testing and which tools and techniques can help.
![]()
Surrounding or starting a word with __ in Python (and some other languages) indicates a special meaning. As such, it’s better not to start and end your own variables and functions this way unless you really know what you’re doing!
Connecting to Twitter
The python-twitter module makes it very easy to read from Twitter. Unfortunately the module isn’t prepackaged for Debian Linux. Luckily it’s not too difficult to build it from source and doing so will give you good experience that will come in handy if you need to install another module in the future. You’ll also see what it’s like to use someone else’s module, which will be an advantage if you write modules that you want other people to reuse. You’ll discover that it is just as important to write good documentation as it is to write good code.
Building and Installing Python Modules
The module’s home page http://code.google.com/p/python-twitter contains a summary of how to build the module. If you’ve never built a module before, you’re better off following the more detailed steps in this chapter.
The website lists and links to dependencies; these are other modules that must be built first. python-twitter requires simplejson, httplib2 and python-oauth2 to be installed. Step-by-step installation instructions are provided in this chapter.
![]()
It’s possible to download files from the command line in Linux without using a web browser. There are two main programs to choose from: either curl or wget. Both provide similar functionality, so deciding which one to use comes down to personal preference and/or availability. wget is used for the examples in this chapter.
simplejson
Clicking the http://cheeseshop.python.org/pypi/simplejson link redirects you to http://pypi.python.org/pypi/simplejson.
![]()
Note that the version numbers may be different as the library is updated, in which case, you should replace simplejson-3.3.0.tar.gz with whatever filename you have downloaded.
From a terminal, type the following (all on one line) to download the code:
wget http://pypi.python.org/packages/source/s/simplejson/
simplejson-3.3.0.tar.gz
The tar.gz file extension tells you that the file is zipped to save space and is a tar archive. A tar archive is often used in Linux as it provides a convenient way to package multiple files and preserve file permissions and other attributes. It is possible to unzip the file and then untar a file as separate operations, but because so many tar archives are compressed, it is possible to do it in a single action. To unzip and untar the compressed archive, type the following on the command line:
tar xvf simplejson-3.0.7.tar.gz
As the command executes, it lists the files as they are expanded (unpacked) from the archive.
Using tar
You can create your own zipped archives by typing the following:
tar czvf <archivename.tar.gz> <list of files and directories>
Tar has many different options, but in most cases czvf, xvf or tvf will be sufficient. t,c and x mean test (list the contents of an archive), compress and expand an archive, respectively. v indicates that tar should be verbose and list the files as it expands them. f is used to specify the filename of the archive.
Change into the newly expanded directory by typing the following in a terminal:
cd simplejson-3.3.7
On Linux, most software that is supplied as source code shares a similar installation process of extract, build and install. Many Python modules follow this same pattern. Because a malicious user could insert a module that would cause harm, you need to use sudo to provide enough access privileges to install the module. Type the following to install the package:
python setup.py build
sudo python setup.py install
After the module has installed, return to the parent directory by typing the following:
cd ..
httplib2
Follow the same procedure to install the httplib2 package from http://code.google.com/p/httplib2. In a terminal, type the following:
wget http://httplib2.googlecode.com/files/httplib2-0.8.tar.gz
tar xvf httplib2-0.8.tar.gz
cd httplib2-0.8
python setup.py build
sudo python setup.py install
cd ..
python-oauth2
python-oauth2 is hosted on GitHub at http://github.com/simplegeo/python-oauth2, so you obtain it through git rather than wget. In a terminal, type the following:
git clone "http://github.com/simplegeo/python-oauth2"
cd python-oauth2
python setup.py build
sudo python setup.py install
cd ..
The final step is to install the python-twitter module:
wget "http://python-twitter.googlecode.com/files/![]()
python-twitter-0.8.2.tar.gz"
tar xvf python-twitter-0.8.2.tar.gz
cd python-twitter-0.8.2
python setup.py build
sudo python setup.py install
cd ..
If you have IDLE open, close all the windows and restart it so it can access the newly installed modules.
Talking to Twitter
Twitter requires programs that access it automatically to send authentication information with requests. This allows Twitter to prevent abuse by blocking programs that put too much load on its servers. Your program will authenticate itself to Twitter by sending secret tokens.
Getting Access Tokens for Twitter
You will need to get four pieces of information by signing into the developers’ part of Twitter. This section explains how to get a consumer_key, consumer_secret, access_token_key and access_token_secret. The names sound confusing, but all they are is a secret code that will identify you and your program to Twitter.
Visit https://dev.twitter.com/apps/new and log in. (You will need to sign up to Twitter if you don’t have an account.) If you’re not old enough to have your own Twitter account you could ask a parent, guardian or teacher to do this for you.
Enter the name of your application, a brief description and a website. If you don’t have a website you could enter www.example.com as a placeholder. Read the terms and click to indicate your acceptance of the terms. Fill in the CAPTCHA and then click Create Your Twitter Application. You may need to enter a different name for your application if it is already in use; you could try prefixing it with your Twitter username.
Upon success, scroll down and click Create My Access Token. Wait up to a minute and reload the page.
Make a note of the Consumer Key and Consumer Secret entries from the OAuth section, and Access Token and Access Token Secret from the Your Access Token section because you will need to include these in your program.
Writing Code to Talk to Twitter
With the Python modules installed, it is time to write the code that will talk to Twitter. Create a new file named twitter_tag_listen.py, containing the following code:
#!/usr/bin/env python
#twitter_tag_listen.py
#listens for new tweets containing a search term
import time
import sys
import twitter
DEFAULT_SEARCH_TERM = "chicken" #what we search twitter for
TIME_DELAY = 30 # seconds between each status check
def main():
#replace values for consumer_key, consumer_secret,
#access_token_key and access_token_secret with the values
#you made a note of from the Twitter website.
api = twitter.Api(consumer_key='xxxxxxcxK9I3g',![]()
consumer_secret='xxxxxfLBmh0gqHohRdkEH891B2XCv00',![]()
access_token_key='xxxxx25-Dw8foMCfNec2Gff72qxxxxxwMwomXYo',![]()
access_token_secret='xxxxxxjIuFb88dI')
previous_status = twitter.Status()
# has user passed command line argument?
if len(sys.argv) > 1:
search_term = sys.argv[1]
else:
search_term = DEFAULT_SEARCH_TERM
#alternative form of print statement to display contents ![]()
of a variable
print "Listening to tweets containing the word '%s'."![]()
% search_term
while True:
# grab the first tweet containing the ![]()
search_term
current_status = api.GetSearch(term=search_term,![]()
count=1)[0]
if current_status.id != previous_status.id:
#if the result we get from twitter is
#different from what we got last time,
# we know there's a new tweet
print current_status
previous_status = current_status
# wait for a short while before checking again
time.sleep(TIME_DELAY)
if __name__ == "__main__":
main()
Run the code to test it. Obviously, you need to be connected to the Internet for it to work. The program should print the latest tweets that contain the word chicken. Press Ctrl + C to stop the program.
You are nearly ready to add in the code that controls the toy, but before you do, it is worth looking at how the code works.
By now you should be recognising statements in the program. First you import three modules that you need. The Time module provides the sleep() function that creates the delay between each time you check Twitter. The Sys module provides a way to get command-line arguments. Next constants are defined before the main function begins.
The Twitter module is written in OOP style, so you create a Twitter api object with the following statement:
api = twitter.Api(consumer_key='xxxxxxcxK9I3g',![]()
consumer_secret='xxxxxfLBmh0gqHohRdkEH891B2XCv00', ![]()
access_token_key='xxxxx25-Dw8foMCfNec2Gff72qxxxxxwMwomXYo',![]()
access_token_secret='xxxxxxjIuFb88dI')
You check if any command-line arguments were used by checking the length (that is, the number of items) in sys.argv. If there’s at least one, then you set the search_term to be the first argument:
# has user passed command line argument?
if len(sys.argv) > 1:
search_term = sys.argv[1]
else:
search_term = DEFAULT_SEARCH_TERM
Command-Line Options and Arguments
When you run a Python program from the command line, you can follow it with a list of arguments. This provides an easy way to pass data into a program at startup and is typically used to pass names of files or configuration options. For many programs, if you run it with just the –h option, it will display simple help and summarise the options and arguments available. To try this with espeak, type the following from a terminal to display a summary of command-line options:
espeak -h
In the twitter_tag_listen.py example, because your program only takes one argument, you read it from the list held by sys.argv. However, as you begin to master Python and your programs get more complicated, you may wish to use the argparse module that splits up the arguments and can automate generating usage information.
Finally, you enter the main loop – a block of code that will keep going around in a loop, running again and again. This is a while loop, which is discussed in Chapter 2.
In this program you use the condition True, to make it loop indefinitely. To stop the program, press Ctrl + C. In Linux, this keyboard combination sends a message from the operating system to interrupt the program, which in most cases will terminate it (cause it to stop running).
With all the components written and tested, it’s the moment of truth: Will they work together?
Putting It All Together
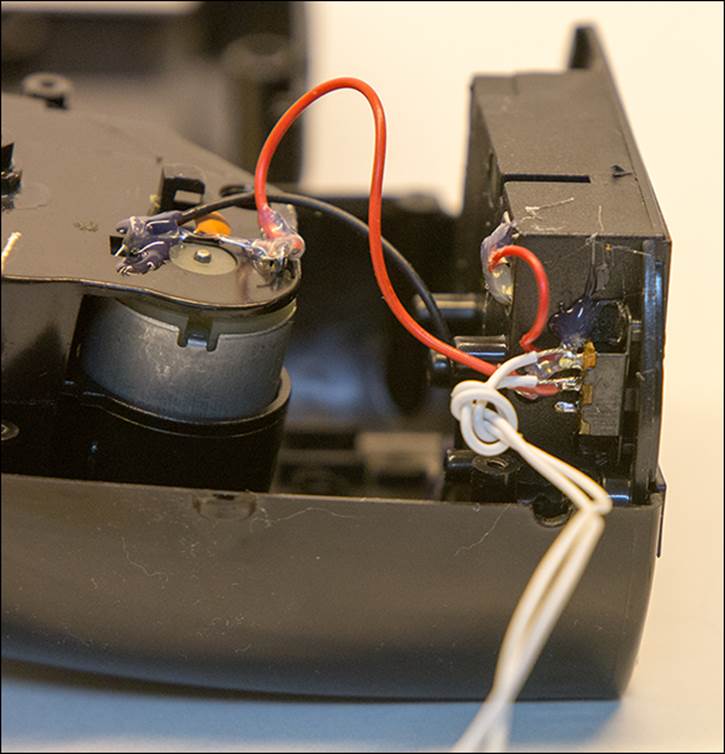
Connect the wires from your toy to the common and normally open relay contact terminals on PiFace Digital as shown in Figure 10.5. The code example in this chapter uses relay 0, which is the bottom two terminals nearest to JP3 and the Raspberry Pi expansion pins. You can use the manual override button in the emulator as described in Chapter 9 to check that the toy moves when the relay is turned on.
Figure 10-5: Wiring the toy up to the normally open relay contacts.
Update the twitter_tag_listen.py code to control the hardware and speak as follows:
1. Import your chicken and piface.pfio modules.
2. Create a Chicken object called chick and pass in the number of the output pins wired up to the toy.
3. Instead of printing a tweet, add three statements to start the chick wobbling, say the tweet and then stop the chick from wobbling.
The code for twitter_tag_listen.py is shown in full in Listing 10.1, with the necessary updates in bold.
Listing 10.1 twitter_tag_listen.py
#!/usr/bin/env python
#twitter_tag_listen.py
#listens for new tweets containing a search term
#and then wobbles a chicken
import time
import sys
import twitter
import chicken
import piface.pfio as pfio
DEFAULT_SEARCH_TERM = "chicken" #what we search twitter for
TIME_DELAY = 30 # seconds between each status check
def main():
api = twitter.Api(consumer_key='xxxxxxcxK9I3g',![]()
consumer_secret='xxxxxfLBmh0gqHohRdkEH891B2XCv00',![]()
access_token_key='xxxxx25-Dw8foMCfNec2Gff72qxxxxxwMwomXYo',![]()
access_token_secret='xxxxxxjIuFb88dI')
previous_status = twitter.Status()
chick = chicken.Chicken(pfio,0)
# has user passed command line argument?
if len(sys.argv) > 1:
search_term = sys.argv[1]
else:
search_term = DEFAULT_SEARCH_TERM
#alternative form of print statement to display contents ![]()
of a variable
print "Listening to tweets containing the word ![]()
'%s'." % search_term
while True:
# grab the first tweet containing the
# search_term
current_status = api.GetSearch(term=![]()
search_term, count=1)[0]
# if the status is different
# then pass it to the chick.say function
if current_status.id != previous_status.id:
chick.start_wobble()
chick.say(current_status.text)
chick.stop_wobble()
previous_status = current_status
# wait for a short while before checking again
time.sleep(TIME_DELAY)
if __name__ == "__main__":
main()
Try it! Run the code and you should have an animated, talking toy that responds to Twitter. Don’t forget you can make the file executable by running the following in a terminal:
chmod a+x twitter_tag_listen.py
Try out different search terms by passing in arguments. For example, type the following in a terminal to search for the hash tag RaspberryPi:
./twitter_tag_listen.py "#raspberrypi"
![]()
Note that you have to enclose the tag in quotes. This tells the command line to ignore the special meaning that # has, and to pass it through to your program as part of the argument. It's the same principle as putting strings in quotes in Python.
Wrapping Up
By now you should have your own animatronic, twittering soft toy. You’ve also seen the advantages of breaking a program up into manageable parts and reusing other people’s code. Becoming a programmer is sometimes like being a plumber – it’s about connecting up functions, with data flowing between them. If you’re struggling with your own program design, try splitting it up into a set of smaller problems, and keep splitting until all the problems are really simple to code. Not only is it less daunting at the design stage, but by testing stage-by-stage, it’s harder for bugs to hide and easier for you to find them. When writing functions, you’ve seen the need for good observability for testing and debugging – that is, you can see what is going on inside them so you can check that they work and fix them when they don’t!
You’ve also seen the need for good documentation. If other people are going to reuse your code, then they need clear instructions about how to install the program, what other modules it depends on and what arguments each function takes and does.
Practically, you’ve also learned about using tar and untar for packaging up sets of files and how to build and install Python modules.
![]()
There are lots of ways you can customise the twittering soft toy; why not try some of the following suggestions? Don’t forget to film what you make, upload it to YouTube and tag it with Raspberry Pi Projects Book.
More Ideas
There are many things you can do with your own toy. Here are some suggestions:
• Try changing the arguments passed to espeak. (Don’t forget that –h will give you a list of options.) For example, you could try
• Different languages
• Different voices, both male and female
• Changing pitch
• Changing speed
Here’s an example of how you could change espeak.py:
import subprocess
DEFAULT_PITCH = 50 # 0-99
DEFAULT_SPEED = 160 # words per min
def say(words, pitch=None, speed=None):
if not pitch:
pitch = DEFAULT_PITCH
if not speed:
speed = DEFAULT_SPEED
devnull = open("/dev/null", "w")
try:
subprocess.call([
"espeak",
"-v", "en-rp", # english received pronunciation
"-p", str(pitch),
"-s", str(speed),
words],
stderr=devnull)
• You could change the speech parameters depending on who is talking or the content of the tweet.
• You could connect multiple soft toys, each with different voices, and have a conversation. (Hint: Create chick0 = chicken.Chicken(pfio,0) and chick1 = chicken.Chicken(pfio,1) and then wire a different chicken up to each relay.)
• You could control more motors in your soft toy and make it dance if it detects certain hash tags.
• If you’re really adventurous, you could replace the espeak.py module completely with a module that splits simple phrases up into words and plays a sound recording of yourself saying each of the words for a more natural sound. Chapter 17, “The Techno–Bird Box, a Wildlife Monitor”, uses the split function, and Chapter 5, “Ping”, shows how to play sounds.