Raspberry Pi Projects (2014)
Part II. Software Projects
Chapter 6. Pie Manby Mike Cook
In This Chapter
• Learn to use animated sprites
• Detect pixels previously drawn on the screen
• Devise artificial intelligence algorithms
• Use screen layers and transparent pixels
• Discover how to detect colliding rectangles
One of the early great hits of computer gaming was Pac-Man, although I don’t think many people had any idea about why it had this name. In the Japanese language there is a tradition of having words that sound like the spirit of what they convey. These are often two identical words said together. In the west the closest we have to that is the concept of onomatopoeia, but it is not quite what giongo and gitaigo is all about, although it is close. Two examples of this are pyonpyon, which is about hopping/skipping, and niyaniya, which is about a grin/smirk. As you can see there is not much sound associated with these, but if there was, those terms are what they would sound like. There is one such word, pakupaku, which is the sound of biting, chomping or eating – in other words, “the munchies” – and it is this phrase that gave the name to Pac-Man. How fitting, then, that my version of this game also has an eating connotation; only this time, the tables are turned, and it is the pie that does the eating.
There have been many variants of this basic game over the years, but some things are constant over different versions, such as the chomping “man” consuming pills distributed in a maze and being pursued by ghosts. Occasionally the tables can be turned on the ghosts by the consumption of a “power pill”; then it is the man that is lethal to the ghosts. (How you could actually kill a ghost, something already dead, is never quite explained.) This situation when the man can kill the ghost is known as a power play. The graphics in the game can range from simple to a stylistic complex 3D rendering, and the sound effects range from bleeps to a horror show. There are optional add-on bonus score items to eat often in the form of fruit, but mainly it is about eating the pills and avoiding the ghosts.
The Pie Man Game
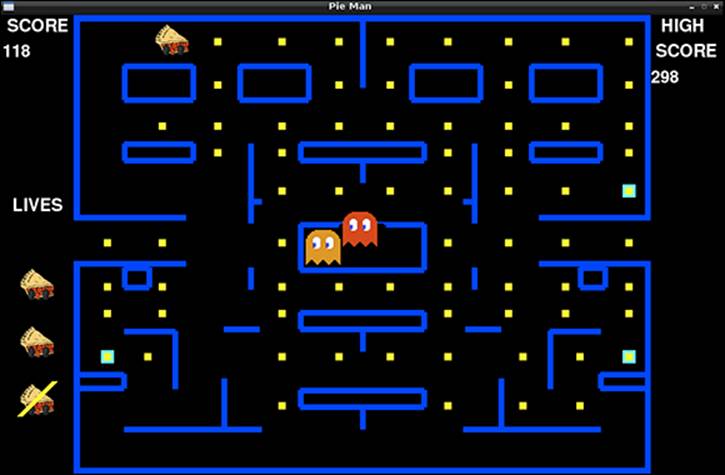
In the preceding chapter, “Ping”, the Ping-Pong game was basically constructed with the technique of having a model of the action in the computer, and the graphics were generated from this model. So variables held the position of the bats, balls and walls, and you set the game going by changing some of these variables and making them interact, and then drawing the result. In this chapter I will show you the other way of making a game, which is in effect the exact opposite. The technique you will use for the Pie Man game involves not knowing in advance the location of anything; things are discovered from frame to frame by examining the pixels in the surrounding locality. This requires a whole bunch of new techniques that need to be learned. In many professional games a mixture of these two methods are used. So, to begin at the end, Figure 6.1 shows a screen dump of the final game, but there is a lot of work to do before you can get there.
Most chapters in this book show you how to build up software by getting increasingly complex and adding more features. However, if I were to take that approach in this chapter, it would probably double the size of the book. This is because each step involves a large piece of code, most of it very similar to the previous piece. So instead I will approach this program in chunks, with each chunk consisting of a number of functions. I will explain what is going on in these functions and talk about the techniques used and difficulties encountered. Each listing needs to be typed into the same file, and there is little that needs to be in any specific order, so let’s get to it.
Figure 6-1: The finished Pie Man game.
Gather Your Resources
Before you start writing any code there are a number of resources you need to construct or to gather. These are the sound effects and the graphic sprites, or small images, of the playing pieces. These are known as sprites because early in computing history they were separate entities with their own dedicated hardware memory that could be set to be displayed anywhere on the screen by simply setting an X and Y register. Nowadays they are always defined in software and the display position controlled by what address in memory you transfer them to, but the name has stuck. Getting these sprites “right” will greatly simplify the code that is needed. First and foremost is the Pie Man himself. It is vital that the sprite used for this be square and not rectangular. At first I made a rectangular Pie Man, but I ran into all sorts of problems with changing direction. The code that tested for the walls on a turn got very complex, and even then it would occasionally fail, causing the Pie Man to walk through a wall. The next thing to worry about is the actual size of the sprite; I settled on a size of 48 pixels square, which in turn governs the size between the walls. Finally, the maximum step size was chosen to be 8, which is a compromise between the speed of the game and the smoothness of the animation. There are a lot of things to calculate between each step, so having it too small will result in a slow game. The step size also governs the thickness of the walls that you need, but more on this when you look at the movement sections of the code.
The Sounds
I found a good source of free sound effects at the Freesound website, www.freesound.org. You need to register in order to download sounds, but that is simple enough. Freesound has a good search engine to narrow down your choice of sounds, and you can hear them directly from your browser without having to download them first. Table 6.1 shows what sounds you need.
Table 6-1 Sounds Required
|
Filename |
Action |
|
eatPill.ogg |
Pie Man eats a pill. |
|
powerPill.ogg |
Pie Man eats a power pill. |
|
ghostDie.ogg |
Pie Man kills a ghost. |
|
pieDie.ogg |
A ghost kills Pie Man. |
|
pieStart.ogg |
Fanfare to indicate that you can start playing. |
Note here that the sound files are all in the .ogg format. I downloaded suitable files and used Audacity to trim them, so there was a minimum delay before the sound actually started, and there were no long silence at the end. Also, Audacity can convert them into mono files and save them in the .ogg format that Python on the Raspberry Pi handles with ease. Note that the Raspberry Pi can also handle WAV files, but I have found that it handles only some files, and I can’t track down what the offending parameters or variations are. When you have these files put them in a folder called sounds inside your working folder.
The Players
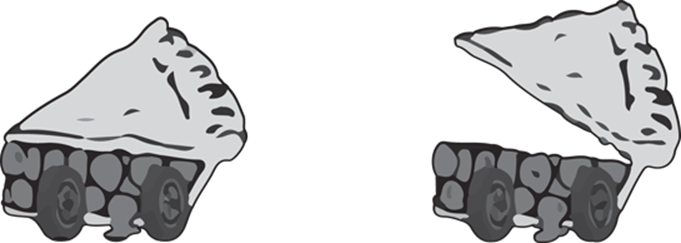
For the sprite I took the image of the racing pie slice used in Chapter 14, “Computer-Controlled Slot Car Racing”, and made it square with a graphics package. I used Photoshop Elements for this, but most graphics programs will allow you to resize an image; however, to make it square, you have to remember to untick the Preserve Aspect Ratio box. Then with a copy of this image, using the Select tool, I carefully removed the pastry lid of the pie slice and pasted it back onto the pie at an angle. Make sure that the background is set to transparent, and save it as a .png file. This gives the two basic images for your Pie Man, shown in Figure 6.2. Make sure that both images are the same size (48 pixels square) and that they are aligned so that when you show one and then the other only the lid moves. Well, if you allow a pixel or two of misalignment in the Y direction, then Pie Man, when it is chomping stationary against a wall, does look like its motor is revving up and down, but don’t overdo it.
Figure 6-2: The two basic Pie Man sprites.
Now with those two basic sprites, make copies of each pointing in the four directions. You can do this by using the Rotate function or the Flip Horizontally and Vertically function of your graphics package. When you have done this give them the names shown in Figure 6.3. Figure 6.3 also shows how you are going to use the sprites in the code. The numbers from zero to seven point at a different image, with the least significant bit of the number determining if the lid is open or closed, and the two most significant bits determining the direction Pie Man is pointing.
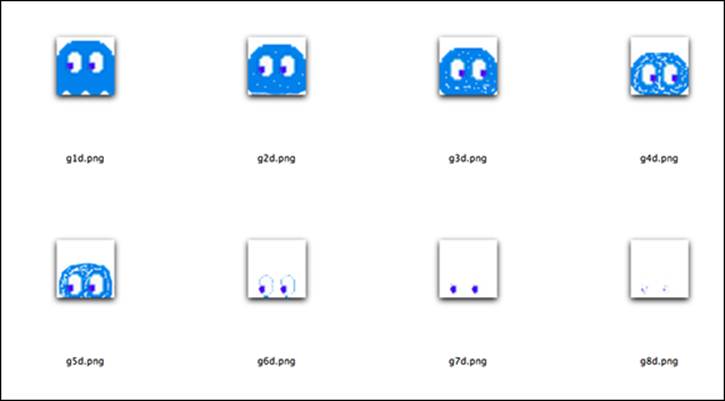
Next you need to consider the ghosts. I used six steps in the animation sprites for the ghosts. Basically the only change that happens from sprite to sprite is the position of the eyes and the ripple of the “skirt” at the bottom. In the game these are run in a shuffling loop – that is, they are used in the order 1 to 6 and then back from 6 to 1. In this way you don’t have to worry about any discontinuities between sprites 1 and 6. You need three sets of ghost sprites, one set being blue and the others red and orange, or two other colours. This is easy in Photoshop. First I selected the eyes, and then inverted the selection so that the eyes were the only things not selected. Then I used the Change Hue function to change the ghost colour. Finally, you need a set of ghosts for the ghost dying sequence. I used a set of eight ghosts, all derived from the first blue ghost. I took the first ghost and shifted it down about three pixels, and carried on doing that in successive ghost sprites until the eyes reached the bottom of frame. Then I added more and more transparent pixels to the last few ghosts to give a fading-away effect. I went back to the first “sinking” ghosts and added a few transparent pixels to the body, putting more transparent pixels in subsequent frames. When played back this gave a nice dissolving effect. In order for the filenames to match up to the programs, the ghost’s names are made from g for ghost, a number for the number in the sequence and finally a letter indicating the colour. These are shown in Figure 6.4. The dying ghost sequence is shown in Figure 6.5; these sprites are named similarly with a d for die as the last letter. Note that all the sprites should have a transparent background and they need to be put into a folder called pies, alongside the sounds folder.
Figure 6-3: All the Pie Man sprites.
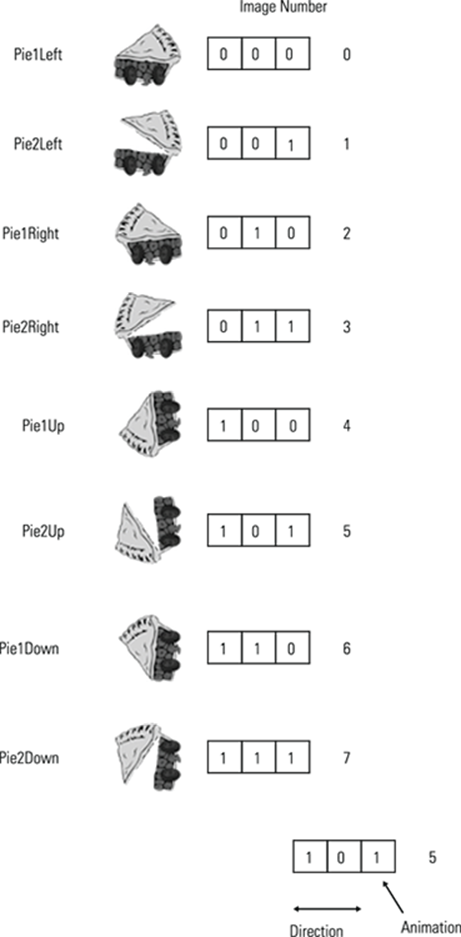
Figure 6-4: All the ghosts.
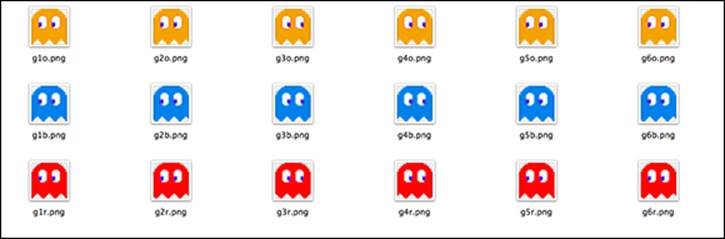
Figure 6-5: The ghost dying sequence.
Setting the Stage
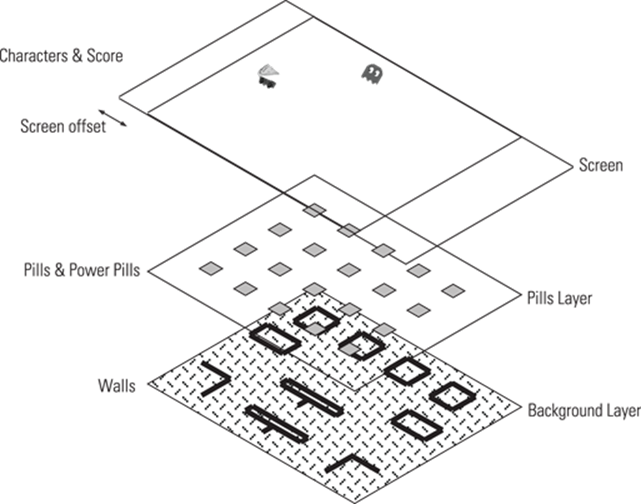
Now with all the players in place, it is time to construct the stage for the action of your game. The trick in making the game play at a reasonable speed is to try and cut down on the number of drawing operations you have to make at each step. Basically the whole screen needs to be redrawn between steps; however, doing this with a set of draw commands would take too much time. To cut down on the amount of work needed, you can construct the game with three layers, or bitmaps. The lowest is the background layer, which contains all the walls of the maze and needs to be drawn only once. The next layer up contains the pills; after they are drawn you need to alter this layer only when a pill is eaten. Finally, the top layer is the screen, where Pie Man and the ghosts will be plotted. So redrawing the screen consists of copying or blitting the background layer into the screen layer, blitting the pill layer into the screen layer and finally blitting the sprites of Pie Man and the ghosts into the screen layer. Although blitting involves transferring a lot of data from one place to another, it is relatively quick and efficient because it is coded in a low-level machine code that can be executed quickly. One thing you must ensure, however, is that the pill layer’s background is transparent so that it does not obscure the walls in the background layer. In Pygame this is done by telling the system that one colour should be treated as being transparent. This is known as the color key. Figure 6.6 shows the arrangement of the layers. Notice that the screen layer is wider than the background or the pills layer because first of all, you need to have room for the score and lives-left indicator and second, you need the extra space to cope with the tunnel from one side of the screen to the other.
Figure 6-6: Screen drawing planes.
Now it is time for your first chunk of code – basically the functions that set up the background layer. As mentioned before, all these listings need to go into one file, so set up a file called pieMan.py in the same folder as the sound and graphics resources and type in the code in Listing 6.1.
Listing 6.1 Setting Up the Background
def setupBackground():
walkIncrement = 8
screen.fill(cBackground)
background.fill(cBackground) # make background colour
#screen bounding box
pygame.draw.rect(background,(0,0,255), (0,0,![]()
800,screenHeight),walkIncrement*2)
block1(70,70, walkIncrement)
block1(230,70, walkIncrement)
block1(634,70, walkIncrement)
block1(468,70, walkIncrement)
block2(70,178, walkIncrement)
block2(634,178, walkIncrement)
block3(314,178, walkIncrement)
block3(314,412, walkIncrement)
block3(314,520, walkIncrement)
pygame.draw.line(background, blue, (playWidth/2, 0),![]()
(playWidth/2,100),walkIncrement) # centre bar
pygame.draw.line(background, blue, (0, 280),![]()
(155, 280),walkIncrement)#tunnel 1 left top
pygame.draw.line(background, blue, (playWidth-155, 280),![]()
(playWidth, 280),walkIncrement) # tunnel 1 right top
pygame.draw.line(background, blue, (0, 344),(155,![]()
344),walkIncrement)#tunnel 1 left bottom
pygame.draw.line(background, blue, (playWidth-155, 344),![]()
(playWidth, 344),walkIncrement) # tunnel 1 right bottom
pygame.draw.rect(background, cBackground, (0,285, ![]()
walkIncrement+1, 8 + pieMan),0) # clear tunnel sides
pygame.draw.rect(background, cBackground, (playWidth-![]()
walkIncrement,285, walkIncrement, 8 + pieMan),0)
pygame.draw.line(background, blue, (245, 178),(245,![]()
288),walkIncrement)
pygame.draw.line(background, blue, (555, 178),(555,![]()
288),walkIncrement)
pygame.draw.line(background, blue, (245, 258),(260,![]()
258),walkIncrement)
pygame.draw.line(background, blue, (540, 258),(555,![]()
258),walkIncrement)
pygame.draw.line(background, blue, (245, 350),(245,![]()
380),walkIncrement)
pygame.draw.line(background, blue, (555, 350),(555,![]()
380),walkIncrement)
pygame.draw.rect(background, blue, (314,290, 172,![]()
64),walkIncrement) # ghost box
pygame.draw.rect(background, cBackground, (370, 291,![]()
60,walkIncrement-2),walkIncrement-2) #ghost door
pygame.draw.line(background, blue, (70, 574),(260,![]()
574),walkIncrement)
pygame.draw.line(background, blue, (540, 574),(730,![]()
574),walkIncrement)
pygame.draw.rect(background,blue, (0,498, 70, 20),![]()
walkIncrement) # left side block
pygame.draw.line(background, blue, (140, 438),(140,![]()
518),walkIncrement)
pygame.draw.line(background, blue, (70, 438),(140,![]()
438),walkIncrement)
pygame.draw.line(background, blue, (208, 574),(208,![]()
504),walkIncrement)
pygame.draw.rect(background,blue, (730,498, 70,![]()
20),walkIncrement) # right side block
pygame.draw.line(background, blue, (660, 438),(660,![]()
518),walkIncrement)
pygame.draw.line(background, blue, (730, 438),(660,![]()
438),walkIncrement)
pygame.draw.line(background, blue, (592, 574),(592,![]()
504),walkIncrement)
pygame.draw.rect(background,blue, (70,350, 35,28),![]()
walkIncrement) # under tunnel bump
pygame.draw.rect(background,blue, (702,350, 35, ![]()
28),walkIncrement) # under tunnel bump
pygame.draw.line(background, blue, (208, 435),(257,![]()
435),walkIncrement)
pygame.draw.line(background, blue, (592, 435),(543,![]()
435),walkIncrement)
drawWords(" SCORE",1,1)
drawWords(" LIVES",1,250)
drawWords(" HIGH",screenOffset+playWidth,1)
drawWords(" SCORE",screenOffset+playWidth,textHeight)
drawWords(str(hiScore),screenOffset+playWidth,textHeight*2)
drawPills()
def block1(x,y, inc):
global background
pygame.draw.rect(background,blue, (x,y, 96, 48),inc)
def block2(x,y,inc):
global background
pygame.draw.rect(background,blue, (x,y, 96, 24),inc)
def block3(x,y, inc):
global background
pygame.draw.rect(background,blue, (x,y, 172, 24),inc)
pygame.draw.line(background, blue, (x+86, y+24),(x+86, ![]()
y+54),inc)
def drawWords(words,x,y) :
textSurface = pygame.Surface((screenOffset,textHeight))
textRect = textSurface.get_rect()
textRect.left = x
textRect.top = y
pygame.draw.rect(screen,cBackground, (x, y, ![]()
screenOffset, textHeight), 0)
textSurface = font.render(words, True, cText, cBackground )
screen.blit(textSurface, textRect)
Remember, you won’t be able to run Listing 6.1 yet as the global variables haven’t been set up, but it is worth examining the code to see what it does. Basically it sets up the background layer by drawing the walls. The thickness of the walls is set by the variable walkIncrement to make them thick enough to make their detection simple. This is basically a large number of draw commands that are, from a programming point of view, quite tedious. The only slightly interesting points are the use of black rectangles to create a hole in the walls for the tunnel from one side of the screen to the other, and to create a thinning of the wall in the ghost box to allow the ghosts to exit. It is not all background, however, and the drawWords function is used to set up the display on each side of the playing area. The screenOffset variable is used to adjust the X coordinates between the background layer and the wider screen layer. A bit more interesting is the next chunk of code shown in Listing 6.2.
Listing 6.2 Drawing the Pills
def drawPills():
pillsLayer.fill((1,0,0)) # make transparent layer
pillsLayer.set_colorkey((1,0,0),0)
# basic grid of pills
pillX = [142, 218, 295, 384, 463, 534, 614, 698, 777, 865 ]
pillY = [32, 92, 149, 186, 239, 311, 372, 409, 469, ![]()
537, 600]
powerPills = [(0,4), (9,4), (0,8), (9,8) ]
# places in the grid where pills are not placed
pillExclude = [(1,1), (3,1), (6,1), (8,1), (1,3), (4,3),![]()
(5,3), (8,3), (4,5), (5,5), (4,7), (5,7), (4,9), (5,9)]
pillShift = [(1,8),(1,9),(2,8),(2,9),(7,8),(7,9),(8,8),![]()
(8,9) ]
for X in range(0,10):
if X > 5 :
pillShiftOffset = -20
else:
pillShiftOffset = 20
for Y in range(0,11):
if not((X,Y) in pillExclude):
if(X,Y) in pillShift:
offset = screenOffset + pillShiftOffset
else:
offset = screenOffset
pygame.draw.rect(pillsLayer,(255,255,0), ![]()
(pillX[X]- offset,pillY[Y], 10,10),0)
if (X,Y) in powerPills:
pygame.draw.rect(pillsLayer,(0,255,255), ![]()
(pillX[X]- offset-4,pillY[Y]-4,18,18),0)
pygame.draw.rect(pillsLayer,(255,255,0), ![]()
(pillX[X]- offset,pillY[Y], 10,10),0)
This function sets up the pills layer and is called every time this layer needs to be refreshed, such as at the start of the game and when all the pills have been eaten. Whereas Listing 6.1 is a simple brute-force set of draw instructions, Listing 6.2 is a bit more subtle. The pills are mainly on a regular grid, so this lends itself to being programmed in an algorithmic way. However, not all the pills in the grid are drawn because some would be over walls or inside boxes. Similarly, some pills need to be dawn slightly off the grid to fit into the walls. This brings into play a new Python function – that of testing if any item in one list is contained in another list. The coordinates of the grid of pills is defined by the pillX and pillY lists, the coordinates pairs of the pills not to plot are in the pillExclude list and similarly the coordinates pairs of the offset pills are in thepillShift list. Two nested for loops generate the sequence of coordinates, and the line
if not((X,Y) in pillExclude)
checks whether those coordinates are contained in the exclusion list. That is quite a lot of functionality in a single statement and would be quite hard to code in another language. Finally, the power pills are simply contained in another list, and they have a large square in a different colour drawn around them. In fact, this did not look good when I drew a box around the existing pixel, so the code draws the large solid square first and then the small yellow pill square on top of that.
The Game Action
Now let’s look at the action part of the program, which will move the sprite in a specific direction unless it is blocked by a wall. This is not quite as simple as it might sound. The position of a sprite, Pie Man or ghost, is the point where you will plot it on the screen, which is in fact the top-left corner of the sprite and, depending on what direction the sprite is moving, will depend on where you have to check to see if it can move. Figure 6.7 shows this for Pie Man moving both left and right. Note that the distance away from the plot position depends on the direction. When Pie Man is moving to the left the place to test is only the move increment away from the plotted position, whereas when he is moving to the right the length of the image needs to be added to the walk increment and then subtracted from the plot position. That is only for the X coordinate; the Y coordinate needs to be scanned over the height of the image to see if a part of a wall is blocking the progress. Note the pixels to test are not contiguous, but every four pixels – that is, half the maximum walk increment. This reduces the number of pixels that need testing and thus speeds up the process. A similar process must be gone through when checking up and down movement. The functions in Listing 6.3 do this.
Figure 6-7: Detecting a wall.

Listing 6.3 Making a Move
def makeStep(p,direction, increment):
global moved
moved = False
if direction == 6:
if wallH(p,p[1]+pieMan+increment):
p[1] += increment
moved = True
else:
while wallH(p,p[1]+pieMan+1):
p[1] +=1 # pull into bottom
elif direction == 4:
if wallH(p,p[1]-increment):
p[1] -= increment
moved = True
else :
while wallH(p,p[1]-1):
p[1] -= 1 # pull into top
elif direction == 2:
if wallV(p,p[0]+pieMan+increment):
p[0] += increment
moved = True
else :
while wallV(p,p[0]+pieMan+1):
p[0] += 1 # pull in to left side
if p[0] > screenOffset + playWidth:
# leaving the screen
p[0] = screenOffset - pieMan
moved = True
elif direction == 0:
if wallV(p,p[0]-increment):
p[0] -= increment
moved = True
else :
while wallV(p,p[0]-1):
p[0] -= 1 # pull in to side
if p[0] < screenOffset - pieMan:
# leaving the screen
p[0] = screenOffset + playWidth
moved = True
return p
def wallV(p,os):
clear = True
for pix in range(0,pieMan,4) :
if screen.get_at((os,p[1]+pix)) == blue:
clear = False
return clear
def wallH(p,os):
clear = True
for pix in range(0,pieMan,4) :
if screen.get_at((p[0]+pix, os)) == blue:
clear = False
return clear
def wallHt2(p,ox,oy,r): #test for turning
clear = True
for pix in range(0,r,4) :
if screen.get_at((p[0]+pix+ox, p[1]+oy)) == blue:
clear = False
return clear
There are four functions here. The main one, makeStep, takes three parameters: The first, p, is a list containing the X and Y coordinates of the plot position, and the others are the direction and how far you need to go in that direction. This function has different code depending on the required direction, but the purpose of the code is the same. It is saying, “Is the space in front of the sprite enough to move the required distance?”, and if so, it lets the sprite move. If not, it pulls in the sprite one pixel at a time until it is up against the obstacle. When that has been done the new position of the sprite is returned.
The three functions following this simply scan the pixels the required distance away to see if it is clear, where clear means not blue, the colour of the walls. Note that the exact colour is specified; you could draw something that was only one bit different from the full blue you are looking for, which would look identical, but you would be able to walk through it. Also, notice that it is the screen layer that is being tested; there is nothing to stop you from testing the background layer if you want to. In that way you could have an identical colour on the pills layer of the screen layer that would not act as an obstacle. Note there is also a global variable called move that is set if a step has been taken successfully, which is used later on for the ghost movements.
There is an additional test for directions 0 and 2 to cope with Pie Man exiting on one side of the screen and entering on the other. In early computers this was a pure consequence of the hardware; the way the memory was scanned meant that if you exceeded the coordinates, the sprite would wrap around and be displayed on the other side of the screen. These days, with a windowed environment, you have to do that effect in code.
Eating the Pills
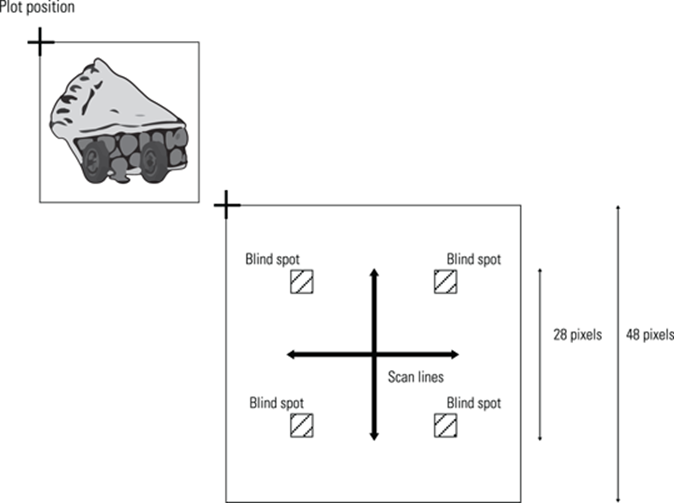
Next turn your attention to the consumption of the pills, which is a bit different from the detection of the walls. Basically you need to know if Pie Man is over a pill – put simply, you need to look at the pixel colour in the pill layer. As the pill is 10 pixels square, you need not look at any pixel within 10 of the boundary of the sprite. Then if you take a look over a horizontal line and vertical line at the center of the sprite and find any pixel that is yellow, you know the sprite is completely over a pill. Just as with checking for a wall, there is no need to look at every pixel on these lines – just every four. Note that there will be four small blind spots where the corner of a pill can be and still not be detected, but in practice this is not a problem because you will detect it on the next munch or step. Figure 6.8 shows the geometry of this situation.
Figure 6-8: Detecting a pill.
Detecting a power pill can in principle be done in the same way, but in practice I found that this was quite time-consuming and slowed the game down noticeably. Therefore, I had to come up with a more efficient way to do this. Basically if the scan for a pill has not detected one, there is no point in scanning for a power pill. If you make a note of where the last pill pixel was found, you can search close to that for the surrounding colour that indicates a power pill. The two functions involved with pill eating are shown in Listing 6.4.
Listing 6.4 Eating the Pills
def eat(p):
global eaten, ghostPos, ghostRelease, gNumber
if pillEat(p):
eatSound.play()
# wipe the pill area
pygame.draw.rect(pillsLayer,(1,0,0), (p[0]- ![]()
screenOffset, p[1], pieMan,pieMan),0)
updateScore(3)
eaten += 1
if eaten >= 96:
eaten = 0
drawPills()
ghostPos = copy.deepcopy(ghostInitalPos) ![]()
# return ghosts to base
gNumber = 0
ghostRelease = time.time()+ 5.0 ![]()
# time for first ghost
pygame.display.update()
def pillEat(p): # test if you are over a pill
global ppCount
fpx = 0
fpy = 0
pill = False
ppColour = (0,255,255,255)
if p[0] > screenOffset and p[0] < rightLimit :
piy = p[1]+24
for pix in range(p[0]+10,p[0]+38,9):
if pillsLayer.get_at((pix-screenOffset, piy))![]()
== pillColour:
pill = True
fpx = pix - screenOffset
pix = p[0]+24
for piy in range(p[1]+10,p[1]+38,9):
if pillsLayer.get_at((pix-screenOffset, piy))![]()
== pillColour:
pill = True
fpy = piy
if pill: #you have a pill is it a power pill?
ppill = False
if fpx != 0:
for pix in range(fpx,fpx+12,2):
if pillsLayer.get_at((pix, p[1]+24)) == ppColour:
ppill = True
if fpy !=0:
for piy in range(fpy,fpy+12,2):
if pillsLayer.get_at((pix-screenOffset, piy))![]()
== ppColour:
ppill = True
if ppill:
#print" we have a power pill"
ppSound.play()
updateScore(40)
ppCount = 0 # start off power play
return pill
There are two functions here. The second, pillEat, deals with the pill detection in the manner already discussed. It returns a Boolean variable showing if it has detected a pill and also clears a global variable (ppCount) if a power pill has been found. The finding of the power pill also triggers the power pill sound as well as giving the score a bonus. The first function, eat, takes in a position list and calls the pillEat function as part of an if statement. When a pill is detected, the sound is played, and the score is updated as you might expect, but also the pill has to be removed from the display. This is done by simply drawing a rectangle covering the whole of the sprite in the pills layer of the colour that you have set to represent transparency. This wipes it from view. There is a count kept of how many pills have been consumed, and when this reaches the maximum number, 96, the ghosts are sent back to their box, and the pills are redrawn again on the pill layer. The line that resets the ghosts contains something you will have not seen before:
ghostPos = copy.deepcopy(ghostInitalPos) # return ghosts to base
This is what is known as a deep copy. When copying lists just putting
ghostPos = ghostInitalPos
will make the two lists the same object; that is, if you change one, the other will also be changed. When the deep copy is used every individual element in the list is transferred to each individual element in the other list. Also, when drawing a new lot of pills the global variable ghostReleaseis set, which controls when the ghosts can come out of their box, but more on this later when you look at the main function.
Death of a Pie Man – or a Ghost
Next, you look at the situation in which a ghost and Pie Man collide, which results in a death; however, whose death it is depends on the mode. If the power play is in force, the ghost dies. Otherwise, the ghost kills Pie Man. He is turned into a ghost because he is killed, and that ghost then dies. This conveniently allows you to use the same animated sequence for any sort of death. This is the only part of the game that relies on knowing where the objects are rather than looking at the screen pixels. This is done by creating a rectangle for Pie Man and the two ghosts, moving that rectangle to match the current playing position and then calling the collide-rectangle function in Pygame, which returns a logic value of true if the two rectangles overlap in any way. The functions that do this are shown in Listing 6.5.
Listing 6.5 Detecting a Touch
def kill(p,g1,g2): # see if man and ghosts are touching
global ghostPos, lives, position, ghostRelease, gNumber
playRect = pygame.Rect(0,0,pieMan,pieMan)
g1Rect = pygame.Rect(0,0,pieMan,pieMan)
g2Rect = pygame.Rect(0,0,pieMan,pieMan)
playRect = playRect.move(p[0],p[1])
g1Rect = g1Rect.move(g1[0],g1[1])
g2Rect = g2Rect.move(g2[0],g2[1])
if playRect.colliderect(g1Rect):
if powerPlay:
ghostDieSound.play()
updateScore(150)
ghostDisolve(g1)
ghostPos[0]=[526,298]
if playRect.colliderect(g2Rect):
if powerPlay:
ghostDieSound.play()
updateScore(260)
ghostDisolve(g2)
ghostPos[1]=[422,298]
if (playRect.colliderect(g1Rect) or playRect.colliderect![]()
(g2Rect) ) and not powerPlay:
pieDieSound.play()
ghostDisolve(p)
time.sleep(0.4)
lives -= 1
updateLives()
ghostPos = copy.deepcopy(ghostInitalPos) ![]()
# return ghosts to base
position = [screenOffset +pieIncrement*2, ![]()
pieIncrement + 2] # position of the pieman
ghostRelease = time.time()+ 5.0 ![]()
# time for subsequent ghosts
gNumber = 0
def ghostDisolve(p):
for i in range(0,8):
pygame.draw.rect(screen, cBackground, (p[0],p[1], ![]()
pieMan, pieMan),0)
screen.blit(ghostdPicture[i],[p[0],p[1]])
pygame.display.update()
time.sleep(0.1)
These two functions do the job of detection. After the rectangles have been created and moved to the correct position the two ghosts are checked to see if Pie Man has caught up with them. If this is true and the global variable powerPlay indicates that a power play is in force, the ghost is killed, the die sound is triggered, the score is updated, the death animation function ghostDisolve is called and the ghost is returned to its box. Note that the two ghosts are worth different amounts in the score. However, if a power play is not in force and one of the ghosts has struck a mortal blow to the brave Pie Man, then it is he who dies. One is subtracted from his total number of lives, the lives display is updated and the players are set back to their initial starting points. The ghostDisolve function simply draws successive ghost pictures on the screen. The sleep time controls the speed of this short animation, and makes it large for a slower, lingering death – or at least lasts as long as your dying sound effect.
The Hunting Pack
Now it is time to look at the control of the ghosts. They must be set to chase Pie Man but run away when there is a power play in force. You need to write something that will determine the movement of the ghosts. Some of this work is done in the main function, but there is one function that hunts you down, getNewDir, which is shown in Listing 6.6.
Listing 6.6 Finding a Way to You
def getNewDir(g):
deltax = ghostPos[g][0] - position[0]
deltay = ghostPos[g][1] - position[1]
#print deltax,deltay
if abs(deltax) > abs(deltay) and abs(deltax)> pieMan:
if deltax < 0:
nd = 2
else:
nd = 0
else:
if deltay < 0:
nd = 6
else:
nd = 4
if powerPlay: # reverse direction
nd ^= 0x2
return nd
Here the function getNewDir takes in the ghost number and first works out the delta, or difference, between Pie Man and the selected ghost. This could be a positive or negative value depending on what side of the ghost Pie Man is on. Therefore, when you test these delta values, you need to discard the sign information and just look at the absolute magnitude, which is done with the abs function. The code then sets the direction number to be in the direction of the largest delta. The last few lines of this function check if there is a power play in force, and if there is, it reverses the direction. This is done in a rather clever way. If you refer back to Figure 6.3 and the numbers associated with direction and if you look at bit 1 of the number (remember you start numbering bits from zero, so bit 1 is the middle bit of the three), you will see that for any given direction number, if bit 1 is inverted, the direction is changed to the opposite direction. So by using the exclusive OR operation, ^, you can reverse the direction number no matter what it is. This clever code line saves you from writing many lines of if tests.
Drawing the Screen
The functions for updating the screen are quite short because most of the heavy lifting has already been done, which is fortunate as this needs to be done every step. This is shown in Listing 6.7.
Listing 6.7 Drawing the Screen
def drawScreen(p,g1p,g2p) : # draw to the screen
screen.blit(background,[screenOffset,0]) # draw background
screen.blit(pillsLayer,[screenOffset,0]) # draw pills
screen.blit(piPicture[pieDirection ^ step],[p[0],p[1]])
if powerPlay:
screen.blit(ghostbPicture[gStep],[g1p[0],g1p[1]])
screen.blit(ghostbPicture[gStep],[g2p[0],g2p[1]])
else :
screen.blit(ghost1Picture[gStep],[g1p[0],g1p[1]])
screen.blit(ghost2Picture[gStep],[g2p[0],g2p[1]])
# blank out exit tunnels
pygame.draw.rect(screen, cBackground, (0,285, ![]()
screenOffset, 12 + pieMan),0)
pygame.draw.rect(screen, cBackground, (playWidth + ![]()
screenOffset,285, screenOffset, 12 + pieMan),0)
pygame.display.update()
def updateLives():
for pie in range(0,maxLives) :
screen.blit(piPicture[2],[25,348+pie*80])
if pie >=lives:
y = 396 + (pie * 80)
pygame.draw.line(screen,(255,255,0),(25,y),![]()
(25+pieMan, y-pieMan),8)
def updateScore(toAdd):
global score
score += toAdd
drawWords(str(score),1,textHeight)
This is quite simple to follow. First the background is blited into the screen and then the pills layer, followed by the picture of Pie Man. Note here that all the sprites are held in an array, and the one chosen is given by the direction number along with the animation bit, which is toggled by the variable step. This simple method ensures that the sprite chosen is in the correct direction and alternates with the pie lid open and closed. This gives a nice chomping effect. Next the two ghosts are drawn. During a power play they are the blue versions; otherwise, they are the red and orange ones. The individual ghost sprite used is determined by the global variable gStep and is altered in the main function, along with Pie Man’s step variable. Finally, the ends of the tunnels are blanked out in case Pie Man is making a trip through them, which makes it look like he is disappearing through the tunnel. The two other functions also update the screen but are called only occasionally. The updateLives function draws a number of Pie Man images on the left of the screen and draws a thick strikethrough line across one if that life has been spent. The updateScore function simply takes in a number, adds it to the total score and then draws that score on the screen.
Before you reach the main function that brings it all together and defines the game you must add the usual housekeeping functions. These are shown in Listing 6.8.
Listing 6.8 Housekeeping Functions
def terminate(): # close down the program
print ("Closing down please wait")
pygame.quit() # close pygame
sys.exit()
def checkForEvent(): # see if you need to quit
global pieDirection, position, start, ppCount
event = pygame.event.poll()
if event.type == pygame.KEYDOWN :
start = True
if event.key == pygame.K_ESCAPE :
terminate()
if event.key == pygame.K_DOWN :
if pieDirection == 0 or pieDirection == 2: #check under
if wallHt2(position,0,pieMan + 1,pieMan):
pieDirection = 6
else :
pieDirection = 6
if event.key == pygame.K_UP :
pieDirection = 4
if event.key == pygame.K_RIGHT :
pieDirection = 2
if event.key == pygame.K_LEFT :
pieDirection = 0
if event.key == pygame.K_p : # cheat - power up at will
ppCount = 0
elif event.type == pygame.QUIT :
terminate()
if __name__ == '__main__':
main()
Unlike the other listings, which can be placed anywhere in the file you are building up, Listing 6.8 has to be at the end – or at least the last line in this listing must be the last line in your file. There is the terminate function that shuts things down when you press the Esc key or close the Pygame window, which is the same for many programs in this book. It is the checkForEvent function that actually provides the user with the controls to play the game – namely, the cursor keys. These mainly look at keyboard events and control the direction of Pie Man through the global variable pieDirection. Primarily, the key simply changes the direction number, but in the case of Pie Man going horizontally and wanting to turn down, an extra check of the wall underneath Pie Man must be made to avoid its walking through a wall. Putting the check here means you don’t have to do it in the normal direction checks that have to be done on every step; you need to do this only on a turn in the downward direction from a left- or right-moving situation. Note as soon as any key is pressed a global variable start is set to be true. This is used at the start of the game on the first key press. Finally, there is a hidden cheat key, much in keeping with early computer games. Of course, because this is typed in a listing, it’s not that “hidden”, anyway: By pressing the P key, you can enter a power play at any time, so if the ghost is about to get you, you can quickly turn the tables. It is easy to remove these two lines for competition play.
The Final Function
Now you are in a position to put it all together and define how the game actually plays. Basically, there are two nested loops: The outer one runs forever and plays game after game, whereas the inner one runs for only as long as there are lives left. The main function sets up all the parameters for a game, and then the inner loop generates the moves and evaluates the results by calling functions you have already typed in. So go ahead and enter the code in Listing 6.9 into your file. You need to place Listing 6.9 at the top of your file because it defines all the global variables and sets up the sounds, sprites and windows.
Listing 6.9 The Global Variables and main Function
#!/usr/bin/env python
"""
Pie Man
A Raspberry Pi Game
"""
import time # for delays
import os, pygame, sys
import random, copy
pygame.init() # initialise graphics interface
pygame.mixer.quit()
pygame.mixer.init(frequency=22050, size=-16, channels=2, ![]()
buffer=512)
eatSound = pygame.mixer.Sound("sounds/eatPill.ogg")
ppSound = pygame.mixer.Sound("sounds/powerPill.ogg")
ghostDieSound = pygame.mixer.Sound("sounds/ghostDie.ogg")
pieDieSound = pygame.mixer.Sound("sounds/pieDie.ogg")
pieStartSound = pygame.mixer.Sound("sounds/pieStart.ogg")
os.environ['SDL_VIDEO_WINDOW_POS'] = 'center'
pygame.display.set_caption("Pie Man")
pygame.event.set_allowed(None)
pygame.event.set_allowed([pygame.KEYDOWN,pygame.QUIT])
textHeight = 36
font = pygame.font.Font(None, textHeight)
screenWidth = 1000
screenHeight =636
playWidth = 800
screenOffset = (screenWidth - playWidth) / 2
screen = pygame.display.set_mode([screenWidth,screenHeight],![]()
0,32)
background = pygame.Surface((playWidth,screenHeight))
pillsLayer = pygame.Surface((playWidth,screenHeight))
picName = [ "pie1left", "pie2left", "pie1right", ![]()
"pie2right", "pie1up", "pie2up", "pie1down", "pie2down" ]
piPicture = [ pygame.image.load("pies/"+picName[frame]![]()
+".png").convert_alpha() for frame in range(0,8)]
ghost2Picture = [ pygame.image.load("pies/g"+str(frame)![]()
+"o.png").convert_alpha() for frame in range(1,7)]
ghost1Picture = [ pygame.image.load("pies/g"+str(frame)![]()
+"r.png").convert_alpha() for frame in range(1,7)]
ghostbPicture = [ pygame.image.load("pies/g"+str(frame)![]()
+"b.png").convert_alpha() for frame in range(1,7)]
ghostdPicture = [ pygame.image.load("pies/g"+str(frame)![]()
+"d.png").convert_alpha() for frame in range(1,9)]
# define the colours to use for the user interface
cBackground =(0,0,0)
cText = (255,255,255)
cBlock = (0,0,0)
blue = (0,0,255,255)
pillColour =(255,255,0,255)
box = [screenWidth-100,screenHeight-40]
hw = screenWidth / 2
hh = screenHeight /2
pieIncrement = 8 # speed of pie man
pieDirection = 2
step = 0 # changing image of pie
gStep = 0 # changing image of ghost
gIncrement = 1
score = 0
hiScore = 0
eaten = 0 # number of pills eaten
ppill = False
maxLives = 3
lives = maxLives
pieMan = 48 # size in pixels each side of the pie man
rightLimit = playWidth+screenOffset-pieMan
position = [screenOffset +pieIncrement*2,pieIncrement+2] ![]()
# position of the pieman
ghostInitalPos = [ [526,298], [422,298] ]
ghostPos = copy.deepcopy(ghostInitalPos)
ghostRelease = time.time()
gNumber = 0
ghostDirection = [0, 2]
moved = True # see if something is blocked
start = False
powerPlay = False
ppCount = 90
def main():
global position, step, gStep, gIncrement, ghostPos, ![]()
moved, ghostRelease, pieDirection
global score, ghostDirection, cBackground, hiScore, ![]()
lives, eaten, gNumber, start, ppCount, powerPlay
while True:
score = 0
eaten = 0
lives = maxLives
pieDirection = 2
setupBackground()
updateLives()
ghostPos = copy.deepcopy(ghostInitalPos) ![]()
# return ghosts to base
position = [screenOffset +pieIncrement*2, ![]()
pieIncrement+2] # position of the pieman
drawScreen(position,ghostPos[0],ghostPos[1])
gNumber = 0
ppCount = 90
start = False
pieStartSound.play()
while not start: # wait for a key
checkForEvent()
ghostRelease = time.time()+ 4.0 # time for first ghost
while lives > 0:
checkForEvent()
if ppCount < 80: # sets length of ![]()
time for power play
if ppCount >70 and ppCount < 75: ![]()
# flash just before end
powerPlay=False
else:
powerPlay=True
else:
powerPlay=False
drawScreen(position,ghostPos[0],ghostPos[1])
kill(position,ghostPos[0],ghostPos[1])
#collision check
eat(position)
position = makeStep(position,pieDirection, ![]()
pieIncrement)
# move ghosts
if powerPlay :
ghostInc = 4
else:
ghostInc = 8
if time.time() > ghostRelease:
if gNumber < 2:
ghostRelease = time.time()+ 5.0 ![]()
# time for subsequent ghosts
gNumber += 1
for i in range(0,gNumber):
new = getNewDir(i)
ghostPos[i] = makeStep(ghostPos[i],new, ghostInc)
if not moved:
ghostPos[i] = makeStep(ghostPos[i], ![]()
ghostDirection[i], ghostInc)
while not moved:
ghostDirection[i] = random.randint(0,3)<<1
ghostPos[i] = makeStep(ghostPos[i], ![]()
ghostDirection[i], ghostInc)
else:
ghostDirection[i] = new
step ^= 1 # toggle pie animation
ppCount +=1 # increment power play count
gStep +=gIncrement
if gStep == 5 or gStep == 0:
gIncrement = -gIncrement
# game over
if score > hiScore : # new high score flash it
hiScore = score
for i in range (0,15):
cBackground = ( (i & 1)*255, ((i>>1) & 1)*255,![]()
((i>>2) & 1)*255)
drawWords(str(hiScore),screenOffset+playWidth, ![]()
textHeight*2)
pygame.display.update()
time.sleep(0.2)
cBackground = (0,0,0)
drawWords(str(hiScore),screenOffset+playWidth,textHeight*2)
pygame.display.update()
time.sleep(2.0)
There is a lot going on here, so let’s walk through it. Listing 6.9 starts off by initialising the sound, the window and the drawing planes – all stuff you have seen before. The lines
pygame.event.set_allowed(None)
pygame.event.set_allowed([pygame.KEYDOWN,pygame.QUIT])
restrict the number and type of events that can be generated. This is important because the event buffer can be filled up with mouse-movement events and other things you are not interested in. As these events are checked only once per step, it could make the game seem insensitive to the control keys. Next, the following lines associate each Pie Man sprite with the correct image number that is shown in Figure 6.3:
picName = [ "pie1left", "pie2left", "pie1right", ![]()
"pie2right", "pie1up", "pie2up", "pie1down", "pie2down" ]
piPicture = [ pygame.image.load("pies/"+picName[frame]![]()
+".png").convert_alpha() for frame in range(0,8)]
This works by first generating a list of image names and then using that list to load in the image files into the piPicture list, with the index number matching the image number that you want. Then come a whole slew of variable definitions that control the game.
The Game Begins
The main function is where it all happens. The part between the first two while statements sets up the game by initialising a lot of variables; you can’t rely on the values they got in the global definitions because these will have changed by the time you play the second game. The secondwhile statement pauses the program at this point until a key is pressed. You will remember that any key press event sets the variable start to true. So when it is the game proper starts. The first thing that happens is the variable ghostRelease is set to the current time plus 4 seconds, which means the player has four seconds of hassle-free pill munching.
The next section of code checks the value of the ppCount variable, which times the power play. The way it works is that the variable is incremented every step and, depending on the total, sets or clears the power play flag called powerPlay. This is set initially to be 90, so there is no power play at the start. However, this allows you to use a simple mechanism for starting a period of power play; you simply have to set the ppCount variable to zero, and it will start. The code also defines a period near the end of the power play when the ghosts will flash briefly. After that section of code the drawScreen function is called, and the positions of Pie Man and the ghosts are plotted. The following section of the code sees if there is a kill, or ghost/Pie Man collision, checks if Pie Man has eaten a pill and then updates Pie Man’s position by calling the makeStep function.
The Ghost Chase
Next comes the movement of the ghosts. First of all, the ghost speed is altered depending on if there is a power play in force. After all, there is little point in being able to kill a ghost if it can outrun you, or at least match your speed. In normal play the ghosts can move as fast as you can, which means errors you make in steering Pie Man will accumulate, so the ghosts will eventually catch you. If you want the ghosts to be able to move faster than Pie Man, don’t increase the speed of the ghosts here; instead reduce the step size of Pie Man using the pieIncrement variable. After that, and providing the ghostRelease time has been exceeded, the moves for the ghosts are calculated by calling the getNewDir function and trying to move in that direction. If this move is blocked, an attempt is made to move in the previous direction. If this is blocked, a series of random directions are tried until one is found that is not blocked. It is this algorithm that gives the ghosts their movement, and it is interesting to see the emergent behaviour that this generates. Note that the gNumber variable is used to release the ghosts one at a time at set intervals.
The next section of code deals mainly with housekeeping. The step variable is toggled to display alternating lid-open and lid-closed images. The ppCount variable is incremented to time the power play period, and the gStep variable is changed up and down to define the ghost sprite to use. And that is it, until the game ends by reducing the number of lives left to zero.
The Game Ends
The final part of the main function deals with what happens at the end of a game. First off, it checks to see if a new high score has been reached, and if it has, it flashes the new score with a number of changing colour backgrounds. The time between the flashes is controlled by the time.sleepstatement. Then after another delay the whole thing starts again.
This is a long piece of code, so the odds are stacked against you for typing it in right the first time. However, if you have worked through the previous chapters, your debugging skills should be quite good by now. The main things to watch out for are getting the indentation correct and getting the case of the characters right; an uppercase X, for example, can look very close to a lowercase x in some fonts.
Using the four cursor keys for playing is quite good as you can concentrate on the screen action without needing to look at the keys. However, when you first play you may be a little frustrated as you might find that your Pie Man doesn’t want to make a turn. This is because the whole of the sprite has to fit into the opening before you can move through it. Just a single pixel blocking the way is enough to prevent any movement. When this happens I have found it best to do a quick turn to one side, then do an about turn and then have another go at making the turn. You will get better the more you play.
Over to You
What you have here is just the start; there are more things you can add to make the game even better. How about keeping a permanent record of the high score? You can write it out to a file in the terminate function and read it in at the start of the main function. Better still, how about a whole table of high scores with names alongside them? There is room on the right side of the screen to do that. See Chapter 8, “Colour Snap”, for hints on how to add a high-score table. Additionally, you have the opportunity to add another sound effect for when a new high score is made. There are also several other places in the game where you can add sound effects, such as when restarting after losing a life and when the game ends altogether. You could add a continuous music soundtrack to play all the time, which is simple to do; you just need the normal command to play the sound but put a -1 in the brackets of the call – then the sound loops continuously.
You can add bonus fruit, like so many games of this type. There is room in the lower left of the screen to show the fruit in waiting. For the more adventurous, you could add some extra code that makes Pie Man wriggle into gaps that he is not initially exactly lined up to fit in. Perhaps the biggest challenge would be to change the behaviour of the ghosts. You might want to have an initial phase in which a ghost can escape from the top of the ghost box no matter where the Pie Man is. Or you can put an exit in the lower part of the ghost box. You could even have each ghost performing a different strategy to hunt. What about using more ghosts? You can also make the ghosts flash more than once toward the end of the power play period.
One other thing you could do is make a level editor. As you have seen, the background consists of many drawing commands; well, you could do this in a separate program and produce an image file of the background. Then, in the game-playing program in place of the drawing, you could simply have an instruction that loads the image file into the background layer. You can also have another file for the pills layer; then when all the pills are eaten you can load in another, different layout.
There is really a lot more you can do, but whatever you do, keep on munching.