HTML5, 20 Lessons to Successful Web Development (2015)
PART I Basic HTML
LESSON 4 Fonts, Colors, and Images

To view the accompanying video for this lesson, please visit mhprofessional.com/nixonhtml5/.
So far you have learned about the structure of an HTML document, and how to format and emphasize text to present it well.
In this lesson, I show you how to change the font face and size of any text, as well as how to add coloring to the text foreground or background, and how to load and display images in a document, including on-the-fly resizing.
Changing Font Face and Color
Even without using CSS, there are many ways you can use HTML to change the way a font displays by passing different attributes to the <font> tag. However, the use of this tag (and another called <basefont>) has been deprecated in HTML4 and made obsolete in HTML5. This means that at some time in the future they could be removed entirely from HTML, but I seriously doubt this will ever happen since they are so widely used on billions of pages worldwide, which would all break if this happened. Nevertheless, you should avoid using them on any new web pages.
It’s true that CSS is a better way to manage colors, but this is a book on HTML, and so I will show you what you can achieve with it. Once you’ve mastered HTML, though, I strongly advise you to learn CSS if you haven’t already.
Anyway, let’s start off this lesson with the <font> tag.
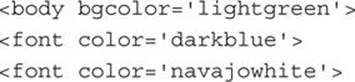
<font color=′…′> … </font>
The color of the text is changed to the value in the quotation marks. This value may be a color name (see the following section, “The Named Colors”) or a color number (see the “Coloring by Numbers” section). For example:
<font color=′red′>This is red text</font>
<font face=′…′> … </font>
The font face of the text is changed to the value in the quotation marks. This value should be the name of a font available to the browser. If the font is not found, a replacement will be selected. For example:
<font face=′Arial′>This text is in the Arial font</font>
<font size=′…′> … </font>
The font size of the text is changed to the value in the quotation marks. This should be a value between 1 and 7 (from smallest to largest size font, with a default of 3). The value may be preceded with a + or – symbol to indicate a relative rather than absolute change of size. For example:
<font size=′5′>This is font size 5</font>
You may combine any or all of the color, face, and size attributes in a single <font> tag, for example, like this:

<basefont>
Additionally you can use the global tag <basefont>, which has the same attributes as the <font> tag but is used to change the default font values for an entire document. In particular, if the size is changed, then any use of the <font> tag with + or – values will change the font’s size relative to the value specified for the basefont.

Headings are not affected by the <basefont> tag, and on some browsers, tables do not use this tag’s values either.
<body bgcolor=′…′>
You can change the default background color of a web page by specifying your choice of color as an attribute to the <body> tag, like this, which sets it to cyan:
<body bgcolor=′cyan′>
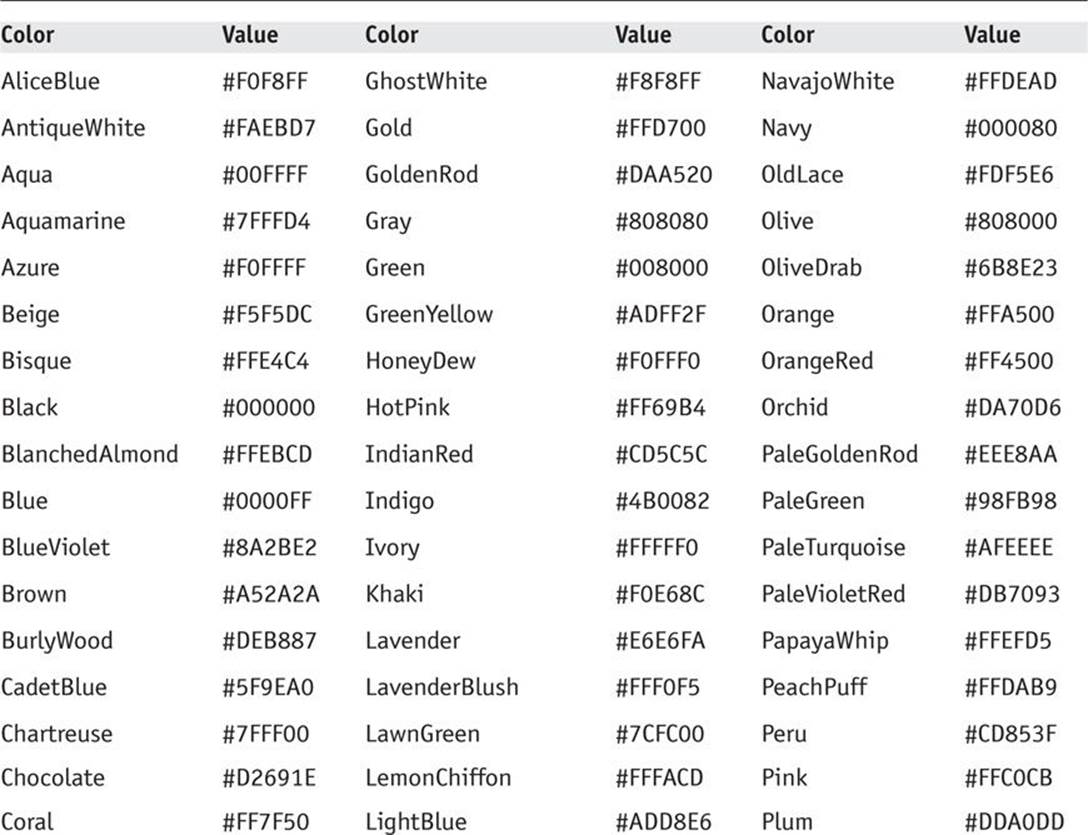
The Named Colors
All browsers support 16 main color names for the color attribute values, including: aqua, black, blue, fuchsia, gray, green, lime, maroon, navy, olive, purple, red, silver, teal, white, and yellow.
Modern browsers support many more color names (up to 147), but those names are not part of the HTML standard. Among other options, you can often add the words dark or light before a color name, but do check that all browsers you intend to support work with these color names. Here are some examples:
See Table 4-1 for the full list of color names supported by all web browsers (and their equivalent hex string values). If you need a wider choice of colors, you should really use hexadecimal color numbers, which allow very precise color selection, as explained in the following section.
TABLE 4-1 The 140 cross-browser color names and their hex values
Coloring by Numbers
Instead of providing color names to HTML tags, you can be much more precise by passing numeric values instead. To do this you start with a # symbol and follow it with six hexadecimal numbers consisting of three pairs, which represent the primary colors of red, green, and blue.
For example, numbers in hexadecimal go from 0 through to F, rather than the 0 to 9 we are used to in decimal notation. Therefore a single hexadecimal digit can represent any of 16 different values (instead of 10). This means that two hexadecimal digits together can represent 256 values (16 × 16, between 00 and FF), and therefore it is possible to create a color out of any one of 256 levels of red, 256 green, and 256 blue—over 16 million colors (256 × 256 × 256).
This is done by following the # symbol with six hexadecimal digits, like this, for example: #006699, which indicates a color consisting of 00 red, hexadecimal 66 (102 decimal) of green, and hexadecimal 99 (153 decimal) of blue. Therefore the value #000000 specifies the color black because it assigns values of 00 to red, 00 to green, and 00 to blue. On the other hand, a value of #FFFF00 specifies the color yellow because it assigns values of FF to red, FF to green, and 00 to blue (on a computer, combining red and green results in the color yellow).
For example, the following tag changes the font color to orange:
<font color=′#FF8800′>This is orange text</font>
You may use either the lowercase letters a–f, or the uppercase A–F, or a combination in hexadecimal color values. Also, in some browsers, if you are prepared to sacrifice the availability of over 16 million possible colors for a more limiting 4,000 or so, you can use a single hexadecimal digit for each primary color in a value, rather than two of them, like this: #000, or #148. The former is the color black, while the latter is shorthand for the color #114488—only use this format if your web pages won’t be accessed with Internet Explorer. However, color values of either length (three or six hexadecimal digits) are accepted by CSS rules (as opposed to HTML) in all browsers.
Font Faces
There are a number of fonts available to a web browser, depending upon the availability of fonts in the underlying operating system. Therefore, when you choose a font name, you are permitted to select alternative, or second-best fonts, in order of preference so that a web page will degrade gracefully according to your font preferences.
For example, as a backup in cases where a computer may not have the Arial font installed, you might choose to ask the browser to choose the best sans-serif font it can find by using the following syntax:

Following is a list of all the main fonts that are likely to be available on most PCs, Macs, Linux boxes or other modern computers, along with one or more suitable substitutes where the chosen font isn’t available. Simply enter the entire string as the value of the face attribute of a <font>tag to select it.
• "Arial, sans-serif"
• "′Arial Black′, sans-serif"
• "′Arial Narrow′, sans-serif"
• "′Avant Garde′, sans-serif"
• "Bookman, ′Bookman Old Style′, serif"
• "′Century Gothic′, sans-serif"
• "Copperplate, ′Copperplate Gothic Light′, serif"
• "′Comic Sans MS′, cursive"
• "Courier, monospace"
• "′Courier New′, monospace"
• "Garamond, serif"
• "′Gill Sans′, ′Gill Sans MT′, sans-serif"
• "Georgia, serif"
• "Helvetica, sans-serif"
• "Impact, fantasy"
• "′Lucida Grande′, ′Lucida Sans Unicode′, sans-serif"
• "′Lucida Console′, monospace"
• "Palatino, ′Palatino Linotype′, serif"
• "Tahoma, sans-serif"
• "Times, serif"
• "′Times New Roman′, serif"
• "Trebuchet, sans-serif"
• "Verdana, sans-serif"
For example, for the Lucida Grande font, enter the string shown, like this:

Figure 4-1 shows how these font strings display on a standard Windows computer using Internet Explorer.
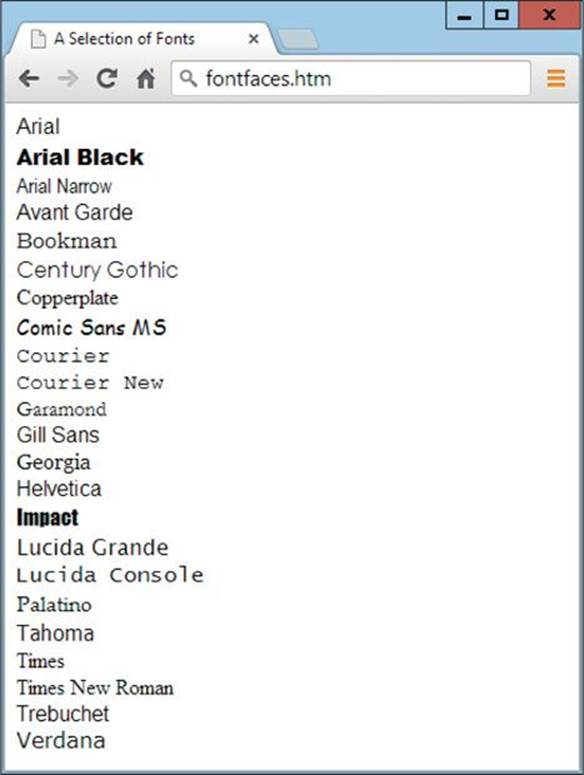
FIGURE 4-1 A selection of fonts and how they display on Windows 7 in IE
The single quotation marks are required within the double quotes to enclose font face names that contain spaces in them.
You can also use these strings without the double quotes (but keeping the single ones) as part of CSS declarations for changing a font face, like this:

Or, better still, employ a CSS class that you create in a separate CSS style sheet or within <style> … </style> tags in the <head> of your document. For more on using CSS, you may wish to refer to my book, CSS & CSS3: 20 Lessons to Successful Web Development.
Displaying Images
Images are easily displayed in a web page and various image types are supported, mainly including .jpg, .gif, and .png. Each of these has different features and drawbacks.
For example, .gif images can be animated, but display fewer colors; .jpg images display more colors but may employ a lossy compression technique that introduces distortions; while .png images offer the best of both worlds, but can be larger.
You include an image in your HTML using the <img> tag (note that this void tag is empty and has no matching </img> tag), accompanied by one or more of the following attributes:
• src This value tells the browser where to fetch the image from. If it is preceded by the string http:// (or https:// on secure servers), then the image will be downloaded from the website at the domain following the http://. Otherwise the image is assumed to be on the current website (or on the local disc) and is loaded from the current folder there.
• alt Some browsers do not display images, or their display may have been disabled, so you can use this attribute to provide alternate text describing the image. This is also useful in cases where an image is slow or fails to load, as shown by the fourth image in Figure 4-2, in which the alternate text is displayed due to the image not being found.
• width and/or height By default web browsers will look up an image’s dimensions and display it using them. But sometimes you may wish to display an image using a different width and height, which you can specify using one or both of these attributes. If only one attribute is used, the browser will compute the other dimension such that the image will stay in proportion. Another reason to specify an image’s width and height is to ensure that page layout is correctly aligned even before the image is loaded. If you specify these values in advance, the browser will allocate the space required for the image right away.
• border Using this attribute you can specify the width of border (if any) to apply to an image. It accepts the value 0 or any positive number. Unless this setting is modified by CSS, if an image has a border and is placed with an anchor, the border color will change when the mouse passes over it. The three images that could be loaded in Figure 4-2 have no border, a one-pixel border, and a five-pixel border respectively. This attribute is obsolete in HTML5 and CSS is recommended instead.
• align With this attribute you can position an image vertically by aligning it within the current line using any of the values top, middle, bottom, absmiddle, or absbottom. You can also align it to the left or right of the current line using the values left or right. This attribute is obsolete in HTML5 and CSS is recommended instead.
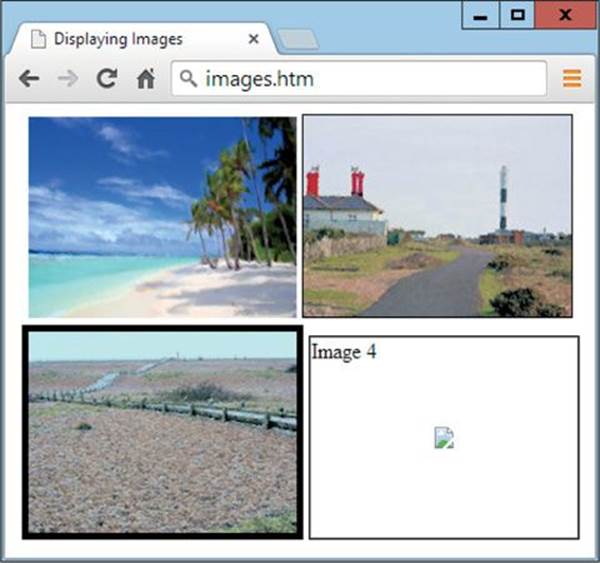
FIGURE 4-2 Four images displayed using the <img> tag, with one missing
The lines of HTML used to create Figure 4-2 are as follows:

In Lesson 3, I introduced the <br> tag, which is used for creating a line break, and mentioned that it also had a secondary purpose, which is to clear left or right alignment. Well, here’s how that works.
Figure 4-3 shows an image being displayed using left alignment with some text flowing to its right. It was created with the following HTML:
<img src=′image1.png′ align=′left′>


FIGURE 4-3 A left-aligned image with text flowing to the right
Disregarding (for now) the fact that the text butts right up against the image, it also seems rather messy because the second paragraph probably should begin under the image. To fix this the <br clear=′left′> tag is used (although clear=′all′ would also work in this instance) prior to closing the first paragraph, as follows, with the result shown in Figure 4-4:
<img src=′image1.png′ align=′left′>


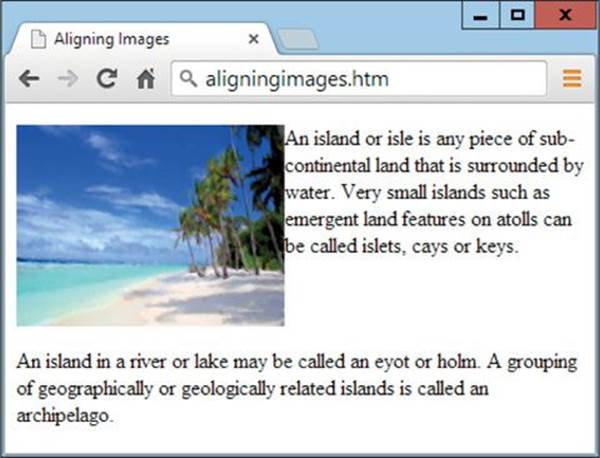
FIGURE 4-4 The left alignment is cleared before the start of the second paragraph.
Although better, this display could still do with a little more cleaning up, so in Figure 4-5 I have added a 1-pixel border to the image, a heading to the text, and created a 15-pixel blank margin to the right of the image using a CSS declaration, as follows:
<img src=′image1.png′ align=′left′ border=′1′ style=′margin-right:15px;′>
<h1>All About Islands</h1>


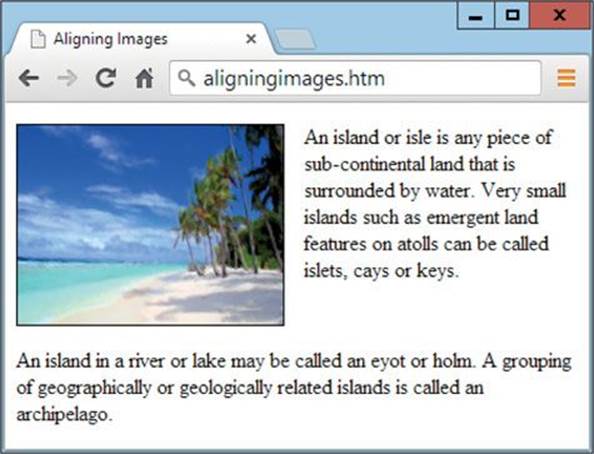
FIGURE 4-5 Now a border, heading, and margin have been added.

Ideally, the CSS styling should be removed from within the body of the web document and into an external style sheet using a class name, which can then be applied to any left-aligned object. Please refer to your favorite CSS book or website for full details on using CSS.
By default, images will line up next to each other unless you use CSS styling or tags such as <br> to force a line break, or <p> to start a new paragraph. Text will also line up next to an image, but starting only at the bottom-most possible line, and then wrapping around to the next line. So use the align attribute to force a full left (or right) align to allow text to flow from the top-most position.
If you choose to right-align an image (or any element, in fact), things are just the same, except that text will flow to its left, and you should use either the clear=′right′ or clear=′all′ attributes of the <br> tag if you wish to turn off the wrapping prior to reaching the bottom of the image.
Remember, though, that the clear attribute (like align) has been made obsolete in HTML5 and, even though it still works in all major browsers (for backward compatibility reasons), you should learn to use CSS to achieve the same effect for all new documents—because one day deprecated and obsolete attributes may be removed altogether, which will break pages that use these attributes.
Summary
Now that you have mastered managing fonts, colors, and images, in the next lesson I will turn to building lists and tables.
Self-Test Questions
Test how much you have learned in this lesson with these questions. If you don’t know an answer, go back and reread the relevant section until your knowledge is complete. You can find the answers in the appendix.
1. What HTML tag is used to manipulate fonts?
2. Which attribute affects the color of text?
3. Which attribute changes the font face?
4. Which attribute changes a font’s size?
5. How can you change the background of a document without using CSS?
6. What colors do the following hexadecimal number values represent: #FF0000, #FFFFFF, #888888?
7. How can you change font face using CSS?
8. Which HTML tag can you use to display images?
9. How can you left-align an image without using CSS?
10. What is the CSS way of left-aligning an element?