Programming 3D Applications with HTML5 and WebGL (2013)
Part I. Foundations
Chapter 3. Three.js—A JavaScript 3D Engine
The previous chapter demonstrated both the power and complexity of programming in WebGL. WebGL allows access to the full capabilities of the GPU to create beautiful real-time 3D renderings and animations in web pages. But to do anything more than the most basic tasks using the API out of the box requires serious effort and literally hundreds of lines of code. This is not a recipe for rapidly building applications on web time. Depending on the kind of project you are contemplating, most developers are faced with a choice: build your own helper library to ease the pain, or use any one of several libraries already out there.
While there are many choices for getting started with your WebGL development, the undisputed leader in this category is Three.js. Three.js provides an easy, intuitive set of objects that are commonly found in 3D graphics. It is fast, using many best-practice graphics engine techniques. It is powerful, with several built-in object types and handy utilities. It is open source, hosted on GitHub, and well maintained, with several authors contributing to it.
Three.js has become something of a de facto choice for WebGL development. Most of the great WebGL content you can view online has been built with it, including Google’s 100,000 Stars (see Chapter 1), and several rich and highly innovative works live on the Web today.
Three.js Flagship Projects
Perhaps the most well-known WebGL project to date is RO.ME “3 Dreams of Black”, an interactive piece created in 2011 by filmmaker Chris Milk with help from engineers at Google. The film is a companion to the song “Black” from ROME, a music project by Danger Mouse and Daniele Luppi, featuring Jack White and Norah Jones. See Figure 3-1.
RO.ME is a sweeping virtual world that allows the user to interactively control the camera, add items to the experience, and see items that other users have added. The project was developed with Three.js and features breakthrough WebGL effects for its time, including a depth-of-field shader that makes close objects appear crisp and far away objects blurry; a cel (“toon”) shader to create a cel-animation-style look; flocking behaviors; and rendering of geometry using point clouds. For more on the technology behind RO.ME, see the team’s project page.

Figure 3-1. RO.ME “3 Dreams of Black,” an interactive video experience inspired by the song “Black” from the album ROME
Moving from the cinematic to the prosaic, we see a completely different but equally important use of WebGL built with Three.js: product visualization. The award-winning car configurator demo shown in Figure 3-2, created by the German team Plus 360 Degrees, allows the user to interactively rotate the scene, select from a set of highly detailed car models, and change the paint colors and the tires to create a customized car. Car configurator applications like this have been around for years, even running in web browsers using Flash; however, the production value of this demonstration is far above anything seen in the past on the Web. The high polygon count for the car detail, the environment maps to simulate reflection, and the use of lighting and shadows all contribute to a very realistic look, and as a result, a truly compelling interactive application.
As good as Three.js may be for rendering real things, it can also be used to display the completely abstract. Figure 3-3 shows an incredible example of this, a visualization of the global small-arms trade created as a Google Experiment. Small Arms Imports/Exports shows over 1 million data points of individual exports and imports to map the transfer of small arms, light weapons, and ammunition across 250 states and territories across the world between 1992 and 2010, using colors, lines, and glow effects mapped onto a virtual globe. The net effect is informative and visually stunning.
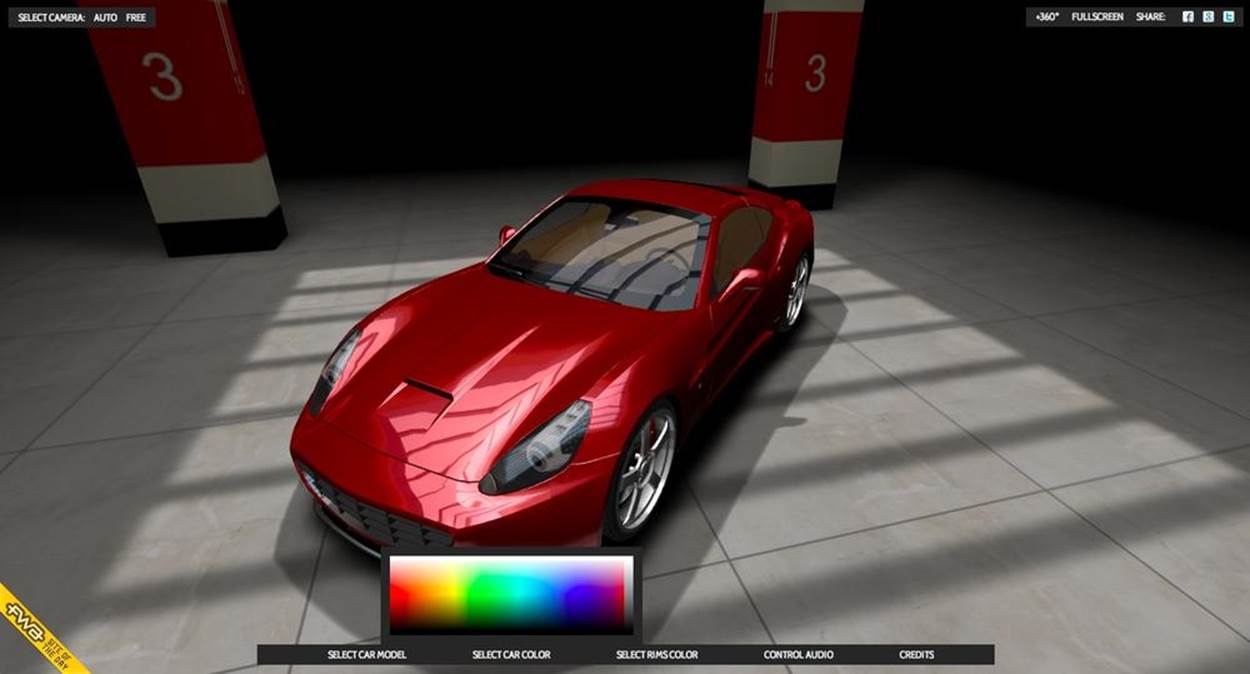
Figure 3-2. A car configurator and visualizer, by Plus 360 Degrees

Figure 3-3. Small Arms Imports/Exports, a Google Experiment created by Google Ideas
Three.js isn’t a game engine in the traditional sense (more on this later); however, it can be used as a foundation upon which to build a game engine and decent games. In a tribute to the original Wipeout and F-Zero game series, Thibaut Despoulain created HexGL, a futuristic space racing game. HexGL features high production values that include glow effects, particle systems, realistic rendering of the buildings and ships, visual post-processing to create the hex lens effect, and a beautifully integrated heads-up display. HexGL is depicted in Figure 3-4.
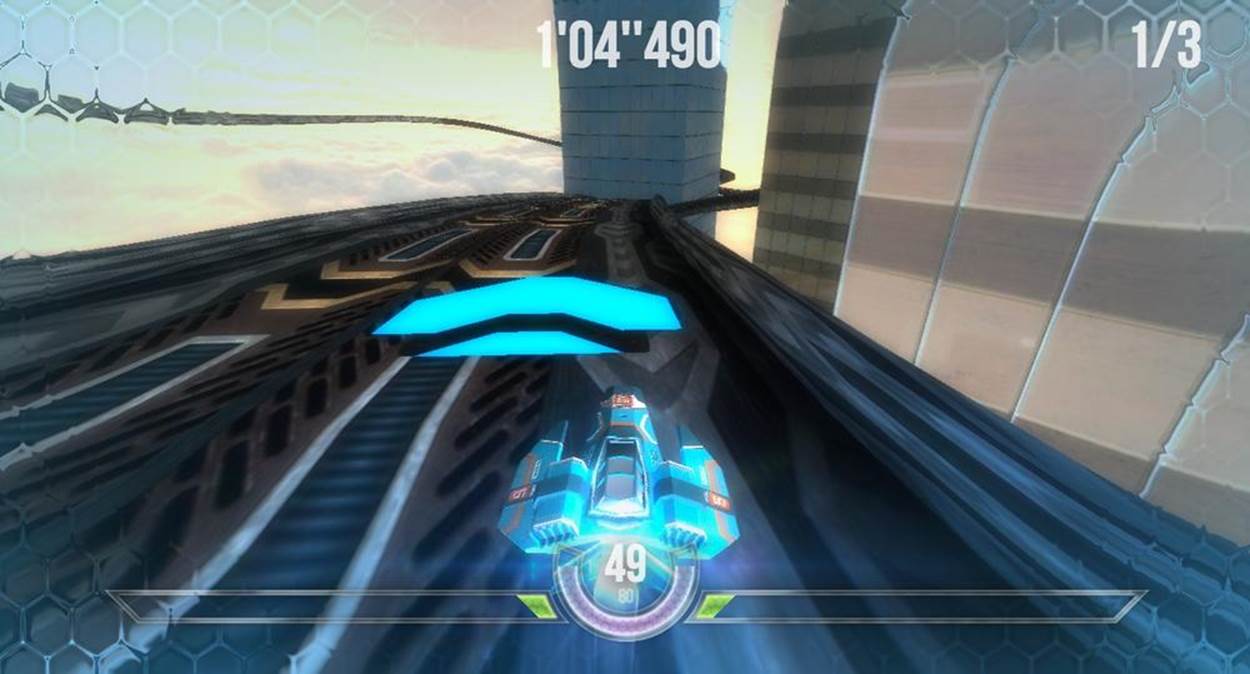
Figure 3-4. HexGL, a futuristic, fast-paced racing game built by Thibaut Despoulain using HTML5, JavaScript, and WebGL
An Overview of Three.js
Three.js was created by Barcelona-based Ricardo Cabello Miguel, more famously known as Mr.doob (I have never dared to ask why). Three.js grew out of Mr.doob’s early participation developing 3D presentations for demoparties—today we would call them hackathons—nearly a decade ago. After being frustrated with the available tools and engines, Mr.doob began building his own, originally in ActionScript for Adobe Flash. When Google Chrome, fast JavaScript, and HTML5 hit the scene a few years later, Mr.doob applied his learning to this new platform, and in 2010 Three.js was born. The first version rendered to SVG and Canvas. A few short months later, when WebGL was released, Three.js was ported to use it—a feat Mr.doob characterizes as “easy to implement,” presumably because he had already built two other renderers with it. Since that time, Three.js has grown in power and sophistication, and has become the most popular choice for building 3D applications in WebGL.
I chose Three.js as the basis for the examples in this book for reasons other than its popularity—though I admit that did play a part. First, I use it for my own development projects and really like it. Second, I believe it is the most complete WebGL library from a features standpoint. Third, I like the fact that it has several core contributors maintaining the code base in the context of creating real-world projects. Finally, it is easy to get started with; in fact, ease of use may be its single biggest selling point. That said, remember that Three.js is just one of many choices, including rolling your own if your project (or temperament) requires it. Throughout the book you will get to know Three.js in detail. For now, here is a summary of what it has to offer.
§ Three.js hides the low-level details of WebGL rendering. Three.js abstracts out the details of the WebGL API, representing the 3D scene as meshes, materials, and lights (i.e., the object types graphics programmers typically work with).
§ Three.js is powerful. More than just a wrapper around WebGL, Three.js contains many prebuilt objects useful for developing games, animations, presentations, data visualization, modeling applications, and post-processing special effects. In addition to the capabilities of the core package, there are numerous samples and extras that you can use in your projects.
§ Three.js is easy to use. The Three.js API has been designed to be friendly and easy to learn. The library comes with many examples that you can use as a starting point.
§ Three.js is fast. Three.js employs 3D graphics best practices to maintain high performance without sacrificing usability.
§ Three.js is robust. There are extensive error checks, exceptions, and console warnings to keep the developer informed and out of trouble.
§ Three.js supports interaction. WebGL provides no native support for picking—that is, knowing when the mouse pointer is over an object. Three.js helps with picking, making it easy to add interactivity to your applications.
§ Three.js does the math. Three.js has powerful, easy-to-use objects for 3D math, such as matrices, projections, and vectors.
§ Three.js has built-in file format support. You can load files in text formats exported by popular 3D modeling packages; there are also Three.js-specific JSON and binary formats.
§ Three.js is object-oriented. Programmers work with first-class JavaScript objects instead of just making JavaScript function calls.
§ Three.js is extensible. It is fairly easy to add features and customize Three.js. If you don’t see a data type you need, write it and plug it in.
§ Three.js also renders to 2D Canvas, SVG, and CSS. As popular as WebGL has become, it is still not running everywhere, or it may not be the best choice for some applications. The good news is that Three.js can also render most content into a 2D Canvas or a SVG element. This can be particularly helpful should the 3D Canvas context not be available, allowing your code to gracefully fall back to another solution. Three.js can also be used to render and transform CSS elements, as we will see in Chapter 6.
It is important to note a few things Three.js doesn’t do. Three.js is not a game engine. It lacks some of the commonly used features you would find in game engines, such as billboards, avatars, finite state machines, and physics. Nor does Three.js have the built-in network support you would expect if you were writing a multiplayer game. If you need this functionality, you will have to build it yourself on top of Three.js or integrate other special-purpose libraries. Three.js is also not an application framework: it does not supply commonly required features such as setup, teardown, event handling, and the run loop. In later chapters we will see how you can use frameworks to save time and avoid implementing those ideas over and over again for each project. Finally, Three.js is not a development environment. You won’t find an integrated set of tools for building your 3D applications end to end.
That said, for all the things Three.js is not, we can appreciate it for what it is: a high-performance, full-featured, easy-to-use 3D rendering engine for web browsers. That’s huge. Let’s have a look.
Setting Up Three.js
To develop with Three.js, first you need to get the latest package from GitHub. As of this writing, the Three.js repository URL is https://github.com/mrdoob/three.js/. Once you have cloned the Git repository, you will want to use the nonminified version of the JavaScript located inbuild/three.js. (There is also a minified version of the library located in build/three.min.js that you can use when deploying finished projects; however, I suggest using the nonminified version while working with the samples in the book to make debugging easier.) Hang on to the full source located under the src folder, too. The API documentation is linked from the GitHub page, but it is pretty basic, so you will want to have the source handy for reference.
NOTE
The version of Three.js used for this book is revision 58 (r58). Mr.doob and company have a habit of changing versions fairly often, so if you are working with the book samples here but have downloaded the latest Three.js, you may find some inconsistency. All of the samples for the book are self-contained, with a copy of r58 stored in the folder libs/three.js.r58/.
Three.js Project Structure
Take a little time with the source tree, documentation, and examples in order to familiarize yourself with Three.js. There is a lot going on in there. You are probably getting anxious to start writing code, but do yourself a favor and look it over; if nothing else, make sure to peruse the examplesfolder. You won’t be sorry.
Here is a quick look at the main folders of interest in the project.
build/
The output directory for the minified and nonminified builds of Three.js. Three.js is built with the Google Closure compiler: one build output file contains the entire Three.js library compiled from several separate source files. If you are not familiar with Closure and want to know more, go to http://code.google.com/closure/compiler/. Note that there is no need to rebuild Three.js from source, so if you don’t want to deal with this, you can ignore the build process and just use three.js or three.min.js as is.
docs/
This folder contains a full set of API documentation in HTML. It is sparse on details, but at least it provides a nicely laid out overview for getting acquainted with the library.
editor/
The Three.js team has begun developing an editing system for creating 3D scenes. As of this writing, it is still very much a work in progress and not particularly useful for production. But you have to give Mr.doob credit: there is nothing he won’t try taking his hand to, given a web browser and a text editor!
examples/
This folder contains literally hundreds of samples covering a range of features and effects, rendered via various methods including Canvas, CSS, and WebGL. Some of these examples are simple “tech demos” that show off a particular feature; others are mind-blowing art pieces that combine several features to create something unique and beautiful. Take your time going through each and every one, and have a look at the source. This will be your best way to get familiar with the vast capabilities the come with Three.js.
src/
The source files for the library. This is a rather complex tree roughly organized into two parts: core and extras. core comprises the main feature set. Think of it as the minimum viable product for Three.js; without it you wouldn’t be able to use Three.js to render scenes. extras contains a host of useful features, including built-in geometric shapes such as cubes, spheres, and cylinders; animation utilities; and image loading classes. You can build all of these yourself on top of Three.js, but you may not want to. In any case, even though they are organized under extras, these classes are all included in the build.
utils/
This folder contains various tools, including Google Closure scripts to compile the minified and nonminified build, file converters from various 3D formats to the Three.js JSON and binary file formats (more on these later), and file exporters from popular modeling packages such as Blender and Maya.
A Simple Three.js Program
Now that you know your way around Three.js, it’s time to write a program. Our first example should make it abundantly clear how much value this library provides over developing to the bare-bones WebGL API.
Recall the texture-mapped cube from the previous chapter; here it is again, this time written with Three.js. The Three.js code is shown in Example 3-1, with a full listing in the file Chapter 3/threejscube.html.
Example 3-1. Creating a texture-mapped cube with Three.js
<script type="text/javascript">
var renderer = null,
scene = null,
camera = null,
cube = null;
var duration = 5000; // ms
var currentTime = Date.now();
function animate() {
var now = Date.now();
var deltat = now - currentTime;
currentTime = now;
var fract = deltat / duration;
var angle = Math.PI * 2 * fract;
cube.rotation.y += angle;
}
function run() {
requestAnimationFrame(function() { run(); });
// Render the scene
renderer.render( scene, camera );
// Spin the cube for next frame
animate();
}
$(document).ready(
function() {
var canvas = document.getElementById("webglcanvas");
// Create the Three.js renderer and attach it to our canvas
renderer = new THREE.WebGLRenderer(
{ canvas: canvas, antialias: true } );
// Set the viewport size
renderer.setSize(canvas.width, canvas.height);
// Create a new Three.js scene
scene = new THREE.Scene();
// Add a camera so we can view the scene
camera = new THREE.PerspectiveCamera( 45,
canvas.width / canvas.height, 1, 4000 );
scene.add(camera);
// Create a texture-mapped cube and add it to the scene
// First, create the texture map
var mapUrl = "../images/webgl-logo-256.jpg";
var map = THREE.ImageUtils.loadTexture(mapUrl);
// Now, create a Basic material; pass in the map
var material = new THREE.MeshBasicMaterial({ map: map });
// Create the cube geometry
var geometry = new THREE.CubeGeometry(2, 2, 2);
// And put the geometry and material together into a mesh
cube = new THREE.Mesh(geometry, material);
// Move the mesh back from the camera and tilt it toward
// the viewer
cube.position.z = −8;
cube.rotation.x = Math.PI / 5;
cube.rotation.y = Math.PI / 5;
// Finally, add the mesh to our scene
scene.add( cube );
// Run the run loop
run();
}
);
</script>
The animation and run loop functions are similar to those in Chapter 2, with a few small changes that I’ll explain in a bit. But what is significant about this version is the code to create the cube scene: what took us nearly 300 lines of WebGL code using the raw API now requires only 40 lines using Three.js. Our jQuery ready() callback fits on one page. Now that’s more like it. Admittedly, this is a trivially simple example, but we can at least begin to imagine how to create a full-scale application like those surveyed at the beginning of this chapter. Let’s take a look at this example in detail.
Creating the Renderer
First, we need to create the renderer. Three.js uses a plug-in rendering system. We can render the same scene using different drawing APIs—for example, either WebGL or the 2D Canvas API. Here we create a new THREE.WebGLRenderer object with two initialization parameters: canvas, which is literally the <canvas> element we created in the HTML file, and the antialias flag, which tells Three.js to use hardware-based multisample antialiasing (MSAA). Antialiasing avoids nasty artifacts that would make some drawn edges look jagged. Three.js uses these parameters to create a WebGL drawing context attached to its renderer object.
After we create the renderer, we initialize its size to be the entire width and height of the canvas. This is equivalent to calling gl.viewport() to set the viewport size as we did in Chapter 2. The entirety of the renderer setup takes place in just two lines of code:
// Create the Three.js renderer and attach it to our canvas
renderer = new THREE.WebGLRenderer(
{ canvas: canvas, antialias: true } );
// Set the viewport size
renderer.setSize(canvas.width, canvas.height);
Creating the Scene
Next, we create a scene by creating a new THREE.Scene object. The scene is the top-level object in the Three.js graphics hierarchy. It contains all other graphical objects. (In Three.js, objects exist in a parent-child hierarchy. More on this shortly.)
Once we have a scene, we are going to add a couple of objects to it: a camera and a mesh. The camera defines where we are viewing the scene from: in this example we will keep the camera at its default position, the origin. Our camera is of type THREE.PerspectiveCamera, which we initialize with a 45-degree field of view, the viewport dimensions, and front and back clipping plane values. Under the covers, Three.js will use these values to create a perspective projection matrix used to render the 3D scene to the 2D drawing surface. (Refer to the 3D graphics primer inChapter 1 if you need a refresher on cameras, viewports, and projections.)
The code to create the scene and add the camera is quite concise:
// Create a new Three.js scene
scene = new THREE.Scene();
// Add a camera so we can view the scene
camera = new THREE.PerspectiveCamera( 45,
canvas.width / canvas.height, 1, 4000 );
scene.add(camera);
Now it’s time to add the mesh to the scene. In Three.js, a mesh comprises a geometry object and a material. For geometry we are using a 2×2×2 cube we created using the built-in Three.js object CubeGeometry. The material tells Three.js how to paint the surface of the object. In this example our material is of type MeshBasicMaterial—that is, just a simple material with no lighting effects. We do, however, want to put the WebGL logo on the cube as a texture map. Texture maps, also known as textures, are bitmaps used to represent surface attributes of 3D meshes. They can be used in simple ways to define just the color of a surface, or they can be combined to create complex effects such as bumps or highlights.
WebGL provides several API calls for working with textures, and the standard provides important security features, such as limiting cross-domain texture use. Happily, Three.js gives us a simple API for loading textures and associating them with materials without too much fuss. We callTHREE.ImageUtils.loadTexture() to load the texture from an image file, and then associate the resulting texture with our material by setting the map parameter of the material’s constructor:
// Create a texture-mapped cube and add it to the scene
// First, create the texture map
var mapUrl = "../images/webgl-logo-256.jpg";
var map = THREE.ImageUtils.loadTexture(mapUrl);
// Now, create a Basic material; pass in the map
var material = new THREE.MeshBasicMaterial({ map: map });
Three.js is doing a lot of work under the covers here. It maps the bits of the JPEG image onto the correct parts of each cube face; the image isn’t stretched around the cube or upside-down or backward on any of the faces. This might not seem like a big deal, but as we saw in the previous chapter, it is. Using WebGL by itself, we have a lot of details to get right; using Three.js, we need only a few lines of code.
Finally, we create the cube mesh. We have constructed the geometry, the material, and the texture; now we put them all together into a THREE.Mesh that we save into a variable named cube. Before adding it to the scene, we position the cube eight units back from the camera, just as we did in the example in Chapter 2, only this time we don’t have to fuss with matrix math; we simply set the cube’s position.z property. We also tilt the cube toward the viewer so that we can see the top face, by setting its rotation.x property. We then add the cube to our scene and—voilà!—we are ready to render.
// Move the mesh back from the camera and tilt it toward
// the viewer
cube.position.z = −8;
cube.rotation.x = Math.PI / 5;
cube.rotation.y = Math.PI / 5;
// Finally, add the mesh to our scene
scene.add( cube );
Implementing the Run Loop
As with the example from the previous chapter, we have to implement a run loop using requestAnimationFrame(). But the details are quite a bit different. In the previous version, our draw() function had to set up buffers, set render states, clear viewports, set up shaders and textures, and much more. Using Three.js, we simply say:
renderer.render( scene, camera );
and the library does the rest. In my opinion, that alone is worth the price of admission.
The finishing touch in our presentation is to rotate the cube so we see its 3D-ness in full glory. Three.js also makes this a snap: set the rotation.y property to the new angle value and, under the covers, the library will do the matrix math, so we don’t have to. Next time through the run loop,render() will use the new y rotation value and the cube will rotate. Here, again, are the animate() and render() functions:
var duration = 5000; // ms
var currentTime = Date.now();
function animate() {
var now = Date.now();
var deltat = now - currentTime;
currentTime = now;
var fract = deltat / duration;
var angle = Math.PI * 2 * fract;
cube.rotation.y += angle;
}
function run() {
requestAnimationFrame(function() { run(); });
// Render the scene
renderer.render( scene, camera );
// Spin the cube for next frame
animate();
}
The end result, depicted in Figure 3-5, should look familiar.
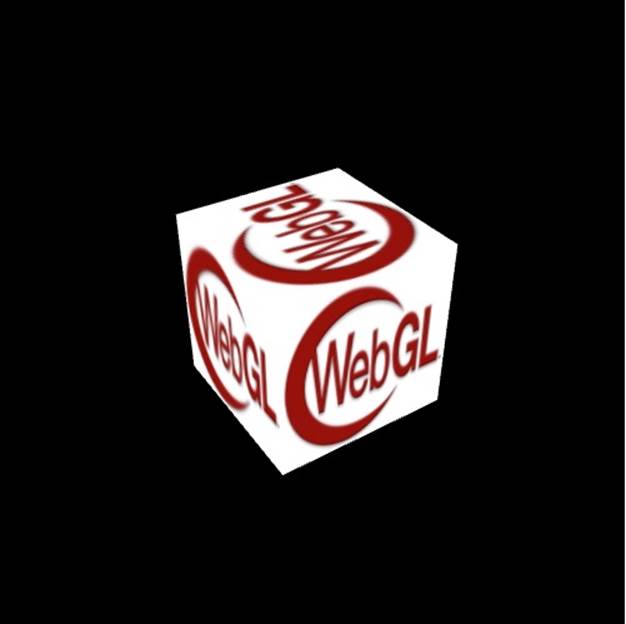
Figure 3-5. Texture-mapped cube using Three.js
Lighting the Scene
Example 3-1 illustrated one of the simplest Three.js 3D scenes we could create. But you may have noticed that this example, while depicting a 3D cube, doesn’t really look very 3D. Sure, as the cube spins we can see its rough shape suggested by the texture map on each face. But still, there is a key element missing: shading. One of the amazing things about real-time 3D rendering is the ability to create a sense of lighter and darker areas on objects by using lights. Take a look at Figure 3-6. Now the faces of the cube have hard edges, as you would expect from an object in the real world. We did this by adding a light to the scene.
I had wanted to add this light to the cube example in Chapter 2, but the additional dozens of lines of code to update the vertex buffer data and rewrite the vertex and fragment shaders didn’t seem worth it; by then, I think had hammered the point home that you could spend your life cranking out WebGL code to do simple things like this. With Three.js it isn’t nearly that laborious. We need only a few extra lines of code. Take a look at Example 3-2. The source code for this version is in Chapter 3/threejscubelit.html.
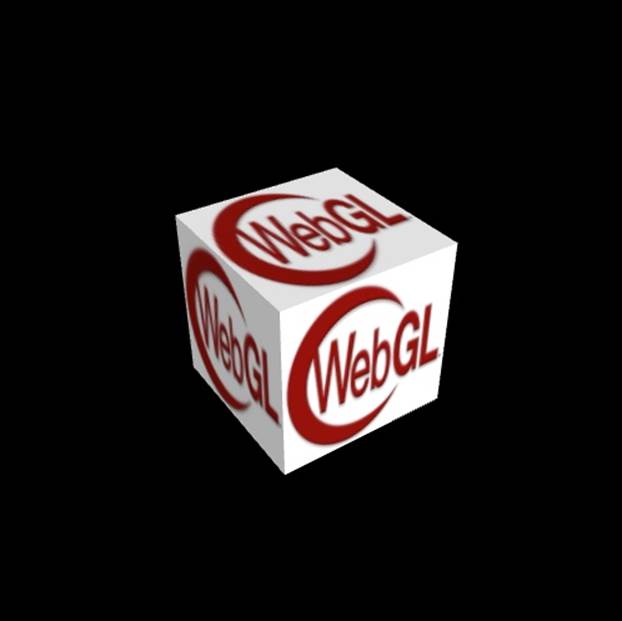
Figure 3-6. Three.js cube with lighting and Phong shading
Example 3-2. Lighting the cube with Three.js
// Add a directional light to show off the object
var light = new THREE.DirectionalLight( 0xffffff, 1.5);
// Position the light out from the scene, pointing
// at the origin
light.position.set(0, 0, 1);
scene.add( light );
// Create a shaded, texture-mapped cube and add it to the scene
// First, create the texture map
var mapUrl = "../images/webgl-logo-256.jpg";
var map = THREE.ImageUtils.loadTexture(mapUrl);
// Now, create a Phong material to show shading; pass in the map
var material = new THREE.MeshPhongMaterial({ map: map });
The lines highlighted in boldface tell the story. First, we add a light to the scene. Lights are just another type of scene object: once you create them, you add them to the scene and their values will be used to render the other objects. In this example, we use a directional light; that is, a light that shines with parallel rays in a particular direction. The Three.js syntax for directional lights is (in my opinion) a little counterintuitive: you specify a position for the light, and a target position (by default located at the origin, so omitted here). Three.js then computes the direction by subtracting the target position from the light’s position. In our example that means the light points into the screen from (0, 0, 1) to (0, 0, 0)—that is, directly at the cube, which is positioned at the origin.
Before we can see the effect of the light, we need to do one more thing. Instead of using a basic material with the cube, as in the previous example, we will use a Phong material. In Three.js, objects are lit based not only on the lights we add to the scene, but also on their material types. The Phong material type implements a simple, fairly realistic-looking shading model, called Phong shading, with high performance. We can now see the edges of the cube: faces that point more toward our light source are brightly lit, those that point away are less brightly lit, and the edges are visible where any two faces meet. There is much more to lighting than this, but those are the basics; we will explore the concept in more detail in the next chapter. But for now at least, we have created what passes for a real-looking 3D object in just one page of JavaScript code.
NOTE
Phong shading was developed at the University of Utah by Bui Tuong Phong. Phong’s algorithms, considered radical at the time of their introduction, are now a standard shading method for many rendering applications, especially real-time rendering, because of their efficient computation of realistic shading. For more information on Phong shading, refer to the Wikipedia entry.
Chapter Summary
This chapter introduced us to Three.js, the most popular open source toolkit for creating 3D web applications in WebGL. We saw some of the amazing projects being built with it, from interactive cinematic experiments to promising e-commerce visualizations. We grabbed the latest source code from GitHub and took a quick tour of the project source. Finally, we built a few simple programs that show how much value the library adds: a program written in raw WebGL style using hundreds of lines of code can be expressed in just a few dozen lines of code with Three.js. Moreover, Three.js allows us to work with well-established 3D graphics concepts in familiar object-oriented style.
This chapter gave us a glimpse of how quickly Three.js can get us going. In the next few chapters, we will see how far it can take us.