Programming 3D Applications with HTML5 and WebGL (2013)
Part II. Application Development Techniques
Chapter 8. The 3D Content Pipeline
In the early days of the Web, if you knew how to write markup, you were a content creator. There was no Dreamweaver WYSIWYG editing; no Photoshop tool for slicing images. The task was left, largely, to programmers—and the Web looked like it. Eventually, the makers of professional authoring software developed tools for creating web-ready content. Once the tools were in place, artists and designers assumed the content responsibilities, and the Internet transformed into a consumer-grade experience.
WebGL development is going through an evolution similar to those early days of the Web. For the first few years of the technology’s existence, content was created by hand by programmers typing into text editors, or cobbled from whatever 3D format they could find a converter for. If a converter didn’t exist, you would write one to get the project done.
Fortunately, the situation is changing rapidly. Three.js and other WebGL libraries are getting better at importing content created by professional tools. The industry is also pulling together to create new 3D file format standards designed specifically for web use. The content creation landscape is still a bit rocky, but at least we have moved beyond the “stone tools” stage of a few years ago into more of a Bronze Age of 3D development.
This chapter covers the 3D content pipeline for web development. First, we will look at the overall content creation process. You may find this useful if you are new to 3D authoring. Then, we survey popular modeling and animation tools being used in today’s WebGL projects, and dig into the details of the 3D file formats that are best suited to web deployment. Finally, we will learn how to load those files into applications using Three.js utilities, in preparation for projects to come in following chapters.
The 3D Creation Process
3D content creation involves a set of highly specialized disciplines. Professional careers in 3D require extensive training and a deep understanding of complex authoring tools and workflows. Often, one 3D artist does everything, including modeling, texture mapping, and animating. But sometimes, especially on bigger projects, people specialize.
In many ways, 3D content creation is similar to making 2D art with Photoshop or Illustrator. But 3D authoring is also different from 2D art creation in a few fundamental respects. Even if you consider yourself a technical person, if you are planning on a developing a 3D project, it’s good to know what it takes to make the content that goes into it. With that in mind, let’s take a look at the basic steps involved in the 3D creation process.
Modeling
3D model creation typically starts with a sketch by the artist. Before long, a modeling package is used to turn that sketch into a digital representation in 3D. Models are usually created as 3D polygonal meshes, drawn first as wireframes and then shaded with materials. This activity is known as3D modeling, and the person who does it for a living is called a modeler. Figure 8-1 depicts a basic model of a teapot, created with Autodesk 3ds Max. The model is seen from four different views: top, left, front, and perspective.
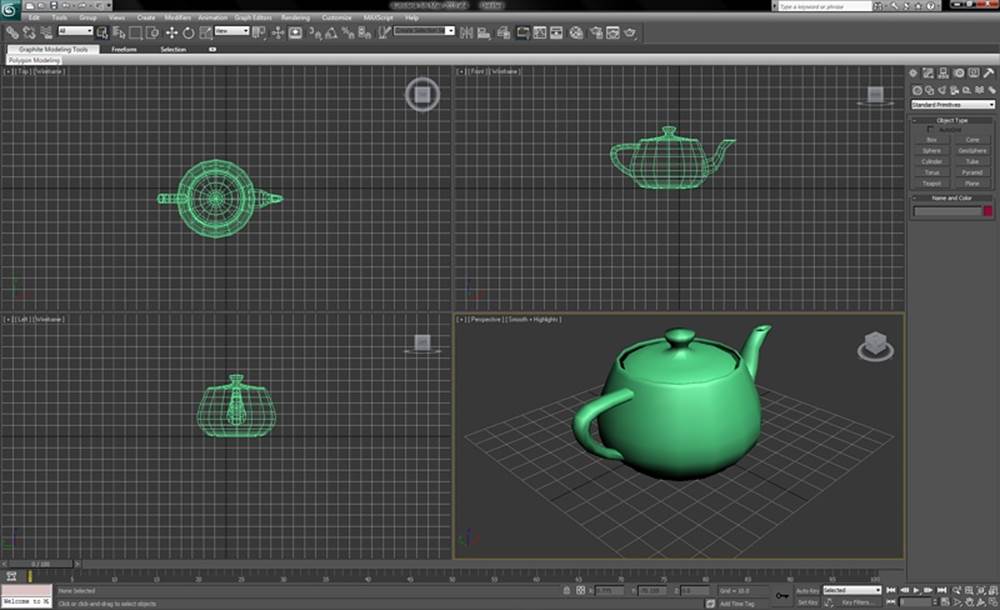
Figure 8-1. 3D modeling in 3ds Max with top, front, left, and perspective views (image ©Autodesk, from the main Wikipedia entry on 3ds Max)
Texture Mapping
Texture mapping, also known as UV mapping, is the process of creating 2D art to wrap onto the surface of a 3D object. Modelers often do their own texture mapping, though in larger projects the responsibilities may be divided, and specialized texture artists do the texturing. Texture mapping is usually done with assistance from a visual tool built directly into the modeling package. The tool allows the artist to associate vertices of the mesh with positions on the 2D texture map while providing visual feedback. Figure 8-2 depicts texture mapping, where we see the map on the left; the combined view is on the bottom right and overlays vertex positions with the image data; and the resulting preview is on the top right. Note the somewhat counterintuitive layout of the image data on the left. Only half the face is shown. This is because, in the case of this texture map, the left and right sides of the face are mirror images. This strategy allows the artist to pack more data into less space and/or use other parts of the image for additional detail.
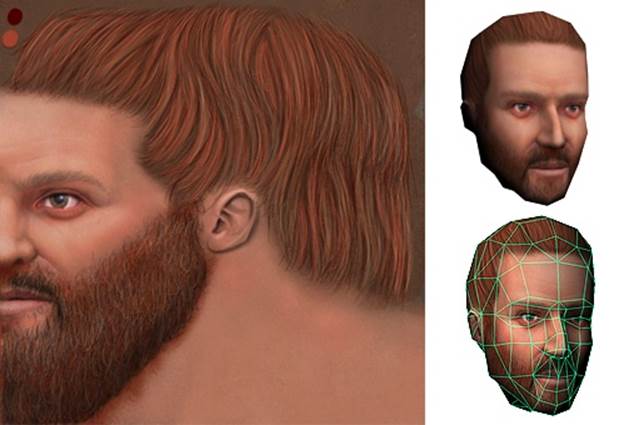
Figure 8-2. Texture mapping: a 2D image is wrapped and reflected onto the surface of a 3D object (image courtesy Simon Wottge)
Animation
The process of creating 3D animations ranges from easy to extremely difficult, depending on the task. Key frame animating tends to be simple, at least in concept. The interfaces can get tricky to use and cluttered visually. A key frame editor, like the one depicted in Figure 8-3 from Autodesk Maya, contains a set of timeline controls (highlighted in the red rectangle near the bottom of the Maya window) that allow the artist, also known as the animator, to move or otherwise changes the object in the view, and then identify and click on positions in the timeline to define the key frames. Key frames can be used to change translation, rotation, scale, and even light and material attributes. When an animator wants to key frame more than one attribute, he or she adds another track to the animation timeline. The animator lays out tracks in the interface by stacking them, which is what can lead to the visual clutter.
Animating characters with skinning is much more involved. Before the character can be animated, a set of bones, or rig, must be created. The rig determines various aspects of how the skin moves in response to movements of the bones. Rigging, or the process of creating the rig, is a very specialized skill. Often, different artists do the character animation and rigging.
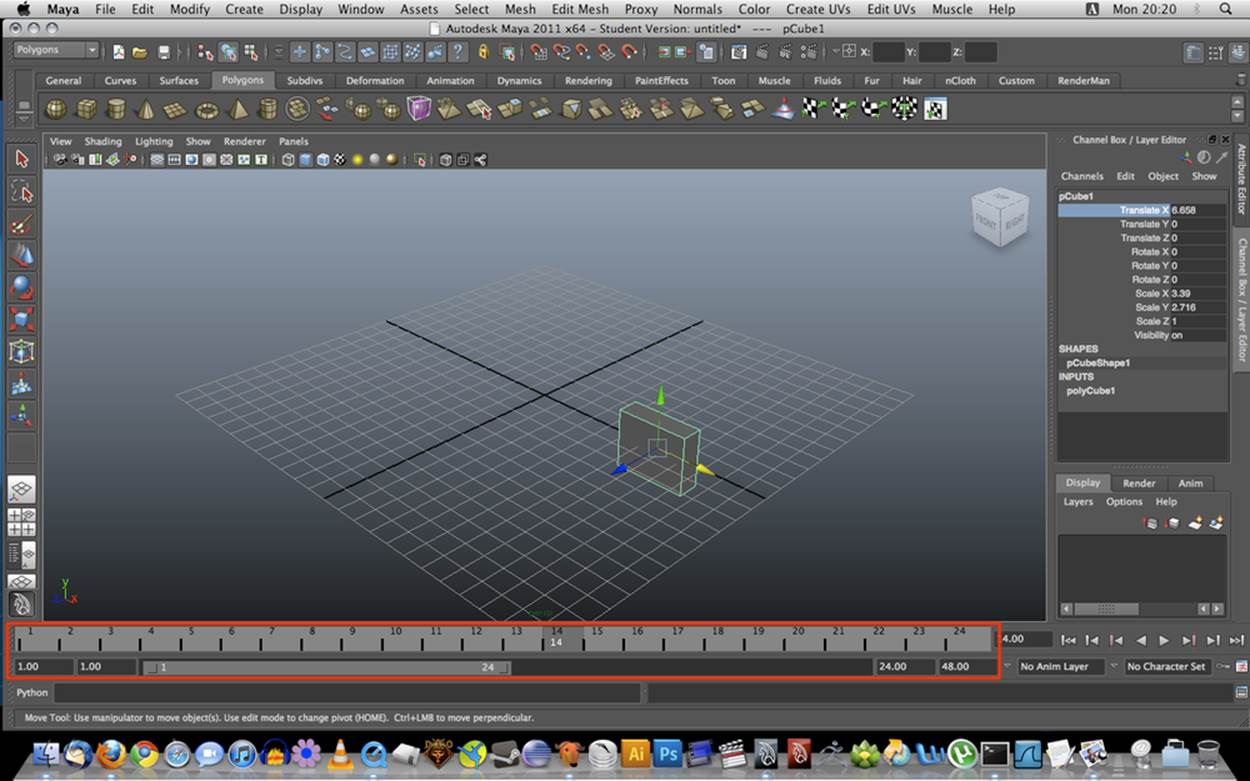
Figure 8-3. Maya’s animation timeline tool, with controls for key frames animating translation, rotation, scale, and other attributes (image courtesy UCBUGG Open Course Ware)
Technical Art
We may not think of programming as a content creation activity, but in 3D development it often is. Complex special effects, such as certain shaders and post-processing techniques, can require the skills of an experienced programmer. In game and animation shops, this job falls to a technical artist (TA) or technical director (TD). There is no formal definition of these job positions, or strict difference between the two positions; though as the name implies, the TD is usually a more senior and experienced person. TDs write scripts, rig characters, write converter programs to get art from one format into another, implement special effects, develop shaders—in other words, all the stuff that is too technical for a visual artist to handle. It is a highly valued set of skills, and to many producers, good TDs are worth their weight in gold.
Given that they program for a living, TDs’ tool of choice is usually a text editor. However, there are now some interesting visual development tools for creating shaders and special effects. One example is ShaderFusion, a recently released visual tool for use with the Unity game engine. ShaderFusion allows the developer to develop shaders by defining data flows between one object’s outputs (such as time or position) and another object’s inputs (e.g., color and refraction). The interface is depicted in Figure 8-4.
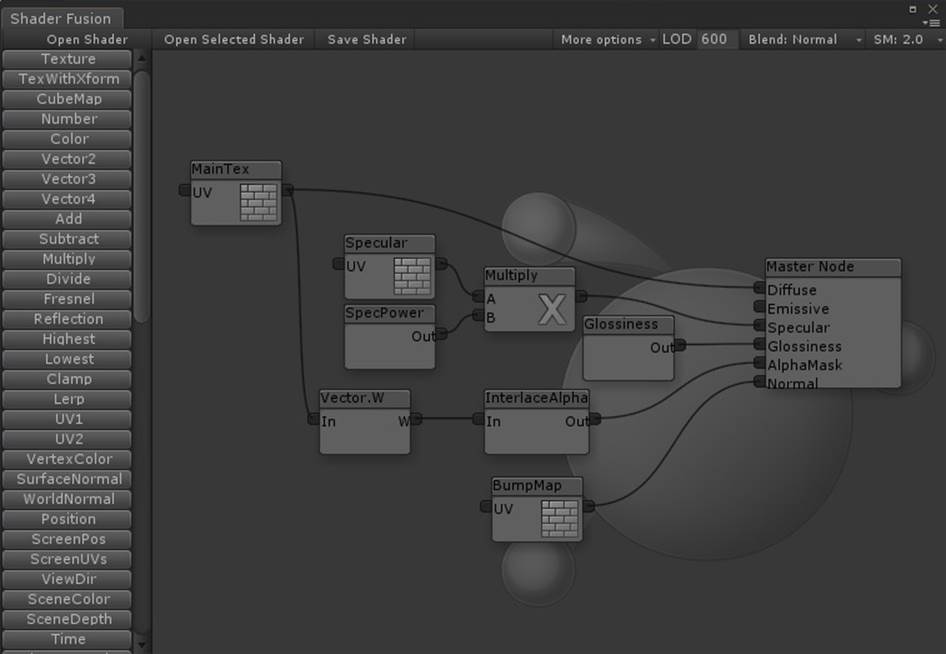
Figure 8-4. ShaderFusion, a visual shader editor for the Unity3D engine
3D Modeling and Animation Tools
This section explores the many tools 3D artists can use to create content. There are traditional packaged desktop software products, catering to a range of users and skill levels. There is also a new and promising class of authoring tool that runs as a cloud-based service with an HTML5 interface; some of these services are free, while others charge monthly subscription fees. Finally, artists can leverage their peers’ work by downloading existing models and animations from any of several online sites.
Traditional 3D Software Packages
For the most part, 3D art creation happens inside software applications known as digital content creation tools, or DCC tools for short. There is a long legacy of 3D DCC tools originating in film production and engineering, and now used widely in architecture, game development, still-rendered art, and more. Think of these packages as analogous to Adobe Photoshop, but for 3D development. They occupy a similar place in the web production pipeline—as sources of original art that needs to be further converted, optimized, and integrated into a web page.
3D DCC tools are typically packaged as native operation system applications, “boxed software” if you will (though of course these days they are usually downloaded from the creators’ websites). 3D DCC tools tend to require professional-level skills, and feature complicated user interfaces with a steep learning curve. The good news is that there are a large and growing number of digital artists learning to use 3D DCC tools as part of their education and early professional training. Like a resident Photoshop expert, an experienced 3D artist will likely become part of the web team as you undertake 3D development projects going forward.
3D DCC tools are offered at a broad range of prices, from the completely free Blender to the Autodesk products 3ds Max and Maya, which cost a few thousand dollars per license. The tools tend to have a general set of features covering modeling, texturing, and animation; however, some products are specialized toward one or another of these capabilities. Most 3D DCC tools come with built-in importers from and exporters to the standard file formats we will look at later in this chapter. They also usually have some form of extensibility, such as a native (C++-based) SDK and/or a high-level scripting language for writing plugins that extend the user interface, provide custom rendering, export to new file types, and so on.
Here is a survey of widely used modeling and animation tools that you may encounter when working on WebGL projects. Later in the chapter, we will look into how a few of those can be integrated into a working WebGL content pipeline.
Autodesk 3ds Max, Maya, and MotionBuilder
San Rafael, California–based Autodesk makes three of the most popular 3D modeling and animation products on the market: 3ds Max, Maya, and MotionBuilder. While the latter is focused primarily on character animation, 3ds Max and Maya are full-featured 3D suites. 3ds Max and Maya are quite similar in terms of feature coverage, and in that sense they can be hard for new users to choose between. Existing users of the products attribute the choice of one or the other to taste, preferences for workflow, and so on. One big difference is that Maya runs on Windows and Mac OS, while 3ds Max runs only on Windows. All three of the Autodesk tools publish to the company’s common file format, FBX.
NOTE
Why would Autodesk have so many similar products? About a decade ago, the company went on a bit of a spree and purchased competing products—Maya from Alias Systems Corporation, and MotionBuilder from Kaydara. While MotionBuilder is really focused on character animation, the other two products have similar feature sets. There is an informative article comparing 3ds Max and Maya on Tom’s Hardware.
The Autodesk tools have complicated user interfaces with lots of controls, views, property sheets, and pop-up windows. They are full “workbench”-style products for complete 3D development. The interface usually starts with a four-viewport view like the 3ds Max screenshot in Figure 8-1, which can be collapsed into single scene view as depicted in the Maya screenshot in Figure 8-5. Common features in these products include material editors, toolbars for creating new objects like geometry primitives (spheres, cubes, etc.), tools for drawing and editing free-form meshes, animation timeline tools, rendering plugins, shader editors—and the list goes on.
Figure 8-5. Autodesk Maya, a complete 3D modeling and animation package (image ©Autodesk, from the main Wikipedia entry)
The Autodesk tools are priced for professionals: about US $3,000–4,000 for a single product. The company also offers annual subscription-based pricing, and student and learning editions.
Blender
Blender is a free, open source, cross-platform suite of tools for 3D creation. It runs on all major operating systems and is licensed under the GNU General Public License (GPL). Blender was created by Dutch software developer Ton Roosendaal, and is maintained by the Blender Foundation, a Netherlands-based nonprofit organization. Blender is extremely popular, with the foundation estimating two million users. It used by artists and engineers from hobbyist/student level to professional.
Like 3ds Max and Maya, Blender has a complex user interface with multiple views, several toolbars and controls, and the associated steep learning curve. So, while the price may be right, it is not for the faint of heart. Still, Blender is an attractive choice for web developers for several reasons:
§ It is free of charge.
§ It is open source.
§ It features an extensibility layer programmable in Python.
§ It supports import and export for many different file formats, including 3ds Max, OBJ, COLLADA, and FBX. The Three.js team has also developed an exporter from Blender to the Three.js JSON format (described later in this chapter).
Trimble SketchUp
Occupying an intermediate rung of the 3D DCC tools ladder is SketchUp (officially, Trimble SketchUp), an easy-to-use 3D modeling program used in architecture, engineering, and to a lesser degree, game development.
SketchUp has had an interesting history. First developed by @Last Software in 1999, the product eventually attracted the interest of the Google Earth team based on @Last’s work building a plugin for that system, and Google purchased the company in 2006. For many years, SketchUp was promoted as a way to create user-generated 3D content to represent the world’s buildings and architectural landmarks within Google Earth. SketchUp was accompanied by the 3D Warehouse, an online repository for casual creators to upload and share 3D models. In 2012, Google decided to exit the user-generated 3D content business and sold SketchUp to Trimble Navigation, a California-based maker of GPS systems. Trimble continues to distribute SketchUp and maintain the 3D Warehouse, though it is no longer being used to generate content for placing inside Google Earth.
SketchUp runs on all platforms. It has a reasonable price point, around US $500 for the Pro version. There is also a completely free version for casual use. SketchUp is known for its ease of use, with a line-drawing-based approach to modeling that is great for architecture and engineering. SketchUp features an excellent COLLADA exporter (see COLLADA: The digital asset exchange format), so it is potentially a great choice for WebGL development. SketchUp can be downloaded from the official website.
Poser
Smith Micro’s Poser is an intermediate 3D tool for character animation. Like SketchUp, it is priced attractively and targets a casual content creation audience. It has an intuitive user interface for posing and animating characters. Poser comes with a large library of modeled, rigged, and fully textured human and animal characters, as well as set background scenes and props, vehicles, cameras, and lighting setups. Poser is used to create both photorealistic still renderings and real-time animations. The Poser user interface is depicted in Figure 8-6.
Figure 8-6. The Poser user interface; image courtesy Smith Micro Software, Inc.
Of the tools discussed so far, Poser is also notable because the development team has been very involved in the creation of the COLLADA file format since its inception, and is also active within the Khronos group in developing the new standard, glTF, which we will discuss later in this chapter. The Poser team strongly believes in standard formats as a way to democratize the adoption of 3D content, especially in a web context. Uli Klumpp, senior director of engineering at Smith Micro, had this to say about using Poser with WebGL:
WebGL-enabled applications are no different than other media; there is often a need to depict the human form (or a decidedly non-human form for that matter). Web designers have been using Poser for illustration purposes since the 90s. They have finally gained a ubiquitous 3rd dimension for their work, and Poser’s vast world of content is already there.
Browser-Based Integrated Environments
The emergence of HTML5 and cheap cloud computing has set the stage for a new breed of DCC tool: the in-browser 3D integrated development environment. Modeling and animation still generally happen in native tools such as the ones just mentioned, but scene layout, interaction programming, and web publishing take place in a browser-based interface.
Browser-based integrated environments offer unique capabilities over their native counterparts. First, obviously, there is nothing to download. Second, they are built in WebGL, so they provide a WYSIWYG display that matches the deployed application. Browser-based tools tend to be attractively priced, using “freemium” models that allow free use to start, and charge a fee only once the developer does something commercial—for example, developing a team project, or using file storage above a set limit. Some of these tools are restrictive about how the content can be used, requiring hosting or publishing through their servers in order to support a particular business model. This is a new and evolving space, so developers can expect a web-style flux in business models and pricing in the coming years.
Verold
Verold Studio is a lightweight publishing platform for 3D interactive content developed by Toronto-based Verold, Inc. It is a no-plugin, extensible system with a simple JavaScript API, so that hobbyists, students, educators, visual communication specialists, and web marketers can integrate 3D animated content easily into their web properties.
A typical Verold workflow has a CG artist upload assets (3D models, animations, textures) to a Verold project. The collaboration tools can be used to provide feedback on iterations of the assets and the editing tools to set up materials and shaders, and to lay out scenes/levels. Once the team is satisfied with the way the assets are set up, the web designer can export boilerplate code and wire it up to the target web page. This workflow works whether the CG artist is located with the developer, or remotely—and likewise for scenarios where the assets are purchased rather than custom-developed. The Verold Studio user interface is depicted in Figure 8-7. Note the clean, browser-based design, in stark contrast to the busy, toolbar- and pop up–heavy look of traditional DCC tools.
Figure 8-7. Verold Studio
Verold’s capabilities to work together in real time, publish online, and share content are enabling novel ways of working on 3D development projects. According to founder and CTO Ross McKegney:
A great case study of using Verold Studio is Swappz Interactive. Swappz is building toys for Teenage Mutant Ninja Turtles, Smurfs, Power Rangers, and other brands. These toys are special, in that they can be “scanned” into the associated mobile games. The child buys the toy, downloads the game, and now can “scan” their toy into the game. Swappz used Verold technology through the development process: as a means to give feedback between the offshore character artists and local animators, to show progress to the parent company, to get approval of assets from Nickelodeon, and finally, when the games were ready for launch, the game assets were used in the marketing websites for the games.
Sketchfab
Another class of online 3D tool is the upload-and-share service. A 3D artist can upload creations in any of several formats, and preview and share the results online using WebGL. The most thoroughly developed of these to date is Sketchfab, created by the Paris-based team of Cédric Pinsonand partners Alban Denoyel and Pierre-Antoine Passet. Sketchfab is a web service to publish and share interactive 3D models online in real time without a plugin. With a few clicks, the artist can upload a 3D model to the website and get the HTML code for sharing an embedded view of the model hosted at Sketchfab.
Sketchfab supports several native 3D formats as well as most of the standard shaders: normal maps, specular, bump, diffuse, and so on. Sketchfab also provides a material editor, letting artists adjust shaders and renderings in real time in the browser. The company has also developed exporters for the major native DCC tools, so that models can be exported and uploaded directly from within the authoring environment (e.g., Maya), a potentially more convenient workflow. The Sketchfab home page is depicted in Figure 8-8. The graphic that takes up the majority of the page is actually a live view of one of the models from the Sketchfab gallery, rendered with WebGL.
Figure 8-8. The Sketchfab website allows content creators to upload and share real-time viewable 3D models
SculptGL
The limitations of 3D rendering and user interfaces would have made the idea of building an in-browser 3D modeling tool unthinkable a few years ago. Now, with HTML5 and WebGL, it’s not such an outlandish idea. Stephane Ginier has created SculptGL, a web-based solid modeling tool with a very easy-to-use interface for creating simple, sculpture-style models. SculptGL is free and open source, available on GitHub at https://github.com/stephomi/sculptgl. SculptGL features export to various formats and direct publishing to both Verold and Sketchfab. SculptGL is depicted in Figure 8-9.
Figure 8-9. SculptGL, an open source, browser-based 3D modeling tool
Shadertoy
Given the rise in popularity of web “sandbox tools” like JSFiddle that allow programmers to experiment with code using in-browser editing and live preview, it was inevitable that someone would develop sandbox tools for use with WebGL. Shadertoy is a browser-based code tool for writing and testing GLSL shaders. It is a combination sandbox and online community. Once a shader is written and tested, it can be submitted to the Shadertoy site for others to discover. This is a great way to learn GLSL shader coding—by emulating the work of others. After a shader has been developed, you can share it via the Shadertoy website, or simply copy and paste the GLSL code directly into your application source code. Figure 8-10 depicts the Shadertoy interface, which includes a live preview frame, a full code-editing frame, and interactive icons for selecting shader input sources.
Figure 8-10. Catacombs, a Shadertoy experiment featuring procedural texturing
3D Repositories and Stock Art
Not all of us possess 3D modeling talent, and budget and time restrictions on our projects don’t always allow us to hire the right people. So it’s a good thing that there are great online sources of stock content—3D “clip art,” if you will. Prices can range from free to hundreds, even thousands, of dollars for some models and content packs. The quality can also vary widely. Some creators offer their models for use without restriction; others limit use. Make sure to review the licensing terms carefully, especially when developing web applications that distribute the content over the wire.
To create 3D content for this book, I used models from various online sources, including:
The Trimble 3D Warehouse
The 3D Warehouse was originally created by Google as a way for amateurs and hobbyists to upload faithful SketchUp recreations of the world’s buildings and architectural landmarks, and geolocate them within Google Earth. With the acquisition of SketchUp by Trimble, the service has transitioned away from use with Google Earth, but it still remains a vital source of nicely rendered buildings and other 3D data.
Turbosquid
Founded in 2000, Turbosquid is a top site featuring thousands of models for use in animation, gaming, and architecture. Many of the models have been designed with low- to medium-polygon counts, appropriate for real-time and web use.
Renderosity
Renderosity is a diverse community of 2D and 3D creative professionals founded in 1998. The site features a large catalog of models and texture art. Its focus tends to be on high-polygon models for use in prerendered still images, over lower-polygon models for real-time use.
3DRT.com
3DRT is a no-nonsense online store with quality 3D art for real-time game and web use. The site is organized to make it easy for professionals to find characters, vehicles, props, and environment art. The models are not cheap, but they are of high quality.
3D File Formats
There have been many 3D file formats developed over the years—so many that an exhaustive list would not be possible here. Some 3D formats have been designed to store files for a single authoring package; others have been designed to exchange data between packages. Some formats are proprietary—that is, completely controlled by a single company or software vendor—whereas others are open standards defined by an industry group. Some 3D file formats are entirely text-based and, therefore, human-readable, while others use a binary representation to save space.
3D file formats fall into three general categories: model formats, used to represent single objects; animation formats for animating key frames and characters; and full-featured formats that support entire scenes, including multiple models, transform hierarchy, cameras, lights, and animations. We will look at each of these kinds of formats, with a special emphasis on the ones that are best suited for web-based applications.
Model Formats
Single-model 3D formats are used extensively for interchange between different packages. Most modeling packages, for example, can import and export the OBJ format (see next section). Because they tend to have a simple syntax and only a few features, it is easy to implement support for them, and their use is prevalent. They do, however, tend to be quite limited in the features they support.
Wavefront OBJ
The OBJ file format, originally developed by Wavefront Technologies, is one of the oldest and best-supported single-model formats in the industry. It is extremely simple, supporting only geometry (with the associated vertices, normals, and texture coordinates). Wavefront introduced the companion MTL (Material Template Library) format for applying materials to geometry.
Example 8-1 illustrates the basics of an OBJ file, an excerpt from the classic “ball chair” model that we will be loading with Three.js later in the chapter (and depicted in Figure 8-12 later in the chapter). The OBJ file is packaged with the code examples in the filemodels/ball_chair/ball_chair.obj. Let’s have a look at the syntax. The # character is used as a comment delimiter. The file consists of a series of declarations. The first declaration is a reference to the material library stored in the associated MTL file. After that, several geometry objects are defined. This excerpt shows a partial listing of the definition for the object shell, the outer shell of the ball chair. We define the shell by specifying vertex position, normal, and texture coordinate data, one entry per line, followed by face data, also one per line. Each vertex of the face is specified by a triple in the form v/vt/vn, where v is the index of the previously supplied vertex position, vt the index of the texture coordinate, and vn the index of the vertex normal.
Example 8-1. A model in Wavefront OBJ format
# 3ds Max Wavefront OBJ Exporter v0.97b - (c)2007 guruware
# File Created: 20.08.2013 13:29:52
mtllib ball_chair.mtl
#
# object shell
#
v −15.693047 49.273174 −15.297686
v −8.895294 50.974277 −18.244076
v −0.243294 51.662109 −19.435429
... more vertex positions here
vn −0.537169 0.350554 −0.767177
vn −0.462792 0.358374 −0.810797
vn −0.480322 0.274014 −0.833191
... more vertex normals here
vt 0.368635 0.102796 0.000000
vt 0.348531 0.101201 0.000000
vt 0.349342 0.122852 0.000000
... more texture coordinates here
g shell
usemtl shell
s 1
f 313/1/1 600/2/2 58/3/3 597/4/4
f 598/5/5 313/1/1 597/4/4 109/6/6
f 313/1/1 598/5/5 1/7/7 599/8/8
f 600/2/2 313/1/1 599/8/8 106/9/9
f 314/10/10 603/11/11 58/3/3 600/2/2
... more face definitions here
The material definitions that accompany the ball chair are in the MTL file models/ball_chair/ball_chair.mtl. The syntax is very simple; see Example 8-2. A material is declared with the newmtl statement, which contains a handful of parameters used to Phong shade the object: specular colors and coefficients (Ks, Ns, and Ni keywords), diffuse color (Kd), ambient color (Ka), emissive color (Ke), and texture maps (map_Ka and map_Kd). The texture map model for MTL has evolved over the years to include bump maps, displacement maps, environment maps, and other types of textures. In this example, only the diffuse and ambient texture maps are defined for the shell material.
Example 8-2. Material definitions for Wavefront OBJ format
newmtl shell
Ns 77.000000
Ni 1.500000
Tf 1.000000 1.000000 1.000000
illum 2
Ka 0.000000 0.000000 0.000000
Kd 0.588000 0.588000 0.588000
Ks 0.720000 0.720000 0.720000
Ke 0.000000 0.000000 0.000000
map_Ka maps\shell_color.jpg
map_Kd maps\shell_color.jpg
...
STL
Another simple, text-based, single model format is STL (for StereoLithography), developed by 3D Systems for rapid prototyping, manufacturing, and 3D printing. STL files are even simpler than OBJ. The format supports only vertex geometry—no normals, texture coordinates, or materials.Example 8-3 shows a fragment from one of the Three.js example STL files (examples/models/stl/pr2_head_pan.stl). To see the file in action, open the Three.js example file examples/webgl_loader_stl.html. STL is an excellent candidate 3D format for building online 3D printing applications in WebGL, because the files can potentially be sent directly to 3D printing hardware. In addition, it loads easily and renders quickly.
Example 8-3. The STL file format
solid MYSOLID created by IVCON, original data in binary/pr2_head_pan.stl
facet normal −0.761249 0.041314 −0.647143
outer loop
vertex −0.075633 −0.095256 −0.057711
vertex −0.078756 −0.079398 −0.053025
vertex −0.074338 −0.088143 −0.058780
endloop
endfacet
...
endsolid MYSOLID
NOTE
STL is such an easy and popular format that GitHub has actually added STL viewing directly into its interface. The viewer is built in WebGL, using our old friend Three.js.
For technical details on the STL format, visit the Wikipedia page.
Animation Formats
The formats described in the previous section represent static model data only. But much of the content in a 3D application is moving around on the screen (i.e., animated). A few specialty formats have evolved to deal with representing animated models. These include the text-based—and therefore web-friendly—formats MD2, MD5, and BVH.
id Software animation formats: MD2 and MD5
A couple of 3D formats that you will see crop up in web use from time to time are the animation formats for id Software’s popular Doom and Quake franchises. The MD2 format and its successor, MD5, are formats that define character animation. While the formats are essentially controlled by id, their specifications were released long ago, and many tools have been written to import them.
The MD2 format, created for Quake II, is a binary file format. It supports vertex-based character animation only via morph targets. MD5 (not to be confused with the Message Digest algorithm, a cryptographic hash function used widely on the Web) was developed for Quake III and introduced skinned animation and a text-based, human-readable format.
Excellent documentation on the MD2 and MD5 specifications can be found online.
To use these formats in WebGL applications, we could write a loader that reads them directly, or if using a library like Three.js, we can use a converter. When an MD2 file is converted to JSON, the format looks something like the example from Chapter 5, depicted in Figure 5-11. As a refresher, run the Three.js example located at examples/webgl_morphtargets_md2_control.htm, and have a look at the source code. There is a lot going on to load and interpret MD2 data.
Three.js does not come with an MD5 loader as part of the example set. However, there is a wonderful online converter from MD5 to Three.js JSON that was written by Klas (OutsideOfSociety) of the Swedish web agency North Kingdom (developers of Find Your Way to OZ). To see already-converted models in action, go to Klas’s blog and open this link. You should see a fairly detailed model of a monster, with controls for starting the various gesture animations.
To run the converter on your own MD5 files, you can open this link, which lets you drag and drop MD5 files into the view window, and produces JSON code.
BVH: The motion capture data format
Motion capture, the process of recording the movement of objects, has become a very popular way to create content, especially animations of people. It is used extensively in film, animation, military, and sports applications. Motion capture is widely supported in open formats, including theBiovision Hierarchical Data format, or BVH. BVH was developed by the motion capture company Biovision to represent movements in the animation of human characters. BVH is a very popular, text-based format supported as an import and export format by many tools.
Developer Aki Miyazaki has created an early experiment to import BVH data into WebGL applications. His BVH Motion Creator, a web-based BVH preview tool written using Three.js, is depicted in Figure 8-11. BVH can be uploaded, and its animations previewed on the simple character.
Figure 8-11. BVH Motion Creator, a previewer for motion capture files in BVH format
Full-Featured Scene Formats
Over the years, a few standard formats have been developed by the industry to support representing the entire contents of a 3D scene, including multiple objects, transform hierarchy, lights, cameras, and animations—essentially anything created by an artist in a full-featured tool like 3ds Max, Maya, or Blender. In general, this is a much harder technical problem to solve, and few formats have survived to enjoy widespread use. This situation may change, however, with WebGL driving new requirements for reuse of content and interoperability between applications. In this section, we look at a few potential full-scene formats for use with WebGL.
VRML and X3D
Virtual Reality Markup Language (VRML) is the original text-based standard for 3D on the Web, created in 1994 by a group that includes inventor and theorist Mark Pesce, members of the Silicon Graphics Open Inventor software team, and myself. VRML went through a couple of iterations in the 1990s, enjoying broad industry backing and the support of a nonprofit standards consortium. A successor featuring XML-based text representation was developed in the early 2000s, and renamed as X3D. While these standards are no longer widely deployed in web applications, they are still supported by most modeling tools as import and export formats.
VRML and X3D define full scenes, animation (key frames, morphs, and skinning), materials, lights, and even scripted, interactive objects with behaviors. Example 8-4 shows the X3D syntax for creating a scene with a red cube that will make a full rotation about the y-axis in two seconds when clicked. The geometry, behavior, and animations are all in this single XML file with an intuitive, human-readable syntax. To this day, there is no other open-standard 3D file format that can express all this functionality in such a simple, elegant syntax (if I do say so myself).
Example 8-4. X3D sample: A red cube that rotates when clicked
<?xml version="1.0" encoding="UTF-8"?>
<!DOCTYPE X3D PUBLIC "ISO//Web3D//DTD X3D 3.0//EN"
"http://www.web3d.org/specifications/x3d-3.0.dtd">
<X3D profile='Interactive' version='3.0'
xmlns:xsd='http://www.w3.org/2001/XMLSchema-instance'
xsd:noNamespaceSchemaLocation =
' http://www.web3d.org/specifications/x3d-3.0.xsd '>
<head>
... <!-- XML meta information for X3D file goes here -->
</head>
<!--
Index for DEF nodes: Animation, Clicker, TimeSource, XForm
-->
<Scene>
<!-- XForm ROUTE: [from Animation.value_changed to rotation ] -->
<Transform DEF='XForm'>
<Shape>
<Box/>
<Appearance>
<Material diffuseColor='1.0 0.0 0.0'/>
</Appearance>
</Shape>
<!-- Clicker ROUTE: [from touchTime to TimeSource.startTime ] -->
<TouchSensor DEF='Clicker' description='click to animate'/>
<!-- TimeSource ROUTEs:
[from Clicker.touchTime to startTime ] [from fraction_changed to
Animation.set_fraction ] -->
<TimeSensor DEF='TimeSource' cycleInterval='2.0'/>
<!-- Animation ROUTEs:
[from TimeSource.fraction_changed to set_fraction ]
[from value_changed to XForm.rotation ] -->
<OrientationInterpolator DEF='Animation' key='0.0 0.33 0.66 1.0'
keyValue='0.0 1.0 0.0 0.0 0.0 1.0 0.0 2.1 0.0 1.0 0.0 4.2 0.0 1.0 0.0 0.0'/>
</Transform>
<ROUTE fromNode='Clicker' fromField='touchTime' toNode='TimeSource'
toField='startTime'/>
<ROUTE fromNode='TimeSource' fromField='fraction_changed'
toNode='Animation' toField='set_fraction'/>
<ROUTE fromNode='Animation' fromField='value_changed' toNode='XForm'
toField='rotation'/>
</Scene>
</X3D>
The design of VRML embodies many key concepts of interactive 3D graphics, and for that reason, you might expect that it is well suited for WebGL use. However, the standard was developed in a pre-JavaScript, pre-DOM world, and also before the advent of many key hardware-accelerated graphics features in use today. At this point, in my humble opinion, VRML/X3D is too out of date to consider for practical use. At the same time, there are many ideas in there yet to be tapped for use in WebGL, so it is a great area for study and inspiration.
Over the years, a wealth of VRML and X3D content has been developed. The folks at the German-based Fraunhofer Institute continue to soldier down the X3D path and are now creating X3DOM, a library for viewing X3D content using WebGL, without the need for a plugin. For more information on X3DDOM, go to http://www.x3dom.org/.
The VRML and X3D specifications may be found online.
COLLADA: The digital asset exchange format
In the mid-2000s, as VRML began showing signs of age, a group of companies, including Sony Computer Entertainment, Alias Systems Corporation, and Avid Technology, teamed up to develop a new format for exchanging 3D digital assets among games and interactive 3D applications. Rémi Arnaud and Mark C. Barnes of Sony led the design of the format, named COLLADA (for COLLAborative Design Activity). After the initial specification work and support from individual companies, development of the standard was turned over to the Khronos Group, the same nonprofit organization that develops WebGL, OpenGL, and other graphics hardware and software API standards.
COLLADA, like X3D, is a full-featured, XML-based format that can represent entire scenes, with a variety of geometry, material, animation, and lighting types. Unlike X3D, the goal of COLLADA is not to deliver an end-user experience complete with behaviors and runtime semantics. In fact, it is a stated nongoal of the technology. Rather, COLLADA is intended to preserve all of the information that could be exported from a 3D authoring tool so that it can be used downstream in another tool, or imported into a game engine or development environment before being deployed into the final application. The main idea was that, once COLLADA was widely accepted by the industry, the makers of various DCC tools would not have to worry about writing exporters to custom formats ever again; export to COLLADA, and, in theory, any package could import it.
Example 8-5 shows an excerpt from a COLLADA scene that we are going to load with Three.js later in this chapter. As we walk through it, there are several things to note about the structure of COLLADA files. First, all constructs are organized into libraries— collections of types such as images, shaders, and materials. These libraries usually come first in the XML definition, to be later referenced by constructs that need them (for example, images used in a material definition). Second, note that there are explicit declarations of what would normally be considered a built-in function, such as Blinn shading. COLLADA assumes nothing about shading and rendering models; it simply stores that data so that another tool can get the information and try to do something with it. Then, we see the vertex data for a mesh, expressed as a series of float_array elements. Finally, the mesh is assembled into a scene the user can see by referencing previously defined geometry and materials (using the instance_geometry, bind_material, and instance_material XML elements).
Example 8-5. COLLADA file structure, sample libraries, geometry, and scene
<?xml version="1.0"?>
<COLLADA xmlns="http://www.collada.org/2005/11/COLLADASchema"
version="1.4.1">
<asset>
<contributor>
<authoring_tool>CINEMA4D 12.043 COLLADA Exporter
</authoring_tool>
</contributor>
<created>2012-04-25T16:44:59Z</created>
<modified>2012-04-25T16:44:59Z</modified>
<unit meter="0.01" name="centimeter"/>
<up_axis>Y_UP</up_axis>
</asset>
<library_images>
<image id="ID5">
<init_from>tex/Buss.jpg</init_from>
</image>
... <!-- more image definitions here -->
</library_images>
<library_effects>
<effect id="ID2">
<profile_COMMON>
<technique sid="COMMON">
<blinn>
<diffuse>
<color>0.8 0.8 0.8 1</color>
</diffuse>
<specular>
<color>0.2 0.2 0.2 1</color>
</specular>
<shininess>
<float>0.5</float>
</shininess>
</blinn>
</technique>
</profile_COMMON>
</effect>
... <!-- more effect definitions here -->
<library_geometries>
<geometry id="ID56">
<mesh>
<source id="ID57">
<float_array id="ID58" count="22812">36.2471
9.43441 −6.14603 36.2471 11.6191 −6.14603 36.2471 9.43441 −9.04828
36.2471 11.6191 −9.04828 33.356 9.43441 −9.04828 33.356 11.6191
−9.04828 33.356 9.43441
... <!-- remainder of mesh definition here -->
...
<!-- define the scene as a hierarchy of nodes -->
<library_visual_scenes>
<visual_scene id="ID53">
<node id="ID55" name="Buss">
<translate sid="translate">5.08833 −0.496439
-0.240191</translate>
<rotate sid="rotateY">0 1 0 0</rotate>
<rotate sid="rotateX">1 0 0 0</rotate>
<rotate sid="rotateZ">0 0 1 0</rotate>
<scale sid="scale">1 1 1</scale>
<instance_geometry url="#ID56">
<bind_material>
<technique_common>
<instance_material
symbol="Material1" target="#ID3">
<bind_vertex_input
semantic="UVSET0"
input_semantic="TEXCOORD"
input_set="0"/>
</instance_material>
</technique_common>
</bind_material>
</instance_geometry>
</node>
... <!-- remainder of scene definition here -->
After an initial period of high enthusiasm and broad vendor adoption, COLLADA support began to wane. Beginning around 2010, active development on exporter plugins for the popular DCC tools all but stopped. Recently, interest in COLLADA has picked up again, primarily due to the surge of support for WebGL—and the lack of a built-in file format for WebGL (more in this in a moment). There is a new open source project called OpenCOLLADA, with updated exporters for 3ds Max and Maya, from 2010 versions onward. It exports clean, standard-compliant COLLADA.
While improved COLLADA support is a boon to the 3D content pipeline, there is a problem. As we saw in the previous example, COLLADA is very verbose. The format was designed to preserve data, not to be fast to download and parse. That is why the Khronos Group has undertaken a new initiative that reimagines the best aspect of COLLADA—its full representation of rich, animated 3D scenes—into a new format designed for web delivery: glTF.
glTF: A new format for WebGL, OpenGL ES, and OpenGL applications
The rise in popularity of WebGL created a problem for web developers: the need to deliver full-scene content from 3D DCC tools into a running WebGL application. Single-mesh text formats such as OBJ are adequate for representing one object, but do not contain scene graph structure, lighting, cameras, and animation. COLLADA is fairly full-featured; however, as we saw in the previous section, it is verbose. In addition, it is represented in XML, requiring intensive CPU cycles to process into data structures suitable for rendering in WebGL. What was needed was a compact, web-ready format that requires minimal extra processing before rendering, something akin to a “JPEG for 3D.”
In the summer of 2012, Fabrice Robinet, an engineer at Motorola and chair of the Khronos COLLADA working group, began working on a 3D file format with the graphics features of COLLADA but with a more compact, WebGL-friendly representation. Originally, the project was dubbed COLLADA2JSON, the idea being that this would be a translation of the heftier XML syntax into lightweight JSON. Since then, the project has taken on a life of its own. Fabrice was joined by other contributors from the working group, including myself, COLLADA creator Remi Arnaud, and Patrick Cozzi, an engineer at defense software vendor AGI. Our mandate was expanded to broaden the scope beyond simple translation/optimization of COLLADA into a ground-up design of a new format for use with OpenGL-based applications for the Web and mobile, and glTF, the Graphics Library Transmission Format, was born.
glTF uses the full-featured nature of COLLADA as a jumping-off point, but it is a completely new format. The COLLADA feature set acts as a reference for the group to determine what sort of graphics features to support, but the details are completely different. glTF uses JSON files to describe scene graph structure and high-level information (such as cameras and lights), and binary files to describe rich data such as vertices, normals, colors, and animation. The binary format for glTF has been designed so that it can be loaded directly into WebGL buffers (typed arrays such as Int32Array and FloatArray). So, the process of loading a glTF file can be as simple as the following:
1. Read a small JSON wrapper file.
2. Load an external binary file via Ajax.
3. Create a handful of typed arrays.
4. Call WebGL drawing context methods to render.
Of course, in practice it is a bit more complicated. But this is far more efficient than downloading and parsing an XML file, and converting arrays of JavaScript Number types to typed arrays. glTF promises significant wins in both file size and speed of loading content—both critical factors in building high-performance web and mobile applications.
Example 8-6 shows the syntax of the JSON for a typical glTF scene, the famous COLLADA duck model. Note that there are structural similarities to COLLADA: libraries appear first, and we define a scene graph structure at the end by referencing elements in those libraries. But this is where the similarity ends. glTF dispenses with any information not absolutely required for runtime use, opting instead to define structures that will load quickly into WebGL and OpenGL ES. glTF defines in painstaking detail the attributes (vertex positions, normals, colors, texture coordinates, and so on) that are used to render objects with programmable shaders. Using this attribute information, a glTF application can faithfully render any meshes, even if it does not have its own sophisticated materials system.
In addition to the JSON file, glTF references one or more binary files (.bin extension) that store rich data (e.g., vertex data for meshes and animations) in structures called buffers and buffer views. Using this approach, we can stream, download incrementally, or load glTF content in one whack, as appropriate for the application.
Example 8-6. glTF JSON file format example
{
"animations": {},
"asset": {
"generator": "collada2gltf 0.1.0"
},
"attributes": {
"attribute_22": {
"bufferView": "bufferView_28",
"byteOffset": 0,
"byteStride": 12,
"count": 2399,
"max": [
96.1799,
163.97,
53.9252
],
"min": [
−69.2985,
9.92937,
−61.3282
],
"type": "FLOAT_VEC3"
},
... more vertex attributes here
"bufferViews": {
"bufferView_28": {
"buffer": "duck.bin",
"byteLength": 76768,
"byteOffset": 0,
"target": "ARRAY_BUFFER"
},
"bufferView_29": {
"buffer": "duck.bin",
"byteLength": 25272,
"byteOffset": 76768,
"target": "ELEMENT_ARRAY_BUFFER"
}
},
"buffers": {
"duck.bin": {
"byteLength": 102040,
"path": "duck.bin"
}
},
"cameras": {
"camera_0": {
"aspect_ratio": 1.5,
"projection": "perspective",
"yfov": 37.8492,
"zfar": 10000,
"znear": 1
}
},
... other high-level objects here, e.g., materials and lights
... finally, the scene graph
"nodes": {
"LOD3sp": {
"children": [],
"matrix": [
... matrix data here
],
"meshes": [
"LOD3spShape-lib"
],
"name": "LOD3sp"
},
While the design focus of glTF is on compact and efficient representation of OpenGL data, the team has taken a balanced design approach that preserves other essential 3D data authored in DCC tools, such as animation, cameras, and lighting. The current version of glTF (version 1.0) supports the following features:
Meshes
Polygonal meshes made up of one or more geometry primitives. The mesh definition is in the JSON file, which references one or more binary data files that contain the vertex data.
Materials and shaders
Materials can be expressed as high-level common constructs (Blinn, Phong, Lambert), or implemented in GLSL vertex and fragment shaders that are included as external files referenced by the glTF JSON file.
Lights
Common light types (directional, point, spot, and ambient) are represented as high-level constructs in the JSON file.
Cameras
glTF defines common camera types such as perspective and orthographic.
Scene graph structure
The scene is represented as a hierarchical graph of nodes (i.e., meshes, cameras, and lights).
Transform hierarchy
Each node in the scene graph has an associated transformation matrix. Each node can contain children; child nodes inherit their parents’ transformation information.
Animations
glTF defines data structures for key frame, skinned, and morph-based animations.
External media
Images and video used as texture maps are referenced via URL.
The glTF project, although executed under the auspices of the Khronos Group, is a completely open effort to which anyone can contribute. There is a source code repository on GitHub that includes working viewers and sample content, and the specification itself. Following a philosophy that we will standardize no features without first proving them in code, the team has already developed four independent glTF viewers, including one for use with Three.js (which we will look at shortly). For more information, see the main Khronos glTF page.
Autodesk FBX
There is one more full-featured scene format worth mentioning, at least in passing. The FBX format from Autodesk is a file format originally developed by Kaydara for use with MotionBuilder. After Autodesk acquired Kaydara, it began to use the FBX format in several of its products. At this point, FBX has become a standard for interchanging data between the various Autodesk products (3ds Max, Maya, and MotionBuilder).
FBX is a rich format that supports many 3D and motion data types. Unlike the other formats covered in this chapter, FBX is proprietary, completely controlled by Autodesk. Autodesk has documented the format, and provided SDKs to read and write FBX in C++ and Python; however, the SDKs require product licenses, which can represent a prohibitive cost for some. There have been successful FBX imports and exports written without the SDKs, such as for Blender, but it is not clear whether these can be used legitimately, given the terms of the FBX license.
Given the proprietary nature of the format, and the ambiguities around licensing, it may be wise to steer clear of FBX. On the other hand, it is a very powerful technology used by the industry’s top tools. So it may be worth a look. For more information, go to the main FBX page.
Loading Content into WebGL Applications
Remember that WebGL is a drawing library. It has no inherent concept of a polygonal mesh, material, lights, or any of the high-level constructs developers use to conceptually model a 3D graphic. WebGL just knows triangles and math. So it may not come as a surprise that WebGL does not define its own file format, nor does it have built-in support for any of the formats discussed earlier in this chapter. In order to load 3D files into your web applications, you will need to write code, or use a library that knows how to load 3D files.
Happily, Three.js comes with sample code to load many popular formats: OBJ, STL, VRML, and COLLADA, to name a few. Not so happily, the loader code really is sample code and as such, mileage varies. Some of the Three.js file loaders are quite robust, but others are incomplete and buggy. Three.js also defines its own file formats designed specifically for the library. There is a clear-text, JSON-based format, and one that uses a binary representation for compact size and fast load speed, similar to glTF. There is even a JSON-based format that can handle complete scenes with multiple objects; however, that format is still experimental and, in my opinion, not ready for production use.
Long story short, we should think of the 3D content pipeline for WebGL as an ongoing adventure. While we will ultimately reach our destination, there are bound to be a few twists, turns, and surprises along the way. Let’s embark, and for the remainder of the chapter, cruise through what it takes to load content into WebGL applications using Three.js.
The Three.js JSON Format
The core Three.js package defines its own file format for loading meshes, comparable to the OBJ format. Unlike OBJ, the format is JSON-based, so once it is parsed it can pretty much be used as is by Three.js.
As of this writing, there aren’t that many tools that export Three.js JSON format. The Three.js team wrote an exporter for Blender, so that is one viable path. In fact, the Blender-to-Three.js art path is something to consider if you need to import content from a variety of sources, because Blender is good at importing many other file formats. If Blender isn’t your cup of tea, another option is to convert OBJ files. Three.js comes with an OBJ converter utility written in Python. We are going to use that to develop the next example.
Open the book example file Chapter 8/pipelinethreejsmodel.html. You should see a model of a classic “ball chair,” one of those mid-century ovoid chairs with a large cushion in the middle. Use the left mouse button to rotate the model, and the scroll wheel or trackpad to zoom in and out. SeeFigure 8-12.
Figure 8-12. A Wavefront OBJ file, converted to Three.js JSON format and loaded via THREE.JSONLoader; classic ball chair model from Turbosquid and created by Luxxeon
The shadows and lighting in this scene are handcoded to provide a nice backdrop, but the model is all OBJ. After downloading this wonderful model from Turbosquid, I ran the OBJ converter to create a JSON file loadable by Three.js.
The converter is located in the utils subfolder of the Three.js project. To convert the model, run the following command:
python <path-to-three.js>/utils/exporters/convert_obj_three.py -i ball_chair.obj
-o ball_chair.js
This will produce the file ball_chair.js. Let’s have a look at the JSON syntax, excerpted in Example 8-7. After some metadata describing version numbers and other details, we get to the content. First, there are some material definitions. These should look quite familiar, as they are the converted material from the OBJ MTL file we saw in Example 8-2. After that comes the mesh definition, the bulk of the file. Unsurprisingly, this is just a set of JSON arrays defining vertex positions, normals, texture coordinates, and faces. Once Three.js has all this information in JSON, it makes light work of building the meshes we see rendered on the screen.
Example 8-7. Three.js JSON format example
{
"metadata" :
{
"formatVersion" : 3.1,
"sourceFile" : "ball_chair(blender).obj",
"generatedBy" : "OBJConverter",
"vertices" : 12740,
"faces" : 12480,
"normals" : 13082,
"colors" : 0,
"uvs" : 15521,
"materials" : 4
},
"scale" : 1.000000,
"materials": [ {
"DbgColor" : 15658734,
"DbgIndex" : 0,
"DbgName" : "shell",
"colorAmbient" : [0.0, 0.0, 0.0],
"colorDiffuse" : [0.588, 0.588, 0.588],
"colorSpecular" : [0.72, 0.72, 0.72],
"illumination" : 2,
"mapAmbient" : "shell_color.jpg",
"mapDiffuse" : "shell_color.jpg",
"opticalDensity" : 1.5,
"specularCoef" : 77.0
},
... more material definitions here
"vertices": [-1.569305,4.927318,-1.529769,-0.889529,
... more vertex data here
"morphTargets": [],
"morphColors": [],
"normals": [-0.53717,0.35055,-0.76718,-0.46279,0.35837,
... more normal, color, and texture coordinate data here
"faces": [43,312,599,57,596,0,0,1,2,3,0,1,2,3,43,597
... more face data here
}
Now let’s look at the code to actually load the model. Three.js doesn’t come with a canned model viewer application—we need to build that. But it’s quite easy, at least to create a simple one. We are going to split this example into two listings: one to create the scene and load the model, and a second listing to go through the details of setting up a nice viewing environment with lighting, backdrop art, and camera controls. The scene creation and loading code is shown in Example 8-8.
Example 8-8. Code to load a Three.js JSON model
function loadModel() {
// Ball chair by Luxxeon
// http://www.turbosquid.com/FullPreview/Index.cfm/ID/761919
// http://www.turbosquid.com/Search/Artists/luxxeon
// http://luxxeon.deviantart.com/
var url = "../models/ball_chair/ball_chair.json";
// Egg chair by Luxxeon
// http://www.turbosquid.com/FullPreview/Index.cfm/ID/738230
// http://www.turbosquid.com/Search/Artists/luxxeon
// http://luxxeon.deviantart.com/
// var url = "../models/egg_chair/eggchair.json";
var loader = new THREE.JSONLoader();
loader.load( url, function( geometry, materials ) {
handleModelLoaded(geometry, materials) } );
}
function handleModelLoaded(geometry, materials) {
// Create a new mesh with per-face materials
var material = new THREE.MeshFaceMaterial(materials);
var mesh = new THREE.Mesh( geometry, material );
// Turn on shadows
mesh.castShadow = true;
// Translate the object to the origin if it's not modeled centered
geometry.computeBoundingBox();
center = new THREE.Vector3().addVectors(geometry.boundingBox.max,
geometry.boundingBox.min).multiplyScalar(0.5);
mesh.position.set(-center.x, 0, -center.z);
scene.add( mesh );
// Find a good camera position based on the size of the geometry
var front = geometry.boundingBox.max.clone().sub(center);
//camera.position.set(0, geometry.boundingBox.max.y / 2,
geometry.boundingBox.max.z * 8);
camera.position.set(0, front.y, front.z * 5);
if (orbitControls)
orbitControls.center.copy(center);
}
function createScene(container) {
// Create a new Three.js scene
scene = new THREE.Scene();
// Add a camera so we can view the scene
camera = new THREE.PerspectiveCamera( 45, container.offsetWidth /
container.offsetHeight, 1, 4000 );
camera.position.z = 10;
scene.add(camera);
// Lights
createLights();
// Ground
if (addEnvironment)
createEnvironment();
// The model
loadModel();
}
First, the function createScene() sets up an empty Three.js scene; then it creates a camera and some lighting and backdrop art using helper functions that we will look at shortly. Remember, these single-model formats do not contain cameras and lights, so we must set those up ourselves.
Next, we call the function loadModel() to do the load. This uses the built-in Three.js class THREE.JSONLoader, which converts the parsed JSON into usable Threej.s geometry. We call the loader’s load() method, supplying the URL to the model and a callback function. The callback,handleModelLoaded(), does a bit of work. Upon successful parsing of the JSON, Three.js creates a geometry object and calls our callback. It’s up to us to create the materials (a bit strange, in my opinion), which we do by using a special material type, THREE.MeshFaceMaterial. This material is a container for a list of several materials: the JSON format supports geometry that can have a different material on each face of the object (hence the name). We create a new MeshFaceMaterial using the list of materials supplied in the second argument to the callback.
Now we have a mesh ready for rendering, so we add it to the scene. But we also add a few finishing touches. We want a shadow, so we set the mesh’s castShadow property to true. We want the mesh to be nicely positioned for use with the orbit camera controller, so we center it at the origin. We can figure out where that center is by calling the Three.js method getBoundingBox(). We also use the bounding box to figure out a good position for the camera, placing it at the top of the bounding box and a bit out in front.
Example 8-9 shows some of the code for creating a general-purpose model viewing setup. First, our render loop contains a subtlety: rotating the headlight (just a white directional light) to always point from the camera’s current position to the scene center. That way, we can see the geometry no matter which part of the model we are looking at.
We want nice shadows to add a finishing touch to the viewing experience, so we set up the necessary Three.js shadow properties when creating the renderer and scene lights. See the functions createRenderer() and createLights(), respectively. Finally, we need a ground upon which to cast the shadows, so we set that up in the function createEnvironment().
The code shown to view the ball chair model is essentially boilerplate stuff: create a backdrop, create some default lights and a camera, load the model, and keep the highlight properly oriented when the camera moves. This could be used to view any basic model.
However, the way it is structured is not optimal for reuse across applications. We will fix this situation in the next chapter, when we develop a set of general-purpose model viewer classes. But for now, the point is clear: loading single model files originally in OBJ format isn’t that hard to do with Three.js.
Example 8-9. Backdrop and scene lighting for the JSON model viewer
function run() {
requestAnimationFrame(function() { run(); });
// Update the camera controller
orbitControls.update();
// Reposition the headlight to point at the model
headlight.position.copy(camera.position);
// Render the scene
renderer.render( scene, camera );
}
var shadows = true;
var addEnvironment = true;
var SHADOW_MAP_WIDTH = 2048, SHADOW_MAP_HEIGHT = 2048;
function createRenderer(container) {
// Create the Three.js renderer and attach it to our canvas
renderer = new THREE.WebGLRenderer( { antialias: true } );
// Turn on shadows
if (shadows) {
renderer.shadowMapEnabled = true;
renderer.shadowMapType = THREE.PCFSoftShadowMap;
}
// Set the viewport size
renderer.setSize(container.offsetWidth, container.offsetHeight);
container.appendChild(renderer.domElement);
}
function createLights() {
// Lighting setup
headlight = new THREE.DirectionalLight;
headlight.position.set(0, 0, 1);
scene.add(headlight);
var ambient = new THREE.AmbientLight(0xffffff);
scene.add(ambient);
if (shadows) {
var spot1 = new THREE.SpotLight(0xaaaaaa);
spot1.position.set(0, 150, 200);
scene.add(spot1);
spot1.shadowCameraNear = 1;
spot1.shadowCameraFar = 1024;
spot1.castShadow = true;
spot1.shadowDarkness = 0.3;
spot1.shadowBias = 0.0001;
spot1.shadowMapWidth = SHADOW_MAP_WIDTH;
spot1.shadowMapHeight = SHADOW_MAP_HEIGHT;
}
}
function createEnvironment() {
// floor
var floorMaterial = new THREE.MeshPhongMaterial({
color: 0xffffff,
ambient: 0x555555,
shading: THREE.SmoothShading,
});
var floor = new THREE.Mesh( new THREE.PlaneGeometry(1024, 1024), floorMaterial);
if (shadows) {
floor.receiveShadow = true;
}
floor.rotation.x = -Math.PI / 2;
scene.add(floor);
}
The Three.js Binary Format
Three.js defines a more compact and optimized format for loading meshes, a binary equivalent to the JSON format. The binary format consists of two files: a small JSON wrapper describing the high-level aspects of the mesh (e.g., materials list), and a binary (.bin) file contain the vertex and face data.
We can use the Three.js OBJ converter to create Three.js binary files, simply by using the -t command-line switch:
python <path-to-three.js>/utils/exporters/convert_obj_three.py -i
ball_chair.obj -o ball_chair_bin.js -t binary
Run the preceding command to create the file ball_chair_bin.js. Take a look at the resulting file; the JSON looks more or less the same as the text version, except all mesh data has been moved to a binary file, which is referenced in the JSON in the buffers property:
"buffers": "ball_chair_bin.bin"
Note the file size difference. The binary format (JSON plus .bin file) is about half as big as the pure JSON version. To see the binary format in action, open the example file Chapter 8/pipelinethreejsmodelbinary.html. The model looks the same as before, as in Figure 8-12. To load Three.js binary files, we only need to make a one-line change, replacing the class THREE.JSONLoader with THREE.BinaryLoader. See Example 8-10.
Example 8-10. Loading models using the Three.js binary format
function loadModel() {
// Ball chair by Luxxeon
// http://www.turbosquid.com/FullPreview/Index.cfm/ID/761919
// http://www.turbosquid.com/Search/Artists/luxxeon
// http://luxxeon.deviantart.com/
var url = "../models/ball_chair/ball_chair_bin.json";
// Egg chair by Luxxeon
// http://www.turbosquid.com/FullPreview/Index.cfm/ID/738230
// http://www.turbosquid.com/Search/Artists/luxxeon
// http://luxxeon.deviantart.com/
// var url = "../models/egg_chair/eggchair.json";
var loader = new THREE.BinaryLoader();
loader.load( url, function( geometry, materials ) {
handleModelLoaded(geometry, materials) } );
}
Loading a COLLADA Scene with Three.js
Three.js has placed a lot of emphasis on loading quality models using single-model formats like OBJ and its own JSON. This is great as far as it goes, but it falls short for many uses. If we want to load scenes that contain multiple objects, and preserve the transform hierarchy and other goodies such as cameras, lights, and animations, then we need to move to a format that supports those features. Otherwise, we will be forced to import models one by one and arrange, light, and animate our scenes by hand. (Unfortunately, this scenario still happens far too often in WebGL development today. But it is changing, slowly, for the better.)
As discussed earlier, COLLADA is a great format for representing full-scene data. It supports the features we need, and several 3D packages already export it. With COLLADA, it is possible to have an artist model, texture, light, and animate a complex scene, and then export it for use with WebGL—without needing a programmer to hand-crank values. And that is a major goal: leave art creation to the artists. Granted, COLLADA does have the big shortcoming of a slow, bulky XML representation. Still, for our purposes here it is a good format for exploring issues related to loading and viewing full scenes.
Open the example file located in Chapter 8/pipelinethreejsdaescene.html. You should see some nice background game art, a set of ruins and abandoned cars. See Figure 8-13.
This example loads a COLLADA scene with several objects in a hierarchy. We load the COLLADA using a one-line load call. The Three.js COLLADA loader knows how to create the entire hierarchy of objects, including any cameras, animations, lights, and so on, without requiring us to get involved. The load callback does a little extra work, looking for cameras and lights, so that it can set up defaults if it doesn’t find them in the scene. But that’s it. Conspicuously absent from this picture are any hardcoded positions, orientations, and scales to lay out the individual objects. Contrast this with the typical sample scene included in the Three.js project—a goulash of hand-typed numbers. It’s refreshing.
Let’s walk through the code to load a COLLADA scene, listed in Example 8-11. This example shows only the code specific to loading the COLLADA scene, and the associated handler callback.
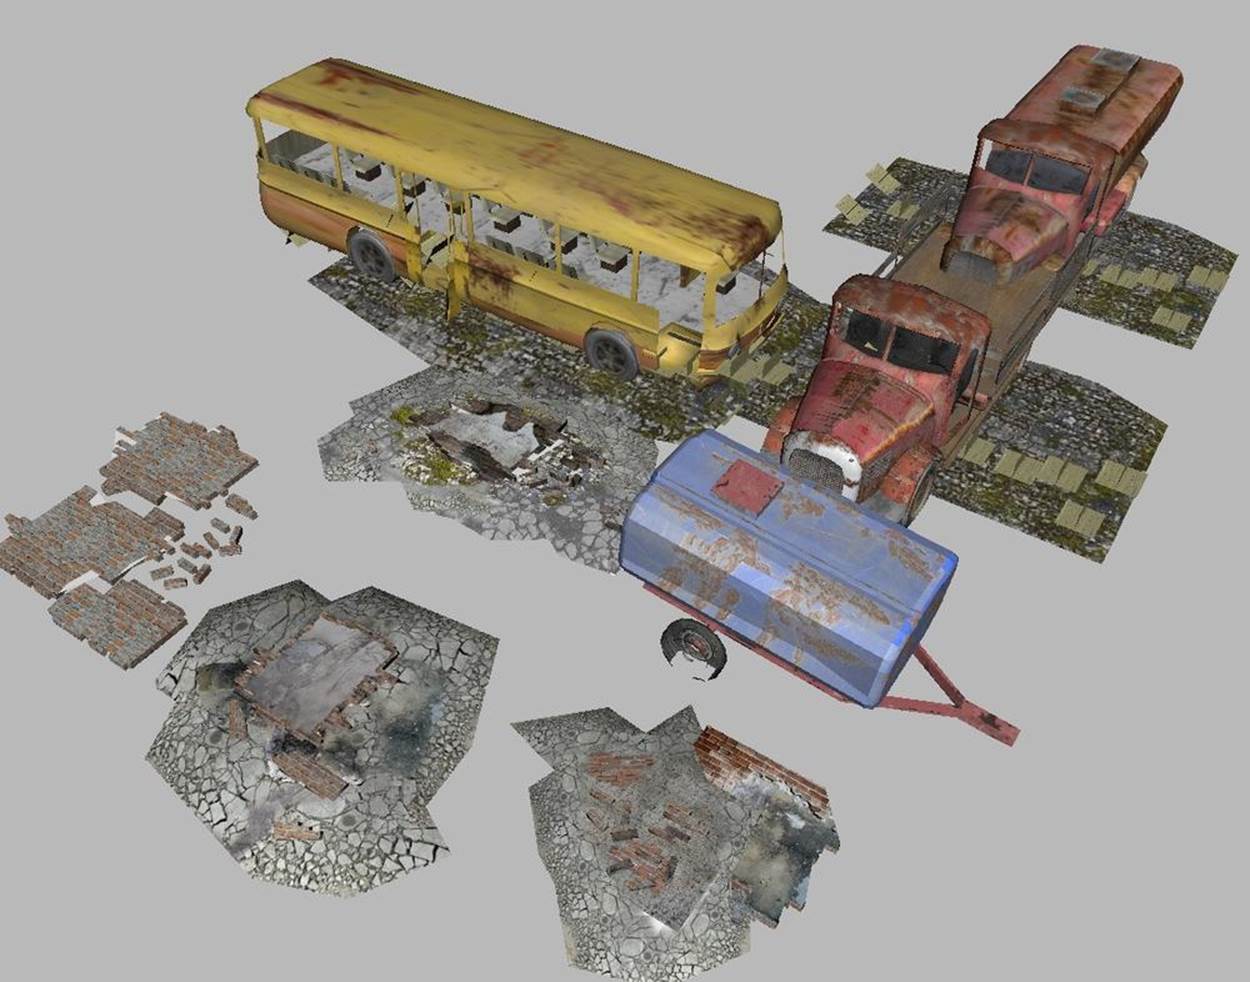
Figure 8-13. Game scene background art, with full hierarchy and materials, loaded in COLLADA format via THREE.ColladaLoader; art from Turbosquid and created by ERHLN
Example 8-11. Loading a COLLADA scene using Three.js
function loadScene() {
// Ruins by ERLHN
// http://www.turbosquid.com/FullPreview/Index.cfm/ID/668298
// http://www.turbosquid.com/Search/Artists/ERLHN
var url = "../models/ruins/Ruins_dae.dae";
var loader = new THREE.ColladaLoader();
loader.load( url, function( data ) {
handleSceneLoaded(data) } );
}
function handleSceneLoaded(data) {
// Add the objects to the scene
scene.add(data.scene);
// Look for a camera and lighting
var result = {};
data.scene.traverse(function (n) { traverseScene(n, result); });
if (result.cameras && result.cameras.length)
camera = result.cameras[0];
else {
// Find a good camera position based on the size of the scene
createDefaultCamera();
var boundingBox = computeBoundingBox(data.scene);
var front = boundingBox.max;
camera.position.set(front.x, front.y, front.z);
}
if (result.lights && result.lights.length) {
}
else
createDefaultLights();
// Create the controller
initControls();
}
function traverseScene(n, result)
{
// Look for cameras
if (n instanceof THREE.Camera) {
if (!result.cameras)
result.cameras = [];
result.cameras.push(n);
}
// Look for lights
if (n instanceof THREE.Light) {
if (!result.lights)
result.lights = [];
result.lights.push(n);
}
}
The loadScene() function loads the ruins using the THREE.ColladaLoader class. The load callback function, handleSceneLoaded(), is passed a single argument, data, that contains a JSON object with several properties that were stored when the COLLADA file was parsed. We are interested in data.scene, which is a THREE.Object that contains the entire loaded scene hierarchy. We add that to our top-level scene, so that Three.js will render it.
We are now basically ready to view the scene, but we are going to add a few bits of polish to the user experience. First, we traverse the contents of the loaded scene looking for cameras and lights. If there are any cameras supplied, we will use the first one we find as our initial viewing camera; if not, we will create a default camera. If there are lights supplied with the scene, we will use those; if not, we will create a default lighting setup. We handle scene traversal using the object’s traverse() method, which recursively visits that object and any descendants, calling the supplied callback function. Our callback function traverseScene() looks for camera and lights by testing their JavaScript object types against THREE.Camera and THREE.Light, using the instanceof operator, and pushes anything it finds onto the arrays result.cameras andresult.lights.
In the case where the scene does not contain any cameras, we create our own default camera. We also want to position it appropriately, based on the size of the scene. To calculate the size of the scene we’ll use a helper function, computeBoundingBox(). This function recursively walks the scene to calculate a containing bounding box. Whenever it finds a geometry object, it uses the Three.js built-in bounding-box method to find the geometry’s bounding box, which it then merges into the bounding box for the whole scene. This function is a little lengthy, so the code is not shown here.
Loading a glTF Scene with Three.js
glTF represents a new approach to 3D file formats. It is designed specifically for use in web and mobile OpenGL-based applications, with many graphics features represented “to the metal” as native buffers and other rendering-ready structures. At the same time, glTF contains many commonly used 3D constructs that have no direct representation in OpenGL ES, such as materials, cameras, and lights. The goal is to create a compact format that will load easily in web and mobile applications but still represent 3D data for practical production use.
There are already several development projects under way to implement glTF support in graphics libraries and applications. This includes a glTF loader that I am writing for use with Three.js. Open the example file Chapter 8/pipelinethreejsgltfscene.html in your browser to see it in action. You should see something that resembles the screenshot in Figure 8-14. Several spaceships cruise around a futuristic cityscape. The rendering in this scene is really nice, with environment maps and Blinn shading. There are several animations, including moving cameras. Use the drop-downs to change cameras and load different scenes, and toggle the animation checkbox to start and stop the animations. The scene depicted here was originally created in 3ds Max. Fabrice Robinet downloaded the 3ds Max file from 3DRT.com, exported it to COLLADA, and then ran a converter tool to convert it to glTF.
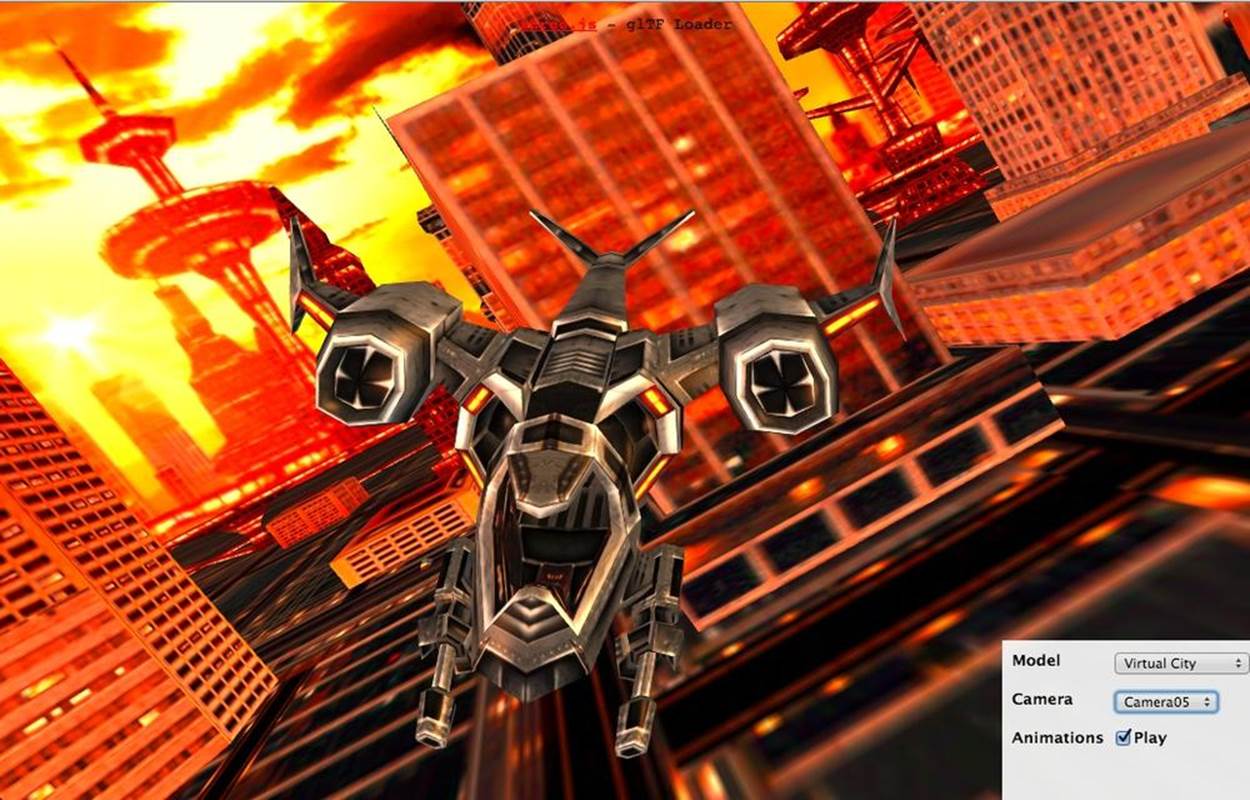
Figure 8-14. Loading glTF scenes—including animation, scene graph hierarchy, materials, lights, and cameras—using the experimental THREE.glTFLoader class, still under development; source code for the loader is on the glTF GitHub project page, and the virtual city scene is courtesy of 3DRT
I patterned the design of the Three.js glTF loader on the other file format loaders that come with the Three.js examples. The class THREE.glTFLoader inherits from the base loader class, THREE.Loader. Its load() method parses the glTF JSON file; loads external resources such as binary buffers, textures, and shaders; and returns the result via a callback function. The callback function has access to the Three.js object hierarchy created by the loader so that it can easily load it into a scene and start rendering.
The early returns on glTF loading are very promising, at least in comparison to the equivalent COLLADA. Files are generally about half the size of the COLLADA text format, and load times for some models are up to 80% faster. This is in part due to our using the new Three.jsBufferGeometry type, which allows us to create geometry directly from already-loaded typed array data such as Int32Array and FloatArray, instead of using regular JavaScript Number arrays (which, under the covers, have to be converted back to typed arrays anyway, before WebGL can render them).
Chapter Summary
This chapter explored the universe of 3D content creation for WebGL. After a brief look at the authoring process, we surveyed 3D content creation tools, ranging from amateur to professional, packaged as downloadable software applications or running in the browser.
We then took an extensive tour of 3D file formats used in today’s applications, especially those suitable for online use with WebGL. This includes well-worn standards as well as a new format, glTF, designed explicitly for use in today’s web and mobile applications. Finally, we looked at detailed examples of how to use the Three.js library to load various formats into our WebGL applications, including single-model formats and full scenes.
While there is no one preferred way to bring 3D content into a web application, and the content pipeline for WebGL is young and still evolving, at least there are several viable approaches to getting the job done.