HTML5, JavaScript and jQuery (Programmer to Programmer) - 2015
Part II Dynamic HTML5 Web Applications with JavaScript and jQuery
Lesson 16 Document Object Model
The Document Object Model (DOM) and the DOM API have been mentioned several times already in this book, but now it's time to step back and look at them in depth.
As you will see over the next few lessons, you can largely avoid an in-depth understanding of the DOM API if you use jQuery. jQuery is essentially a wrapper around the DOM; it provides all the same basic functionality but with a more intuitive API.
It is, however, wise to have at least a basic understanding of how the underlying DOM technology works before starting with jQuery because this places it in a wider context, and helps you understand what jQuery is trying to achieve.
Nodes and Objects
The Document Object Model is the in-memory browser representation of a web page. When the browser loads a web page, it parses all the HTML tags and their content, and generates a model for display in the browser.
As you have already seen, the DOM model may differ from the literal HTML in several ways. For example:
· It will close any unclosed tags, such as self-closing tags.
· It will convert attribute names to lowercase.
· It will rearrange tags closed in the wrong order, per the rules in the HTML5 specification.
· It will add certain tags that may be missing such as the body tag.
You have also seen how the DOM is represented as a tree-like structure via the Elements tab in the Chrome developer tools.
The DOM is actually more complex than the Elements tab implies. In order to understand the DOM, you need to think in terms of nodes rather than elements: The DOM is a hierarchy of nodes.
In this section you will gain an understanding of the DOM constructed for the following web page:
<!DOCTYPE html>
<html lang="en">
<head>
<meta charset="utf-8">
</head>
<body>
<h1>This is the header</h1>
</body>
</html>
The DOM for this HTML will be modeled as you see in Figure 16.1. Each square box in this diagram is called a node in the DOM tree. As you can see, there are many nodes that are not simple elements in the document.
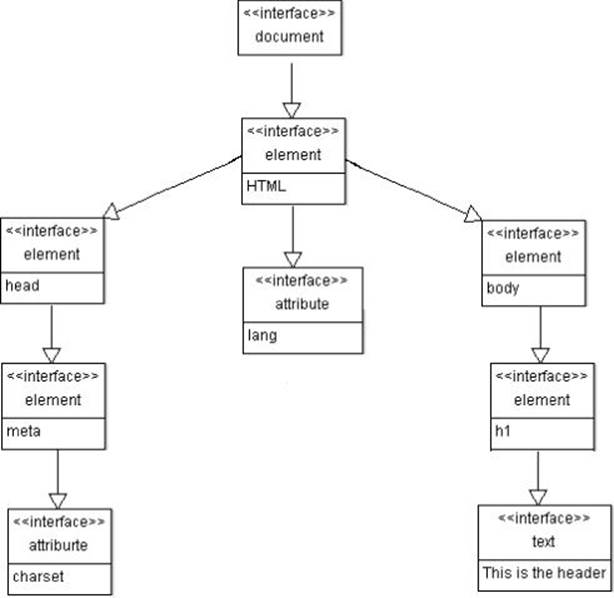
Figure 16.1
Figure 16.1 also lists the interface or object type of each node. The DOM represents each node as an object (a JavaScript object in this case), and this object exposes an interface consisting of a set of properties and methods.
You can see that the top-level node is called the document, and the html element is its child. Along with the element nodes, you can also see examples of text and attr nodes in the tree because the DOM models these as independent objects.
The following are the most common types of object:
· document: A document object represents the entire document. This can be accessed within the browser using the global variable document. When you start using the DOM API shortly, you will always do so from the context of the document.
· element: This object is used to represent the elements, or tags, in the document. Every tag—such as td, head, or h1—is represented by an instance of this object, but their content and attributes are modeled as independent objects.
· attr: The attr object type represents attributes. Each element can have zero to many attr objects as its children.
· text: When the body of an element contains text, this is represented by a separate object called the text object. In some cases an element can have multiple text nodes. For instance, with the following HTML fragment <p>Left side<em>inner</em>right side</p>, the p tag has two text nodes, one for the text on either side of the em tag, while the em tag also has a text node.
You may be wondering why you need all these different object types. The primary reason is that you want to do different things to different nodes in the document. For instance, the API exposed by the document may contain functionality to determine the doctype, whereas the API exposed by the attr object may contain functionality to change the attribute value. Alternatively, the element object allows you to navigate, add, remove, and change its child nodes, whereas this is not possible with text nodes.
The API used for interacting with, and manipulating all these types of node is called the DOM API. Browsers implement the DOM API in JavaScript, but the DOM API can be written in any language and can exist outside a web browser.
The purpose of the DOM API is mainly to allow the DOM to be manipulated after the web page has loaded. This allows you to implement dynamic functionality within web pages without resorting to page refreshes. There are four essential aspects to the DOM API that allow this manipulation:
· Selecting nodes from the DOM—for example, finding all the nodes with a particular class
· Traversing from a selected node to another set of nodes—for example, finding the children for a particular node
· Manipulating the nodes in the DOM—for example, adding, replacing or deleting nodes
· Responding to events generated by nodes—for example, responding to the user clicking an element
Each of these will be briefly discussed in the text that follows. Before starting, it is worth mentioning that the DOM API is very large, and I will only scratch the surface of what is possible. The idea is to be introduced to broad themes rather than understand every aspect of the API.
The examples that follow will use the following web page:
<!DOCTYPE html>
<html lang="en">
<head>
<meta charset="utf-8">
</head>
<body>
<h1 class="mainHeader">This is the title</h1>
<ol id="daysOfWeek">
<li>Monday
<li>Tuesday
<li>Wednesday
<li>Thursday
<li>Friday
</ol>
</body>
</html>
You can either download this from the book's website (it is called domexample.html), or you can write it yourself.
This web page contains a heading and a list of days in an ordered list. You will interact with this web page from the Chrome console, but the code could also be added to a script block in the page itself.
Selecting Elements
You select elements from the DOM using the same basic criteria as CSS: Specifically, you select elements by their type, their classes, or their IDs.
To select an element by ID, you can use the following method on the document object:
> document.getElementById('daysOfWeek');
This returns a single object, which is why it is very important you never duplicate IDs on a web page.
Whenever you select an object from the DOM, you can determine its type by using the nodeType property. For example:
> document.getElementById('daysOfWeek').nodeType;
1
The DOM API uses numbers to represent the various types of node: 1 represents an element node, 2 represents an attribute node, 3 represents a text node, and so on.
Alternatively, you can determine the name of the element:
> document.getElementById('daysOfWeek').nodeName;
"OL"
It is also possible to select nodes by class name:
> document.getElementsByClassName('mainHeader');
or tag name:
> document.getElementsByTagName('li')
Both of these methods return an array of objects rather than a single object. Therefore, if you know only a single object will be returned, you still need to access it from the first index in the array before using it:
> document.getElementsByTagName('ol')[0].nodeName
"OL"
Traversing the DOM
Once nodes have been selected, it is common to navigate from these nodes to other nodes. The examples that follow demonstrate how it is possible to navigate from nodes to their children, and from child nodes to parents:
// obtain a reference to the daysOfWeek node
o = document.getElementById('daysOfWeek');
// find all the children for this node (i.e., the li elements)
o.childNodes
// find the parent of this node, i.e., the body element
o.parentNode
// find the first child of this node
o.firstElementChild
The DOM API also supports a number of shortcuts for traversing from one node to another. For instance, you can traverse from the document node to the body node as follows:
> document.body
Manipulating the DOM
Selection and traversal operations are used to select a set of nodes; these can then be manipulated to dynamically change the appearance of the web page after it has loaded in the browser.
For example, you may want to add a new li element with the value Saturday. This is a two-part process: First, you need to construct the nodes that represent the new li element, and then you need to insert it into the DOM at the appropriate location.
To start, you will create the li node, and assign this to the variable newLi. The node created will not be part of the DOM at this stage; it will be a standalone DOM object, commonly referred to as a document fragment.
> newLi = document.createElement('li');
Next, you will create a new text node, also using a method on the document itself. Like the li node, this will not be part of the DOM:
> saturday = document.createTextNode("Saturday");
Next, you will set the text node to be the first child of the new li node:
> newLi.appendChild(saturday);
Finally, you can add the li node into the DOM at the appropriate location. Many methods are available for controlling where nodes are inserted in relation to other nodes, but you will use the appendChild method; this simply adds the node as the last child of an existing node:
> document.getElementById('daysOfWeek').appendChild(newLi);
As soon as you invoke this final line, a new li element will appear in the web page. In addition, if you look at the Elements tab in the developer tool, you can see that the DOM has been updated (see Figure 16.2).
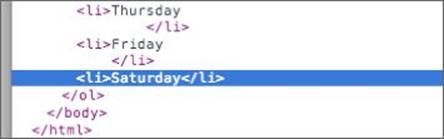
Figure 16.2
As you can see, working with the DOM API is somewhat convoluted: This code will be significantly simplified once you introduce jQuery.
Responding to Events
The final aspect of the DOM API you need to understand is events. In fact, you have already seen these when you wrote the drag-and-drop–based web page in Lesson 9.
Each type of DOM object supports a wide variety of events. These are primarily categorized as:
· Keyboard events, such as keyup and keydown
· Mouse events, such as onclick and onmousedown
· Document events, such as onload and onresize
· Form events, such as onchange and onselect
In this section, you will take advantage of two mouse events. You will add functionality so that if the user hovers over the header (a mouseenter event), the list will be displayed (its display property will be set to block). When the mouse moves away from the header (amouseleave event), the list will be hidden again.
You will change the web page so that the list of days is initially hidden by adding the following to the head element:
<style>
ol {
display:none;
}
</style>
Next you will add the appropriate event listeners in the script block before the closing body tag.
<script>
document.getElementsByClassName('mainHeader')[0]
.addEventListener("mouseenter", function(event) {
document.getElementById('daysOfWeek').style.display = 'block';
});
document.getElementsByClassName('mainHeader')[0]
.addEventListener("mouseleave", function(event) {
document.getElementById('daysOfWeek').style.display = 'none';
});
</script>
In this example, you add two event listeners to the h1 element. One is fired when the mouse enters the box of the header element; the other fires when the mouse leaves the box.
Within each event listener you simply locate the ol node, and either hide it or show it as appropriate. This is achieved by updating its display style to either block or none.
Try It
In this Try It, you will take the CRM web application from Lesson 14 and add two dynamic features to it:
· You will change the contact details form so that it is initially hidden and only displayed if the user clicks a link to add a new contact.
· You will create a hover effect for displaying notes: If the user hovers over the last contacted time, you will display the notes to the user in a popup box.
Lesson Requirements
In order to complete this lesson, you will need the Chrome web browser and the CRM project files from Lesson 14.
Step-by-Step
This step-by-step will be broken into two distinct sections. Work through each in turn, ensuring that the functionality works as expected before moving on.
Displaying Form Dynamically
1. To start, you need to hide the section with the id contactDetails in the HTML. This can be accomplished via an inline style on the element itself, which will set its display property to none.
2. Add a hyperlink to the bottom of the contactList section (after the closing table tag) that the user can click to add a new contact. The href for this should simply be # because you will not use browser-based navigation (you will respond to the user click in JavaScript). You need to also ensure the hyperlink has an id so you can select it from the DOM. You can choose how this looks, but I added the following:
3. <div class="controls">
4. <a href="#" id="addContact">Add a new contact</a>
</div>
I also added the following to contacts.css to improve its appearance:
.controls {
padding:15px;
}
3. Within the init method of contacts.js, select the hyperlink by id using document.getElementById, and add an event listener to the object returned using addEventListsner. The first parameter to addEventListener is the type of event you are listening for, which in this case is click. The second parameter is a function that accepts a single parameter called event. Create this as an anonymous function.
4. Within the function, you first need to disable the default behavior of clicking a hyperlink to request a new page from the server. This can be achieved by calling the method preventDefault() on the event itself.
5. Select the element contactDetails by id, and set its style.display property to block.
6. If you reload the page and click the hyperlink, the contact details section should immediately appear.
Showing Notes
1. You will now change the time field so that when the user hovers above it, the notes are displayed, as shown in Figure 16.3.
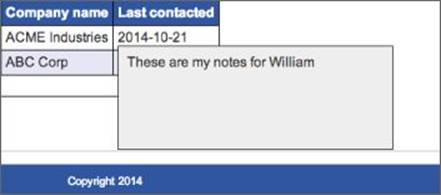
Figure 16.3
1. In order to display notes, you first need to ensure that they are present, but hidden, in the DOM when the page loads. Identify any table cells that contain time elements, and modify them so that they contain an additional element with notes information. For example:
2. <td>
3. <time datetime="2014-09-12">2014-09-12</time>
4. <div class="overlay">These are my notes for William</div>
</td>
Notice that I have also added a class called overlay to the div.
2. You now need to add a CSS rule for the overlay class. Try to add this yourself based on the following specification:
· Set the height of the div to 100px.
· Set the width of the div to 300px.
· Add a 1px solid border to the div with a color of #333333.
· Set the background color to #eeeeee.
· Add 10px of padding between the content and the border.
· Set the initial display to none.
· Use the position element to remove the element from the flow of the page, and ensure that, when it is displayed, it does not impact the position of any other elements in the DOM. Think about which position value most closely meets these needs.
· Set the z-index so that when the div is displayed, it appears over the top of the table.
My CSS looked like this:
.overlay {
position: fixed;
height: 100px;
width: 300px;
border: 1px solid #333333;
background: #eeeeee;
display: none;
z-index:1;
padding:10px;
}
3. You need to add event listeners to each of the time elements. Select all the time elements using document.getElementsByTagName. Once these have been found and stored in a local variable, iterate through them in a for loop.
4. Within the for loop, you need to add two different event listeners, one for mouseenter and one for mouseleave. Create skeleton implementations for each of these and make sure the anonymous function passed as their second parameter accepts the parameterevent.
5. Within the function passed to each event listener, you need to find the notes div that is closest to the time element that the mouse is hovering over. You can first find the time element they are hovering over using event.target. You can then find the next sibling of this element using nextElementSibling and set the display property to either block or none, depending on whether you are hiding or showing the div.
The next sibling element allows you to find the next element in the DOM with the same parent as the specified element. In the case of the time element, that will be the div element containing the notes.
6. If you reload the page and hover the mouse over the time elements, the notes should display and then immediately disappear if you hover away.
Reference
Please go to the book's website at www.wrox.com/go/html5jsjquery24hr to view the video for Lesson 16, as well as download the code and resources for this lesson.