HTML5, JavaScript and jQuery (Programmer to Programmer) - 2015
Part II Dynamic HTML5 Web Applications with JavaScript and jQuery
Lesson 18 jQuery Traversal and Manipulation
In the previous lesson, you learned how to select elements from the DOM with jQuery. This lesson will build on that knowledge and teach you how to:
· Traverse from those elements to another set of related elements.
· Manipulate the nodes in the DOM—this includes adding new nodes, modifying existing nodes, and removing nodes from the DOM.
Traversal
When you execute a jQuery selection, the result is a jQuery object encapsulating a set of elements. The traversal operations allow you to traverse from the initially selected elements to a new set of elements. The result of a traversal is therefore also a jQuery object encapsulating a set of elements.
You have already seen one instance of a traversal operation: the find method in the previous lesson was a traversal operation because it began by finding an element (or set of elements), and then finding other elements that are children of these elements.
It is also possible to traverse from elements to their parents. For instance, the following starts by finding all the time elements, and then finds their parents, which are td elements:
> $('time').parent();
This will return two td elements.
The parent function returns immediate parents; if you want to find elements that are indirect parents, you can use the parents function. This returns any element that is an ancestor of the selected elements, but it is possible to provide a selection to this function as a parameter. For instance, you might want to return the form that is the parent of all the input fields. This can be achieved as follows:
> $(':input').parents('form');
This only returns unique results; therefore a single form element is returned from this selection.
It is also possible to create a result set that contains the original elements along with the newly selected elements. For example, the following selects all the input fields and the form element in a single selection list using the andSelf function:
> $(':input').parents('form').andSelf();
Another common traversal is to select elements that are siblings of other elements (elements are siblings if they have the same parent). For instance, you may want to select all the labels that are siblings of input fields, but only if they contain the required attribute. In the “Manipulation” section later in this lesson, you will modify the way these labels are displayed:
> $(':input[required]').siblings('label');
With most traversal functions, you can choose to add a selection filter ('label' in this case), or omit the parameter to receive all siblings.
There are a number of other traversal functions that find specific siblings:
· last: Find the last sibling that (optionally) meets specific criteria.
· first: Find the first sibling that (optionally) meets specific criteria.
· next: Find the next sibling that (optionally) meets specific criteria.
· prev: Find the previous sibling that (optionally) meets specific criteria.
There are a couple more important traversal functions you need to know before moving on:
· add: This provides a mechanism to join together two different selections. For instance, the following can be used to create a selection list of all the input fields and all the labels.
> $(':input').add('label')
· closest: The closest function finds the closest ancestor of an element, meeting specific criteria, but, unlike the parents selector, considers the original element. Imagine if you want to select the closest td element to any element that contains the text “Bob”. You can use the following:
> $(':contains("Bob")').closest('td')
If the element containing the text is a td element, it is added to the result set. Otherwise, jQuery ascends up through the parents of the element, searching for the first td element.
· eq: The equals operator can be used to return the element at a specific index—for example, the following returns the second section in the document:
> $('section').eq(1)
Chaining
Traversal functions also highlight another great strength of jQuery:
· The traversal functions are executed on a selection of jQuery elements.
· The traversal functions return a selection of jQuery elements.
To put it another way, the input for traversal functions is the same data type as their output. This means that it is possible to chain together a whole set of traversal functions in a single statement. Consider the following call:
> $('time').siblings('.overlay').parents('tr').last();
This code performs the following:
· Selects all time elements
· Selects any sibling of these elements that has the overlay class
· Selects the tr element that is a parent of these elements
· Selects the last element returned from the list
Effectively, this code selects the last row that has a time element with an overlay. This chaining can continue almost indefinitely.
Manipulation
Now that you have written code to find elements, you can get to the interesting part of jQuery: manipulating the DOM to provide dynamic behavior to the user.
Consider the selection earlier that found all the labels of input fields that had the required attribute:
> $(':input[required]').siblings('label');
You may decide that you want to change the text of labels such as this to display in red. This can be achieved as follows:
> $(':input[required]').siblings('label').css('color', 'red');
Running this single line of code is sufficient to color all the labels red.
Red labels are potentially overpowering so you will instead add a red asterisk next to each label. Your goal is to create the following structure:
<label for="contactName" style="color: red;">
Contact name<span class="requiredMarker">*</span>
</label>
You will start by adding a class to contacts.css to match the requiredMarker class:
.requiredMarker {
color: red;
padding-left:7px;
}
The first task is to create a new element to add to each of the labels:
$('<span>').text('*').addClass('requiredMarker');
This performs the following:
· Creates a new span node that can be added to the DOM
· Adds an * as its text
· Adds the class redMarker to the span
· Returns the new span element as a result
Next, you select all the labels that you want to add the span to, and you use the append function to insert this single span into all the labels:
$(':input[required]').siblings('label').append($('<span>').text('*').addClass('requiredMarker'));
Notice how this complex operation can be expressed in a single statement. If you run this and select to create a contact, the relevant labels will appear as you see in Figure 18.1.

Figure 18.1
Once this line of code has been tested in the Console, you can add it to the init method in contacts.js to ensure it always runs when the page loads.
Naturally, you could have added the asterisks to the labels manually, but the advantage of this approach is that you are deriving this content directly from the data: If you mark a new field as required, you do not need to remember to add an asterisk to the label. It is functionality such as this that helps maintain consistency as the web application grows in size.
When adding new elements in relation to an existing element, there are four positions for which you may want to insert new nodes. For instance, consider the h2 element selected in Figure 18.2:
· You may want to insert a new element as a sibling of the h2 element, but before it in the DOM. This can be achieved with the before function. For example:
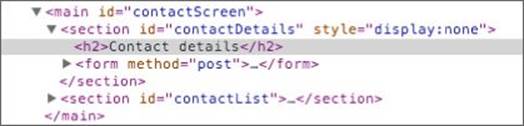
Figure 18.2
$('h2').before('<span>before</span>')
· As a sibling of the h2 element, but after it in the DOM. This can be achieved with the after function.
· As the first child of the h2 element. This can be achieved with the prepend function.
· As the last child of the h2 element. As already shown, this can be achieved with the append function.
Any of these functions can either be passed a string of HTML markup or a DOM object.
Figure 18.3 shows where a span element would be inserted using each of these functions.
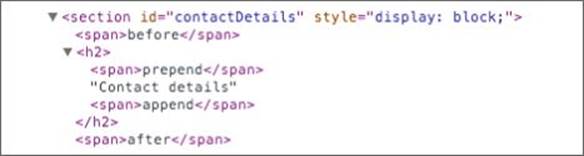
Figure 18.3
Along with adding new nodes to the DOM, it is simple to remove nodes from the DOM with the remove function. This can be seen in the following example:
> $('.requiredMarker').remove();
This function returns all the elements that have been removed.
Changing Elements
The manipulation techniques you have looked at so far are designed to add or remove nodes from the DOM. jQuery also provides the capability to modify existing elements.
For instance, you can directly manipulate the text of an element as follows:
> $('#contactDetails h2').text('CONTACT DETAILS');
or you can modify its HTML as follows:
> $('#contactDetails h2').html('<span>Contact Details</span>');
This line of code positions the text inside a span element. jQuery is a very flexible library, so there are typically many different ways to accomplish the same task. For example, the following code also adds a span element around the text of the h2 element:
> $('#contactDetails h2').wrapInner('<span>');
It is also possible to set the value of form inputs using the val function. For example:
> $('[name="contactName"]').val('testing 123');
Any of these functions can be used without an argument to access the current value. The following displays the current value of the contactName field:
> $('[name="contactName"]').val();
When used in this mode, only a single value will be returned so if you invoke these functions on a set of elements, only the value of the first element will be returned. Additionally, because these functions do not return jQuery objects, it is not possible to chain other jQuery functions onto their results.
Earlier in this lesson, you saw how individual CSS properties can be set using the css function, and how classes can be added to an element with addClass. It is also possible to remove classes with removeClass. For example, this will remove the class you added to all thespan elements containing asterisks:
> $('label span').removeClass('requiredMarker');
One additional useful function is toggleClass. This adds a class to an element if it does not already have it, and removes it if it does. You will come back to this function when you look at jQuery events.
Finally, it is possible to access and modify the attributes of an element. For instance, the following returns the maxlength of the textarea in the form:
> $('textarea').attr('maxlength');
while the following modifies the value of the attribute (or adds the attribute if it does not already exist):
> $('textarea').attr('maxlength', 200);
Alternatively, an attribute can be removed as follows:
> $('textarea').removeAttr('maxlength');
Iteration
A common requirement once a set of elements has been selected is to iterate through each element and perform an operation on it. Because the result of a jQuery selection mimics an array, it is possible to use a for loop to iterate through it.
An easier approach to iteration is to use a jQuery helper function called each. jQuery contains a number of helper functions that can be invoked directly rather than on a jQuery selection.
In this section you will write a function that iterates through all the input fields in the form, extracts their name and value, and constructs an object of these name/value pairs. Essentially this function is serializing the form to an object: You will then be able to use this object in your web application.
Start by creating a new method on the object returned from the contactsScreen function. This should come immediately after the init function and be separated from it by a comma:
function contactsScreen(mainID) {
var screen = mainID;
var initialized = false;
return {
init: function() {
// body omitted
},
serializeForm: function() {
}
};
}
The first thing the function should do is obtain a reference to the input fields on the form. You also want to create an empty object that can be returned as a result of the function:
var inputFields = $(screen).find('form :input');
var result = {};
Remember that you always want to select elements in the context of the screen element (which was set to the main element).
Next, you want to iterate through all the input fields using each. The each function accepts two arguments: a jQuery selection, and a function that should be passed the index and value of each element in the selection:
$.each(inputFields, function(index, value) {
});
Notice that the call to each is prepended with $. rather than just $: This indicates that each is a helper function rather than a jQuery selection.
You now need to write the implementation of the function itself. This should first check whether the input field has a name attribute. (This lets you omit input fields such as the submit button.) If it does, it should write a property to the object using the name attribute as the property name and the value of the input field as the value. The final version will look like this:
serializeForm: function() {
var inputFields = $(screen).find('form :input');
var result = {};
$.each(inputFields, function(index, value) {
if ($(value).attr('name')) {
result[$(value).attr('name')] = $(value).val();
}
});
return result;
}
Notice that each time the value is accessed, it is converted into a jQuery object using the following syntax: $(value). This allows you to invoke methods, such as val and attr.
You can now invoke this from the console:
> appScreen.serializeForm();
Figure 18.4 shows the results of invoking this method with a given set of values in the input fields.
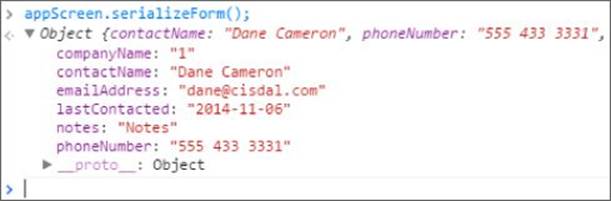
Figure 18.4
You will make more use of this method in the lessons ahead.
Try It
In this Try It, you will try out a number of the traversal and manipulation techniques discussed in the lesson. If you want, you can follow along with these examples in the screencast.
Lesson Requirements
You will need the CRM web application, and you will need to have loaded the jQuery library using one of the techniques outlined earlier in this lesson. Once the web page is loaded, you can perform jQuery selections against the web page using the Chrome Console.
Step-by-Step
1. Write a jQuery selection that starts by finding any time elements in the contacts.html web page and then traverses from these to find each element's parent tr element. Essentially, you are finding all the rows in the table that contain a time element.
2. Find the input field in the document with the attribute autofocus. Traverse from this to its parent element, ensuring that this is a div with the class formRow. Now, find the next sibling of this node (which should also be a div with the class formRow), and find an input field within this div. You should be able to achieve this entire operation in a single line of jQuery.
3. Imagine that you want to add placeholder text to every input field that has the required attribute specifying, “This field is required.” Write a selection that finds all input fields that match this selection and add a placeholder attribute with the appropriate text.
4. Write a line of jQuery to set the value of the companyName select box to 2.
5. Use the each function to iterate through all the input fields that have pattern attributes. Inside the loop, append a sibling to each input field to display this pattern. The result should display as you see in Figure 18.5.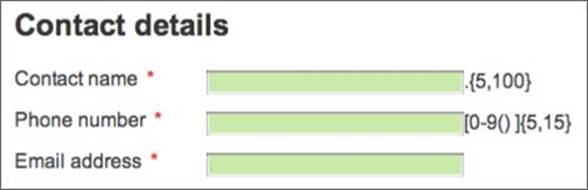
Figure 18.5
Reference
Please go to the book's website at www.wrox.com/go/html5jsjquery24hr to view the video for Lesson 18, as well as download the code and resources for this lesson.
All materials on the site are licensed Creative Commons Attribution-Sharealike 3.0 Unported CC BY-SA 3.0 & GNU Free Documentation License (GFDL)
If you are the copyright holder of any material contained on our site and intend to remove it, please contact our site administrator for approval.
© 2016-2026 All site design rights belong to S.Y.A.