HTML5, JavaScript and jQuery (Programmer to Programmer) - 2015
Part III HTML5 Multimedia
Lesson 23 HTML5 Video
Like audio, video has been widely supported in browsers for many years, but has gained increased prominence in recent years with the advent of sites such as YouTube and Netflix. Although the technical capabilities to deliver video over the Internet have been around for a long time, the increased prominence of video is largely a result of faster Internet connections because video tends to be bandwidth intensive.
As with audio, video has been supported in browsers via plugins. Adobe Flash currently dominates the video plugin market, largely due to the overwhelming success of YouTube, but many other plugins also support video, such as QuickTime and Silverlight.
HTML5 provides native support for video inside a browser. The HTML5 video capabilities are essentially the same as the audio capabilities, but obviously the format types for video are quite different from the format types for audio. As with audio, the HTML5 standard does not specify a default video format that all browsers must support.
HTML5 video has received more attention than HTML5 audio, and received an extra boost when Apple declined to support Adobe Flash on phones and tablets, suggesting instead that HTML5 should be used in its place. As you will see later in this lesson, there are still some impediments to the commercialization of HTML5 video, but it continues to gain traction. Even YouTube now supports HTML5 video for much of its content.
File Formats
Video formats are slightly more complex than audio formats because the container format is required to encapsulate an audio and a video stream. In fact, the same video container may support multiple audio streams to provide audio in multiple languages. Thus, a video file typically consists of the following formats:
· A container format such as OGG, WebM, or MP4
· A video codec such as H.264 or VP8
· An audio codec such as AAC or Vorbis
The following are the main video codecs and their accompanying container and audio formats:
· Theora: Theora is an open, royalty-free video format using lossy compression. There was a concerted push from some quarters to make Theora the standard HTML5 video format, but because of resistance from some browser vendors, those efforts have largely failed. Theora is typically used with the Vorbis audio format and packaged in the OGG container format.
· H.264: H.264 is an extremely common video codec, used for everything from Blu-Ray discs, to YouTube, to iTunes. H.264 supports both lossy and lossless compression, but most commonly is used in a lossy mode.
· H.264 is a patent-encumbered format, and there has been a certain amount of controversy surrounding the use of H.264 in browsers. Google has suggested support may be removed from Chrome in the future, and Firefox only supports H.264 where it is natively supported by the operating system.
· H.264 is typically used with the MP4 container format and the AAC audio format.
· VP8: VP8 is a competitor of H.264 and produces very similar quality to H.264 for similar sized files. Google acquired the intellectual property behind VP8, but it has released all patents pertaining to the VP8 codec.
· VP8 is typically used with the WebM container format and the Vorbis audio format.
· VP9: VP9 is the successor to VP8. It is also developed by Google, and is also royalty free. Unlike VP8, VP9 is based on open standards. VP9 is likely to grow in prominence due to the resources Google has spent on the project.
VP9 is typically used with the WebM container format and the Opus audio format.
Table 23.1 demonstrates support for these formats across the most popular browsers.
Table 23.1: Video support in browsers
|
Theora |
H.264 |
VP8 |
VP9 |
|
|
Chrome |
Yes |
Yes |
Yes |
Yes |
|
Firefox |
Yes |
Partial |
Yes |
Yes |
|
Internet Explorer |
No |
Yes |
No |
No |
|
Opera |
Yes |
Yes |
Yes |
Yes |
|
Safari |
No |
Yes |
No |
No |
A video tag can be added to a web page as follows:
<video width="800" controls>
<source src="test.m4v" type="video/mp4">
Your browser does not support the video element.
</video>
The video file referenced is available on the book's website, and is a 90-second section from one of the screencasts. Naturally, you can use your own video file if you wish.
You will notice that this example contains a width attribute for controlling the size of the video element. As with the image tag, it is considered acceptable to provide height and width directly on the tag, rather than through CSS, even though these attributes do affect presentation.
As with images, it is generally advisable to only provide a height or a width, and if the size is omitted, the size will be based on the size of the encoded video.
As with audio, multiple formats can be specified. In addition, the type attribute specifies the container format, just as with the audio tag, but it is also possible to specify the codecs supported by each container. For example:
<video width="800" controls>
<source src="test.ogg" type='video/ogg; codecs="theora, vorbis"'>
<source src="test.m4v" type="video/mp4">
Your browser does not support the video element.
</video>
Specifying the codecs can helping the browser make a quicker decision about whether it supports a particular file.
Another interesting attribute supported by the video tag is the poster. This allows a static image to be used in place of the video before it begins playing:
<video width="800" controls poster="poster.png">
<source src="test.ogg" type='video/ogg; codecs="theora, vorbis"'>
<source src="test.m4v" type="video/mp4">
Your browser does not support the video element.
</video>
The poster.png file is available from the book's website.
Finally, the video tag also supports an attribute called muted. This allows the video to be played with mute initially enabled, and is useful when video is set to play automatically. The user can then decide to increase the audio as required.
<video width="800" controls muted autoplay poster="poster.png">
Controlling Volume
Just as it is possible to interact with audio files with JavaScript, it is also possible to interact with video files. All of the methods and properties you looked at in the previous lesson are also supported by video. In this lesson, you will look at a number of additional methods supported by both audio and video.
In this lesson, you will also look at an alternative approach for interacting with native DOM objects with jQuery. Up until this point, when you have needed to set properties on native DOM objects, you have accessed them through the array of elements returned by jQuery. For instance:
$('table')[0].nodeType
This allowed you to access the underlying DOM object. jQuery also supports alternative mechanisms for achieving this without accessing the native DOM object:
$('table').prop('nodeType');
The second parameter to prop can be used to set the value of the property if required.
Likewise, if you want to invoke a method (or trigger an event) on a jQuery selection, you have used the following approach:
$("audio")[0].play();
This can also be written with jQuery using the trigger method:
$('audio').trigger('play');
Again, this allows you to work directly with a jQuery selection rather than obtaining a reference to the native DOM object. The trigger method name can also accept any other parameters needed by the method that will be invoked.
The following web page declares a video element without adding any controls, although it is set to autoplay. It then provides two buttons to increase or decrease volume. The volume property on a video can be set to any value between 0 and 1, and defaults to the value of 1. A value of 0 is equivalent to mute.
<!DOCTYPE html>
<html lang="en">
<head>
<meta charset="utf-8">
<script src="jquery-2.1.1.js"></script>
</head>
<body>
<video width="800" autoplay poster="poster.png">
<source src="test.ogg" type='video/ogg; codecs="theora, vorbis"'>
<source src="test.m4v" type="video/mp4">
Your browser does not support the video element.
</video>
<div id="buttons" style="padding:5px;">
<a href="#" id="decreaseVolume">Lower volume</a>
<a href="#" id="increaseVolume">Increase volume</a>
</div>
<script>
$('#decreaseVolume').click(function(evt) {
evt.preventDefault();
var currentVolume = parseFloat($('video').prop('volume'));
$('video').prop('volume', Math.max(0, currentVolume-0.1));
});
$('#increaseVolume').click(function(evt) {
evt.preventDefault();
var currentVolume = parseFloat($('video').prop('volume'));
$('video').prop('volume', Math.min(1, currentVolume+0.1));
});
</script>
</body>
</html>
Notice that this example is careful to keep the volume in the range 0 to 1 by using the built-in functions Math.min and Math.max. For instance, if the volume was already 1, and the user asked to increase the volume, the new volume would be set to the minimum of 1 and 1 + 0.1, which would be 1. If the volume was 0.8 and they requested to increase the volume, you would set it to the minimum of 1 and 0.8 + 0.1, which is 0.9. If you attempt to set the volume outside the 0 to 1 range, an error will be generated.
Also notice in this case that I was careful to convert the volume property to a number before using it with the + operator. Because attribute values are strings by default, using the + operator with a raw attribute value would perform string concatenation.
Controlling Playback Speed
Another common feature with video, which is less common with audio, is the ability to play the track at a faster or slower rate. Slower rates are used for slow motion effects, whereas faster rates are used to allow the user to visually fast-forward to a particular point in the track.
The JavaScript API provides the ability to control the playback via the playbackRate property. This has a default value of 1, and therefore setting this to a value of 4 makes the video play at four times its normal rate, whereas setting it to 0.5 makes it play at half its normal rate, and setting it to 0 is the equivalent of pausing playback.
In order to demonstrate this, add two more controls to the screen:
<a href="#" id="slowDown">Slow down</a>
<a href="#" id="speedUp">Speed up</a>
And add the following JavaScript to modify the playbackRate property:
$('#slowDown').click(function(evt) {
evt.preventDefault();
var currentRate = parseFloat($('video').prop('playbackRate'));
$('video').prop('playbackRate', Math.max(0, currentRate-0.1));
});
$('#speedUp').click(function(evt) {
evt.preventDefault();
var currentRate = parseFloat($('video').prop('playbackRate'));
$('video').prop('playbackRate', Math.min(5, currentRate+0.1));
});
There is no maximum playback rate, but in this example the user is prevented from setting playbackRate to greater than 5.
Controlling Video Size
The HTML5 specification has been extended to allow for full screen video. The video can be made full screen by invoking the requestFullScreen method on the video element.
Because the Fullscreen API is so new, most browsers do not support this method. Instead, browsers support their own variants of the method.
It is common for browsers to provide their own implementations of JavaScript APIs or CSS properties for new specifications. In such cases, the browser family will prefix the method or property name, typically:
· webkit for Chrome or Safari
· moz for Firefox
· ms for Internet Explorer
· opera for Opera
In order to see this in Chrome, add the following control:
<a href="#" id="fullscreen">Fullscreen</a>
and then add the following JavaScript:
$('#fullscreen').click(function(evt) {
evt.preventDefault();
$('video').trigger('webkitRequestFullScreen');
});
Notice that the method invoked is webkitRequestFullScreen. If you open this example in Chrome or Safari, you will be able to enter full-screen mode.
If you want to write an example that works in any browser, you need to determine which browser the page has been loaded into and invoke the correct method. The typical way of achieving this is as follows:
$('#fullscreen').click(function(evt) {
evt.preventDefault();
var video = $('video')[0];
if (video.requestFullscreen) {
video.requestFullscreen();
} else if (video.mozRequestFullScreen) {
video.mozRequestFullScreen();
} else if (video.webkitRequestFullScreen) {
video.webkitRequestFullScreen();
} else if (video.msRequestFullScreen) {
video.msRequestFullScreen();
}
});
Browsers will eventually support the requestFullscreen method; therefore, the code first attempts to use this. If this is not provided, it tests whether the method is available under a browser-specific name. This code relies on the fact that an undefined function returnsundefined (which is false), whereas a defined function will return the function definition (which evaluates to true).
Different browsers may also choose to add additional security around this functionality. For instance, Firefox displays the warning shown in Figure 23.1.
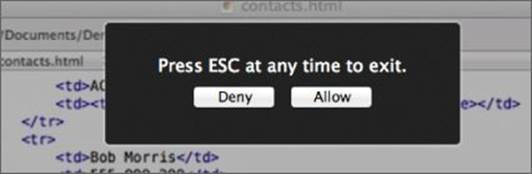
Figure 23.1
Browsers typically provide users with the ability to exit full-screen mode; it is, however, possible to listen for a keypress and invoke the exitFullscreen method (or its browser-specific implementations).
Media Source Extensions
Although the video tag is sufficient for displaying video on most websites, it is not sufficient for some of the larger video providers. Websites such as Netflix and YouTube have requirements that are not covered by the functionality discussed so far.
The next three sections will briefly cover some of the more advanced standards that are emerging in the HTML5 video space.
One of the key requirements for many streaming websites is the capability to downgrade the video quality if the user's Internet connection slows down. This removes the need to freeze the video entirely while it buffers.
Additionally, a user may choose to jump to the 60-minute point of a 90-minute video. It is extremely wasteful on bandwidth if the user is still required to download the entire video file.
The Media Source API is an extension to the HTML5 audio and video tags that enables more fine-grained control over the source of media. Rather than linking to a static video file on the server, it allows JavaScript to build streams for playback from “chunks” of video. This enables techniques such as adaptive streaming and time shifting.
In order to facilitate this, the Media Source API allows a media stream to be defined in JavaScript as follows:
var stream = new MediaSource();
and its type to be defines as follows:
stream.addSourceBuffer('video/webm; codecs="vorbis,vp9" ');
It is then possible to dynamically add chunks of video to the stream:
stream.appendBuffer(chunkOfVideo);
The chunk of video will typically be requested from the server on an “as-needed” basis, and may only cover a few seconds of the overall video track. This means that when each chunk is requested, the appropriate portion of the video can be retrieved, using the appropriate bitrate for the user's connection.
Encrypted Media Extensions
The other main feature required by many commercial websites is the ability to stop the video from being pirated using Digital Rights Management (DRM). This has been a highly controversial area of the HTML5 specification.
The main specification for protecting video is Encrypted Media Extensions (EME). This provides an API for encrypting media streams using the video and audio tags. EME defines a standard for determining how HTML5 browsers should detect that encrypted streams are being used, and then find an appropriate Content Decryption Module (CDM) that will verify the license associated with the video. It will also perform the task of decrypting the video data.
Encrypted Media Extensions therefore provides an API that enables web applications to interact with content protection systems, to allow playback of encrypted audio and video.
EME is an optional extension to the HTML5 specification so browsers can choose not to support it. If it is not supported, websites may decide not to play video inside the browser.
Web Cryptography
The final specification being developed to support video inside the browser is the Web Cryptography API (WebCrypto). This is a JavaScript API for performing common cryptographic functions, such as encoding and decoding data using common cryptographic algorithms.
Although this API is not directly related to the other video APIs, it is one of the ingredients needed to support the EME specification.
The Web Cryptography API is large and complex and not fully supported by most browsers, but it is an important standard to watch over the coming years.
Try It
In this Try It, you will add a simple enhancement to the web page that has been developed during this lesson so far. If you have not been developing this throughout the lesson, it can be downloaded from the book's website (it is called video_pre.html).
This enhancement will allow the user to skip 10 seconds forward or backwards in the video by clicking a button.
Lesson Requirements
You need to have created the video_pre.html file, along with its dependent resources such as jQuery, poster.png, and the video files. These are all available from the book's website.
Step-by-Step
1. Start by adding two new controls to the web page called “Jump forward” and “Jump back.” Assign appropriate IDs to both elements.
2. Add an event listener to the jump back button. This should start by obtaining the currentTime property from the video and converting it into a number.
3. Subtract 10 from the currentTime property, and set this as the new currentTime. Ensure that this does not result in a negative number by using Math.max.
Add an event listener for the jump forward button. This is essentially the same, but it needs to also access the duration property, and ensure that the currentTime is not set to a value greater than this.
My controls looked like this:
<a href="#" id="jumpForward">Jump forward</a>
<a href="#" id="jumpBack">Jump back</a>
And my event listeners looked like this:
$('#jumpBack').click(function(evt) {
evt.preventDefault();
var currentTime = parseFloat($('video').prop('currentTime'));
var newTime = currentTime-10;
$('video').prop('currentTime', Math.max(0, newTime));
});
$('#jumpForward').click(function(evt) {
evt.preventDefault();
var currentTime = parseFloat($('video').prop('currentTime'));
var duration = parseFloat($('video').prop('duration'));
var newTime = currentTime+10;
$('video').prop('currentTime', Math.min(duration, newTime));
});
Reference
Please go to the book's website at www.wrox.com/go/html5jsjquery24hr to view the video for Lesson 23, as well as download the code and resources for this lesson.
All materials on the site are licensed Creative Commons Attribution-Sharealike 3.0 Unported CC BY-SA 3.0 & GNU Free Documentation License (GFDL)
If you are the copyright holder of any material contained on our site and intend to remove it, please contact our site administrator for approval.
© 2016-2026 All site design rights belong to S.Y.A.