Multiplayer Game Development with HTML5 (2015)
Chapter 3. Feeding a Snake in Real Time
After having covered the introductory material until now, it is time to let the rubber hit the road. This chapter will walk you through the upgrade of a single-player game into its multiplayer counterpart.
Unlike the game we developed in Chapter 1, Getting Started with Multiplayer Game Programming, this game will need to be played in real-time, as opposed to being turn-based, which brings a whole set of challenges to the table. Once we solve the fundamental problems associated with synchronizing real-time game worlds across two or more players, we'll look into other fundamental, yet more involving concepts.
In this chapter, we will discuss the following principles and concepts:
· Fixing your game loop for multiplayer gaming
· Implementing an authoritative server
· The lobby and room system
· Matchmaking algorithms
· Socket programming with Socket.io
Hello world for game development
Surely, you must have written a hello world program when you were learning programming. In game development, I'd say the classic hello world game every developer should start with is snake. The concept is simple: move a block around the screen collecting special blocks that cause your block to stretch into a sequence of connected blocks that resemble the movement of a snake. If you run the head of the snake into its body, you lose.
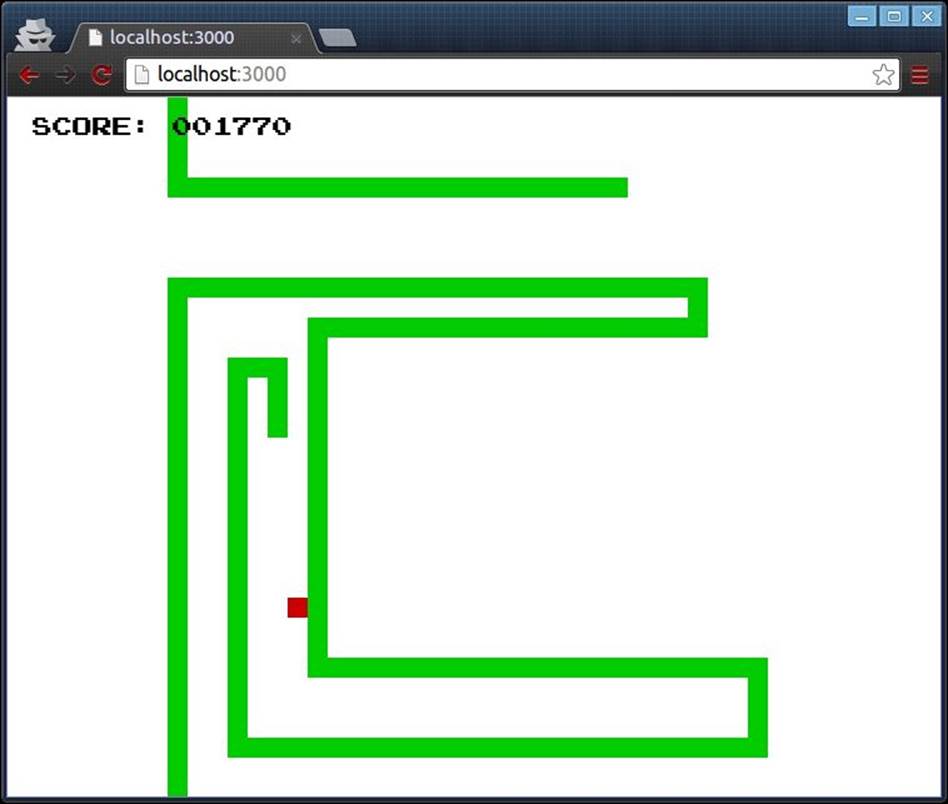
This implementation only allows the snake to move up, down, left, or right. Once you specify the direction for the snake to move, it will continue moving in that direction until you move it in a different direction. As a bonus, this particular implementation allows you to wrap around the screen—that is, if you move outside one of the sides of the screen, the snake will appear on the opposite side.
Catching a red block makes the snake grow by one extra block and increments your score by 10 points. Running the snake into itself stops the game loop and prints a simple game over message.
In order to keep things simple for this initial version, there aren't any additional screens, including a main entry screen. The game simply begins once it is fully loaded. As we build upon this single player version of the game, we'll add the required screens that will make it more intuitive and user friendly for more than one player to join the game.
Setting up the game
The goal of this initial single player version of the game is to make a playable game with as few lines of code by using the most basic model that we can build on. Thus, many additional details are left as an exercise for you.
In preparation for the next step, where we'll add server-side components to the game, we've written the first version of the game using Node.js and exported it to the browser using Browserify, as discussed in Chapter 2, Setting Up the Environment.
package.json
In keeping with the theme of making everything as simple possible, we will use a package.json file that only requires the Express framework to help us with routing and the Grunt plugins to help us to automatically build and export our modules with Browserify:
// ch3/package.json
{
"name": "snake-ch3",
"dependencies": {
"express": "*",
"express-generator": "*"
},
"devDependencies": {
"grunt": "~0.4.5",
"grunt-browserify": "~3.4.0",
"grunt-contrib-uglify": "~0.8.0",
"grunt-contrib-watch": "~0.6.1"
}
}
Note
Express.js is a web framework for Node.js that allows us to very quickly set up the entire web server to host and serve our game. (refer to http://expressjs.com/.) While Express plays a major role in our project, as it routes user requests for the appropriate files, understanding how it works is not a prerequisite to this chapter or the rest of the book. We will cover enough of the absolute basics to get you started using this powerful framework.
With all this in place, we use the Express command-line tool to build the project.
npm install
express snake-ch3
cd snake-ch3
npm install
After executing the preceding sequence of commands, we have set up our boilerplate Node.js server with all of Express' defaults, which, for our purpose, will work just fine. If anything goes wrong for whatever reason, there will be enough error messages to help you understand why and what the problems are. Provided that everything seems to be going fine after you enter the preceding commands, you can now test the project by starting your server with the following command:
npm start
This will start the server on port 3000, which you can load on your modern browser of choice at http://localhost:3000/.
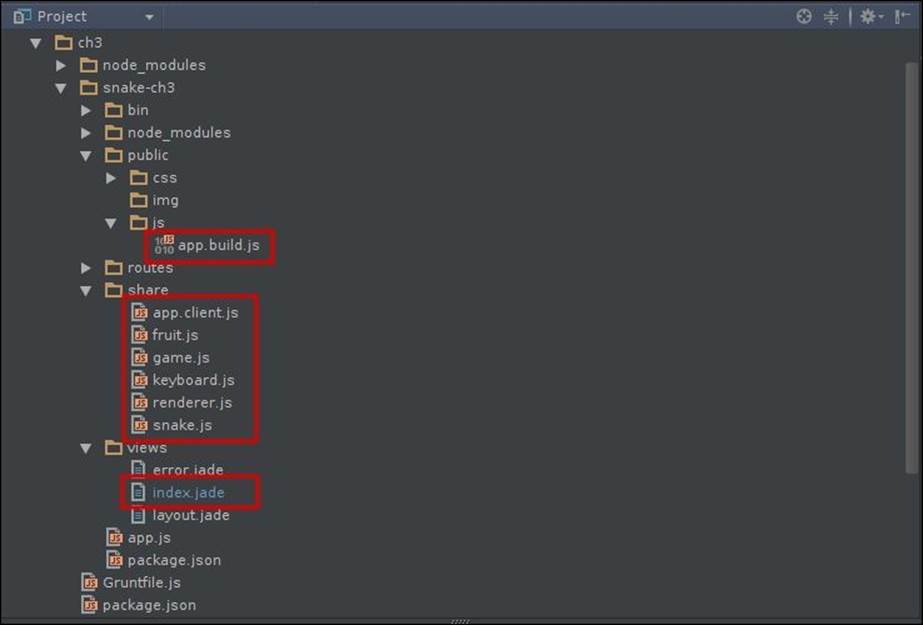
The project structure will now look like the one in the preceding screenshot, except for the files enclosed within the red box that will not be generated by Express Generator. We will be creating and editing these files by hand, as you will see in the next several sections.
Index.jade
By default, Express will create an index file that displays a welcome message. Since all we need for now is a single screen to display the game, we'll just edit this file for our own purpose:
// ch3/snake-ch3/views/index.jade
extends layout
block content
div#gameArea
p#scoreA SCORE: <span>000000</span>
p#gameOver.animated.pulse.hidden Game Over
canvas#gameCanvas
div#statsPanel
script(src='/js/app.build.js')
If you squint hard enough, you will see the HTML markup. If you're not familiar with the Jade templating language that Express uses by default, don't worry. What we do in the template is create a <p> element where we'll display the current score, one for the game over message, and a canvas element that we'll use to render the game. We also include the main script file, which is the output of the Grunt task that concatenates all our files and runs Browserify over them so that we can load it in the browser. Since index.jade is the only thing we'll see of Jade in this book, we won't go into it any further. For more information about how Jade works and what it can do, visit its website at http://www.jade-lang.com.
The game modules
With the preceding structure in place, all that we need now is a couple of classes that implement the game. We'll do this in five classes so that we can reuse individual pieces of logic when we implement the game server.
Game.js
Here's how we'll implement our game.js file:
// ch3/snake-ch3/share/game.js
var Game = function (fps) {
this.fps = fps;
this.delay = 1000 / this.fps;
this.lastTime = 0;
this.raf = 0;
this.onUpdate = function (delta) {
};
this.onRender = function () {
};
};
Game.prototype.update = function (delta) {
this.onUpdate(delta);
};
Game.prototype.render = function () {
this.onRender();
};
Game.prototype.loop = function (now) {
this.raf = requestAnimationFrame(this.loop.bind(this));
var delta = now - this.lastTime;
if (delta >= this.delay) {
this.update(delta);
this.render();
this.lastTime = now;
}
};
Game.prototype.start = function () {
if (this.raf < 1) {
this.loop(0);
}
};
Game.prototype.stop = function () {
if (this.raf > 0) {
cancelAnimationFrame(this.raf);
this.raf = 0;
}
};
module.exports = Game;
This module is the cornerstone of our project. It defines a very simple interface that abstracts away a simple game loop. All that we need to do when we implement this class is define the update() and render() methods.
You will notice the use of requestAnimationFrame, which is a special function defined by browsers to help us render the game. Since the game server won't render the game, neither will it have the function available to it, we'll need to adapt to that when we start working on the server. We'll talk more about frame rate independence in the next section.
snake.js
We'll be adding the following code to our snake.js file:
// ch3/snake-ch3/share/snake.js
var keys = require('./keyboard.js');
var EventEmitter = require('events').EventEmitter;
var util = require('util');
var Snake = function (id, x, y, color_hex, width, height) {
this.id = id;
this.color = color_hex;
this.head = {x: x, y: y};
this.pieces = [this.head];
this.width = width || 16;
this.height = height || 16;
this.readyToGrow = false;
this.input = {};
};
Snake.events = {
POWER_UP: 'Snake:powerup',
COLLISION: 'Snake:collision'
};
util.inherits(Snake, EventEmitter);
Snake.prototype.setKey = function (key) {
this.input[keys.UP] = false;
this.input[keys.DOWN] = false;
this.input[keys.LEFT] = false;
this.input[keys.RIGHT] = false;
this.input[key] = true;
};
Snake.prototype.update = function (delta) {
if (this.readyToGrow) {
this.pieces.push({x: -10, y: -10});
this.readyToGrow = false;
}
for (var len = this.pieces.length, i = len - 1; i > 0; i--) {
this.pieces[i].x = this.pieces[i - 1].x;
this.pieces[i].y = this.pieces[i - 1].y;
}
if (this.input[keys.LEFT]) {
this.head.x += -1;
} else if (this.input[keys.RIGHT]) {
this.head.x += 1;
} else if (this.input[keys.UP]) {
this.head.y += -1;
} else if (this.input[keys.DOWN]) {
this.head.y += 1;
}
};
Snake.prototype.checkCollision = function(){
var collide = this.pieces.some(function(piece, i){
return i > 0 && piece.x === this.head.x && piece.y === this.head.y;
}, this);
if (collide) {
this.emit(Snake.events.COLLISION, {id: this.id, point: this.head, timestamp: performance.now()});
}
};
Snake.prototype.grow = function() {
this.readyToGrow = true;
this.emit(Snake.events.POWER_UP, {id: this.id, size: this.pieces.length, timestamp: performance.now()});
};
module.exports = Snake;
The snake class extends Node's EventEmitter class so that it can emit events to the main application. This way we can isolate the specific behavior of the class and decouple it from any concrete implementation that responds to the snake as per our choice.
We also create a simple interface that the main application can use to control the snake. Again, since the immediate goal of this version is to get the game running in a browser, we will make use of browser-specific functionality, which in this case is window.performance.now(), which we'll replace with a module compatible with Node.js when we need to.
Other supporting modules
There are three other classes (namely, fruit.js, keyboard.js, and renderer.js) that merely wrap the canvas and canvas context objects, a JavaScript equivalent of an enumeration to help us refer to keyboard input, and a simple point that we'll use to represent the pellet that the snake will eat. For brevity, we will omit the code for these classes.
app.client.js
Here's how our app.client.js module should look like:
// ch3/snake-ch3/share/app.client.js
game.onUpdate = function (delta) {
var now = performance.now();
// Check if there's no fruits left to be eaten. If so, create a new one.
if (fruits.length < 1) {
fruitDelta = now - lastFruit;
// If there's been enough time without a fruit for the snakes,
// create a new one at a random position, and place it in the world
if (fruitDelta >= fruitDelay) {
fruits[0] = new Fruit(
parseInt(Math.random() * renderer.canvas.width / BLOCK_WIDTH / 2, 10),
parseInt(Math.random() * renderer.canvas.width / BLOCK_HEIGHT / 2, 10),
'#c00', BLOCK_WIDTH, BLOCK_HEIGHT
);
}
}
player.update(delta);
player.checkCollision();
// Check if the snake has gone outside the game board.
// If so, wrap it around to the other side
if (player.head.x < 0) {
player.head.x = parseInt(renderer.canvas.width / player.width, 10);
}
if (player.head.x > parseInt(renderer.canvas.width / player.width, 10)) {
player.head.x = 0;
}
if (player.head.y < 0) {
player.head.y = parseInt(renderer.canvas.height / player.height, 10);
}
if (player.head.y > parseInt(renderer.canvas.height / player.height, 10)) {
player.head.y = 0;
}
// Check if there's a fruit to be eaten. If so, check if the snake has just
// eaten it. If so, grow the player that ate it.
if (fruits.length > 0) {
if (player.head.x === fruits[0].x && player.head.y === fruits[0].y) {
fruits = [];
player.grow();
lastFruit = now;
}
}
};
game.onRender = function () {
ctx.clearRect(0, 0, renderer.canvas.width, renderer.canvas.height);
ctx.fillStyle = player.color;
player.pieces.forEach(function(piece){
ctx.fillRect(
piece.x * player.width,
piece.y * player.height,
player.width,
player.height
);
});
fruits.forEach(function(fruit){
ctx.fillStyle = fruit.color;
ctx.fillRect(
fruit.x * fruit.width,
fruit.y * fruit.height,
fruit.width,
fruit.height
);
});
};
The first part of the app.client module, which is the concrete implementation of the game, imports all the required classes and modules and instantiates the game loop and player classes. Next (as seen previously) we implement the two game loop life cycle methods, namely the update andrender methods. The only change that we'll need to make to these two methods when we add multiplayer functionality is to update and render an array of snakes rather than a single one.
Since the actual update for each player is delegated to the snake class itself, the game loop has no issues over what is done inside that method. In fact, the game loop doesn't even care about the output of the update methods, as we'll see later. The key here is that the game loop's update method allows every entity in the game to update itself during the update phase.
Similarly, during the render phase, the game loop only cares about rendering the current state of each entity that it wants to render. Although we could have also delegated the rendering of the snake and other visual entities, we'll leave the concrete rendering inside the game loop for simplicity.
Finally, at the end of the app.client module, we hook up to the incoming events that we care about. Here, we listen for game events that were created by the snake object. The Snake.events.POWER_UP and Snake.events.COLLISION custom events let us execute callback functions to respond to when the snake consumes a pellet and collides with itself respectively.
Next, we bind to the keyboard and listen for key press events. Due to the game mechanics that we implement, we don't care about any keys that are not being pressed, so that's why we don't register any listeners for these events. This particular block of code is a great candidate for refactoring later on since the way the client will receive this kind of input will be different from the server. For example, the client will still take input directly from the user using the same keyboard events as input, but the server will receive this input from the user, which will notify the server of its state through the socket connection:
// whenever we receive a POWER_UP event from the game, we
// update the player's score and display its value inside scoreWidget.
player.on(Snake.events.POWER_UP, function(event){
var score = event.size * 10;
scoreWidgets.filter(function( widget){
return widget.id === event.id;
})
.pop()
.el.textContent = '000000'.slice(0, - (score + '').length) + score + '';
});
// whenever we receive a COLLISION event from the game, we
// stop the game and display a game over message to the player.
player.on(Snake.events.COLLISION, function(event){
scoreWidgets.filter(function(widget){
return widget.id === event.id;
})
.pop()
.el.parentElement.classList.add('gameOver');
game.stop();
setTimeout(function(){
ctx.fillStyle = '#f00';
ctx.fillRect(event.point.x * player.width, event.point.y * player.height, player.width, player.height);
}, 0);
setTimeout(function(){
gameOver.classList.remove('hidden');
}, 100);
});
document.body.addEventListener('keydown', function (e) {
var key = e.keyCode;
switch (key) {
case keys.ESC:
game.stop();
break;
case keys.SPACEBAR:
game.start();
break;
case keys.LEFT:
case keys.RIGHT:
case keys.UP:
case keys.DOWN:
player.setKey(key);
break;
case keys.D:
console.log(player.pieces);
break;
}
});
The game loop
As you know, the game loop is the very core of any real-time game. Although the game loop serves a fairly simple function, let us now consider some of the implications of having a game server and client running together.
Frame rate independence
The purpose of the game loop is nothing more than to ensure that the game runs in a consistent, ordered manner. For example, if we draw the current game state before we update it, the player might find the game to be slightly out of sync when they interact with it since the current display would be at least one frame behind what the player would expect it to be.
In addition, and this is particularly so in JavaScript's event-based input system, if we update the game every time we receive input from the user, we might have different parts of the game updating at different times, making the experience even more out of sync.
Thus, we put a game loop in place to ensure that, after any input is handled and cached and until the next tick of the game loop, we can apply the input during the update phase of the game step and then render the outcome of the update:
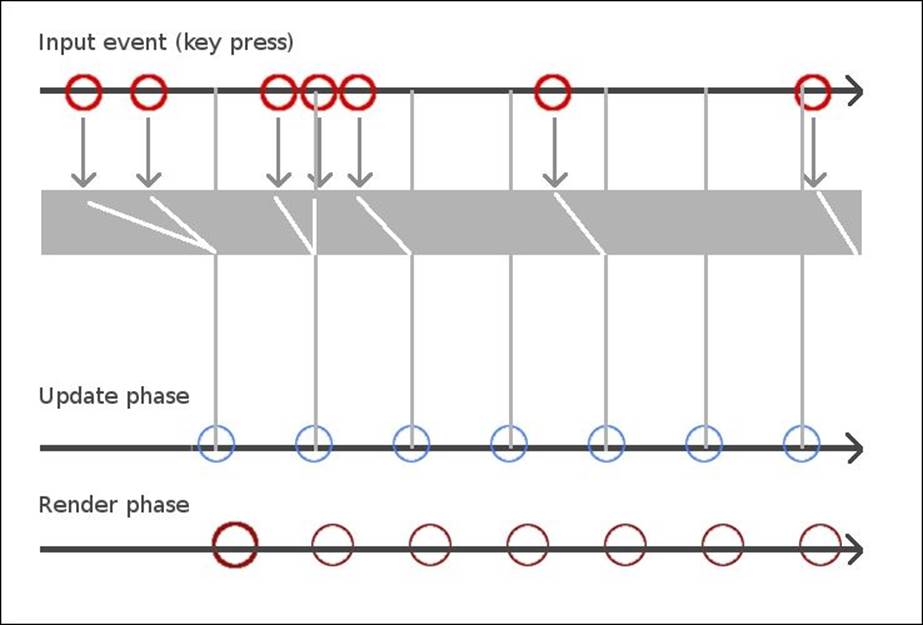
The most obvious solution to this problem is to model the input space within your game; then, query this during the update phase and respond accordingly. In other programming environments, we can simply query the input devices directly. Since JavaScript exposes events instead, we can't ask the runtime whether the left key is currently pressed.
Next, we need to update the game, which in most cases means that we'll move something just a tiny bit. After a few frames have been updated, these small movements that we've updated in each iteration will combine to create a smooth motion. In practical terms, what we need to do once the game loop has completed a cycle is to call the game loop again for the next cycle:
while (true) {
update();
render();
}
While a traditional game loop in most other programming languages might look something like the preceding code snippet, we can't do this in JavaScript because the while loop would block JavaScript's single thread, causing the browser to lock up:
function tick() {
setTimeout(tick, 0.016);
update();
render();
}
A more appropriate approach in JavaScript is to use one of the timer functions (either setTimeout or setInterval) to call the game step method. While this solution actually works, unlike the while loop idea, we can run into issues such as the game consuming too much CPU (as well as the battery life of a mobile device), particularly when the loop continues to execute when the game is not running. We can also run into issues with the timer approach if JavaScript is busy with other things, and the tick function can't be called as often as we'd like.
Note
You may wonder why we make the call to setTimeout and requestAnimationFrame at the beginning of the tick method, instead of at the end, after we have actually executed the code inside the method.
The reason for this is that calling either of these two functions simply schedules the callback function to run at the next event loop cycle. Calling setTimeout or requestAnimationFrame returns execution to the next command in the function calling it immediately, then the rest of the function executes to completion.
Once the function returns, JavaScript will execute the next piece of code in the event loop, which was added to the loop some time in the past. In other words, if JavaScript detects user input while we're executing our game tick method or some other event takes place, these events will be added to the queue and will be handled after our tick method returns. Thus, if we wait until the end of the tick method to schedule it again with the event loop, we may find the tick method waiting in line (so that it can have a turn at the CPU again) before other callbacks are handled.
By scheduling the tick method early on, we can be sure that it will be called again as soon as it can after it completes its current execution, even if other events are triggered during the current execution, and other code is placed on the event loop.
Finally, the most appropriate way to write a game loop in JavaScript is to use the more recent window.requireAnimationFrame function:
function tick(timestamp) {
var rafId = requestAnimationFrame(tick);
update();
render();
}
RequestAnimationFrame is a handy function implemented in browsers that we can use to ask the browser to invoke our callback function right before the browser performs its next repaint. Since the inner workings of the browser are outside the scope of JavaScript, the refreshing rate is now at the operating system level, which is much more precise. In addition, since the browser knows when it needs to repaint and is much closer to the display device than JavaScript can possibly be, it can make many optimizations that we couldn't do on our own.
Calling requestAnimationFrame will return an integer value that will map to the provided function in the callback list. We can use this ID number to cancel our callback from being triggered when the browser determines that it should have. This is a handy way to pause execution of the game loop without using a conditional statement at the beginning of the callback, which would normally evaluate to false most of the time (or so we hope).
Finally, the callback function that we supply to RequestAnimationFrame will be passed a timestamp value in the form of a DOMHighResTimeStamp type. This timestamp represents the time when the callbacks registered with RequestAnimationFrame get triggered in a given cycle. We can use this value to calculate the delta time since the previous frame, thus breaking our game loop out of the time-space continuum, which we'll discuss next.
Time-based game loop
Now that we have an effective way to update our game as fast as the underlying hardware is able to, we just need to control the rate at which the update happens. One option would be to ensure that the game loop doesn't execute again until at least some time has elapsed. This way we will not update more often than we know we have to. The other option is to calculate how long the previous update took and send that number into the update function so that it can move everything relative to that time difference:

As illustrated in the preceding figure, if we update the game twice as fast in one browser or device, then the time taken to update a single frame (also known as the delta time) will be half as well. Using this delta as a factor in the physics update, we can make each update relative to how long it'll take to update a single frame. In other words, in the course of a whole second, we can either update the game a few times where each time the update is larger or we update the game many times during the same second, but each update would be much smaller. At the end of the second, we would have still moved the same distance.
Multiple game loops
Running a game smoothly and consistently across different CPUs is a victory on its own. Now that we're past that, let's think about how we can actually achieve it across the client and the server.
On the browser, we can run the game for the user using requestAnimationFrame, as demonstrated earlier. On the server, however, there is no requestAnimationFrame. Worse yet, we can't quite send updates across the network to all participants at a full 60 updates per second. In theory, we could very well do that—maybe for a few seconds before the server heats up and melts down. In other words, running 60 updates per second for every game in the same server would cause tremendous load on the server. Thus, we will need to slow down the update's pace on the server.
First things first, though. Since there is no requestAnimationFrame in Node.js, we know that we can't use it. However, since the concrete implementation of the game loop for the game server is separate from the game client's, we can just choose another timer mechanism that Node offers.
Secondly, we need to have a second timer running in the server so that it can send updates to the clients at a much slower pace. If we actually try to send updates to every single client at 60 frames per second, we will likely overload the server very quickly and performance will decrease.
The solution to the client update problem is to send updates at a slower but consistent rate, allowing the server to be the ultimate authority on game state in a way that we can scale. Between updates from the server, if the game requires quicker updates, we can make the game client update itself in the best way it can; then, once it receives information from the server, we can fix the client state if needed.
There are two timer functions that are commonly used in Node.js as higher resolution replacements for setTimeout(). These are setImmediate() and process.nextTick(). The reason you will want to use one of these two functions instead of setTimeout() is because setTimeout() doesn't guarantee the delay you specify nor does it guarantee the order in which the events will be executed.
For a better alternative, we can use setImmediate to schedule a callback to run after every event that is currently sitting on the event queue. We could also use process.nextTick, which will schedule the callback to run right after the current block of code finishes its execution.
While process.nextTick might seem like the better option between the two, keep in mind that it will not give the CPU a chance to execute other code in the event queue (or allow the CPU to rest), causing execution to consume 100 percent of the CPU. Thus, for the particular use case of a game loop in your Node.js game simulation, you might be better off using setImmediate.
As mentioned before, there will be two timers or loops running in the game server. The first is the physics update loop, which will use setImmediate in an attempt to efficiently run at a full 60 fps. The second will be the client sync loop, which doesn't need to run as fast.
The purpose of the client sync loop is to authoritatively tell the clients what the real state of the game is so that each client can update itself. If we try to let the server adjust each client at every frame, we would have a very slow game and a very slow server. A simple, widely used solution is to only synchronize the clients a couple of times per second. In the mean time, each client can play the game locally and then make any necessary corrections when the server updates its state.
Implementing an authoritative server
The strategy that we'll use for this server will be to run two game loops for two different purposes. The first loop is the physics update, which we'll run close to the same frequency as the clients' loop. The second loop, which we'll refer to as the client sync loop, is run at a slower pace, and at each tick, it will send the entire game state to every connected client.
At this point, we'll only focus on getting the server working as we've described. The current implementation of the clients will continue to work as it did, managing the entire game logic locally. Any data a client receives from the server (using the game sync loop) will only be rendered. Later in the book, we'll discuss the concept of client prediction, where we'll use the input from the game sync loop as the actual input for the game's logic rather than just rendering it mindlessly.
Game server interface
The first thing to change from the current implementation of the game client will be to break the input and output points so that they can communicate with the socket layer in the middle. We can think of this as a programming interface that specifies how the server and clients will communicate.
For this, let's create a simple module in our project to serve as a poor man's enum since enums aren't available in JavaScript. Though the data in this module will not be immutable, it will give us the advantage since the IDE will automatically suggest values, correct us when we make a typing mistake, and put all of our intents in one place. By convention, any event that starts with the word server_ represent actions for the server. From example, the event named server_newRoom asks the server to create a new room:
// ch3/snake-ch3/share/events.js
module.exports = {
server_spawnFruit: 'server:spawnFruit',
server_newRoom: 'server:newRoom',
server_startRoom: 'server:startRoom',
server_joinRoom: 'server:joinRoom',
server_listRooms: 'server:listRooms',
server_setPlayerKey: 'server:setPlayerKey',
client_newFruit: 'client:newFruit',
client_roomJoined: 'client:roomJoined',
client_roomsList: 'client:roomsList',
client_playerState: 'client:playerState'
};
We now use the string values defined in this module to register callbacks for and emit events to sockets in a consistent and predictable way between the client and the server. For example, when we emit an event named modules.exports.server_spawnFruit, we know that what is intended is that a message to be received by the server has the action name of spawnFruit. In addition, you'll notice that we'll use socket.io to abstract away the socket communication between the client and the server. If you're curious to get started with socket.io right now, feel free to skip ahead to the end of this chapter and read the Socket.io section.
var gameEvents = require('./share/events.js');
socket.on(gameEvents.server_spawnFruit, function(data){
var pos = game.spawnFruit(data.roomId, data.maxWidth, data.maxHeight);
socket.emit(gameEvents.client_newFruit, pos);
});
In the given example, we first include our module into a gameEvents variable. We then register a callback function whenever a socket receives an server_spawnFruit event. Presumably, this code is in some server code, as indicated by the server keyword at the beginning of the key name. This callback function takes a data argument created by the client (whoever is sending the command on the other end of the socket). This data object has the data that is needed by the specific call to spawn a new fruit object for the game.
Next, we use the input data into the socket event to perform some task (in this case, we generate a random position where a fruit can be added in the game world). With this data on hand, we emit a socket command back to the client to send the position that we just generated.
Updating the game client
The first thing to change in the client code is to add different screens. At a minimum, we need two different screens. One of the screens will be the game board as we've implemented so far. The other is the lobby, which we'll discuss in more detail later. In brief, the lobby is an area where players go before they join a specific room, which we'll also discuss shortly.
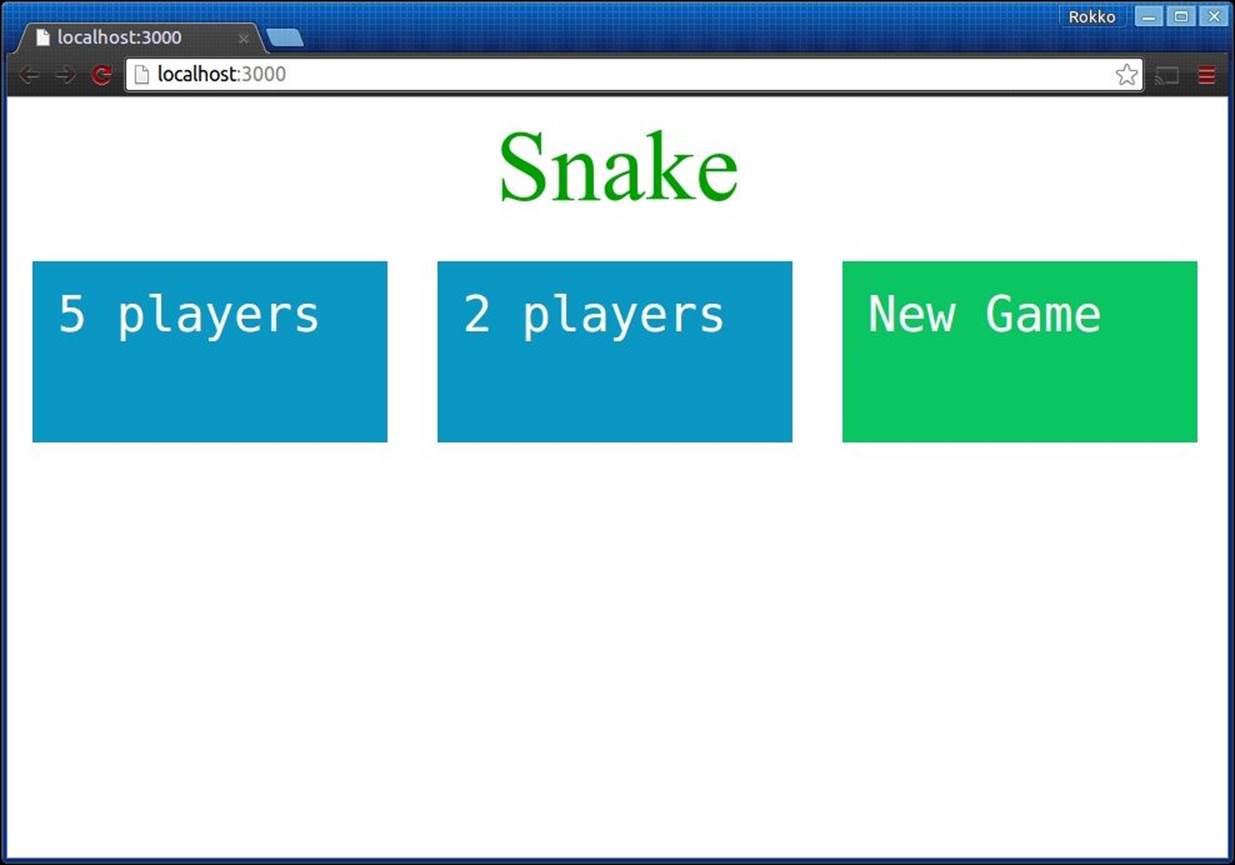
Once in the lobby, the player can choose to join an existing room or create and join a new room with no players in it.
In a perfect world, your game engine would offer great support for multiple screens. Since the sample game we're writing is not written in such a game engine, we'll just use basic HTML and CSS and write every screen along with any supporting props and widgets in the same HTML file that will be served up originally:
// ch3/snake-ch3/views/index.jade
extends layout
block content
div#lobby
h1 Snake
div#roomList
div#main.hidden
div#gameArea
p#scoreA SCORE: <span>000000</span>
p#gameOver.animated.pulse.hidden Game Over
canvas#gameCanvas
div#statsPanel
script(src='/js/socket.io.js')
script(src='/js/app.build.js')
There are only three blocks of code in the previous template. First, we have a div element with an ID of lobby inside which we dynamically add a list of available game rooms. Next, there is a div element with an ID of main, initially with a class of hidden, so that this screen is not visible initially. Finally, we include the socket.io library as well as our app.
The simplest way to bind to that HTML structure is to create module-wide global variables that reference each desired node. Once these references are in place, we can attach the necessary event listeners so that the player can interact with the interface:
// ch3/snake-ch3/share/app.client.js
var roomList = document.getElementById('roomList');
var screens = {
main: document.getElementById('main'),
lobby: document.getElementById('lobby')
};
// …
socket.on(gameEvents.client_roomsList, function (rooms) {
rooms.map(function (room) {
var roomWidget = document.createElement('div');
roomWidget.textContent = room.players.length + ' player';
roomWidget.textContent += (room.players.length > 1 ? 's' : '');
roomWidget.addEventListener('click', function () {
socket.emit(gameEvents.server_joinRoom, {
roomId: room.roomId,
playerId: player.id,
playerX: player.head.x,
playerY: player.head.y,
playerColor: player.color
}
);
});
roomList.appendChild(roomWidget);
});
var roomWidget = document.createElement('div');
roomWidget.classList.add('newRoomWidget');
roomWidget.textContent = 'New Game';
roomWidget.addEventListener('click', function () {
socket.emit(gameEvents.server_newRoom, {
id: player.id,
x: player.head.x,
y: player.head.y,
color: player.color,
maxWidth: window.innerWidth,
maxHeight: window.innerHeight
});
});
roomList.appendChild(roomWidget);
});
socket.on(gameEvents.client_roomJoined, function (data) {
// ...
screens.lobby.classList.add('hidden');
screens.main.classList.remove('hidden');
});
Since the initial game screen is the lobby, and the markup for the lobby is already visible, we don't do anything else to set it up. We simply register a socket callback to be invoked when we receive a list of available rooms and create individual HTML nodes with event listeners for each, attaching them to the DOM when we're ready.
Inside a different socket callback function, this time the one associated with the roomJoined custom event, we first make the lobby screen invisible, and then we make the main screen visible. We do this by adding and removing a CSS class named hidden, whose definition is shown in the following code snippet:
// ch3/snake-ch3/public/css/style.css
.hidden {
display: none;
}
Understanding the game loop
The next set of changes that we'll need to make on the original game code is in the game class. As you'll remember, this class defines a basic game life cycle, exposing the functions update and render, which get implemented by whoever uses it.
Since the core of the game loop defined in this class (found in Game.prototype.loop) uses window.requestAnimationFrame, we'll need to get rid of that call since it will not be available in Node.js (or in any other environment outside the browser).
One technique that is commonly used to allow us the flexibility to write a single module that is used in both the browser and the server is to wrap the browser- and server-specific functions in a custom module.
Using Browserify, we can write two separate modules that wrap the environment-specific functionality but only reference a single one in the code. By configuring Browserify property, we can tell it to compile a different module whenever it sees a require statement for the custom wrapper module. For simplicity, we have only mentioned this capability here, but we will not get into it in this book. Instead, we will write a single component that automatically detects the environment it's under at runtime and responds accordingly.
// ch3/snake-ch3/share/tick.js
var tick = function () {
var ticks = 0;
var timer;
if (typeof requestAnimationFrame === 'undefined') {
timer = function (cb) {
setTimeout(function () {
cb(++ticks);
}, 0);
}
} else {
timer = window.requestAnimationFrame;
}
return function (cb) {
return timer(cb);
}
};
module.exports = tick();
The tick component is made up of a function that returns one of the two functions, depending on the availability of window.requestAnimationFrame. This pattern might look somewhat confusing at first, but it offers the benefit that it only detects the environment once and then makes the environment-specific functionality every time after the initial setup.
Note that what we export from this module is a call to tick and not a mere reference. This way, when we require the module, what ends up being referenced in the client code is the function returned by tick. In a browser, this will be a reference to window.requestAnimationFrame, and in node, it'll be a function that calls setTimeout, by passing an incrementing number to it, similar to how the browser version of tick would.
Game client's game loop
Now that the abstract game loop class is ready for use in any environment, let's take a look at how we could refactor the existing client implementation so that it can be driven by sockets connected to the authoritative server.
Note how we no longer determine when a new fruit should be generated. All that we check for on the client is how we might move the player's character. We could let the server tell us where the snake is at each frame, but that would overload the application. We could also only render the main snake when the server syncs its state, but that would make the entire game seem really slow.
What we do instead is just copy the entire logic here and ignore what the server says about it when we sync. Later, we'll talk about client prediction; at that point, we'll add some logic here to correct any discrepancies that we find when the server syncs with us.
// ch3/snake-ch3/share/app.client.js
game.onUpdate = function (delta) {
// The client no longer checks if the player has eaten a fruit.
// This task has now become the server's jurisdiction.
player.update(delta);
player.checkCollision();
if (player.head.x < 0) {
player.head.x = parseInt(renderer.canvas.width / player.width, 10);
}
if (player.head.x > parseInt(renderer.canvas.width / player.width, 10)) {
player.head.x = 0;
}
if (player.head.y < 0) {
player.head.y = parseInt(renderer.canvas.height / player.height, 10);
}
if (player.head.y > parseInt(renderer.canvas.height / player.height, 10)) {
player.head.y = 0;
}
if (fruits.length > 0) {
if (player.head.x === fruits[0].x && player.head.y === fruits[0].y) {
fruits = [];
player.grow();
}
}
};
Game server's game loop
This is where things get exciting. Before we implement the game loop for the server-side code, we'll first need to implement an API that the client will use to query the server and issue other commands.
One of the benefits of using express in this project is that it works so well with Socket.io. Without stealing any thunder from the section later in this chapter that is dedicated to Socket.io, this is how our main server script will look like:
// ch3/snake-ch3/app.js
// …
var io = require('socket.io')();
var gameEvents = require('./share/events.js');
var game = require('./server/app.js');
var app = express();
app.io = io;
// …
io.on('connection', function(socket){
// when a client requests a new room, create one, and assign
// that client to this new room immediately.
socket.on(gameEvents.server_newRoom, function(data){
var roomId = game.newRoom(data.maxWidth, data.maxHeight);
game.joinRoom(roomId, this, data.id, data.x, data.y, data.color);
});
// when a client requests to join an existing room, assign that
// client to the room whose roomId is provided.
socket.on(gameEvents.server_joinRoom, function(data){
game.joinRoom(data.roomId, this, data.playerId, data.playerX, data.playerY, data.playerColor);
});
// when a client wishes to know what all the available rooms are,
// send back a list of roomIds, along with how many active players
// are in each room.
socket.on(gameEvents.server_listRooms, function(){
var rooms = game.listRooms();
socket.emit(gameEvents.client_roomsList, rooms);
});
});
Adding to the default Express app.js script, we import Socket.io, the game events module that we defined earlier, and the game application that we will discuss throughout the rest of the chapter.
Next, after we've finished setting up Express, we set up our socket communication with the clients. The first step is to wait until a connection has been established, which will give us access to an individual socket that is bound to an individual client.
Once we have a live socket, we configure all the events we care about by registering custom event listeners to each event. You will notice that some of the sample event listeners mentioned previously also emit events back to the requesting socket, while others simply call methods on the game object. The difference between the two scenarios is that when we only need to talk to a single client (the requesting client), we contact that socket directly from the event listener. There are situations, however, when we might wish to talk to all the sockets connected to the same room. When this is the case, we must let the game object alert all the players that it needs since it will know who all are the clients that belong to a given room.
Lobby and room system
The concepts of game rooms and a lobby are central to multiplayer gaming. In order to understand how it works, think about the game server as a building in which people go in order to play games together.
Before entering the building, a player may stand in front of the building and enjoy the beauty of the outside walls. In our metaphor, staring at the front of the building would be the equivalent of being greeted by a splash screen that introduces the game.
Upon entering the building, the player may or may not see some options from which to make a choice, such as a listing of the available floor to which he or she may want to go. In some games, you can choose the type of game to play as well as a difficulty level. Think of this as taking an elevator to a specific floor.
Finally, you arrive at a lobby. Similar to the way a lobby works in real life, in multiplayer games, the lobby is a special room that multiple players go to before entering a specific room where the playing takes place. In the lobby, you can see what the available rooms are and then choose one to join.
Once you have decided which room you'd like to join, you can now enter that room and participate in an existing game with other players. Alternatively, you can join an empty room and wait for others to join you there.
Typically, there is never an empty room in multiplayer games. Every room has at least one player in it, and every player can belong to one room at a time. Once all players have left the room, the game server would delete the room and release the associated resources.
Implementing the lobby
With the basic understanding of a lobby, we can implement it in a number of ways. Generally speaking, a lobby is actually a special room that all players join before they end up at a room where they'll play a particular game.
One way to implement this is to keep track of all socket connections in your server as an array. For all practical purposes, that array of sockets is your lobby. Once a player connects to the lobby (in other words, once a player has connected to your server), he or she can communicate with other players and possibly be an observing participant in a conversation between other players in the lobby.
In our case, the lobby is simple and to the point. A player is assigned to the lobby automatically upon starting the game. Once in the lobby, the player queries the server for a list of available rooms. From there, the player can issue a socket command to join an existing room or create a new one:
// ch3/snake-ch3/server/app.js
var Game = require('./../share/game.js');
var gameEvents = require('./../share/events.js');
var Room = require('./room.js');
// ...
/** @type {Array.<Room>} */
var rooms = [];
module.exports = {
newRoom: function(maxWidth, maxHeight){
var room = new Room(FPS, maxWidth, maxHeight);
rooms.push(room);
return rooms.length - 1;
},
listRooms: function(){
return rooms.map(function(room, index) {
return {
roomId: index,
players: room.players.map(function(player){
return {
id: player.snake.id,
x: player.snake.head.x,
y: player.snake.head.y,
color: player.snake.color
};
})
};
});
},
joinRoom: function(roomId, socket, playerId, playerX, playerY, playerColor) {
var room = rooms[roomId];
var snake = new Snake(playerId, playerX, playerY, playerColor, 1, 1);
room.join(snake, socket);
socket.emit(gameEvents.client_roomJoined, {roomId: roomId});
},
};
Remember that our main server script exposed an interface that sockets could use to communicate with the game server. The previously mentioned script is the backend service with which the interface communicated. The actual sockets connected to the server are stored in and managed by Socket.io.
The list of available rooms is implemented as an array of Room objects, which we'll look at in detail in the next section. Note that every room will need at least two things. First, a room will need a way to group players and run the game with those same players. Second, a room will need a way for both the client and server to uniquely identify each individual room.
The two simple approaches to identify the rooms individually are to ensure that each room object has an ID property, which would need to be unique across the entire game space, or we could use the array index where the room is stored.
For simplicity, we've chosen the second. Keep in mind that, should we delete a room and splice it off the rooms array, the room ID that some players have may now point to the wrong room.
For example, suppose there are three rooms in the array so that the room ID for the rooms are 0, 1, and 2 respectively. Suppose that each of these rooms have several players participating in a game there. Finally, imagine that all the players in room ID 0 leave the game. If we splice that first room off the array (stored at index 0), then the room that used to be the second element in the array (formerly stored at index 1) would be shifted down to the front of the array (index 0). The third element in the array would also change and would be stored at index 1 instead of index 2. Thus, players who used to be in rooms 1 and 2 respectively will now report back to the game server with those same room IDs, but the server will report the first room as the second one, and the second room will not exist. Therefore, we must avoid deleting empty rooms by splicing them off the rooms array. Remember that the largest integer that JavaScript can represent is 2^53 (which equals 9,007,199,254,740,992), so we will not run out of slots in the array if we simply add new rooms to the end of the rooms array.
Implementing the rooms
The game room is a module that implements the game class and runs the game loop. This module looks fairly similar to the client game as it has references to the player and fruit objects and updates the game state at each game tick.
One difference you will notice is that there is no render phase in the server. In addition, the room will need to expose a few methods so that the server application can managed it as needed. Since each room has references to all the players in it and every player in the server is represented by a socket, the room can contact every player who is connected to it:
// ch3/snake-ch3/server/room.js
var Game = require('./../share/game.js');
var Snake = require('./../share/snake.js');
var Fruit = require('./../share/fruit.js');
var keys = require('./../share/keyboard.js');
var gameEvents = require('./../share/events.js');
/** @type {Game} game */
var game = null, gameUpdateRate = 1, gameUpdates = 0;
var players = [], fruits = [], fruitColor = '#c00';
var fruitDelay = 1500, lastFruit = 0, fruitDelta = 0;
var Room = function (fps, worldWidth, worldHeight) {
var self = this;
game = new Game(fps);
game.onUpdate = function (delta) {
var now = process.hrtime()[1];
if (fruits.length < 1) {
fruitDelta = now - lastFruit;
if (fruitDelta >= fruitDelay) {
var pos = {
x: parseInt(Math.random() * worldWidth, 10),
y: parseInt(Math.random() * worldHeight, 10)
};
self.addFruit(pos);
players.map(function(player){
player.socket.emit(gameEvents.client_newFruit, pos);
});
}
}
players.map(function (player) {
player.snake.update(delta);
player.snake.checkCollision();
if (player.snake.head.x < 0) {
player.snake.head.x = worldWidth;
}
if (player.snake.head.x > worldWidth) {
player.snake.head.x = 0;
}
if (player.snake.head.y < 0) {
player.snake.head.y = worldHeight;
}
if (player.snake.head.y > worldHeight) {
player.snake.head.y = 0;
}
if (fruits.length > 0) {
if (player.snake.head.x === fruits[0].x
&& player.snake.head.y === fruits[0].y) {
fruits = [];
player.snake.grow();
}
}
});
if (++gameUpdates % gameUpdateRate === 0) {
gameUpdates = 0;
var data = players.map(function(player){
return player.snake;
});
players.map(function(player){
player.socket.emit(gameEvents.client_playerState, data);
});
lastFruit = now;
}
};
};
Room.prototype.start = function () {
game.start();
};
Room.prototype.addFruit = function (pos) {
fruits[0] = new Fruit(pos.x, pos.y, fruitColor, 1, 1);
};
Room.prototype.join = function (snake, socket) {
if (players.indexOf(snake.id) < 0) {
players.push({
snake: snake,
socket: socket
});
}
};
Room.prototype.getPlayers = function(){
return players;
};
module.exports = Room;
Note that the players array holds a list of object literals that contain a reference to a snake object as well as the actual socket. This way both resources are together in the same logical place. Whenever we need to ping every player in the room, we can simply map over the player's array and then access the socket through player.socket.emit.
In addition, note that the sync loop is placed inside the main game loop, but we only trigger the logic inside the sync loop whenever a certain amount of frames have elapsed. The goal is to only synchronize all the clients every so often.
Matching players within game rooms
After we have broken down the various concepts into simple fundamentals, you will see that implementing each module is not as complicated as they may have sounded at first. Player matching is one such example.
There are different ways in which you might want to match players in a game room. While our sample game doesn't do any complex matching (we allow players to blindly match themselves), you should know that there are more options here.
The following are some ideas about how you might go about matching players into the same game world. Keep in mind that there are third-party services, such as Google's Play Services API, that you can use to help you with these.
Inviting friends into your world
One of the most engaging ways to match players leverages the social aspect of today's world. By integrating with a social network service (or using your own social network populated by your players), you can give a player the option to invite a friend to play with them.
While this can be a fun experience, it goes without saying that both players must be online at the same time for the game to be played. Often, this means that when a player sends an invite to his or her friend, an email is sent to the friend with information about the invitation. Whenever the friend joins the game room and both players are ready, the fun can begin.
A variation of this technique is to only show available friends (that is, friends who are already online and either in the lobby or in a game room). This way play can begin immediately or as soon as the friend exits the current game.
Auto-matching
Perhaps, you don't have a social network to leverage, or perhaps, the player doesn't care who the opponents are. When you want the player to be able to just get in and play a quick game, auto-matching is a great option.
There are more specific ways to automatically match players (for example, automatically match players based on their skills or some other criteria), but in its most basic form, you would need to create a private room for the first player (by private room, I mean a room that isn't listed for any player to join—only the game server knows about it), then wait for a matching player to join that room.
Skill-based matching
Another common way that players are matched into the same game room is by grouping players together based on their skill level. The way you keep track of a player's skill level can be determined in at least three ways— namely, by asking the user what his or her skill level is, by monitoring them during a single session, or by persisting the player's information across multiple sessions.
The first option is the easiest to implement. A common way in which this is done is by displaying a menu with three or more options asking the player to choose from the options, such as amateur, advanced, and rock star. Based on this selection, you will then try to match other players from the same group.
One possible benefit of this approach is that a new player with no past history with the game (from the point of view of the server) can start playing more advanced players right away. On the other hand, the same feature can be considered to be a downside to the approach as truly advanced players who may only wish to play with equally skilled players might get frustrated by being matched up against poor players who claim to possess a higher skill level than they really qualify for.
The second option is to start everyone at the same level (or randomly assign the first skill level for incoming players). Then, as more games are played, the application can keep track of each player's wins and losses along with other metadata about each player to allow you to bucket each player into a current skill level.
For example, a player may start the game in a beginner's room. After winning two games and losing none, you can then put this player in a advanced room. After the player has played additional two or three games and has two or three more victories under their belt, you can now consider that player to be in the super-advanced level.
The obvious downside to this approach is that it makes the assumption that an individual player will stay logged in long enough to play multiple games. Depending on the type of game you're designing, most players won't even be logged in to finish a single playing session.
However, if your game is a good candidate for this type of approach (where a single game doesn't last longer than a few minutes), then this matching technique works out quite well because you won't need to write any long term persistence logic or need to authenticate users.
Finally, you can keep track of a player's skill level by persisting their information in some form of backend database. In most cases, this will require players to have individual accounts, which will need to be authenticated before the play begins.
Again, in some cases, you might want to use an existing third-party service to authenticate players, and possibly persist information you generate about them in the service itself.
While this can get pretty elaborate and engaging, the basic concept is simple—calculate some sort of score that can be used to deduce a player's skill level and store that information away somewhere in a way that it can be retrieved later. From this point of view, you can possibly implement this persistence by storing the player's current skill level locally using HTML5's local storage API. The main drawback of doing this would be that this data would be stuck in the player's machine, so if the player uses a different machine (or wipes out their local storage data), you won't have access to the data.
Socket.io
In Chapter 1, Getting Started with Multiplayer Game Programming, we implemented the first demo game using native HTML5 sockets. Although WebSockets are still totally awesome, they are unfortunately still heavily dependent on the specific browser the player uses.
Today, every modern browser ships with a complete implementation of WebSockets, especially on mobile devices where the world seems to be converging. However, for the possible exception where the user's browser doesn't quite support WebSockets but does support canvas (or whatever other HTML5 API you game uses), Socket.io comes to the rescue.
In short, Socket.io is an open source library that offers a fantastic level of abstraction over sockets. Not only this, Socket.io also makes it super easy to implement the backend service that the frontend socket clients will consume.
To implement the server-side code is as easy as specifying the port on which the connection will be and then implementing callbacks for events in which you're interested.
Now, this book is not a comprehensive guide for those wanting to master every aspect of Socket.io and will not be too descriptive for a lot of features that are offered by the library. However, you might find it useful to know that Socket.io offers amazing client-side support. In other words, if the browser using the socket doesn't implement the WebSockets specification, then Socket.io will fallback to some other technique that can be used to communicate with the server asynchronously. While some of these techniques may be too slow for real-time gaming (for example, Socket.io will eventually fallback to using HTML iFrames to communicate with the server if nothing else is supported by the browser), it is good to know just how powerful the library is.
Installing Socket.io
We will bring Socket.io into our project through NPM. Be sure to stay close to the version used in this book (which is 1.3.5), as some of the methods or configurations might vary.
npm install socket.io --save
npm install socket.io-client –save
Again, since we're using the Express framework to ease the effort of creating the Node.js server, we'll integrate Socket.io with Express.
// ch3/snake-ch3/app.js
var express = require('express');
var io = require('socket.io')();
// ...
var app = express();
app.io = io;
// ...
io.on('connection', function(socket){
console.log('New client connected. Socket ready!');
});
});
The first thing we need to do is require Socket.io together with Express and all your other dependencies for the server script. We then add Socket.io to the Express instance by taking advantage of JavaScript's dynamic nature. We do this because Socket.io is not fully set up yet since we'll need access to the HTTP server that Express uses. In our case, as is the current standard today, we use Express Version 4.9.0 along with express-generator, which generates a file under <project-name>/bin/www where the low-level server setup takes place. This is where we integrate Socket.io into Express, by attaching the same server used by Express into our Socket.io instance.
// ch3/snake-ch3/bin/www
#!/usr/bin/env node
var debug = require('debug')('snake-ch3');
var app = require('../app');
app.set('port', process.env.PORT || 3000);
var server = app.listen(app.get('port'), function() {
debug('Express server listening on port ' + server.address().port);
});
app.io.attach(server);
Client-side Socket.io
The last step is to use the Socket.io library in our client JavaScript. Here, there are only two simple steps that you must be certainly used to by now if you've ever done any JavaScript programming at all.
First, we copy the client-side library into our public directory so that we can include it into our client code. To do this, copy the ch3/snake-ch3/node_modules/socket.io-client/socket.io.js file into ch3/snake-ch3/public/js/socket.io.js. Next, include the library in your HTML file using a script tag.
To start using the socket in your client code, all you need to do is instantiate it by requiring it with the domain where the server is running.
// ch3/snake-ch3/share/app.client.js
var socket = require('socket.io-client')(window.location.origin);
// …
socket.on('connect', function () {
socket.emit(gameEvents.server_listRooms);
});
Now, the socket will attempt to connect to your server right away and asynchronously. Once it does this, the connect event will fire and the corresponding callback will be fired as well, and you would know that the socket is ready to be used. From then on you can start emitting events to the other end of the socket.
Summary
Hopefully, this chapter got you excited about the unique aspects of multiplayer game development. We took an existing single-player snake game and broke it apart into an authoritative server component and a socket-driven frontend component. We used Socket.io to link the game client and server together in a very seamless integration with Express. We also discussed the concept of a game lobby and game rooms as well as the way to match players into the same game world.
In the next chapter, we will improve our Snake game by adding reduced network latency with client prediction and correction as well as input interpolation. We will also fix the game server's game loop for smoother and more efficient game play.