HTML5: The Missing Manual Matthew MacDonald (2013)
Part 3. Building Web Apps
Chapter 10, Storing Your Data
Chapter 11, Running Offline
Chapter 12, Communicating with the Web Server
Chapter 13, Geolocation, Web Workers, and History Management
Chapter 10. Storing Your Data
On the Web, there are two places to store information: on the web server, or on the web client (the viewer’s computer). Certain types of data belong on one, while others work better on the other.
The web server is the place to store sensitive information and data you don’t want people tampering with. For example, if you fill your shopping cart at an online bookstore, your potential purchases are stored on the web server, as are the catalog of books, the history of past sales, and just about everything else. The only data your computer keeps is a tiny bit of tracking information that tells the website who you are, so it knows which shopping cart is yours. Even with HTML5, there’s no reason to change this setup—it’s safe, secure, and efficient.
But server-side storage isn’t the best bet for every website. Sometimes, it’s easier to keep nonessential information on the web surfer’s computer. For example, local storage makes sense for user preferences (for example, settings that influence how the web page tailors its display) andapplication state (a snapshot of where the web application is right now, so the web visitor can pick up at the same spot later on). And if the data takes time to calculate or retrieve from the web server, you may be able to improve performance by storing it on the visitor’s computer.
Before HTML5, the only way to get local storage was to use cookies, a mechanism originally devised to transmit small bits of identifying information between web browsers and web servers. Cookies work perfectly well for storing small amounts of data, but the JavaScript model for using them is a bit clunky. Cookies also force you to fiddle with expiry dates and needlessly send your data back and forth over the Internet with every web request.
HTML5 introduces a better alternative that lets you store information on your visitor’s computer simply and easily. This data stays on the client indefinitely, isn’t sent to the web server (unless you do it yourself), has plenty of room, and works through a couple of simple, streamlined JavaScript objects. This feature—called web storage—is a particularly nice fit with the offline application feature explored in Chapter 11, because it lets you build self-sufficient offline applications that can store all the information they need, even when there’s no web connection.
In this chapter, you’ll explore every corner of the web storage feature. You’ll also look at two additional, newer standards: the File API, which lets the web browser read the content from other files on the computer’s hard drive; and IndexedDB, which lets web developers run a complete, miniature database engine right inside the browser.
Web Storage Basics
HTML5’s web storage feature lets a web page store some information on the viewer’s computer. That information could be short-lived (so it disappears once the browser is shut down), or it could be long-lived (so it’s still available days later, on subsequent visits to the website).
NOTE
The name web storage is more than a little misleading. That’s because the information a page stores is never on the Web—in fact, it never leaves the web surfer’s computer.
There are two types of web storage, and they revolve around two objects:
§ Local storage uses the localStorage object to store data permanently and make it accessible to any page in your website. If a web page stores local data, it will still be there when the visitor returns the next day, the next week, or the next year. Of course, most browsers also include a way to let users clear out local storage. Some web browsers provide an all-or-nothing command that lets people wipe out local data, in much the same way that you can clear out your cookies. (In fact, in some browsers the two features are linked, so that the only way to clear local data is to clear the cookies.) Other browsers may let their users review the storage usage of each website and clear the local data for specific sites.
§ Session storage uses the sessionStorage object to store data temporarily, for a single window (or tab). The data remains until the visitor closes that tab, at which point the session ends and the data disappears. However, the session data stays around if the user goes to another website and then returns to your site, provided that this all happens in the same window tab.
TIP
From the point of view of your web page code, both local storage and session storage work exactly the same. The difference is just how long the data lasts. Using local storage is the best bet for information you want to keep for future visits. Use session storage for data that you want to pass from one page to another. (You can also use session storage to keep temporary data that’s used in just one page, but ordinary JavaScript variables work perfectly well for that purpose.)
Both local storage and session storage are linked to your website domain. So if you use local storage on a page at www.GoatsCanFloat.org/game/zapper.html, that data will be available on the page www.GoatsCanFloat.org/contact.html, because the domain is the same (www.GoatsCanFloat.org). However, other websites won’t be able to see it or manipulate it.
Also, because web storage is stored on your computer (or mobile device), it’s linked to that computer; a web page can’t access information that was stored locally on someone else’s computer. Similarly, you get different local storage if you log onto your computer with a different user name or fire up a different browser.
NOTE
Although the HTML5 specification doesn’t lay down any hard rules about maximum storage space, most browsers limit local storage to 5 MB. That’s enough to pack in a lot of data, but it falls short if you want to use local storage to optimize performance by caching large pictures or videos (and truthfully, this isn’t what local storage is designed to do). For space-hoggers, the still-evolving IndexedDB database storage standard (see Browser Support for the File API) offers much more room—typically hundreds of megabytes, if the user agrees.
Storing Data
To put a piece of information away into local storage or session storage, you first need to think of a descriptive name for it. This name is called a key, and you need it to retrieve your data later on.
To store a piece of data, you use the localStorage.setItem() method, as follows:
localStorage.setItem(keyName, data);
For example, imagine you want to store a piece of text with the current user’s name. For this data, you might use the key name user_name, as shown here:
localStorage.setItem("user_name", "Marky Mark");
Of course, it doesn’t really make sense to store a hard-coded piece of text. Instead, you’d store something that changes—for example, the current date, the result of a mathematical calculation, or some text that the user has typed into a text box. Here’s an example of that last one:
// Get a text box.
var nameInput = document.getElementById("userName");
// Store the text from that text box.
localStorage.setItem("user_name", nameInput.value);
Pulling something out of local storage is as easy as putting it in, provided you use the localStorage.getItem() method. For example, here’s a line of code that grabs the previously stored name and shows it in a message box:
alert("You stored: " + localStorage.getItem("user_name"));
This code works whether the name was stored five seconds ago or five months ago.
Of course, it’s possible that nothing was stored at all. If you want to check whether a storage slot is empty, you can test for a null reference. Here’s an example of that technique:
if (localStorage.getItem("user_name") == null) {
alert ("You haven't entered a name yet.");
}
else {
// Put the name into a text box.
document.getElementById("userName").value = localStorage.getItem("user_
name");
}
Session storage is just as simple. The only difference is that you use the sessionStorage object instead of the localStorage object:
// Get the current date.
var today = new Date();
// Store the time as a piece of text in the form HH:mm.
var time = today.getHours() + ":" + today.getMinutes();
sessionStorage.setItem("lastUpdateTime", time);
Figure 10-1 shows a simple test page that puts all of these concepts together.
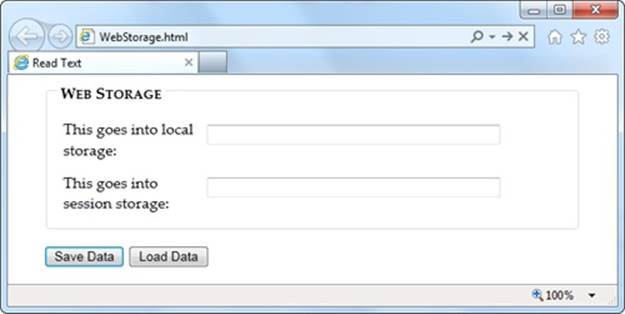
Figure 10-1. This page has two text boxes, one for session storage and one for local storage. When you click Save, the page stores the values. Click Load Data, and it brings them back. To try this out (and to verify that session storage disappears when the window is closed but that local storage lives forever), run this page at http://prosetech.com/html5.
NOTE
Web storage also supports two alternate syntaxes for accessing data. Instead of using the getItem() and setItem() methods that you’ve already seen, you can use property names or an indexer. With property names, you access a storage slot called “user_name” as localStorage.user_name. With an indexer, you access the same storage slot aslocalStorage[“user_name”]. You can choose a syntax based on your preference, but most web experts believe the getItem() and setItem() methods are best because they offer the least ambiguity.
TROUBLESHOOTING MOMENT: WEB STORAGE FAILS WITHOUT A WEB SERVER
There’s an unexpected problem that can trip up your web storage testing. In many browsers, web storage works only when you’re requesting the pages from a live web server. It doesn’t matter whether that web server is located on the Internet or if it’s just a test server running on your own computer—the important detail is that you aren’t just launching the pages from your local hard drive.
This quirk is a side effect of the way browsers dole out their local storage space. As you’ve already learned, they limit each website to 5 MB, and in order to do that, they need to associate every page that wants to use local storage to a website domain.
So what happens if you break this rule and open a web page that uses web storage, straight from a file? It depends. In Internet Explorer, the browser appears to lose its web storage support completely. The localStorage and sessionStorage objects disappear, and trying to use them causes a JavaScript error. In Firefox, the localStorage and sessionStorage objects remain, and support appears to be there (even to Modernizr), but everything you try to store quietly disappears into a void. And in Chrome, the result is different again—most of web storage works fine, but some features (like the onStorage event) don’t work. You’ll see the same issues when you use the File API (Reading Files). So do yourself a favor and put your pages on a test server, so you’re not tripped up by unexpected quirks. Or, run the examples in this chapter from the try-out site at http://prosetech.com/html5.
A Practical Example: Storing the Last Position in a Game
At this point, you might have the impression that there isn’t much to web storage, other than remembering to pick a name and put it in square brackets. And you’d be mostly right. But you can put local storage to some more practical purposes without any extra effort.
For example, consider the canvas-based maze game you saw in Chapter 9 (A Practical Example: The Maze Game). A maze might be too much trouble to solve in one go, in which case it makes sense to store the current position when the user closes the window or navigates to a new page. When the user returns to the maze page, your code can then restore the happy face to its previous position in the maze.
There are several possible ways to implement this example. You could simply save a new position after each move. Local storage is fast, so this wouldn’t cause any problem. Or, you could react to the page’s onBeforeUnload event to ask the game player whether it’s worth storing the current position (Figure 10-2).
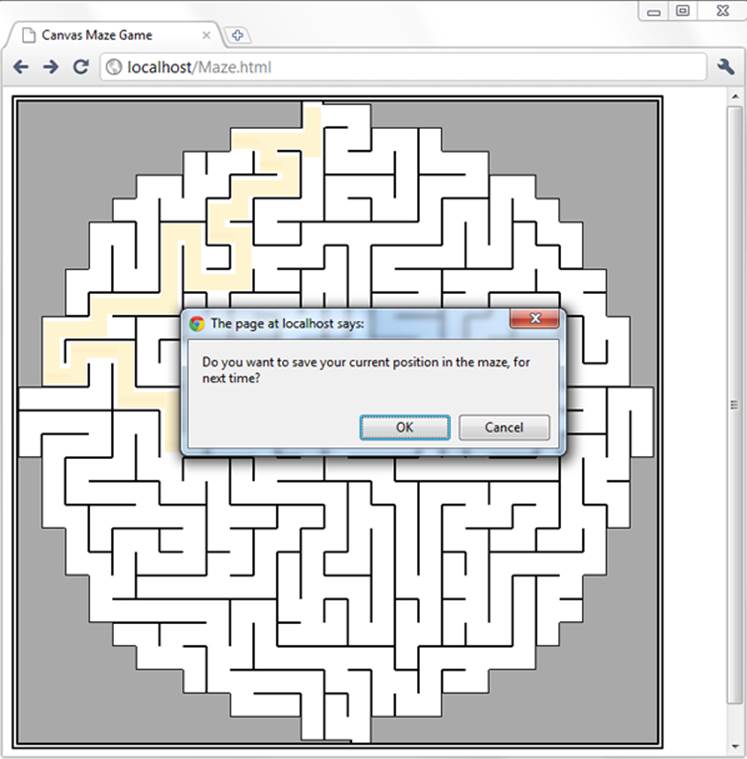
Figure 10-2. When a visitor leaves this page, either by navigating to a new site or by closing the window, the page offers to store the current position.
Here’s the code that offers to store the position details:
window.onbeforeunload = function(e) {
// Check if the localStorage object exists (as there's no reason to offer
// to save the position if it won't work).
if (localStorage) {
// Ask to save the position.
if (confirm(
"Do you want to save your current position in the maze, for next time?")) {
// Store the two coordinates in two storage slots.
localStorage.setItem("mazeGame_currentX", x);
localStorage.setItem("mazeGame_currentY", y);
}
}
}
TIP
Long key names, like mazeGame_currentX, are good. After all, it’s up to you to ensure that key names are unique, so two web pages on your website don’t inadvertently use the same name to store different pieces of data. With just a single container that holds all your data, it’s all too easy to run into naming conflicts, which is the one glaring weakness in the web storage system. To prevent problems, come up with a plan for creating logical, descriptive key names. For example, if you have separate maze games on separate pages, consider incorporating the page name into the key name, as in Maze01_currentX.
This example shows how to store an application state (the current position). If you wanted to avoid showing the same message each time the user leaves the game, you could add an “Automatically save position” checkbox. You would then store the position if the checkbox is switched on. Of course, you’d want to save the value of the checkbox too, and that would be an example of storing application preferences.
When the page loads the next time, you can check to see whether there’s a previously stored position:
// Is the local storage feature supported?
if (localStorage) {
// Try to get the data.
var savedX = localStorage.getItem("mazeGame_currentX");
var savedY = localStorage.getItem("mazeGame_currentY");
// If the variables are null, no data was saved.
// Otherwise, use the data to set new coordinates.
if (savedX != null) x = Number(savedX);
if (savedY != null) y = Number(savedY);
}
This example also uses the JavaScript Number() function to make sure the saved data is converted to valid numbers. You’ll learn why that’s important on Storing Numbers and Dates.
Browser Support for Web Storage
Web storage is one of the best-supported HTML5 features in modern browsers. The only browser that you’re likely to find that doesn’t support web storage is the thankfully endangered IE 7.
If you need a workaround for IE 7, you can simulate web storage using cookies. The fit isn’t perfect, but it works. And although there’s no official piece of script that plugs that gap, you can find many decent starting points on the GitHub polyfill page at http://tinyurl.com/polyfill (just look under the “Web Storage” section heading).
One web storage feature that enjoys slightly less support is the onStorage event, which you’ll consider on Reacting to Storage Changes. In particular, IE 8 supports web storage but not the onStorage event. (IE 9 and later versions correct the problem, with full web storage support.) This situation is fine if you’re using onStorage to add a nonessential feature, but otherwise be warned.
Deeper into Web Storage
You now know the essentials of web storage—how to put information in, and how to get it out again. However, there are several finer points and a few useful techniques left to cover before you put it to use. In the following sections, you’ll see how to remove items from web storage and how to examine all the currently stored items. You’ll also learn to deal with different data types, to store custom objects, and to react when the collection of stored items changes.
Removing Items
It couldn’t be easier. You use the removeItem() method, and the key name, to get rid of a single piece of data you don’t want:
localStorage.removeItem("user_name");
Or, if you want to empty out all the local data your website has stored, use the more radical clear() method:
sessionStorage.clear();
Finding All the Stored Items
To get a single piece of data out of web storage, you need to know its key name. But here’s another neat trick. Using the key() method, you can pull every single item out of local or session storage (for the current website), even if you don’t know any key names. This is a nifty technique when you’re debugging, or if you just want to review what other pages in your site are storing, and what key names they’re using.
Figure 10-3 shows a page that puts this technique into practice.
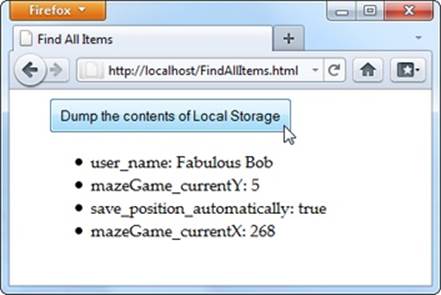
Figure 10-3. Click the button, and this page fills a list with the local storage contents.
When you click the button in this example, it triggers the findAllItems() function, which scans through the collection of items in local storage. Here’s the code:
function findAllItems() {
// Get the <ul> element for the list of items.
var itemList = document.getElementById("itemList");
// Clear the list.
itemList.innerHTML = "";
// Do a loop over all the items.
for (var i=0; i<localStorage.length; i++) {
// Get the key for the item at the current position.
var key = localStorage.key(i);
// Get the item that's stored with this key.
var item = localStorage.getItem(key);
// Create a new list item with this information,
// and add it to the page.
var newItem = document.createElement("li");
newItem.innerHTML = key + ": " + item;
itemList.appendChild(newItem);
}
}
Storing Numbers and Dates
So far, the exploration into web storage has glossed over one important detail. Whenever you store something in the localStorage or sessionStorage object, that data is automatically converted to a string of text. For values that are already text (like the user name typed into a text box), there’s no problem. But numbers aren’t as forgiving. Consider the example on A Practical Example: Storing the Last Position in a Game, which stores the most recent maze position in local storage. If you forget to convert the coordinates from text to numbers, you can run into this sort of problem:
// Get the last x-coordinate position.
// For example, this might return the text "35"
x = localStorage.getItem("mazeGame_currentX");
// Attempt to increment the position (incorrectly).
x += 5;
Unfortunately, this code doesn’t have the result you want. Because x is a string, JavaScript converts the number 5 to a string as well. And instead of adding 35+5, JavaScript actually performs the string combination “35”+“5”, which returns a result of 355. This clearly isn’t what you want. In fact, this code will cause the happy face to jump to completely the wrong position, or right out of the maze.
The issue here is that JavaScript assumes you’re trying to stick two pieces of text together, rather than perform a mathematical operation. To solve the problem, you need to give JavaScript a hint that you’re trying to work with numbers. Several solutions are possible, but the Number()function works well:
x = Number(localStorage.getItem("mazeGame_currentX"));
// Now JavaScript calculates 35+10 properly, and returns 40.
x += 10;
Text and numbers are easy to deal with, but if you want to place other sorts of data into web storage, you’ll need to handle them with care. Some data types have handy conversion routines. For example, imagine you store a date like this:
var today = new Date();
This code doesn’t store a date object, but a text string, like “Sat Jun 07 2014 13:30:46”. Unfortunately, there’s no easy way to convert this text back into a date object when you pull it out of storage. And if you don’t have a date object, you won’t be able to manipulate the date in the same way—say, calling date methods and performing date calculations.
To solve this problem, it’s up to you to explicitly convert the date into the text you want, and then convert it back into a proper date object when you retrieve it. Here’s an example:
// Create a date object.
var today = new Date();
// Turn the date into a text string in the standard form YYYY/MM/DD,
// and store that text.
var todayString = today.getFullYear() + "/" +
today.getMonth() + "/" + today.getDate();
sessionStorage.setItem("session_started", todayString);
...
// Now retrieve the date text and use it to create a new date object.
// This works because the date text is in a recognizable format.
today = new Date(sessionStorage.getItem("session_started"));
// Use the methods of the date object, like getFullYear().
alert(today.getFullYear());
Run this code, and the year appears in a message box, confirming that you’ve successfully recreated the date object.
Storing Objects
In the previous section, you saw how to convert numbers and dates to text and back again, so you can store them with web storage. These examples work because the JavaScript language helps you out, first with the handy Number() function, and then with the text-to-date conversion smarts that are hard-wired into date objects. However, there are plenty of other objects that you can’t convert this way, especially if you create a custom object of your own.
For example, consider the personality quiz you first saw in Chapter 9 (Putting It Together: Drawing a Graph). The personality quiz uses two pages. On the first, the quiz-taker answers some questions and gets a score. On the second, the results are shown. In the original version of this page, the information is passed from the first page to the second using query string arguments that are embedded in the URL. This approach is traditional HTML (although a cookie would work too). But in HTML5, local storage is the best way to shuffle data around.
But here’s the challenge. The quiz data consists of five numbers, one for each personality factor. You could store each personality factor in a separate storage slot. But wouldn’t it be neater and cleaner to create a custom object that packages up all the personality information in one place? Here’s an example of a PersonalityScore object that does the trick:
function PersonalityScore(o, c, e, a, n) {
this.openness = o;
this.conscientiousness = c;
this.extraversion = e;
this.accommodation = a;
this.neuroticism = n;
}
If you create a PersonalityScore object, you need just one storage slot, instead of five. (For a refresher about how custom objects work in JavaScript, see Objects.)
To store a custom object in web storage, you need a way to convert the object to a text representation. You could write some tedious code that does the work. But fortunately, there’s a simpler, standardized approach called JSON encoding.
JSON (JavaScript Object Notation) is a lightweight format that translates structured data—like all the values that are wrapped in an object—into text. The best thing about JSON is that browsers support it natively. That means you can call JSON.stringify() to turn any JavaScript object into text, complete with all its data, and JSON.parse() to convert that text back into an object. Here’s an example that puts this to the test with the PersonalityScore object. When the test is submitted, the page calculates the score (not shown), creates the object, stores it, and then redirects to the new page:
// Create the PersonalityScore object.
var score = new PersonalityScore(o, c, e, a, n);
// Store it, in handy JSON format.
sessionStorage.setItem("personalityScore", JSON.stringify(score));
// Go to the results page.
window.location = "PersonalityTest_Score.html";
On the new page, you can pull the JSON text out of storage and use the JSON.parse() method to convert it back to the object you want. Here’s that step:
// Convert the JSON text to a proper object.
var score = JSON.parse(sessionStorage.getItem("personalityScore"));
// Get some data out of the object.
lblScoreInfo.innerHTML = "Your extraversion score is " + score.extraversion;
To see the complete code for this example, including the calculations for each personality factor, visit http://prosetech.com/html5. To learn more about JSON and take a peek at what JSON-encoded data actually looks like, check out http://en.wikipedia.org/wiki/JSON.
Reacting to Storage Changes
Web storage also gives you a way to communicate among different browser windows. That’s because whenever a change happens to local storage or session storage, the window.onStorage event is triggered in every other window that’s viewing the same page or another page on the same website. So if you change local storage on www.GoatsCanFloat.org/storeStuff.html, the onStorage event will fire in a browser window for the page www.GoatsCanFloat.org/checkStorage.html. (Of course, the page has to be viewed in the same browser and on the same computer, but you already knew that.)
The onStorage event is triggered whenever you add a new object to storage, change an object, remove an object, or clear the entire collection. It doesn’t happen if your code makes a storage operation that has no effect (like storing the same value that’s already stored, or clearing an already-empty storage collection).
Consider the test page shown in Figure 10-4. Here, the visitor can add any value to local storage, with any key, just by filling out two text boxes. When a change is made, the second page reports the new value.
To create the example shown in Figure 10-4, you first need to create the page that stores the data. In this case, clicking the Add button triggers a short addValue() function that looks like this:
function addValue() {
// Get the values from both text boxes.
var key = document.getElementById("key").value;
var item = document.getElementById("item").value;
// Put the item in local storage.
// (If the key already exists, the new item replaces the old.)
localStorage.setItem(key, item);
}
The second page is just as simple. When the page first loads, it attaches a function to the window.onStorage event, using this code:
window.onload = function() {
// Connect the onStorage event to the storageChanged() function.
window.addEventListener("storage", storageChanged, false);
};
This code looks a little different than the event handling code you’ve seen so far. Instead of setting window.onstorage, it calls window.addEventListener(). That’s because this code is the simplest that works on all current browsers. If you set window.onstorage directly, your code will work in every browser except Firefox.
NOTE
Web graybeards may remember that the addEventListener() method doesn’t work on Internet Explorer 8 (or older). In this example, that limitation is no cause for concern, because IE 8 doesn’t support storage events anyway.
The storageChanged() function has a simple task. It grabs the updated information and displays it on the page, in a <div> element:
function storageChanged(e) {
var message = document.getElementById("updateMessage");
message.innerHTML = "Local storage updated.";
message.innerHTML += "<br>Key: " + e.key;
message.innerHTML += "<br>Old Value: " + e.oldValue;
message.innerHTML += "<br>New Value: " + e.newValue;
message.innerHTML += "<br>URL: " + e.url;
}
As you can see, the onStorage event provides several pieces of information, including the key of the value that was changed, the old value, the newly applied value, and the URL of the page that made the change. If the onStorage event is a reaction to the insertion of a new item, thee.oldValue property is either null (in most browsers) or an empty string (in Internet Explorer).
NOTE
If you have several pages open for the same website, the onStorage event occurs in each one, except the page that made the change (in the current example, that’s StorageEvents1.html). However, Internet Explorer is the exception—it doesn’t follow this rule, and fires the onStorage event in the original page as well.
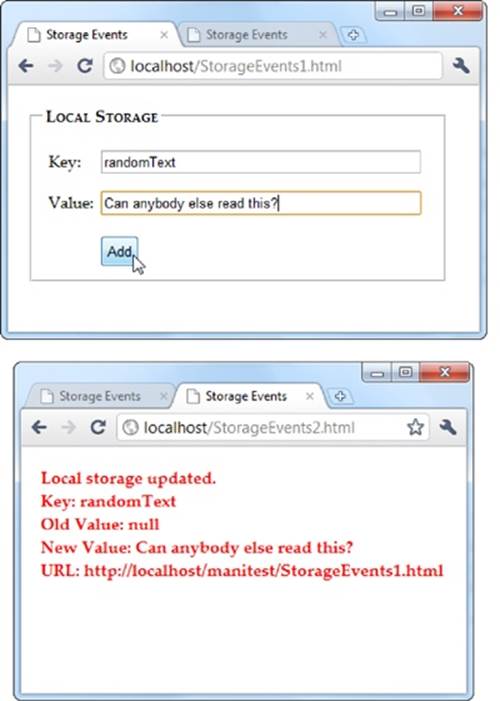
Figure 10-4. To see the onStorage event in action, open StorageEvents1.html and StorageEvents2.html at the same time. When you add or change a value in the first page (top), the second page captures the event and reports it in the page (bottom).
Reading Files
Web storage is a solidly supported part of HTML5. But it’s not the only way to access information. Several new standards are creeping onto the field for different types of storage-related tasks. One example is a standard called the File API, which technically isn’t a part of HTML5, but has good support across modern browsers, with the exception of Internet Explorer (which didn’t add support until IE 10).
Based on its rather vague name, you might expect that the File API is a sweeping standard for reading and writing files on a web browser’s hard drive. However, it’s not that ambitious or powerful. Instead, the File API gives a way for a visitor to pick a file from his hard drive and hand it directly to the JavaScript code that’s running on the web page. This code can then open the file and explore its data, whether it’s simple text or something more complicated. The key thing is that the file goes directly to the JavaScript code. Unlike a normal file upload, it never needs to travel to the web server.
It’s also important to note what the File API can’t do. Most significantly, it can’t change a file or create a new one. If you want to store any data, you’ll need to use another mechanism—for example, you can send your data to a web server through XMLHttpRequest (The XMLHttpRequest Object), or you can put it in local storage.
You might think that the File API is less useful than local storage—and for most websites, you’d be right. However, the File API is also a toehold into a world where HTML has never gone before, at least not without a plug-in to help.
NOTE
Right now, the File API is an indispensable feature for certain types of specialized applications, but in the future its capabilities may expand to make it much more important. For example, future versions may allow web pages to write local files, provided the user has control over the file name and location, using a Save dialog box. Browser plug-ins like Flash already have this capability.
Getting Hold of a File
Before you can do anything with the File API, you need to get hold of a file. There are three strategies you can use, but they are the same in one key fact—namely, your web page gets a file only if the visitor explicitly picks it and gives it to you.
Here are your options:
§ The <input> element. Set the type attribute to file, and you’ve got the standard file upload box. But with a bit of JavaScript and the File API, you can open it locally.
§ A hidden <input> element. The <input> element is ugly. To get right with the style police, you can hide your <input> element and make a nicer browser button. When it’s clicked, use JavaScript to call the click() method on the hidden <input> element. This shows the standard file-selection dialog box.
§ Drag-and-drop. If the browser supports it, you can drag a file from the desktop or a file browser window and drop it on a region in the web page.
In the following sections, you’ll see all three approaches.
Reading a Text File with <input>
One of the easiest things you can do with the File API is read the content from a simple text file. Figure 10-5 shows a web page that uses this technique to read the markup in a web page and then display it.
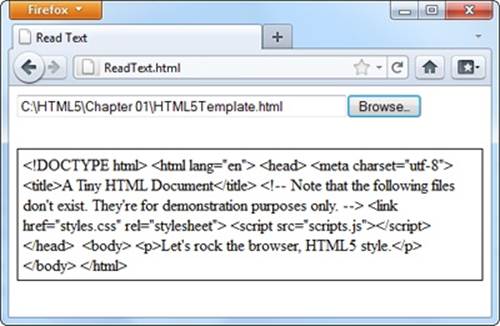
Figure 10-5. Click the Browse button (or Choose File, as it’s named in Chrome), choose a file, and then click OK. Instead of the usual upload, the web page JavaScript takes it from there, copying the content into your page.
To build this example, you start with the <input type=“file”> element, which creates the infamous text box and Browse button combination:
<input id="fileInput" type="file" onchange="processFiles(this.files)">
However, whereas an <input> element usually belongs in a <form> container so the file can be posted to the web server, this <input> element goes its own way. When the web page visitor picks a file, it triggers the <input> element’s onChange event, and that triggers theprocessFiles() function. It’s here that the file is opened, in ordinary JavaScript.
Now you’ll consider the processFiles() function, one piece at a time. The first order of business is to grab the first file from the collection of files that the <input> element provides. Unless you explicitly allow multiple file selection (with the multiple attribute), the files collection is guaranteed to hold just one file, which will be at position 0 in the files array:
function processFiles(files) {
var file = files[0];
NOTE
Every file object has three potentially useful properties. The name property gives you its file name (not including the path), the size property tells you how many bytes big it is, and the type property tells you the MIME type of the file (Meet the Media Formats), if it can be determined. You could read these properties and add additional logic—for example, you could refuse to process files above a certain size, or allow files of only a certain type.
Next, you create a FileReader object that allows you to process the file:
var reader = new FileReader();
It’s almost time to call one of the FileReader’s methods to extract the file content. All of these methods are asynchronous, which means they start the file-reading task but don’t wait for the data. To get the data, you first need to handle the onLoad event:
reader.onload = function (e) {
// When this event fires, the data is ready.
// Copy it to a <div> on the page.
var output = document.getElementById("fileOutput");
output.textContent = e.target.result;
};
Finally, with that event handler in place, you can call the FileReader’s readAsText() method:
reader.readAsText(file);
}
This method dumps all the file content into a single long string, which is provided in the e.target.result that’s sent to the onLoad event.
The readAsText() method works properly only if the file holds text content (not binary content). That means it suits HTML files perfectly well, as shown in Figure 10-5. However, there are other useful formats that use plain text. One good example is the CSV format, which is a basic export format supported by all spreadsheet programs. Another example is the XML format, which is a standard way of exchanging bunches of data between programs. (It’s also the foundation of the Office XML formats, which means you can hand .docx and .xlsx files directly to thereadAsText() method as well.)
NOTE
The JavaScript language even has a built-in XML parser, which means you can browse around an XML file and dig out just the content you need. Of course, the code this requires is considerable, it performs poorly for large files, and it’s rarely easier than just uploading the file to a web server and running your file-processing logic there. However, you can start to see how theFile API can open up new possibilities that HTML lovers didn’t dare imagine even just a few years ago.
The readAsText() method isn’t the only way to pull your data out of a file. The FileReader object also includes the following file-reading methods: readAsBinaryString(), readAsArrayBuffer(), and readAsDataUrl().
The readAsBinaryString() method gives your application the ability to deal with binary-encoded data, although it somewhat awkwardly sticks it into a text string, which is inefficient. And if you actually want to interpret that data, you need to struggle through some horribly convoluted code.
The readAsArryaBuffer() method is a better bet for web developers who need to do some serious do-it-yourself data processing. This method reads the data into an array (Loops), where each element represents a single byte of data. The advantage of this package is that you can use it to create Blob objects and slice out smaller sections of binary data, so you can process it one chunk at a time.
NOTE
Blob is shorthand for binary large object—in other words, a fat chunk of raw data. Blobs are an advanced part of the File API; to learn more, you can take a look at Mozilla’s steadily evolving documentation on the subject at http://tinyurl.com/file-blob.
Lastly, the readAsDataURL() method gives you an easy way to grab picture data. You’ll use that on Reading an Image File with Drag-and-Drop. But first, it’s time to make the page in this example a bit prettier.
Replacing the Standard Upload Control
Web developers agree: The standard <input> control for file submission is ugly. And although you do need to use it, you don’t need to let anyone see it. Instead, you can simply hide it, with a style rule like this:
#fileInput {
display: none;
}
Now add a new control that will trigger the file-submission process. An ordinary link button will do, which you can make look as pretty as you want:
<button onclick="showFileInput()">Analyze a File</button>
The final step is to handle the button click and use it to manually trigger the <input> element, by calling its click() method:
function showFileInput() {
var fileInput = document.getElementById("fileInput");
fileInput.click();
}
Now, when the button is clicked, the showFileInput() function runs, which clicks the hidden Browse button and shows the dialog box where the visitor can pick a file. This, in turn, triggers the hidden <input> element’s onChange event, which runs the processFiles() function, just like before.
Reading Multiple Files at Once
There’s no reason to limit people to submitting one file at a time. HTML5 allows multiple file submission, but you need to explicitly allow it by adding the multiple attribute to the <input> element:
<input id="fileInput" type="file" onchange="processFiles(this.files)"
multiple>
Now the user can select more than one file in the Open dialog box (for example, by pressing Ctrl on a Windows computer while clicking several files, or by dragging a box around a group of them). Once you allow multiple files, your code needs to accommodate them. That means you can’t just grab the first file from the files collection, as in the previous example. Instead, you need a for loop that processes each file, one at a time:
for (var i=0; i<files.length; i++) {
// Get the next file
var file = files[i];
// Create a FileReader for this file, and run the usual code here.
var reader = new FileReader();
reader.onload = function (e) {
...
};
reader.readAsText(file);
}
Reading an Image File with Drag-and-Drop
As you’ve seen, FileReader handles text content in a single, simple step. It deals will images just as easily, thanks to the readAsDataURL() method.
Figure 10-6 shows an example that introduces two new features: image support, and file drag-and-drop. The submitted image is used to paint the background of an element, although you could just as easily paint it on a canvas and process it using the canvas’s raw pixel features (Hit Testing with Pixel Colors). For example, you could use this technique to create a page where someone can drop in a picture, draw on it or modify it, and then upload the final result using an XMLHttpRequest call (The XMLHttpRequest Object).
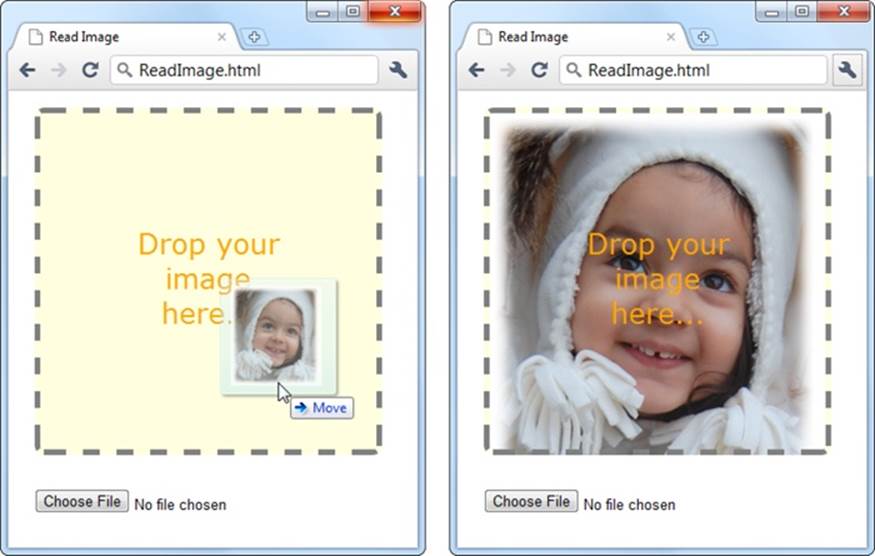
Figure 10-6. There are two ways to provide an image to this page: Use the file controls below, or drag one or more images onto the drop box.
To create this page, you first need to decide what element will capture the dropped files. In this example, it’s a <div> element named dropBox:
<div id="dropBox">
<div>Drop your image here...</div>
</div>
Some straightforward style sheet magic gives the drop box the size, borders, and colors you want:
#dropBox {
margin: 15px;
width: 300px;
height: 300px;
border: 5px dashed gray;
border-radius: 8px;
background: lightyellow;
background-size: 100%;
background-repeat: no-repeat;
text-align: center;
}
#dropBox div {
margin: 100px 70px;
color: orange;
font-size: 25px;
font-family: Verdana, Arial, sans-serif;
}
Keen eyes will notice that the drop box sets the background-size and background-repeat properties in preparation for what comes next. When the image is dropped onto the <div>, it’s set as the background. The background-size property ensures that the picture is compressed down so you can see all of it at once. The background-repeat property ensures that the picture isn’t tiled to fill the leftover space.
To handle file drops, you need to handle three events: onDragEnter, onDragOver, and onDrop. When this page first loads, it attaches event handlers for all three:
var dropBox;
window.onload = function() {
dropBox = document.getElementById("dropBox");
dropBox.ondragenter = ignoreDrag;
dropBox.ondragover = ignoreDrag;
dropBox.ondrop = drop;
};
The ignoreDrag() function handles both onDragEnter (which fires when the mouse pointer enters the drop box, with a file attached) and onDragOver (which fires continuously, as the file-dragging mouse pointer moves over the drop box). That’s because you don’t need to react to either of these actions, other than to tell the browser to hold off from taking any actions of its own. Here’s the code you need:
function ignoreDrag(e) {
// Make sure nobody else gets this event, because you're handling
// the drag and drop.
e.stopPropagation();
e.preventDefault();
}
The onDrop event is more important. It’s at this point that you get the file and process it. However, because there are actually two ways to submit files to this page, the drop() function calls the processFiles() function to do the actual work:
function drop(e) {
// Cancel this event for everyone else.
e.stopPropagation();
e.preventDefault();
// Get the dragged-in files.
var data = e.dataTransfer;
var files = data.files;
// Pass them to the file-processing function.
processFiles(files);
}
The processFiles() function is the last stop in the drag-and-drop journey. It creates a FileReader, attaches a function to the onload event, and calls readAsDataURL() to transform the image data into a data URL (Saving the Picture in the Canvas):
NOTE
As you learned when you explored the canvas, a data URL is a way of representing image data in a long text string that’s fit for URL. This gives you a portable way to move the image data around. To show the image content in a web page, you can set the src property of an <img> element (as on Drawing Images), or you can set the CSS background-image property (as in this example).
function processFiles(files) {
var file = files[0];
// Create the FileReader.
var reader = new FileReader();
// Tell it what to do when the data URL is ready.
reader.onload = function (e) {
// Use the image URL to paint the drop box background
dropBox.style.backgroundImage = "url('" + e.target.result + "')";
};
// Start reading the image.
reader.readAsDataURL(file);
}
The FileReader provides several more events, and when reading image files you might choose to use them. The onProgress event fires periodically during long operations, to let you know how much data has been loaded so far. (You can cancel an operation that’s not yet complete by calling the FileReader’s abort() method.) The onError event fires if there was a problem opening or reading the file. And the onLoadEnd event fires when the operation is complete for any reason, including if an error forced it to end early.
Browser Support for the File API
The File API has solid browser support, but it isn’t quite as reliable as web storage. Table 10-2 shows which browsers include it.
Table 10-1. Browser support for the File API
|
IE |
FIREFOX |
CHROME |
SAFARI |
OPERA |
SAFARI IOS |
ANDROID |
|
|
Minimum version |
10 |
3.6 |
13 |
6 |
11.1 |
6 |
3 |
Because the File API requires some privileges that ordinary web pages don’t have, you can’t patch the missing feature with more JavaScript. Instead, you need to rely on a plug-in like Flash or Silverlight. For example, you can find a polyfill at https://github.com/MrSwitch/dropfile that uses Silverlight to intercept a dragged file, open it, and then pass the details to the JavaScript code on the page.
IndexedDB: A Database Engine in a Browser
You’re probably familiar with the concept of databases—carefully structured catalogs of information that can swallow lists of people, products, sales, and just about any other sort of data you want to stuff them with. Many websites use databases that are stored on the web server. For example, when you look up a book on Amazon, the page extracts the details from Amazon’s staggeringly big database. Much the same thing happens when you look for an article on Wikipedia or a video on YouTube, or when you perform a web search on Google.
For years, the story ended there. Databases were the province of the web server; conversation closed. But HTML5 introduces another possibility. What if the browser had the ability to create a local database—a database that’s stored on the client’s computer rather than the far-off web server? Different ideas cropped up, including a briefly popular and now abandoned specification called Web SQL Databases. More recently, the still-evolving IndexedDB specification rose to prominence as the official HTML5-sanctioned solution for local databases.
NOTE
The name “IndexedDB” emphasizes the fact that the databases use indexes to identify and arrange data. Indexes ensure that you don’t end up with the same record of data stored in two places, and they also speed up data retrieval when you have acres of information.
UP TO SPEED: THE DIFFERENCE BETWEEN SERVER-SIDE AND CLIENT-SIDE DATABASES
There are plenty of ways for websites to use server-side databases, but none of them have anything to do with HTML5. To understand why, you need to remember that the HTML5 universe is centered on the mix of markup, styles, and JavaScript that’s loaded in the client’s browser. There’s no direct way for a browser on your computer to access a database on the web server. Even if it were technically possible, this kind of contact would raise all kinds of security issues. Instead, to interact with a server-side database you need code that runs on the web server. For example, websites commonly use PHP or C# code (although there are many other technologies) to take care of server-side database tasks like generating a page of search results or logging a customer’s purchase.
Before going ahead, it’s important to understand exactly what role IndexedDB can play in a web application. For a host of reasons, IndexedDB can never replace the server-side databases described earlier. Most significantly, there’s this: IndexedDB creates a separate database for every user. Websites that use server-side data need a single, centralized catalog of information that they can share with everyone.
However, IndexedDB is useful in several other special scenarios:
§ Making a self-sufficient offline application. In Chapter 11, you’ll learn how HTML5 caching lets you run a web page even without a web connection—a feat that’s particularly useful for mobile devices. You can make your offline apps even more capable by using IndexedDB storage. For example, your page can retrieve the data it needs from a database on the web server when it’s connected (using the XMLHttpRequest object demonstrated on The XMLHttpRequest Object), and store that data in a local database so it’s available even when the network isn’t.
§ Enhancing performance. Some applications use masses of data, and if you’re continually retrieving the same data every time you need it, you’ll slow down your pages. Similarly, if you create an application that generates data using complex calculations, you don’t want to waste time performing the same work more than once. The solution is to store everything you need in an IndexedDB database. Treat it like your own super-customizable cache.
§ Improving local storage. As you learned earlier, local storage provides a place to stash some data between browser sessions, and pass it from one page to another. If your data is relatively simple in structure and small in size, ordinary JavaScript variables and objects will hold it fine. But if you have an extraordinarily large or complex batch of data, you may find that it’s easier and faster to manage it with an IndexedDB database.
NOTE
The IndexedDB storage system behaves like local storage in several key ways. Most importantly, an IndexedDB database belongs to a single person, using a particular browser and a particular computer, and visiting a specific site. If you change any of these details—for example, switching browsers, logging on with a different user account, or switching to your smartphone—theweb page gets a new IndexedDB database.
Learning to use IndexedDB can be daunting. First, the specification is complex (some less charitable developers say ugly). You, the web developer, are responsible for creating the database, building its tables, and filling them with data. Second, IndexedDB uses an asynchronous model, which means that database tasks happen in the background, without stalling your code or locking up the page. The drawback is that this forces you to use a more complex model that scatters your code into different places. For example, the code you use to start a database task isn’t in the same place as the code you use to handle the outcome of that task. Following the sequence and figuring out how each piece of code fits together takes some practice.
Figure 10-7 shows the database-powered web page that you’ll analyze through the rest of this chapter. It puts the IndexedDB feature through a set of basic operations with a database that stores link information. Each record in the database consists of a URL and some relevant information about that URL, like its name and a description. Using the FavoriteSiteTracker.html page, you can add new link records, browse the ones that already exist, and change or delete individual records—all of which are fundamental tasks for code that deals with any type of database.
The Data Object
Before you get started with the link tracker example, it’s time to learn about the data it stores—the LinkRecord object. Traditional databases are all about tables and fields, but IndexedDB simplifies life by storing objects. So before you create your database, it’s a good idea to define yourdata structure in JavaScript.
In the link tracker example, the database has a single table, and each record in that table holds the information for a single link. You can package all the link details in JavaScript using an object-definition function, like this:
function LinkRecord(name, url, description, notes) {
this.name = name;
this.url = url;
this.description = description;
this.notes = notes;
}
Once you’ve added this function to your code, you can call it when needed to create a LinkRecord object, complete with a descriptive name, URL, full description, and notes. (If you’re a bit fuzzy on object-creation with JavaScript, refer to Objects for a review.)
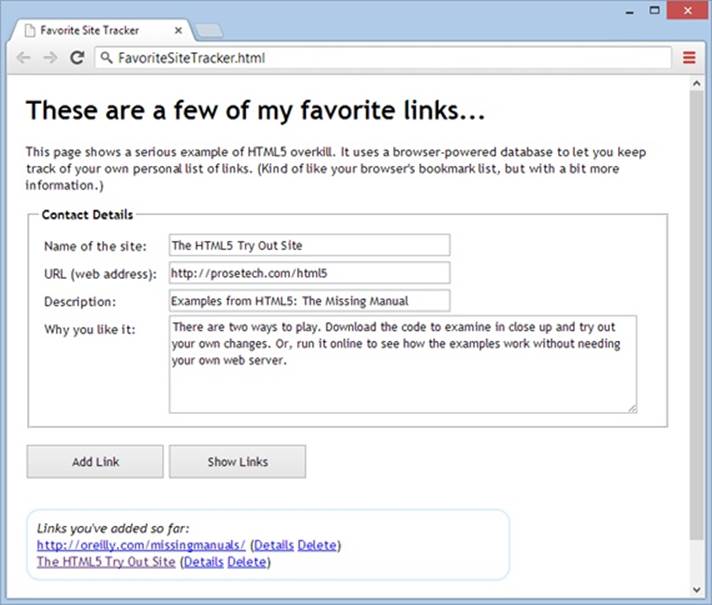
Figure 10-7. This example uses an IndexedDB database to hold link information. The top of the page has a form that lets you create a new link record. Underneath is a list that shows the name and URL (but not the other details) of every link that’s in the database. As always, you can try this example for yourself at http://prosetech.com/html5.
Creating and Connecting to a Database
In any web page that uses IndexedDB, the first task is to connect to your database. Since you’ll usually perform this task when the page first loads, it makes sense to handle the window.onload event and put your code there. Here’s the basic skeleton:
var database;
window.onload = function () {
...
}
The database variable goes outside your function. That way, once you set the database variable, you can access it everywhere else in your code.
So, what does your code need to do when the page loads? That depends on what you’ve done before:
§ If this is the first time the user is visiting the page, you need to create the database and set up its tables from scratch.
§ If the user has been here before, you only need to open the database and set the database variable, so it’s ready for use.
Either way, your starting point is the open() function that’s provided by the window.indexedDB object. It takes two arguments: the name of the database you want to use (or create), and its version number. If you’re starting out with a brand new database, you need to set the version to 1:
var request = window.indexedDB.open("LinksDB", 1);
NOTE
It doesn’t matter what name you give your database, so long as you stay consistent and aren’t already using that name in another page on the same website.
As explained earlier, everything in IndexedDB land is asynchronous. Accordingly, when you call the open() method, nothing is actually opened. Instead, you’re making a request. In this case, your request is for the browser to open the database when it gets the chance, and preferably on a background thread so it won’t freeze up the page for even a moment.
You’ll find this pattern of asynchronous requests—and the same request object—with just about every task you perform with IndexedDB. To react when the task is finished, you need to attach at least two event handlers: one that handles a successful result (onSuccess) and one that handles an unexpected failure (onError). In addition, when using the open() method, you need a third event handler for an event called onUpgradeNeeded.
When opening a database, the onSuccess event indicates that the right version of your database already exists. At this point you need to set the database variable so you can use it later. Optionally, you can get to work reading data. In the link tracker example, a separate function namedshowLinks() does that job (Querying All the Records in a Table).
request.onsuccess = function(event) {
alert("Created or opened database successfully.");
// Make the database available everywhere in the code.
database = request.result;
// Call the showLinks() function to read the database and display the
// list of links that already exist.
showLinks();
};
The onError event is equally straightforward. Depending on the error, you may be able to take corrective action, or you may simply choose to report it to the user with a message either in a pop-up box or right on the page.
request.onerror = function(event) {
alert(request.error + " occurred.");
};
WARNING
Don’t make the mistake of omitting the onError event handler. If you do, problems will slip by without any notification at all, and you’ll have no clue what went wrong.
The onUpgradeNeeded event is the most interesting of the three. It fires when the database version you requested isn’t available. For example, if you requested database version 2 and the computer currently has database version 1, this event fires. At this point, you can upgrade the database—for example, by adding a new table. (You can find out the version of the current database from the event.oldVersion argument.) The onUpgradeNeeded event also fires if the database doesn’t exist at all, in which case the browser obligingly creates a blank database and waits for you to fill in the tables you want.
To create a table, you must first grab the database object from the request.result property. Then, you call its createObjectStore() method. Here’s the code that adds a table named Links to the LinksDB database:
request.onupgradeneeded = function(event) {
var db = request.result;
var objectStore = db.createObjectStore("Links", { keyPath: "url" });
}
};
In traditional database programming, you need to specify field names and data types when you create a table. But IndexedDB uses a simpler, object-focused model. When you create a table, you supply just two details: the name of the table and the key path, which is the property of your object that should be used for the primary key.
NOTE
The key path identifies a property in your data object. In this example, the word url is written in lowercase so it matches the name of the property of the data object. If you flip back to The Data Object, you’ll see that the LinkRecord object defines a property named url.
UP TO SPEED: UNDERSTANDING PRIMARY KEYS
The primary key is the bit of information that uniquely identifies each record. In the case of the Links table, each link record has a unique URL, so it makes sense to use that for the key. This setup prevents you from accidentally creating two records for the same address. It also forces the browser to create an index for the Links table that will let you look up any link record by URL.
If your data doesn’t include an obvious candidate for the primary key—in other words, it doesn’t have an essential piece of information that’s guaranteed to be unique—you can use the time-honored database technique of adding a numeric ID number. Even better, you can get the browser to generate unique numbers for you automatically and fill them in whenever you insert a new record. To do that, set the autoIncrement property to true when you create the database:
var objectStore =
db.createObjectStore("Links",
{ keyPath: "id", autoIncrement: true });
If your database needs to have multiple tables, you can call createObjectStore() multiple times, with different data objects. The request.onError event fires if the browser encounters a problem. Once the tables are added successfully, the request.onSuccess event will fire and your code can finish setting up the page.
NOTE
The databases you create with IndexedDB are stored permanently, just like the objects you store in local storage. However, you can delete a database using the window.indexedDB.deleteDatabase() method, and some browsers allow users to review how much data each website is storing and remove whatever they don’t want.
Storing Records in the Database
Database geeks use the term data manipulation to describe every database operation that works with table data, whether it involves reading, changing, inserting, or updating information. In the IndexedDB world, data manipulation operations always follow the same four basic steps. Once you understand this pattern, you’ll have an easier time following the code for different database tasks.
Here are the steps:
1. Create a transaction.
Whenever you want to do anything with an IndexedDB database, whether it’s writing data or reading it, you must first begin by creating a transaction. In a database, a transaction is one or more data operations that are committed together, as a unit. If any part of a transaction fails, every operation inside the transaction is reversed, restoring the database to its pre-transaction state.
Transactions are important in the IndexedDB world because there are so many ways that a database operation can be interrupted. For example, if the user closes the browser while the page is still at work, the browser interrupts your code mid-task. The transaction system guarantees that even when these rude interruptions occur, the database is kept in a consistent state. In fact, transactions are so important that there’s no way to perform IndexedDB operations without one.
NOTE
To understand the problems you can run into without transactions, imagine you’re transferring money from one bank account to another. In a transactional world, the first step (removing money from account A) and the second step (depositing it in account B) either succeed or fail together. But without transactions, you could end up in an unhappy situation: a successful debit from account A, but a failed deposit to account B, leading to some serious missing cash.
2. Retrieve the object store for your transaction.
Object store is a fancy name for table. Because every record in an IndexedDB table is actually a data object, this name makes sense.
3. Call one of the object store methods.
The object store is the gateway to all the table-manipulation features. For example, to add a record you call its put() method. To delete a record, you call its delete() method. The method returns a request object, which you must use for the next step.
4. Handle the success and error events.
As you already know, virtually everything in IndexedDB is asynchronous. If you want to do something when an operation is finished, and if you want to catch errors before they metastasize into more serious problems, you need to handle the onSuccess and onError events, just as you did when opening the database.
With these steps in mind, you’re ready to look at the code in the addLink() function, which runs when the web page visitor clicks the Add Link button.
Before you do anything with your database, you need your data on hand. In the link tracker example, the code grabs the typed-in data from the form and uses it to create a LinkRecord object. This task is basic JavaScript—you simply need to find your elements, pull out the corresponding values, and use the LinkRecord() function shown on The Data Object.
function addLink() {
// Collect the data from the form.
var name = document.getElementById("name").value;
var url = document.getElementById("url").value;
var description = document.getElementById("description").value;
var notes = document.getElementById("notes").value;
// Create the LinkRecord object.
var linkRecord = new LinkRecord(name, url, description, notes);
Now you’re ready to follow step 1 from the list and create your transaction. To do that, you call the database.transaction() method and provide two parameters:
var transaction = database.transaction(["Links"], "readwrite");
The first parameter is a list of all the tables involved in the transaction. This information enables IndexedDB to lock the tables, preventing other pieces of code from making overlapping and possibly inconsistent changes at the same time. Technically, this parameter is an array that holds a list of table names, which is why you wrap the whole thing in square brackets. But in this example, there’s just one table involved in the task.
The second parameter is a string that identifies the type of transaction. Use the word readwrite if you want to create a transaction that changes the table in any way, whether it’s inserting, updating, or deleting records. But if all you need to do is retrieve data, use the word readonly instead.
This brings you to step 2—getting the indispensable object store for your table. You can do so easily with the transaction.objectStore() property. Just supply the name of the table, like this:
var objectStore = transaction.objectStore("Links");
To add a record, use the put() method of the object store and supply the data object:
var request = objectStore.put(linkRecord);
Finally, you need to handle the onError and onSuccess events to find out whether the record was successfully added:
request.onerror = function(event) {
alert(request.error + " occurred.");
};
request.onsuccess = function(event) {
// The record has been added.
// Refresh the display. (For better performance, you could add just the
// one new item, rather than refresh the whole list.)
showLinks();
};
}
NOTE
If you call put() to add a record that has the same primary key as an existing record (for example, a link with an existing URL), the browser quietly replaces the existing record with your new data.
Querying All the Records in a Table
Querying is the essential job of retrieving your stored information. You pick out a single record, search for a group of records that match certain criteria, or travel through all the records in your table, whichever you prefer.
The link tracker performs a complete table scan and a single-record search. It uses the table scan to create the list of links that appears under the link-adding form. It uses the record search to get the full details for a specific site when you click one of the Details links in the list, as you’ll see shortly.
The first task is the more complex one. That’s because you need the help of a cursor to browse through an IndexedDB table. (A database cursor is an object that keeps track of your current position in a table and lets you step through its records.)
You begin by creating a transaction and getting the object store. This time, you don’t need to make any changes, so a read-only transaction fits the bill:
function showLinks() {
var transaction = database.transaction(["Links"], "readonly");
var objectStore = transaction.objectStore("Links");
Next, you create the cursor using the openCursor() method of the object store:
var request = objectStore.openCursor();
Then, you attach your code to the familiar onError and onSuccess events. The onError event handler is nothing special:
request.onerror = function(event) {
alert(request.error + " occurred.");
};
The onSuccess event handler is more interesting. It has the job of stepping through the records in the Links table, one by one. As it travels, it builds up a string of HTML with the list of links.
// Prepare the string of markup that will be inserted into the page.
var markupToInsert = "";
request.onsuccess = function(event) {
// Create a cursor.
var cursor = event.target.result;
Initially, the cursor is positioned on the first record of the table, if it exists. You check for data by testing whether the cursor is true or false. If it’s true, there’s a record there ready for you to read. You can get the record from the cursor.value property:
if (cursor) {
var linkRecord = cursor.value;
Your data is returned to you as an object. In the link tracker example, each record is a genuine LinkRecord object, complete with the name, url, description, and notes properties outlined in the object-definition function on The Data Object.
Once you retrieve your object, it’s up to you to decide what to do with it. In the current example, the code uses the LinkRecord data to construct an <a> element. It uses the site name for the link text and the URL for the link address:
markupToInsert += "<a href=" + linkRecord.url + ">" + linkRecord.name +
"</a>";
For now, the <a> is stored in a variable called markupToInsert. When the code is finished examining every LinkRecord in the database and adding all their information to the markupToInsert variable, it will finally be ready to copy the markup to the page.
The link tracker example gets a bit fancier by adding two clickable bits of text after every link. One is named “Details” and the other is named “Delete,” and you can see them both in Figure 10-7 (near the very bottom of the screen).
These bits of text look like ordinary links, but they are actually <span> elements that are hard-wired to call two other JavaScript functions in the page (getLinkDetails and deleteLink) when clicked. Here’s the code that creates them:
markupToInsert += "(" +
"<span class='linkButton' data-url='" + linkRecord.url +
"' onclick='getLinkDetails(this)'>Details</span>" + " " +
"<span class='linkButton' data-url='" + linkRecord.url +
"' onclick='deleteLink(this)'>Delete</span>" +
")<br>";
There’s a neat trick here. The Details and Delete commands are <span> elements. To simplify life, the URL of the corresponding element is stored in each <span> element using an attribute. That way, when one of these commands is clicked, the page can quickly retrieve the URL and use it to look up the corresponding record in the Links table.
NOTE
The attribute that stores the URL is named data-url, according to HTML5 convention. The data- prefix indicates that you’re using the attribute to hold custom data, which the browser can ignore. You can use whatever you want for the rest of the attribute name—here, url makes sense because the attribute is storing a URL.
So far, you’ve seen how the code processes a single record during a search. When you’re ready to move to the next record, you call the cursor.continue() method. However, you don’t attempt to process any more data. That’s because stepping through your records is an asynchronous operation. When the cursor reaches the next record, the onSuccess event fires again, triggering the same code a second time, at which point you can add the markup for the next record, if it exists.
cursor.continue();
}
When you reach the last record in the table, the cursor will evaluate to false. At this point, it’s time to copy your markup into the page:
else {
// If there wasn't at least one result, substitute some placeholder text.
if (markupToInsert == "") {
markupToInsert = "<< No links. >>";
}
else {
markupToInsert = "<i>Links you've added so far: </i><br>" +
markupToInsert;
}
// Insert the markup.
var resultsElement = document.getElementById("links");
resultsElement.innerHTML = markupToInsert;
}
};
}
Querying a Single Record
Querying an individual record in a table is easier than getting them all, because you don’t have to mess around with cursors. Instead, you follow the well-established four-step procedure you saw on Storing Records in the Database, using the get() method from the object store.
If you click one of the “Details” links in the link tracker example, the following code springs into action. It grabs the corresponding LinkRecord object and extracts all of its information.
function getLinkDetails(element) {
// Get the URL for this link from the handy data-url attribute we added
// earlier.
var url = element.getAttribute("data-url");
var transaction = database.transaction(["Links"], "readonly");
var objectStore = transaction.objectStore("Links");
// Find the record that has this URL.
var request = objectStore.get(url);
request.onerror = function(event) {
alert(request.error + " occurred.");
};
request.onsuccess = function(event) {
var linkRecord = request.result;
var resultsElement = document.getElementById("linkDetails");
resultsElement.innerHTML = "<b>" + linkRecord.name + "</b><br>" +
"<b>URL:</b> " + linkRecord.url + "<br>" +
"<b>Description:</b> " + linkRecord.description + "<br>" +
"<b>Notes:</b> " + linkRecord.notes;
}
}
The information from the LinkRecord object is used to create a snippet of HTML markup, which is then inserted into the page in a separate box under the link list. Figure 10-8 shows the result.
Deleting a Record
By this point, you’re familiar with the four-step sequence that underpins every data operation. Deleting a record isn’t any different. You simply need to use the delete() method of the object store.
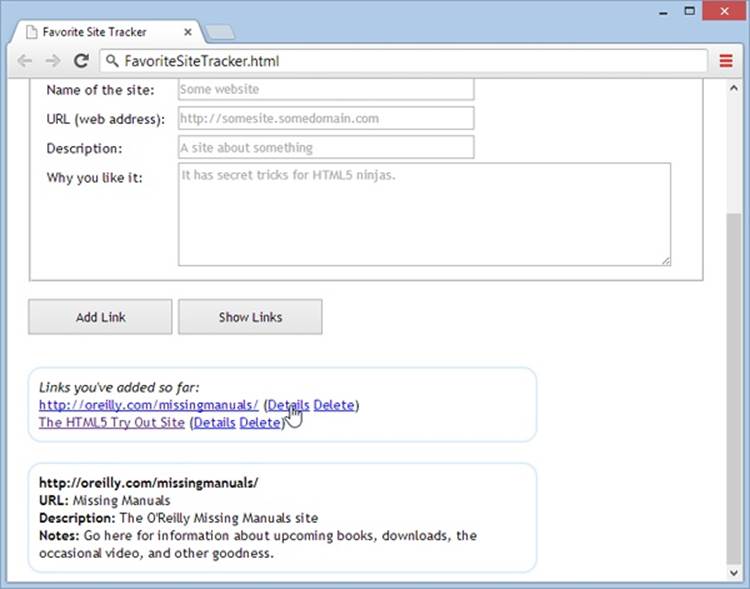
Figure 10-8. When you click Details, the code grabs the corresponding record and shows all its data in the bottom box.
In the link tracker example, the “Delete” link does the job. When clicked, it removes the LinkRecord with the matching URL, using this code:
function deleteLink(element) {
var url = element.getAttribute("data-url");
var transaction = database.transaction(["Links"], "readwrite");
var objectStore = transaction.objectStore("Links");
var request = objectStore.delete(url);
request.onerror = function(event) {
alert(request.error + " occurred.");
};
request.onsuccess = function (event) {
// The record has been deleted.
// Refresh the display.
showLinks();
}
}
You’ve now seen the key methods that you can use to manipulate data with IndexedDB. You’ve learned how to use the object store to add records or update them (with the put() method) and delete them (with delete). You’ve also learned how to retrieve individual records by key value (with get) or browse through them all (with openCursor). But if you want to get deeper into databases, check out Mozilla’s helpful documentation for the object store at http://tinyurl.com/objectstore, or explore the nitty-gritty details of the IndexedDB standard atwww.w3.org/TR/IndexedDB.
Browser Support for IndexedDB
IndexedDB is a relatively new specification, and requires a relatively recent browser. Table 10-2 shows the current state of affairs.
Table 10-2. Browser support for IndexedDB
|
IE |
FIREFOX |
CHROME |
SAFARI |
OPERA |
SAFARI IOS |
CHROME FOR ANDROID |
|
|
Minimum version |
10 |
10 |
23 |
- |
15 |
- |
29 |
Sadly, IndexedDB isn’t yet available on desktop or mobile versions of Safari. This support gap exists because the developers of Safari invested their effort in the now-abandoned Web SQL Database standard. If you need Safari support, you can use a polyfill that converts IndexedDB operations to the corresponding Web SQL commands. (Download it at http://tinyurl.com/DBpolyfill.) But if you want IndexedDB support on a browser that doesn’t support IndexedDB or Web SQL, such as Internet Explorer version 9 or 8, you’re unfortunately out of luck.