Pro HTML5 Accessibility: Building an Inclusive Web (2012)
A P P E N D I X A
WCAG 2.0 Client-Side Scripting Techniques1
· SCR1: Allowing the user to extend the default time limit
· SCR2: Using redundant keyboard and mouse event handlers
· SCR14: Using scripts to make nonessential alerts optional
· SCR16: Providing a script that warns the user a time limit is about to expire
· SCR18: Providing client-side validation and alert
· SCR19: Using an onchange event on a select element without causing a change of context
· SCR20: Using both keyboard and other device-specific functions
· SCR21: Using functions of the Document Object Model (DOM) to add content to a page
· SCR22: Using scripts to control blinking and stop it in five seconds or less
· SCR24: Using progressive enhancement to open new windows on user request
· SCR26: Inserting dynamic content into the Document Object Model immediately following its trigger element
· SCR27: Reordering page sections using the Document Object Model
· SCR28: Using an expandable and collapsible menu to bypass block of content
· SCR29: Adding keyboard-accessible actions to static HTML elements
· SCR30: Using scripts to change the link text
· SCR31: Using scripts to change the background color or border of the element with focus
__________
1 Copyright © 2008-2011 W3C® (MIT, ERCIM, Keio), All Rights Reserved. W3C liability, trademark and document use rules apply.
· SCR32: Providing client-side validation and adding error text via the DOM
· SCR33: Using script to scroll content, and providing a mechanism to pause it
· SCR34: Calculating size and position in a way that scales with text size
· SCR35: Making actions keyboard accessible by using the onclick event of anchors and buttons
· SCR36: Providing a mechanism to allow users to display moving, scrolling, or auto-updating text in a static window or area
· SCR37: Creating custom dialogs in a device-independent way
SCR1: Allowing the user to extend the default time limit
Description
The objective of this technique is to allow the user to extend the default time limit by providing a mechanism to extend the time when scripts provide functionality that has default time limits. To allow the user to request a longer time limit, the script can provide a form (for example) that allows the user to enter a larger time limit or indicate that more time is needed. If the user is being warned that a time limit is about to expire (see “SCR16: Providing a script that warns the user a time limit is about to expire"), this form can be made available from the warning dialog. The user can extend the time limit to at least 10 times the default time limit, either by entering a value into the form to indicate how much additional time is needed or by repeatedly extending the time limit.
Examples
A webpage contains current stock market statistics and is set to refresh periodically. When the user is warned prior to the first refresh, the user is provided with an option to extend the time period between refreshes.
In an online chess game, each player is given a time limit for completing each move. When the player is warned that time is almost up for this move, the user is provided with an option to increase the time limit.
SCR2: Using redundant keyboard and mouse event handlers
Description
The objective of this technique is to demonstrate using device-independent events to change a decorative image in response to a mouse or focus event. Use the onmouseover and onmouseout events to change a decorative image when the mouse moves on top of or away from an element on the page. Also, use the onfocus and onblur events to change the image when the element receives and loses focus.
The example in Listing A-1 has a decorative image in front of an anchor element. When the user mouses over the anchor tag, the decorative image in front of the anchor is changed. When the mouse moves off the anchor, the image is changed back to its original version. The same image-change effect occurs when the user gives keyboard focus to the anchor element. When focus is received, the image changes; when focus is lost, the image is changed back. This is accomplished by attaching onmouseover, onmouseout, onfocus, and onblur event handlers to the anchor element. The event handler is a JavaScript function called updateImage(), which changes the src attribute of the image. The updateImage() is called in response to the onmouseover, onmouseout, onfocus, and onblur events.
Each image is given a unique Id. This unique ID is passed to updateImage() along with a boolean value indicating which image is to be used: updateImage(imgId, isOver);. The boolean value of true is passed when the mouse is over the anchor element or it has focus. A false value is passed when the mouse moves off the anchor element or it loses focus. The updateImage() function uses the image id to load the image and then changes the src attribute based on the boolean value. Note that since the image is for decorative purposes, it has a null alt attribute.
![]() Note It is best to use images that are similar in size and to specify the height and width attributes on the image element. This will prevent any changes to the layout of the page when the image is updated. This example uses images that are identical in size.
Note It is best to use images that are similar in size and to specify the height and width attributes on the image element. This will prevent any changes to the layout of the page when the image is updated. This example uses images that are identical in size.
Listing A-1. Swapping Images
<!DOCTYPE HTML PUBLIC "-//W3C//DTD HTML 4.01 Transitional//EN" "http://www.w3.org/TR/html4/loose.dtd">
<html lang="en">
<head>
<meta http-equiv="Content-Type" content="text/html; charset=ISO-8859-1">
<title>Changing Image Source in a Device Independent Manner</title>
<script type="text/javascript">
/* This function will change the image src of an image element.
* param imgId - the id of the image object to change
* param isOver - true when mouse is over or object has focus,
* false when mouse move out or focus is lost
*/
function updateImage(imgId, isOver) {
var theImage = document.getElementById(imgId);
if (theImage != null) { //could use a try/catch block for user agents supporting at least![]()
JavaScript 1.4
// These browsers support try/catch - NetScape 6, IE 5, Mozilla,![]()
Firefox
if (isOver) {
theImage.setAttribute("src","yellowplus.gif");
}
else {
theImage.setAttribute("src","greyplus.gif");
}
}
}
</script>
</head>
<body>
<p>Mouse over or tab to the links below and see the image change.</p>
<a href="http://www.w3.org/wai" onmouseover="updateImage('wai', true);"![]()
onfocus="updateImage('wai', true);"
onmouseout="updateImage('wai',false);" onblur="updateImage('wai',false);">
<img src="greyplus.gif" border="0" alt="" id="wai">
W3C Web Accessibility Initiative</a> &
<a href="http://www.w3.org/International/" onmouseover="updateImage('i18n', true);"
onfocus="updateImage('i18n',true);" onmouseout="updateImage('i18n',false);"
onblur="updateImage('i18n',false);">
<img src="greyplus.gif" border="0" alt="" id="i18n">
W3C Internationalization</a>
</body>
</html>
Tests
Procedure
1. Load the webpage, and test the events using a mouse and via the keyboard.
2. Check that the standard image is displayed as expected when the webpage is loaded.
Using the Mouse
1. Move the mouse over the element containing the event handlers (in this example, it is an anchor element). Check that the image changes to the expected image.
2. Move the mouse off the element. Check that the image changes back to the standard image.
Using the Keyboard
1. Use the keyboard to set focus to the element containing the event handlers. Check that the image changes to the expected image.
2. Use the keyboard to remove focus from the element (generally by moving focus to another element). Check that the image changes to the standard image.
3. Verify that the layout of other elements on the page is not affected when the image is changed.
Expected Results
All of the steps for the previous checks are true.
If this is a sufficient technique for a success criterion, failing this test procedure does not necessarily mean that the success criterion has not been satisfied in some other way, only that this technique has not been successfully implemented and cannot be used to claim conformance.
SCR16: Providing a script that warns the user a time limit is about to expire
Example
A page of stock market quotes uses a script to refresh the page every five minutes in order to ensure the latest statistics remain available. Twenty seconds before the five minute period expires, a confirmation dialog appears asking if the user needs more time before the page refreshes. This allows the user to be aware of the impending refresh and to avoid it if desired. Listing A-2 creates the described behavior.
Listing A-2. Using a Script to Refresh the Page
<!DOCTYPE html PUBLIC "-//W3C//DTD HTML 4.01 Transitional//EN"
"http://www.w3.org/TR/html4/loose.dtd">
<html lang="en">
<head>
<title>Stock Market Quotes</title>
<script type="text/javascript">
<!--
function timeControl() {
// set timer for 4 min 40 sec, then ask user to confirm.
setTimeout('userCheck()', 280000);
}
function userCheck() {
// set page refresh for 20 sec
var id=setTimeout('pageReload()', 20000);
// If user selects "OK" the timer is reset
// else the page will refresh from the server.
if (confirm("This page is set to refresh in 20 seconds.
Would you like more time?"))
{
clearTimeout(id);
timeControl();
}
}
function pageReload() {
window.location.reload(true);
}
timeControl();
-->
</script>
</head>
<body>
<h1>Stock Market Quotes</h1>
...etc...
</body>
</html>
SCR21: Using functions of the Document Object Model (DOM) to add content to a page
Description
The objective of this technique is to demonstrate how to use functions of the Document Object Model (DOM) to add content to a page instead of using document.write or object.innerHTML. The document.write() method does not work with XHTML when served with the correct MIME type (application/xhtml+xml), and the innerHTML property is not part of the DOM specification and thus should be avoided.
If the DOM functions are used to add the content, user agents can access the DOM to retrieve the content. The createElement() function can be used to create elements within the DOM. The createTextNode() is used to create text associated with elements. The appendChild(),removeChild(), insertBefore(), and replaceChild() functions are used to add and remove elements and nodes. Other DOM functions are used to assign attributes to the created elements.
![]() Note When adding elements that will receive focus into the document, do not add tabindex attributes to explicitly set the tab order as this can cause problems when adding focusable elements into the middle of a document. Let the default tab order be assigned to the new element by not explicitly setting a tabindex attribute.
Note When adding elements that will receive focus into the document, do not add tabindex attributes to explicitly set the tab order as this can cause problems when adding focusable elements into the middle of a document. Let the default tab order be assigned to the new element by not explicitly setting a tabindex attribute.
Example
This example demonstrates use of client-side scripting to validate a form. If errors are found, appropriate error messages are displayed. The example uses the DOM functions to add error notifications consisting of a title, a short paragraph explaining that an error has occurred, and a list of errors in an ordered list. The content of the title is written as a link so that it can be used to draw the user's attention to the error using the focus method. Each item in the list is also written as a link that places the focus onto the form field in error when the link is followed.
For simplicity, the example just validates two text fields, but it can easily be extended to become a generic form handler. Client-side validation should not be the sole means of validation, and should be backed up with server-side validation. The benefit of client-side validation is that you can provide immediate feedback to the user to save them waiting for the errors to come back from the server, and it helps reduce unnecessary traffic to the server.
Here is the script that adds the event handlers to the form. If scripting is enabled, the validateNumbers() function will be called to perform client-side validation before the form is submitted to the server. If scripting is not enabled, the form will be immediately submitted to the server, so validation should also be implemented on the server.
Listing A-3. Adding Event Handlers to the Form
window.onload = initialise;
function initialise()
{
// Ensure we're working with a relatively standards compliant user agent
if (!document.getElementById || !document.createElement || !document.createTextNode)
return;
// Add an event handler for the number form
var objForm = document.getElementById('numberform');
objForm.onsubmit= function(){return validateNumbers(this);};
}
Here is the validation function. Note the use of the createElement(), createTextNode(), and appendChild() DOM functions to create the error message elements.
Listing A-4. Form Validation
function validateNumbers(objForm)
{
// Test whether fields are valid
var bFirst = isNumber(document.getElementById('num1').value);
var bSecond = isNumber(document.getElementById('num2').value);
// If not valid, display errors
if (!bFirst || !bSecond)
{
var objExisting = document.getElementById('validationerrors');
var objNew = document.createElement('div');
var objTitle = document.createElement('h2');
var objParagraph = document.createElement('p');
var objList = document.createElement('ol');
var objAnchor = document.createElement('a');
var strID = 'firsterror';
var strError;
// The heading element will contain a link so that screen readers
// can use it to place focus - the destination for the link is
// the first error contained in a list
objAnchor.appendChild(document.createTextNode('Errors in Submission'));
objAnchor.setAttribute('href', '#firsterror');
objTitle.appendChild(objAnchor);
objParagraph.appendChild(document.createTextNode('Please review the following'));
objNew.setAttribute('id', 'validationerrors');
objNew.appendChild(objTitle);
objNew.appendChild(objParagraph);
// Add each error found to the list of errors
if (!bFirst)
{
strError = 'Please provide a numeric value for the first number';
objList.appendChild(addError(strError, '#num1', objForm, strID));
strID = '';
}
if (!bSecond)
{
strError = 'Please provide a numeric value for the second number';
objList.appendChild(addError(strError, '#num2', objForm, strID));
strID = '';
}
// Add the list to the error information
objNew.appendChild(objList);
// If there were existing errors, replace them with the new lot,
// otherwise add the new errors to the start of the form
if (objExisting)
objExisting.parentNode.replaceChild(objNew, objExisting);
else
{
var objPosition = objForm.firstChild;
objForm.insertBefore(objNew, objPosition);
}
// Place focus on the anchor in the heading to alert
// screen readers that the submission is in error
objAnchor.focus();
// Do not submit the form
objForm.submitAllowed = false;
return false;
}
return true;
}
// Function to validate a number
function isNumber(strValue)
{
return (!isNaN(strValue) && strValue.replace(/^\s+|\s+$/, '') !== '');
}
Listing A-5 details the helper functions used to create the error message and to set focus to the associated form field.
Listing A-5. Helper Functions
// Function to create a list item containing a link describing the error
// that points to the appropriate form field
function addError(strError, strFragment, objForm, strID)
{
var objAnchor = document.createElement('a');
var objListItem = document.createElement('li');
objAnchor.appendChild(document.createTextNode(strError));
objAnchor.setAttribute('href', strFragment);
objAnchor.onclick = function(event){return focusFormField(this, event, objForm);};
objAnchor.onkeypress = function(event){return focusFormField(this, event, objForm);};
// If strID has a value, this is the first error in the list
if (strID.length > 0)
objAnchor.setAttribute('id', strID);
objListItem.appendChild(objAnchor);
return objListItem;
}
// Function to place focus to the form field in error
function focusFormField(objAnchor, objEvent, objForm)
{
// Allow keyboard navigation over links
if (objEvent && objEvent.type == 'keypress')
if (objEvent.keyCode != 13 && objEvent.keyCode != 32)
return true;
// set focus to the form control
var strFormField = objAnchor.href.match(/[^#]\w*$/);
objForm[strFormField].focus();
return false;
}
Listing A-6 shows the HTML for the example form.
Listing A-6. Example Form
<!DOCTYPE HTML PUBLIC "-//W3C//DTD HTML 4.01//EN" "http://www.w3.org/TR/html4/strict.dtd">
<html>
<head>
<title>ECMAScript Form Validation</title>
<meta http-equiv="Content-Type" content="text/html; charset=utf-8">
<script type="text/javascript" src="validate.js"></script>
</head>
<body>
<h1>Form Validation</h1>
<form id="numberform" method="post" action="form.php">
<fieldset>
<legend>Numeric Fields</legend>
<p>
<label for="num1">Enter first number</label>
<input type="text" size="20" name="num1" id="num1">
</p>
<p>
<label for="num2">Enter second number</label>
<input type="text" size="20" name="num2" id="num2">
</p>
</fieldset>
<p>
<input type="submit" name="submit" value="Submit Form">
</p>
</form>
</body>
</html>
This example is limited to client-side scripting and should be backed up with server-side validation. The example is limited to the creation of error messages when client-side scripting is available.
A working version of the form can be found at www.w3.org/TR/WCAG20-TECHS/working-examples/SCR21/ex1.html.
SCR24: Using progressive enhancement to open new windows on user request
Description
The objective of this technique is to avoid confusion that might be caused by the appearance of new windows that were not requested by the user. Suddenly opening new windows can disorient users or be missed completely by some users. If the document type does not allow the targetattribute (it does not exist in HTML 4.01 Strict or XHTML 1.0 Strict) or if the developer prefers not to use it, new windows can be opened with ECMAScript. The following example demonstrates how to open new windows with script: it adds an event handler to a link (a element) and warns the user that the content will open in a new window.
Example
Markup
The script is included in the head of the document, and the link has an ID that can be used as a hook by the script, as shown in Listing A-7.
Listing A-7. Opening a New Window
<script type="text/javascript" src="popup.js"></script>
…
<a href="help.html" id="newwin">Show Help</a
// Use traditional event model whilst support for event registration
// amongst browsers is poor.
window.onload = addHandlers;
function addHandlers()
{
var objAnchor = document.getElementById('newwin');
if (objAnchor)
{
objAnchor.firstChild.data = objAnchor.firstChild.data + ' (opens in a new window)';
objAnchor.onclick = function(event){return launchWindow(this, event);}
// UAAG requires that user agents handle events in a device-independent manner
// but only some browsers do this, so add keyboard event to be sure
objAnchor.onkeypress = function(event){return launchWindow(this, event);}
}
}
function launchWindow(objAnchor, objEvent)
{
var iKeyCode, bSuccess=false;
// If the event is from a keyboard, we only want to open the
// new window if the user requested the link (return or space)
if (objEvent && objEvent.type == 'keypress')
{
if (objEvent.keyCode)
iKeyCode = objEvent.keyCode;
else if (objEvent.which)
iKeyCode = objEvent.which;
// If not carriage return or space, return true so that the user agent
// continues to process the action
if (iKeyCode != 13 && iKeyCode != 32)
return true;
}
bSuccess = window.open(objAnchor.href);
// If the window did not open, allow the browser to continue the default
// action of opening in the same window
if (!bSuccess)
return true;
// The window was opened, so stop the browser processing further
return false;
}
SCR26: Inserting dynamic content into the Document Object Model immediately following its trigger element
Description
The objective of this technique is to place inserted user-interface elements into the Document Object Model in such a way that the tab order and screen-reader reading order are set correctly by the default behavior of the user agent. This technique can be used for any user-interface element that is hidden and shown, such as menus and dialogs.
The reading order in a screen reader is based on the order of the HTML or XHTML elements in the DOM, as is the default tab order. This technique inserts new content into the DOM immediately following the element that was activated to trigger the script. The triggering element must be a link or a button, and the script must be called from its onclick event. These elements are natively focusable, and their onclick event is device independent. Focus remains on the activated element and the new content, inserted after it, becomes the next thing in both the tab order and screen-reader reading order.
Note that this technique works for synchronous updates. For asynchronous updates (sometimes called AJAX), an additional technique is needed to inform the assistive technology that the asynchronous content has been inserted.
Example
This example creates a menu when a link is clicked and inserts it after the link. The onclick event of the link is used to call the ShowHide script, passing in an ID for the new menu as a parameter, as shown in the following snippet:
<a href="#" onclick="ShowHide('foo',this)">Toggle</a>
The ShowHide script creates a div containing the new menu and inserts a link into it. The last line is the core of the script. It finds the parent of the element that triggered the script and appends the div it created as a new child to it. This causes the new div to be in the DOM after the link. When the user presses the Tab key, the focus will go to the first focusable item in the menu, which is the link we created. (See Listing A-8.)
Listing A-8. Using ShowHide
function ShowHide(id,src)
{
var el = document.getElementById(id);
if (!el)
{
el = document.createElement("div");
el.id = id;
var link = document.createElement("a");
link.href = "javascript:void(0)";
link.appendChild(document.createTextNode("Content"));
el.appendChild(link);
src.parentElement.appendChild(el);
}
else
{
el.style.display = ('none' == el.style.display ? 'block' : 'none');
}
}
Cascading Style Sheets are used to make the div and link look like a menu.
Tests: Procedure
1. Find all areas of the page that trigger dialogs that are not pop-up windows.
2. Check that the dialogs are triggered from the click event of a button or a link.
3. Using a tool that allows you to inspect the DOM generated by script, check that the dialog is next in the DOM.
Expected Results
#2 and #3 are true.
If this is a sufficient technique for a success criterion, failing this test procedure does not necessarily mean that the success criterion has not been satisfied in some other way, only that this technique has not been successfully implemented and cannot be used to claim conformance.
SCR28: Using an expandable and collapsible menu to bypass block of content
Description
This technique allows users to skip repeated material by placing that material in a menu that can be expanded or collapsed under user control. The user can skip the repeated material by collapsing the menu. The user invokes a user interface control to hide or remove the elements of the menu.
![]() Note Similar approaches can be implemented by using server-side scripting and reloading a modified version of the webpage.
Note Similar approaches can be implemented by using server-side scripting and reloading a modified version of the webpage.
Example 1
The navigation links at top of a webpage are all entries in a menu implemented using HTML, CSS, and JavaScript. When the navigation bar is expanded, the navigation links are available to the user. When the navigation bar is collapsed, the links are not available. The code in Listing A-9details this functionality.
Listing A-9. Expandable Menu
<script type="text/javascript">
function toggle(id){
var n = document.getElementById(id);
n.style.display = (n.style.display != 'none' ? 'none' : '' );
}
</script>
...
<a href="#" onclick="toggle('navbar')">Toggle Navigation Bar</a>
<ul id="navbar">
<li><a href="http://target1.html">Link 1</a></li>
<li><a href="http://target2.html">Link 2</a></li>
<li><a href="http://target3.html">Link 3</a></li>
<li><a href="http://target4.html">Link 4</a></li>
</ul>
A working example of this code is available at www.w3.org/TR/WCAG20-TECHS/working-examples/SCR28/toggle-navbar.html.
Example 2
The table of contents for a set of webpages is repeated near the beginning of each webpage. A button at the beginning of the table of contents lets the user remove or restore it on the page.
Listing A-10. A Table of Contents
<script type="text/javascript">
function toggle(id){
var n = document.getElementById(id);
n.style.display = (n.style.display != 'none' ? 'none' : '' );
}
</script>
...
<button onclick="return toggle('toc');">Toggle Table of Contents</button>
<div id="toc">
...
</div>
A working example of this code can be found here: www.w3.org/TR/WCAG20-TECHS/working-examples/SCR28/toggle-toc.html.
SCR32: Providing client-side validation and adding error text via the DOM
Description
The objective of this technique is to demonstrate the display of an error message when client-side validation of a form field has failed. Anchor elements are used to display the error messages in a list and are inserted above the fields to be validated. Anchor elements are used in the error messages so that focus can be placed on the error message(s), drawing the user's attention to it. The href of the anchor elements contain an in-page link that references the fields where error(s) have been found.
In a deployed application, if JavaScript is turned off, client-side validation will not occur. Therefore, this technique is sufficient only in situations where scripting is relied upon for conformance or when server-side validation techniques are also used to catch any errors and return the page with information about the fields with errors.
Example
This example validates required fields as well as fields where a specific format is required. When an error is identified, the script inserts a list of error messages into the DOM and moves focus to them, as shown in Figure A-1.
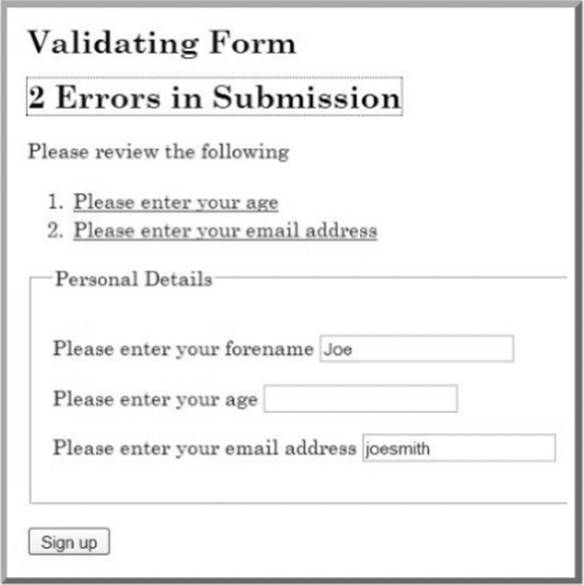
Figure A-1. Accessible Validation Sample Form
HTML and JavaScript Code
The HTML for the example form appears in Listing A-11.
Listing A-11. HTML for Client-Side Validation
<!DOCTYPE HTML PUBLIC "-//W3C//DTD HTML 4.01//EN" "http://www.w3.org/TR/html4/strict.dtd">
<html>
<head>
<title>Form Validation</title>
<meta http-equiv="Content-Type" content="text/html; charset=utf-8"/>
<link href="css/validate.css" rel="stylesheet" type="text/css"/>
<script type="text/javascript" src="scripts/validate.js"/>
</head>
<body>
<h1>Form Validation</h1>
<p>The following form is validated before being submitted if scripting is available,
otherwise the form is validated on the server. All fields are required, except ![]() those marked optional. If errors are found in the submission, the form is cancelled and a list of errors is displayed at the top of the form.</p>
those marked optional. If errors are found in the submission, the form is cancelled and a list of errors is displayed at the top of the form.</p>
<p> Please enter your details below. </p>
<h2>Validating Form</h2>
<form id="personalform" method="post" action="index.php">
<div class="validationerrors"/>
<fieldset>
<legend>Personal Details</legend>
<p>
<label for="forename">Please enter your forename</label>
<input type="text" size="20" name="forename" id="forename" class="string"
value=""/>
</p>
<p>
<label for="age">Please enter your age</label>
<input type="text" size="20" name="age" id="age" class="number" value=""/>
</p>
<p>
<label for="email">Please enter your email address</label>
<input type="text" size="20" name="email" id="email" class="email"![]()
value=""/>
</p>
</fieldset>
<p>
<input type="submit" name="signup" value="Sign up"/>
</p>
</form>
<h2>Second Form</h2>
<form id="secondform" method="post" action="index.php#focuspoint">
<div class="validationerrors"/>
<fieldset>
<legend>Second Form Details</legend>
<p>
<label for="suggestion">Enter a suggestion</label>
<input type="text" size="20" name="suggestion" id="suggestion"
class="string" value=""/>
</p>
<p>
<label for="optemail">Please enter your email address (optional)</label>
<input type="text" size="20" name="optemail" id="optemail"
class="optional email" value=""/>
</p>
<p>
<label for="rating">Please rate this suggestion</label>
<input type="text" size="20" name="rating" id="rating"
class="number" value=""/>
</p>
<p>
<label for="jibberish">Enter some jibberish (optional)</label>
<input type="text" size="20" name="jibberish" id="jibberish" value=""/>
</p>
</fieldset>
<p>
<input type="submit" name="submit" value="Add Suggestion"/>
</p>
</form>
</body>
</html>
The JavaScript that performs the validation and inserts the error messages is detailed in Listing A-12.
Listing A-12. Validation JavaScript
window.onload = initialise;
function initialise()
{
var objForms = document.getElementsByTagName('form');
var iCounter;
// Attach an event handler for each form
for (iCounter=0; iCounter<objForms.length; iCounter++)
{
objForms[iCounter].onsubmit = function(){return validateForm(this);};
}
}
// Event handler for the form
function validateForm(objForm)
{
var arClass = [];
var iErrors = 0;
var objField = objForm.getElementsByTagName('input');
var objLabel = objForm.getElementsByTagName('label');
var objList = document.createElement('ol');
var objError, objExisting, objNew, objTitle, objParagraph, objAnchor, objPosition;
var strLinkID, iFieldCounter, iClassCounter, iCounter;
// Get the id or name of the form, to make a unique
// fragment identifier
if (objForm.id)
{
strLinkID = objForm.id + 'ErrorID';
}
else
{
strLinkID = objForm.name + 'ErrorID';
}
// Iterate through input form controls, looking for validation classes
for (iFieldCounter=0; iFieldCounter<objField.length; iFieldCounter++)
{
// Get the class for the field, and look for the appropriate class
arClass = objField[iFieldCounter].className.split(' ');
for (iClassCounter=0; iClassCounter<arClass.length; iClassCounter++)
{
switch (arClass[iClassCounter])
{
case 'string':
if (!isString(objField[iFieldCounter].value, arClass))
{
if (iErrors === 0)
{
logError(objField[iFieldCounter], objLabel, objList, strLinkID);
}
else
{
logError(objField[iFieldCounter], objLabel, objList, '');
}
iErrors++;
}
break;
case 'number':
if (!isNumber(objField[iFieldCounter].value, arClass))
{
if (iErrors === 0)
{
logError(objField[iFieldCounter], objLabel, objList, strLinkID);
}
else
{
logError(objField[iFieldCounter], objLabel, objList, '');
}
iErrors++;
}
break;
case 'email' :
if (!isEmail(objField[iFieldCounter].value, arClass))
{
if (iErrors === 0)
{
logError(objField[iFieldCounter], objLabel, objList, strLinkID);
}
else
{
logError(objField[iFieldCounter], objLabel, objList, '');
}
iErrors++;
}
break;
}
}
}
if (iErrors > 0)
{
// If not valid, display error messages
objError = objForm.getElementsByTagName('div');
// Look for existing errors
for (iCounter=0; iCounter<objError.length; iCounter++)
{
if (objError[iCounter].className == 'validationerrors')
{
objExisting = objError[iCounter];
}
}
objNew = document.createElement('div');
objTitle = document.createElement('h2');
objParagraph = document.createElement('p');
objAnchor = document.createElement('a');
if (iErrors == 1)
{
objAnchor.appendChild(document.createTextNode('1 Error in Submission'));
}
else
{
objAnchor.appendChild(document.createTextNode(iErrors + ' Errors in Submission'));
}
objAnchor.href = '#' + strLinkID;
objAnchor.className = 'submissionerror';
objTitle.appendChild(objAnchor);
objParagraph.appendChild(document.createTextNode('Please review the following'));
objNew.className = 'validationerrors';
objNew.appendChild(objTitle);
objNew.appendChild(objParagraph);
objNew.appendChild(objList);
// If there were existing errors, replace them with the new lot,
// otherwise add the new errors to the start of the form
if (objExisting)
{
objExisting.parentNode.replaceChild(objNew, objExisting);
}
else
{
objPosition = objForm.firstChild;
objForm.insertBefore(objNew, objPosition);
}
// Allow for latency
setTimeout(function() { objAnchor.focus(); }, 50);
// Don't submit the form
objForm.submitAllowed = false;
return false;
}
// Submit the form
return true;
}
// Function to add a link in a list item that points to problematic field control
function addError(objList, strError, strID, strErrorID)
{
var objListItem = document.createElement('li');
var objAnchor = document.createElement('a');
// Fragment identifier to the form control
objAnchor.href='#' + strID;
// Make this the target for the error heading
if (strErrorID.length > 0)
{
objAnchor.id = strErrorID;
}
// Use the label prompt for the error message
objAnchor.appendChild(document.createTextNode(strError));
// Add keyboard and mouse events to set focus to the form control
objAnchor.onclick = function(event){return focusFormField(this, event);};
objAnchor.onkeypress = function(event){return focusFormField(this, event);};
objListItem.appendChild(objAnchor);
objList.appendChild(objListItem);
}
function focusFormField(objAnchor, objEvent)
{
var strFormField, objForm;
// Allow keyboard navigation over links
if (objEvent && objEvent.type == 'keypress')
{
if (objEvent.keyCode != 13 && objEvent.keyCode != 32)
{
return true;
}
}
// set focus to the form control
strFormField = objAnchor.href.match(/[^#]\w*$/);
objForm = getForm(strFormField);
objForm[strFormField].focus();
return false;
}
// Function to return the form element from a given form field name
function getForm(strField)
{
var objElement = document.getElementById(strField);
// Find the appropriate form
do
{
objElement = objElement.parentNode;
} while (!objElement.tagName.match(/form/i) && objElement.parentNode);
return objElement;
}
// Function to log the error in a list
function logError(objField, objLabel, objList, strErrorID)
{
var iCounter, strError;
// Search the label for the error prompt
for (iCounter=0; iCounter<objLabel.length; iCounter++)
{
if (objLabel[iCounter].htmlFor == objField.id)
{
strError = objLabel[iCounter].firstChild.nodeValue;
}
}
addError(objList, strError, objField.id, strErrorID);
}
// Validation routines - add as required
function isString(strValue, arClass)
{
var bValid = (typeof strValue == 'string' && strValue.replace(/^\s*|\s*$/g, '')
!== '' && isNaN(strValue));
return checkOptional(bValid, strValue, arClass);
}
function isEmail(strValue, arClass)
{
var objRE = /^[\w-\.\']{1,}\@([\da-zA-Z\-]{1,}\.){1,}[\da-zA-Z\-]{2,}$/;
var bValid = objRE.test(strValue);
return checkOptional(bValid, strValue, arClass);
}
function isNumber(strValue, arClass)
{
var bValid = (!isNaN(strValue) && strValue.replace(/^\s*|\s*$/g, '') !== '');
return checkOptional(bValid, strValue, arClass);
}
function checkOptional(bValid, strValue, arClass)
{
var bOptional = false;
var iCounter;
// Check if optional
for (iCounter=0; iCounter<arClass.length; iCounter++)
{
if (arClass[iCounter] == 'optional')
{
bOptional = true;
}
}
if (bOptional && strValue.replace(/^\s*|\s*$/g, '') === '')
{
return true;
}
return bValid;
}
A working example of this technique implemented using PHP, JavaScript, CSS, and XHTML can be found here: www.w3.org/TR/WCAG20-TECHS/working-examples/SCR32/index.php.
SCR35: Making actions keyboard accessible by using the onclick event of anchors and buttons
Description
The objective of this technique is to demonstrate how to invoke a scripting function in a way that is keyboard accessible by attaching it to a keyboard-accessible control. To ensure that scripted actions can be invoked from the keyboard, they are associated with natively actionable HTML elements (links and buttons). The onclick event of these elements is device independent. Although “onclick” sounds like it is tied to the mouse, the onclick event is actually mapped to the default action of a link or button. The default action occurs when the user clicks the element with a mouse, but it also occurs when the user focuses the element and presses Enter or the spacebar, and when the element is triggered via the accessibility API.
This technique relies on client-side scripting. However, it is beneficial to provide a backup implementation or explanation for environments in which scripting is not available. When using anchor elements to invoke a JavaScript action, a backup implementation or explanation is provided via the href attribute. When using buttons, it is provided via a form post.
Example 1
The code in Listing A-13 creates a link that runs script, but it navigates to another page when script is not available. This approach can be used to create sites that don't rely on script, if and only if the navigation target provides the same functionality as the script. This example is identical to the example shown in the previous section, except that its href is now set to a real page, dostuff.htm. The dostuff.htm page must provide the same functionality as the script. The “return false;” at the end of the doStuff() event handling function tells the browser not to navigate to the URI. Without it, the browser would navigate to dostuff.htm after the script ran.
Listing A-13. Creating a Link to Run a Script
<script>
function doStuff()
{
//do stuff
return false;
}
</script>
<a href="dostuff.htm" onclick="return doStuff();">do stuff</a>
A working example of this code is available at www.w3.org/TR/WCAG20-TECHS/working-examples/SCR35/jslink.html.
Example 2
Listing A-14 creates a button that runs a script and falls back to a form post for users without script. This approach can be used by sites that do not rely on script, if and only if the form post provides the same functionality as the script. The onsubmit="return false;" prevents the form from submitting.
Listing A-14. Creating a Button to Run a Script, with Form Post as Fallback
<script>
function doStuff()
{
//do stuff
}
</script>
<form action="doStuff.aspx" onsubmit="return false;">
<input type="submit" value="Do Stuff" onclick="doStuff();" />
</form>
A working example of this code is available here: www.w3.org/TR/WCAG20-TECHS/working-examples/SCR35/jsbutton.html.
SCR37: Creating custom aialogs in a device-independent way
Description
Site designers often want to create dialogs that do not use the pop-up windows supplied by the browser. This is typically accomplished by enclosing the dialog contents in a div and placing the div above the page content using z-order and absolute positioning in CSS.
To be accessible, these dialogs must follow a few simple rules.
· Trigger the script that launches the dialog from the onclick event of a link or button.
· Place the dialog div into the Document Object Model (DOM) immediately after the element that triggered it. The triggering element will maintain focus, and inserting the dialog content after that element will make the content inside the dialog next in the screen-reader reading order and next in the tab order. The dialog can still be absolutely positioned to be elsewhere on the page visually. This can be done either by creating the dialog in the HTML and hiding it with CSS, as in the following example, or by inserting it immediately after the triggering element with script.
· Ensure that the HTML inside the dialog div meets the same accessibility standard as other content.
· It is also nice, but not always necessary, to make the launching link toggle the dialog open and closed, and to close the dialog when the keyboard focus leaves it.
Example
The HTML for this example includes a triggering element—in this case a button—and a div that acts as the frame for the dialog.
The triggering element is a button, and the script is triggered from the onclick event. This sends the appropriate events to the operating system so that assistive technology is aware of the change in the DOM.
In this example, the Submit and Reset buttons inside the dialog simply hide the div.
Listing A-15. An Options Button That Opens a Dialog
...
<button onclick="TogglePopup(event,true)"
name="pop0001">Options</button>
<div class="popover" id="pop0001">
<h3>Edit Sort Information</h3>
<form action="default.htm" onsubmit="this.parentNode.style.display='none'; return false;"![]()
onreset="this.parentNode.style.display='none'; return false;">
<fieldset>
<legend>Sort Order</legend>
<input type="radio" name="order" id="order_alpha" /><label![]()
#160;for="order_alpha">Alphabetical</label>
<input type="radio" name="order" id="order_default" checked="true" /><label![]()
for="order_default">Default</label>
</fieldset>
<div class="buttons">
<input type="submit" value="OK" />
<input type="reset" value="Cancel" />
</div>
</form>
</div>
...
The div, heading, and form elements are styled with CSS to look like a dialog, as shown in Listing A-16.
Listing A-16. Styling Form Elements
...
a { color:blue; }
a.clickPopup img { border:none; width:0; }
div.popover { position:absolute; display:none; border:1px outset; background-color:beige;![]()
font-size:80%; background-color:#eeeeee; color:black; }
div.popover h3 { margin:0; padding:0.1em 0.5em; background-color:navy; color:white; }
#pop0001 { width:20em; }
#pop0001 form { margin:0; padding:0.5em; }
#pop0001 fieldset { margin-bottom:0.3em; padding-bottom:0.5em; }
#pop0001 input, #pop0001 label { vertical-align:middle; }
#pop0001 div.buttons { text-align:right; }
#pop0001 div.buttons input { width:6em; }
...
The script toggles the display of the popup div, showing it and hiding it. See Listing A-17.
Listing A-17. Displaying the Popup
...
function TogglePopup(evt,show)
{
HarmonizeEvent(evt);
var src = evt.target;
if ("click" == evt.type)
{
evt.returnValue = false;
}
var popID = src.getAttribute("name");
if (popID)
{
var popup = document.getElementById(popID);
if (popup)
{
if (true == show)
{
popup.style.display = "block";
}
else if (false == show)
{
popup.style.display = "none";
}
else
{
popup.style.display = "block" == popup.style.display ?![]()
"none" : "block";
}
if ("block" == popup.style.display)
{
//window.alert(document.documentElement.scrollHeight);
popup.style.top = ((document.documentElement.offsetHeight –![]()
popup.offsetHeight) / 2 ) + 'px';
popup.style.left = ((document.documentElement.offsetWidth –![]()
popup.offsetWidth) / 2) + 'px';
}
}
}
}
function SubmitForm(elem)
{
elem.parentNode.style.display='none';
return false;
}
function ResetForm(elem)
{
elem.parentNode.style.display='none';
return false;
}
...
A working example, which is an options button that opens a dialog, is available here: www.w3.org/TR/WCAG20-TECHS/working-examples/SCR37/default.htm.
As mentioned earlier the full list of techniques are available here: www.w3.org/TR/WCAG20-TECHS/client-side-script.html.
All materials on the site are licensed Creative Commons Attribution-Sharealike 3.0 Unported CC BY-SA 3.0 & GNU Free Documentation License (GFDL)
If you are the copyright holder of any material contained on our site and intend to remove it, please contact our site administrator for approval.
© 2016-2026 All site design rights belong to S.Y.A.