Creating a Website: The Missing Manual (2015)
.
Part 1. Building Basic Web Pages
Chapter 1, Creating Your First Page
Chapter 2, Becoming Fluent in HTML
Chapter 3, Building a Style Sheet
Chapter 4, Adding Graphics
Chapter 5, Working with a Web Editor
Chapter 1. Creating Your First Page
Every website is a collection of web pages, so it should come as no surprise that your journey to build a complete site starts here, with the writing of a single web page.
Technically, a web page is a special type of document written in a computer language called HTML (that’s short for HyperText Markup Language). Web pages are written for web browsers—programs like Internet Explorer, Google Chrome, and Safari. These browsers have a simple but crucially important job: they read the HTML in a web page document and display the perfectly formatted result for you to read.
This chapter will introduce you to HTML. You’ll see how a basic web page works and learn how to create one of your own. For now, you’ll be working with web pages you store on your computer, visible only to you. Later on, in Chapter 9, you’ll learn to put web pages online so anyone with a web connection can see them.
HTML: The Language of the Web
HTML is the single most important standard in web design—and the only one that’s absolutely required if you plan to create a web page. Every web page is written in HTML. It doesn’t matter whether your page contains a series of blog entries, a dozen pictures of your pet lemur, or a heavily formatted screenplay—odds are that, if you’re looking at it in a browser, it’s an HTML page.
HTML plays a key role in web pages: It tells browsers how to display the contents of a page, using special instructions called tags that tell a browser when to start a paragraph, italicize a word, or display a picture. To create your own web pages, you need to learn to use this family of tags.
HTML is such an important standard that you’ll spend a good portion of this book digging through its features, frills, and occasional shortcomings. Every web page you build along the way will be a bona fide HTML document.
NOTE
The HTML standard doesn’t have anything to do with the way a web browser retrieves a page on the Web. That task is left to another standard, called HTTP (HyperText Transport Protocol), which is a communication technology that lets two computers exchange data over the Internet. To use the analogy of a phone conversation, the telephone wires represent HTTP, and the juicy tidbits of gossip you exchange with Aunt Martha are the HTML documents.
FREQUENTLY ASKED QUESTION: THE WEB VS. THE INTERNET
Is there a difference between the Web and the Internet?
Newscasters, politicians, and regular people often use these terms interchangeably. Technically, however, the concepts are different—and confusing them is likely to put computer techies and other self-respecting nerds on edge.
The Internet is a network of connected computers that spans the globe. These computers are connected together to share information, but there are a number of ways to do that, including by email, instant messaging, file sharing, transferring files through FTP (short for File Transfer Protocol), and through HTTP (with the help of a web browser).
The World Wide Web is a term that describes the billions of public web pages that you can visit on the Internet. In other words, the Web is just one way to use the Internet, although it’s undeniably the most popular—and the one that interests us in this book.
Cracking Open an HTML File
On the inside, an HTML page is actually nothing more than a plain-vanilla text file. That means that the raw code behind every web page you create will consist entirely of letters, numbers, and a few special characters (like spaces, punctuation marks, and everything else you can spot on your keyboard). Figure 1-1 dissects an ordinary (and very simple) HTML document.
Here’s one of the secrets of web page writing: You don’t need a live website to start creating your own web pages. That’s because you can easily build and test pages using only your own computer. In fact, you don’t even need an Internet connection. The only tools you need are a basic text editor and a standard web browser.
Your Text Editor
A text editor lets you create or edit an HTML file (in a window like the one you can see in Figure 1-1, bottom). Even many professional web designers stick with simple text-editing tools. There are plenty of fancier editing tools that are designed specifically for editing websites, but you don’t actually need any of them. And if you start using them too soon, you’re likely to end up drowning in a sea of extra frills and features before you really understand how HTML works.
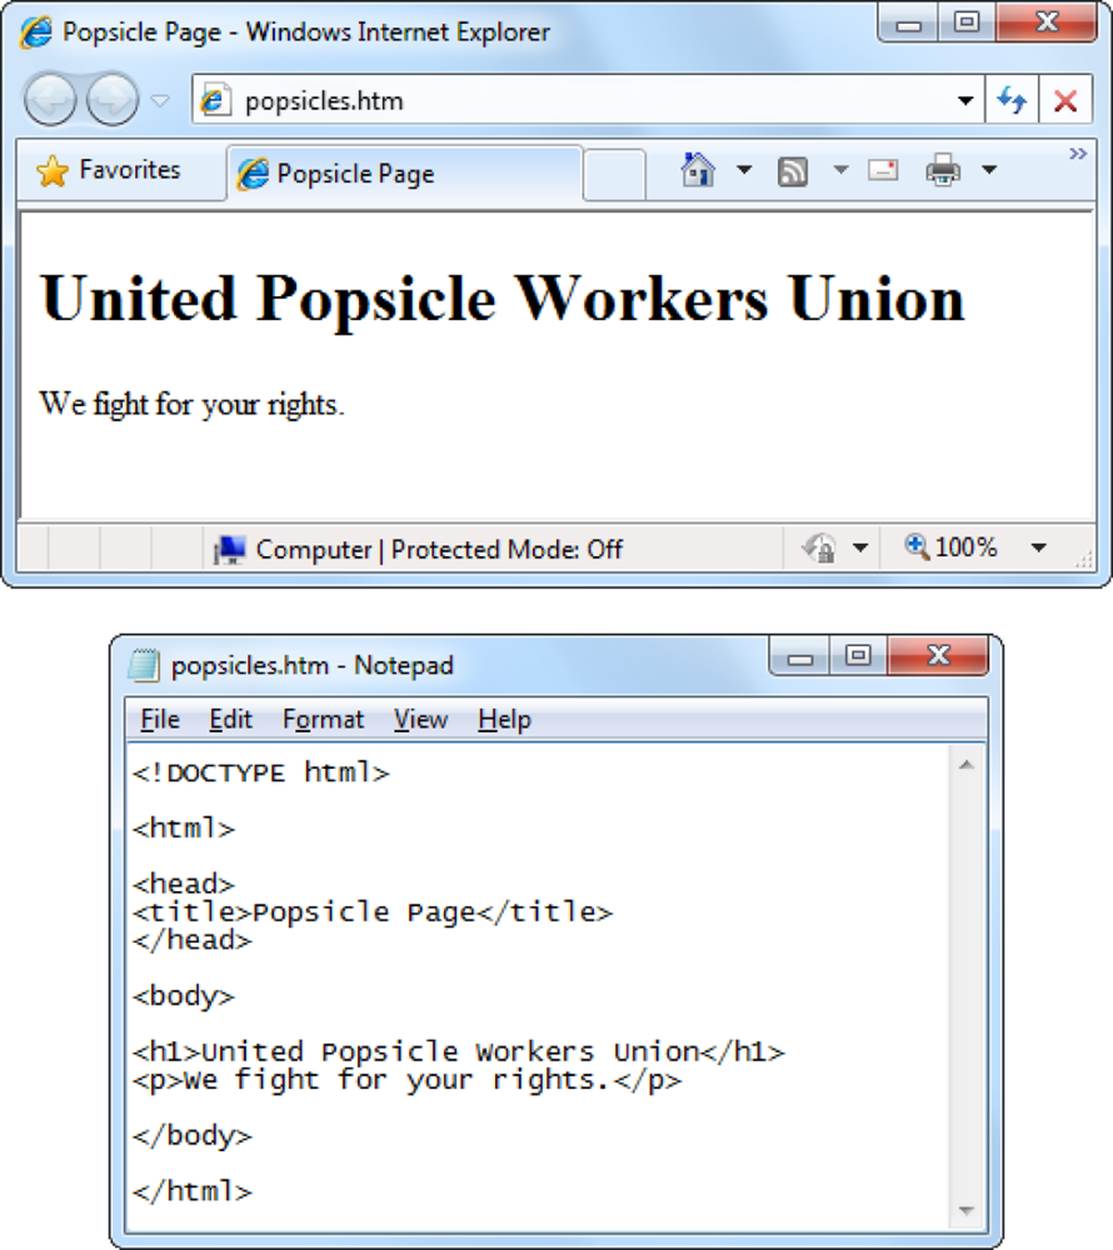
Figure 1-1. Every HTML document is actually an ordinary text file. Top: A web browser displays a simple HTML document, showing all its glorious formatting. Bottom: But when you open the same document in a text editor, you see all the text from the original document, along with a few extra pieces of information inside angle brackets < >. These HTML tags convey information about the document’s structure and formatting.
The type of text editor you use depends on your computer’s operating system:
§ If you have a Windows computer, you use the bare-bones Notepad editor. Sail on to the next section.
§ If you have a Mac computer, you use the built-in TextEdit editor. But first, you need to make the adjustments described below.
Mac fans need to tweak the way TextEdit works because the program has an “HTML view” that hides the tags in an HTML file and shows you the formatted page instead. This behavior is aimed at making life simpler for newbies, but it presents a serious danger for anyone who wants to write a real web page. To avoid confusion and to make sure you write real, raw HTML, you need to turn HTML view off. Here’s how:
1. Choose TextEdit→Preferences.
This opens a tabbed window of TextEdit options (Figure 1-2).
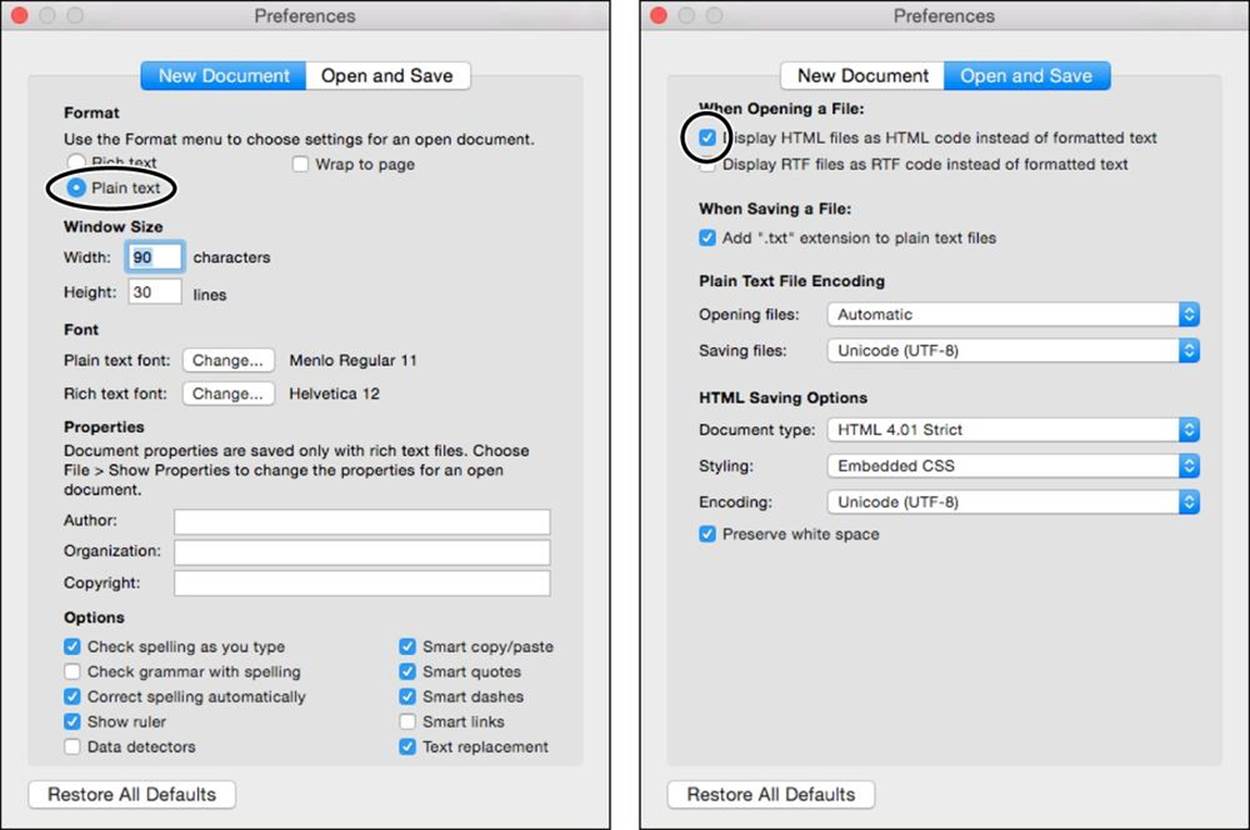
Figure 1-2. TextEdit’s Preferences window has two tabs of settings: “New Document” (left) and “Open and Save” (right).
2. Click “New Document” and then, in the Format section, choose “Plain text.”
This tells TextEdit to start you out with ordinary, unformatted text and to dispense with the formatting toolbar and ruler that would otherwise appear onscreen, which aren’t relevant to creating HTML files.
3. Click “Open and Save” and switch on the first option, “Display HTML files as HTML code instead of formatted text.”
This tells TextEdit to let you see (and edit) the real HTML markup, tags and all, not the formatted version of the page as it would appear in a web browser.
4. Close the Preferences window, and then close TextEdit.
Now, the next time you start TextEdit, you’ll begin in the plain-text mode that every self-respecting web developer uses.
Your Web Browser
As you no doubt know, a web browser is a program that lets you navigate to and display web pages. Without browsers, the Web would still exist, but you wouldn’t be able to look at it.
A browser’s job is surprisingly simple—in fact, the bulk of its work consists of two tasks. First, it requests web pages, which happens when you type in a website address (like www.google.com) or click a link in a web page. The browser sends that request to a far-off computer called a web server. A server is typically much more powerful than a home computer because it needs to handle multiple browser requests at once. The server heeds these requests and sends back the content of the desired web pages.
When the browser gets that content, it puts its second skill into action and renders, or draws, the web page. Technically, this means the browser converts the plain text it receives from the server into a display document based on formatting instructions embedded in the page. The end result is a graphically rich page with different typefaces, colors, and links. Figure 1-3 illustrates the process.
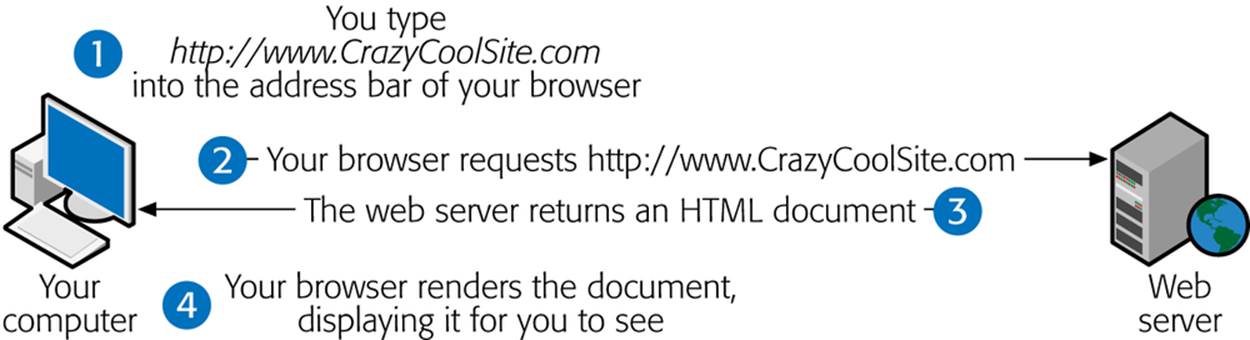
Figure 1-3. A web browser is designed to do two things really well: contact remote computers to ask for web pages, and then display those pages on your computer.
Although you usually ask your browser to retrieve pages from the Web, you can also use it to view a web page that’s stored on your computer, which is particularly handy when you’re practicing your HTML skills. In fact, your computer already knows that files that end in .htm or .html have web page content. So if you double-click one of these files, your computer launches your web browser automatically. (You can get the same result by dragging a web page file and dropping it on an already-open browser window.)
Although ordinary people need only a single web browser, it’s a good idea for web developers-in-training (like yourself) to become familiar with the most common browsers out there (see Figure 1-4). That’s because, when you design your website, you need to prepare for a wide audience of people with different browsers. To make sure your nifty pages don’t turn funky when other people look at them, you should test your site using a variety of browsers, screen sizes, and operating systems.
The following list describes the most popular browsers of today:
§ Google Chrome is the current king of web browsers, despite the fact that it’s the newest kid on the block. Tech-savvy web fans love its features, like bookmarks you can synchronize across different computers, and its blistering speed.
Get with Google Chrome at www.google.com/chrome.
§ Internet Explorer is the longest-lived browser and the official standard in many corporate and government environments. It’s also the browser that comes pre-installed on Windows, so it’s the one non-techie people use if they don’t want (or don’t know how) to install something new. Even hotshot web designers need to check that Internet Explorer understands their pages, because even old versions of IE, like IE 8, remain popular.
To download the most recent version of Internet Explorer, visit www.microsoft.com/ie.
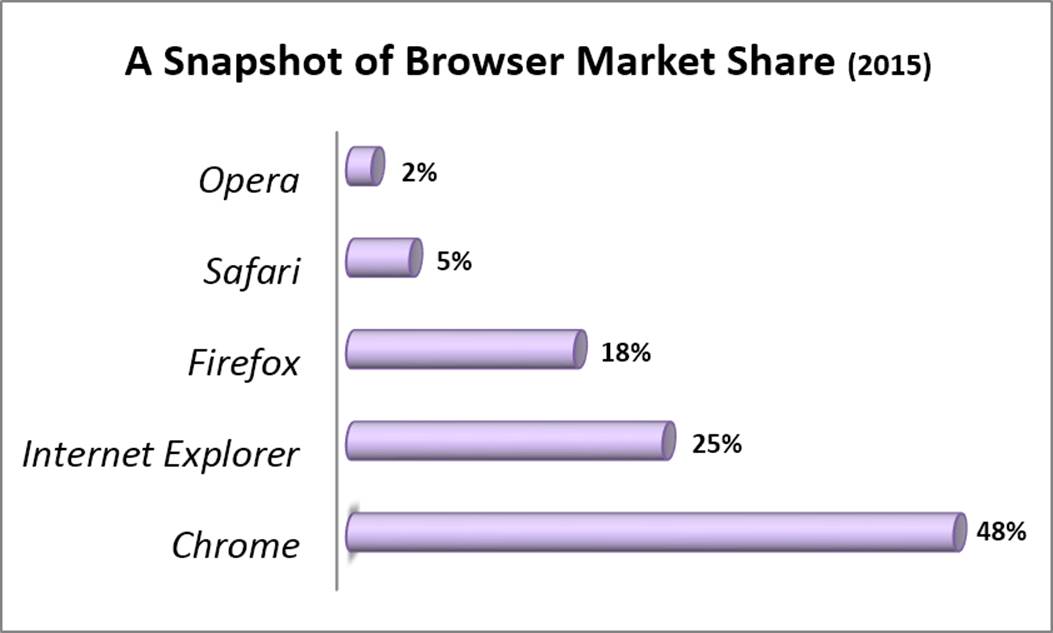
Figure 1-4. Browser usage statistics, which estimate the percentage of people using each major browser, vary depending on what sites you examine and how you count visitors, but at the time of this writing, this is one reasonable estimate. (For current browser usage statistics, check out http://tinyurl.com/stats-browsers.)
§ Firefox started life as the modern response to Internet Explorer. It’s still ahead of the game with its incredibly flexible add-ons, tiny programs that other people develop to enhance Firefox with extra features, like a web mail notifier and thumbnails of the sites that show up in a page of search results. Best of all, an army of volunteer programmers keep Firefox rigorously up to date.
Give Firefox a go at www.mozilla.org/firefox.
§ Safari is an Apple-designed browser that comes with current versions of the Mac OS operating system. Apple products like the iPhone, the iPad, and the iPod Touch also use the Safari browser (albeit a mobile version that behaves a bit differently). The fine folks at Apple created an incarnation of Safari for Windows computers but have since abandoned it, making Safari an Apple-only option.
Go on Safari at www.apple.com/safari.
§ Opera is a slimmed-down, easy-to-install browser that’s been around for well over a decade, serving as an antidote to the bloated size and pointless frills of Internet Explorer. For years, Opera was held back by an unfortunate detail—if you wanted an ad-free version, you needed to pay. Today, Opera is free and ad-free, too, just like the other browsers on this list. It has a small but loyal following but runs a distant fifth in web browser standings.
Check out Opera at www.opera.com.
UP TO SPEED: REACHING AS MANY PEOPLE AS POSSIBLE
As you create your website, you need to consider not just what your audience wants to see, but what it can see as well. Good web designers avoid using frills on their pages unless everyone can experience them. Nothing is more disappointing than visiting a site that’s supposed to have a nice animation and seeing a blank box, simply because your computer doesn’t have the right browser plug-in (an add-on program that gives your browser more capabilities). Nor is it any fun finding a website that’s all decked out for wide-screen monitors, but unbearably cramped (or, even worse, partly amputated) on the smaller screen of an iPad.
The creators of the most popular websites carefully consider these sorts of issues. For example, think about the number of people whose computers won’t let them buy a book on Amazon.com, make a bid on eBay, or conduct a search on Google. (Are you thinking of a number that’s close to zero?) To make your website as accessible as these top sites, you need to stick to widely accepted web standards, follow the advice in this book, and try your site on different computers.
It’s been widely remarked that the average web designer goes through three stages of maturity: 1) “I’m just learning, so I’ll keep it simple”; 2) “I’m a web guru, and I’ll prove it by piling on the features”; and 3) “I’ve been burned by browser compatibility problems, so I’ll keep it simple and classy.”
Tutorial: Creating an HTML File
Now that you’ve prepped your web kitchen, you’re ready to create your very own web page. In this tutorial, you’ll build the basic page that you saw in Figure 1-1.
TIP
Like all the tutorials in this book, you’ll find the solution for this exercise on the companion site at http://prosetech.com/web. Just look in the folder named Tutorial-1-1 (which stands for “Chapter 1, first tutorial,” if you’re curious).
Ready to begin? Here’s what to do:
1. Fire up your text editor.
On a Windows computer, that’s Notepad. To open Notepad, click the Start button, type “notepad,” and then click the Notepad icon that appears.
On a Mac, that’s TextEdit. To launch it, go to the Applications folder and then double-click TextEdit.
When you load up your text editor, it starts you out with a new, blank document, which is exactly what you want.
2. Start writing your HTML code.
This task is a little tricky because you haven’t explored the HTML standard yet. Hang on—help is on the way in the rest of this chapter. For now, you can use the following very simple HTML snippet. Just type it in exactly as it appears, text, slashes, pointy brackets, and all:
<h1>United Popsicle Workers Union</h1>
<p>We fight for your rights.</p>
Technically, this two-line document is missing a few structural details that self-respecting web pages should have. However, every browser can read this HTML fragment and correctly interpret what you want: the two lines of formatted text shown in Figure 1-1, top.
3. When you finish your web page, choose File→Save.
That brings up the Save or Save As window, where you fill in the details for your new file (Figure 1-5).
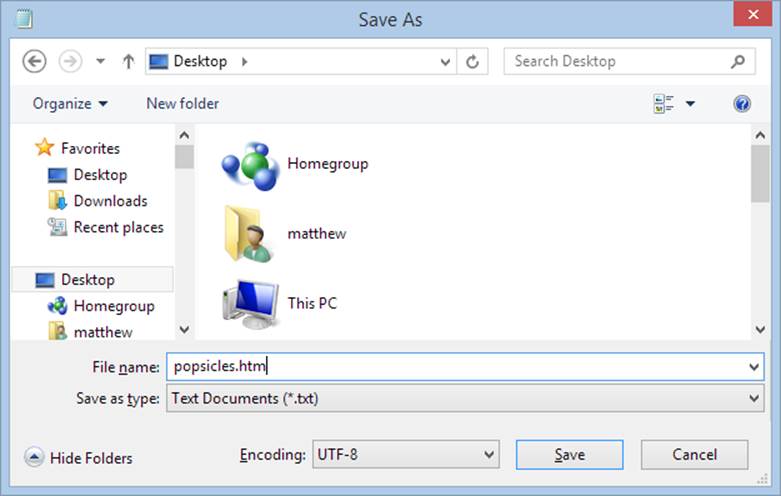
Figure 1-5. Whether you use Notepad (shown here) or TextEdit, there’s nothing tricky about saving your file. Just make sure to include “.htm” or “.html” at the end of the filename to identify it as an HTML document.
4. Pick a save location for your file, and give it the name popsicles.htm.
If you’re not sure where to stash your file, you can save it right on your desktop for now.
When you name your file, make sure you include the extension .htm or .html at the end of the filename. For example, by using the name popsicles.htm or popsicles.html, you ensure that your computer will recognize your document as an HTML file.
Note for the paranoid: There’s no difference between .htm and .html files. Both are 100% the same—text files that contain HTML content.
element are two paragraphs and a bulleted list with four items in it. If you stare at the tree model long enough, you’ll understand why HTML calls all these elements “container elements.”">
Figure 1-14. Here’s another way to look at the HTML you created. The tree model shows you how you nested HTML elements. By following the arrows, you can see that the top-level <html> element contains <head> and <body> elements. Inside the <head> element is the <title> element, and inside the <body> element are two paragraphs and a bulleted list with four items in it. If you stare at the tree model long enough, you’ll understand why HTML calls all these elements “container elements.”
If you’re a masochist, you don’t need to use any spaces. The previous example is exactly equivalent to the following much-less-readable HTML document:
<!DOCTYPE html><html><head><title>Hire Me!</title></head><body><p>I am
Lee Park. Hire me for your company, because my work is <b>off the hizzle
</b>.</p><p>My skills include:</p><ul><li>Fast typing (nearly 12
words/minute).</li><li> Extraordinary pencil sharpening.</li><li>Inventive
excuse making.</li><li> Negotiating with officers of the peace.</li></ul>
</body></html>
Of course, it’s nearly impossible for a human to write HTML like this without making a mistake.
Where Are All the Pictures?
Whether it’s a stock chart, a logo for your underground garage band, or a doctored photo of your favorite celebrity, the Web would be pretty drab without pictures. So far, you’ve seen how to put text into an HTML document, but what happens when you need an image?
GEM IN THE ROUGH: HAVE SOMETHING TO HIDE?
When you’re working with a complex web page, you may want to temporarily remove an element or a section of content. This is a handy trick when you have a page that doesn’t quite work right and you want to find out which element is causing the problem. You do so using the good ol’ fashioned cut-and-paste feature in your text editor. Cut the section you think may be troublesome, save the file, and then load it up in your browser. If the section is innocent, paste it back in place, and then re-save the file. Repeat this process until you find the culprit.
But HTML gives you a simpler solution—comments. With comments, you can leave the entire page intact. When you “comment out” a section of the page, HTML ignores it.
You create an HTML comment using the character sequence <!-- to mark the start of the comment, and the character sequence --> to mark its end. Browsers ignore everything in between, whether it’s content or tags. You can comment out just a single line of HTML or an entire section of code. However, don’t try to nest one comment inside another, as that won’t work.
Here’s an example that hides two list items. When you open this document in your web browser, the list will show only the last two items (“Inventive excuse making” and “Negotiating with officers of the peace”).
<ul>
<!--
<li>Fast typing (nearly 12 words/minute).
</li>
<li>Extraordinary pencil sharpening.</li>
-->
<li>Inventive excuse making.</li>
<li>Negotiating with officers of the
peace.</li>
</ul>
When you want to return the list to its original glory, just remove the comment markers.
Although it may seem surprising, you can’t store a picture inside an HTML file. There are plenty of good reasons why you wouldn’t want to anyway—your web page files would become really large, it would be hard to modify your pictures or do other things with them, and you’d have a fiendish time editing your pages in a text editor because the image data would make a mess. The solution is to store your pictures as separate files, and then link your HTML document to them. This way, your browser pulls up the pictures and positions them exactly where you want them on your page.
The linking tool that inserts pictures is the <img> element (short for “image”). It points to an image file, which the browser retrieves and inserts into the page. You can put the image file in the same folder as your web page (which is the easiest option), or you can put it on a completely different website.
Although you’ll learn everything you ever wanted to know about web graphics in Chapter 4, it’s worth considering a simple example now. To try this out, you need a web-ready image handy. (The most commonly supported image file types are JPEG, GIF, and PNG.) If you don’t have an image handy, you can download the sample picture leepark.jpg from the Tutorial-1-2 folder. Here’s an example of an <img> element that uses the leepark.jpg file:
<img src="leepark.jpg" alt="Lee Park Portrait" />
Like the <br> element discussed earlier, <img> is a standalone element with no content. For that reason, it makes sense to use the empty element syntax and add a forward slash before the closing angle bracket.
However, there’s an obvious difference between the <br> element and the <img> element. Although <img> is a standalone element, it isn’t self-sufficient. In order for the element to mean anything, you need to supply two more pieces of information: the name of the image file and some alternate text, which is used in cases where a browser can’t download or display the picture (see Alternate Text). To incorporate this extra information into the image element, HTML uses attributes, extra pieces of information that appear after an element name, but before the closing > character.
The <img> example includes two attributes, separated by a space. Each attribute has two parts—a name (which tells the browser what the attribute does) and a value (a piece of information you supply). The name of the first <img> attribute is src, which is shorthand for “source”; it tells the browser where to get the image you want. In this example, the value of the src attribute is leepark.jpg, which is the name of the file with Lee Park’s headshot.
The name of the second <img> attribute is alt, which is shorthand for “alternate text.” It tells a browser that you want it to show text if it can’t display the image. Its value is the text you want to display, which is “Lee Park Portrait” in this case.
Once you understand the image element, you’re ready to use it in an HTML document. Just place it wherever it makes sense, inside or after an existing paragraph:
<!DOCTYPE html>
<html>
<head>
<title>Hire Me!</title>
</head>
<body>
<p>I am Lee Park. Hire me for your company, because my work is <b>off the
hizzle</b>.
<img src="leepark.jpg" alt="Lee Park Portrait" />
</p>
<p>My skills include:</p>
<ul>
<li>Fast typing (nearly 12 words/minute).</li>
<li>Extraordinary pencil sharpening.</li>
<li>Inventive excuse making.</li>
<li>Negotiating with officers of the peace.</li>
</ul>
</body>
</html>
Figure 1-15 shows exactly where the picture ends up.
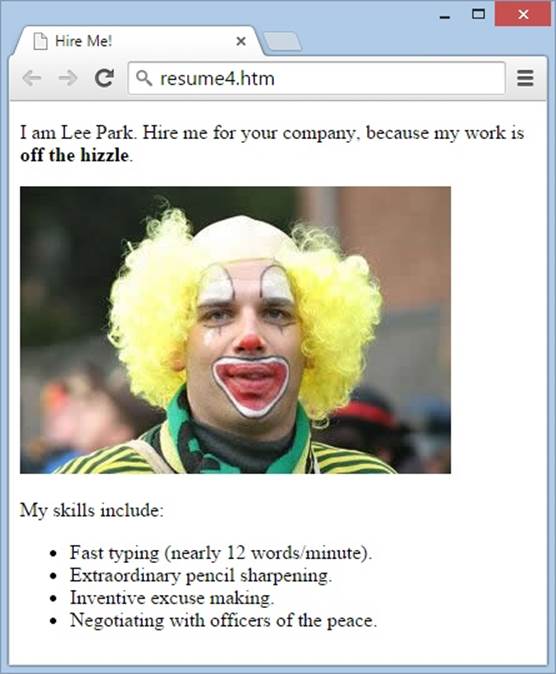
Figure 1-15. Here’s a web page that embeds a picture, thanks to the linking power of the image element. To display this document, a web browser performs a separate request to retrieve the image file. As a result, your browser may display the text of the web page before it downloads the graphic, depending on how long the download takes (typically, that’s a fraction of a second).
NOTE
You’ll learn many more techniques for web graphics, including how to change their size and wrap text around them, in Chapter 4.
The 10 Most Important Elements (and a Few More)
You’ve now reached the point where you can create a basic HTML document, and you already have several elements under your belt. You know the fundamentals—all that’s left is to expand your knowledge by learning how to use more elements.
HTML has a relatively small set of elements. You’ll most likely use fewer than 25 on a regular basis. This is a key part of HTML’s success, because it makes HTML a simple, shared language that anyone can understand.
NOTE
You can’t define your own elements and use them in an HTML document, because web browsers won’t know how to interpret them.
Some elements, like the <p> element that formats a paragraph, are important for setting out the overall structure of a page. These are called block elements. Block elements get extra space—when you add one to a page, the browser starts a new line (separating this block element from the preceding one). The browser also adds a new line at the end of the block element, separating it from the following element.
You can place block elements directly inside the <body> section of your web page or inside another block element. Table 1-1 provides a quick overview of some of the most fundamental block elements, several of which you’ve already seen. It also points out which of these are container elements and which are standalone elements. (As you learned on Understanding Elements, container elements require start and end tags, but standalone elements get by with just a single tag.) You’ll study all of these elements more closely in Chapter 2.
Table 1-1. Basic block elements.
|
ELEMENT |
NAME |
TYPE OF ELEMENT |
DESCRIPTION |
|
<p> |
Paragraph |
Container |
As your high school English teacher probably told you, the paragraph is the basic unit for organizing text. When you use more than one paragraph element in a row, a browser inserts space between the two paragraphs—just a bit more than a full blank line. |
|
<h1>,<h2>,<h3>, <h4>,<h5>,<h6> |
Heading |
Container |
Heading elements are a good way to add structure to your page and make titles stand out. They display text in large, boldfaced letters. The lower the number, the larger the text, so <h1> produces the largest heading. By the time you get to <h5>, the heading has dwindled to the same size as normal text, and <h6>, although bold, is actually smaller than normal text. |
|
<hr> |
Horizontal line (or horizontal rule in HTML-speak) |
Standalone |
A horizontal line can help you separate one section of your web page from another. The line automatically matches the width of the browser window. (Or, if you put the line inside another element, like a cell in a table, it takes on the width of its container.) |
|
<ul>,<li> |
Unordered list, list item |
Container |
These elements let you build basic bulleted lists. The browser automatically puts individual list items on separate lines and indents each one. For a quick change of pace, you can substitute <ul> with <ol> to get an automatically numbered list instead of a bulleted list (ol stands for “ordered list”). |
Other elements are designed to deal with smaller structural details—for example, snippets of bold or italicized text, line breaks, links that lead to other web pages, and images. These elements are called inline elements. You can put an inline element in a block element, but you should never put a block element inside an inline element. Table 1-2 lists the most useful inline elements.
Table 1-2. Basic inline elements.
|
ELEMENT |
NAME |
TYPE |
DESCRIPTION |
|
<b>, <i> |
Bold and italic |
Container |
These two elements apply character styling—either bold or italic text. (Technically, <i> means “text in an alternate voice” and <b> means “stylistically offset text,” and there are ways to change the formatting they apply, as you’ll see in Chapter 3. But in the real world, almost all web developers expect that <i> means italics and <b> means bold.) |
|
<br> |
Line break |
Standalone |
Sometimes, all you want is text separated by simple line breaks, not separate paragraphs. This keeps subsequent lines of text closer together than when you use a paragraph. |
|
<img> |
Image |
Standalone |
To display an image inside a web page, use this element. Make sure you specify the src attribute to indicate the filename of the picture you want the browser to show. |
|
<a> |
Anchor |
Container |
The anchor element is the starting point for creating hyperlinks that let website visitors jump from one page to another. You’ll learn about this indispensable element in Chapter 6. |
To make the sample resumé look more respectable, you can use a few of the ingredients from Table 1-1 and Table 1-2. Figure 1-16 shows a revised version of the web page that throws some new elements into the mix.
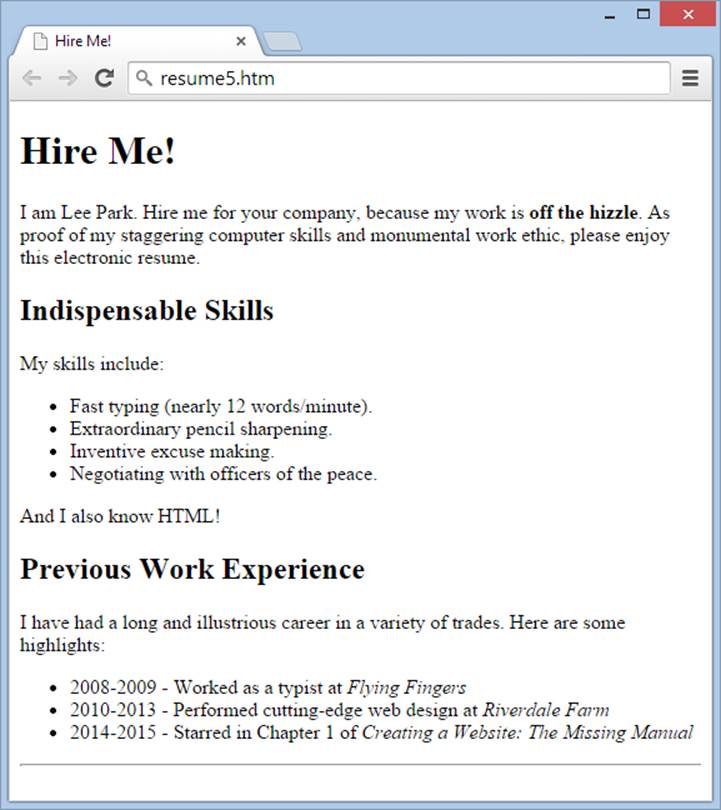
Figure 1-16. Featuring more headings, lists, and a horizontal line, this HTML document adds a little more style to the resumé.
Here’s the pumped-up HTML, with the new headings and the horizontal rule highlighted in bold:
<!DOCTYPE html>
<html>
<head>
<title>Hire Me!</title>
</head>
<body>
<h1>Hire Me!</h1>
<p>I am Lee Park. Hire me for your company, because my work is <b>off the
hizzle</b>. As proof of my staggering computer skills and monumental work
ethic, please enjoy this electronic resume.</p>
<h2>Indispensable Skills</h2>
<p>My skills include:</p>
<ul>
<li>Fast typing (nearly 12 words/minute).</li>
<li>Extraordinary pencil sharpening.</li>
<li>Inventive excuse making.</li>
<li>Negotiating with officers of the peace.</li>
</ul>
<p>And I also know HTML!</p>
<h2>Previous Work Experience</h2>
<p>I have had a long and illustrious career in a variety of trades.
Here are some highlights:</p>
<ul>
<li>2008-2009 - Worked as a typist at <i>Flying Fingers</i></li>
<li>2010-2013 - Performed cutting-edge web design at <i>Riverdale
Farm</i></li>
<li>2014-2015 - Starred in Chapter 1 of <i>Creating a Website: The
Missing Manual</i></li>
</ul>
<hr />
</body>
</html>
Don’t worry if this example has a bit too much markup for you to digest at once. In the next chapter, you’ll get some more practice turning ordinary text into structured HTML.
Checking Your Pages for Errors
Even a web designer with the best intentions can write bad markup and break the rules of HTML. Although browsers really should catch these mistakes, virtually none of them do. Instead, they do their best to ignore mistakes and display flawed documents.
At first glance, this seems like a great design—after all, it smooths over any minor slip-ups you might make. But there’s a dark side to tolerating mistakes. In particular, this behavior makes it all too easy for serious errors to lurk undetected in your web pages. What’s a serious error? A problem that’s harmless when you view the page in your favorite browser but makes an embarrassing appearance when someone views the page in another browser; a mistake that goes undetected until you edit the code, which inadvertently exposes the problem the next time your browser displays the page; or an error that has no effect on page display but prevents an automated tool (like a search engine) from reading the page.
Fortunately, there’s a way to catch problems like these. You can use a validation tool that reads through your web page and checks its markup. If you use a professional web design tool like Dreamweaver, you can use its built-in error-checker (Chapter 5 has the details). If you create pages by hand in a text editor, you can use a free online validation tool (see below).
Here are some potential problems that a validator can catch:
§ Missing mandatory elements (for example, the <title> element).
§ A container start tag without a matching end tag.
§ Incorrectly nested tags.
§ Tags with missing attributes (for example, an <img> element without the src attribute).
§ Elements or content in the wrong place (for example, text that’s placed directly in the <head> section).
You can find plenty of validation tools online. The following steps show how to use the popular validator provided by the W3C standards organization (the official owners of the HTML language). Try it out with the resume.htm file you created in the second tutorial (Tutorial: Building a Complete HTML Document). Or give the validator something to complain about with the popsicles.htm file you created in the first tutorial (Tutorial: Creating an HTML File). Because it’s an HTML snippet, not a full HTML document, the validator is quick to complain about the missing bits, like the required <html>, <head>, and <body> elements.
Once you decide what you want to validate, here’s what to do:
1. Make sure your document has a doctype (Understanding HTML Documents).
The doctype tells the validator what rules to use when validating your document. In this book, we stick with the universal HTML5 doctype (The Basic Skeleton).
2. In your web browser, go to http://validator.w3.org (Figure 1-17).
The W3C validator gives you three choices, represented by three tabs: Validate by URI (for a page that’s already online), Validate by File Upload (for a page that’s stored on your computer), and Validate by Direct Input (for markup you type directly into the provided box).
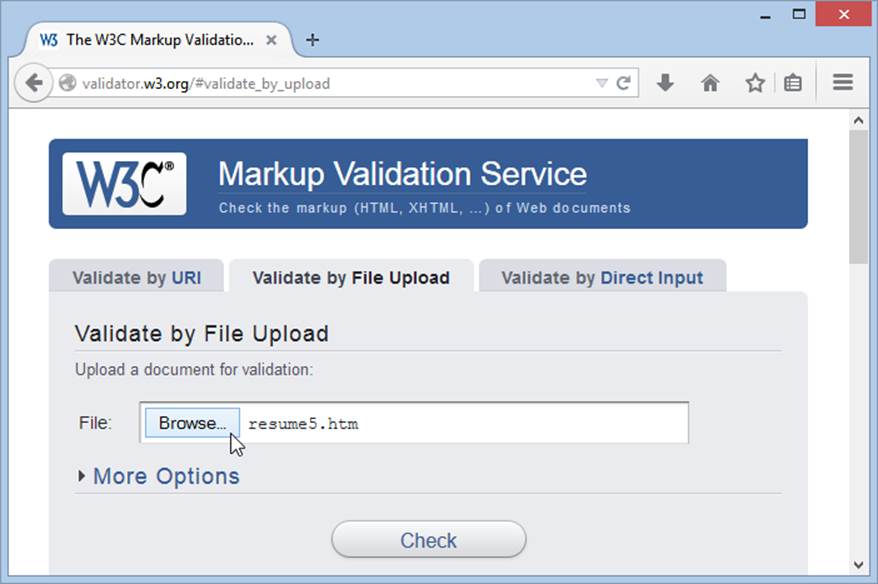
Figure 1-17. The website http://validator.w3.org gives you three options for validating HTML. You can fill in the address of a page on the Web, you can upload a file of your own (shown here), or you can type the markup in directly.
3. Click the tab you want, and supply your HTML content.
Validate by URI lets you validate an existing web page. Simply enter the URL (that’s the full Internet address) for the page in the Address box (like www.MySloppySite.com/FlawedPage.html).
Validate by File Upload lets you upload any file from your computer. First, click the Browse button (called Choose File in Chrome) to see the standard Open dialog box. Browse to the location of your HTML file, select it, and then click Open. This is the easiest way to make sure you got everything right with the resume.htm page you built earlier.
Validate by Direct Input lets you validate any markup—you just need to type it into the large box provided. The easiest way to use this option is to copy the markup from your text editor and paste it into the box.
Before continuing, you can click More Options in any of the tabbed windows to set other options, but you probably won’t. It’s best to let the validator automatically detect the document type; that way, the validator will use the doctype specified in your web page. Similarly, leave the Character Encoding option set to “detect automatically” unless you wrote your page in something other than English and the validator has trouble determining the correct character set.
4. Click the Check button.
After a brief delay, the validator reports whether your document passed the validation check or, if it failed, what errors the validator detected (see Figure 1-18).
The validator also may offer a few harmless warnings for a perfectly valid HTML document, including a warning that the character encoding was determined automatically and a warning that the HTML5 validation service is considered to be an experimental, unfinished feature.
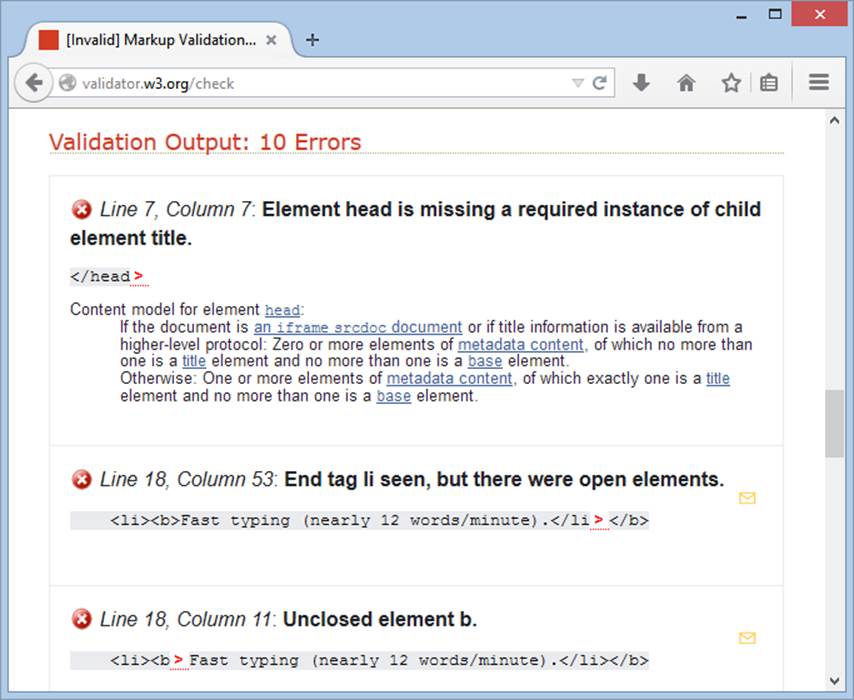
Figure 1-18. In this file, the validator has discovered 10 errors that stem from two mistakes. First, the page is missing the mandatory <title> element. Second, it closes the <li> element before closing the <b> element nested inside. (To solve this problem, you would replace </li></b> with </b> </li>.) Incidentally, this file is still close enough to correct that browsers can display it correctly.
SHARPEN UP: PUTTING MORE PAGES UNDER THE MICROSCOPE
A validator is a good way to double-check the work you do for any of the tutorials in this book. But if you’re keen to practice more validation right now, why not try the sample files from the companion site? This chapter includes a sample bad file, called invalid_resume.htm, that’s chock-full of common mistakes. For a real challenge, peek inside the file and see if you can spot the problems before you hand it off to the W3C validator.